Mastering OpenClaw | One-Click, Instant Deployment Guide for OpenClaw (Clawdbot) on the Cloud
Introduction
In late January, an open-source AI assistant application called OpenClaw (formerly Clawdbot/Moltbot) quickly gained popularity in Chinese and international tech communities and social media, frequently trending on platforms like X, Reddit, and the Chinese tech world. OpenClaw isn’t the first “capable” AI agent on the market. However, it was precisely within just two or three weeks of Claude Cowork’s release that it suddenly reignited everyone’s enthusiasm. The reason for its explosive popularity in the tech world may not only be because its code is 100% AI-generated, but also because of its unexpected “human-machine collaboration method”: OpenClaw runs in the user’s own environment (such as a local computer, personal server, etc.), and the interaction method directly returns to the user’s familiar chat software, just like talking to a colleague or friend. Furthermore, it possesses full operational permissions and a long memory, meaning it is a personalized AI assistant.
Note for first-time users: If you haven’t deployed OpenClaw yet, start with Tencent Cloud OpenClaw first. You can launch your OpenClaw instance in seconds with one click, then come back to this guide to explore more advanced use cases.
Where is OpenClaw best run?
With the explosive popularity of OpenClaw, the Mac Mini has also become a “financial product,” with many early adopters claiming to have purchased numerous Mac Minis to run it. However, as more people learn about this project, another perspective has emerged: with its high privileges, it’s better suited to run in an environment isolated from your primary personal computer. This could be an older computer (macOS currently offers the best support) or a cloud server (Linux is generally recommended). OpenClaw currently has good support for Linux as well, and the cloud environment is strongly isolated from the local computer, preventing any adverse effects on data stored locally.
Note: The official OpenClaw community currently advises against deploying OpenClaw on your primary personal computer, as this may compromise the security of local data.
The advantages of deploying OpenClaw on a cloud server not only include providing a secure, isolated running environment to protect local data, but also ensuring 24/7 online service, allowing you to interact with OpenClaw anytime.
Note: OpenClaw currently has relatively weak support for Windows, so it is not recommended to try it out on Windows at this time.
Why Choose Tencent Cloud Lighthouse?
Tencent Cloud Lighthouse is a cloud server product designed for lightweight application scenarios. Users don’t need to understand complex cloud computing concepts. It offers cost-effective server packages and supports developers in quickly deploying various popular open-source applications with a single click based on pre-installed operating systems and dependencies.
Compared to using an old macOS computer or urgently purchasing a Mac Mini, using a Lighthouse server is a more convenient (starts in minutes), more cost-effective (starts immediately for just a few tens of dollars), and natively supports 24/7 operation.
Currently, Tencent Cloud Lighthouse offers a one-click application template for OpenClaw, pre-installed with the OpenClawU application and the necessary basic dependencies. No manual installation is required; it’s ready to use out of the box!
One-Click Installation of OpenClaw Based on Application Templates
For both new and existing Tencent Cloud Lighthouse users, OpenClaw can be installed using application templates by purchasing a new instance or reinstalling an existing instance.
Method 1: Purchase a New Lighthouse Server
If you wish to purchase a new Lighthouse server to install and run OpenClaw, you can go to the Tencent Cloud Lighthouse product purchase page to select it, or go to the Tencent Cloud OpenClaw exclusive event to place an order at a discounted price.
Below, we provide an example of the ordering steps based on the Lighthouse product purchase page:
Application Creation Method:
- Application Templates > AI Agents > OpenClaw (Clawdbot)
Region:
- Both domestic and overseas regions are supported. Please select according to your use case. For example, when integrating with Tencent QQ, a domestic region is usually selected, while when integrating with Discord, an overseas region is usually selected. Also consider whether you will need to call domestic or overseas models later; for calling domestic models, a domestic server is recommended.
Packages
- Package Types: Reach (Recommended), Entry-level, General
- Package Configuration: A 2-core, 4GB RAM or higher configuration is recommended. The minimum configuration supports 2 cores and 2GB RAM (suitable for simple scenarios).
Server name, login method, etc., can be configured as needed.
Recommendation: After the server is created, it is recommended to use Tencent Cloud’s default OrcaTerm terminal to log in to the Lighthouse server in the cloud.
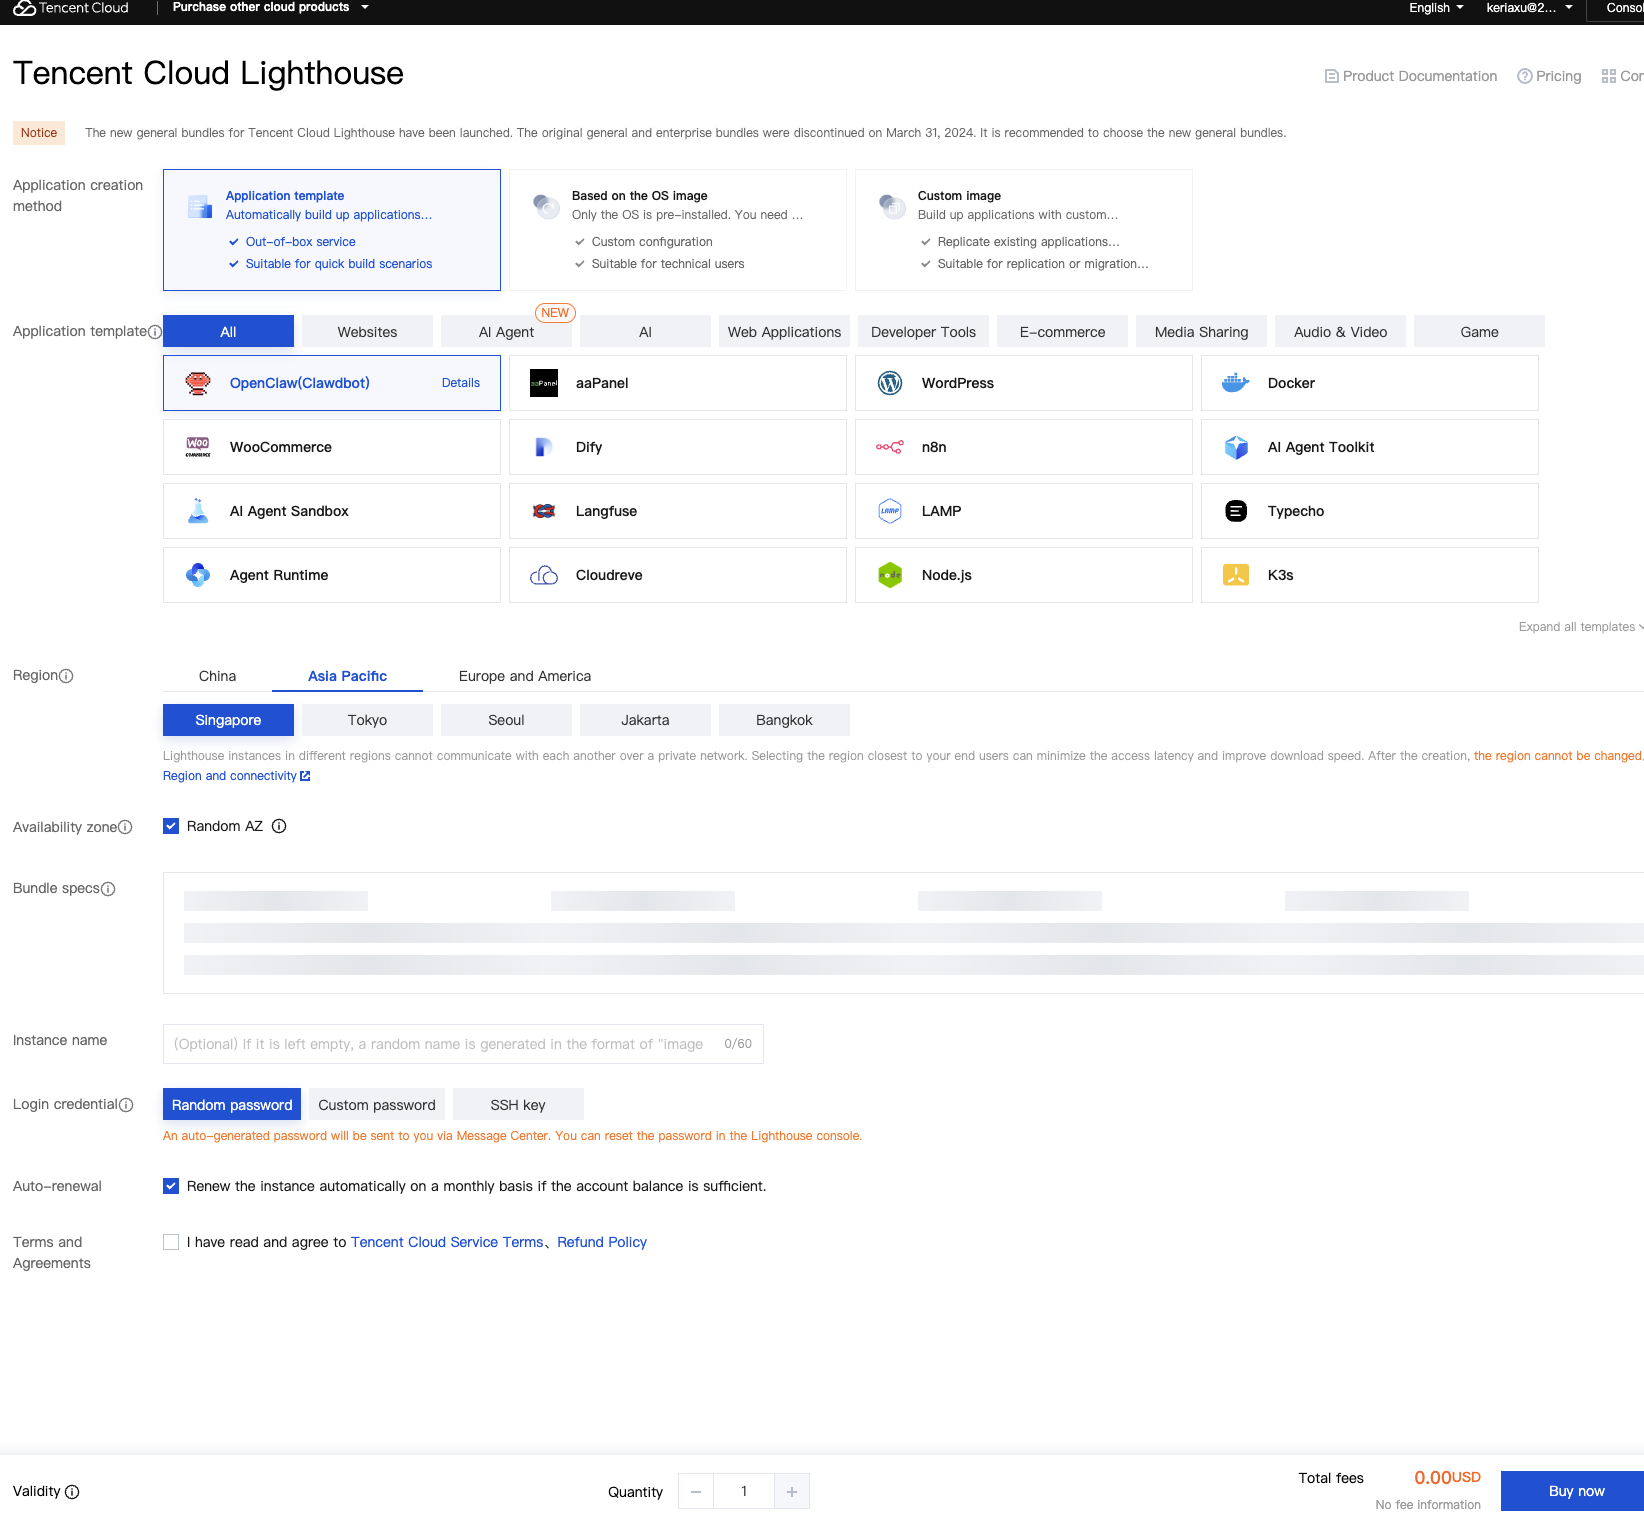
Click “Buy Now” in the bottom right corner of the page and follow the on-screen instructions to complete the payment.
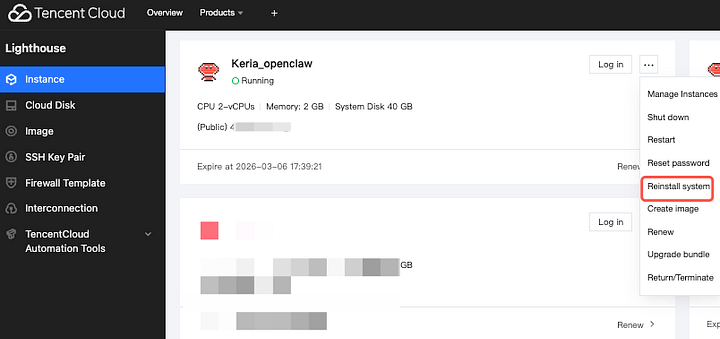
Method 2: Reinstall an existing Lighthouse server
Note: Reinstalling the system will erase all data on the existing server. Please operate with caution!
If you wish to deploy OpenClaw while retaining the applications and data on the existing server, you can try using the Tencent Cloud Lighthouse AI Assistant for installation. Refer to the AI deployment tutorial for details.
If your Tencent Cloud account already has an existing Lighthouse server instance and you wish to install OpenClaw on that server, and the old data on that server does not need to be retained, you can use the “Reinstall System” method for installation. Detailed steps are described below.
First, go to the Tencent Cloud Lighthouse product console, find the existing Lighthouse instance under your account that needs to be reinstalled, click the “…” or “More” button on the instance page, find and click “Reinstall System”.
On the system reinstallation page, select “Use application template > AI agent > OpenClaw (Clawdbot)”, and choose to set up the login credentials after reinstallation.
Note: Reinstalling the system will erase all existing data on the server. Therefore, in the “Backup Options”, it is recommended to prioritize backing up before reinstalling. You can then use snapshots to revert to the previous server state.
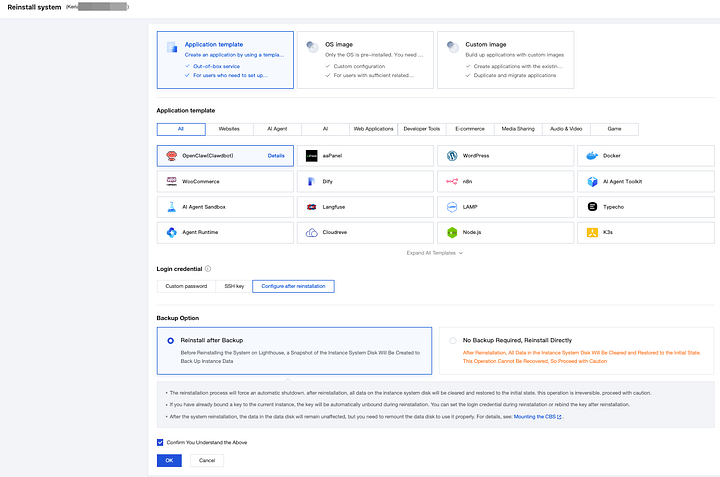
Click the “OK” button on the page, wait for the reinstallation to complete, and then continue with the following steps.
Configuring OpenClaw
After completing the above deployment steps, you also need to configure the software according to the official OpenClaw requirements. Tencent Cloud Lighthouse provides a visual interface in the product console to make OpenClaw configuration easier. The general operation steps are as follows.
Access the OpenClaws configuration panel.
In the Tencent Cloud console, select the corresponding Lighthouse server with OpenClaw deployed, and then click to enter the “Manage Instance” page.
After entering the “Application Management” tab, you will see the interface shown below:
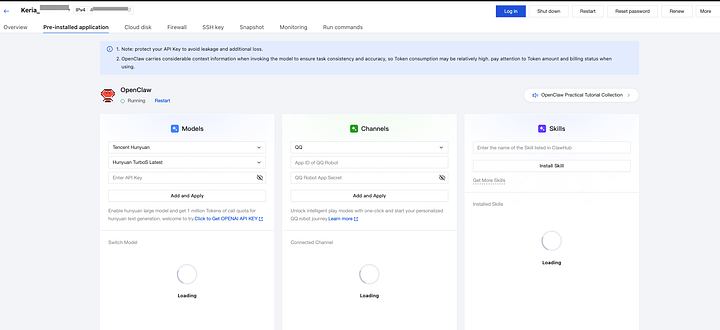
Next, you can configure the model, OpenClaw Channel (including QQ, WeChat Work, DingTalk, and Lark), and OpenClaw Skills on the interface.
Configuring Model API Keys
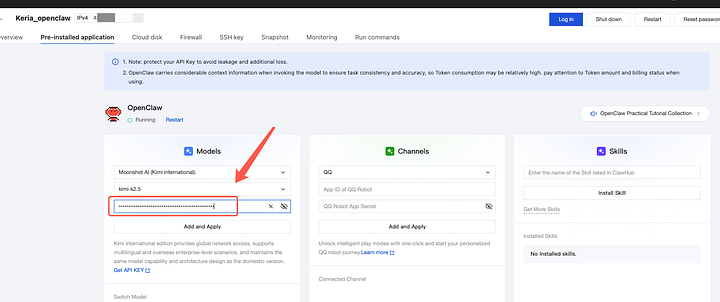
We prioritize using domestic model vendors. Tencent Cloud Lighthouse’s OpenClaw configuration panel currently supports configuring API keys for major domestic models such as Tencent Hunyuan, Tencent Cloud DeepSeek, DeepSeek, Tongyi Qianwen, Kimi, Zhipu, and Doubao.
Here, we’ll use Tencent Cloud DeepSeek (click to go directly to the API Key management page) as an example. The configuration methods for other models like Tencent Hunyuan, DeepSeek, and Tongyi Qianwen are largely similar.
After entering the Tencent Cloud DeepSeek API Key management page, click the “Create API KEY” button. Then, click the “View” button in the operation column. In the pop-up window, check “I know and save the API KEY,” then click the “Copy and close the pop-up” button to complete the operation.
After creating the API Key, return to the server application management page, copy the API Key and paste it into the “Models — API Key” input box in the panel, then click the Add and Apply button to save the model API Key configuration.
After a short wait, a message appears saying “Model added successfully”.
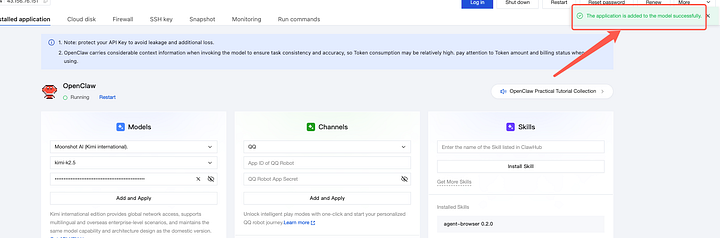
After adding, a new model configuration will be added under the Model Configuration tab.
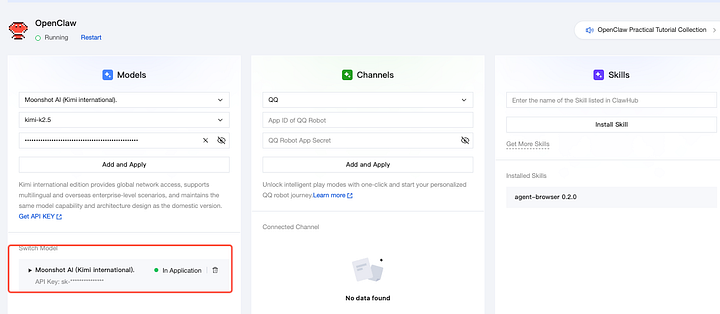
The configuration is complete when the model status is updated to “in use”.
Note: In addition to the models supported for configuration in the application management page, such as Tencent Hunyuan, DeepSeek, and Qianwen, user-configured custom models, such as OpenAI GPT and Gemini, are also supported. Please refer to the reference tutorial for details.
Configuring OpenClaw Channel
Next, you need to configure OpenClaw’s channel (APP ID and APP Secret) so that OpenClaw can be integrated into various applications in the future.
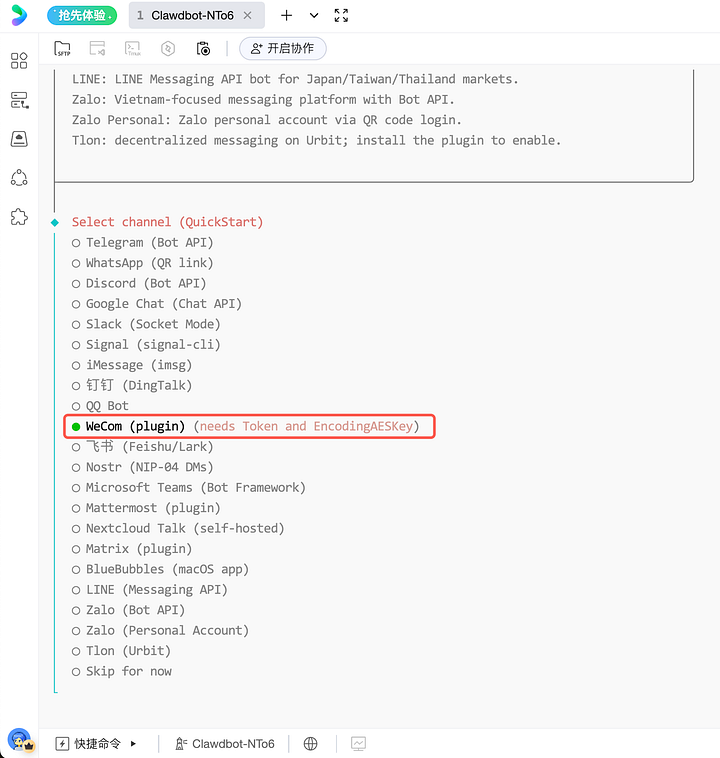
(Optional) If you are familiar with command line operations, Tencent Cloud also supports configuring the access to various applications using the default onboard method provided by the OpenClaw community (currently, access to overseas applications such as Telegram, Discord, and WhatsApp requires command line operation). After remotely logging into the server, execute the “clawdbot onboard” command and select the corresponding application as shown in the figure below.
Note: If you find that the panel configuration items above do not appear in the Lighthouse console interface, or that the options shown in the image above do not appear in the onboard stage of the command line, it is because you have not upgraded to the latest version of the application template. In this case, it is recommended that you refer to the previous article “[Method 2: Reinstall an existing instance]” and select the OpenClaw (Clawdbot) application template to reinstall the current Lighthouse instance to use the latest version of the configuration.
More common operations
Log in to the server and use the command line to operate OpenClaw
We recommend that you use Tencent Cloud’s default OrcaTerm remote terminal to log in to the server. You can also use third-party software (such as Xterminal, iTerm, etc.) to log in.
You can log in to the server using Tencent Cloud OrcaTerm remote terminal and perform advanced configurations using the OpenClaw community’s default “onboard” method.
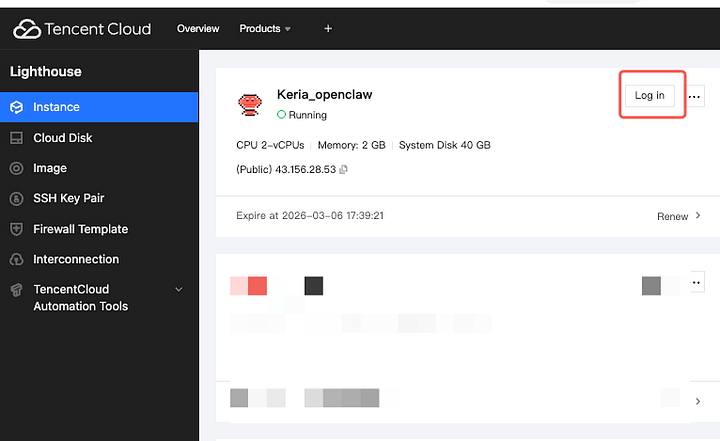
First, go to the Lighthouse console to find the purchased or reinstalled OpenClaw instance, and click the login button on the page:
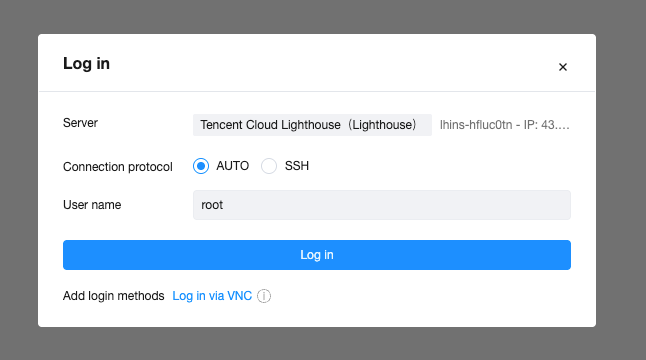
After clicking “Login”, on the Tencent Cloud OrcaTerm remote terminal page, select “Passwordless Connection” and click “Login”.
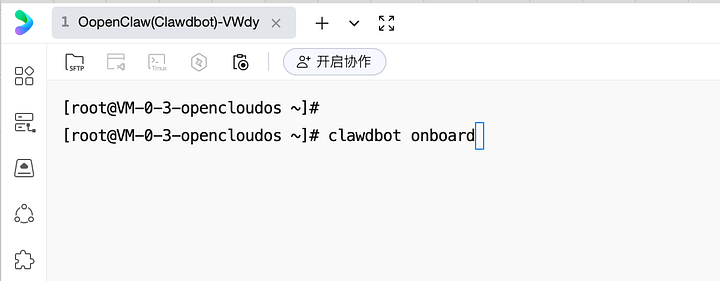
The interface after successfully logging into the server via the remote terminal OrcaTerm is shown below. You can then use the OrcaTerm terminal tool to perform various operations within the server’s operating system, such as uploading and downloading files. Alternatively, you can execute the commands “clawdbot onboard” or “openclaw onboard” to access the OpenClaw configuration tool.
Enable the OpenClaw WebUI panel (Dashboard).
Accessing the OpenClaw WebUI (Dashboard) directly using the instance’s public IP address would put your server in a very vulnerable state. Therefore, Lighthouse does not support direct access to the WebUI via public IP address by default.
If you absolutely need to use the WebUI, we provide a more private and secure method for accessing it. Please refer to the following instructions for configuration.
Keep OpenClaw running in the background (optional)
If you are using Lighthouse application template version 2026.1.29 or higher, OpenClaw will run in the background by default after the server is created, and no further actions are required.
To avoid losing communication with the bot after closing the server’s remote terminal (OrcaTerm), you can refer to the following tutorial to keep OpenClaw running continuously in the background.
The reason for this is that the commands run in the previous steps were only “temporarily executed.” Therefore, after completing the preliminary configuration, we need to run OpenClaw (Clawdbot) in the background so that we can maintain communication with it even after closing the server’s command-line interface (OrcaTerm).
First, in the remote terminal (OrcaTerm), press Ctrl+C (Linux systems) to terminate the previously run commands, returning to a state similar to the image below:
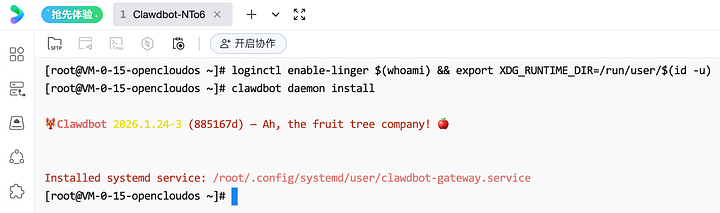
Paste and press Enter in the remote terminal to run the following command:loginctl enable-linger (whoami) && export XDG_RUNTIME_DIR=/run/user/(id -u)
This step will not return any value after it completes, which is normal.

Continue by pasting and pressing Enter in the remote terminal to run the following command:
clawdbot daemon install
The result after running is as follows:
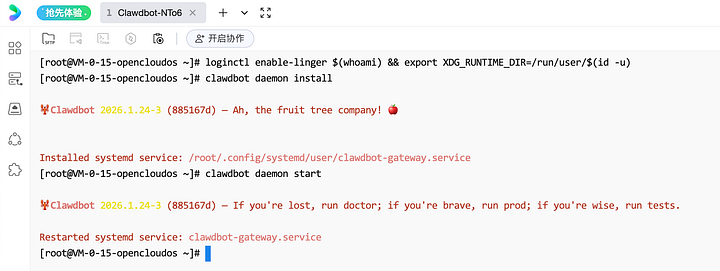
Continue by pasting and pressing Enter in the remote terminal to run the following command:
clawdbot daemon start
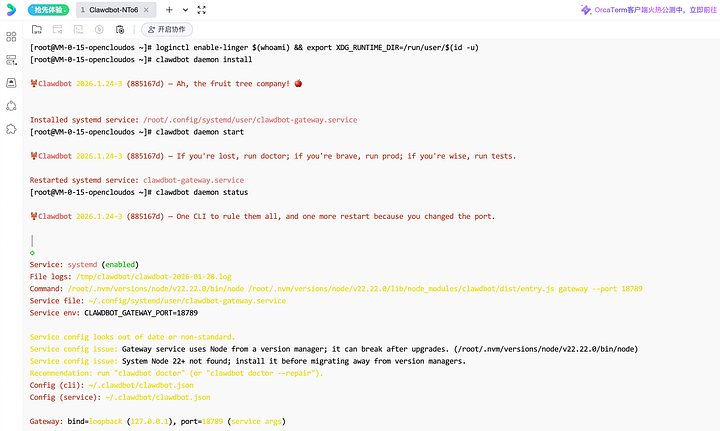
The final step is verification:
clawdbot daemon status
If the following effect appears after running this script, it means that the configuration is successful. You can then safely close the remote terminal (OrcaTerm) page that executed the aforementioned commands without worrying that the OpenClaw service will terminate after closing the terminal.
Welcome to join the discussion!
A Discord has been created, and everyone is welcome to join and explore advanced ways to use Moltbot (Clawdbot) together!

🚀 Developer Community & Support
1️⃣ OpenClaw Developer Community
Unlock advanced tips on Discord
Click to join the community
Note: After joining, you can get the latest plugin templates and deployment playbooks
2️⃣ Dedicated Support
Join WhatsApp / WeCom for dedicated technical support
| Channel | Scan / Click to join |
|---|---|
| WhatsApp Channel |

|
| WeCom (Enterprise WeChat) |

|
Learn more on the official page: Tencent Cloud OpenClaw