Mastering OpenClaw | A Quick Guide to Integrating OpenClaw (Clawdbot) into iMessage on the Cloud
Note for first-time users: If you haven’t deployed OpenClaw yet, start with Tencent Cloud OpenClaw first. You can launch your OpenClaw instance in seconds with one click, then come back to this guide to explore more advanced use cases.
It comes with a visual management panel and supports fast integration with QQ, WeCom, Lark, DingTalk, Discord, WhatsApp, Telegram, and iMessage.
Foreword
Here’s a comprehensive practical guide to OpenClaw (formerly Clawdbot) on the cloud! Feel free to click the link to find more integration tutorials!
This tutorial will guide you through the detailed configuration process for integrating OpenClaw with iMessage, providing the smoothest OpenClaw experience. Beginners can follow along directly.
Preparatory work
Ensure the following tools are installed on your macOS operating system. If not, please execute the corresponding installation commands first:
- brew (package manager): If not installed, execute `/bin/bash -c “$(curl -fsSL https://raw.githubusercontent.com/Homebrew/install/HEAD/install.sh)"
- npm (Node.js package manager): If not installed, you can install it via
brew install node. npm will be automatically included after installation.
Install and verify imsg (iMessage command-line tool)
imsg is a core dependency for OpenClaw to interface with iMessage, used to read iMessage chat data. It needs to be installed and self-checked first.
# Install imsg (install via specified tap source)
brew install steipete/tap/imsg
# Key Self-Check (Verify if the iMessage chat list can be read, core steps)
imsg chats --limit 3
# If 3 chat records are output, it means that chat.db (iMessage database) permissions are normal;
# If a permission error is prompted, you need to go to "System Settings - Privacy and Security" to grant the terminal permission to access "Documents and Desktop Folder" and "Messages".
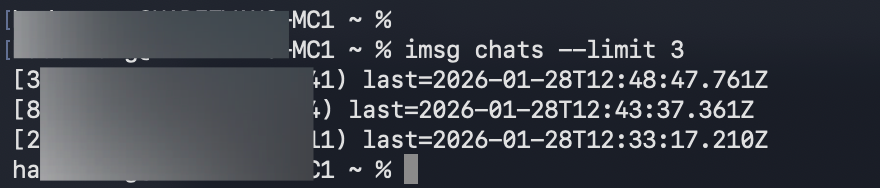
If a permission error occurs, please go to “System Settings — Privacy and Security — bottom left corner + — Add ‘Messages’ and ‘Terminals’”.
Enable Event Subscriptions
Find Event Subscriptions in the left navigation bar and click Enable Events. Enabling this allows you to receive messages and event notifications from Slack, enabling bot responses.
No further configuration is needed after enabling (subsequent terminal pairings will automatically associate them). Simply keep the page open and continue with the following steps.
Configure the Model for OpenClaw
Next, you need to configure the model for the already deployed OpenClaw instance.
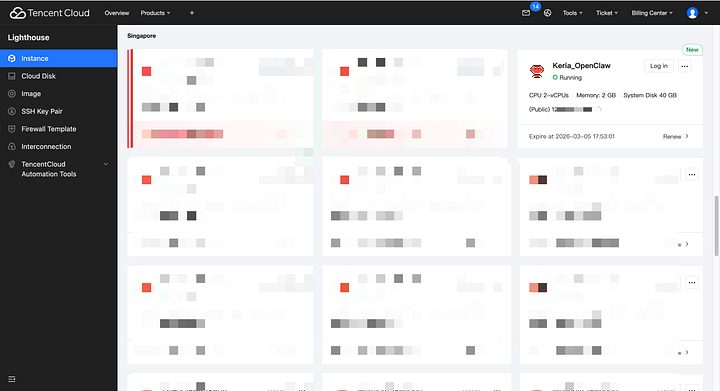
Go to the Tencent Cloud console, select the corresponding Lighthouse instance with deployed OpenClaw, and click the server card to enter the “Manage Instances” page.
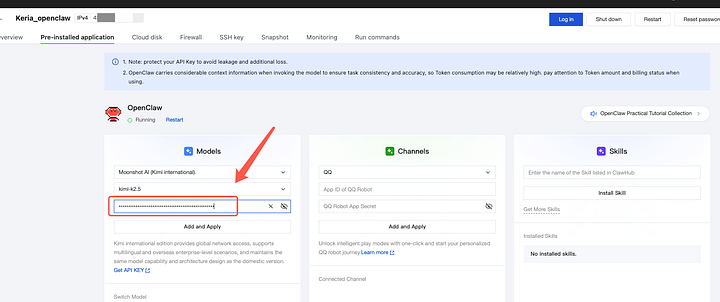
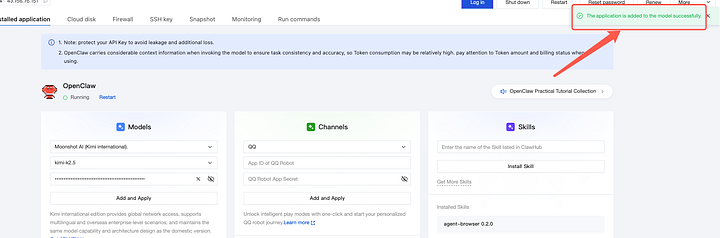
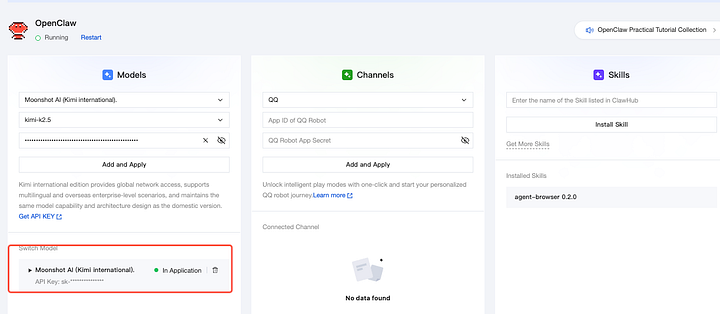
Configuring the Model API Key
Configuring the model API Key for OpenClaw can be done directly on the application management page of the Lighthouse server. The panel supports configuring API Keys for commonly used models such as Tencent Hunyuan, Tencent Cloud DeepSeek, Lunar Dark Side Kimi, MiniMax, and Zhipu GLM, as well as other custom models. For details, please refer to the OpenClaw (formerly Clawdbot) One-Click Instant Deployment Guide — Configuring the Model API Key; it will not be elaborated here.
OpenClaw Basic Configuration
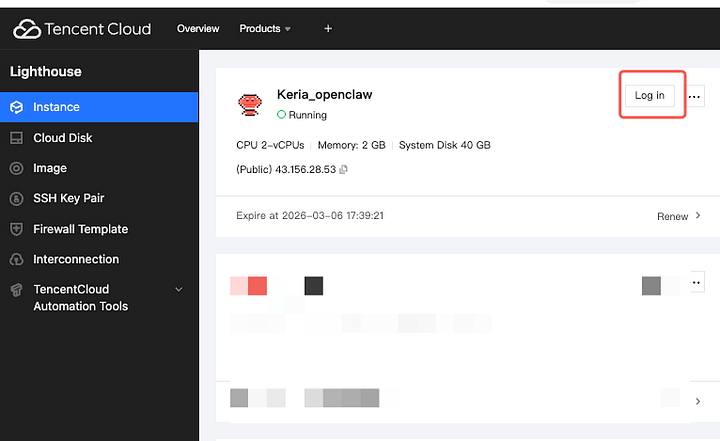
First, go to the Lighthouse console to view the OpenClaw instance you just purchased or reinstalled. Click the login button on the page.
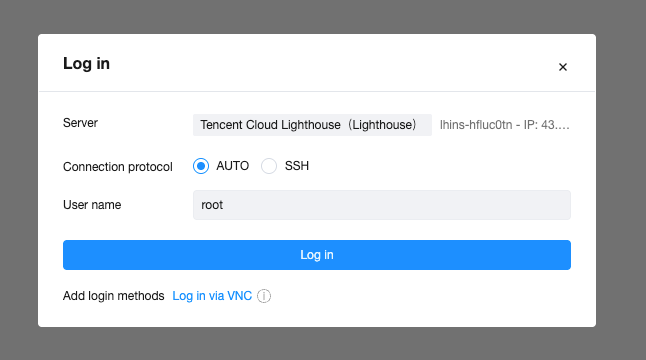
After clicking “Login,” on the Tencent Cloud remote terminal (OrcaTerm) page, select “Passwordless Connection” and click “Login.”
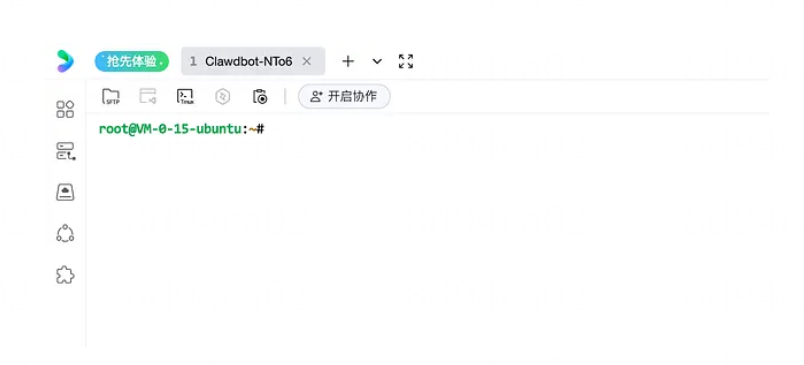
The interface after successfully logging into the server via the OrcaTerm remote terminal is shown below:
After successfully logging into the server, enter the following command and press Enter to execute it.
openclaw onboard
After running the openclaw onboard command, you’ll need to complete the subsequent configuration steps using the keyboard. Use the arrow keys to control the options, and press Enter to select and confirm.
Agree to the Disclaimer
After running the above command, a confirmation option will appear: Do you understand the risks? Select “Yes”.

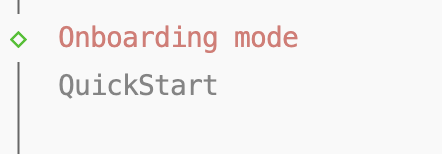
Configuration Mode Selection: Quick Start
Next, you need to select the Onboarding mode. Simply select “QuickStart”.
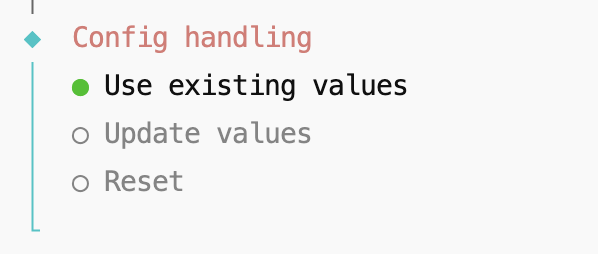
Configuration Handling
Next, you need to configure Config handling. Select “Use existing values”.
Model Configuration
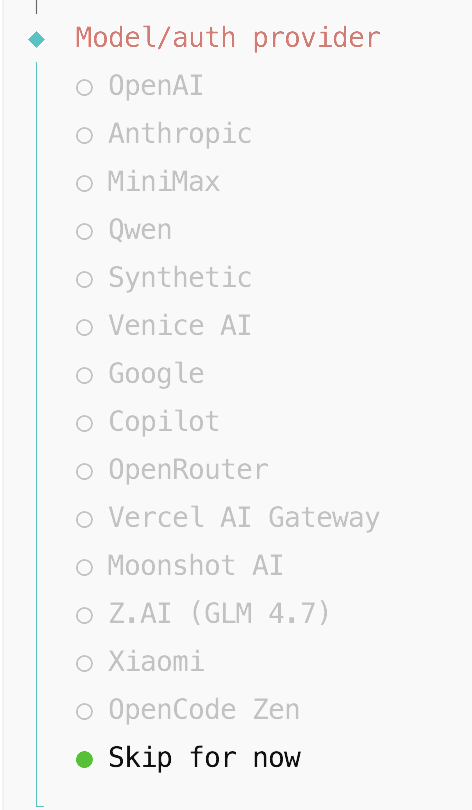
This step requires selecting the Model/auth provider, i.e., configuring the model. If you have already completed the OpenClaw model configuration in the Tencent Cloud console in the previous steps, you can skip this step. If you have not yet configured the model, you can configure the model API Key via command line in this step.
-
Kimi:https://platform.moonshot.ai/
-
MiniMax:https://platform.minimax.io/
-
GLM:https://z.ai/manage-apikey/apikey-list
As shown in the example below, select Skip for now.
Select All providers.

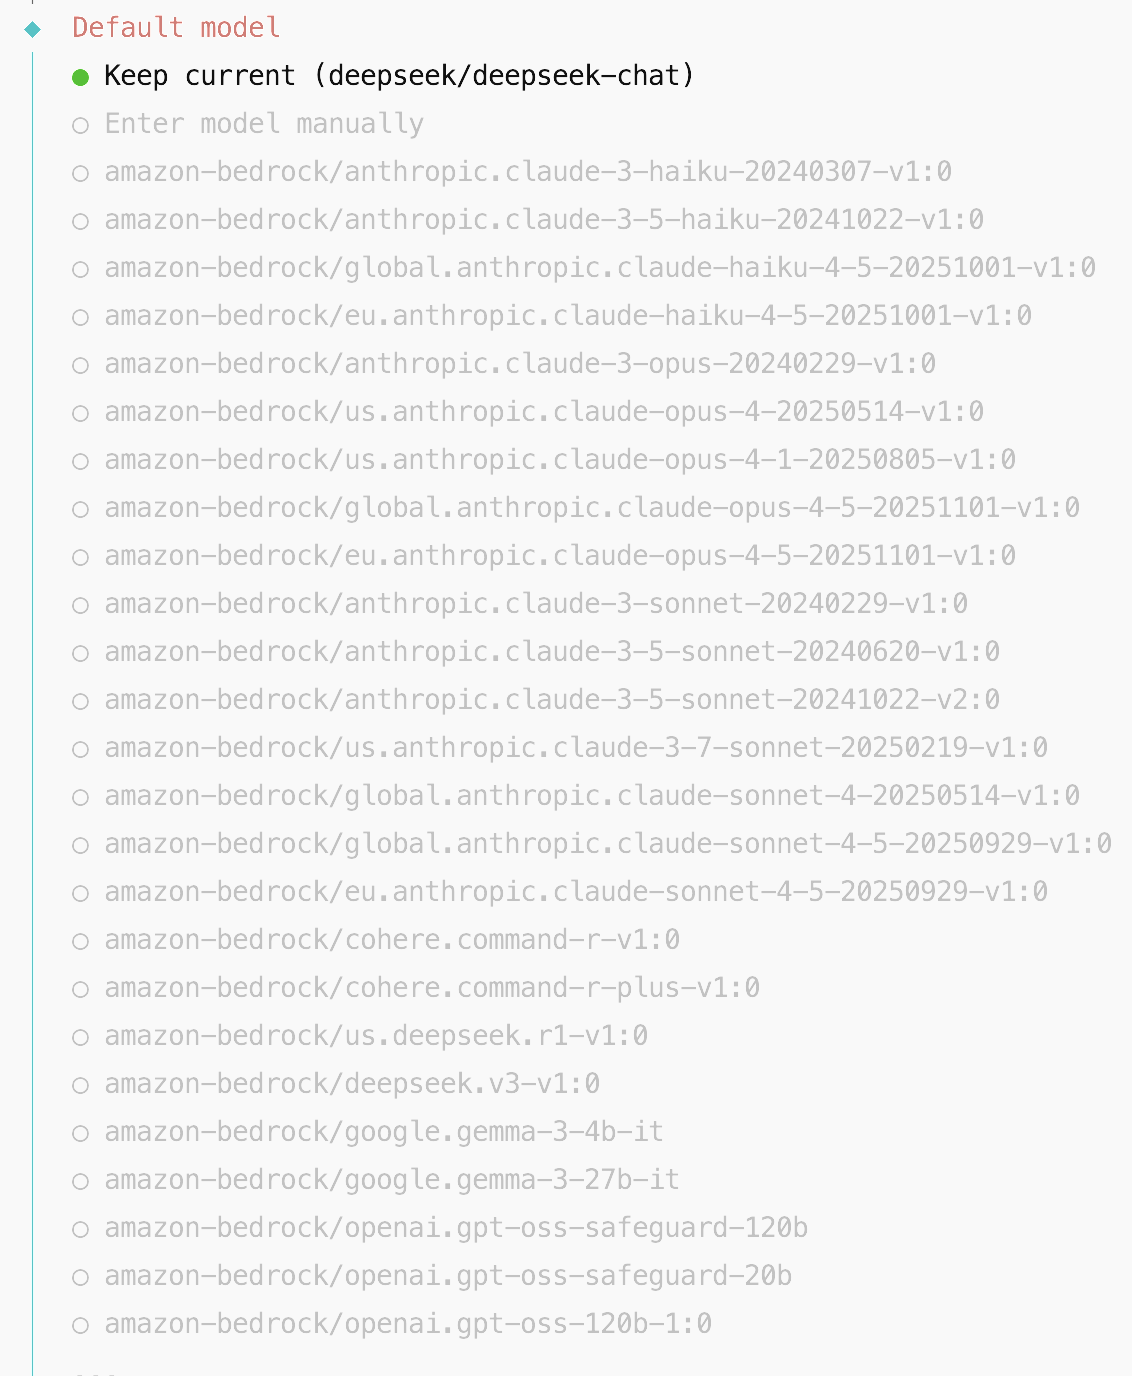
Select Keep current.

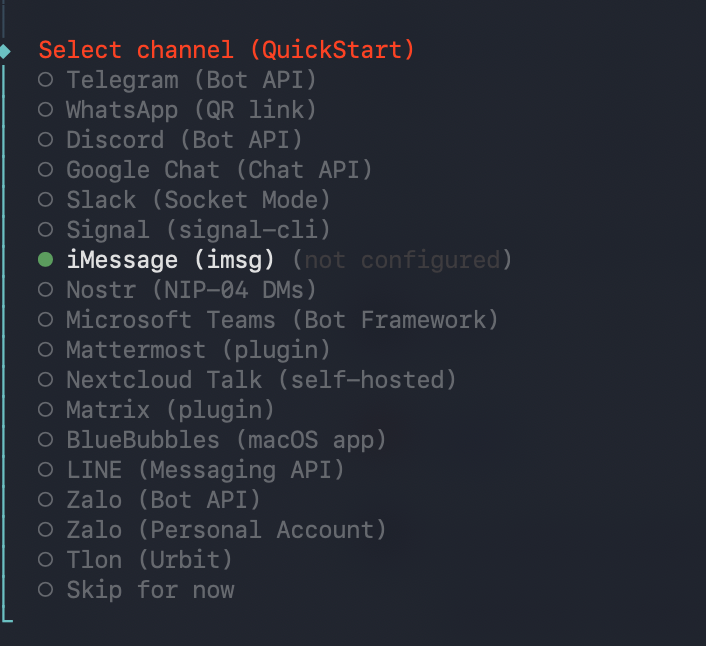
Chat software (Channel) configuration:
Select iMessage and press Enter to confirm;
Enter Bot token and App Token
Enter the Bot token and App Token saved in the previous steps, pressing Enter to confirm after each entry.
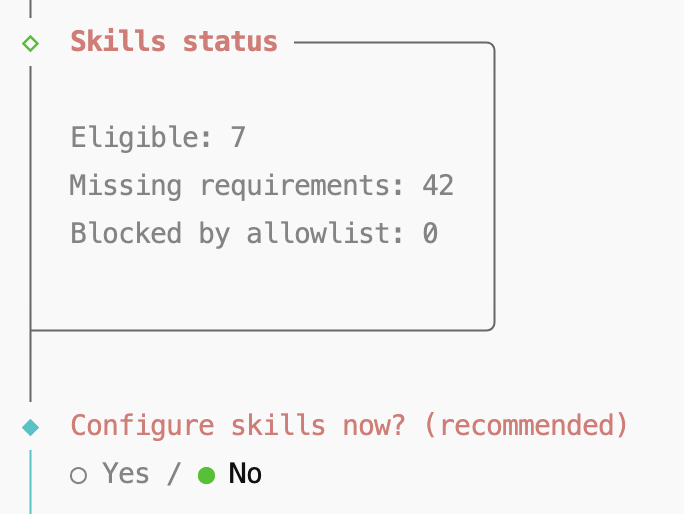
Configuring Skills
New users do not need to add additional skill packs for now; it is recommended to select “No” here. This is because Skills can enable system-level automation capabilities, including:
- File Access
- Browser Control
- Shell Command Execution
For initial deployments, restricting permissions can improve stability and security.
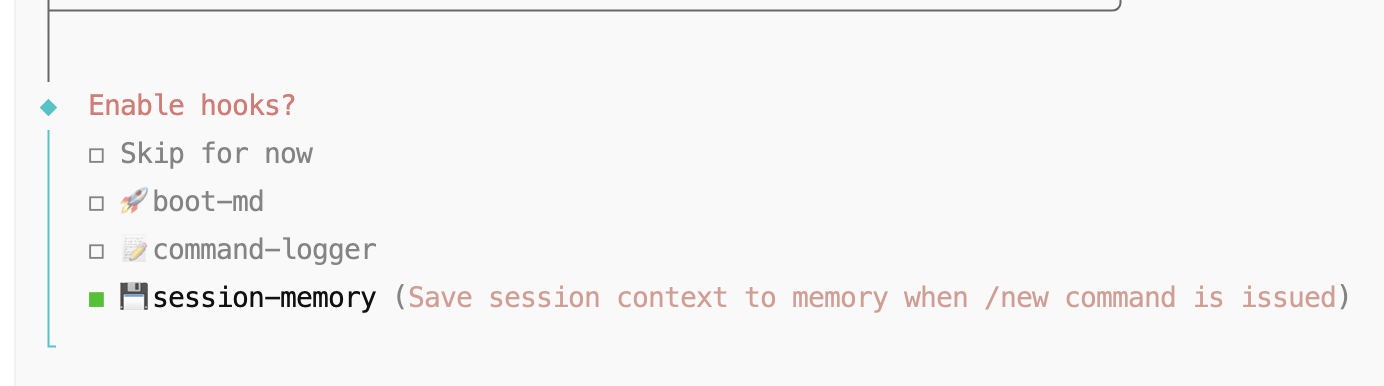
Enable Hooks (Skip this step if it doesn’t appear)
Recommended to select only: session-memory (Use the up and down arrow keys to move the cursor, the spacebar to select, and the Enter key to confirm and proceed to the next step).
Reason:
- No system commands will be executed.
- Lowest security risk.
Please do not select:
- Execute the script automatically at startup (boot-md)
- Command tracing and logging (command-logger)
Press enter or click to view image in full size
Waiting for Deployment Completion
After configuration confirmation, the system will automatically complete the deployment, which takes approximately 30 seconds to 1 minute. No operation is required. Wait for the configuration wizard to automatically exit and return to the command-line interface (displaying “root@VM-xxx-ubuntu:~#”), indicating successful deployment.
Configuring and Enabling the iMessage Channel (Core Step)
You need to add iMessage-related configurations to the OpenClaw configuration to ensure that OpenClaw can access iMessage data via imsg. First, obtain the necessary path information, and then configure it visually or manually.
Obtaining Key Paths
First, execute the following command to obtain the imsg installation path and the iMessage database (chat.db) path. These two paths will be needed for subsequent configuration.
# 1. Get the imsg path (copy the command output and fill it into cliPath later)

which imsg
# 2. Get the path to chat.db (iMessage chat database, usually the default path is as follows)
echo "$HOME/Library/Messages/chat.db"
# Verify that the database file exists
ls -l "$HOME/Library/Messages/chat.db"
# If the file does not exist, confirm that your iMessage is working correctly (you need to be logged in with your Apple ID on macOS and have used iMessage before).
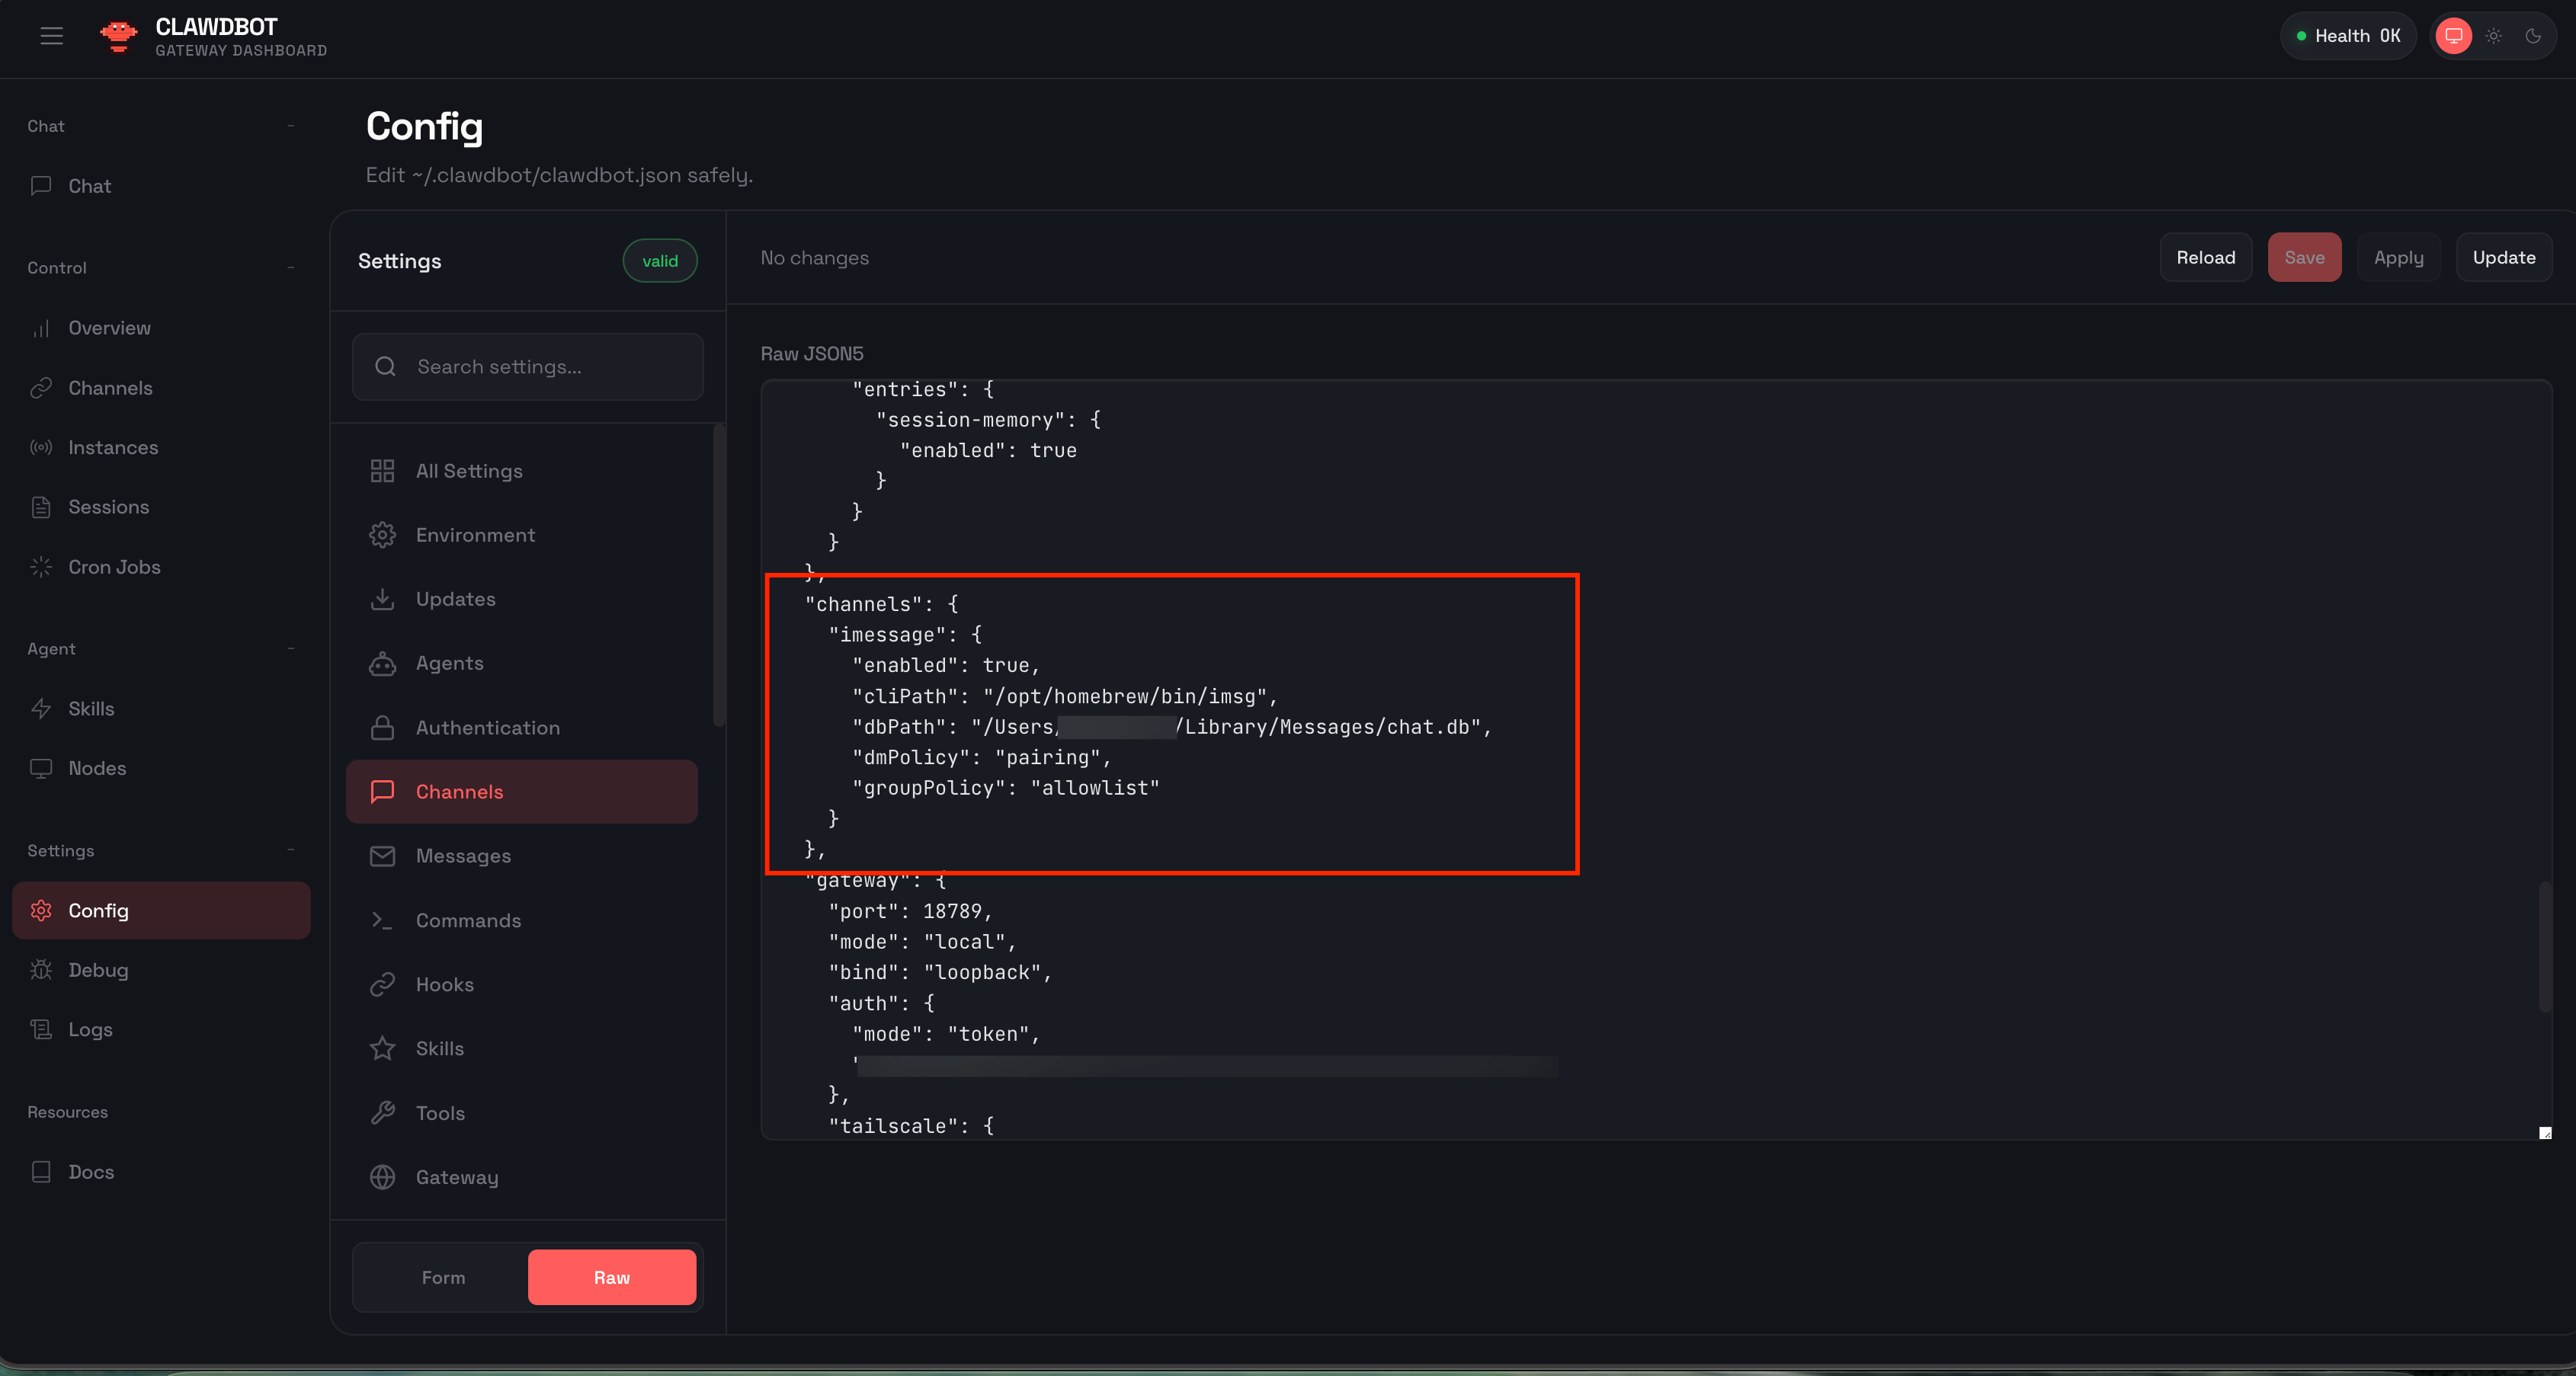
Configure the iMessage channel
The configuration must include the following four core parameters; none can be omitted:
channels.imessage.enabled = true (Enables iMessage channels)
channels.imessage.cliPath = “<imsg path>” (The imsg path obtained in step 4.1)
channels.imessage.dbPath = “<chat.db path>” (The chat.db path obtained in step 4.1)
channels.imessage.dmPolicy = “pairing” (Recommended default configuration, used to control private message permissions)
Dashboard Visual Configuration
First, start the OpenClaw gateway (detailed explanation in step 5, can be started earlier): openclaw gateway — port 18789 — verbose
- Start the Dashboard (visual configuration interface). Open a new terminal window and execute:
openclaw dashboard - Open your browser and access the Dashboard address:
http://127.0.0.1:18789/ - In the left navigation bar of the Dashboard, go to the “Config” page and find the “channels.imessage” configuration item:
Check “enabled” and set it to true;
Enter “cliPath” and paste the path to the imsg obtained in step 4.1;
Enter “dbPath” and paste the path to chat.db obtained in step 4.1;
Set “dmPolicy” to “pairing”;
- After configuration, click “Save” at the bottom of the page to save the configuration. The configuration will be automatically synchronized to the
~/.clawdbot/clawdbot.jsonfile.
Start the OpenClaw gateway in the foreground
The gateway is the core of communication between OpenClaw and iMessage. After starting the gateway, the connection between OpenClaw and iMessage can be completed. The example uses port 18789 (the port number can be modified according to needs).
clawdbot gateway --port 18789 --verbose
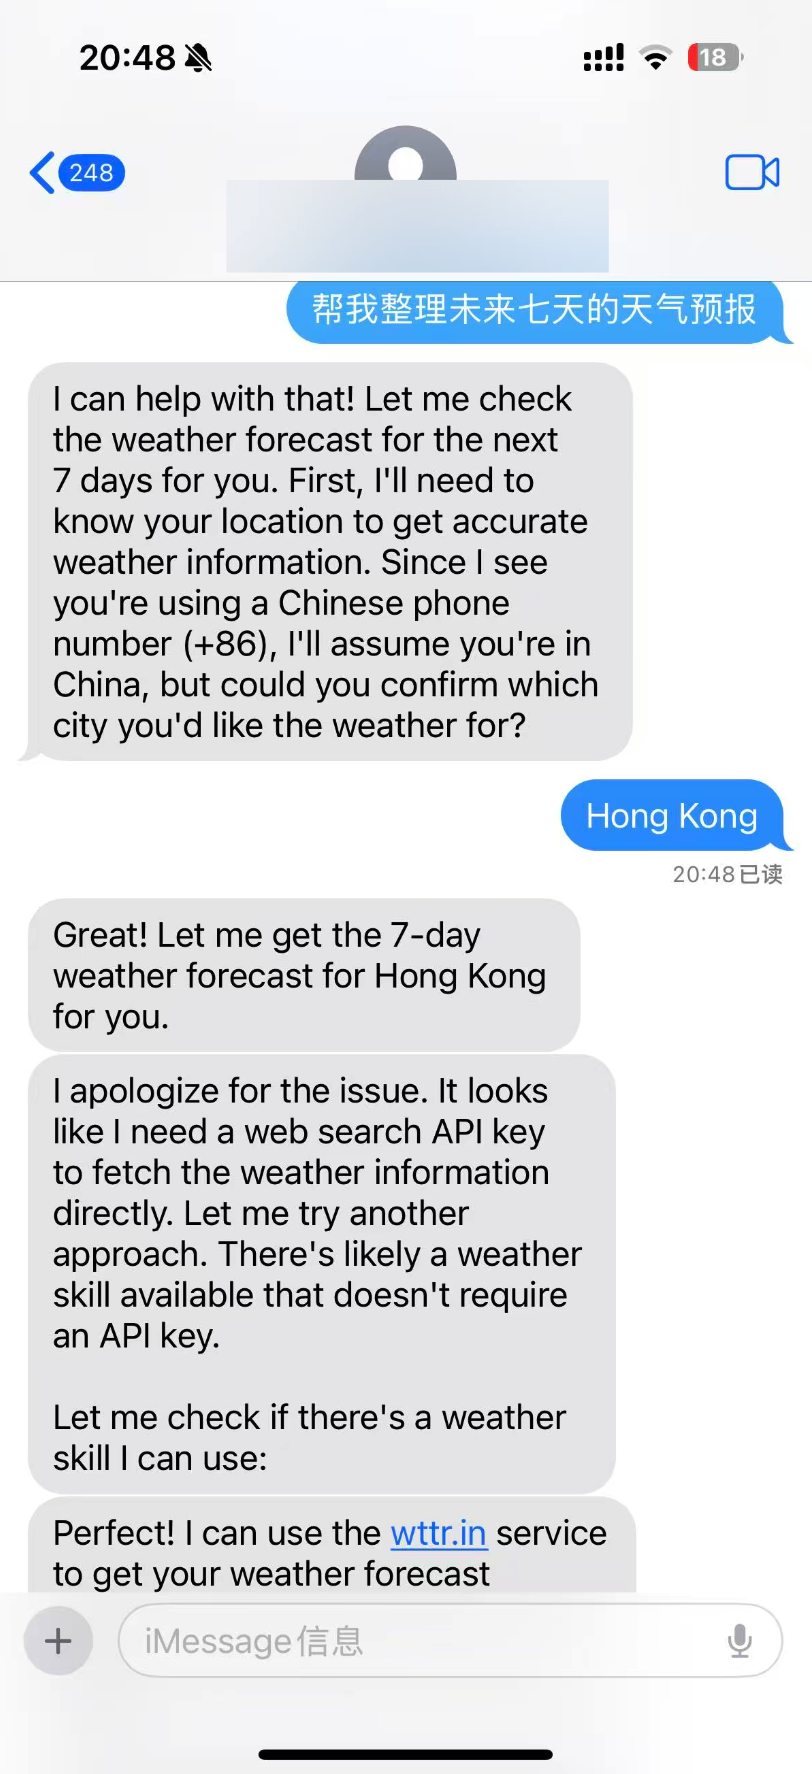
Pairing (Final Connection Completed, Enables Phone Control of Mac)
After completing the gateway startup and configuration, you need to bind your phone and computer’s iMessage accounts through pairing to enable phone control of your Mac. The steps are as follows:
Send a pairing trigger message: Use your phone to send any message to the iMessage account logged into your computer (which must match your computer’s Apple ID). After sending, the computer terminal will automatically return a pairing code (please remember or copy this pairing code).
Stop the current gateway service: Return to the terminal window where the gateway was started, and press Ctrl + C to stop the running gateway service.
Execute the pairing approval command: Enter the following command in the terminal, replacing openclaw pairing approve imessage <pairing code>
Restart the gateway: After pairing approval, restart the gateway to ensure pairing is effective. Execute the following command: openclaw gateway — port 18789 — verbose
After the gateway restarts successfully, pairing is complete. You can now control your Mac via iMessage from your phone.
The result is shown in the picture.
More tutorials:
For more practical tutorials on OpenClaw in the cloud, such as one-click deployment of OpenClaw, integration with QQ/WeChat/DingTalk/Lark/Discord/Telegram/WhatsApp, installation and use of Skills, please check out the most comprehensive collection of practical tutorials on OpenClaw in the cloud (formerly Clawdbot).
Welcome to join the discussion!
A Discord has been created, and everyone is welcome to join and explore advanced ways to use Openclaw(Clawdbot) together!

🚀 Developer Community & Support
1️⃣ OpenClaw Developer Community
Unlock advanced tips on Discord
Click to join the community
Note: After joining, you can get the latest plugin templates and deployment playbooks
2️⃣ Dedicated Support
Join WhatsApp / WeCom for dedicated technical support
| Channel | Scan / Click to join |
|---|---|
| WhatsApp Channel |

|
| WeCom (Enterprise WeChat) |

|
Learn more on the official page: Tencent Cloud OpenClaw