Mastering OpenClaw - How to Configure Multiple Independent Agents
Note for first-time users: If you haven’t deployed OpenClaw yet, start with Tencent Cloud OpenClaw first. You can launch your OpenClaw instance in seconds with one click, then come back to this guide to explore more advanced use cases.
It has been more than a month since OpenClaw exploded in popularity, and we have seen many AI explorers continuously trying out different OpenClaw scenarios and workflows. As you get to know OpenClaw better, one issue gradually becomes obvious: when a single Agent handles many kinds of tasks, the memory burden becomes extremely heavy, which can dramatically increase token consumption. Later on, a single question may easily burn through hundreds of thousands of tokens.
Just like members in a real company or organization, different people handle different kinds of work. Clear division of labor and specialized roles are almost inevitable once a system reaches a certain level of complexity.
OpenClaw supports the same idea: you can create multiple isolated Agents, each with its own personality, skills, memory, workspace, and more. Your job is to define them, and then use them to build an “AI legion.”
Principle Explanation and Solution Overview
The core mechanism for implementing multiple Agents in OpenClaw is as follows:
- An Agent is an isolated “brain”: it has its own workspace, where memory and skills are stored, and its own sessions.
- Which Agent receives a request: this is determined by the
bindingsconfiguration, with the most specific rule taking priority. - Which model an Agent uses: this can be configured individually in
agents.list[].model. At runtime, the model configured for that Agent overrides the default value first (code path:resolveDefaultModelForAgent).
Based on the above principles, this article uses the following approach:
- The default main Agent continues to handle all private chats.
- Each group is bound to a different group Agent.
- Each Agent’s memory, skills, and model can be fully isolated.
Of course, you can also copy this principle and solution into your OpenClaw instance and ask it to help with the configuration through direct conversation. However, in practice, we found that if you rely entirely on OpenClaw to complete the whole configuration process by itself, it is easy to run into issues because model performance varies.
This guide will walk you through using the command line to configure an independent Agent for a Feishu group, fully isolated from the main Agent. That Agent can have its own workspace, making its context, memory, model, and more completely independent.
Prerequisites
Before you begin, make sure that:
- You have already deployed OpenClaw with one click through Tencent Cloud Lighthouse. If you have not done so yet, refer to One-Click, Instant Deployment Guide for OpenClaw (Clawdbot) on the Cloud.
- You have already configured a Feishu application and connected it to OpenClaw. If you want to follow this guide step by step, first refer to Quick Guide to Connecting OpenClaw (Clawdbot) to Feishu on the Cloud so that private chat with OpenClaw is working.
- You have permission to create Feishu groups.
Step 1: Create a Feishu Group and Obtain Its ID
First, create a Feishu group and obtain its conversation ID.
Create a Feishu Group
- Open the Feishu client and click the
+button. - Select
Create Group.
- Enter a group name and add members as prompted. You can also create the group without adding members for now.
Obtain the Conversation ID
Getting the Feishu conversation ID is straightforward. You can copy it directly from the group settings:
- Open the group and click the
...button in the upper-right corner. - Select
Settings.
- Scroll to the bottom of the settings page and find the group information.
- Click
Copyto copy the conversation ID.

The conversation ID looks like this: oc_5b6799cff4a754c15e5ff3025becc648
⚠️ Note: Keep the copied conversation ID safe, because you will need it in the later configuration steps. It is a good idea to save it in a local text file for convenience.
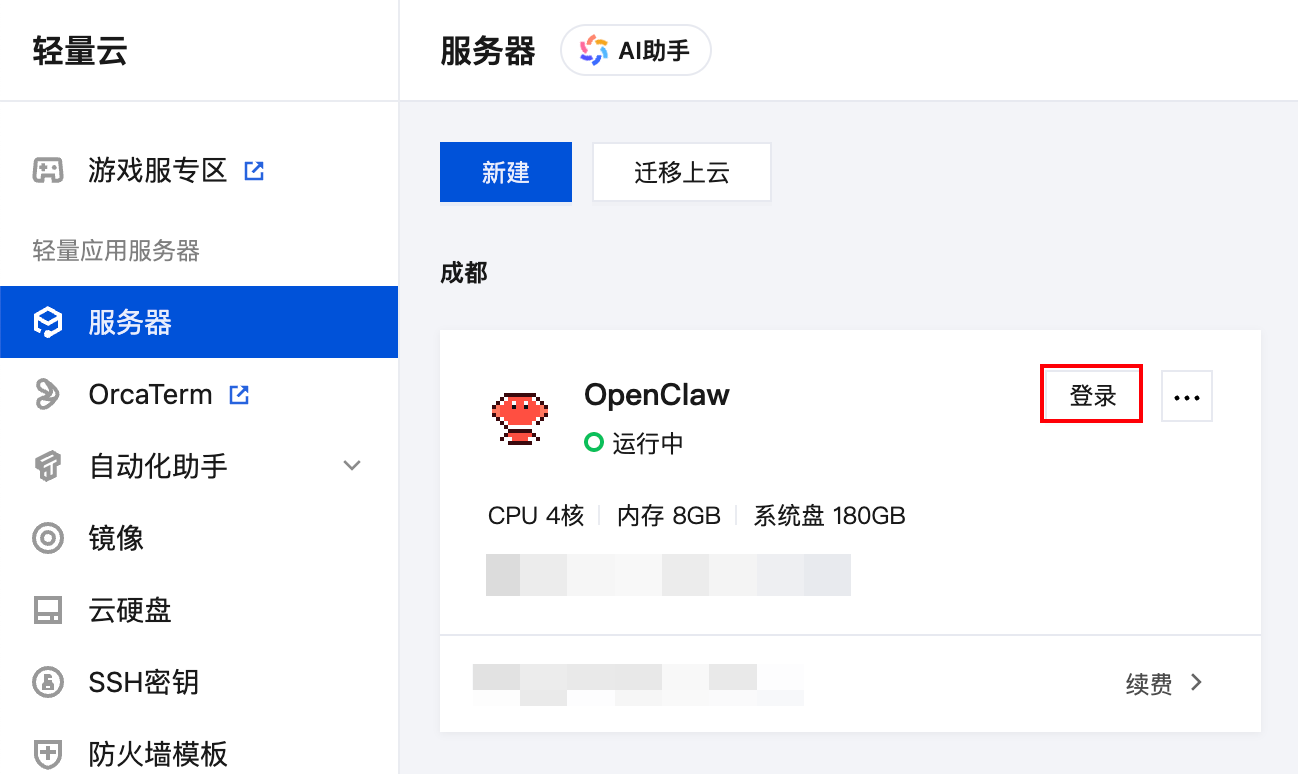
Step 2: Log In to the Server
After obtaining the conversation ID, log in to the server command line from the Tencent Cloud Lighthouse console.
- Log in to the Tencent Cloud Lighthouse Console, and find your OpenClaw instance.
- Click the Log In button on the instance card.
- Wait for the OrcaTerm terminal window to open, then follow the on-screen instructions to complete the login.
Step 3: Back Up the Configuration File
Before modifying the configuration file, it is strongly recommended that you back up the original file so you can quickly restore it if something goes wrong.
Run the following command to back up the OpenClaw configuration file:
cp ~/.openclaw/openclaw.json ~/.openclaw/openclaw.json.backup.$(date +%Y%m%d_%H%M%S)
After that, run the following command to confirm that the backup file has been created:
ls -la ~/.openclaw/openclaw.json*
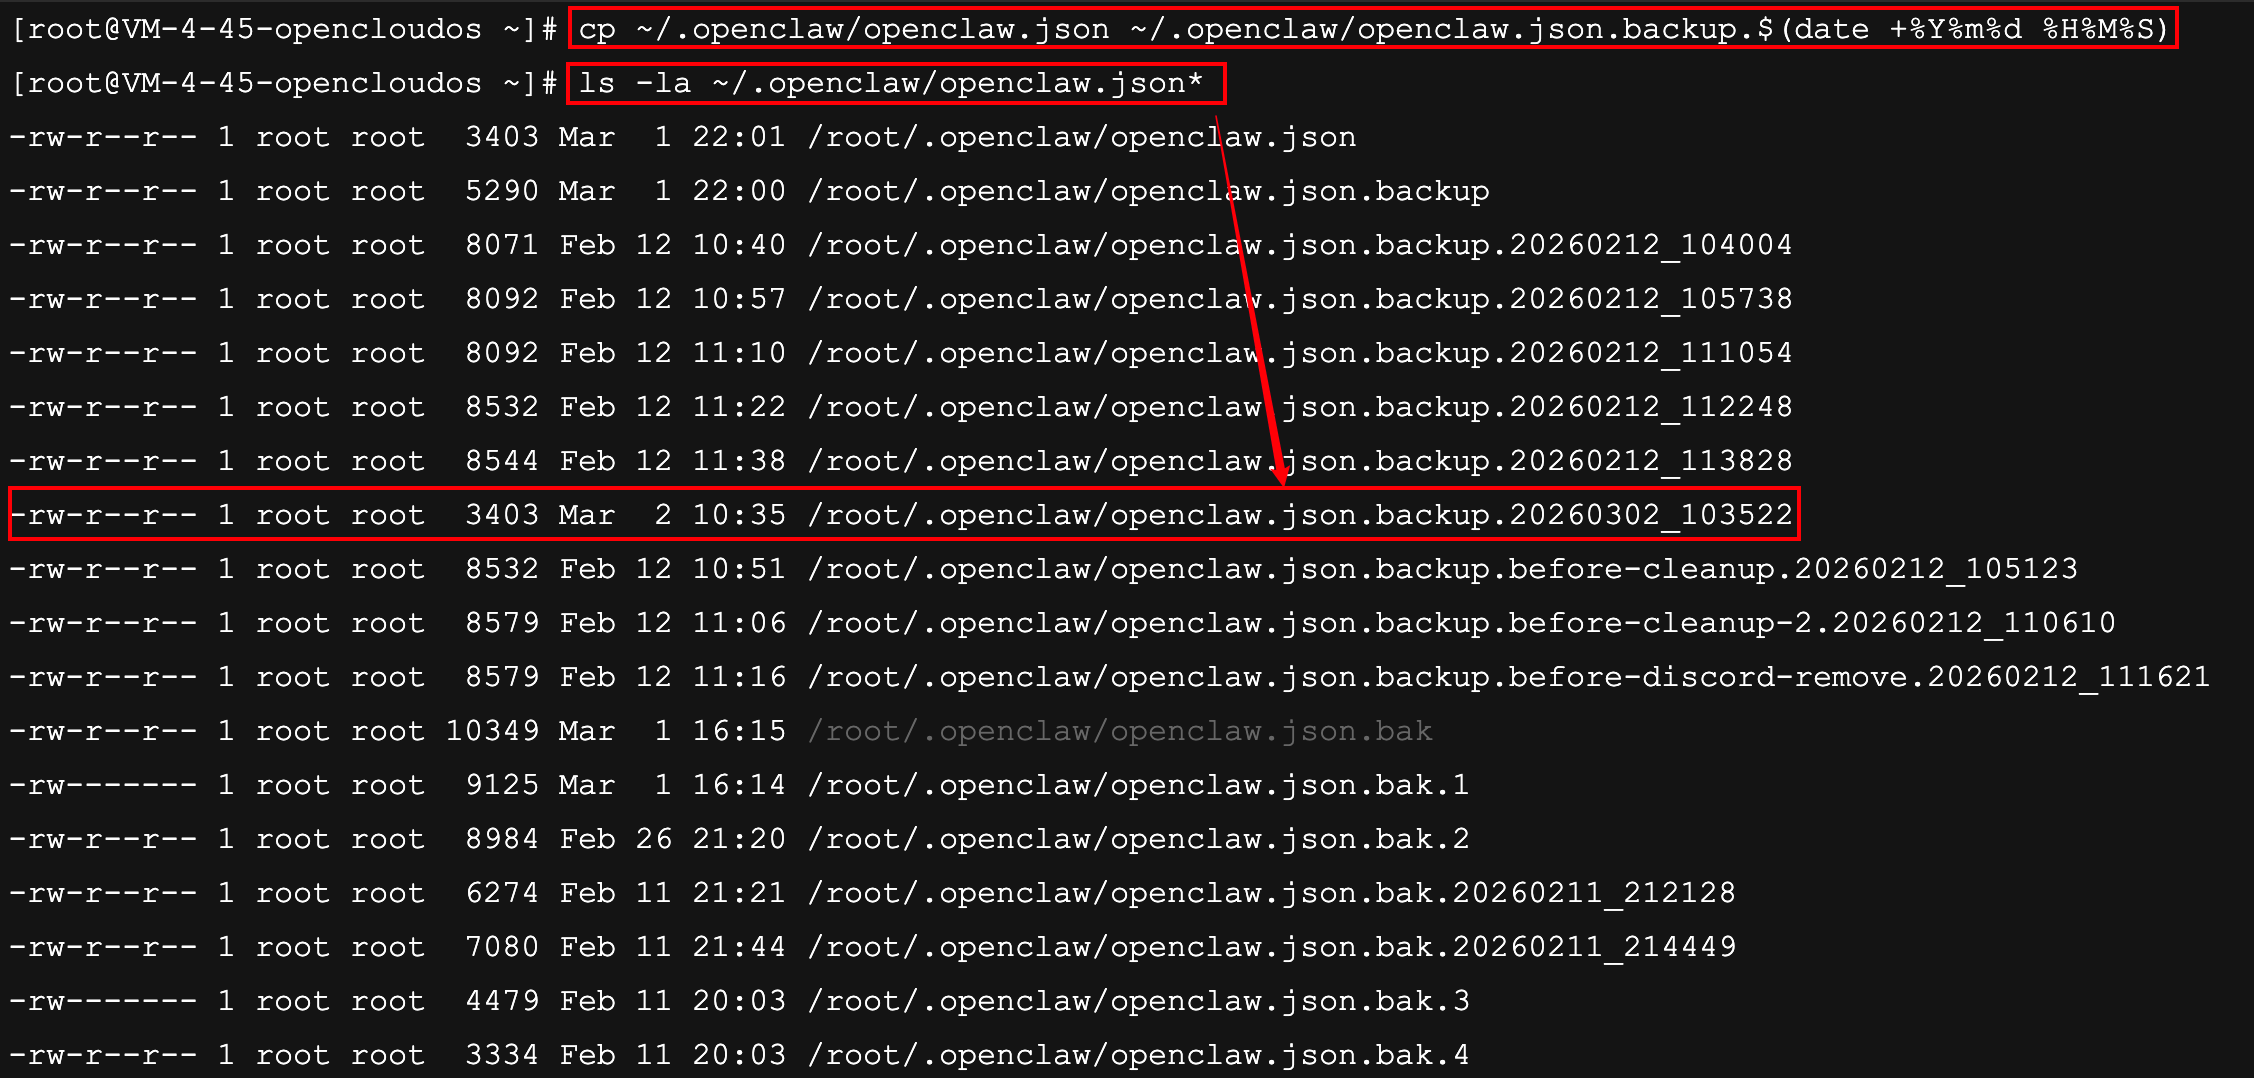
⚠️ Note: If OpenClaw fails to start or behaves abnormally in the later configuration process, you can restore the original configuration with the following commands:
cp ~/.openclaw/openclaw.json.backup.YYYYMMDD_HHMMSS ~/.openclaw/openclaw.json
openclaw gateway restart
Replace YYYYMMDD_HHMMSS with the actual timestamp from your backup file name.
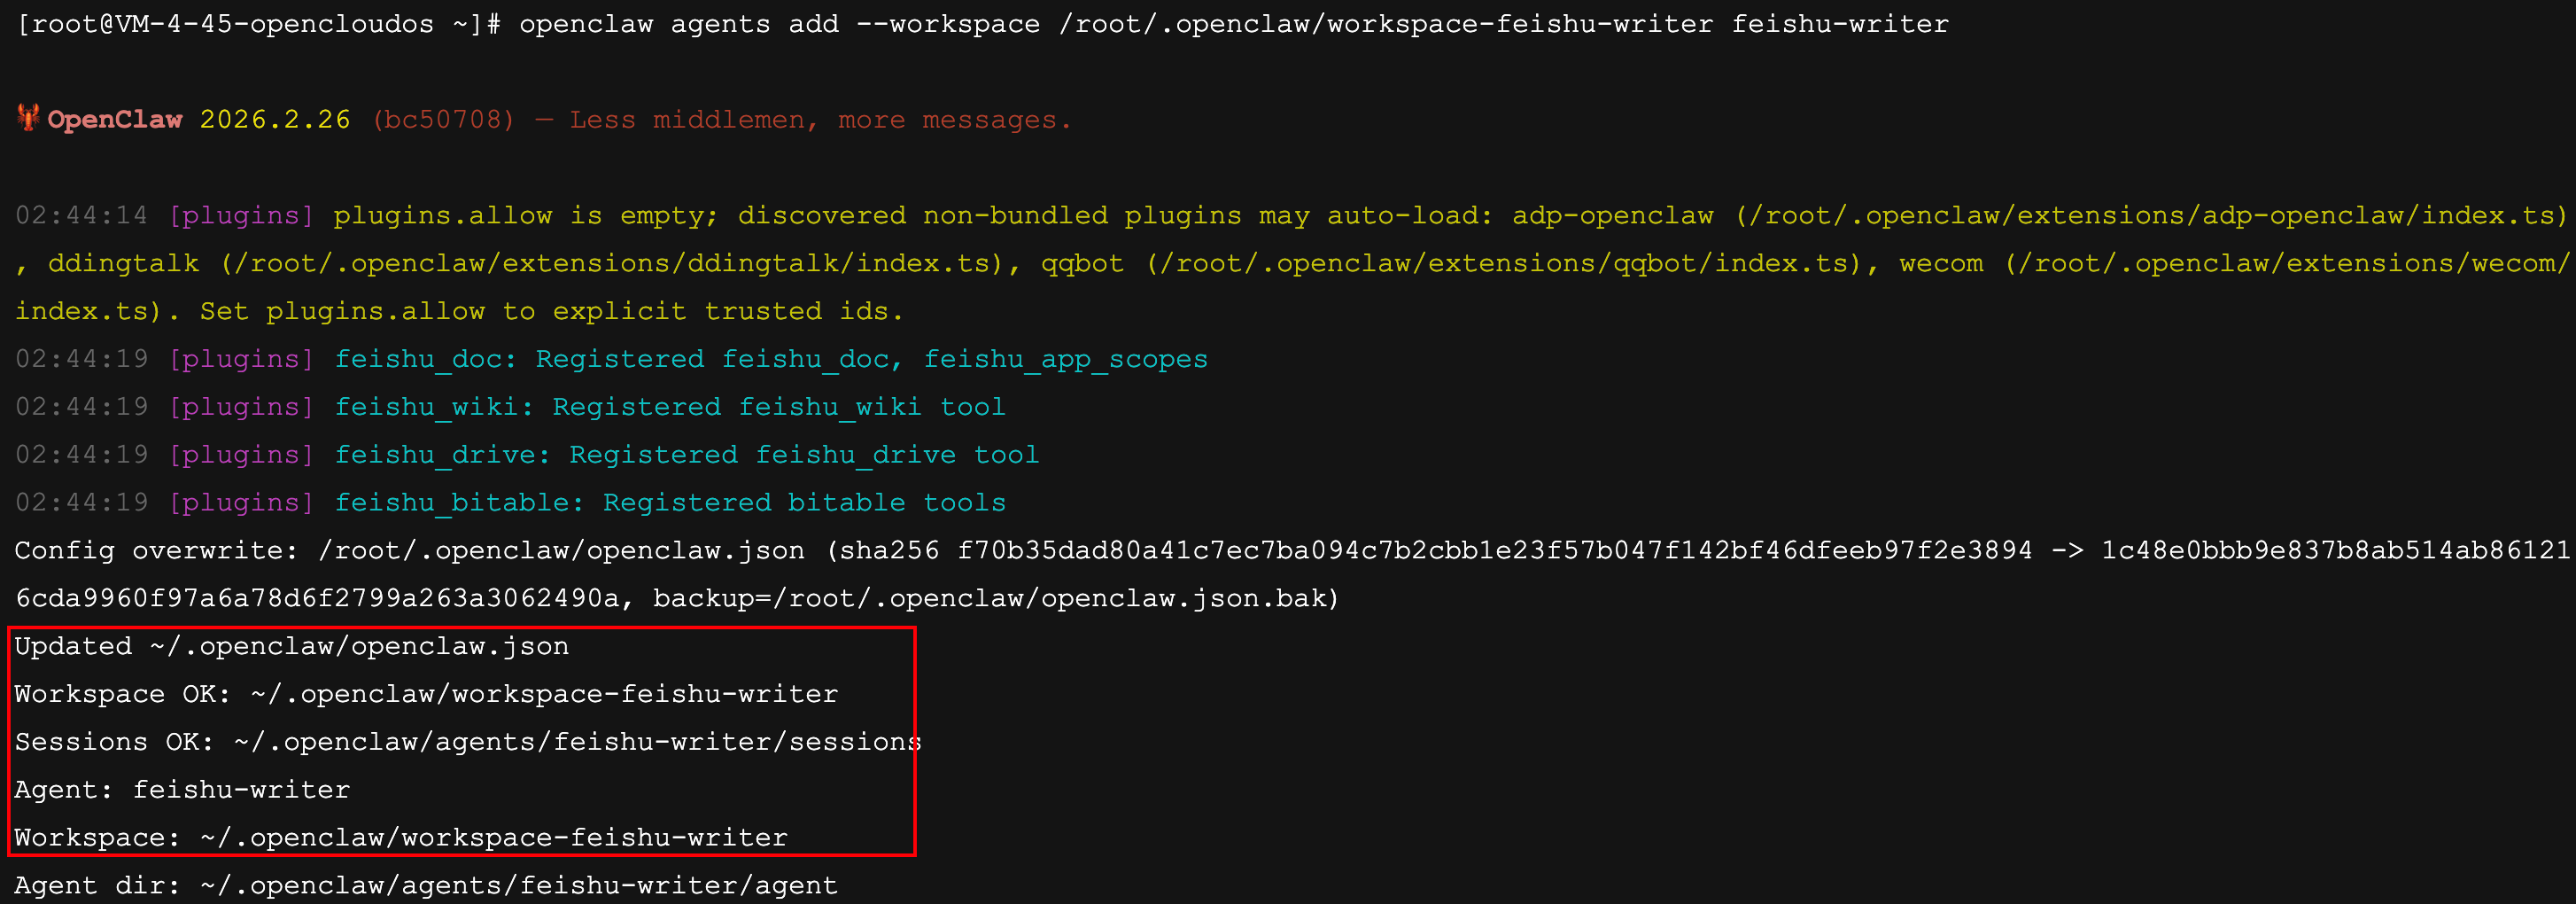
Step 4: Configure the New Agent
Use the openclaw agents add command to add a new Agent. Replace the workspace path and the new Agent name (ID) with values you want to use:
openclaw agents add --workspace workspace-path new-agent-name-id
ℹ️ Note: Command parameter description:
--workspace: specifies the independent data workspace path. The recommended format is/root/.openclaw/workspace-feishu-team-namenew-agent-name-id: the recommended format isfeishu-team-purpose--model: if you need a custom model, add this argument and provide the model ID; otherwise, the default model will be used
In this example, we create an Agent for document writing, named feishu-writer, with the workspace set to /root/.openclaw/workspace-feishu-writer.
So run:
openclaw agents add --workspace /root/.openclaw/workspace-feishu-writer feishu-writer
If you see output similar to the following, the Agent has been created successfully:
Agent: feishu-writer
Workspace: ~/.openclaw/workspace-feishu-writer
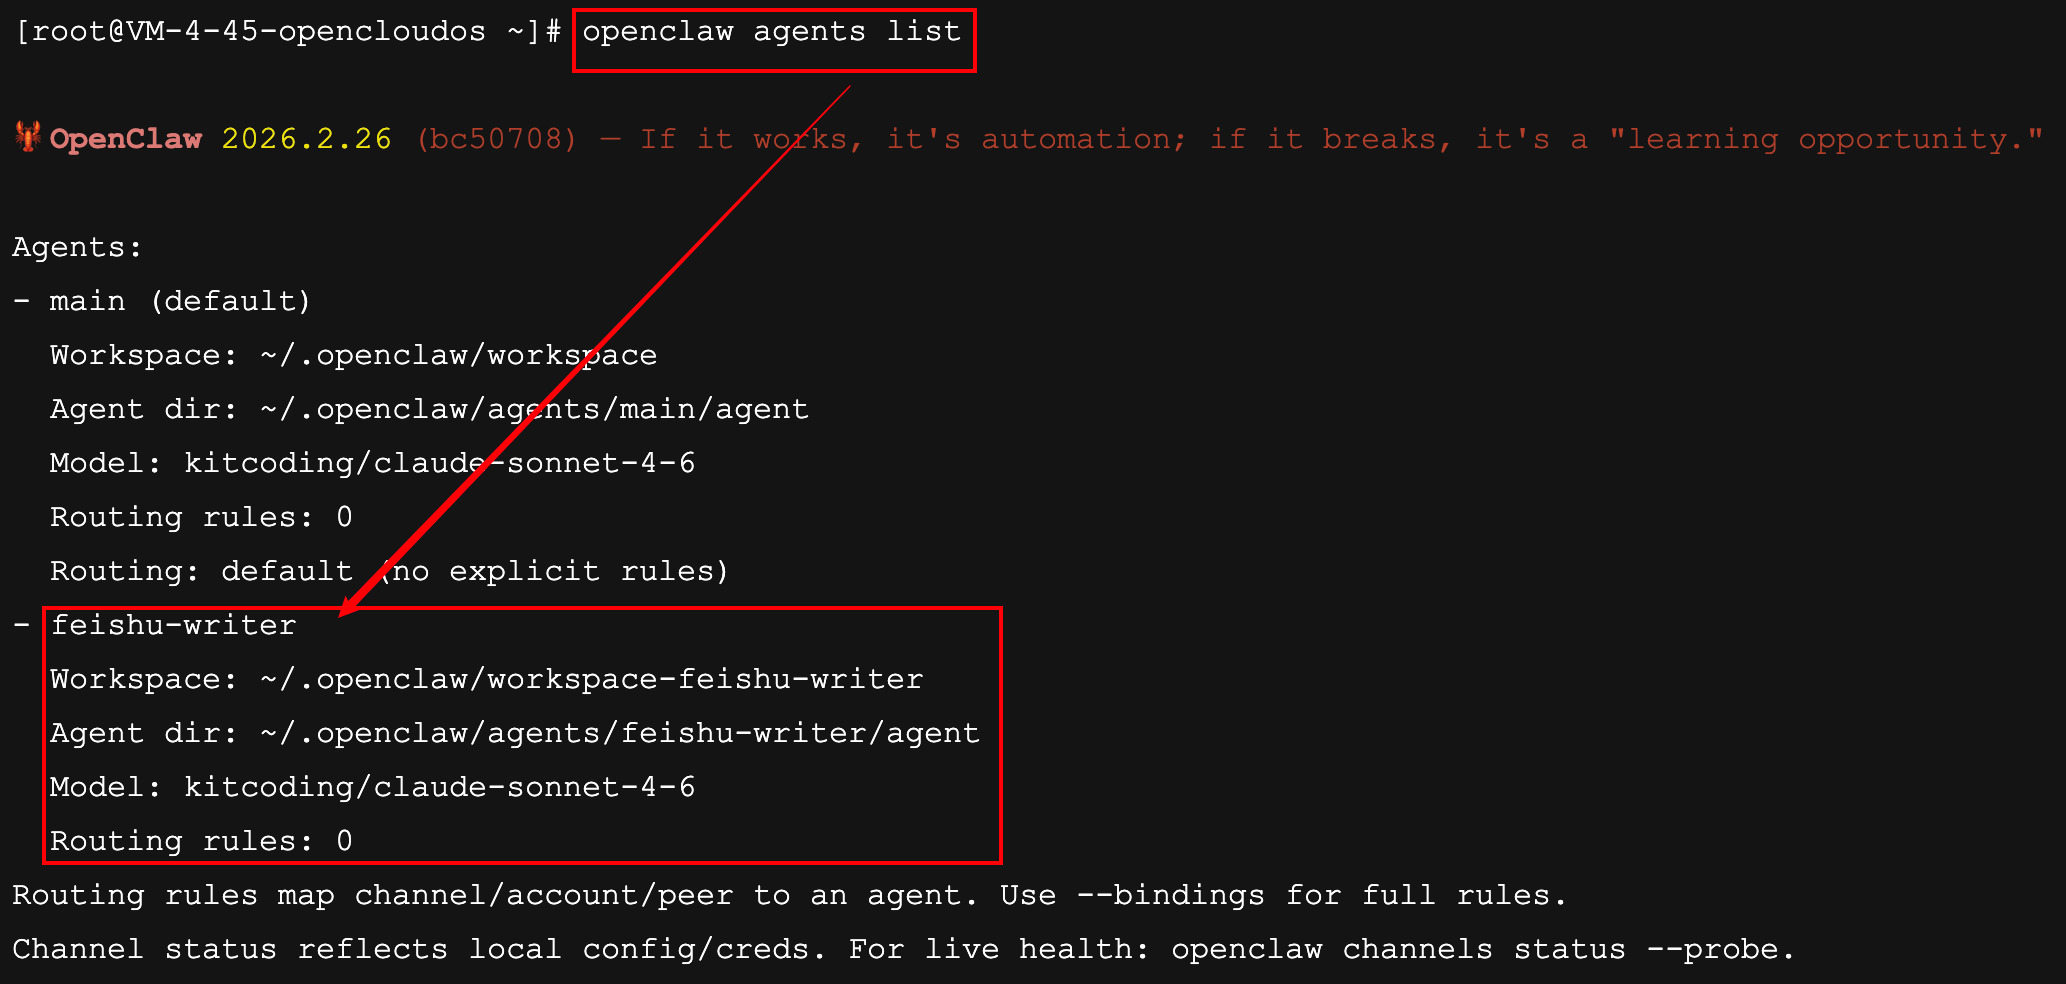
You can also run the following command to verify that the Agent was added successfully:
openclaw agents list
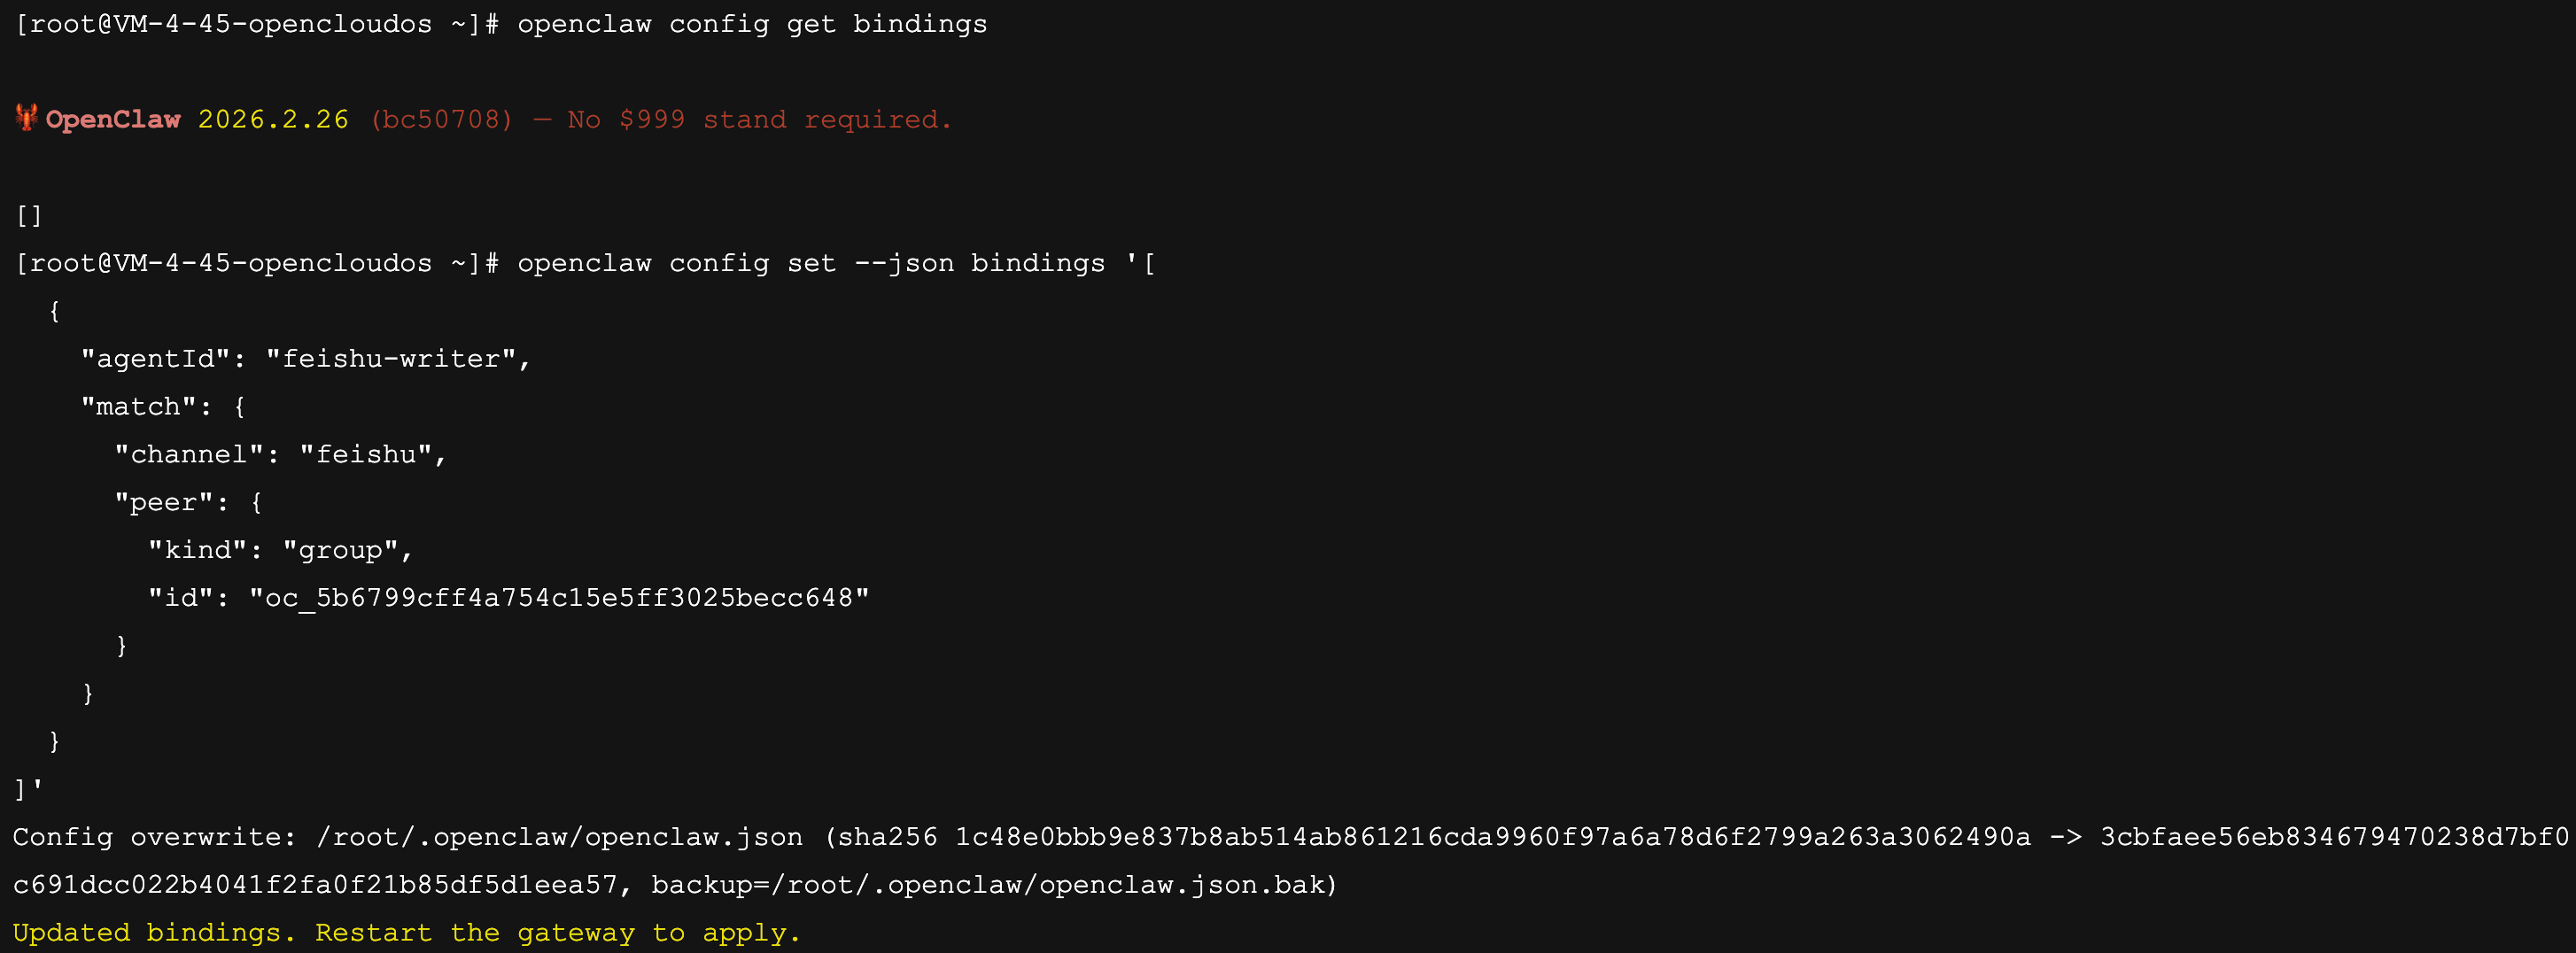
Step 5: Configure the Feishu Group Binding
Next, configure the binding relationship between the Feishu group and the new Agent.
If your configuration already contains other bindings, such as Telegram group bindings, it is recommended that you export the current configuration first:
openclaw config get bindings > /tmp/bindings-backup.json
Then add the Feishu group binding with the following command. Replace oc_5b6799cff4a754c15e5ff3025becc648 with the actual conversation ID you obtained:
openclaw config set --json bindings '[
  {
    "agentId": "feishu-writer",
    "match": {
      "channel": "feishu",
      "peer": {
        "kind": "group",
        "id": "oc_5b6799cff4a754c15e5ff3025becc648"
      }
    }
  }
]'
❌ Warning:
openclaw config set --json bindings '[...]' will replace the entire current bindings configuration. In other words, if your command contains only one Feishu binding, all previously configured QQ, Telegram, or other bindings will be overwritten.
If you already have other bindings configured:
- Run
openclaw config get bindingsfirst and copy the existing bindings. - Append one Feishu group binding to the existing array.
- Write the entire array back with
config set --json bindings '[ existing bindings..., new Feishu binding ]'.
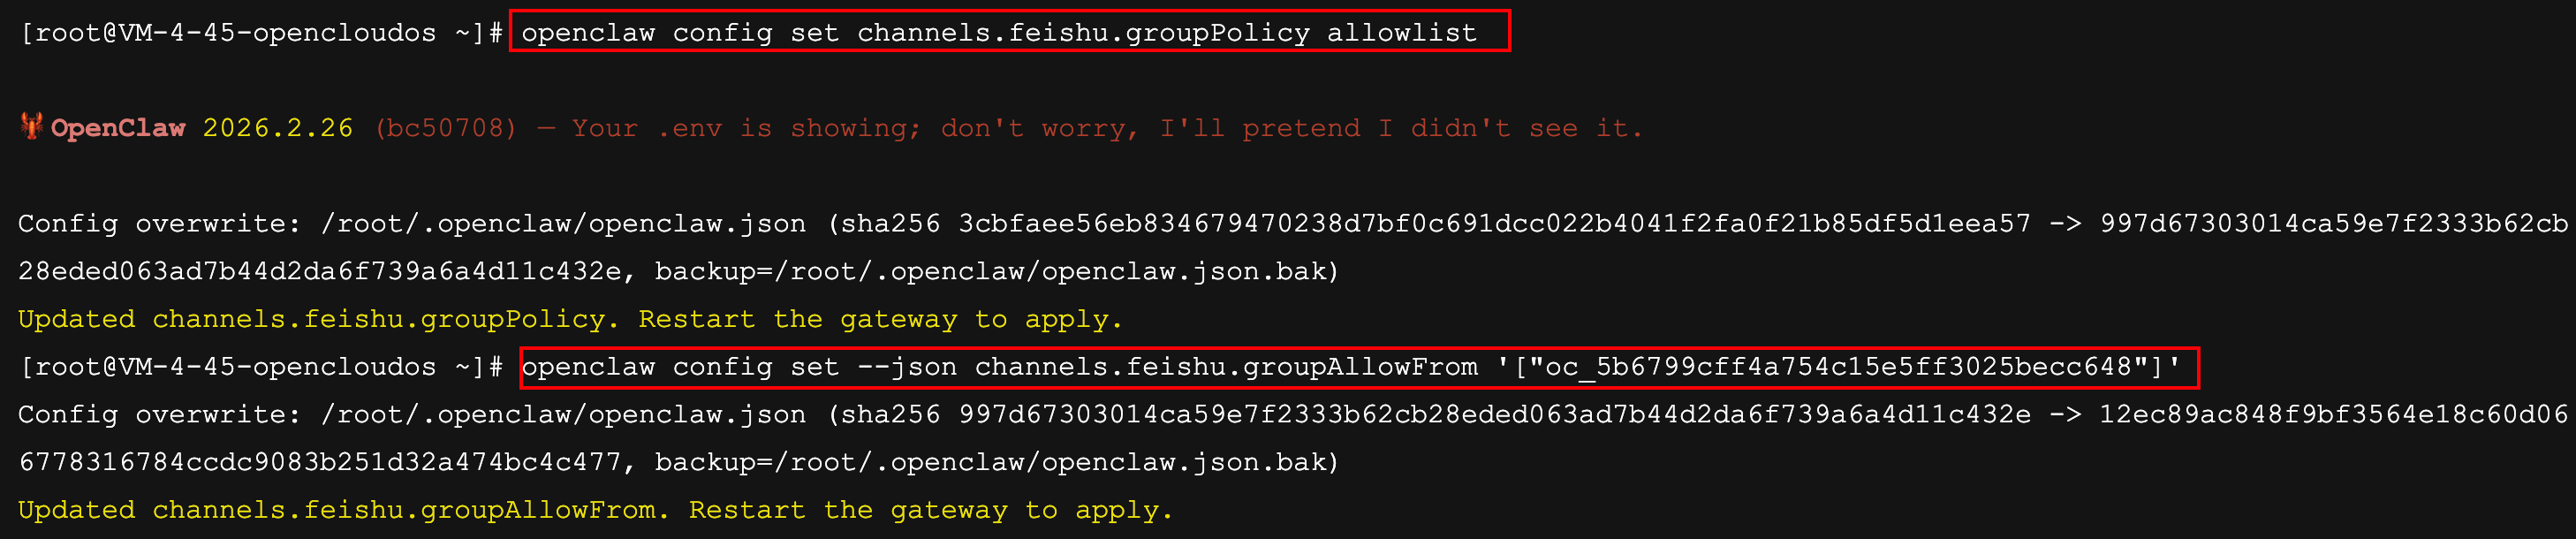
Step 6: Configure the Feishu Group Allowlist
Use the following command to configure the Feishu group access policy:
openclaw config set channels.feishu.groupPolicy allowlist
Then configure the list of allowed groups. Replace the conversation ID in the following command with your actual ID:
openclaw config set --json channels.feishu.groupAllowFrom '["oc_5b6799cff4a754c15e5ff3025becc648"]'
✅ Note: Using the allowlist policy ensures that only groups configured in groupAllowFrom can access OpenClaw. This is a safety measure.
Step 7: Restart the Gateway
Restart the Gateway so it loads the new configuration:
openclaw gateway restart
After the restart is complete, use the following command to confirm the Gateway status:
openclaw gateway status
✅ Success: If the Gateway status shows running, the configuration file format is correct and has been loaded successfully.
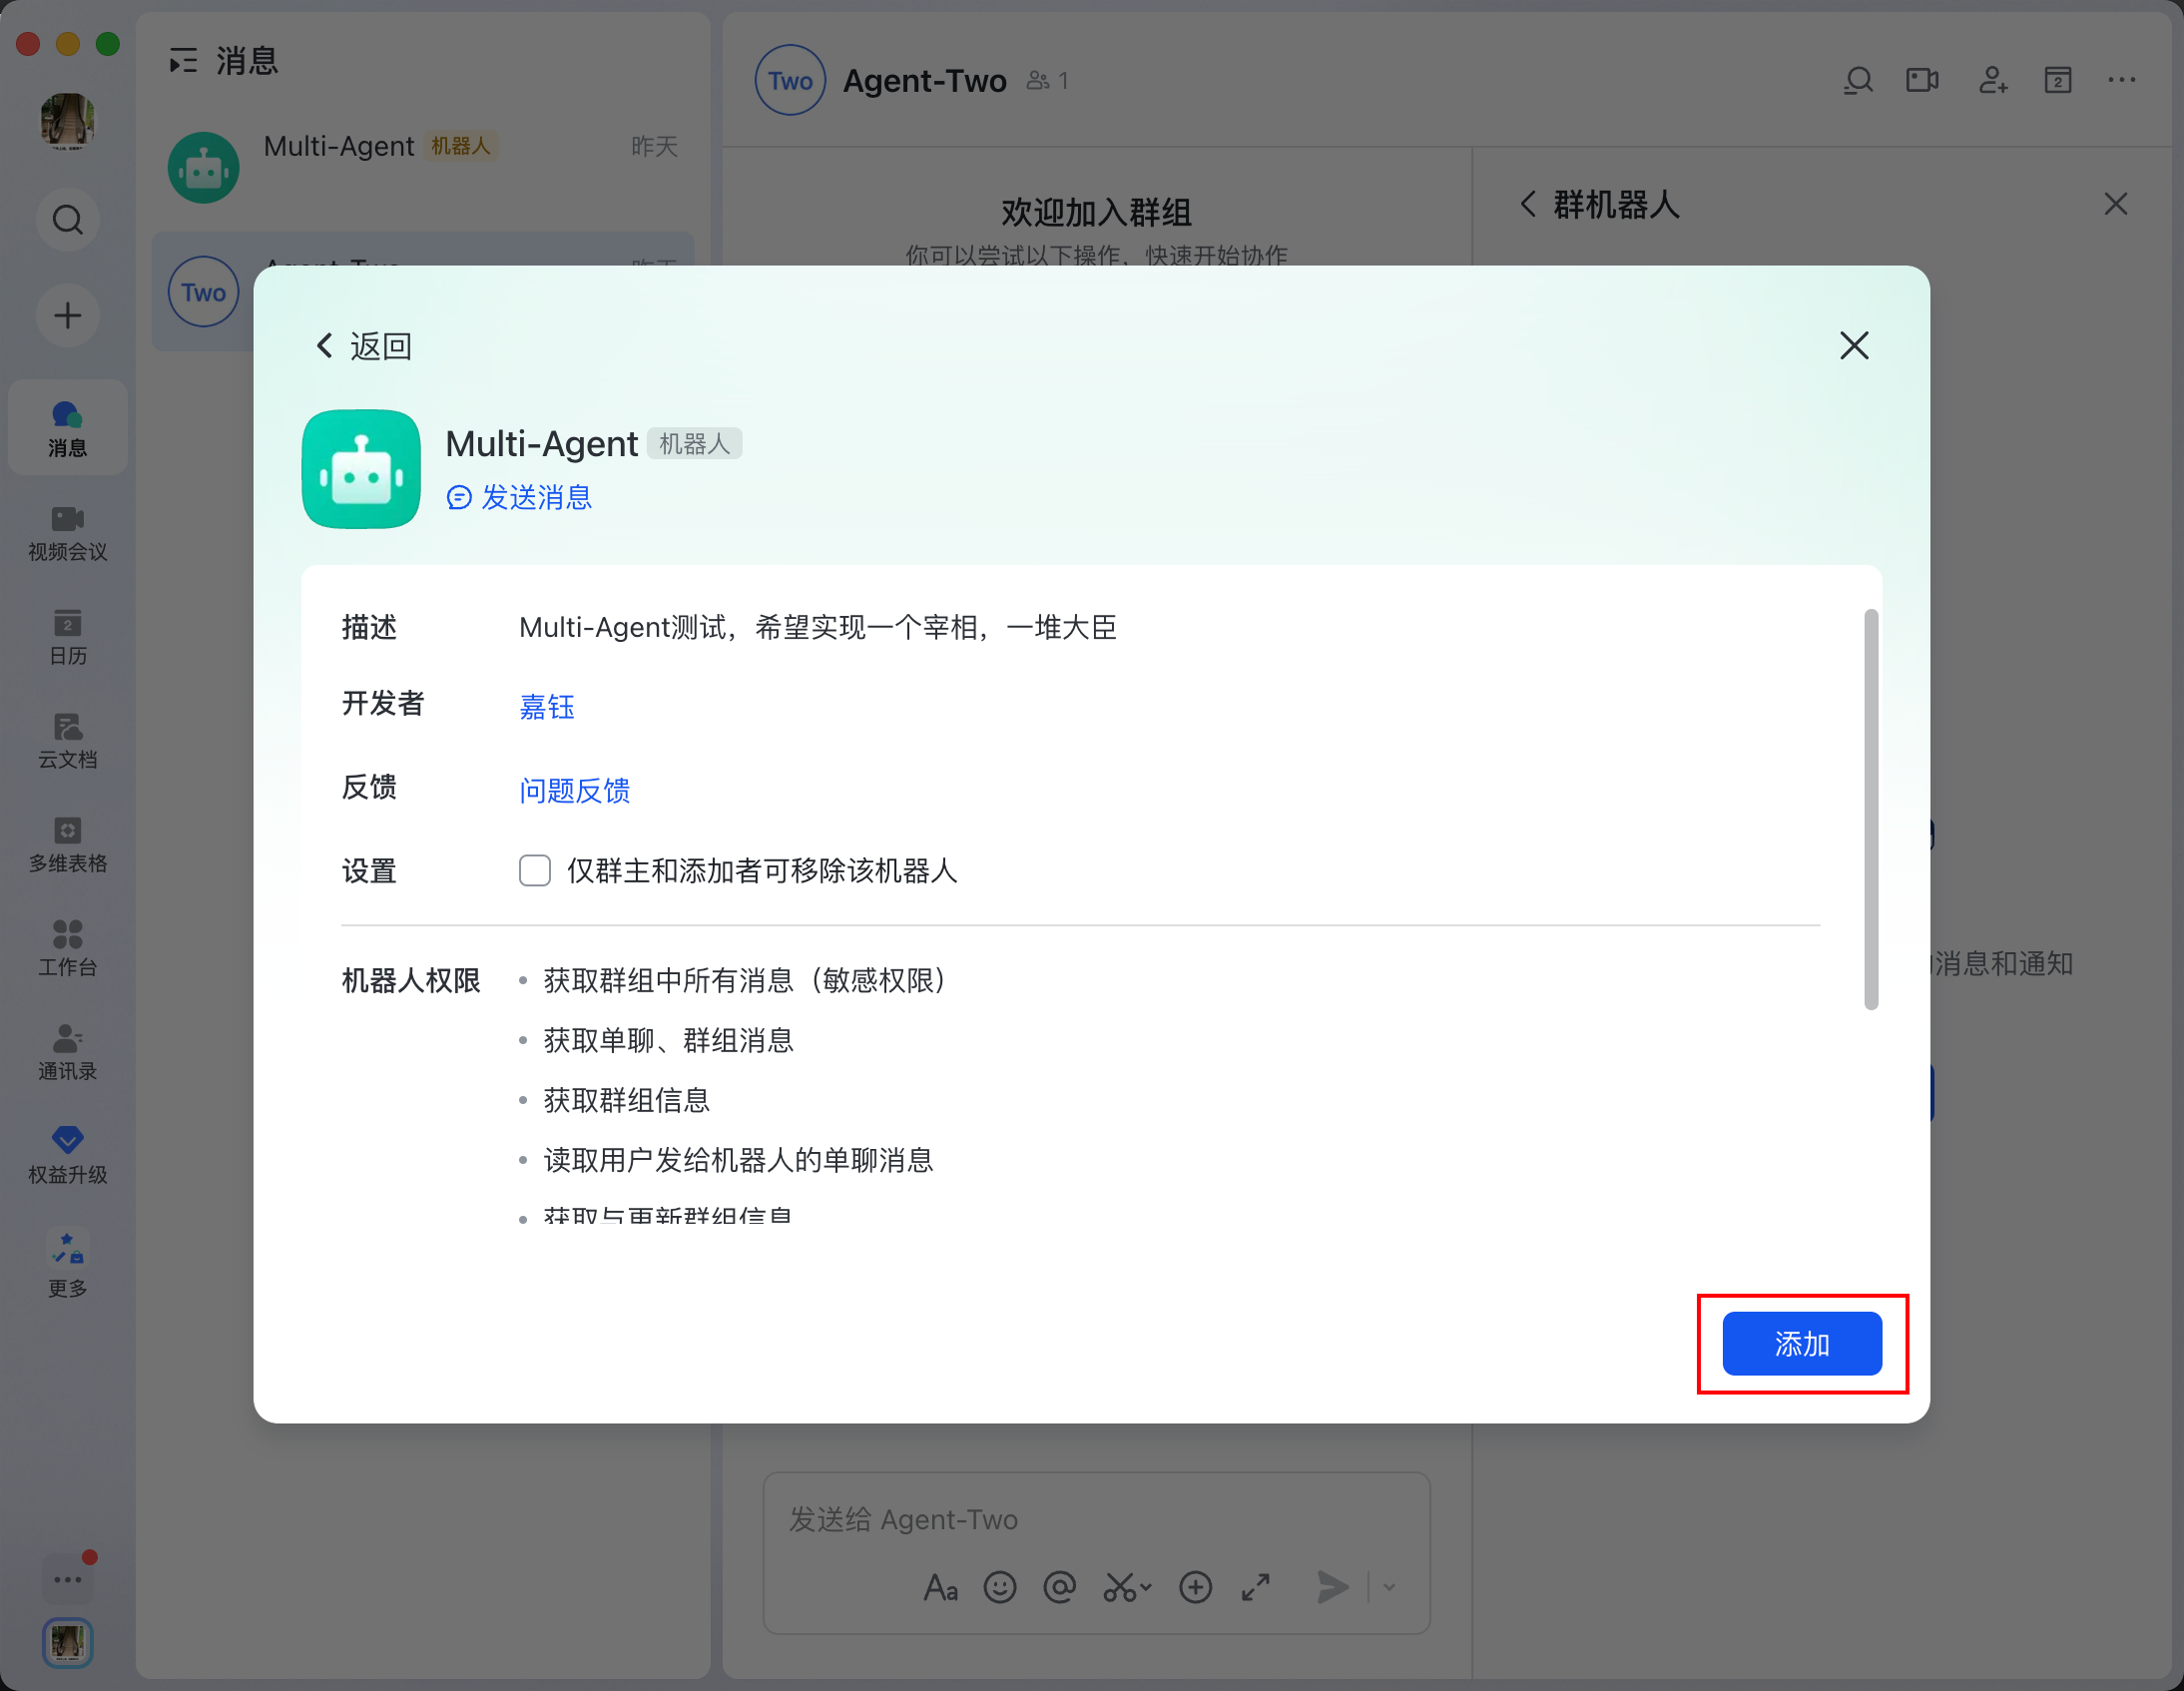
Step 8: Add the Bot to the Group
Now add the Feishu bot to the group so that members can use the AI assistant directly in the group.
- Open the Feishu group, click the
Settingsbutton from the More menu in the upper-right corner, and selectGroup Bot:
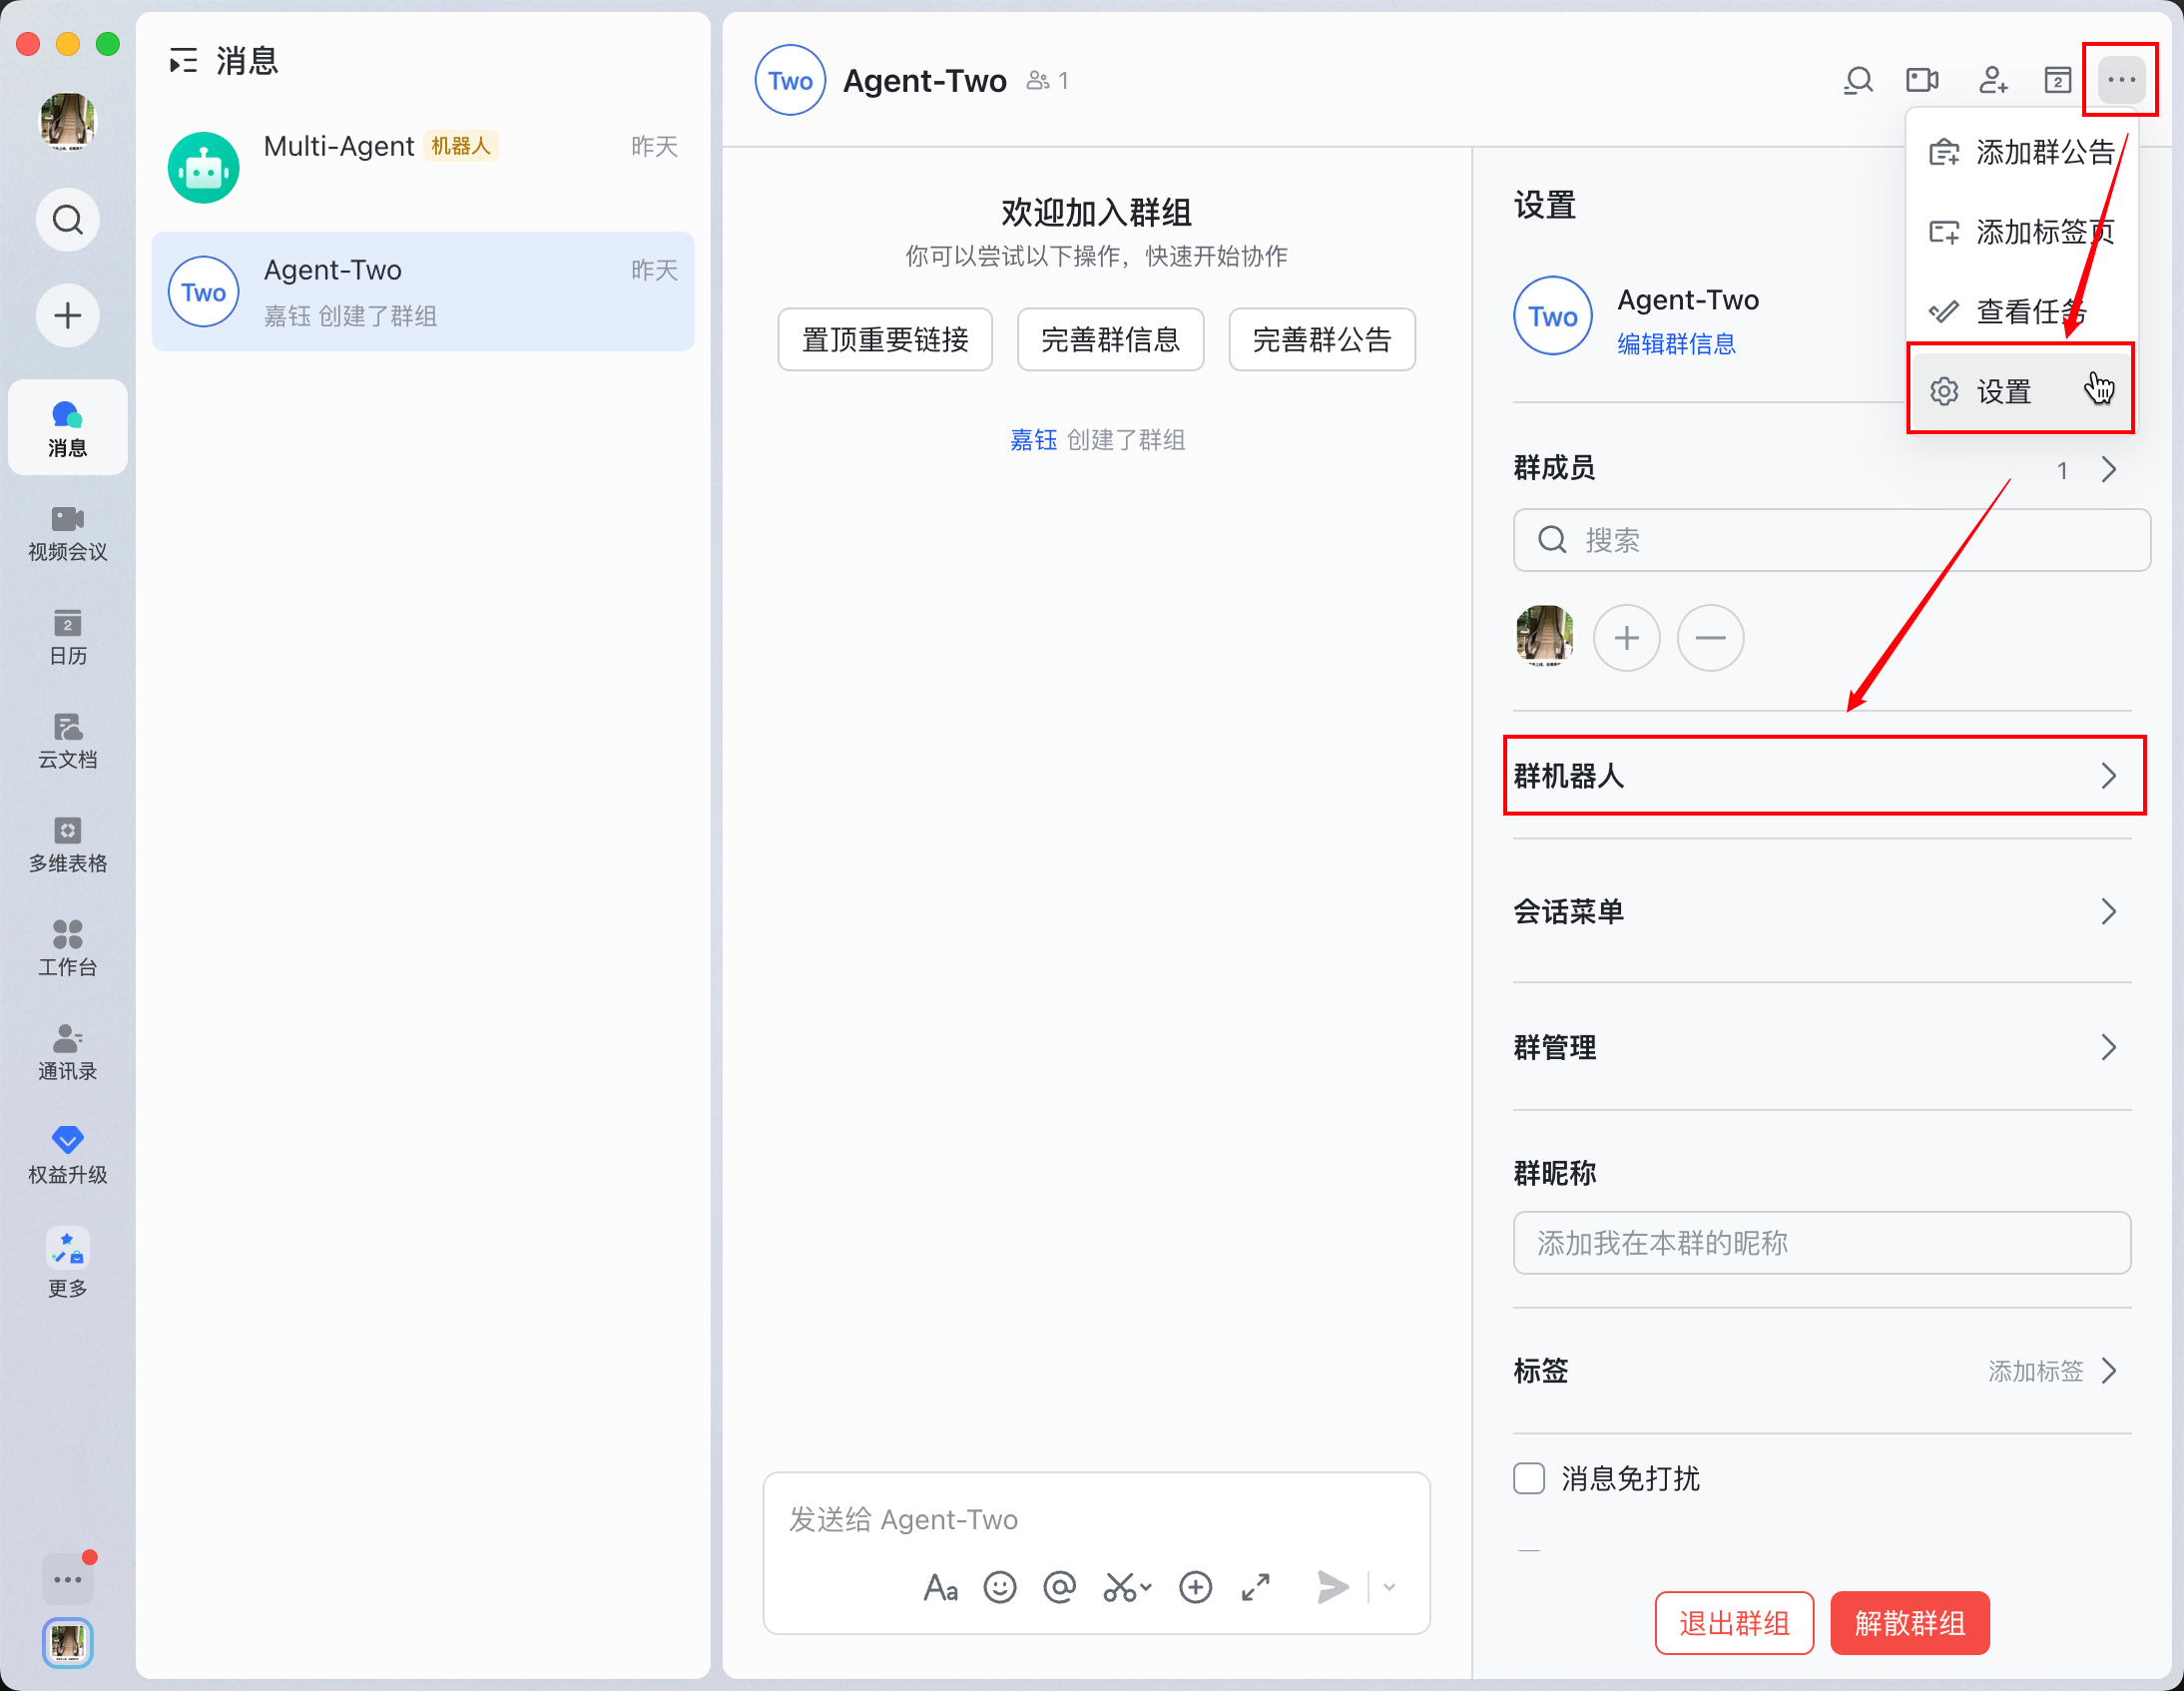
- Select your bot and add it to the group.
⚠️ Note: The bot you add here is the same bot you used earlier in private chat.

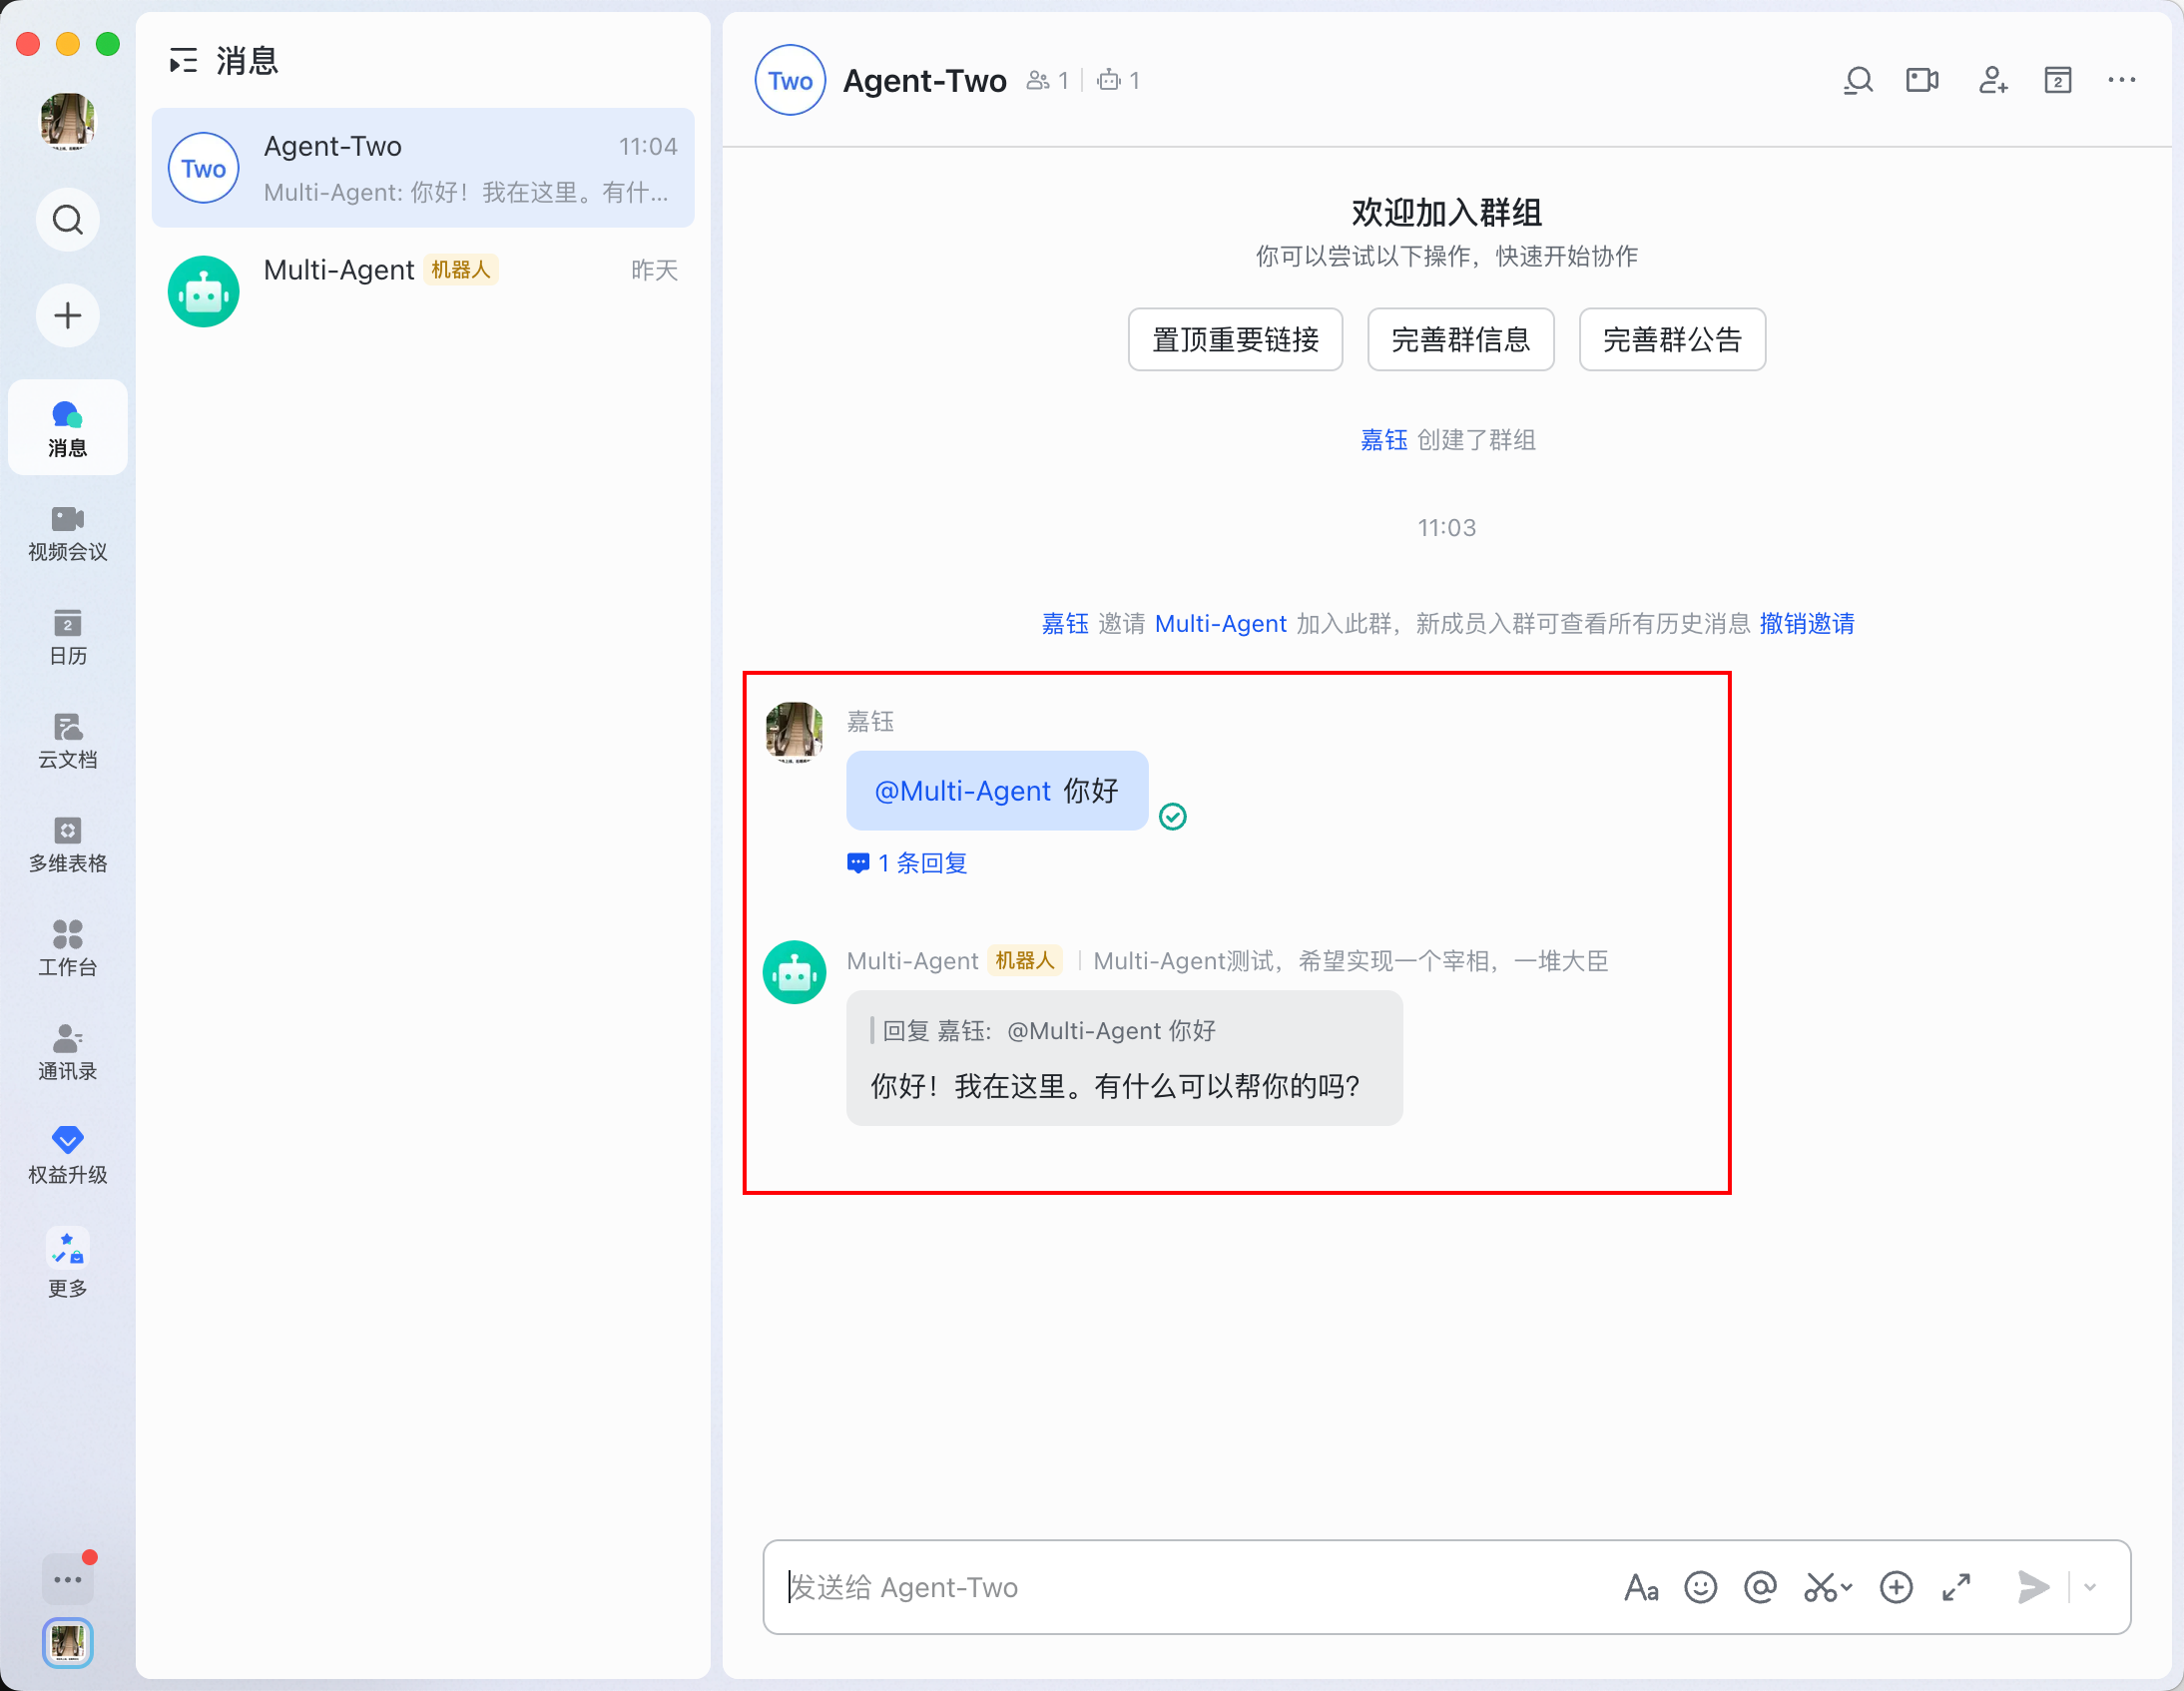
- After the bot is added successfully, you will see a notification in the group.
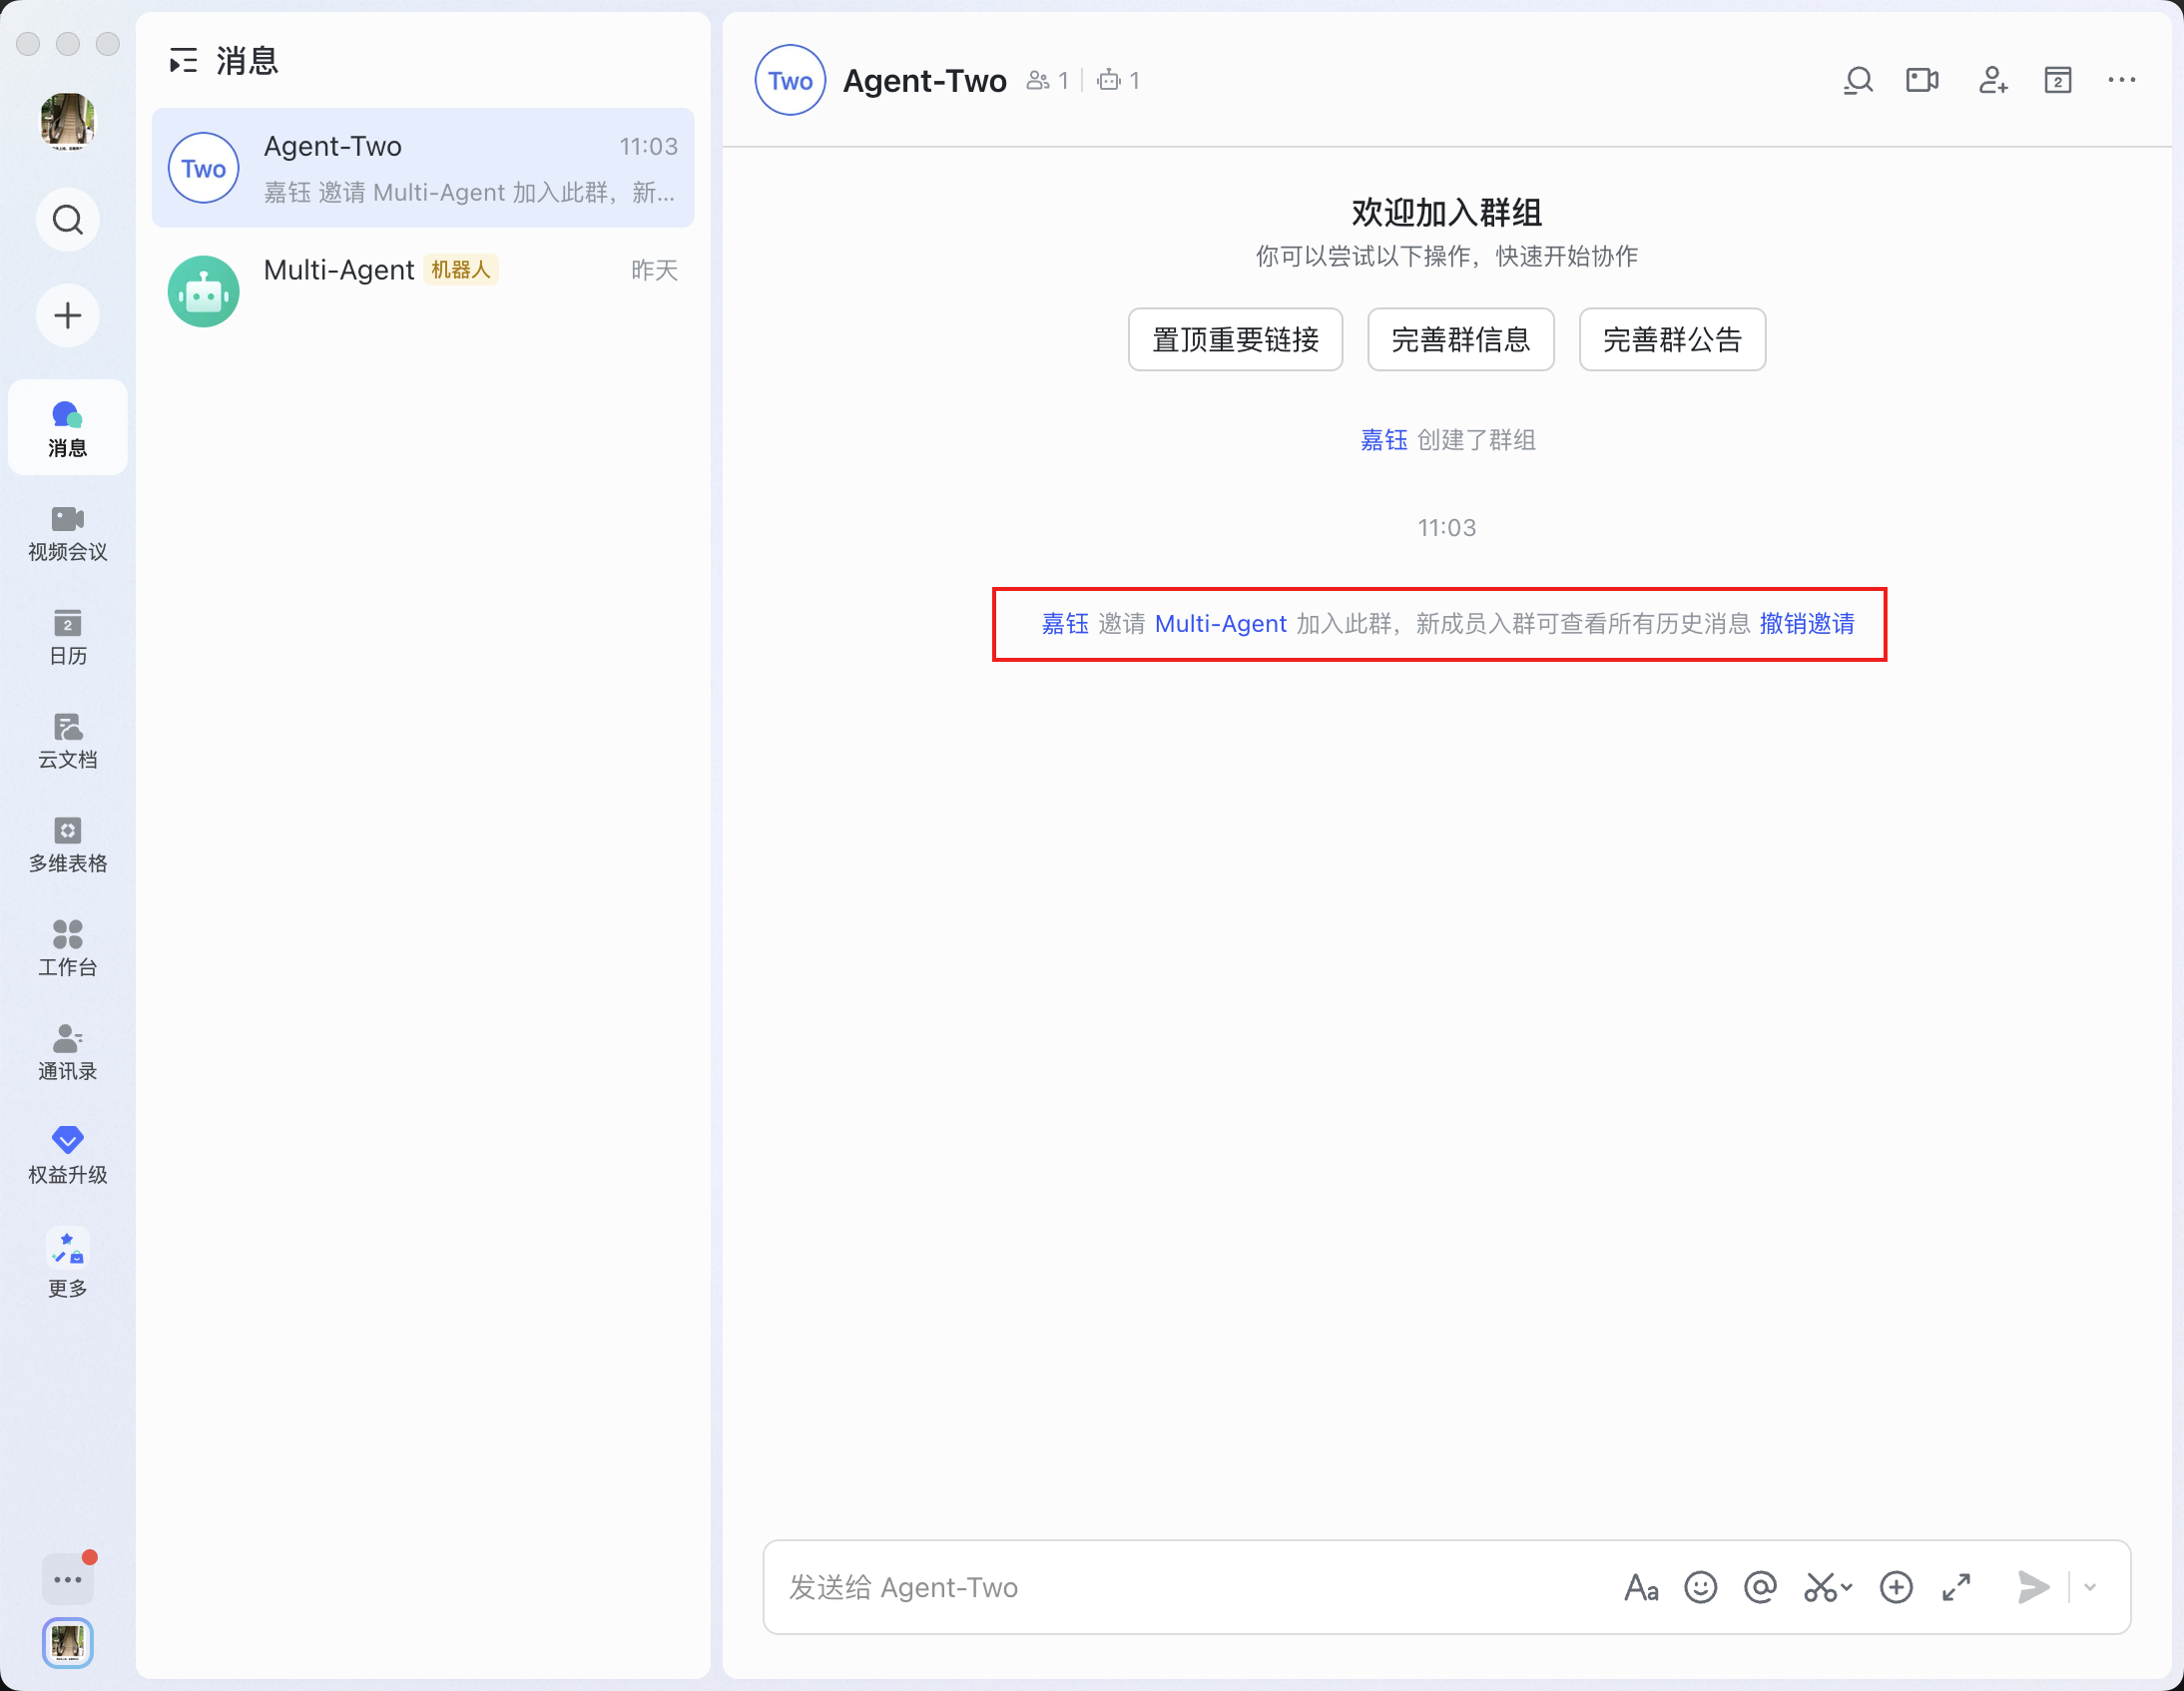
After the bot is added successfully, send a test message to confirm that it responds correctly.
⚠️ Note: By default, you need to @mention the bot when interacting with it in a group.
Step 9: Test and Verify Agent Isolation
After the configuration is complete, you should verify that the Agent isolation works as expected.
Test 1: Group Messages Use the Independent Agent
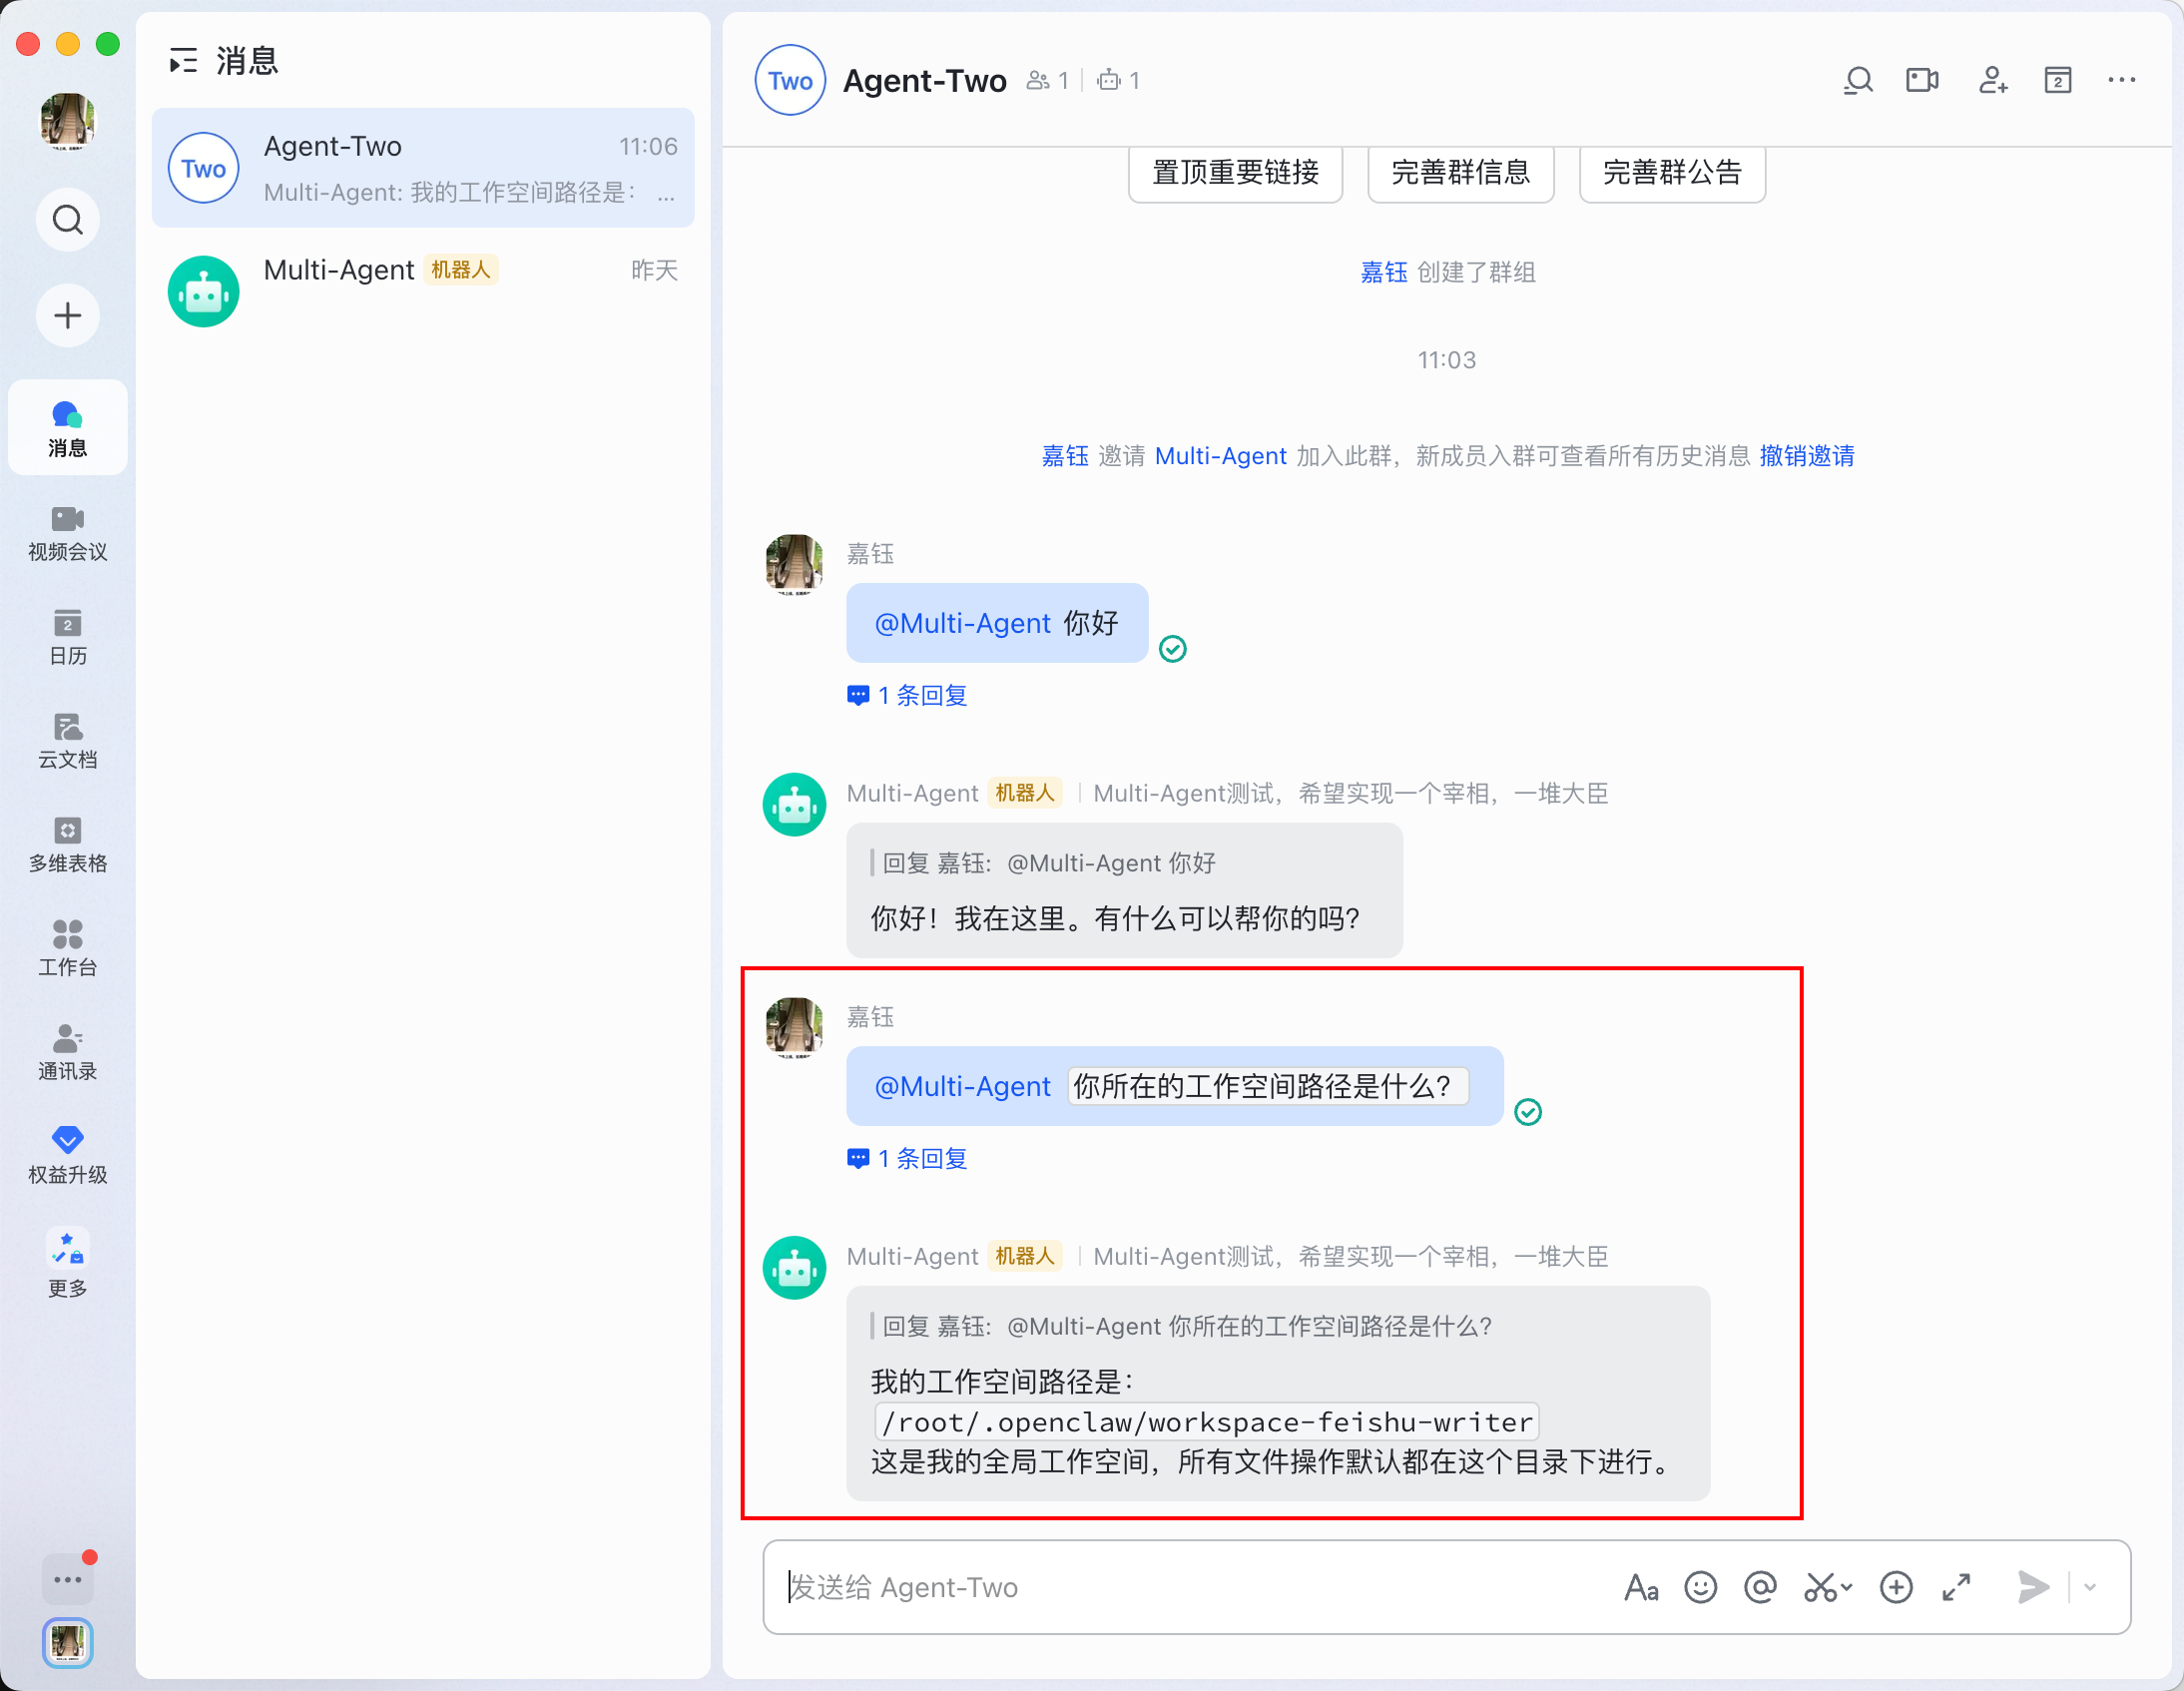
- In the newly created Feishu group, ask the bot:
What is your workspace path? - Verify that the bot returns the new Agent workspace path:
/root/.openclaw/workspace-feishu-writer
Test 2: Verify Isolation Between the Main Agent and the Independent Agent
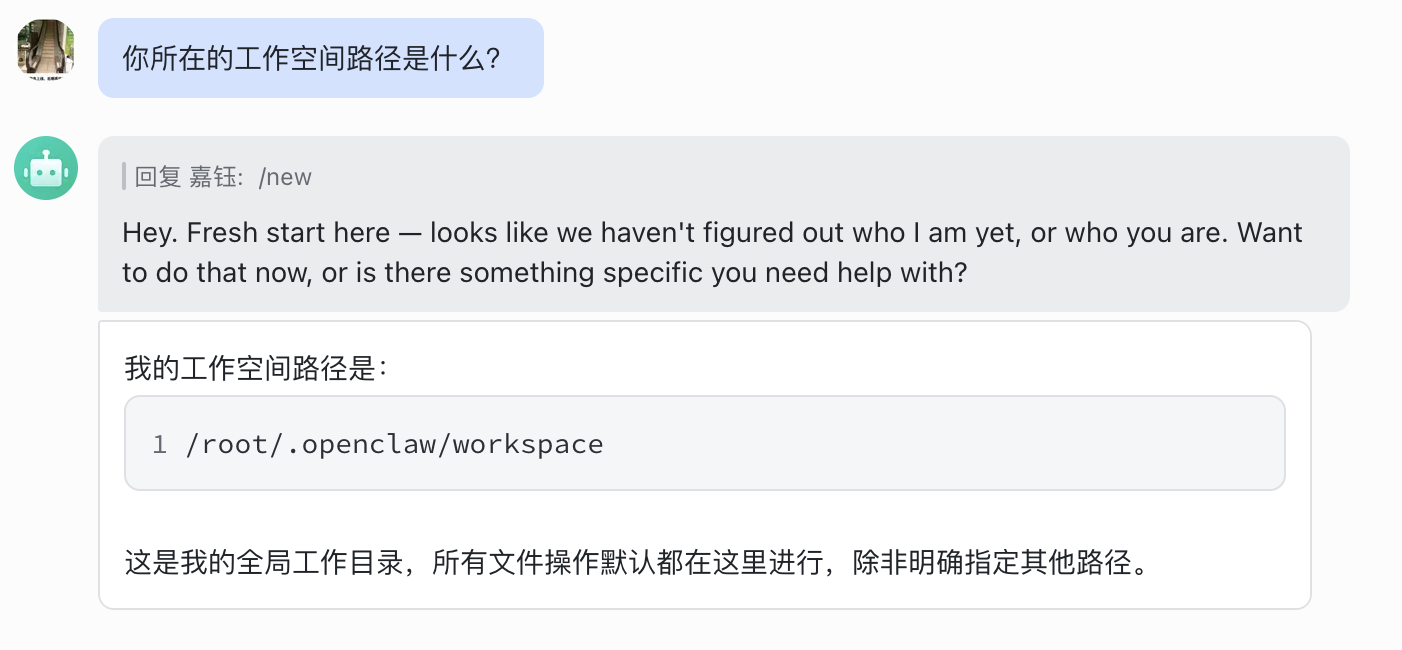
- Start a one-to-one private chat with the bot, not through the group.
- Ask:
What is your workspace path? - Verify that the main Agent returns the default workspace path:
/root/.openclaw/workspace
Test 3: Verify Data Isolation
- In the group, ask the bot to remember some information, for example:
Remember this: our team code name is "North Star".
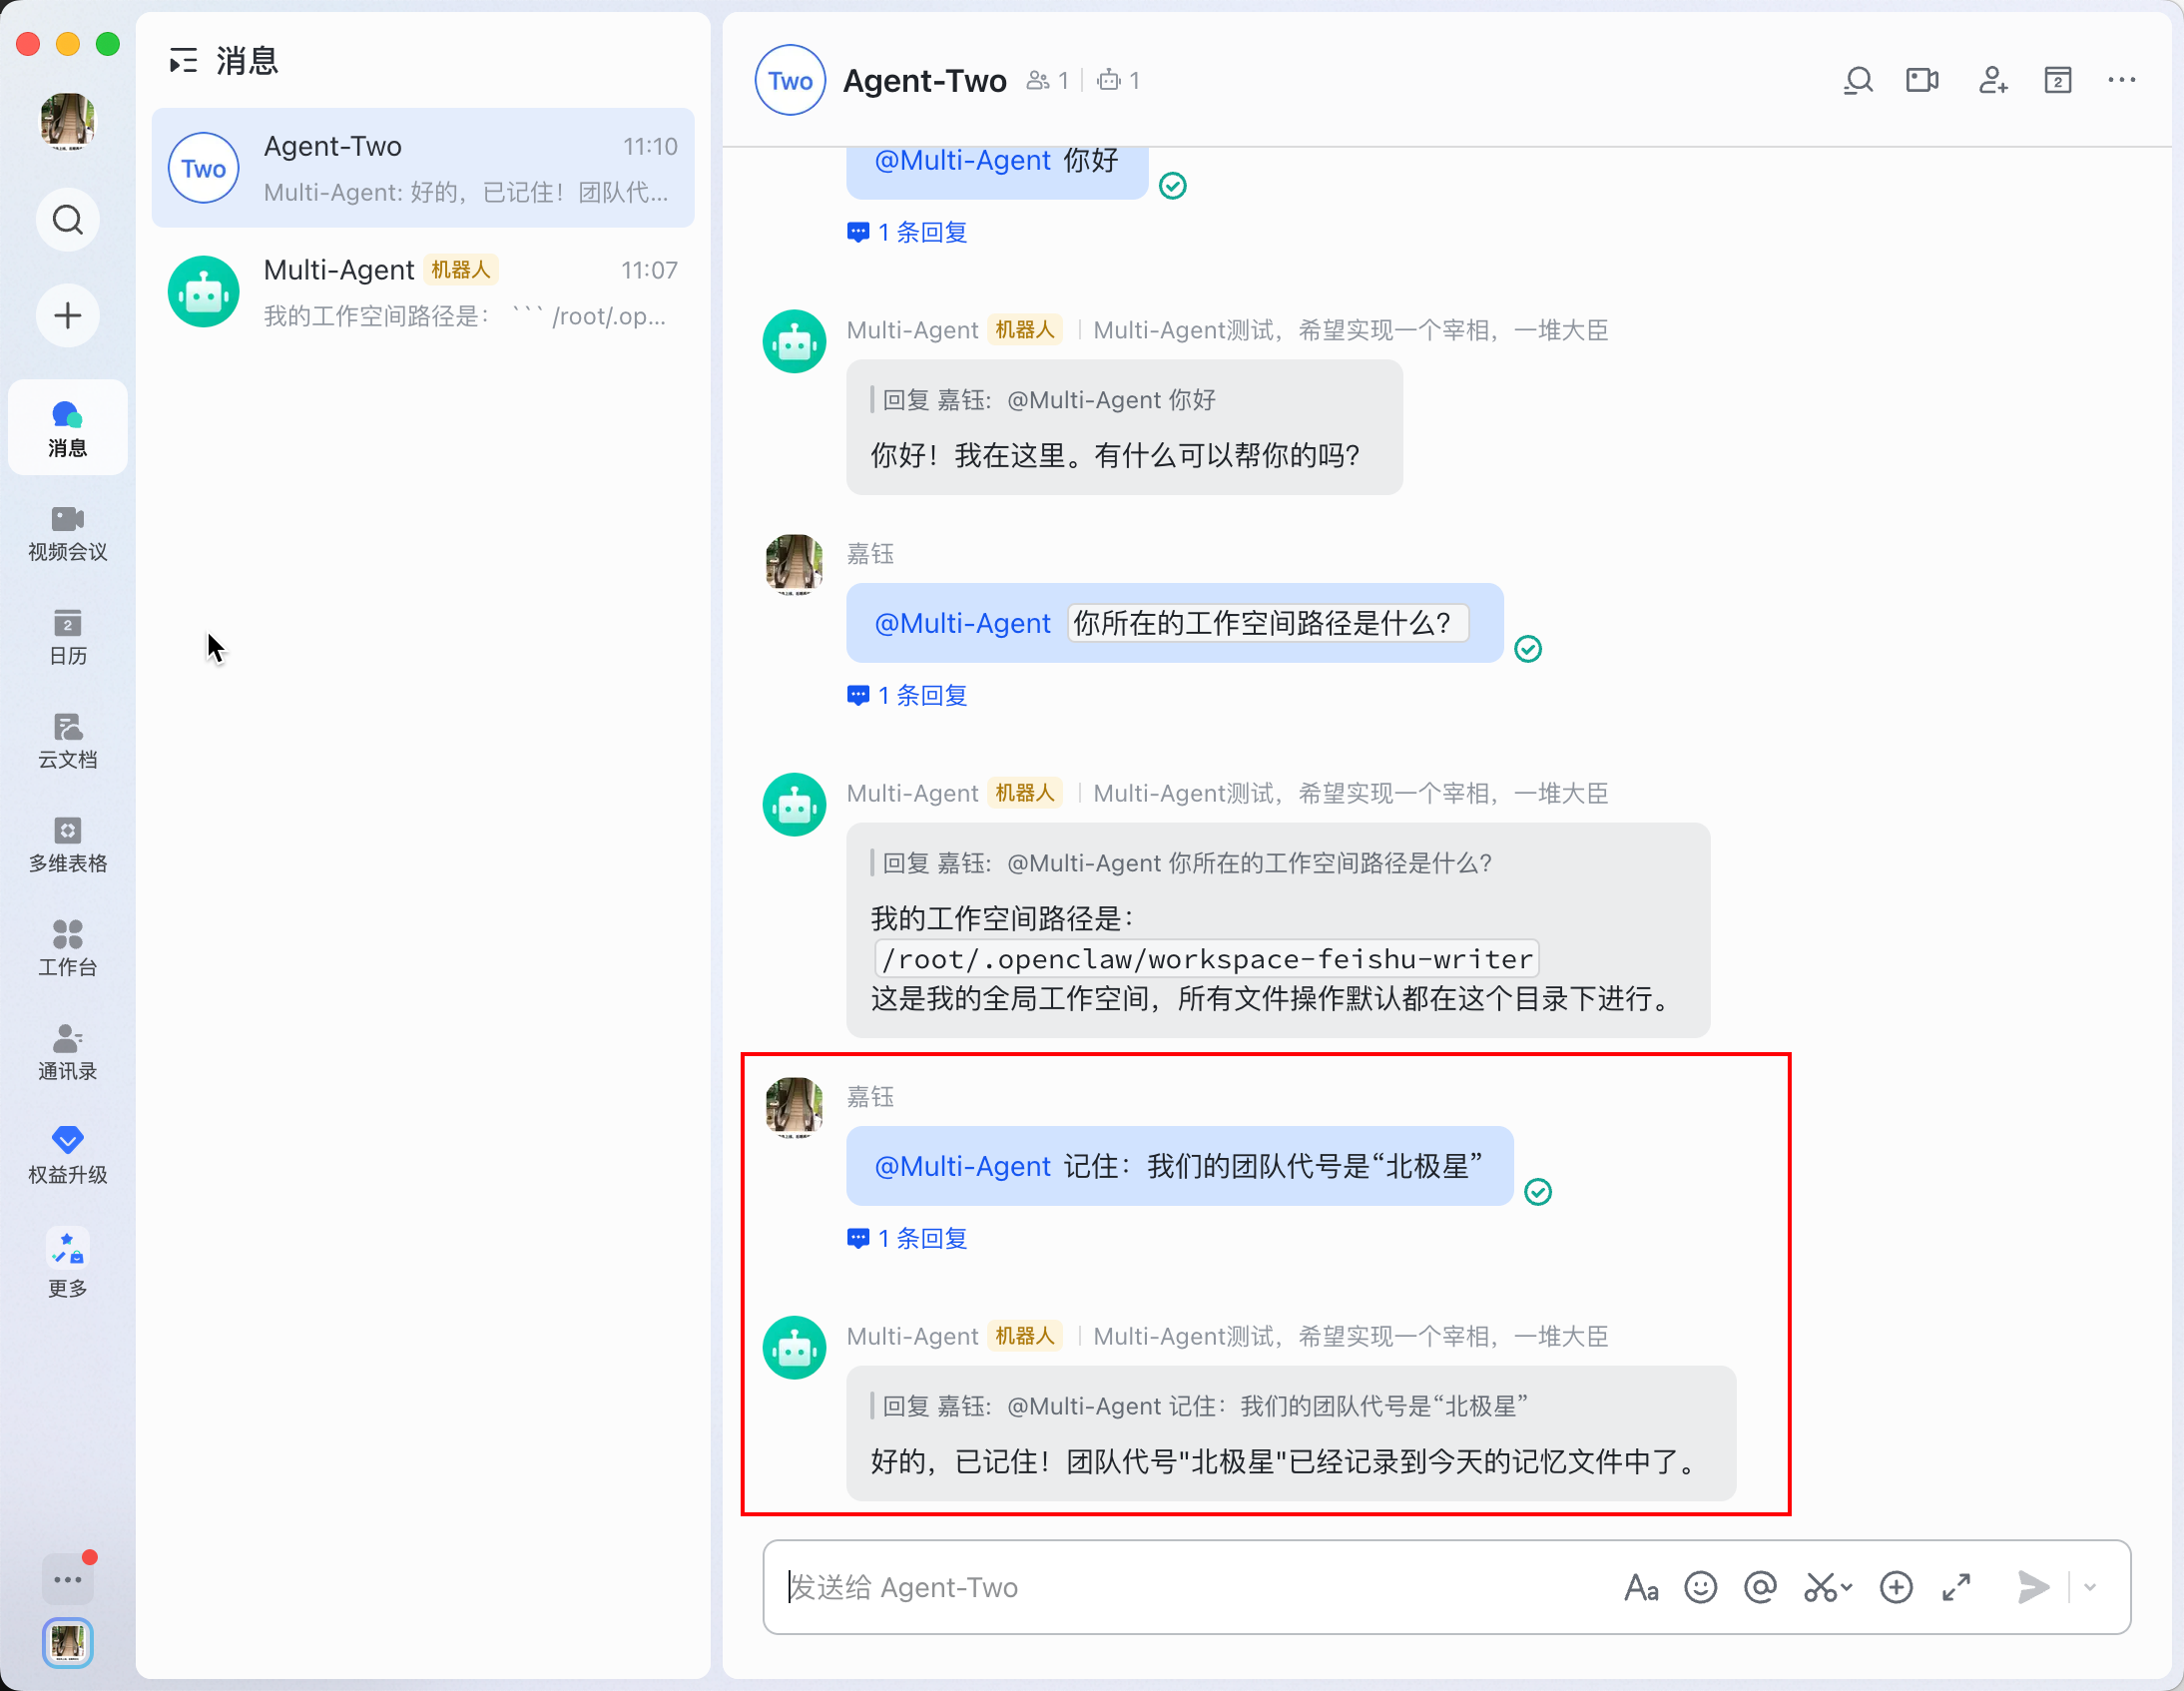
- In private chat, ask the bot:
Do you remember our team code name? - Verify that the main Agent cannot access information from the group.
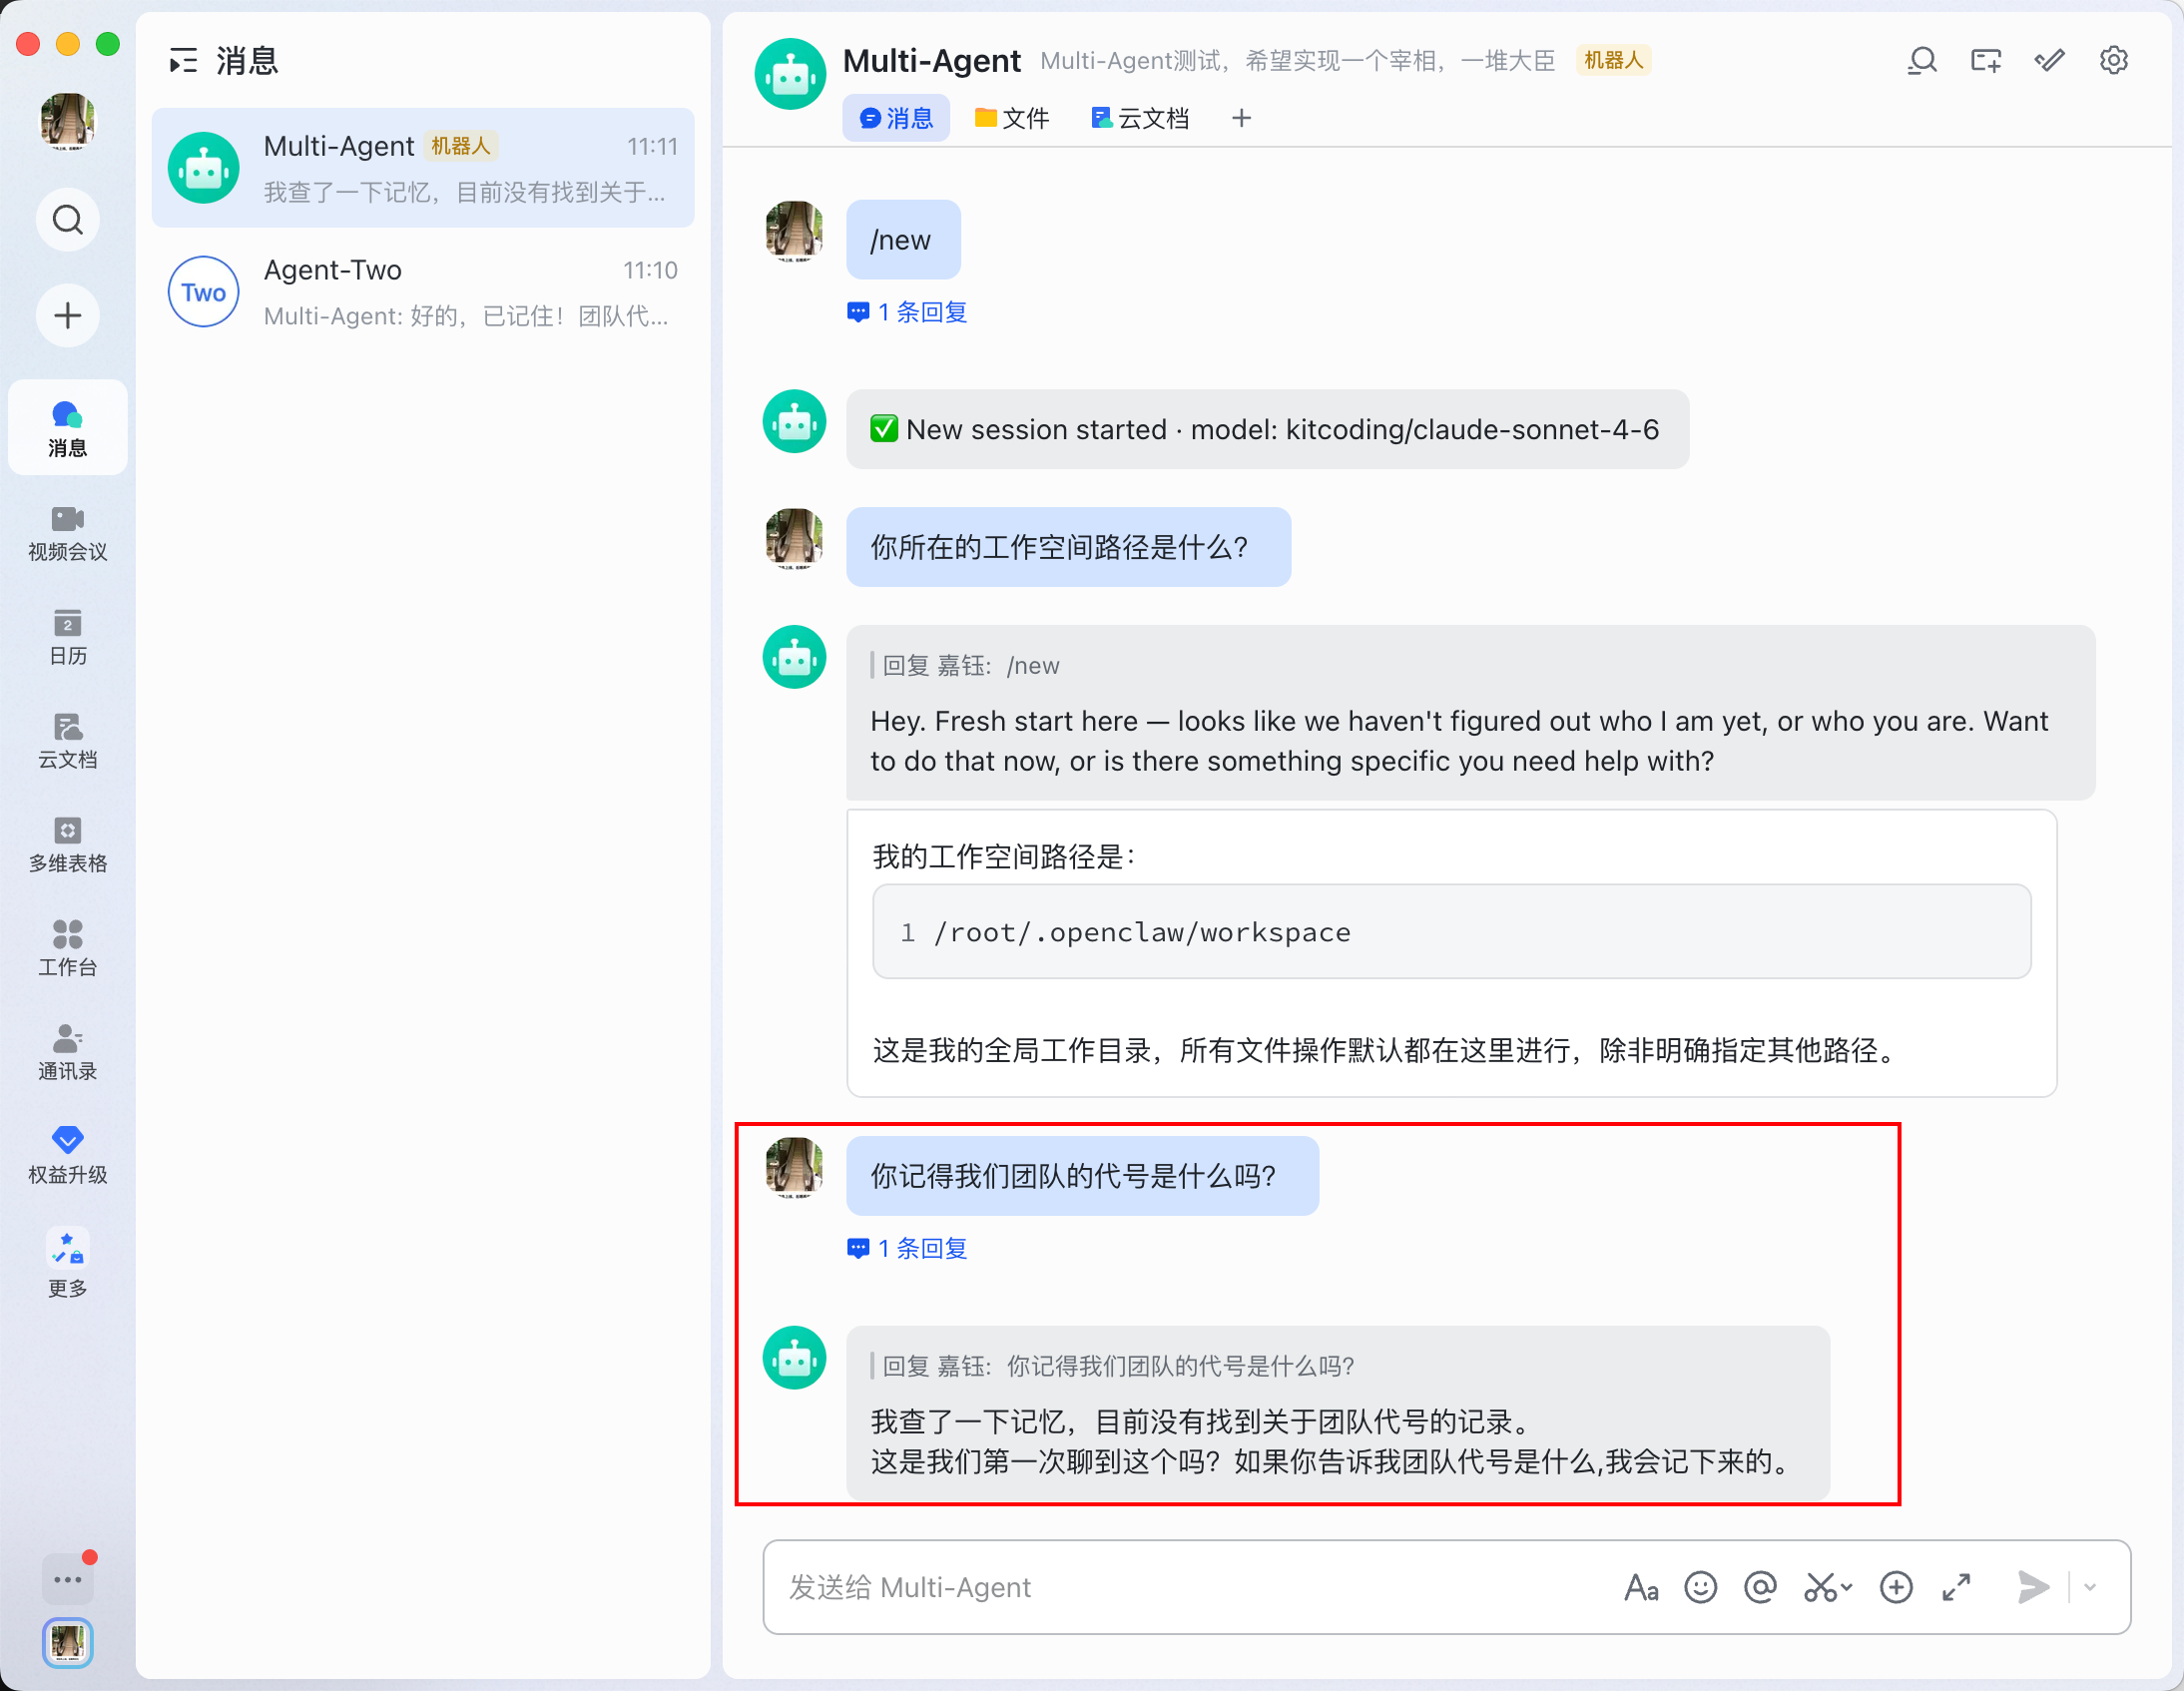
✅ Success: If the main Agent replies with “I don’t know” or something similar, the independent Agent and the main Agent are fully isolated, and the configuration is successful.
Troubleshooting
Problem 1: Gateway Fails to Start
If the Gateway fails to start, first check whether the configuration file format is correct:
cat ~/.openclaw/openclaw.json | python3 -m json.tool
If it returns a JSON parsing error, fix the configuration file according to the error message.
If the configuration file format is correct but the Gateway still cannot start, restore the backup configuration:
cp ~/.openclaw/openclaw.json.backup.YYYYMMDD_HHMMSS ~/.openclaw/openclaw.json
openclaw gateway restart
Problem 2: The Bot Does Not Respond in the Group
Check the Gateway logs for error messages:
openclaw logs --follow
Common causes:
- The conversation ID was not configured correctly in
bindings. - The conversation ID was not added to
groupAllowFrom. - The bot was not added to the group correctly.
Problem 3: Agent Isolation Does Not Work
Check whether the bindings configuration is correct:
openclaw agents list --bindings
Make sure that:
agentIdmatches the Agent ID shown byopenclaw agents list.peer.idis the correct conversation ID.
Problem 4: Configuration Commands Fail
If you encounter a JSON format error while running openclaw config set --json, make sure that:
- The JSON format is correct, especially quotation marks and commas.
- Strings use double quotes.
- There is no trailing comma after the last element of an array.
📝 Note: If you are not sure whether the JSON format is correct, you can validate it with an online JSON validation tool, or temporarily use openclaw config set to test a single field first.
Advanced Operations
After completing the above configuration, you can explore additional capabilities for your Feishu group:
- Configure a custom model for the independent Agent to provide different AI capabilities.
- Create multiple independent Agents for different teams, each with its own dedicated AI assistant.
- Configure the Agent’s skills and permissions to provide more precise service.
Configure a Custom Model for the Agent
If you need a specific model for the independent Agent, you can specify it when creating the Agent:
openclaw agents add --workspace /root/.openclaw/workspace-feishu-writer --model kitcoding-openai/z-ai/glm4.7 feishu-writer
Configure Different Agents for Multiple Groups
If you need separate Agents for multiple Feishu groups, repeat the above steps:
- Create an independent Agent for each group.
- Add multiple group bindings in
bindings. - Add multiple conversation IDs to
groupAllowFrom.
Configuration example:
openclaw config set --json bindings '[
  {
    "agentId": "feishu-writer",
    "match": {
      "channel": "feishu",
      "peer": {
        "kind": "group",
        "id": "oc_e4dfb35658c81ce5100add124c3592a8"
      }
    }
  },
  {
    "agentId": "feishu-operations",
    "match": {
      "channel": "feishu",
      "peer": {
        "kind": "group",
        "id": "oc_9f23c45769d92df621Bee02350c4603d"
      }
    }
  }
]'

openclaw config set --json channels.feishu.groupAllowFrom '[
  "oc_e4dfb35658c81ce5100add124c3592a8",
  "oc_9f23c45769d92df621Bee02350c4603d"
]'
Frequently Asked Questions
Q: Can I configure multiple Agents for a single group?
A: Currently, OpenClaw does not support binding multiple Agents to a single group. Each group can be bound to only one Agent, but you can configure different Agents for multiple different groups.
Q: Does an independent Agent inherit the main Agent’s configuration?
A: An independent Agent does not inherit the main Agent’s configuration. It has a completely independent workspace, memory, and state. However, it can inherit the default model and default workspace path from agents.defaults.
Q: Can I move an already configured Agent to another group?
A: Yes. You only need to change the peer.id in bindings to the new conversation ID, update groupAllowFrom, and restart the Gateway. Note that data from the original group is not migrated automatically to the new group.
Q: Is command-line configuration more complicated than manually editing the configuration file?
A: For beginners, using openclaw agents add and openclaw config set is simpler and safer than editing the configuration file manually with editors like nano. These commands automatically handle configuration formatting and reduce the chance of mistakes.
Q: What if I want to delete a configured Agent?
A: Use the following command to delete the Agent:
openclaw agents delete feishu-writer
This command deletes the Agent configuration as well as the related workspace and state data.
Join the User Community Group
You are welcome to scan the code to join the OpenClaw user community group, share your experience and questions, and explore more OpenClaw use cases with other developers.

🚀 Developer Community & Support
1️⃣ OpenClaw Developer Community
Unlock advanced tips on Discord
Click to join the community
Note: After joining, you can get the latest plugin templates and deployment playbooks
2️⃣ Dedicated Support
Join WhatsApp / WeCom for dedicated technical support
| Channel | Scan / Click to join |
|---|---|
| WhatsApp Channel |

|
| WeCom (Enterprise WeChat) |

|
Learn more on the official page: Tencent Cloud OpenClaw