You can detach a cloud disk used as a data disk from a Lighthouse instance and reattach it to another Lighthouse instance. This document describes how to detach a cloud disk in the Lighthouse console. Note that detaching a cloud disk will not clear the disk data.
Considerations
Only cloud disks that are used as data disks can be detached, and the system disks cannot be detached.
It's recommended that you run the umount command (for Linux instances) or make the cloud disk offline (for Windows instances) before detaching the disk. Otherwise, the cloud disk may not be recognized when it's reattached to the Lighthouse instance.
Directions
Preparations
You need to run the umount command (for Linux instances) or make the cloud disk offline (for Windows instances) before detaching the disk.
Windows instances
Linux instances
To prevent data loss, we recommend that you suspend read and write operations on all file systems of the disk. Otherwise, data that has not been read or written will be lost.
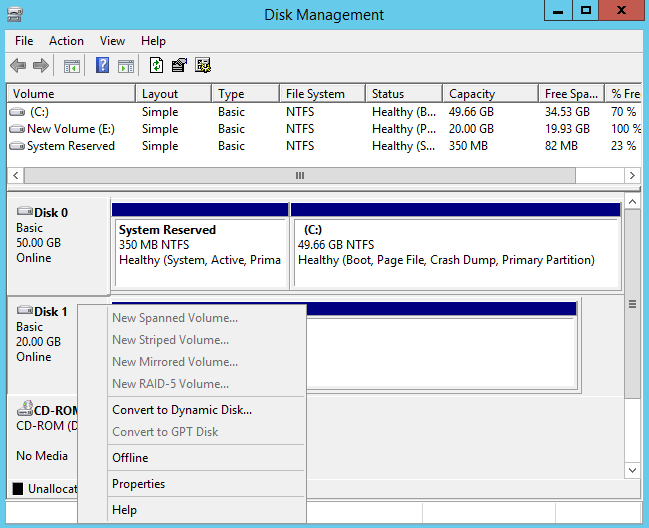
When detaching a cloud disk, you must first set the disk to offline status. Otherwise, you may not be able to reattach the cloud disk unless you restart the Lighthouse instance.
on the lower left corner of the desktop, and select Disk management in the pop-up menu.
3. In the Disk management window, right-click the Disk 1 area and select Offline from the menu list.
If you detach the disk directly from the console without running the umonut, the problem shown below may occur upon the instance shutdown or start-up:
If you have enabled the auto-attaching, please modify the /etc/fstab file to prevent the disk from being attached automatically when the instance starts up again.
If you have created a Logical Volume Manager (LVM) in aLighthouse instance, detaching the disk directly in the console without run the umonut command may cause some device data to remain in memory. A system error occurs when an application inside the instance attempts to traverse or access the device.
Assume that you have created a logical volume /dev/test/lv1 based on /dev/vdb1 and mounted it into the /data directory. Then, do the following:
1.1 Run the following command to unmount the disk mount point.
sudoumount /data
1.2 Run the following command to remove the Logical Volume (LV). If there are multiple LVs, remove all LVs in sequence.
sudo lvremove /dev/test/lv1
1.3 Run the following command to remove the volume group.
sudo vgremove test
1.4 Run the following command to remove the physical volume.
sudo pvremove /dev/vdb1
Detaching the cloud disks in the console
You can detach the cloud disks in the following ways:
Detach on the cloud disk page
Detach on the instance details page
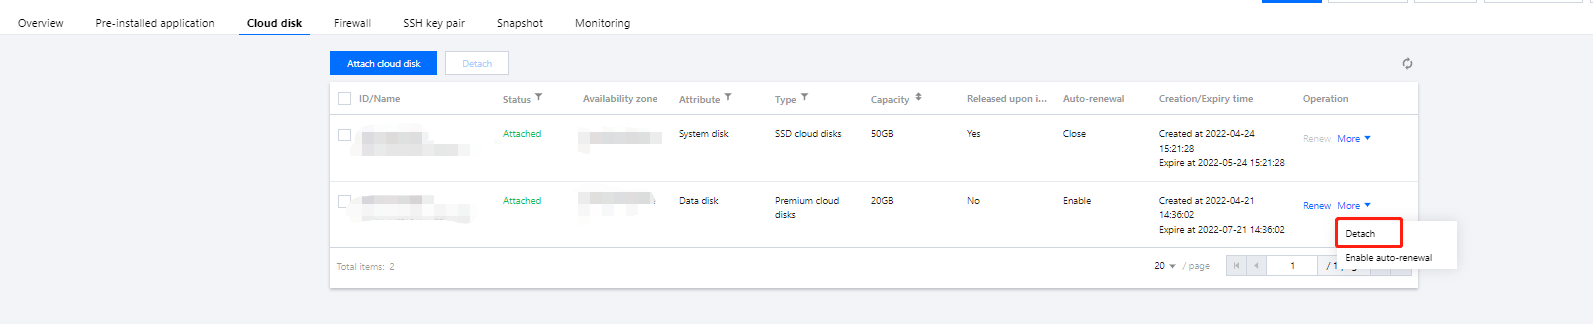
1. Log in to the Lighthouse console and click Cloud Disk on the left sidebar.
2. Select a region at the top of the Cloud disk page, find the target cloud disk, and click More > Detach.
To detach multiple cloud disks at the same time, select the target cloud disks, and click Detach at the top of the page.
3. In the pop-up Detach cloud disks window, confirm the information and click OK.
Once detached, the cloud disks go to To be attached status.
1. Log in to the Lighthouse console and select the target instance and enter the details page.
2. Select the Cloud disk tab, find the target cloud disk, and click More > Detach under the "Operation" column.
To detach multiple cloud disks at the same time, select the target cloud disks, and click Detach at the top of the page.
3. In the pop-up Detach cloud disks window, confirm the information and click OK.
After the detachment is successful, you cannot see the disk in the Cloud disk tab of the instance. You can view that the cloud disk status is "To be attached" on the Cloud Disk page.