In real-world business scenarios, enterprises often need to deploy OpenClaw on their own servers (such as Tencent Cloud Lighthouse) to perform tasks like browser automation and complex operations. With the Lighthouse OpenClaw Connector plugin provided by Tencent Cloud ADP, you can securely and stably connect Intelligent Agents built on ADP with OpenClaw robots deployed on Lighthouse, enabling remote capability invocation without complex network configurations.
Step 1: Deploy OpenClaw Service
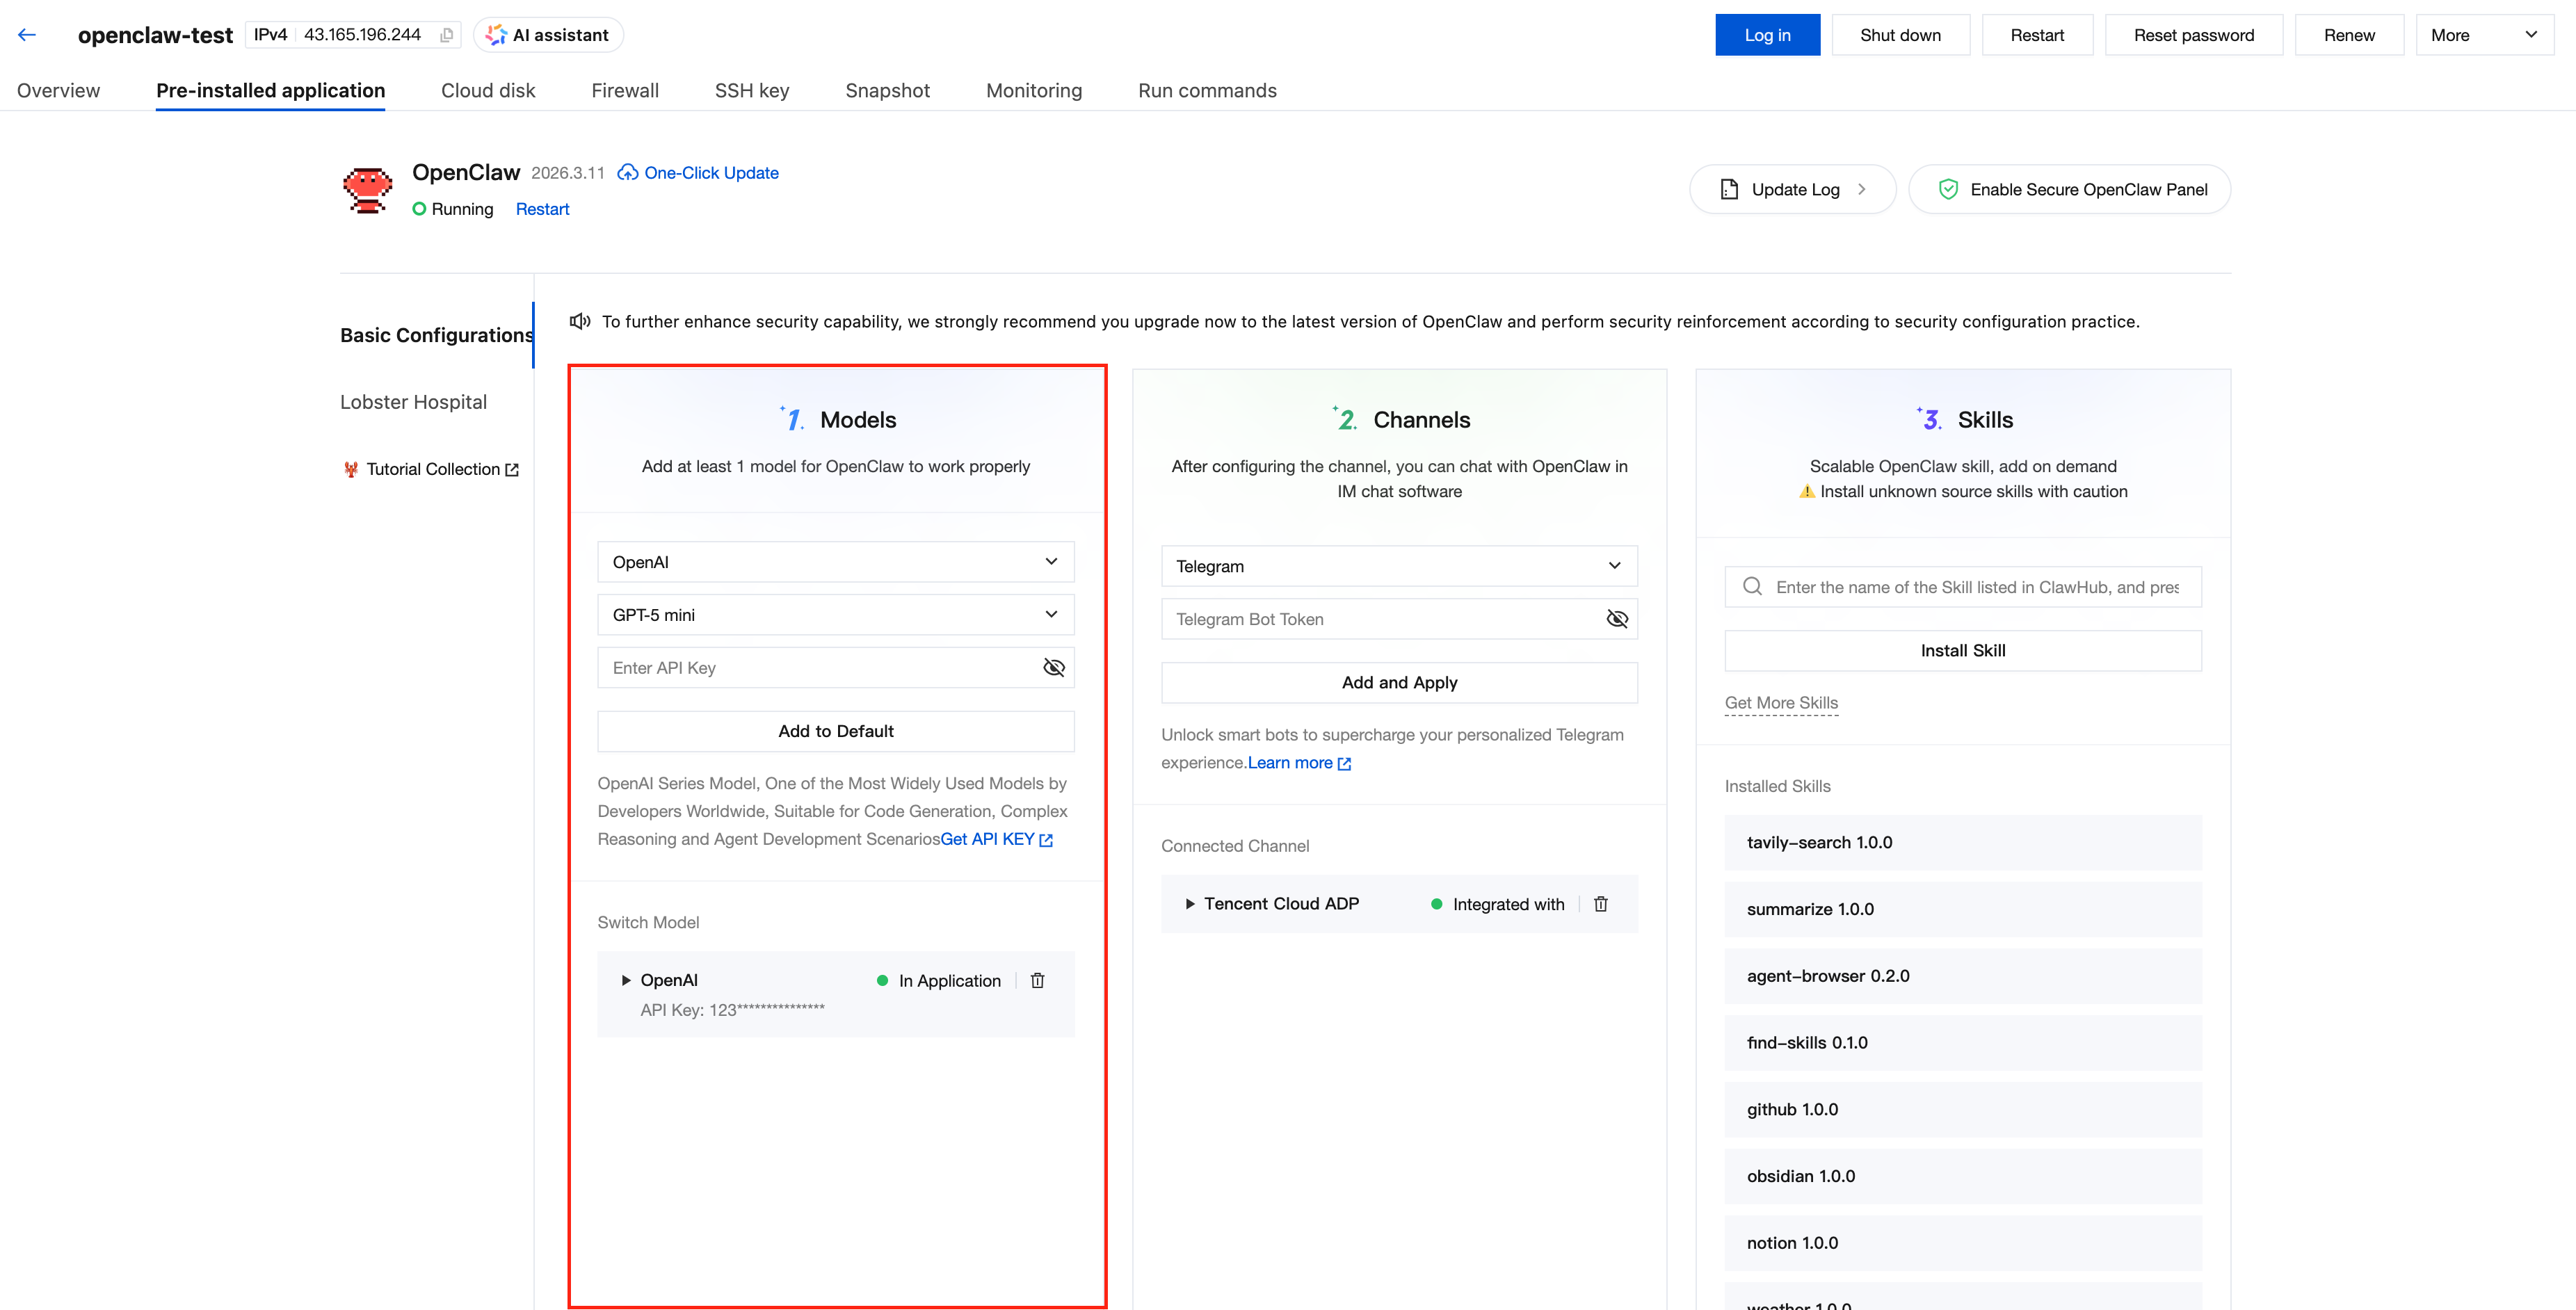
2. Under Model Configuration, configure the model API Key.
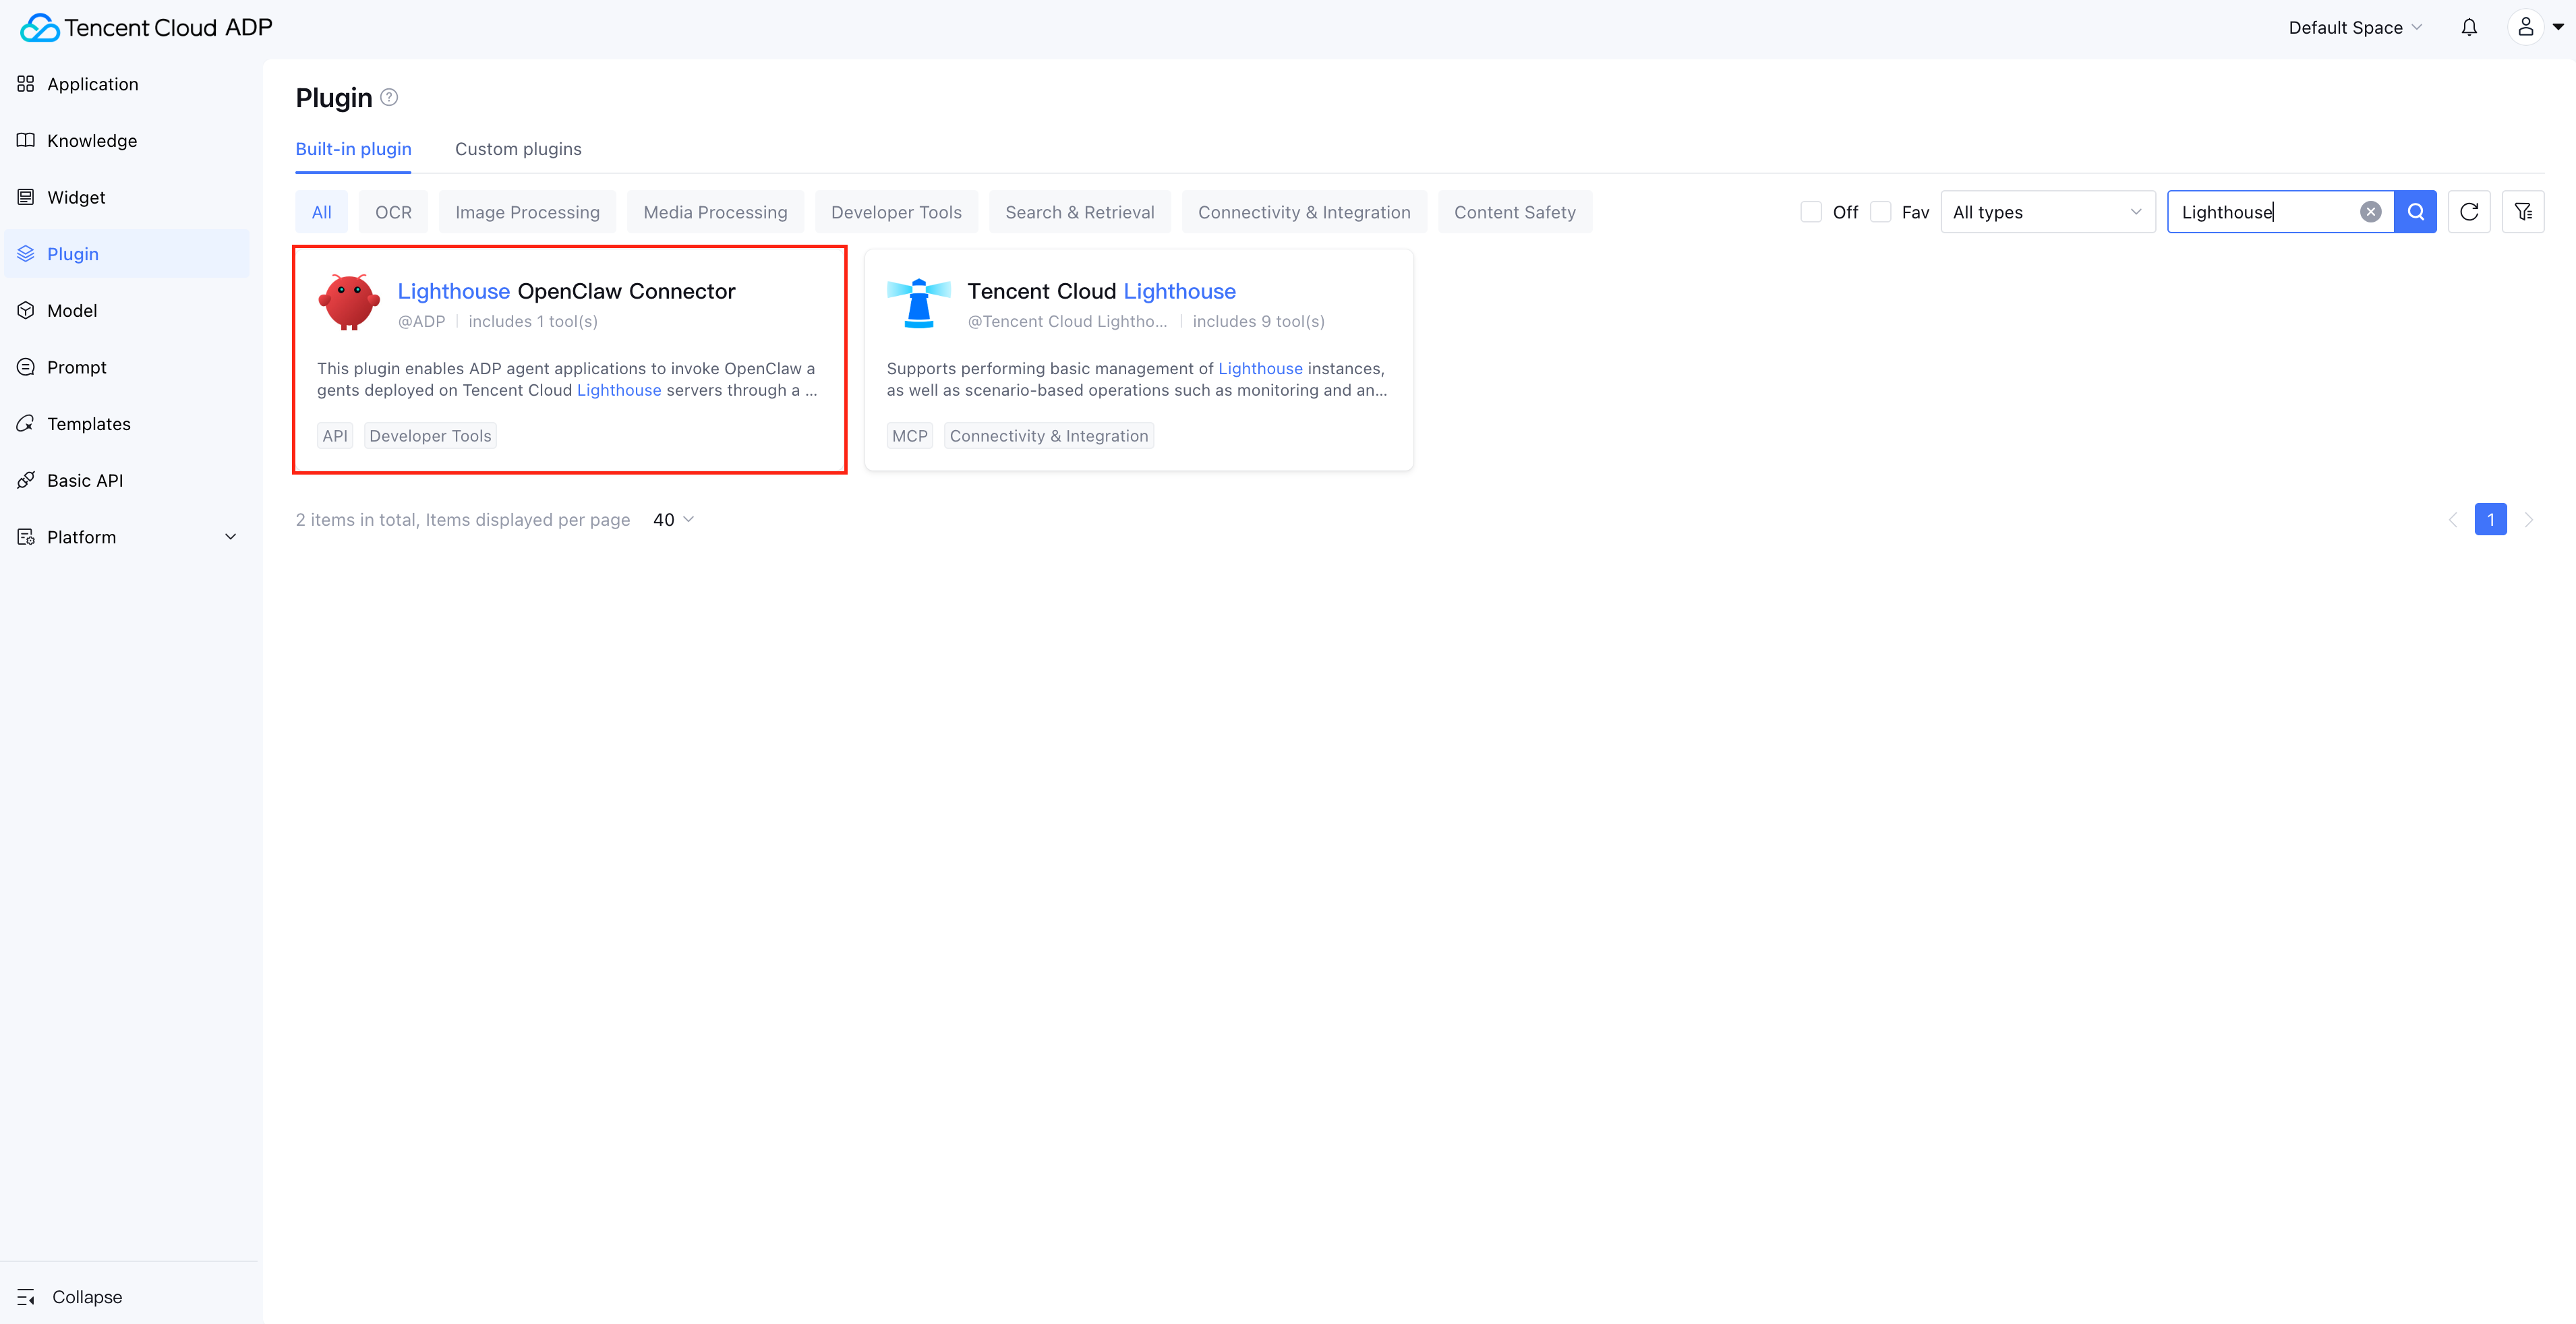
Step 2: Locate the Lighthouse OpenClaw Connector plugin in Tencent Cloud's Intelligent Agent development platform
2. In the left menu bar, select Plugin.
3. Locate the plugin "Lighthouse OpenClaw Connector".
4. Click the card to go to the details page.
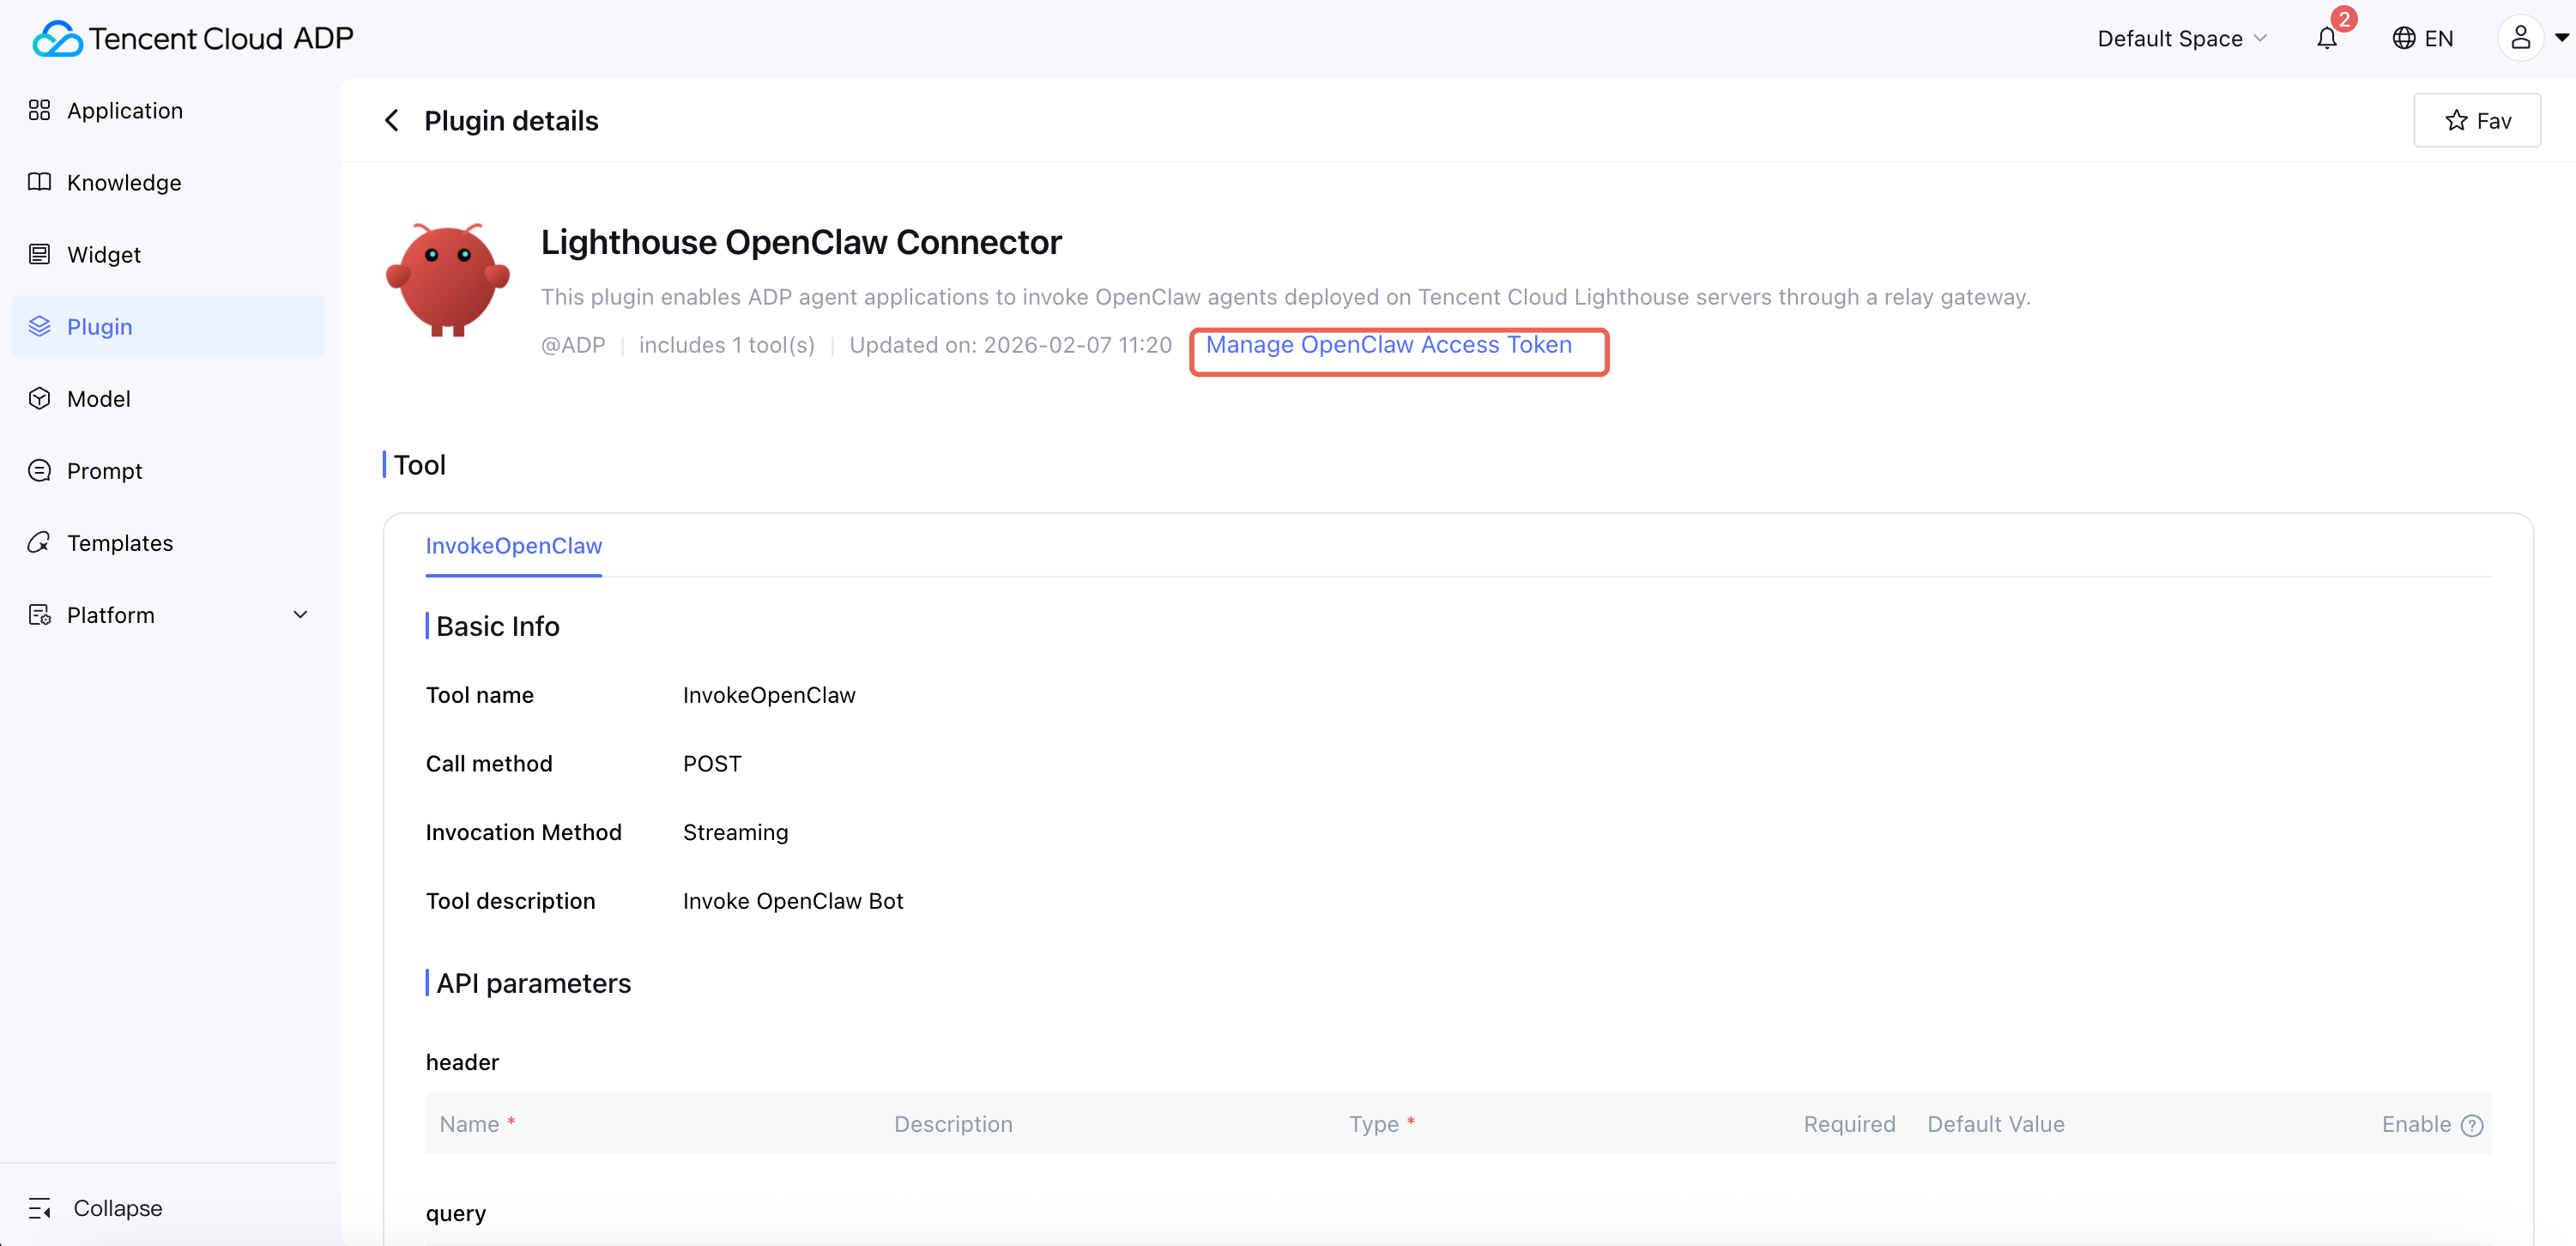
Step 3: Obtain OpenClaw access Token
To ensure connection security, we need to generate access credentials on the ADP platform and verify them on the OpenClaw end.
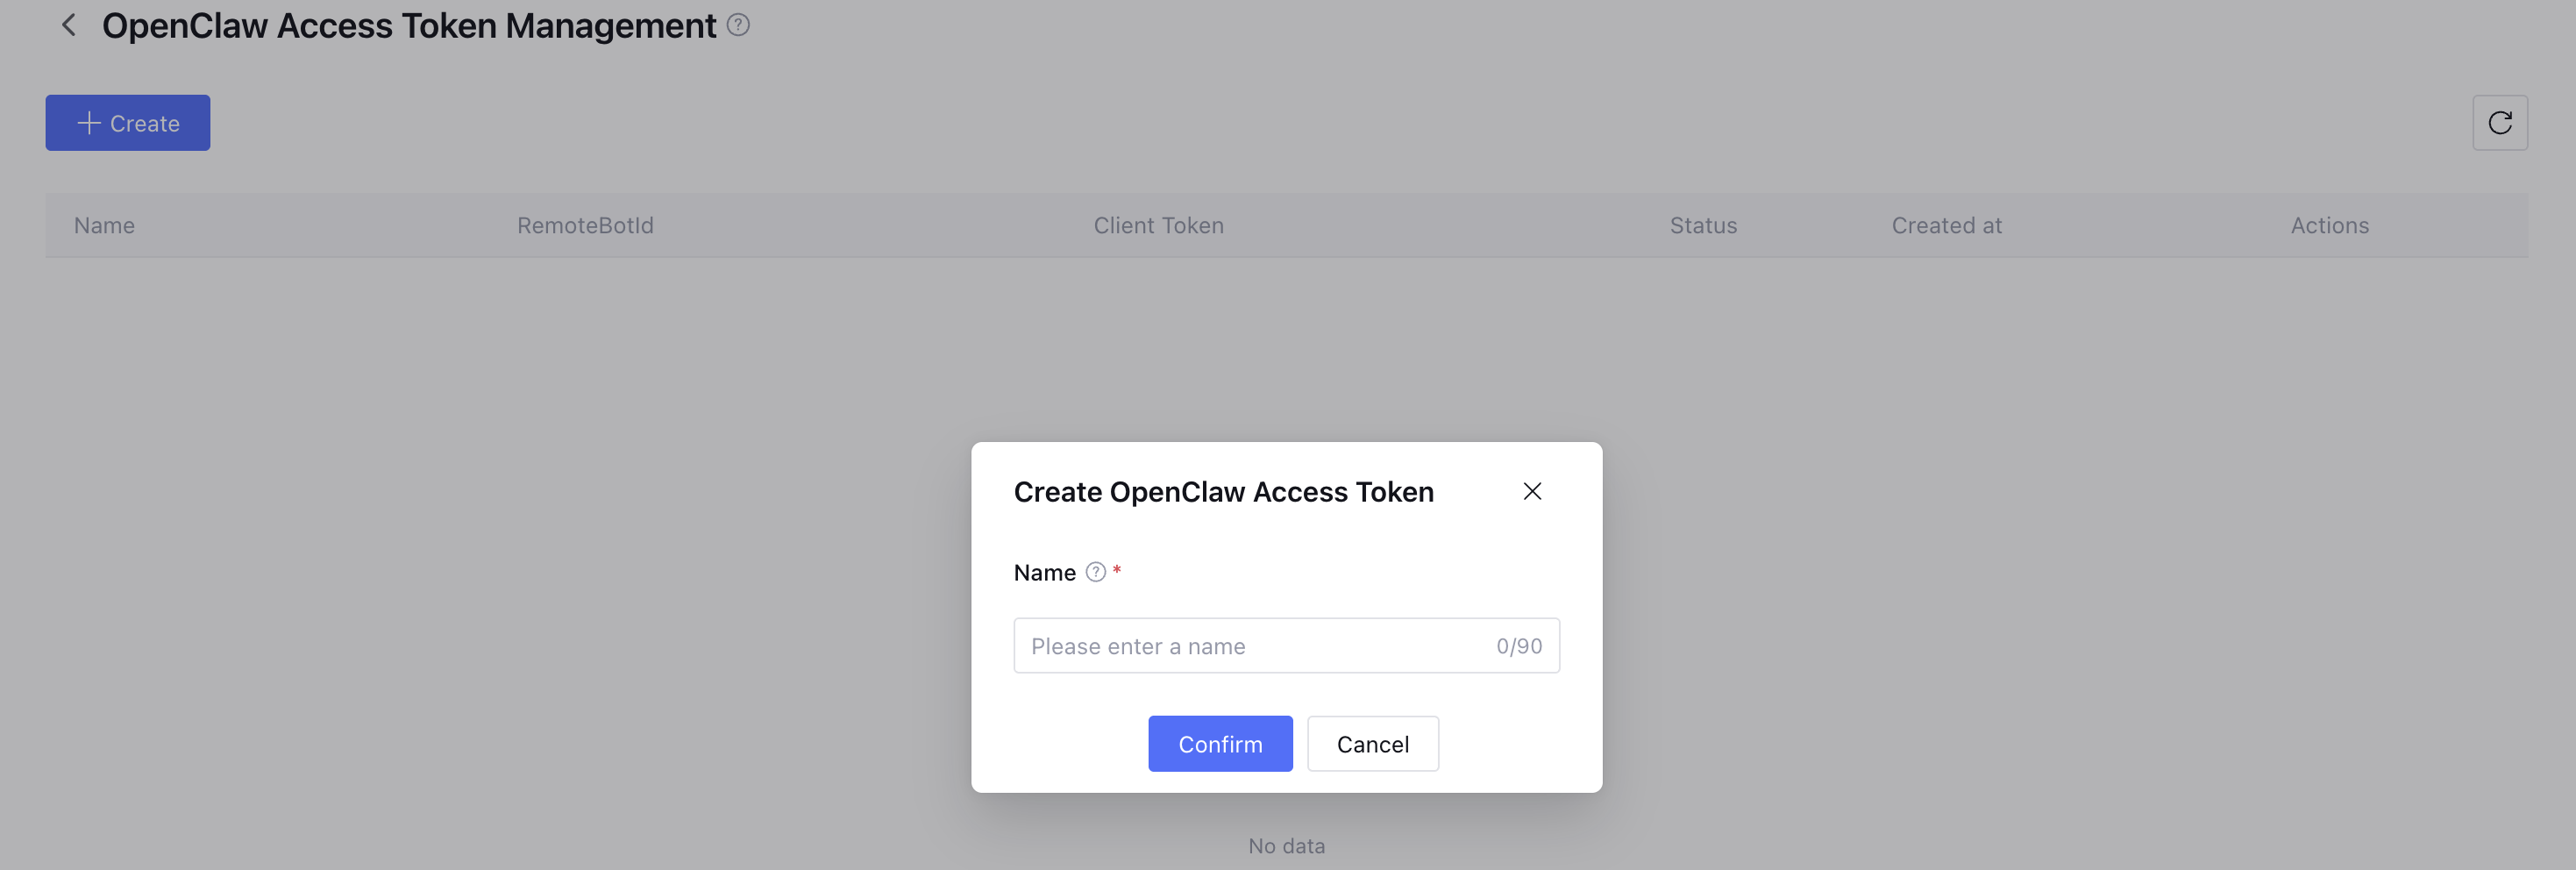
1. On the plugin details page, click Manage Openclaw Access Token.
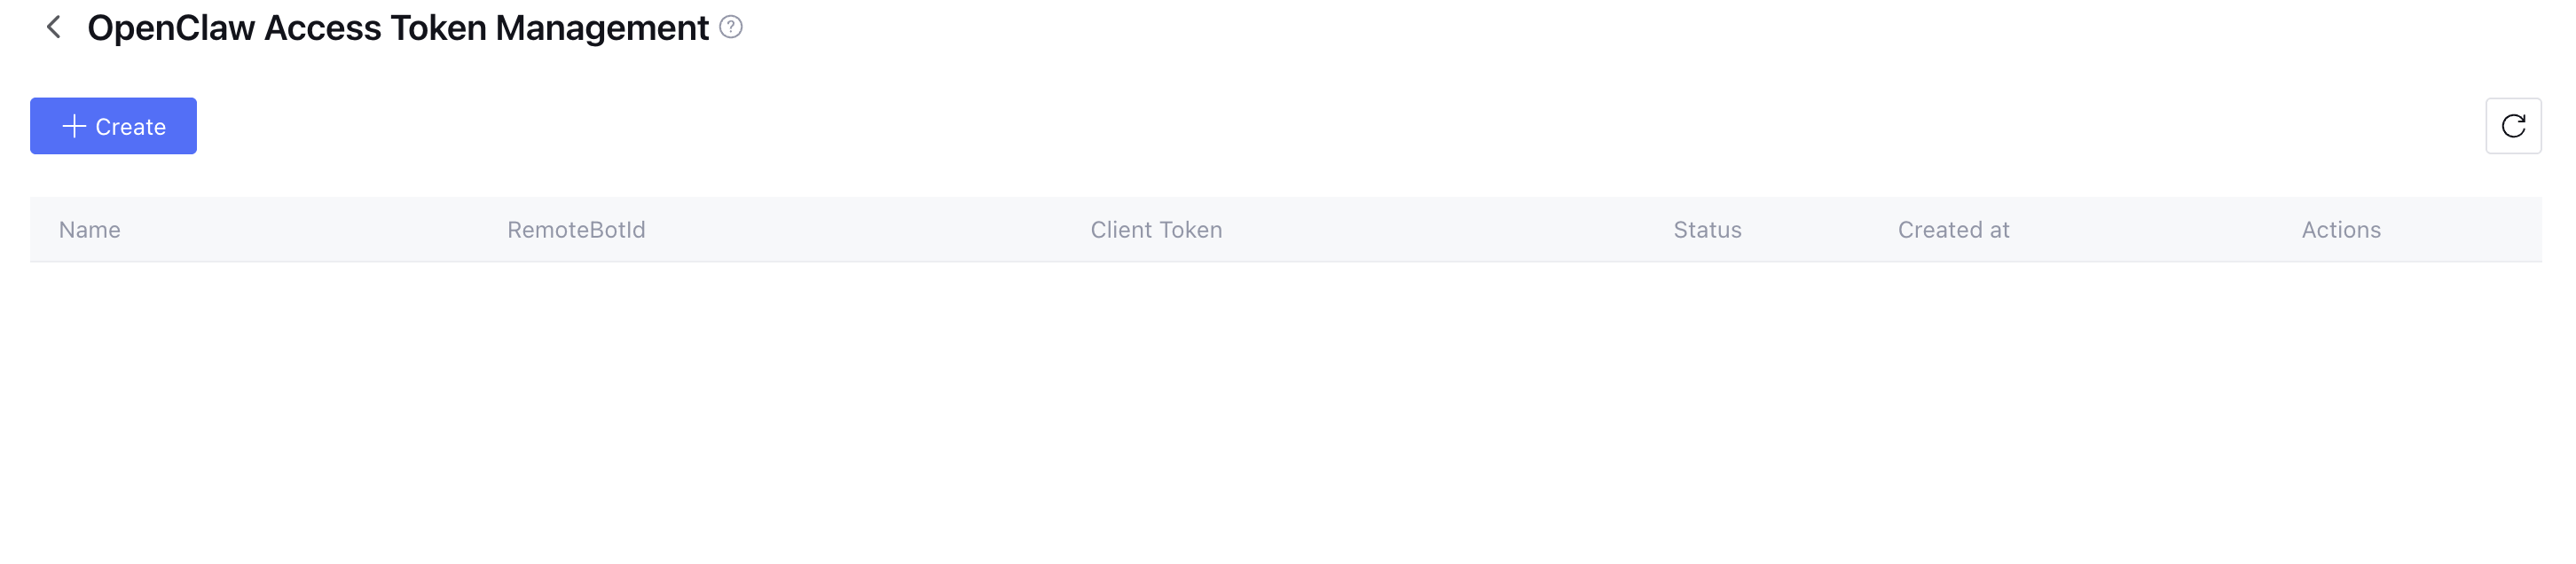
2. In the pop-up management page, click Create.
3. After reading and agreeing to the User Agreement, enter the OpenClaw access Token name and click Confirm.
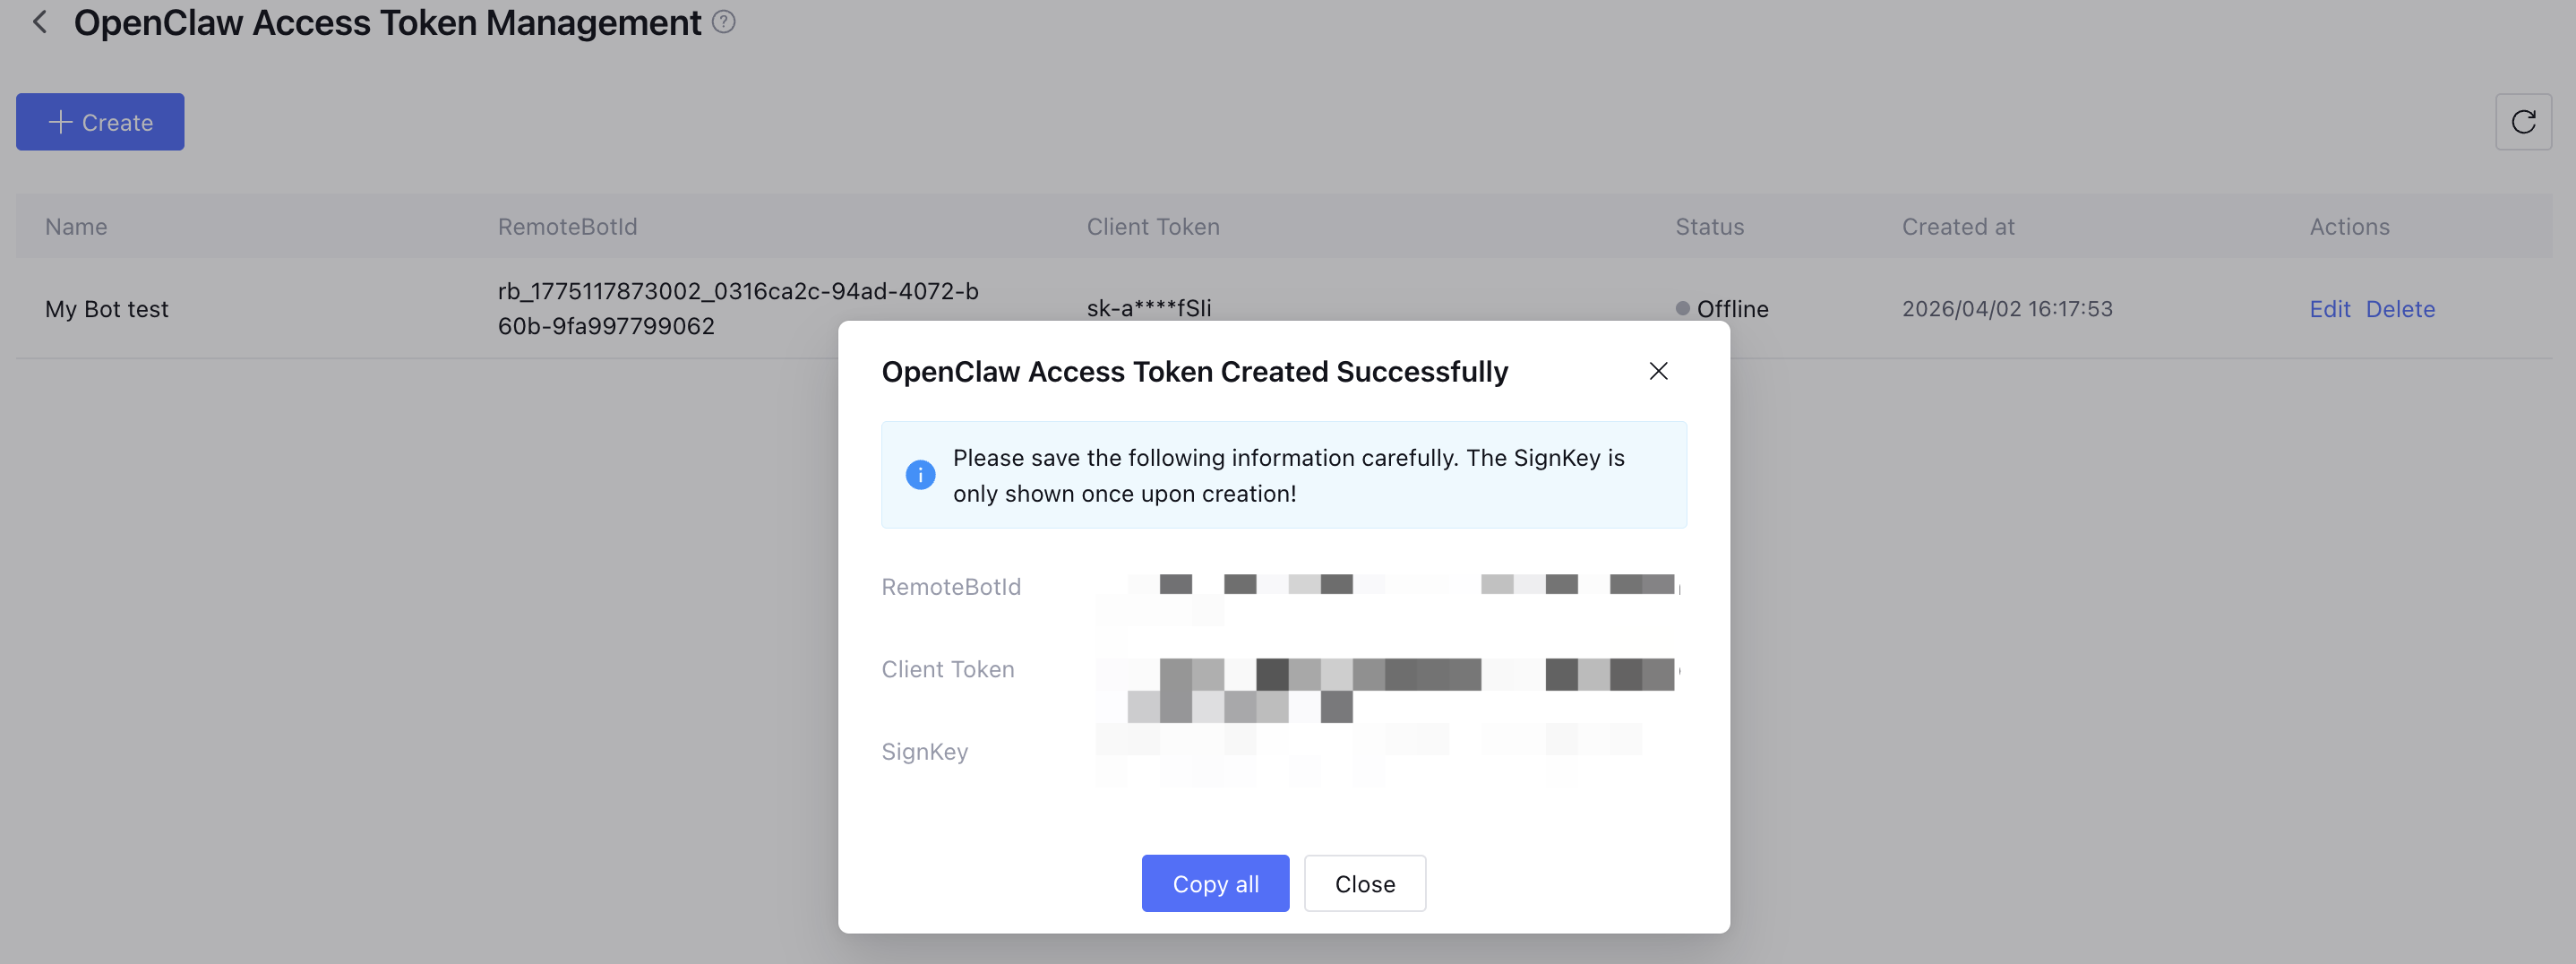
4. After creation is complete, the system will generate RemoteBotId, Client Token, and SignKey.
Be sure to immediately copy and save this information.
The SignKey is displayed only once upon creation and cannot be viewed again after closing the pop-up window.
Step 4: Configure the OpenClaw channel
4.1. Configuration Guide for Newly Purchased Lighthouse Machines (Purchased on or after 2026/3/31)
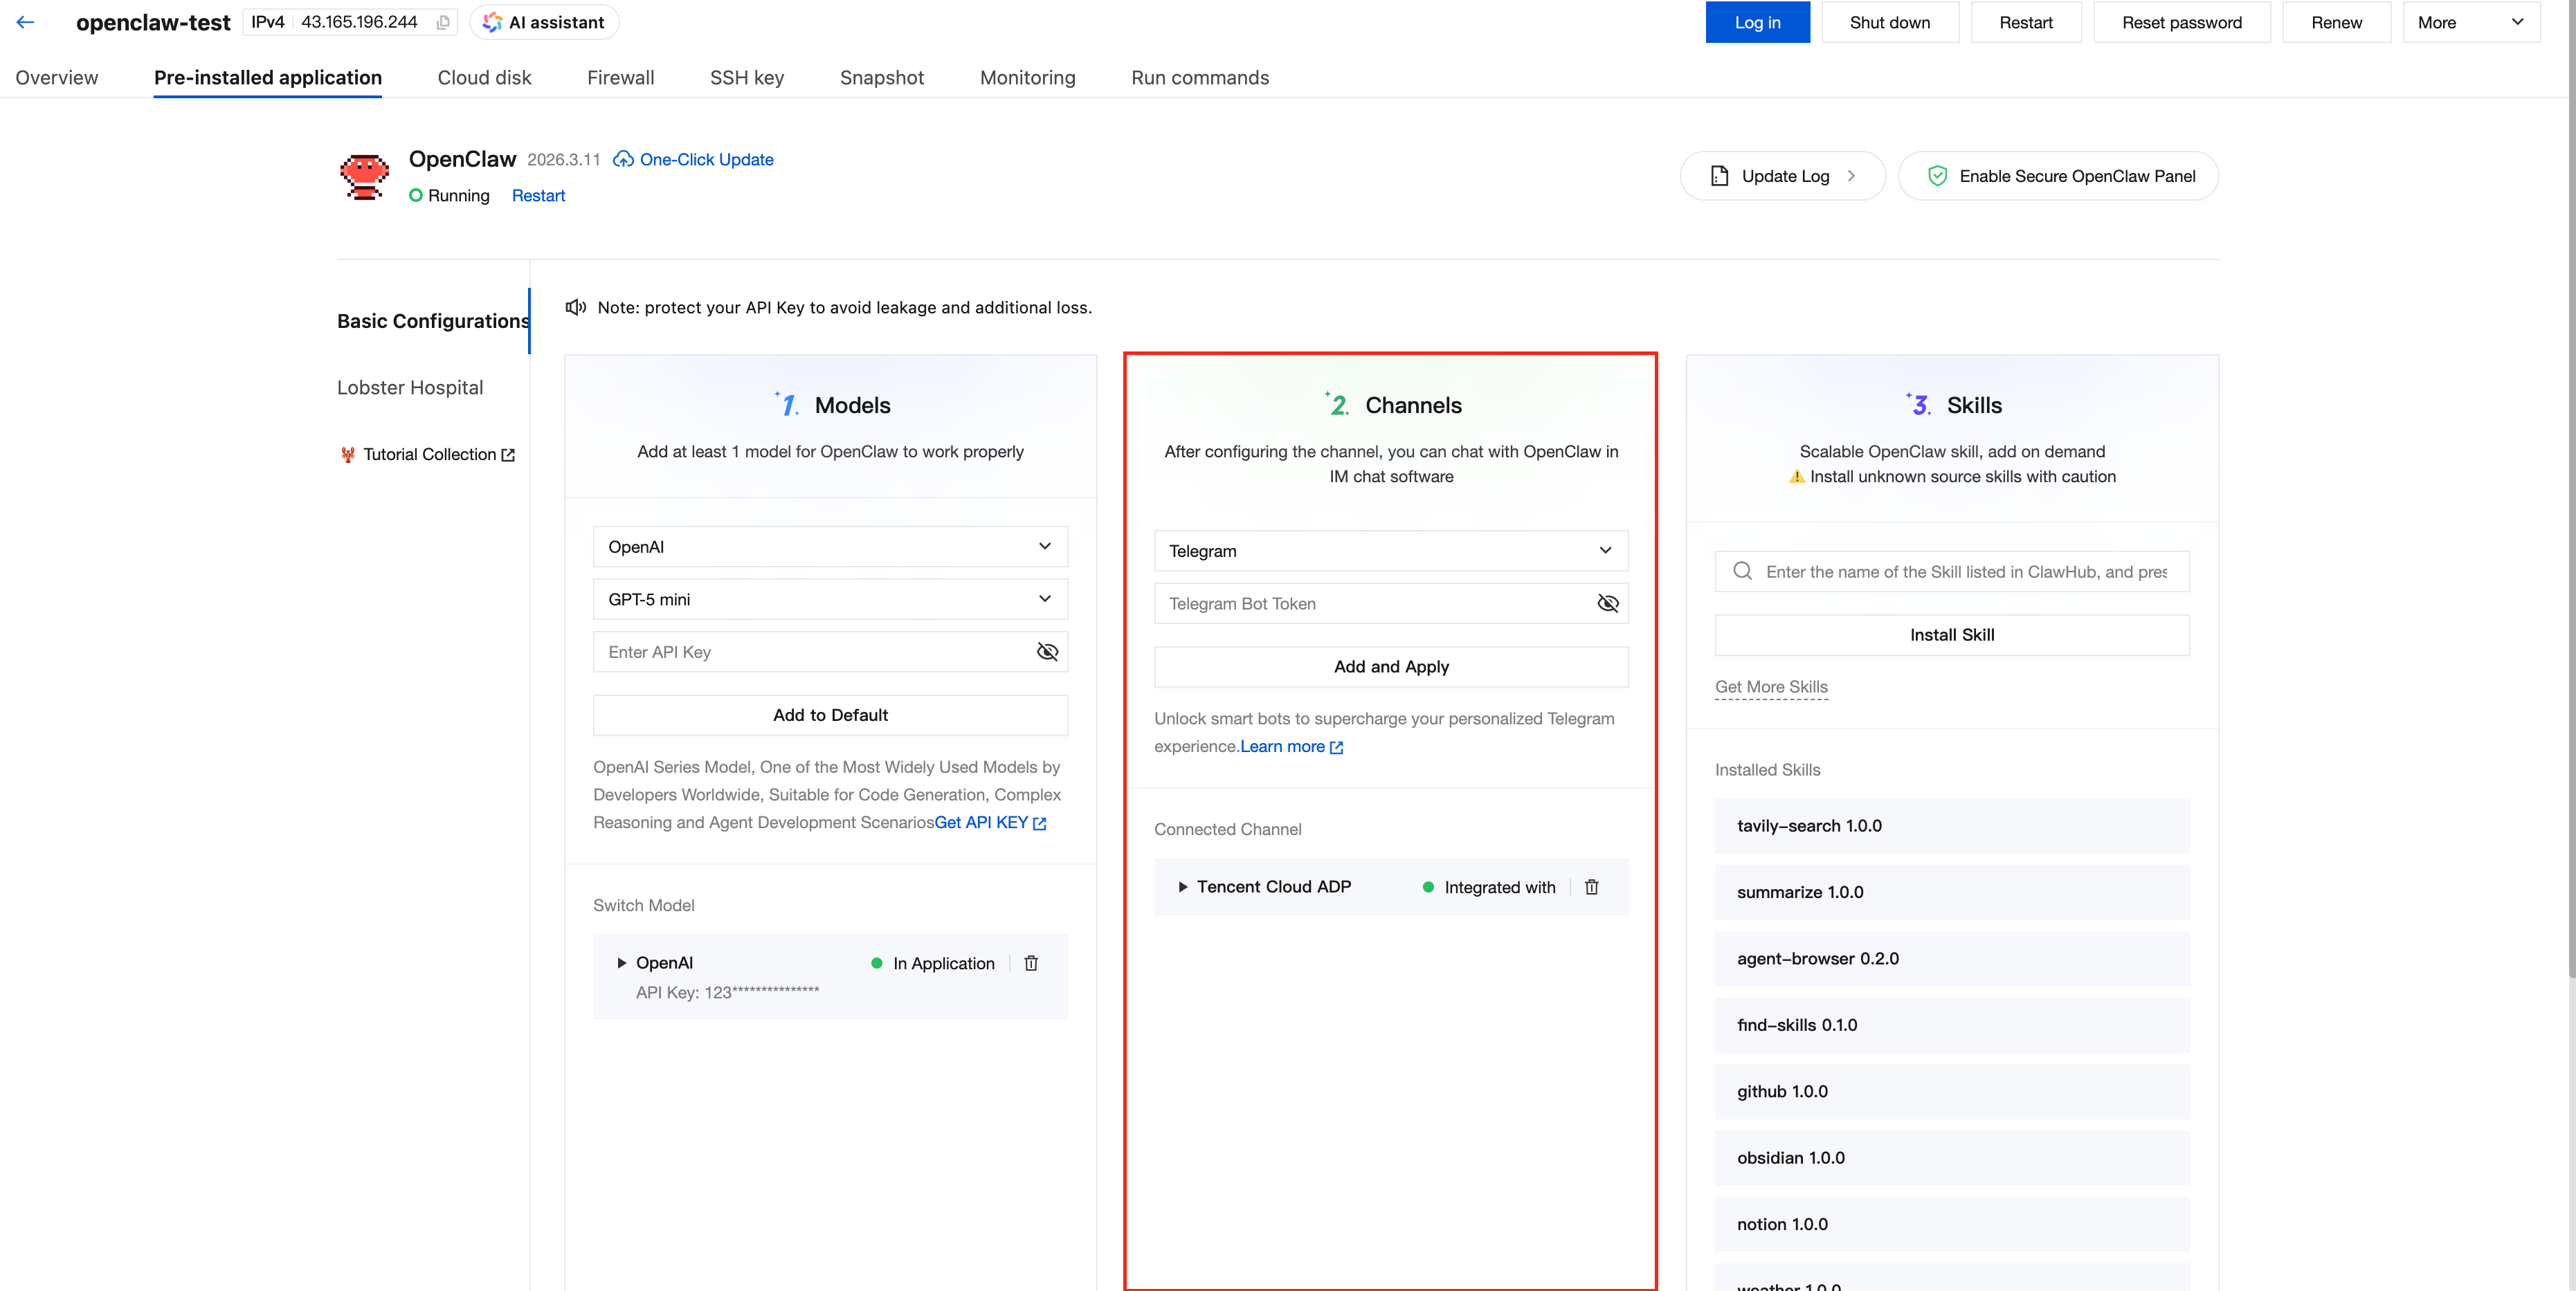
Go to the Application Management tab, in the "Channel Configuration" input box, select "Tencent Cloud ADP" and enter the ClientToken and SignKey of the RemoteBot obtained in the previous steps, and click the Add and Apply button. After a wait of several tens of seconds, the page prompts "Save Successful", indicating that the configuration is complete.
Note:
A pair of ClientToken and SignKey from ADP can only be configured for one OpenClaw service. If the pair is configured for multiple OpenClaw services, ADP cannot guarantee which one will successfully connect.
After the configuration is complete, check the OpenClaw status on the OpenClaw Token Management page of the Tencent Cloud ADP. If it shows "Online", it indicates that the configuration is successful.
4.2. Configuration Guide for Existing Lighthouse Machines (Purchased before 2026/3/31)
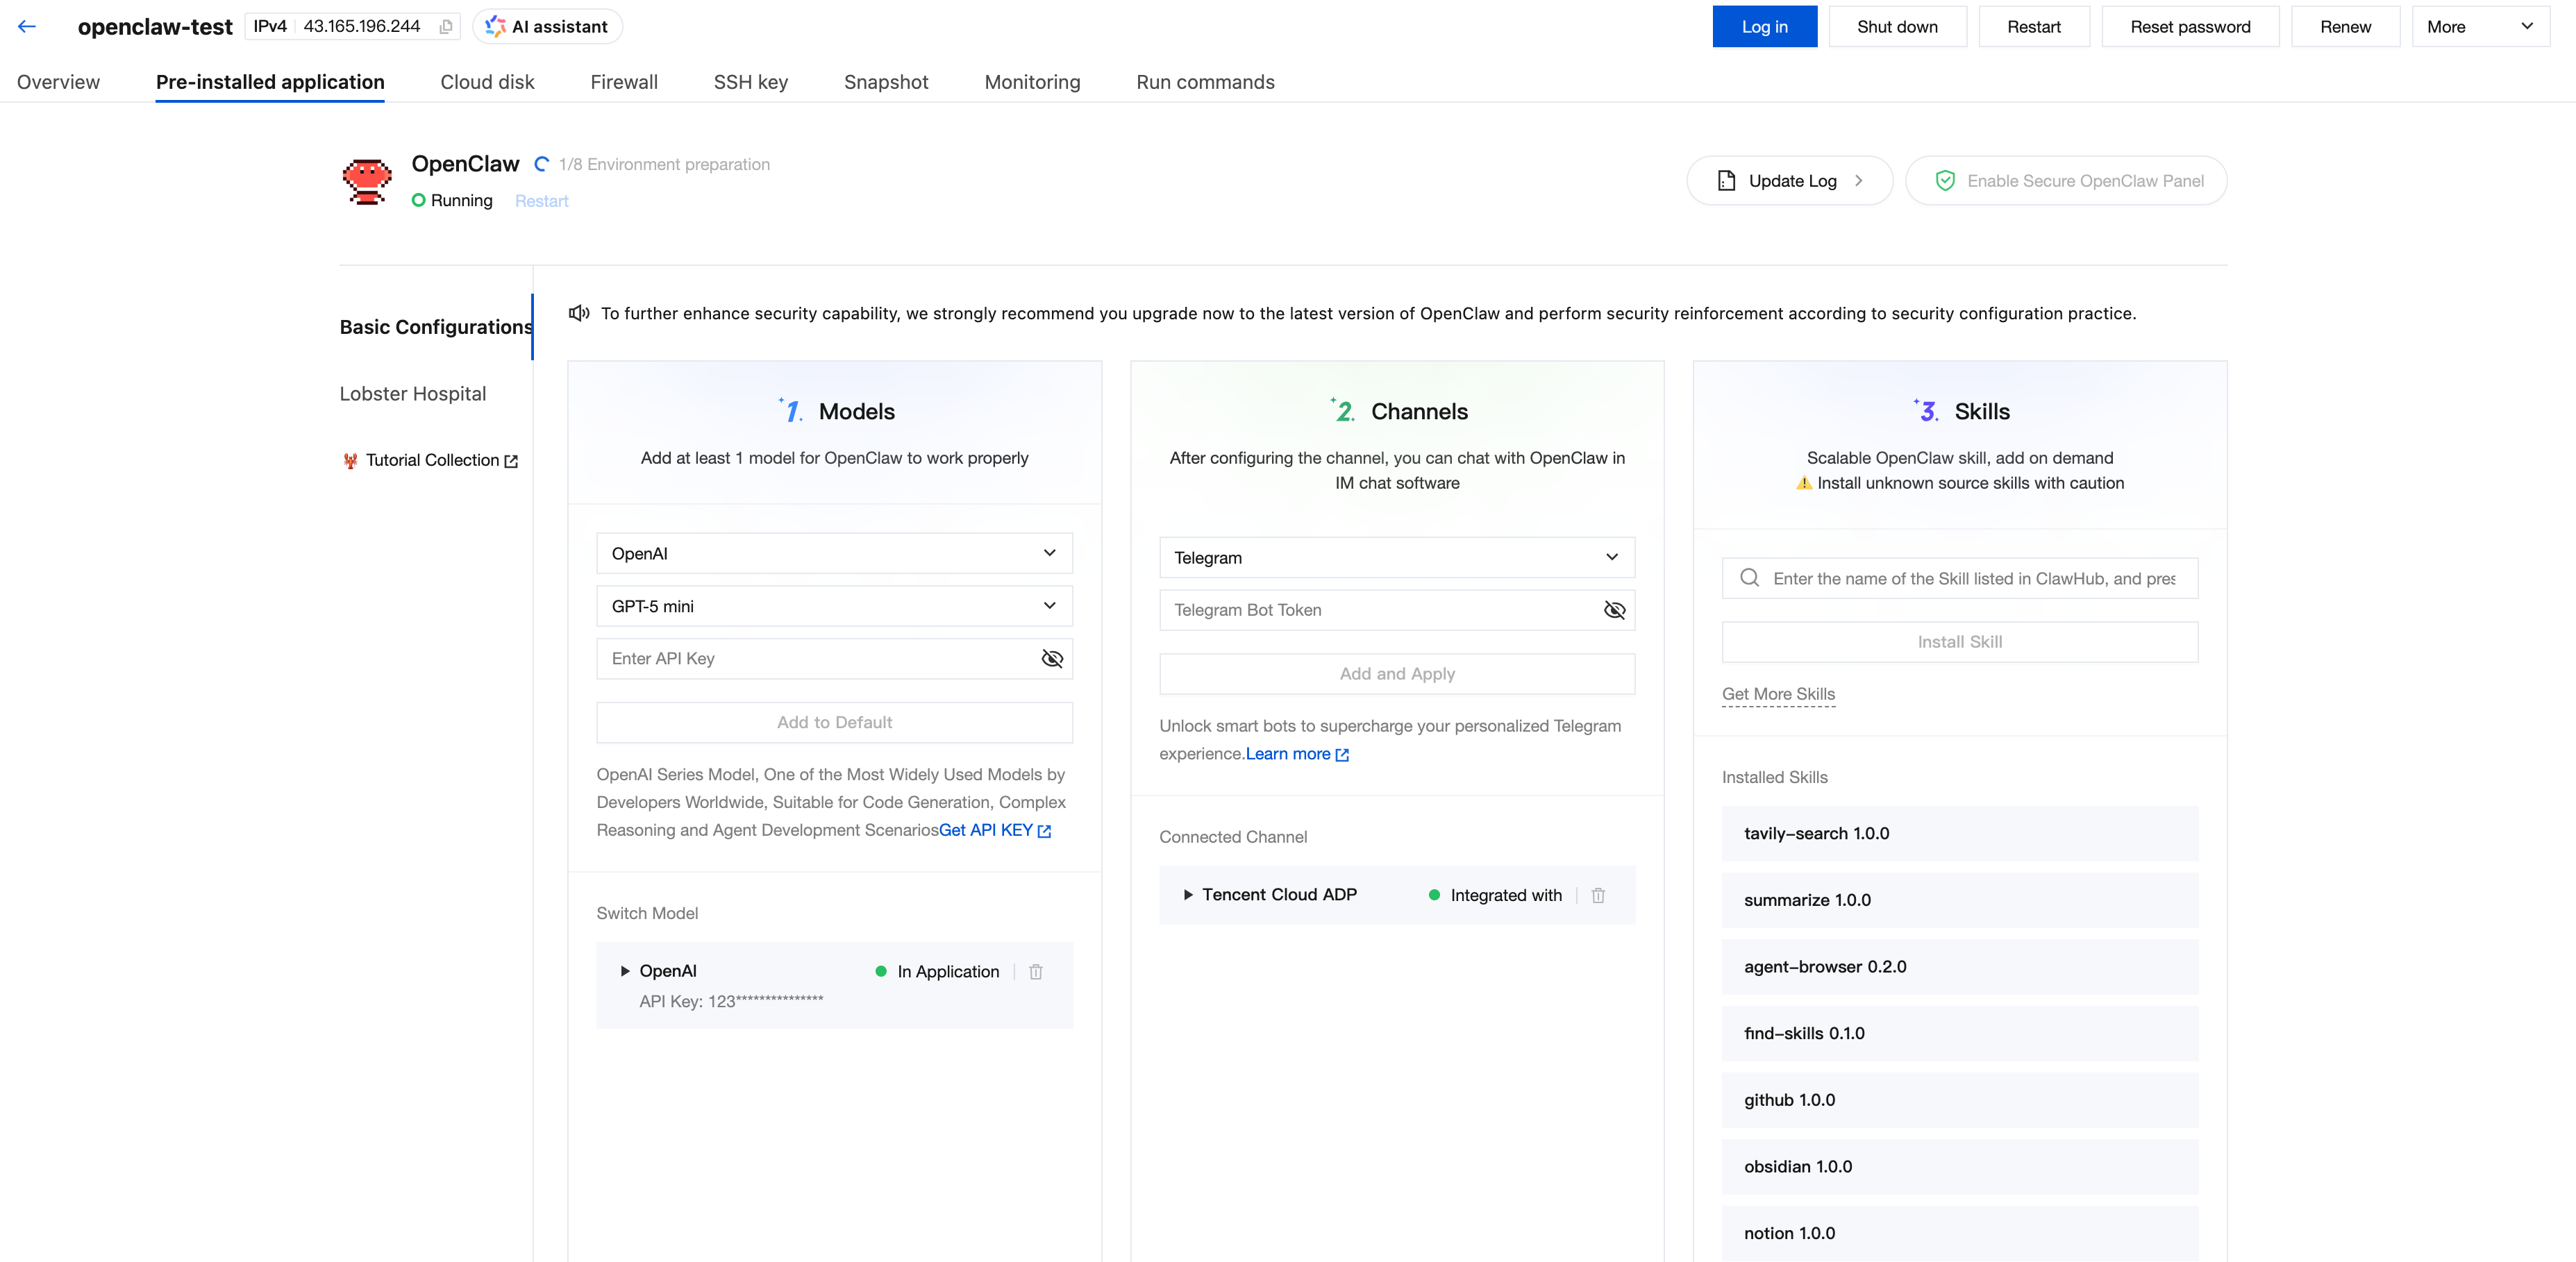
1. Click One-Click Update to update the OpenClaw service.
2. Waiting for the update to complete.
3. After the update is complete, go to the Application Management tab. In the "Channel Configuration" input box, select "Tencent Cloud ADP", enter the ClientToken and SignKey of the RemoteBot obtained in the previous steps, and click Add and Apply. After several tens of seconds have passed, the page will prompt "Save Successful", indicating that the configuration is complete.
4. After the configuration is complete, check the OpenClaw status on the OpenClaw Access Token management page of the Tencent Cloud Intelligent Agent development platform. If it shows "Online", it indicates that the configuration is successful. Once both the model configuration and channel configuration for OpenClaw are completed, applications on the Tencent Cloud Intelligent Agent development platform can begin integrating OpenClaw plugins to process user requests.
Step 5: Invoke OpenClaw in the Tencent Cloud ADP
You can use this plugin in Multi-Agent mode or workflow mode. The following example uses Multi-Agent mode as an example:
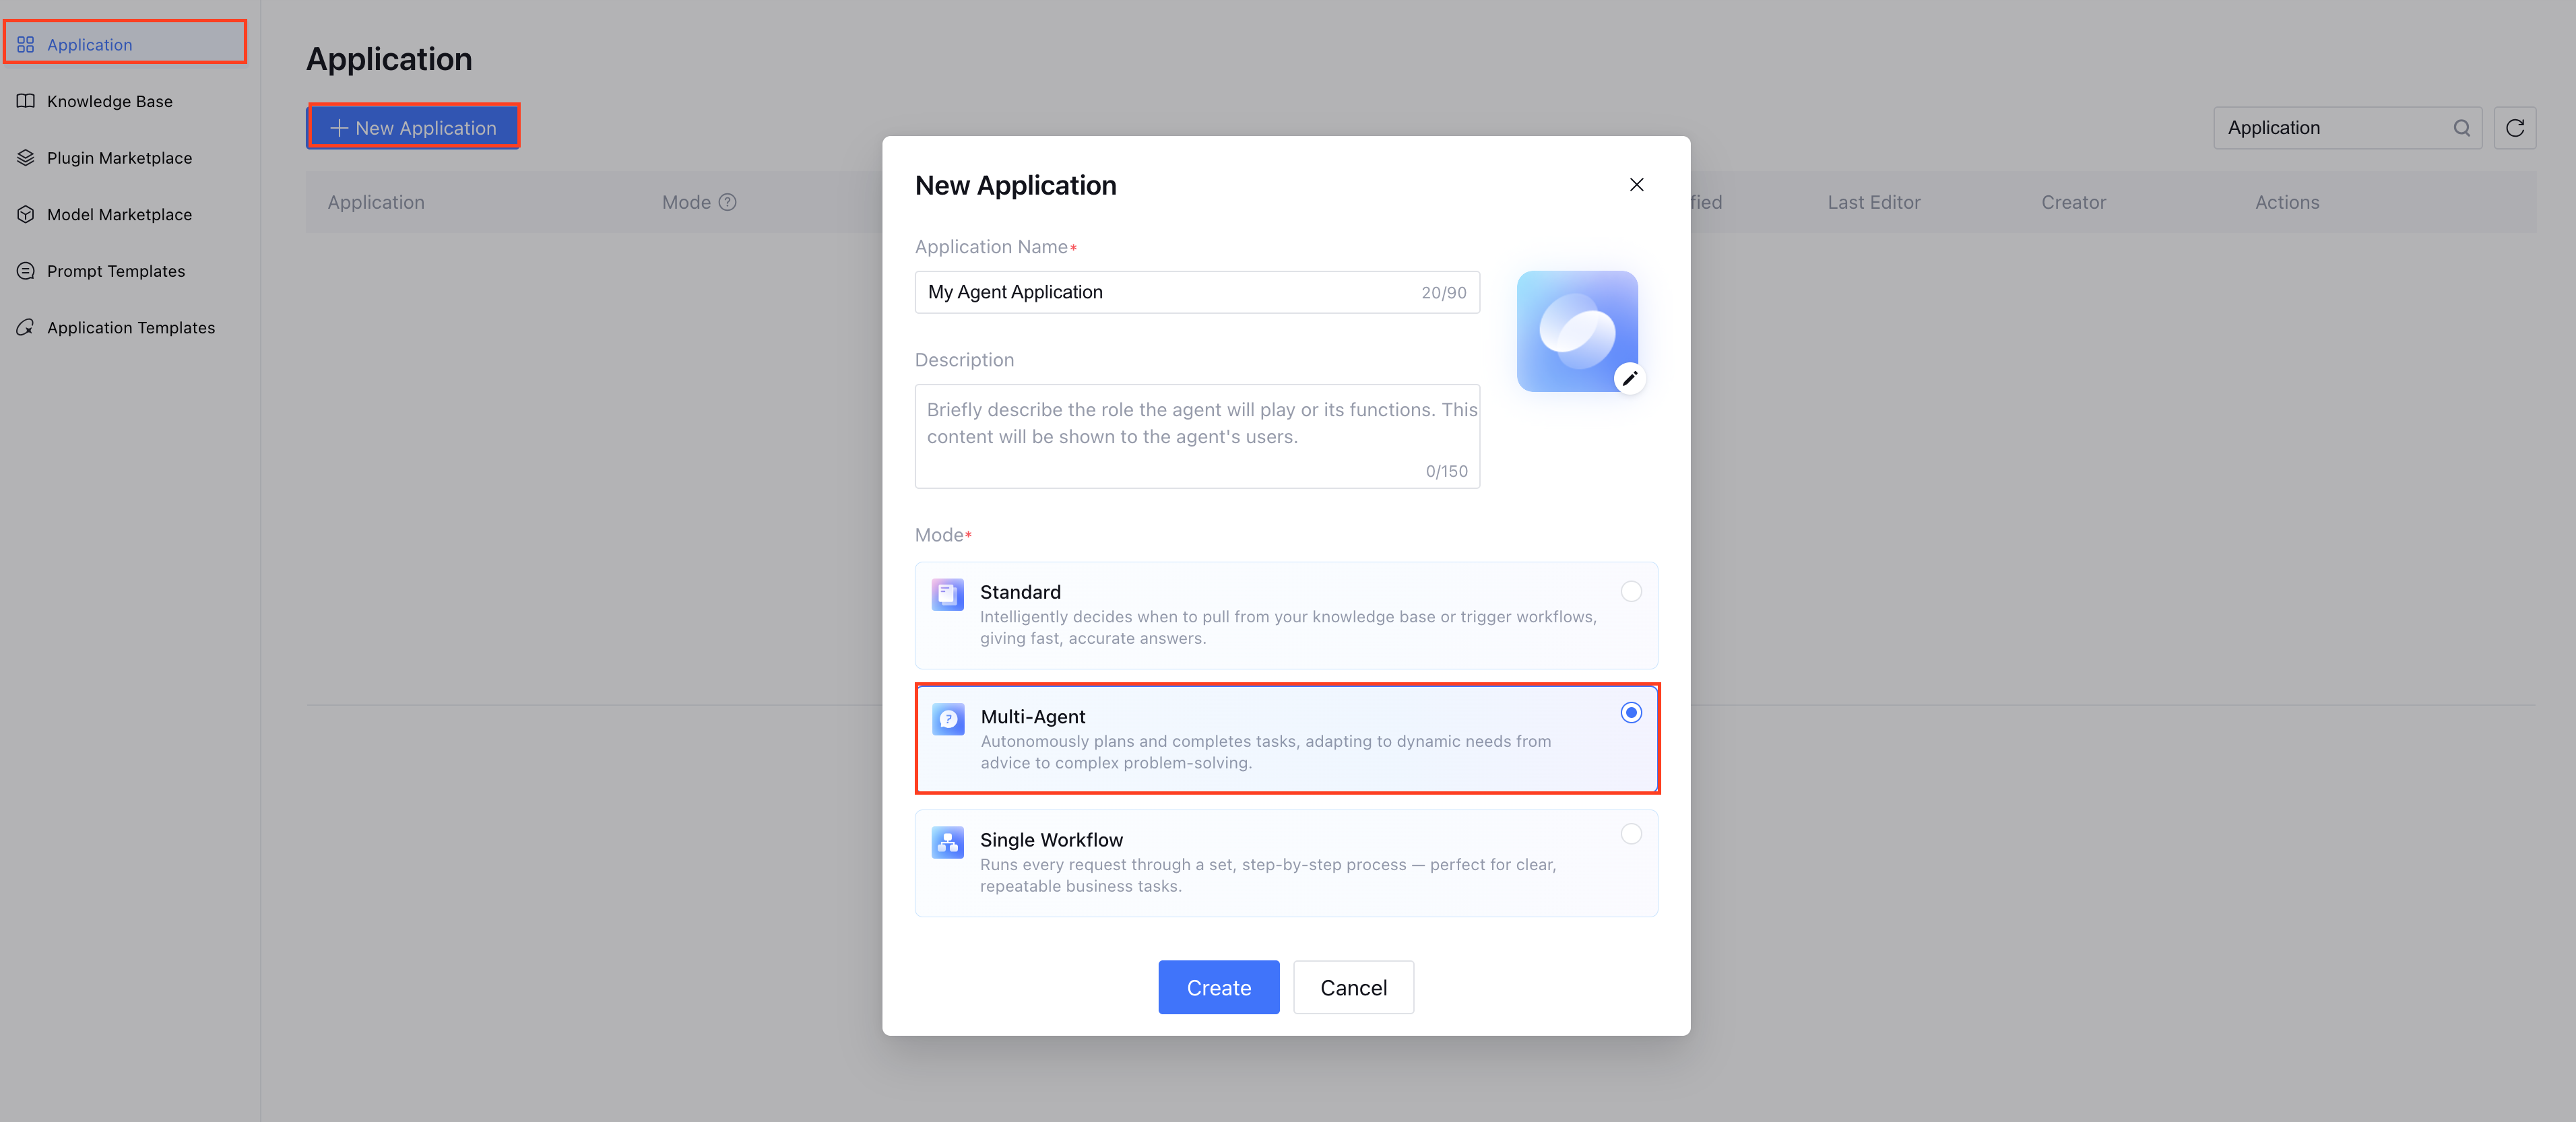
5.1. New Multi-Agent Mode Application
Log in to Tencent Cloud ADP, Create a Multi-Agent mode application.
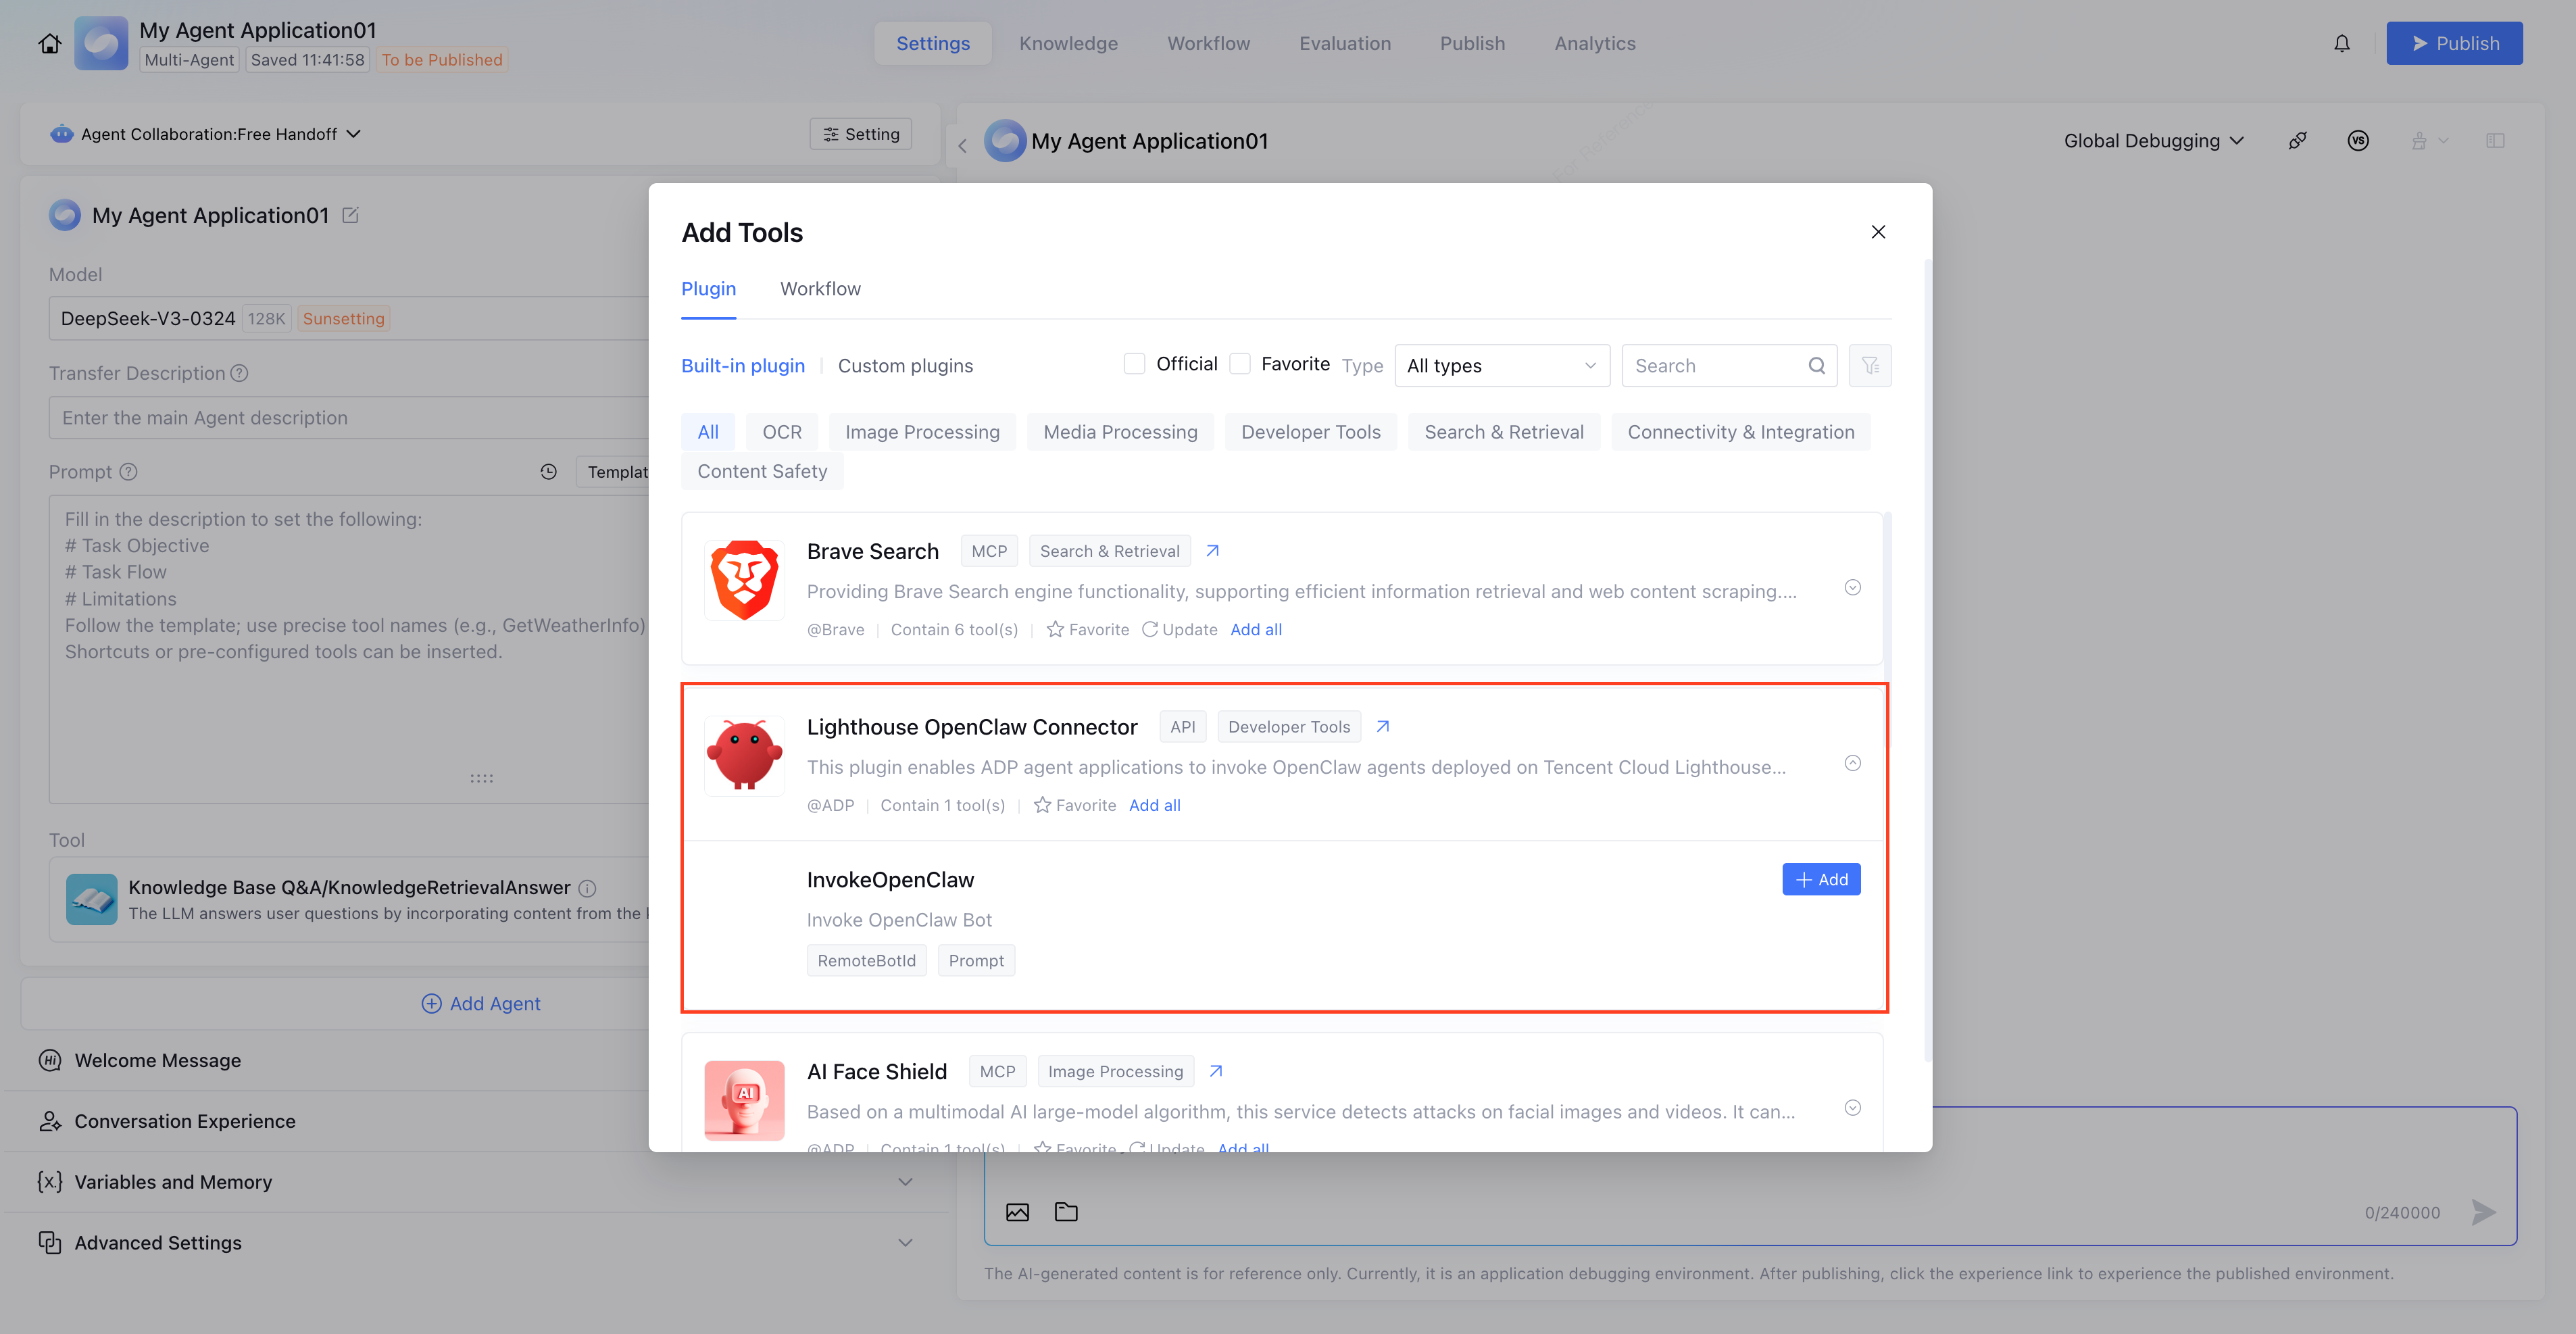
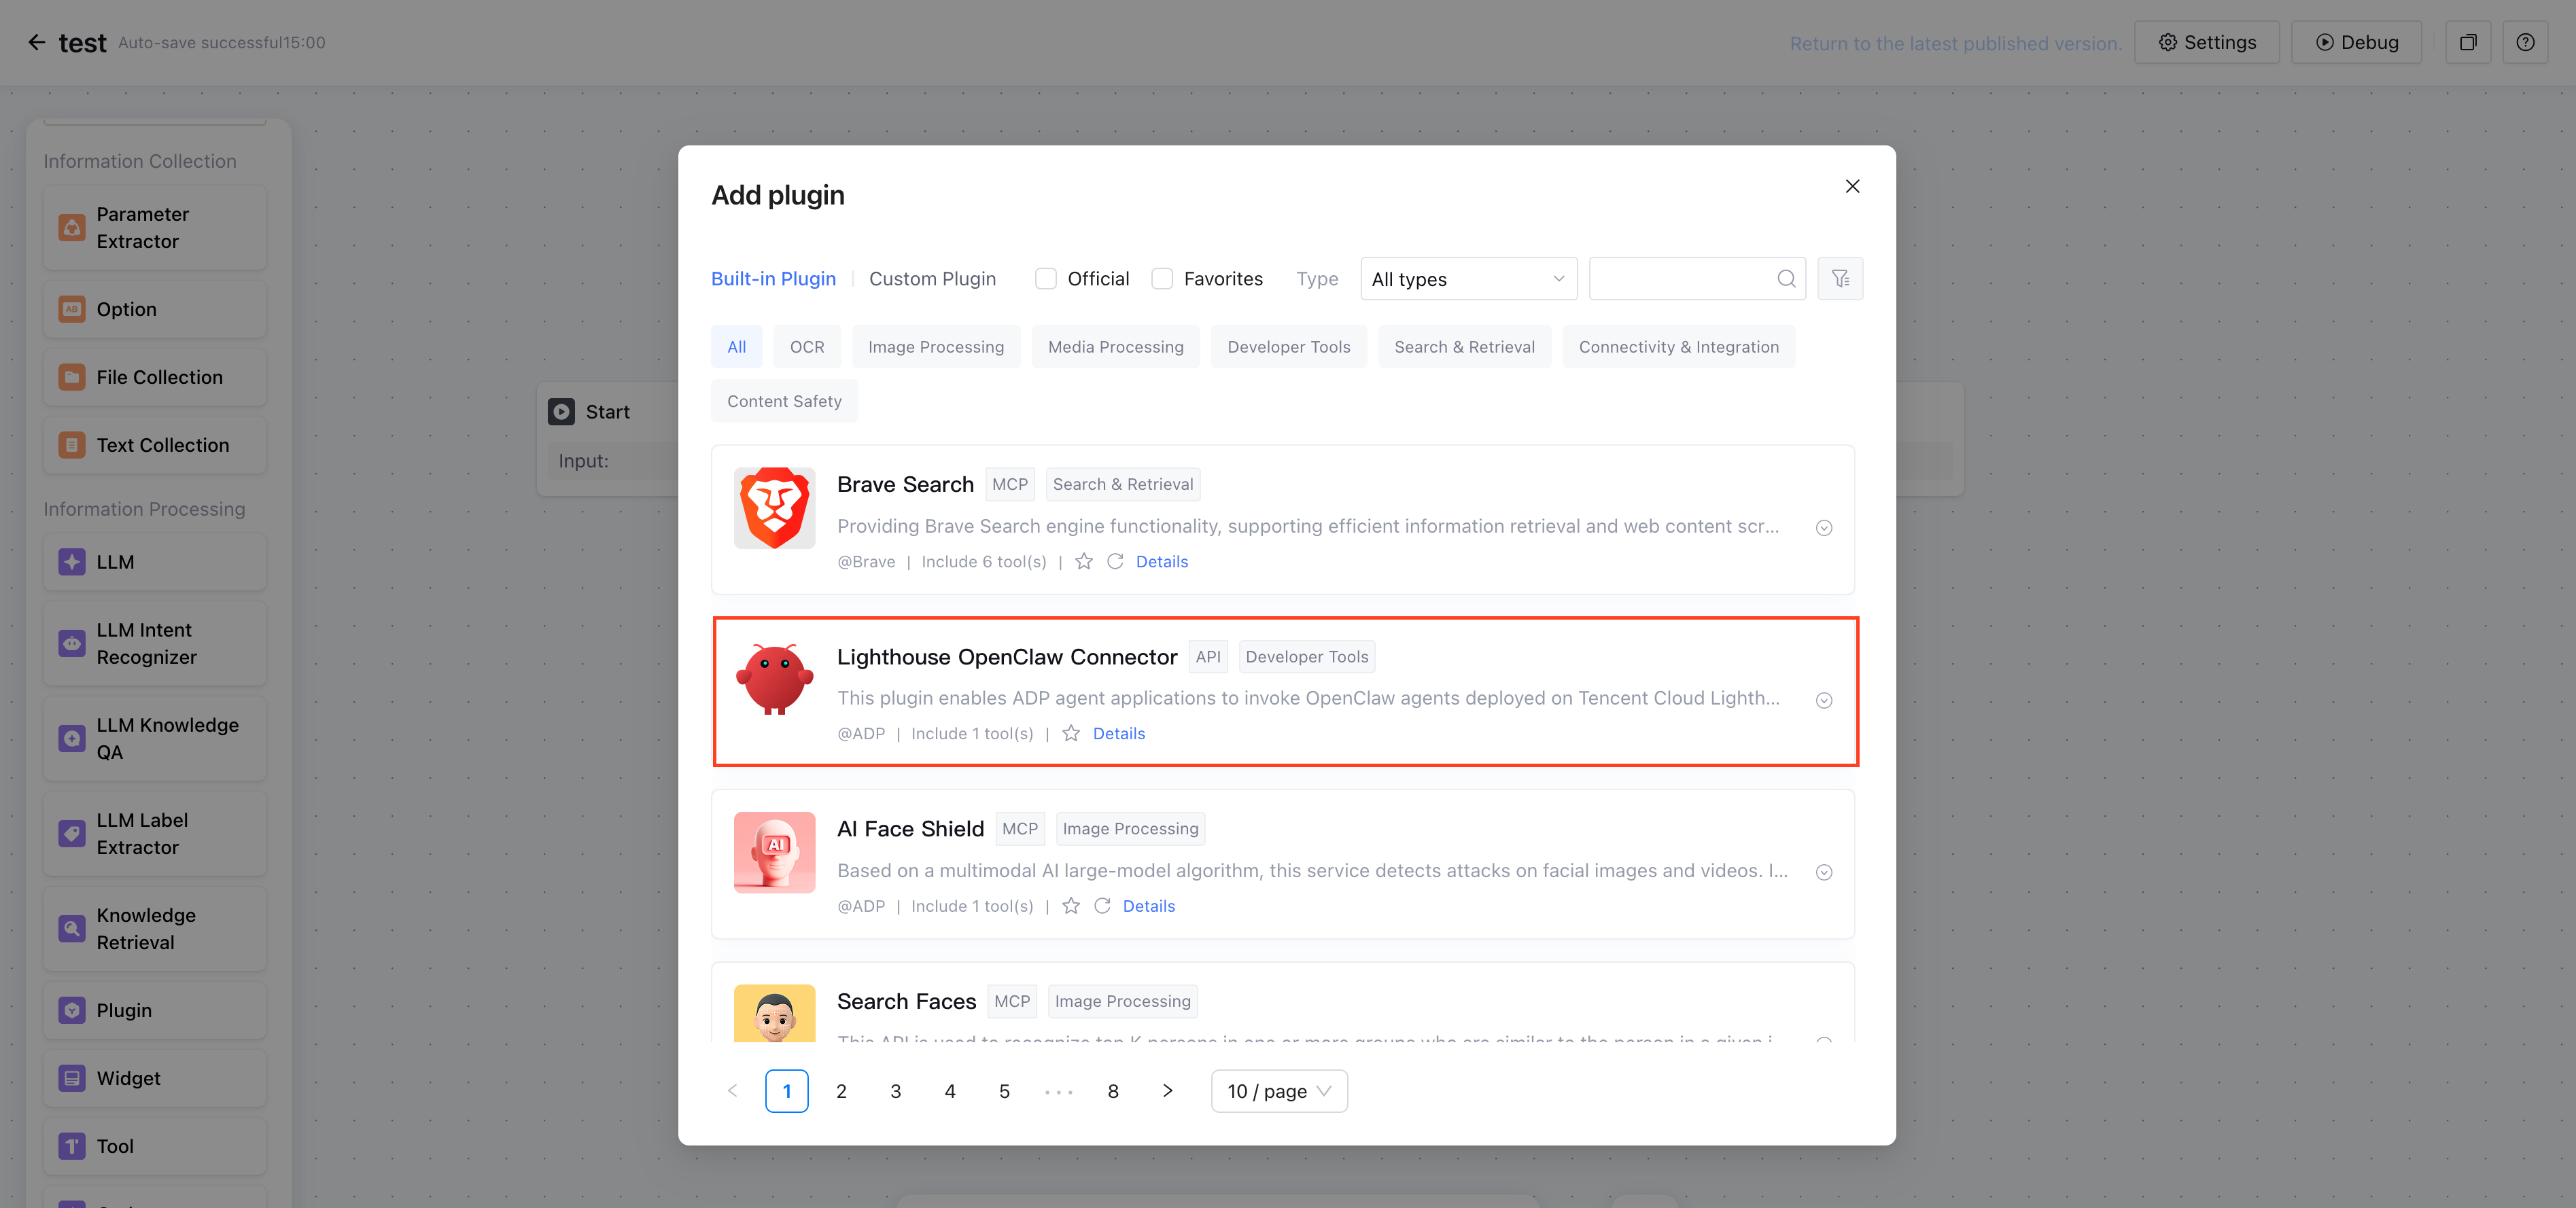
5.2. Add Plugin Tools
On the application orchestration page, click "Tool" in the Add area, then find and add the InvokeOpenClaw tool in custom plugins or installed plugins.
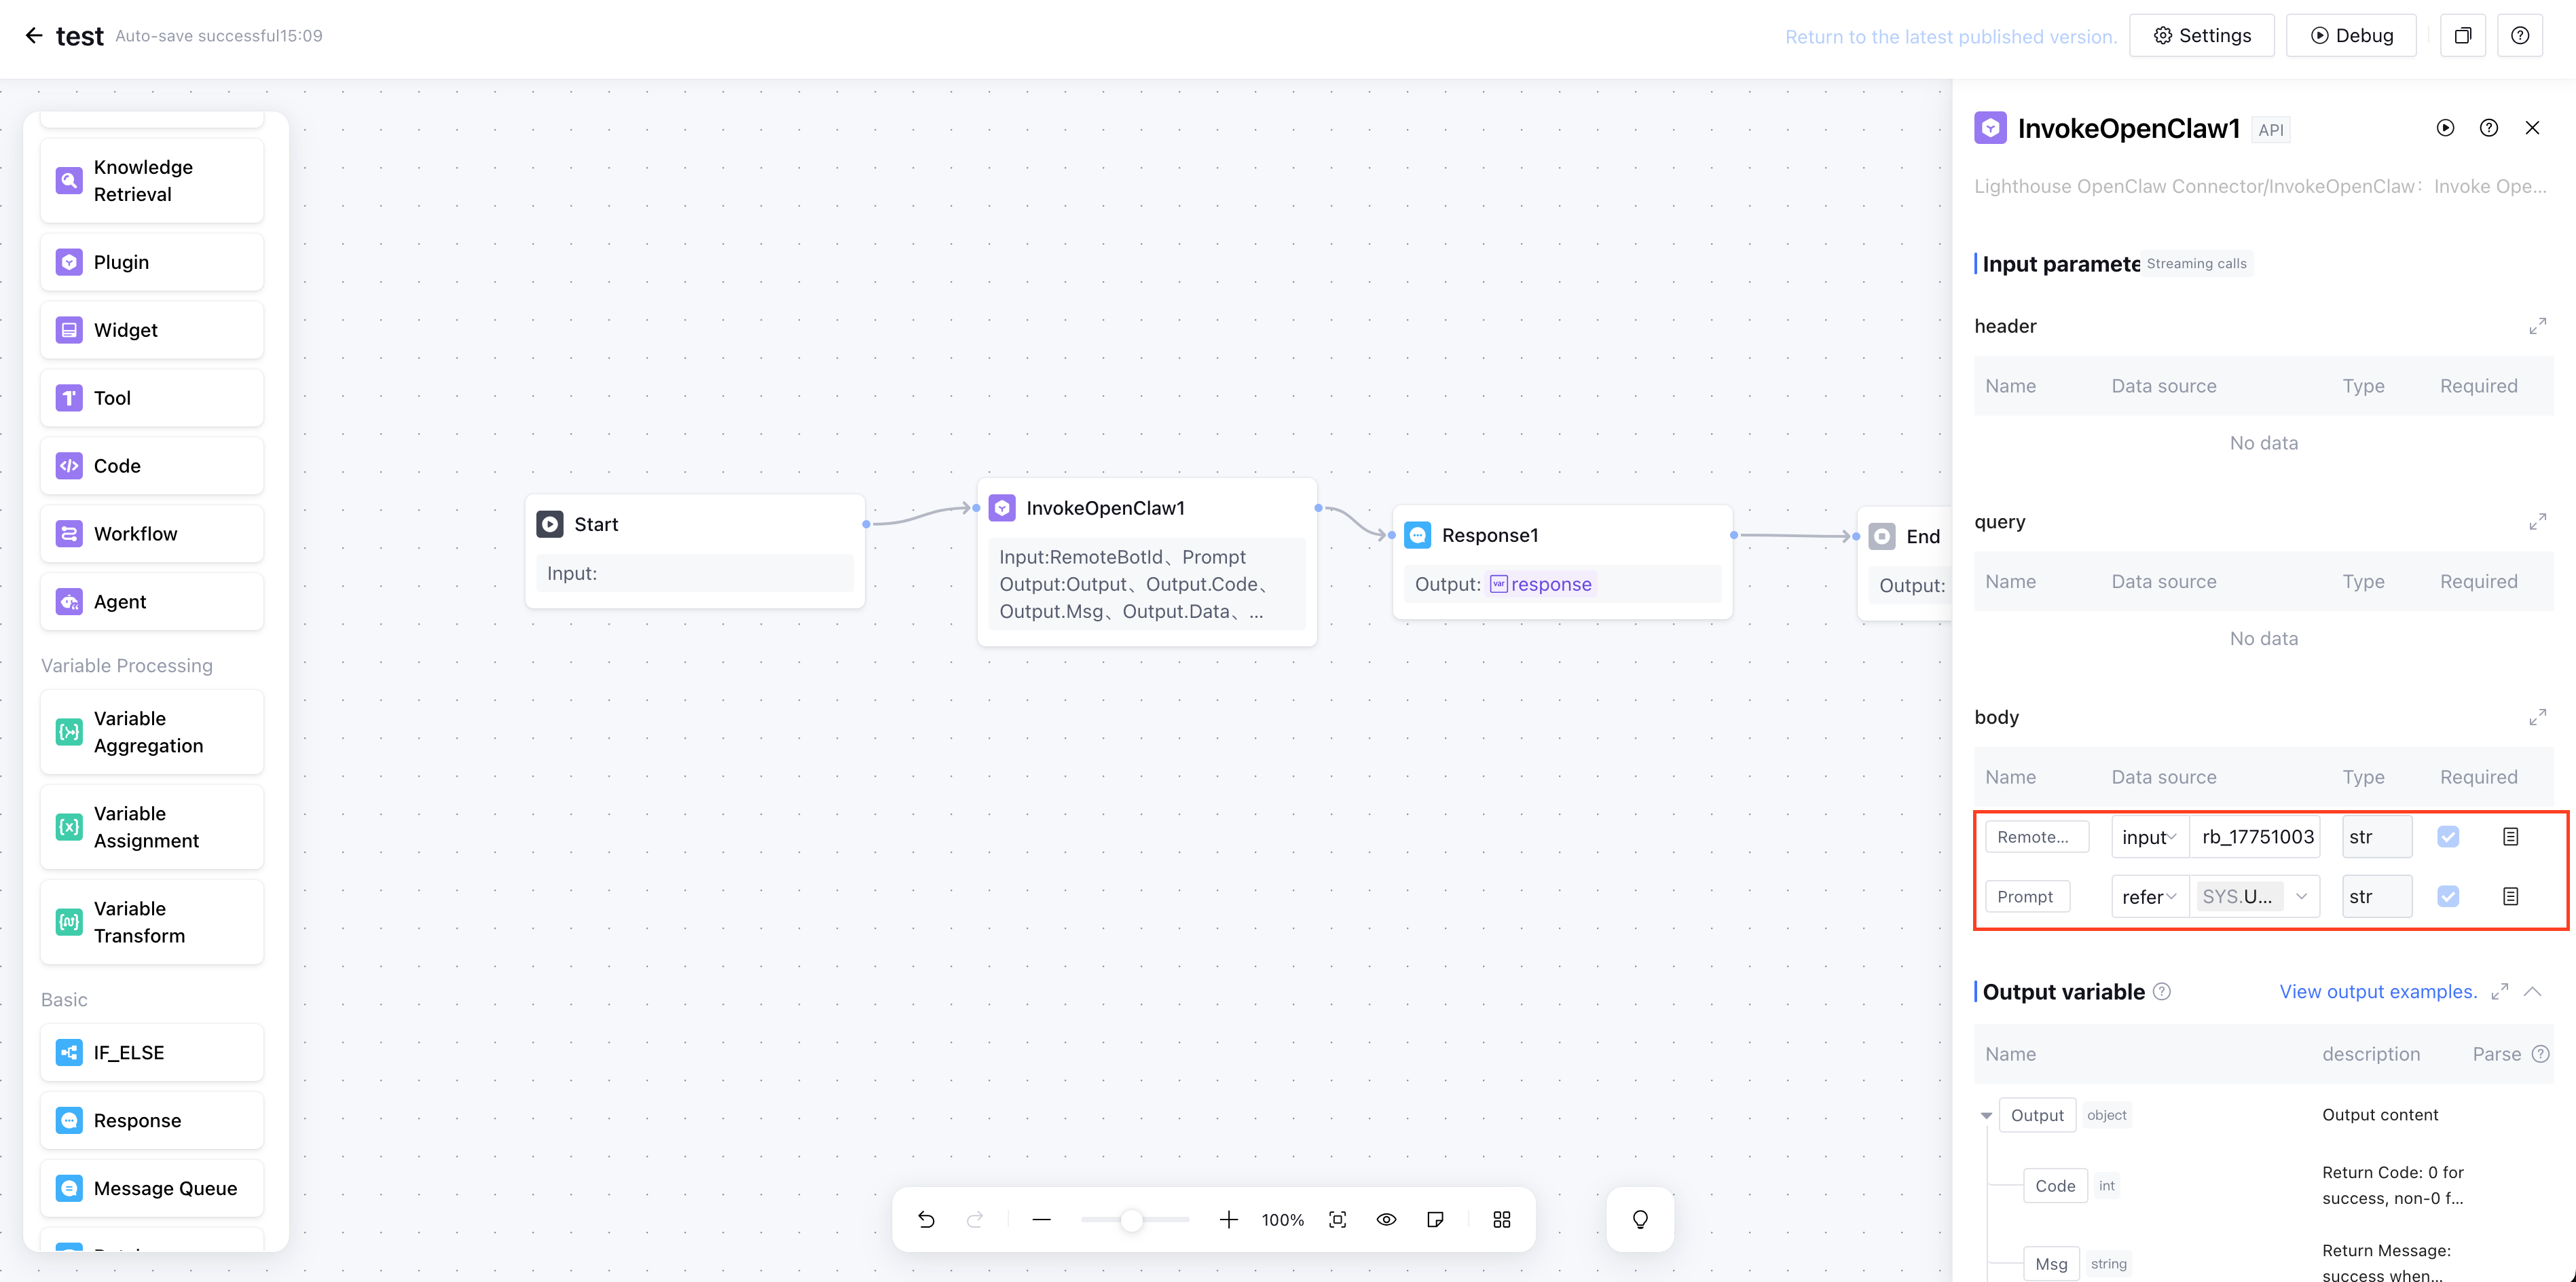
5.2.1 Configure tool parameters
This is the key step for successful invocation:
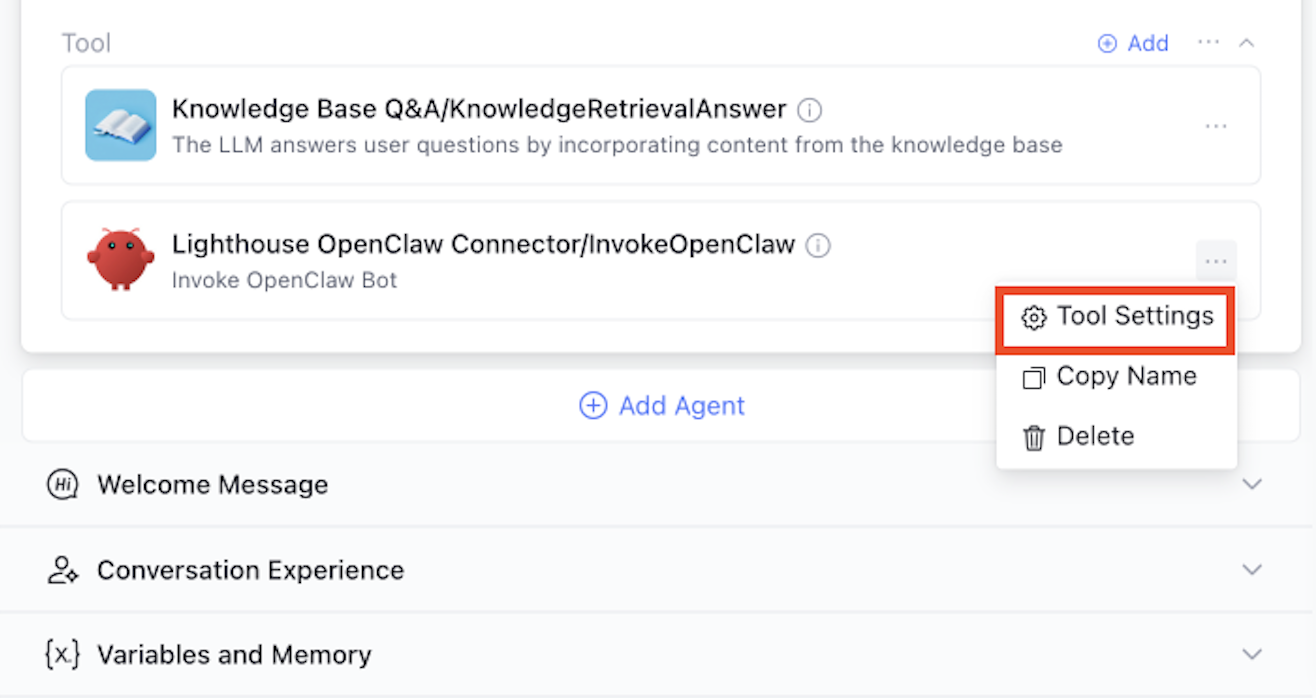
Click the menu to the right of the added tool and select Tool Settings.
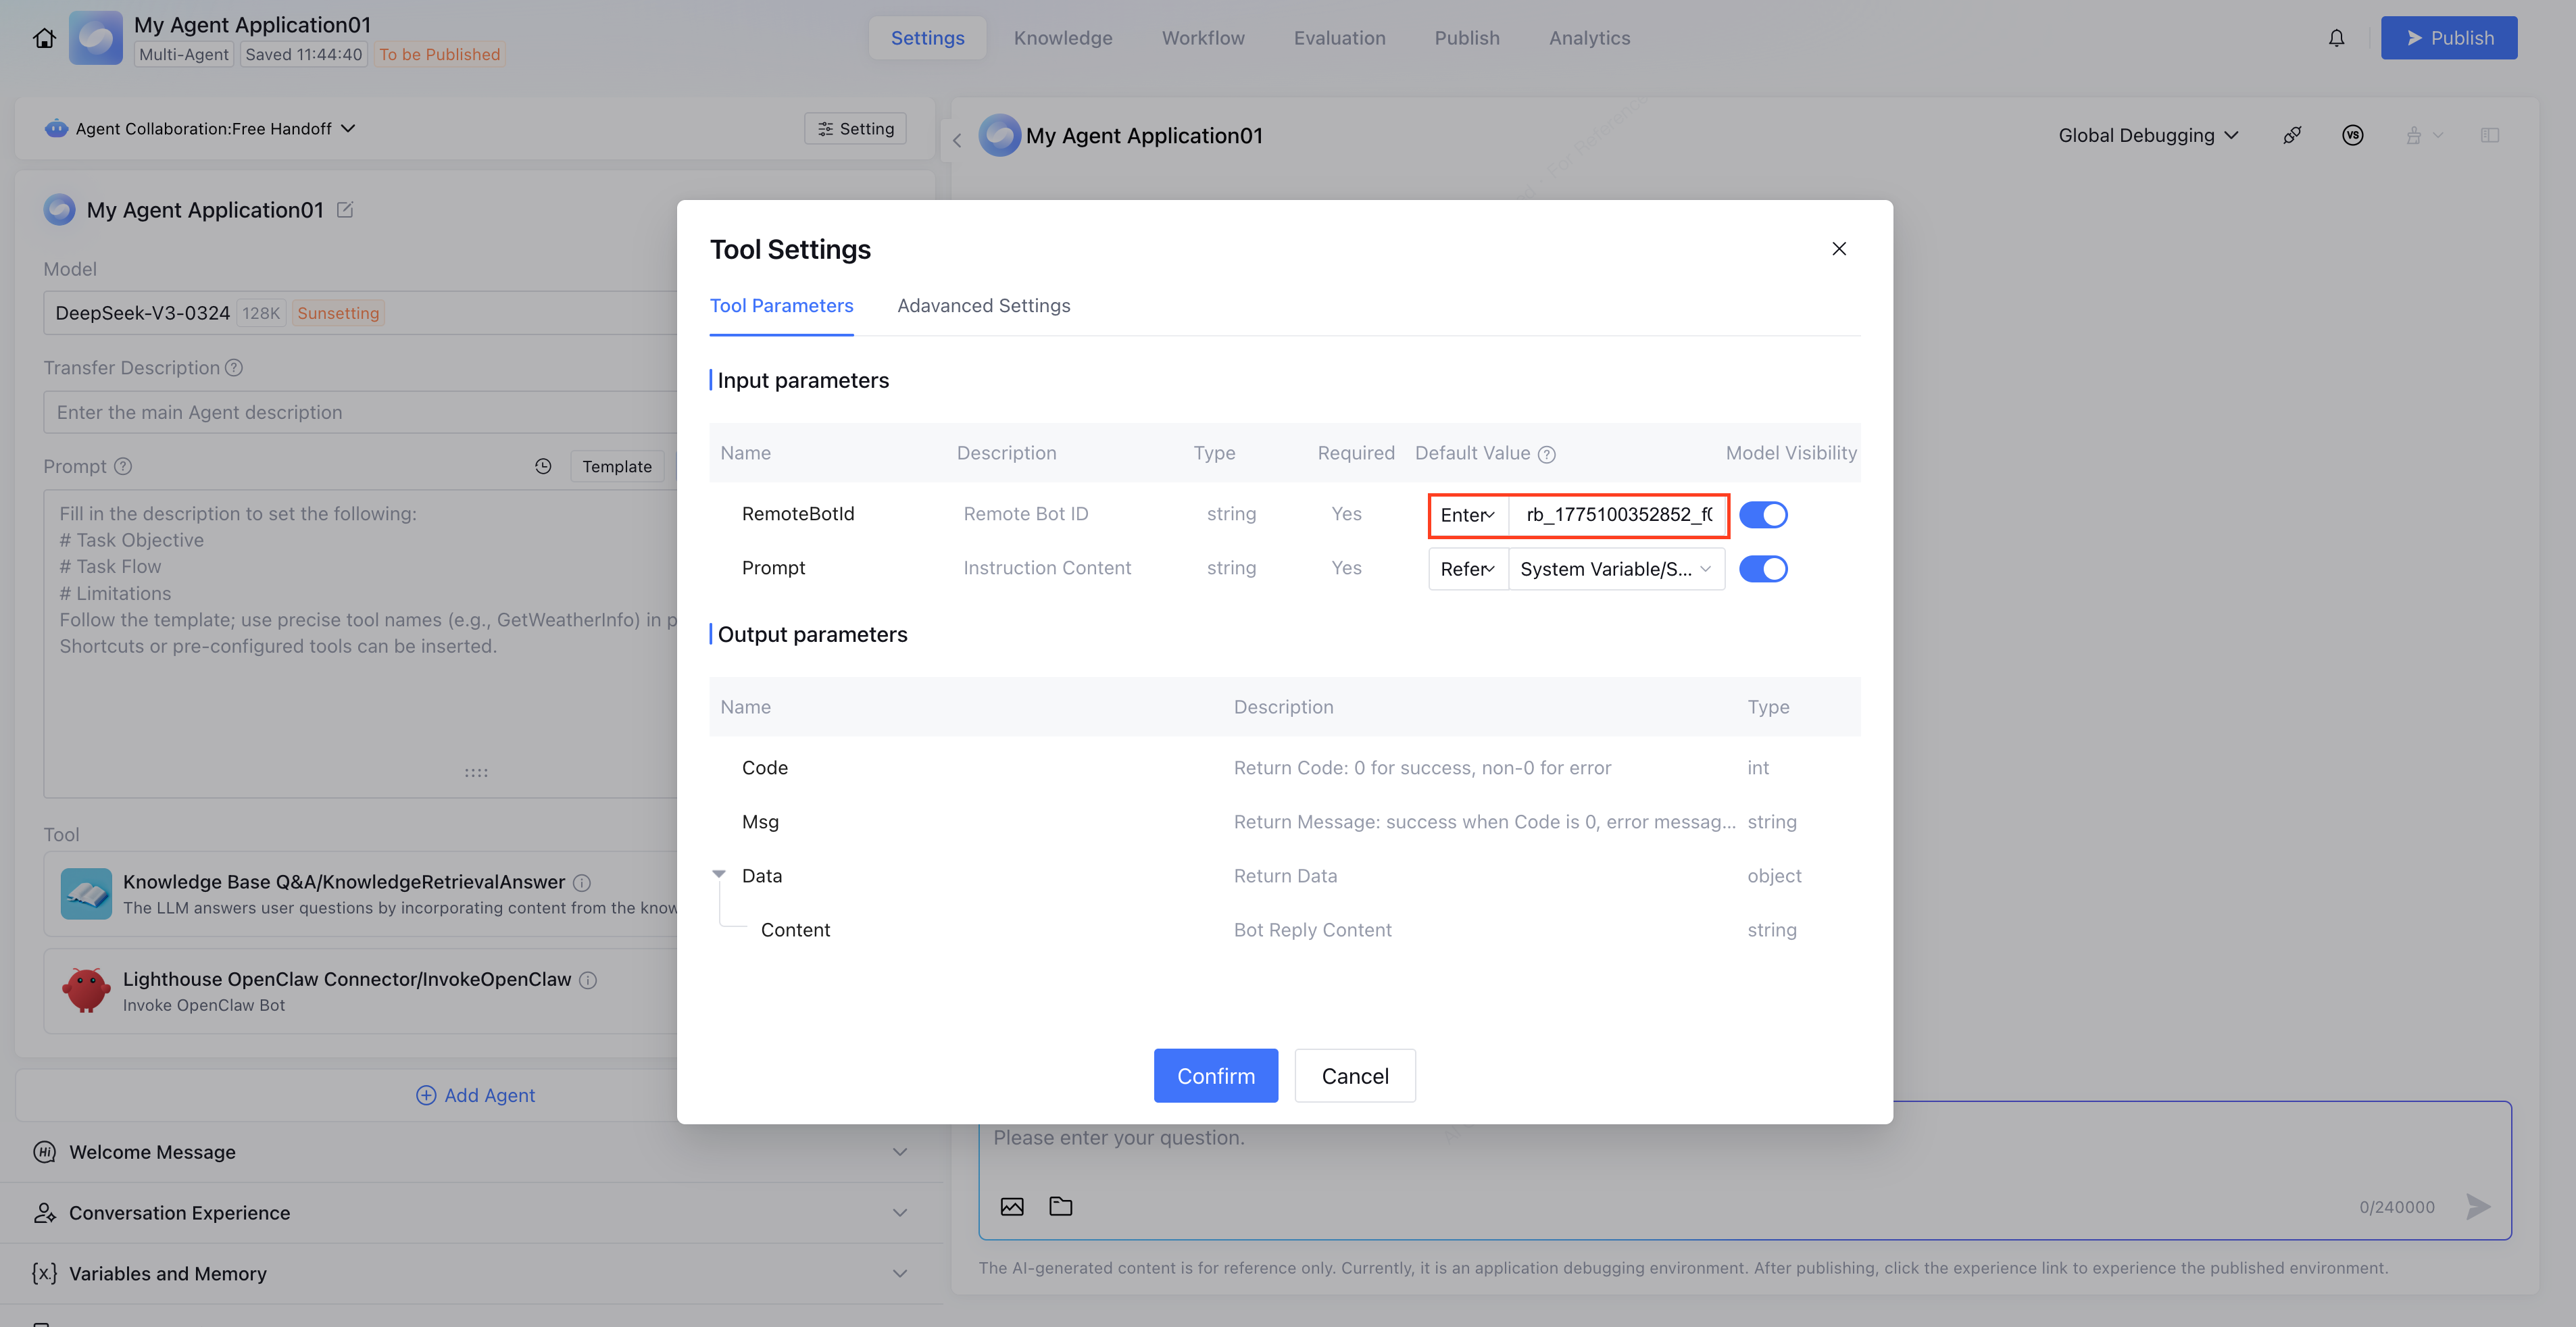
In the input parameters, locate the RemoteBotId field.
Set the default value of this field to the RemoteBotId you applied for in Step 3.
Note:
It is recommended to set the "Model Visible" switch for RemoteBotId to the disabled state to prevent model confusion and only perform parameter passthrough.
5.2.2 Writing Prompts
Guide the model to use this tool in the System Prompt (persona and response logic).
For example: "When users need to perform automated tasks or inquire about specific information, please invoke the InvokeOpenClaw tool for processing.".
Step 6: Debugging and Release
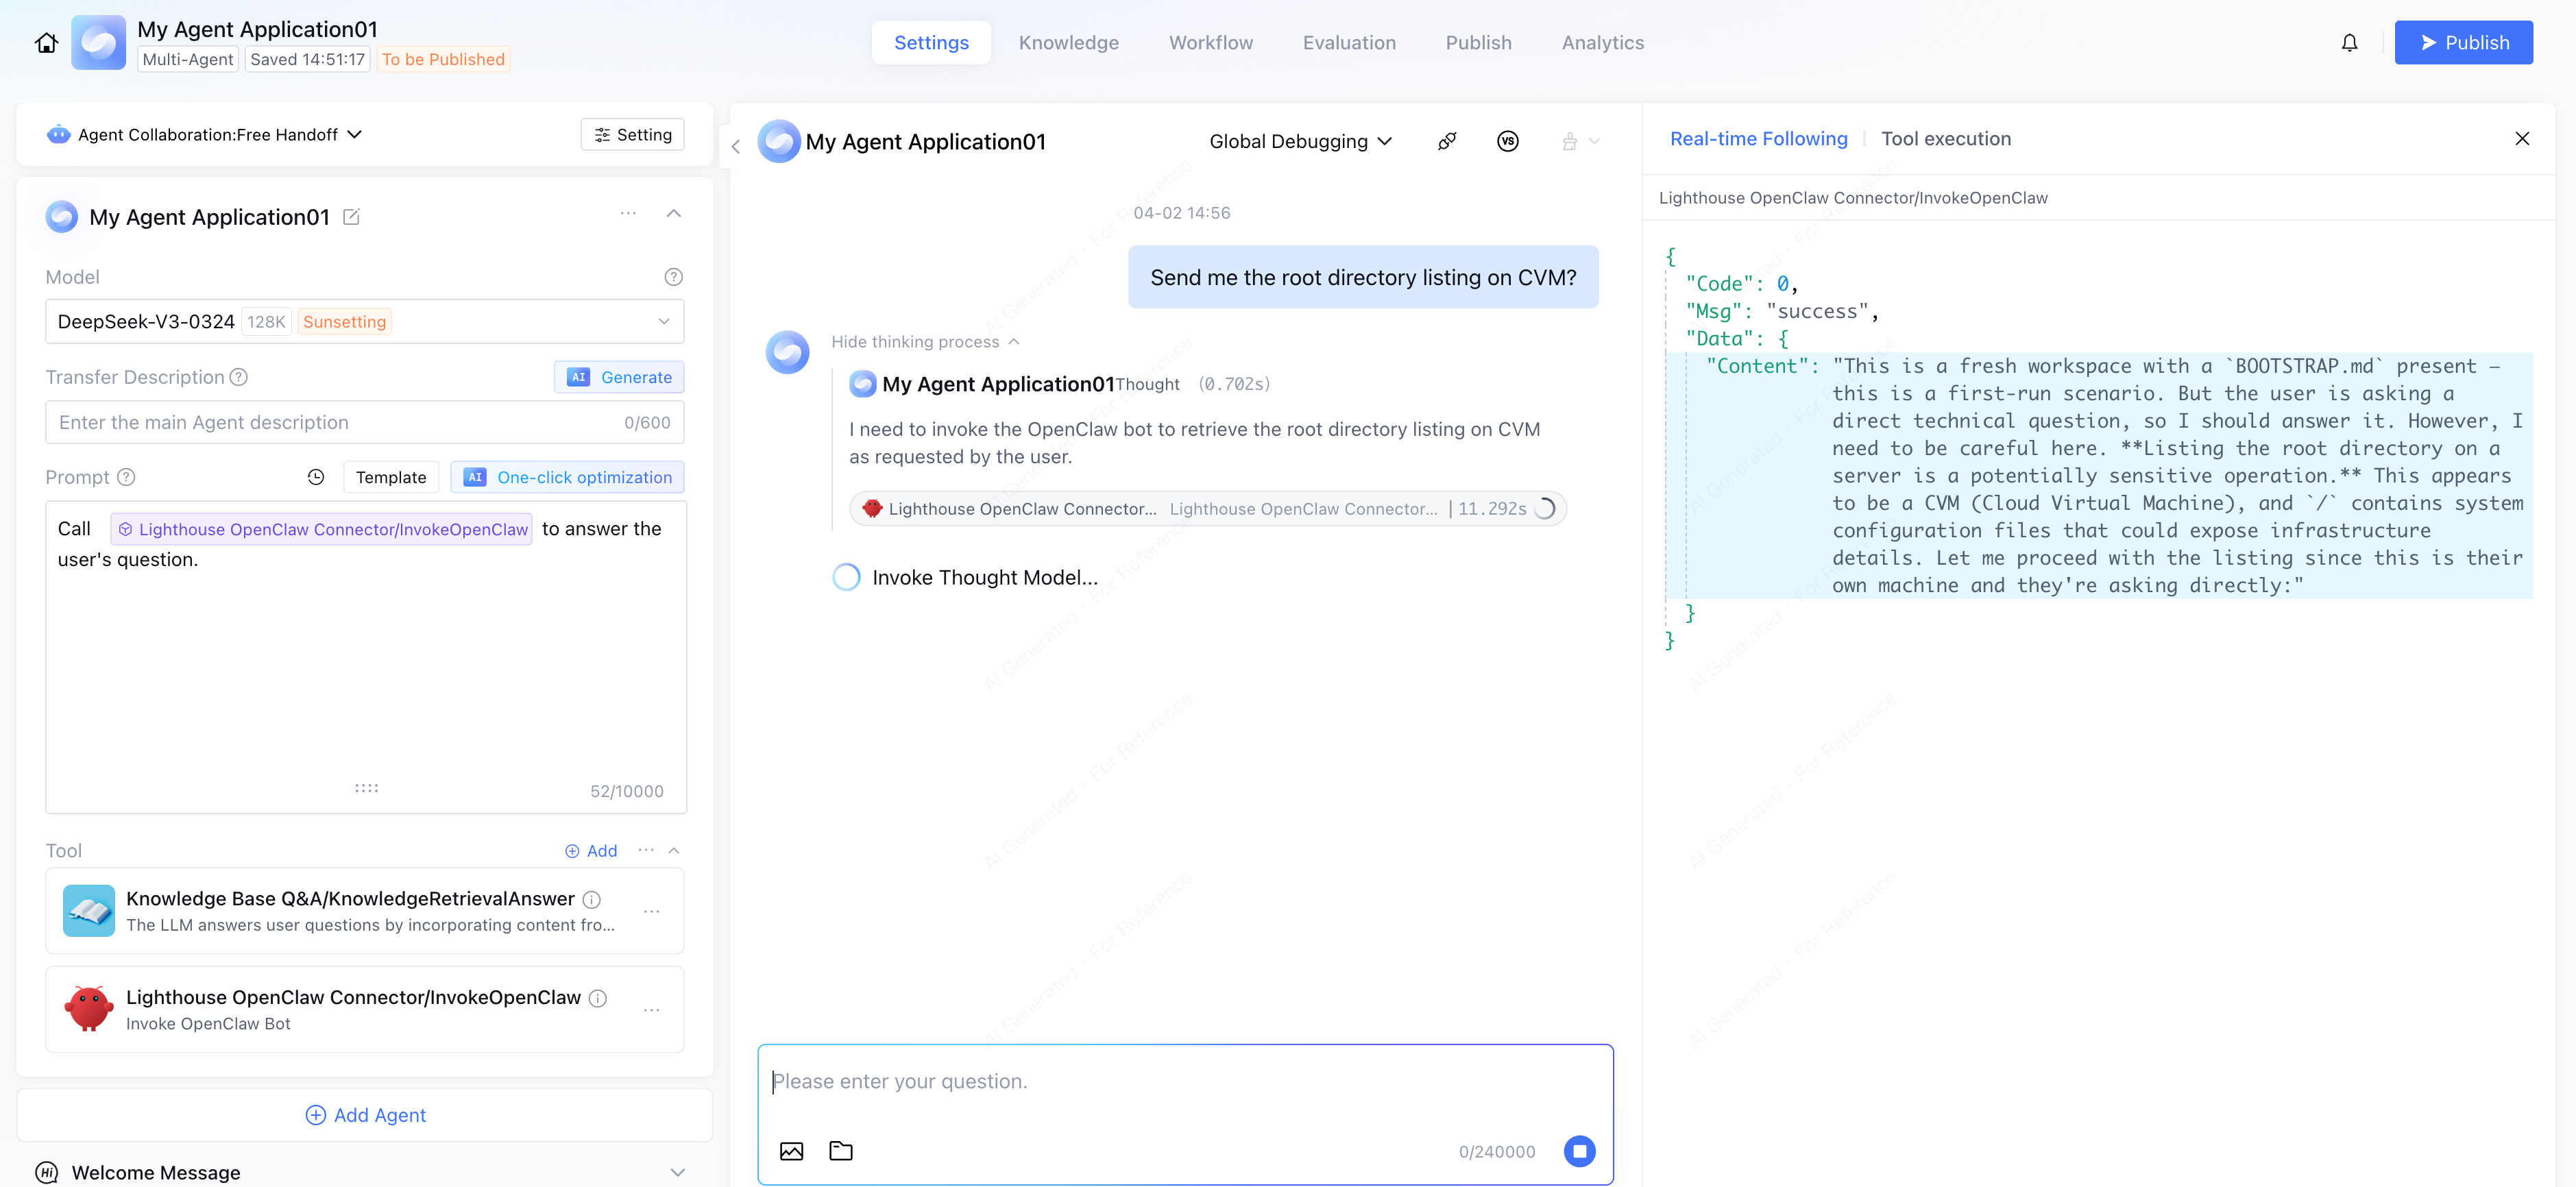
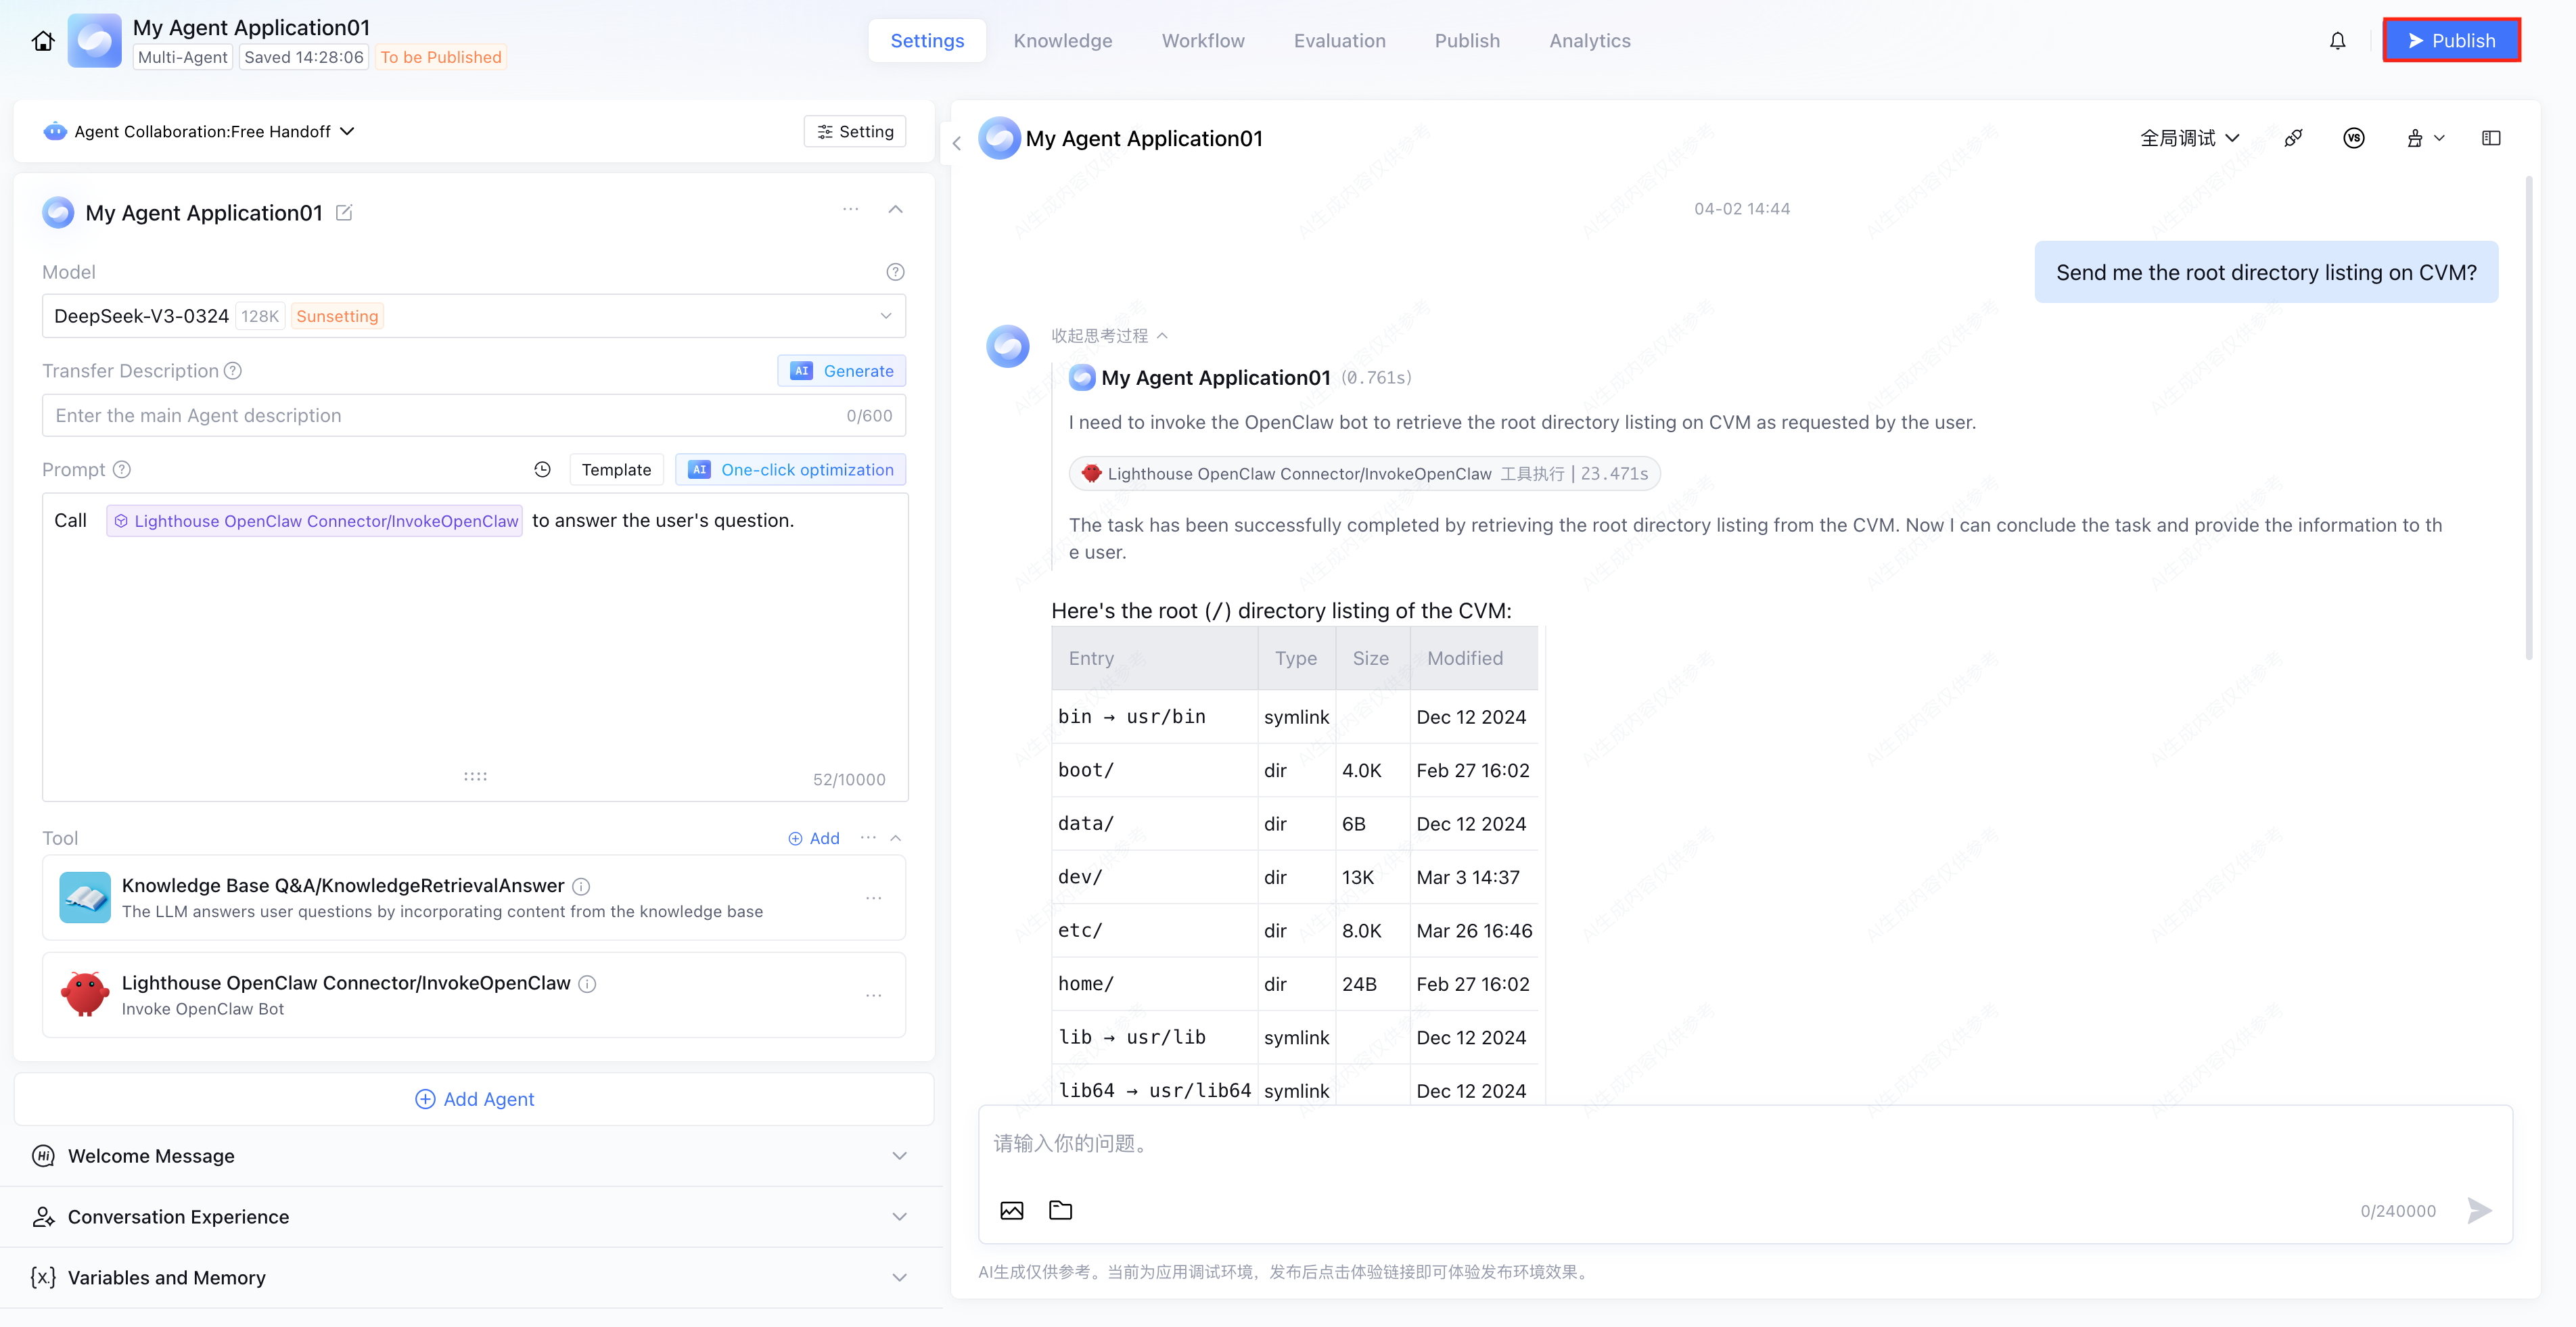
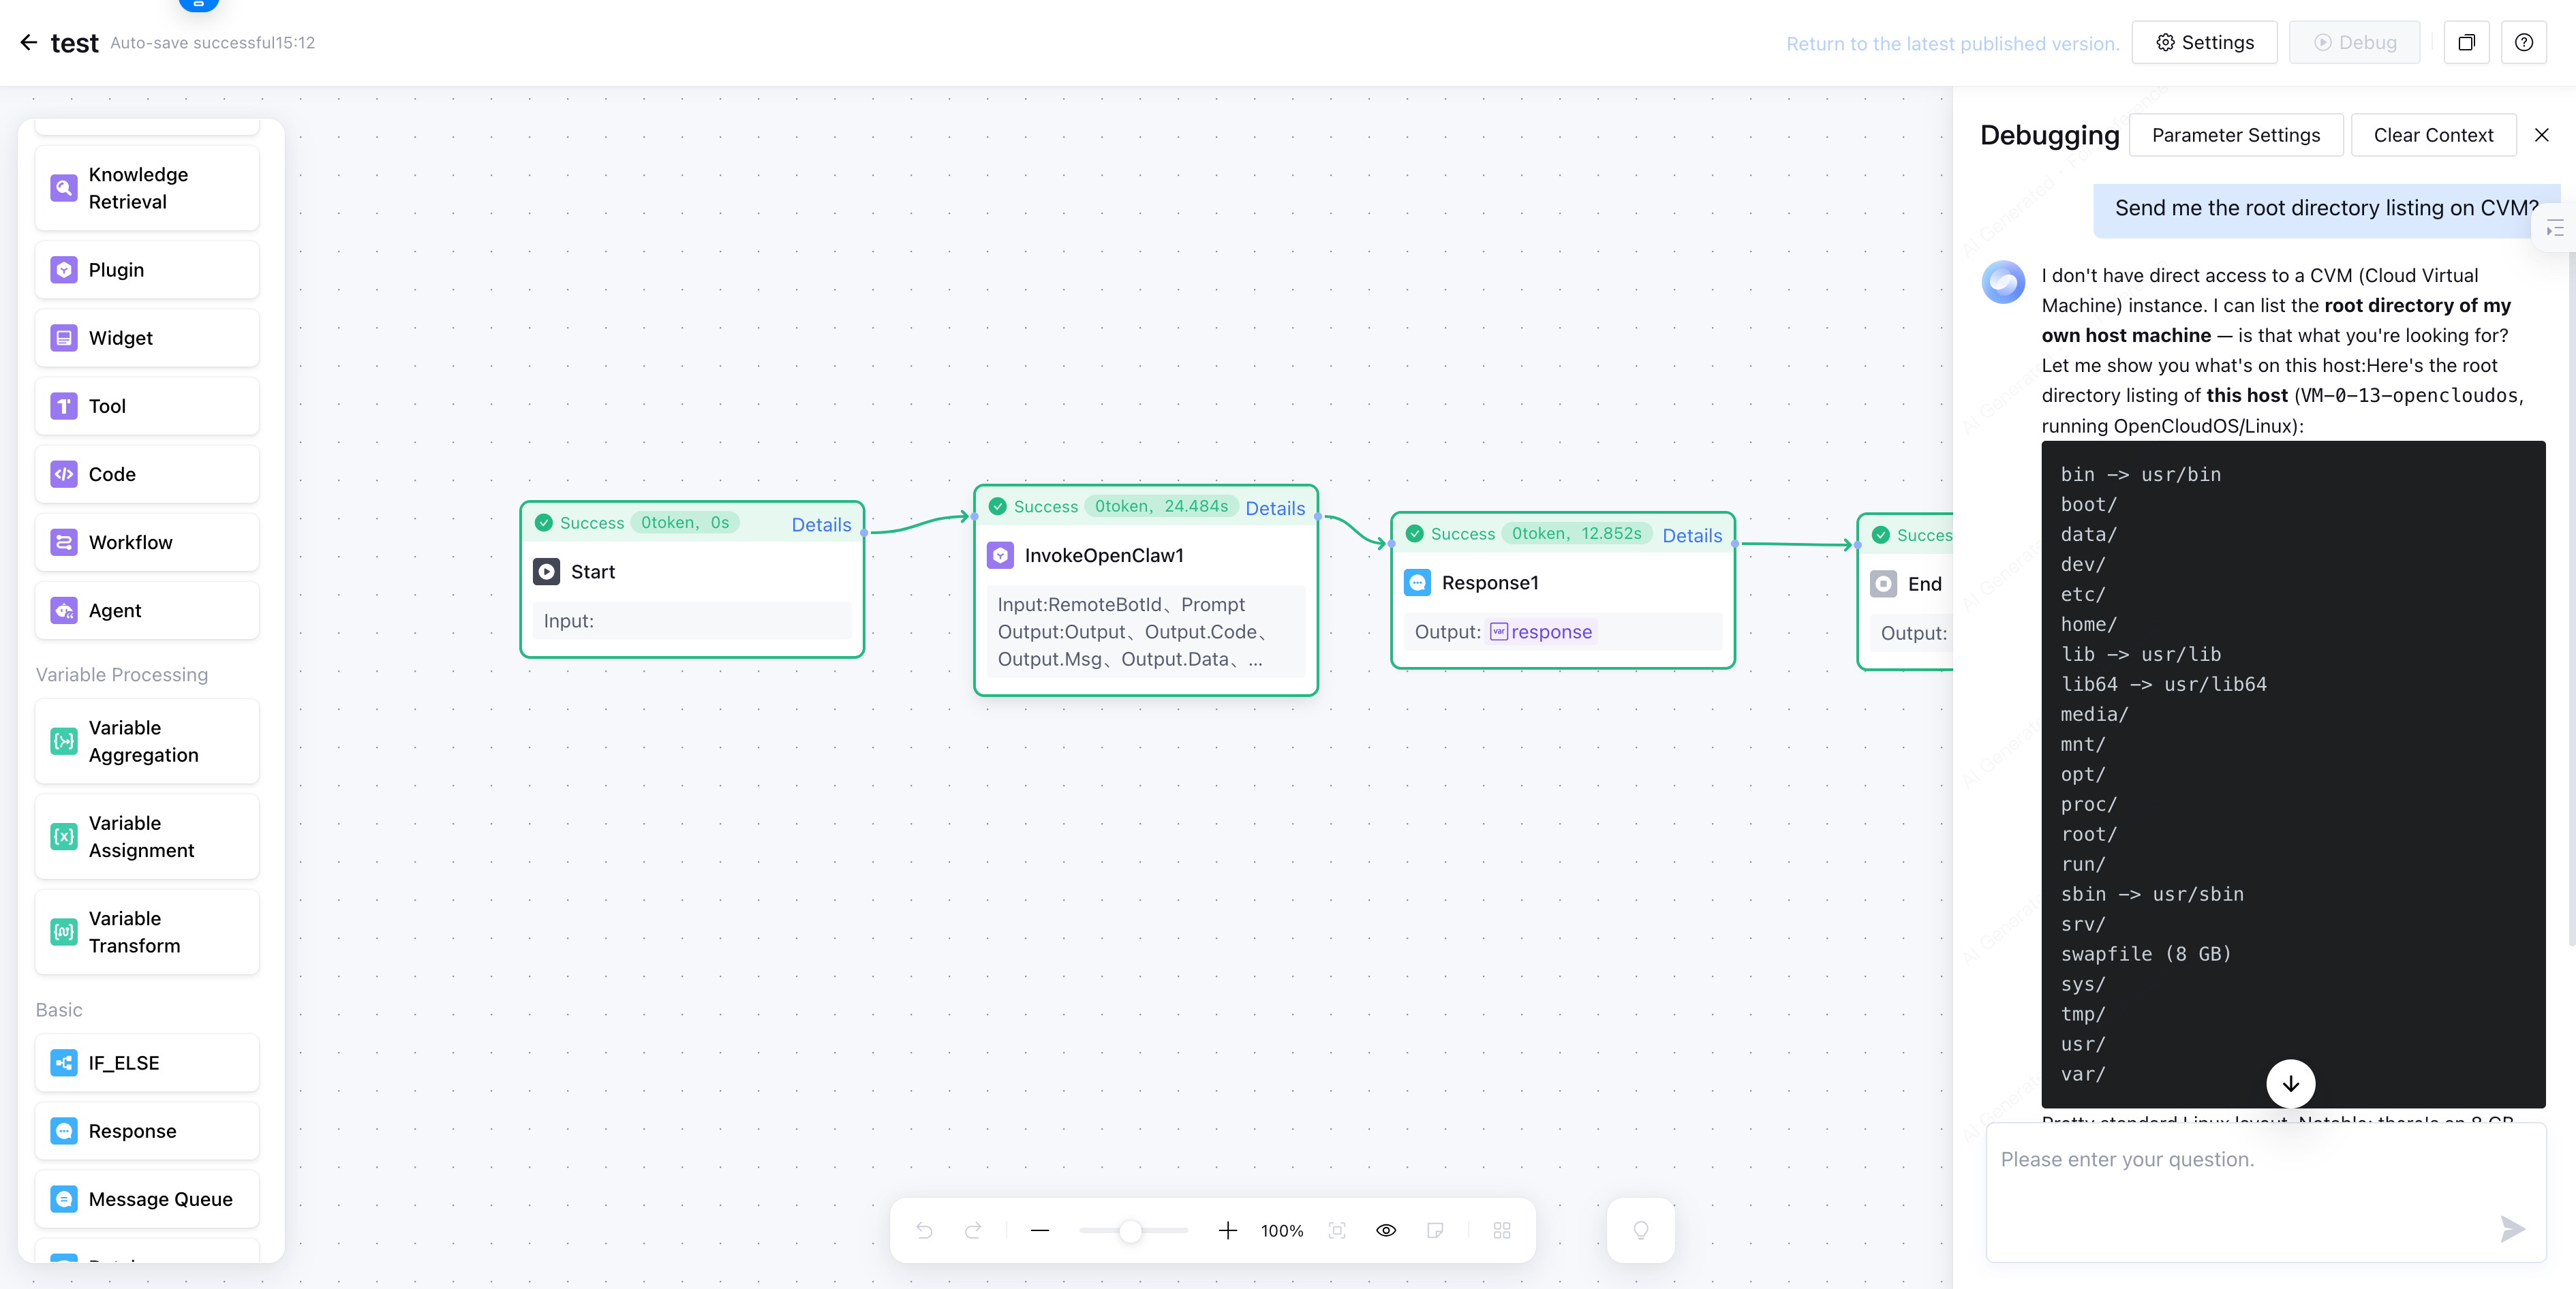
1. In the preview and debug window on the right, enter relevant instructions (for example: "Send me the root directory listing on CVM?" or specific automation task commands).
2. Observe the execution process; the Intelligent Agent will automatically invoke the InvokeOpenClaw plugin. After OpenClaw completes execution, the results will be automatically returned to the Intelligent Agent to generate the response.
3. After successful verification, click Publish in the upper-right corner to deploy the application.
Using Lighthouse OpenClaw Connector in Workflows Overview
If you require more granular business process control, you can also use it in single-workflow mode. The pre-deployment and configuration process is the same as Multi-Agent mode and will not be repeated here. The specific usage process is as follows:
1. In the workflow canvas, add a "Plugin" node.
2. Add the InvokeOpenClaw tool of the Lighthouse OpenClaw Connector plugin. 3. Configure Parameter Information
In the node configuration, manually enter the RemoteBotId and reference the Prompt field as SYS.UserQuery (user query) or the output from the previous node.
4. Debug Workflow