Overview
To implement blue-green deployment or Grayscale Release in a Tencent Cloud Kubernetes cluster, you usually need to deploy extra open-source tools in the cluster, such as Nginx Ingress and Traefik or deploy services to Service Mesh to utilize its capabilities. These solutions are relatively difficult to implement. If you only have simple requirements for blue-green deployment or grayscale release, you don’t expect to import too many components into the cluster, and don’t require complex usage, you can refer to this document to utilize the native features of Kubernetes and the LB plug-ins of TKE general clusters and TKE Serverless clusters to implement simple blue-green deployment and grayscale release.
Note:
This document is applicable only to TKE general clusters and TKE Serverless clusters.
How It Works
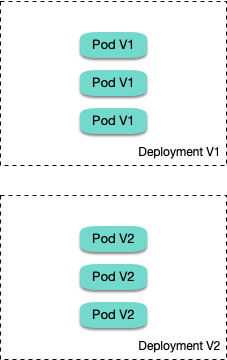
Users usually use Kubernetes workloads, such as Deployment and StatefulSet, to deploy businesses. Each workload manages a group of pods. With Deployment as an example, the following figure shows how it works:
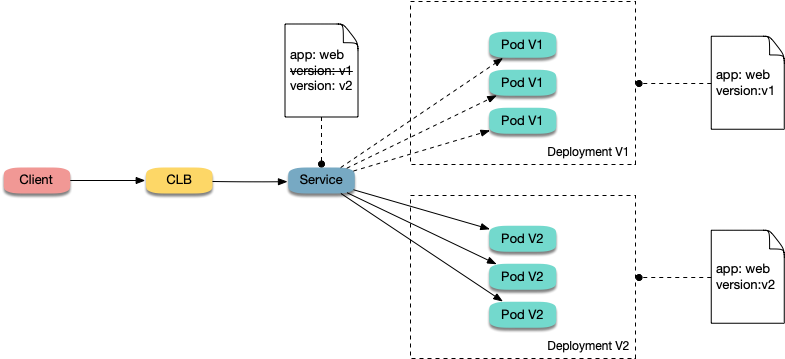
For each workload, a corresponding Service is created, and the Service matches backend pods via a selector. This allows other services or external requests to access the Service and the services provided by backend pods. To open services to external users, you can directly set the Service type to LoadBalancer, and the LB plug-in will automatically create a Tencent CLB as the traffic entry. How blue-green deployment works
Using Deployment as an example, assume that two different versions of Deployment have been deployed in a cluster, and its pods have the same label, but the two versions correspond to two different label values. In this case, the Service selects the pods of one of the versions via the selector. We can modify the label value, which indicates the service version, in the selector of the Service to switch services from one version to the other. See the figure below:
How Grayscale Release works
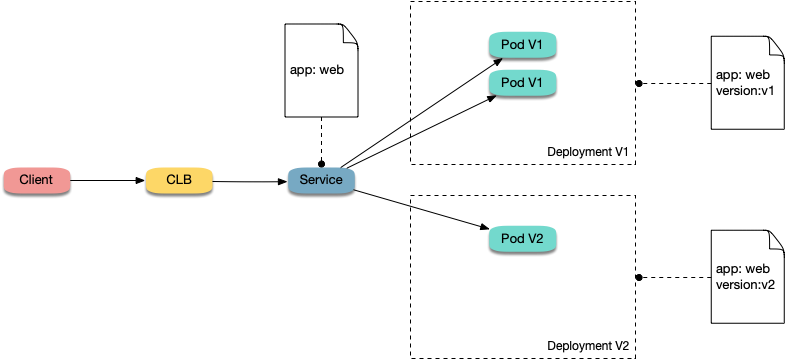
Users usually create a Service for each workload, but Kubernetes does not require Services to have a one-to-one correspondence to workloads. When a Service matches backend pods via a selector, if the pods of different workloads are selected by the same selector, then the Service corresponds to multiple workload versions. By adjusting the number of replicas of different workload versions, you can adjust the weight of different service versions. See the figure below:
Directions
Using YAML to create resources
This document introduces the following two methods for using YAML to deploy workloads and create Services:
Method 1: log in to the TKE console, click the ID of the target cluster to go to the cluster details page, click Create via YAML in the upper right corner, and input the YAML sample file content in this document to the editing interface. Method 2: save the sample YAML as a file and use kubectl to specify the YAML file to create resources, for example, kubectl apply -f xx.yaml.
Deploying multiple versions of workloads
1. Deploy the first version of Deployment in the cluster. Here nginx is used as an example. The YAML sample is as follows:
apiVersion: apps/v1
kind: Deployment
metadata:
name: nginx-v1
spec:
replicas: 3
selector:
matchLabels:
app: nginx
version: v1
template:
metadata:
labels:
app: nginx
version: v1
spec:
containers:
- name: nginx
image: "openresty/openresty:centos"
ports:
- name: http
protocol: TCP
containerPort: 80
volumeMounts:
- mountPath: /usr/local/openresty/nginx/conf/nginx.conf
name: config
subPath: nginx.conf
volumes:
- name: config
configMap:
name: nginx-v1
---
apiVersion: v1
kind: ConfigMap
metadata:
labels:
app: nginx
version: v1
name: nginx-v1
data:
nginx.conf: |-
worker_processes 1;
events {
accept_mutex on;
multi_accept on;
use epoll;
worker_connections 1024;
}
http {
ignore_invalid_headers off;
server {
listen 80;
location / {
access_by_lua '
local header_str = ngx.say("nginx-v1")
';
}
}
}
2. Deploy the second version of Deployment. Here nginx is used as an example. The YAML sample is as follows:
apiVersion: apps/v1
kind: Deployment
metadata:
name: nginx-v2
spec:
replicas: 3
selector:
matchLabels:
app: nginx
version: v2
template:
metadata:
labels:
app: nginx
version: v2
spec:
containers:
- name: nginx
image: "openresty/openresty:centos"
ports:
- name: http
protocol: TCP
containerPort: 80
volumeMounts:
- mountPath: /usr/local/openresty/nginx/conf/nginx.conf
name: config
subPath: nginx.conf
volumes:
- name: config
configMap:
name: nginx-v2
---
apiVersion: v1
kind: ConfigMap
metadata:
labels:
app: nginx
version: v2
name: nginx-v2
data:
nginx.conf: |-
worker_processes 1;
events {
accept_mutex on;
multi_accept on;
use epoll;
worker_connections 1024;
}
http {
ignore_invalid_headers off;
server {
listen 80;
location / {
access_by_lua '
local header_str = ngx.say("nginx-v2")
';
}
}
}
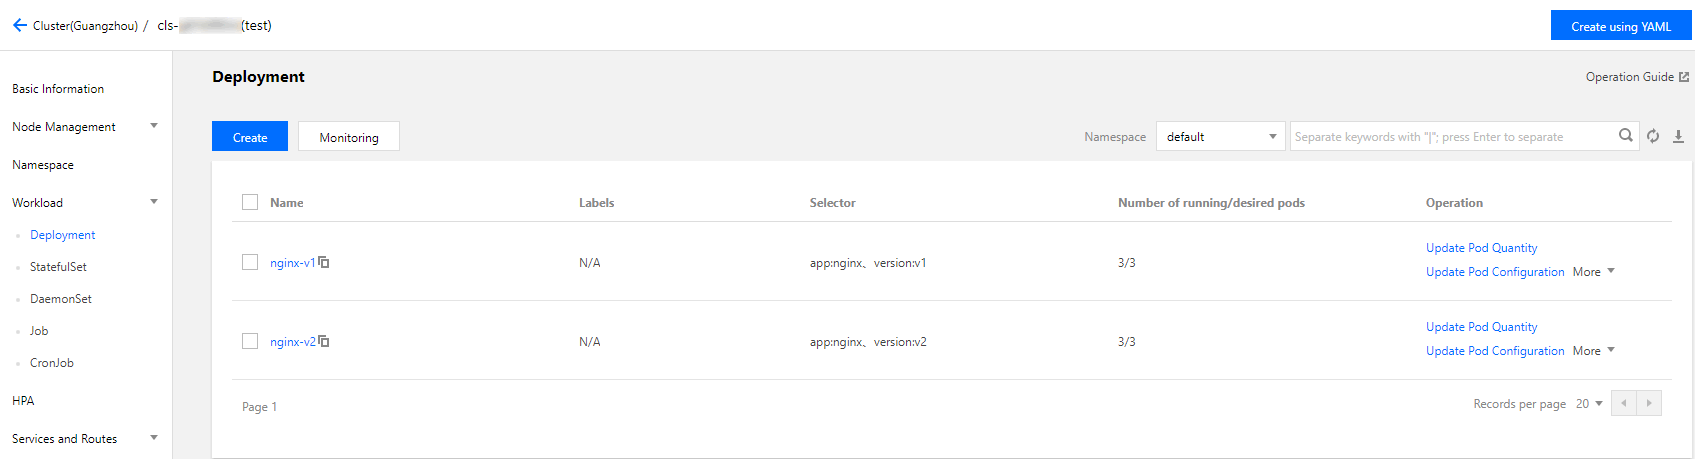
3. Log in to the TKE console and go to the Workload > Deployment page of the cluster to view the deployment information. Implementing blue-green deployment
1. Create a LoadBalancer-type Service for the deployed Deployment to open services to external users and specify that the v1 version is used. The YAML sample is as follows:
apiVersion: v1
kind: Service
metadata:
name: nginx
spec:
type: LoadBalancer
ports:
- port: 80
protocol: TCP
name: http
selector:
app: nginx
version: v1
2. Run the following commands to test the access.
for i in {1..10}; do curl EXTERNAL-IP; done;
The returned results are as follows. All of them are responses from the v1 version.
nginx-v1
nginx-v1
nginx-v1
nginx-v1
nginx-v1
nginx-v1
nginx-v1
nginx-v1
nginx-v1
nginx-v1
3. Use the console or kubectl to modify the selector of the Service to enable the selector to select the v2 service version:
Modification via the console:
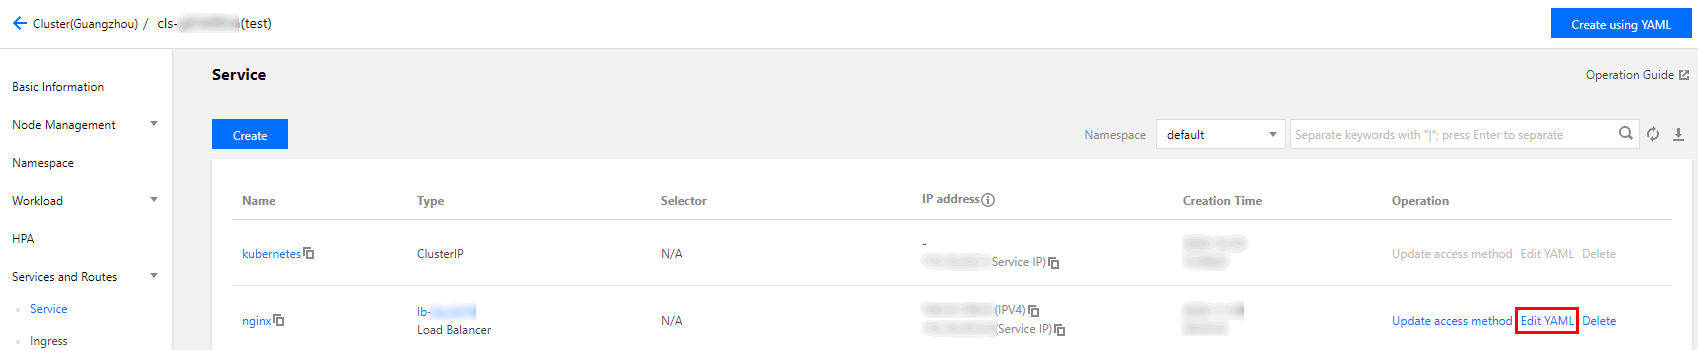
3.1.1 Go to the cluster details page, and choose Services and Routes > Service in the left sidebar.
3.1.2 On the "Service" page, locate the Service to be modified and click Edit YAML to its right, as shown in the figure below:
Modify the selector content as follows:
selector:
app: nginx
version: v2
3.1.3 Click Done.
Modification via kubectl:
kubectl patch service nginx -p '{"spec":{"selector":{"version":"v2"}}}'
4. Run the following commands to test the access again.
$ for i in {1..10}; do curl EXTERNAL-IP; done;
The returned results are as follows. All of them are responses from the v2 version. This means you have successfully implemented blue-green deployment.
nginx-v2
nginx-v2
nginx-v2
nginx-v2
nginx-v2
nginx-v2
nginx-v2
nginx-v2
nginx-v2
nginx-v2
Implementing Grayscale Release
1. Grayscale Release is different from blue-green deployment. You do not need to specify the v1 version to be used by the Service. You only need to delete the version label in the selector so that the Service will simultaneously select the pods of the two Deployment versions. The YAML sample is as follows:
apiVersion: v1
kind: Service
metadata:
name: nginx
spec:
type: LoadBalancer
ports:
- port: 80
protocol: TCP
name: http
selector:
app: nginx
2. Run the following commands to test the access.
for i in {1..10}; do curl EXTERNAL-IP; done; # Replace EXTERNAL-IP with the CLB IP address of the Service.
The returned results are as follows. Half of them are responses from the v1 version, and the other half from the v2 version.
nginx-v1
nginx-v1
nginx-v2
nginx-v2
nginx-v2
nginx-v1
nginx-v1
nginx-v1
nginx-v2
nginx-v2
3. Use the console or kubectl to adjust the replicas of Deployment versions v1 and v2. Specifically, set v1 to 1 replica and v2 to 4 replicas.
Modification via the console:
3.1.1 Go to the Workload > Deployment page of the cluster and choose More > Edit YAML to the right of the v1 Deployment version.
3.1.2 On the YAML editing page, change .spec.replicas of v1 to 1 and click Done.
3.1.3 Repeat the above steps to change .spec.replicas of v2 to 4 and click Done.
Modification via kubectl:
kubectl scale deployment/nginx-v1 --replicas=1
kubectl scale deployment/nginx-v2 --replicas=4
4. Run the following commands to perform an access test again.
for i in {1..10}; do curl EXTERNAL-IP; done;
The returned results are as follows. In 10 access attempts, the v1 version responded only twice. The ratio between the responses of v1 and those of v2 is consistent with the ratio between their replicas, that is, 1:4. This shows you have implemented Grayscale Release by controlling the number of replicas of different service versions.
nginx-v2
nginx-v1
nginx-v2
nginx-v2
nginx-v2
nginx-v2
nginx-v1
nginx-v2
nginx-v2
nginx-v2