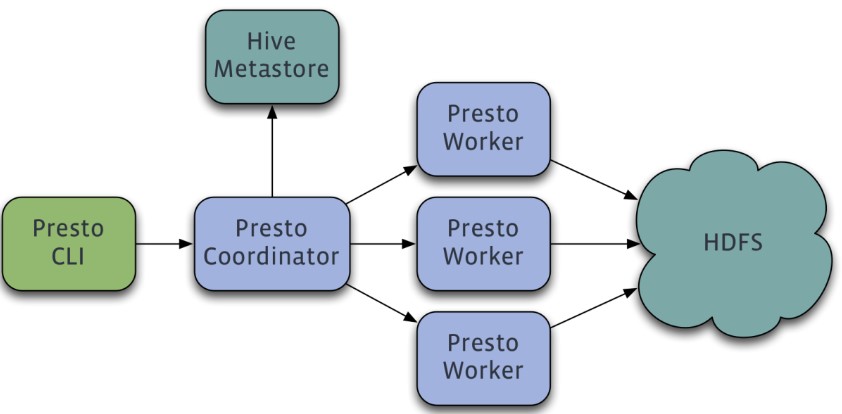
Presto is a distributed SQL query engine developed by Facebook that is designed to perform high-speed, real-time data analysis for interactive analytical queries of gigabytes to petabytes of data. It supports standard ANSI SQL, including complex queries, aggregations, joins, and window functions. Implemented by Java, it supports various data sources such as Hive, HBase, relational databases, and even proprietary data stores. Below is its architecture diagram:
Presto adopts a distributed system running on multiple servers in a master-slave architecture, which consists of one master node (coordinator) and multiple slave nodes (worker). The client (Presto CLI) is responsible for submitting a query to the Coordinator node which is responsible for parsing the SQL statement, generating the query execution plan, and managing the worker nodes. A worker node is responsible for actually executing the query job.
Presto on EMR is pre-configured with connectors such as Hive, MySQL, and Kafka. In this section, the Hive connector is used as an example to illustrate how Presto reads the data in a Hive table for query. The EMR cluster is configured with environment variables related to presto-client, so you can switch directly to the Hadoop user and use Presto CLI.
1. Preparations for Development
Confirm that you have activated Tencent Cloud and created an EMR cluster. When creating the EMR cluster, select the Presto component on the software configuration page.
Relevant software programs such as Presto are installed in the `/usr/local/service/` directory of the CVM instance for the EMR cluster.
2. Using a Connector to Manipulate Hive
First, you need to log in to any node (preferably a master one) in the EMR cluster. For more information on how to log in to EMR, please see Logging in to Linux Instances. Here, you can choose to log in with WebShell. Click "Log in" on the right of the desired CVM instance to enter the login page. The default username is root, and the password is the one you set when creating the EMR cluster. Once the correct credentials are entered, you can enter the command line interface.
Run the following command in EMR command-line interface to switch to the Hadoop user and go to the Presto folder:
[root@172 ~]# su hadoop
[hadoop@172 ~]# cd /usr/local/service/presto
View the value of uri in the etc/config.properties configuration file:
[hadoop@172 presto]$ vim etc/config.properties
http-server.http.port=$port
discovery.uri=http://$host:$port
Here, $host is your host address, and $port is your port number. Then, switch to the presto-client folder and connect to Hive through Presto:
[hadoop@172 presto]# cd /usr/local/service/presto-client
Here, --catalog indicates the type of database to be manipulated, and --schema the database name (the default database "default" is entered here). For more information on the parameters, run the presto –h command or see the official documentation.
After successful execution, you can enter the Presto interface and go directly to the specified database. You can use Hive-SQL to view the table in the Hive database: