製品アップデート情報
Tencent Cloudオーディオビデオ端末SDKの再生アップグレードおよび承認チェック追加に関するお知らせ
TRTCアプリケーションのサブスクリプションパッケージサービスのリリースに関する説明について
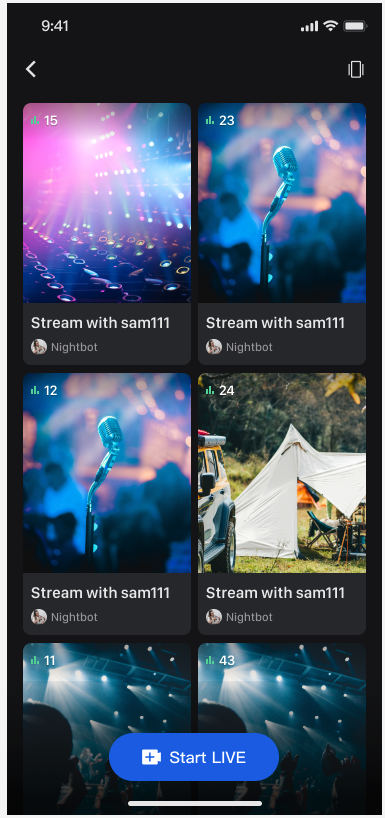
Double-Column Waterfall Flow | Single-Column Waterfall Flow |
 |
 |
import android.content.Contextimport android.os.Bundleimport androidx.appcompat.app.AppCompatActivityimport com.trtc.uikit.livekit.features.livelist.LiveListViewimport com.trtc.uikit.livekit.features.livelist.Styleclass YourActivity : AppCompatActivity() {override fun onCreate(savedInstanceState: Bundle?) {super.onCreate(savedInstanceState)// 1. Create and initialize waterfall layout viewval view = createLiveListView(this)// 2. Add the created LiveListView to your Activity or FragmentsetContentView(view)}fun createLiveListView(context: Context): LiveListView {val liveListView = LiveListView(context)// This code is a two-column waterfall layout initialization example. If you need to use a single column waterfall layout, change the initialization code to liveListView.init(this, Style.SINGLE_COLUMN)liveListView.init(this, Style.DOUBLE_COLUMN)return liveListView}}
import android.content.Context;import android.os.Bundle;import androidx.appcompat.app.AppCompatActivity;import com.trtc.uikit.livekit.features.livelist.LiveListView;import com.trtc.uikit.livekit.features.livelist.Style;public class YourActivity extends AppCompatActivity {@Overrideprotected void onCreate(Bundle savedInstanceState) {super.onCreate(savedInstanceState);// 1. Create and initialize waterfall layout viewLiveListView view = createLiveListView(this);// 2. Add the created LiveListView to your Activity or FragmentsetContentView(view);}private LiveListView createLiveListView(Context context) {LiveListView liveListView = new LiveListView(context);// This code is a two-column waterfall layout initialization example. If you need to use a single column waterfall layout, change the initialization code to liveListView.init(this, Style.SINGLE_COLUMN, null, null);liveListView.init(this, Style.DOUBLE_COLUMN, null, null);return liveListView;}}
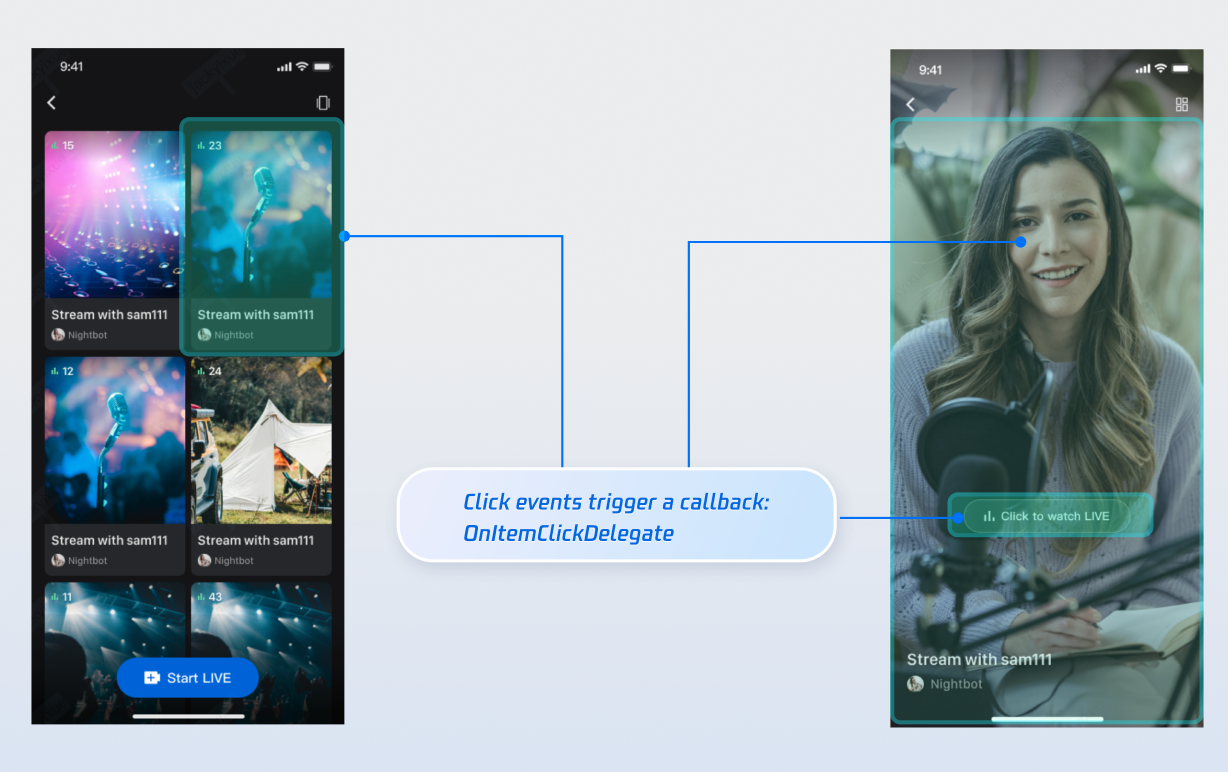
fun createLiveListView(context: Context): LiveListView {val liveListView = LiveListView(context)// This code is a two-column waterfall layout initialization example. If you need to use a single column waterfall layout, change the initialization code to liveListView.init(this, Style.SINGLE_COLUMN)liveListView.init(this, Style.DOUBLE_COLUMN)liveListView.setOnItemClickListener { view, liveInfo ->click live list item to redirect to audience viewing pageval intent = Intent(context, YourAudienceActivity::class.java)intent.putExtra("liveId", liveInfo.roomId)context.startActivity(intent)}return liveListView}
private LiveListView createLiveListView(Context context) {LiveListView liveListView = new LiveListView(context);// This code is a two-column waterfall layout initialization example. If you need to use a single column waterfall layout, change the initialization code to liveListView.init(this, Style.SINGLE_COLUMN, null, null);liveListView.init(this, Style.DOUBLE_COLUMN, null, null);liveListView.setOnItemClickListener((view, liveInfo) -> {click live list item to redirect to audience viewing pageIntent intent = new Intent(context, YourAudienceActivity.class);intent.putExtra("liveId", liveInfo.roomId);context.startActivity(intent);});return liveListView;}
LiveListDataSource interface instead of using the component's default list data.// 1. Import dependencyimport com.trtc.uikit.livekit.features.livelist.LiveListDataSource;// 2. Customize the data source by implementing LiveListDataSourceval dataSource = object : LiveListDataSource {override fun fetchLiveList(param: FetchLiveListParam,callback: LiveListCallback) {// Connect to your own business backend and return data to the UI component in the following formatval liveInfoList = mutableListOf<TUILiveListManager.LiveInfo>()val liveInfo = TUILiveListManager.LiveInfo().apply {roomInfo = TUIRoomDefine.RoomInfo().apply {roomId = "live_123456"name = "live_123456"}}liveInfoList.add(liveInfo)val cursor = "aabbccdd"callback.onSuccess(cursor, liveInfoList)}}// 3. Import a custom dataSource during initializationliveListView.init(this, Style.DOUBLE_COLUMN, dataSource = dataSource)
// 1. Import dependencyimport com.trtc.uikit.livekit.features.livelist.LiveListDataSource;// 2. Customize the data source by implementing LiveListDataSourceLiveListDataSource dataSource = (param, callback) -> {// Connect to your own business backend and return data to the UI component in the following formatList<TUILiveListManager.LiveInfo> liveInfoList = new ArrayList<>();TUILiveListManager.LiveInfo liveInfo = new TUILiveListManager.LiveInfo();liveInfo.roomInfo = new TUIRoomDefine.RoomInfo();liveInfo.roomInfo.roomId = "live_123456";liveInfo.roomInfo.name = "live_123456";liveInfoList.add(liveInfo);String cursor = "aabbccdd";callback.onSuccess(cursor, liveInfoList);};// 3. Import a custom dataSource during initializationliveListView.init(this, Style.DOUBLE_COLUMN, null, dataSource);
LiveListViewAdapter interface.// 1. Import dependencyimport com.trtc.uikit.livekit.features.livelist.LiveListViewAdapter;// 2. Implement LiveListViewAdapter to customize widgetsval liveListViewAdapter = object : LiveListViewAdapter {override fun createLiveInfoView(liveInfo: TUILiveListManager.LiveInfo): View {// Custom viewval widgetView = YourView(context)widgetView.init(liveInfo)return widgetView}override fun updateLiveInfoView(view: View, liveInfo: TUILiveListManager.LiveInfo) {// Refresh the bound data in the viewval widgetView = view as YourViewwidgetView.updateLiveInfoView(liveInfo)}}// 3. Import a custom liveListViewAdapter during initializationliveListView.init(this, Style.DOUBLE_COLUMN, adapter = liveListViewAdapter)
// 1. Import dependencyimport com.trtc.uikit.livekit.features.livelist.LiveListViewAdapter;// 2. Implement LiveListViewAdapter to customize widgetsLiveListViewAdapter liveListViewAdapter = new LiveListViewAdapter() {@Overridepublic View createLiveInfoView(TUILiveListManager.LiveInfo liveInfo) {// Custom viewCustomView widgetView = new CustomView(context);widgetView.init(liveInfo);return widgetView;}@Overridepublic void updateLiveInfoView(View view, TUILiveListManager.LiveInfo liveInfo) {// Refresh the bound data in the viewCustomView widgetView = (CustomView) view;widgetView.updateLiveInfoView(liveInfo);}};// 3. Import a custom liveListViewAdapter during initializationliveListView.init(this, Style.DOUBLE_COLUMN, liveListViewAdapter, null);
Feature | Description | Integration Guide |
Host Streaming | The complete workflow for a host to start a stream, including pre-stream setup and various in-stream interactions. | |
Audience Viewing | Audience can watch live streaming after entering the anchor's live streaming room, with features like audience mic connection, live room information, online audience, and bullet screen display. |
フィードバック