Overview of Scenario-Based Solutions
소셜 엔터테인먼트
이커머스 라이브 방송
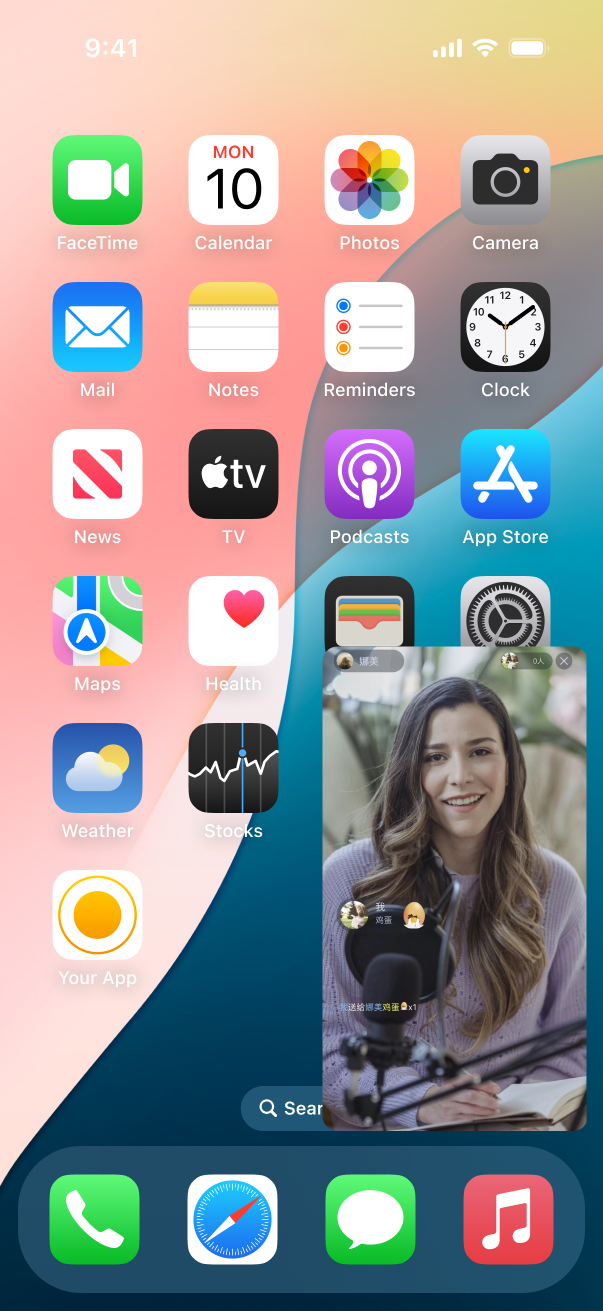
Audio/Video Call
원거리 실시간 조작
스마트 고객 서비스
AI 인터뷰
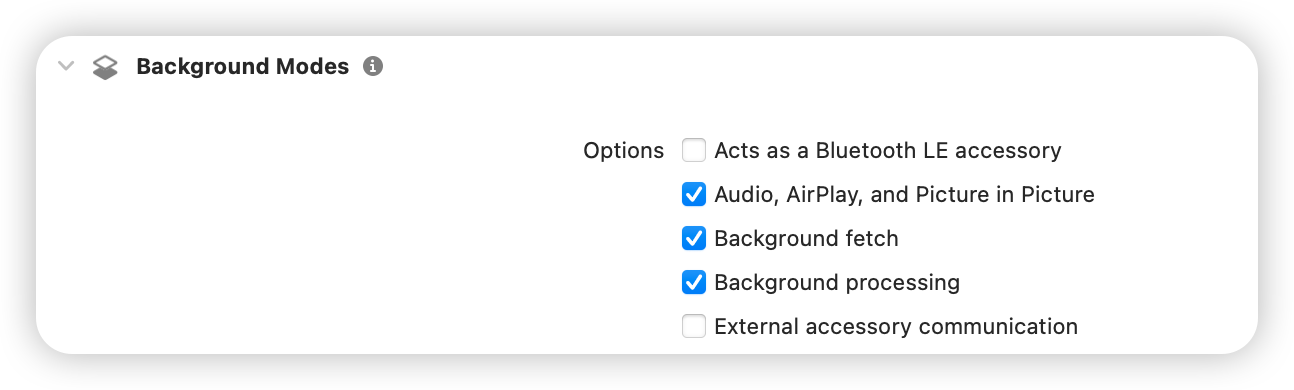
NSDictionary *param = @{@"api" : @"enablePictureInPictureFloatingWindow",@"params" : @{@"enable" : @(true)}};NSError *err = nil;NSData *jsonData = [NSJSONSerialization dataWithJSONObject:param options:0 error:&err];if (err) {NSLog(@"error: %@", err);}NSString *paramJsonString = [[NSString alloc] initWithData:jsonData encoding:NSUTF8StringEncoding];[self.trtcCloud callExperimentalAPI:paramJsonString];
let param: [String : Any] = ["api": "enablePictureInPictureFloatingWindow", "params": ["enable":true]]if let jsonData = try? JSONSerialization.data(withJSONObject: param, options: .fragmentsAllowed) {let paramJsonString = String.init(data: jsonData, encoding: .utf8) ?? ""trtcCloud.callExperimentalAPI(paramJsonString)}
import UIKitimport AVKitimport CoreFoundationimport TXLiteAVSDK_Professionalclass PipVC: UIViewController {let trtcCloud = TRTCCloud()var pipController: AVPictureInPictureController?var combinedPixelBuffer: CVPixelBuffer?let pixelBufferLock = DispatchQueue(label: "com.demo.pip")var pipDisplayLayer: AVSampleBufferDisplayLayer!}
func enterTrtcRoom() {let params = TRTCParams()params.sdkAppId = UInt32(SDKAppID)params.roomId = UInt32(roomId)params.userId = userIdparams.role = .audienceparams.userSig = GenerateTestUserSig.genTestUserSig(identifier: userId) as StringtrtcCloud.addDelegate(self)trtcCloud.enterRoom(params, appScene: .LIVE)}
func setupAudioSession() {do {try AVAudioSession.sharedInstance().setCategory(.playback)} catch let error {print("+> error: \\(error)")return}do {try AVAudioSession.sharedInstance().setActive(true)} catch let error {print("+> error: \\(error)")return}}func enableBGDecode() {let param: [String : Any] = ["api": "enableBackgroundDecoding","params": ["enable":true]]if let jsonData = try? JSONSerialization.data(withJSONObject: param, options: .fragmentsAllowed) {let paramJsonString = String.init(data: jsonData, encoding: .utf8) ?? ""trtcCloud.callExperimentalAPI(paramJsonString)}}
func setupPipController() {let screenWidth = UIScreen.main.bounds.widthlet videoHeight = screenWidth / 2 / 9 * 16pipDisplayLayer = AVSampleBufferDisplayLayer()pipDisplayLayer.frame = CGRect(x: 0, y: 0, width: screenWidth, height: videoHeight) // Adjust size as neededpipDisplayLayer.videoGravity = .resizeAspectpipDisplayLayer.isOpaque = truepipDisplayLayer.backgroundColor = CGColor(red: 0, green: 0, blue: 0, alpha: 1)view.layer.addSublayer(pipDisplayLayer)if AVPictureInPictureController.isPictureInPictureSupported() {let contentSource = AVPictureInPictureController.ContentSource(sampleBufferDisplayLayer: pipDisplayLayer,playbackDelegate: self)pipController = AVPictureInPictureController(contentSource: contentSource)pipController?.delegate = selfpipController?.canStartPictureInPictureAutomaticallyFromInline = true} else {print("+> error")}}
._NV12과 단계6: 좌우 2개 화면 결합의 방법은 관련이 있으며, 다른 형식은 다른 결합 방법이 필요합니다. 이 예제는 ._NV12 형식의 좌우 결합만 보여줍니다.extension PipVC: TRTCCloudDelegate {func onUserVideoAvailable(_ userId: String, available: Bool) {if available {trtcCloud.startRemoteView(userId, streamType: .big, view: nil)trtcCloud.setRemoteVideoRenderDelegate(userId, delegate: self, pixelFormat: ._NV12, bufferType: .pixelBuffer);}else{trtcCloud.stopRemoteView(userId, streamType: .big)}}}
func createCombinedPixelBuffer(from sourceBuffer: CVPixelBuffer) {let width = CVPixelBufferGetWidth(sourceBuffer) * 2let height = CVPixelBufferGetHeight(sourceBuffer)let pixelFormat = CVPixelBufferGetPixelFormatType(sourceBuffer)let attributes: [CFString: Any] = [kCVPixelBufferWidthKey: width,kCVPixelBufferHeightKey: height,kCVPixelBufferPixelFormatTypeKey: pixelFormat,kCVPixelBufferIOSurfacePropertiesKey: [:]]CVPixelBufferCreate(kCFAllocatorDefault, width, height, pixelFormat, attributes as CFDictionary, &combinedPixelBuffer)}func updateCombinedPixelBuffer(with sourceBuffer: CVPixelBuffer, forLeft: Bool) {guard let combinedBuffer = combinedPixelBuffer else { print("+> error"); return}CVPixelBufferLockBaseAddress(combinedBuffer, [])CVPixelBufferLockBaseAddress(sourceBuffer, [])// Plane 0: Y/luma planelet combinedLumaBaseAddress = CVPixelBufferGetBaseAddressOfPlane(combinedBuffer, 0)!let sourceLumaBaseAddress = CVPixelBufferGetBaseAddressOfPlane(sourceBuffer, 0)!let combinedLumaBytesPerRow = CVPixelBufferGetBytesPerRowOfPlane(combinedBuffer, 0)let sourceLumaBytesPerRow = CVPixelBufferGetBytesPerRowOfPlane(sourceBuffer, 0)let widthLuma = CVPixelBufferGetWidthOfPlane(sourceBuffer, 0)let heightLuma = CVPixelBufferGetHeightOfPlane(sourceBuffer, 0)// Plane 1: UV/chroma planelet combinedChromaBaseAddress = CVPixelBufferGetBaseAddressOfPlane(combinedBuffer, 1)!let sourceChromaBaseAddress = CVPixelBufferGetBaseAddressOfPlane(sourceBuffer, 1)!let combinedChromaBytesPerRow = CVPixelBufferGetBytesPerRowOfPlane(combinedBuffer, 1)let sourceChromaBytesPerRow = CVPixelBufferGetBytesPerRowOfPlane(sourceBuffer, 1)let widthChroma = CVPixelBufferGetWidthOfPlane(sourceBuffer, 1)let heightChroma = CVPixelBufferGetHeightOfPlane(sourceBuffer, 1)for row in 0..<heightLuma {let combinedRow = combinedLumaBaseAddress.advanced(by: row * combinedLumaBytesPerRow + (forLeft ? 0 : widthLuma))let sourceRow = sourceLumaBaseAddress.advanced(by: row * sourceLumaBytesPerRow)memcpy(combinedRow, sourceRow, widthLuma)}// ._nv12 the chroma plane is subsampled 2:1 horizontally and verticallyfor row in 0..<heightChroma {let combinedRow = combinedChromaBaseAddress.advanced(by: row * combinedChromaBytesPerRow + (forLeft ? 0 : 2 * widthChroma))let sourceRow = sourceChromaBaseAddress.advanced(by: row * sourceChromaBytesPerRow)memcpy(combinedRow, sourceRow, 2 * widthChroma)}CVPixelBufferUnlockBaseAddress(sourceBuffer, [])CVPixelBufferUnlockBaseAddress(combinedBuffer, [])}
func displayPixelBuffer(_ pixelBuffer: CVPixelBuffer, in layer: AVSampleBufferDisplayLayer) {var timing = CMSampleTimingInfo.init(duration: .invalid,presentationTimeStamp: .invalid,decodeTimeStamp: .invalid)var videoInfo: CMVideoFormatDescription? = nilvar result = CMVideoFormatDescriptionCreateForImageBuffer(allocator: nil,imageBuffer: pixelBuffer,formatDescriptionOut: &videoInfo)if result != 0 {return}guard let videoInfo = videoInfo else {return}var sampleBuffer: CMSampleBuffer? = nilresult = CMSampleBufferCreateForImageBuffer(allocator: kCFAllocatorDefault,imageBuffer: pixelBuffer,dataReady: true,makeDataReadyCallback: nil,refcon: nil,formatDescription: videoInfo,sampleTiming: &timing,sampleBufferOut: &sampleBuffer)if result != 0 {return}guard let sampleBuffer = sampleBuffer else {return}guard let attachments = CMSampleBufferGetSampleAttachmentsArray(sampleBuffer,createIfNecessary: true) else {return}CFDictionarySetValue(unsafeBitCast(CFArrayGetValueAtIndex(attachments, 0), to: CFMutableDictionary.self),Unmanaged.passUnretained(kCMSampleAttachmentKey_DisplayImmediately).toOpaque(),Unmanaged.passUnretained(kCFBooleanTrue).toOpaque())layer.enqueue(sampleBuffer)if layer.status == .failed {if let error = layer.error as? NSError {if error.code == -11847 {print("+> error")}}}}
extension PipVC: TRTCVideoRenderDelegate {func onRenderVideoFrame(_ frame: TRTCVideoFrame, userId: String?, streamType: TRTCVideoStreamType) {guard let newPixelBuffer = frame.pixelBuffer else { print("+> error"); return}pixelBufferLock.sync {if combinedPixelBuffer == nil {createCombinedPixelBuffer(from: newPixelBuffer)}if userId == "left" {updateCombinedPixelBuffer(with: newPixelBuffer, forLeft: true)} else {updateCombinedPixelBuffer(with: newPixelBuffer, forLeft: false)}}if let combinedBuffer = combinedPixelBuffer {DispatchQueue.main.async {self.displayPixelBuffer(combinedBuffer, in: self.pipDisplayLayer)}}}}
extension PipVC: AVPictureInPictureControllerDelegate {func pictureInPictureControllerWillStartPictureInPicture(_ pictureInPictureController: AVPictureInPictureController) {}func pictureInPictureControllerDidStartPictureInPicture(_ pictureInPictureController: AVPictureInPictureController) {}func pictureInPictureControllerDidStopPictureInPicture(_ pictureInPictureController: AVPictureInPictureController) {}func pictureInPictureController(_ pictureInPictureController: AVPictureInPictureController, restoreUserInterfaceForPictureInPictureStopWithCompletionHandler completionHandler: @escaping (Bool) -> Void) {completionHandler(true)}func pictureInPictureController(_ pictureInPictureController: AVPictureInPictureController, failedToStartPictureInPictureWithError error: any Error) {}}extension PipVC: AVPictureInPictureSampleBufferPlaybackDelegate {func pictureInPictureControllerTimeRangeForPlayback(_ pictureInPictureController: AVPictureInPictureController) -> CMTimeRange {return CMTimeRange.init(start: .zero, duration: .positiveInfinity)}func pictureInPictureControllerIsPlaybackPaused(_ pictureInPictureController: AVPictureInPictureController) -> Bool {return false}func pictureInPictureController(_ pictureInPictureController: AVPictureInPictureController, setPlaying playing: Bool) {}func pictureInPictureController(_ pictureInPictureController: AVPictureInPictureController, didTransitionToRenderSize newRenderSize: CMVideoDimensions) {}func pictureInPictureController(_ pictureInPictureController: AVPictureInPictureController, skipByInterval skipInterval: CMTime) async {}}
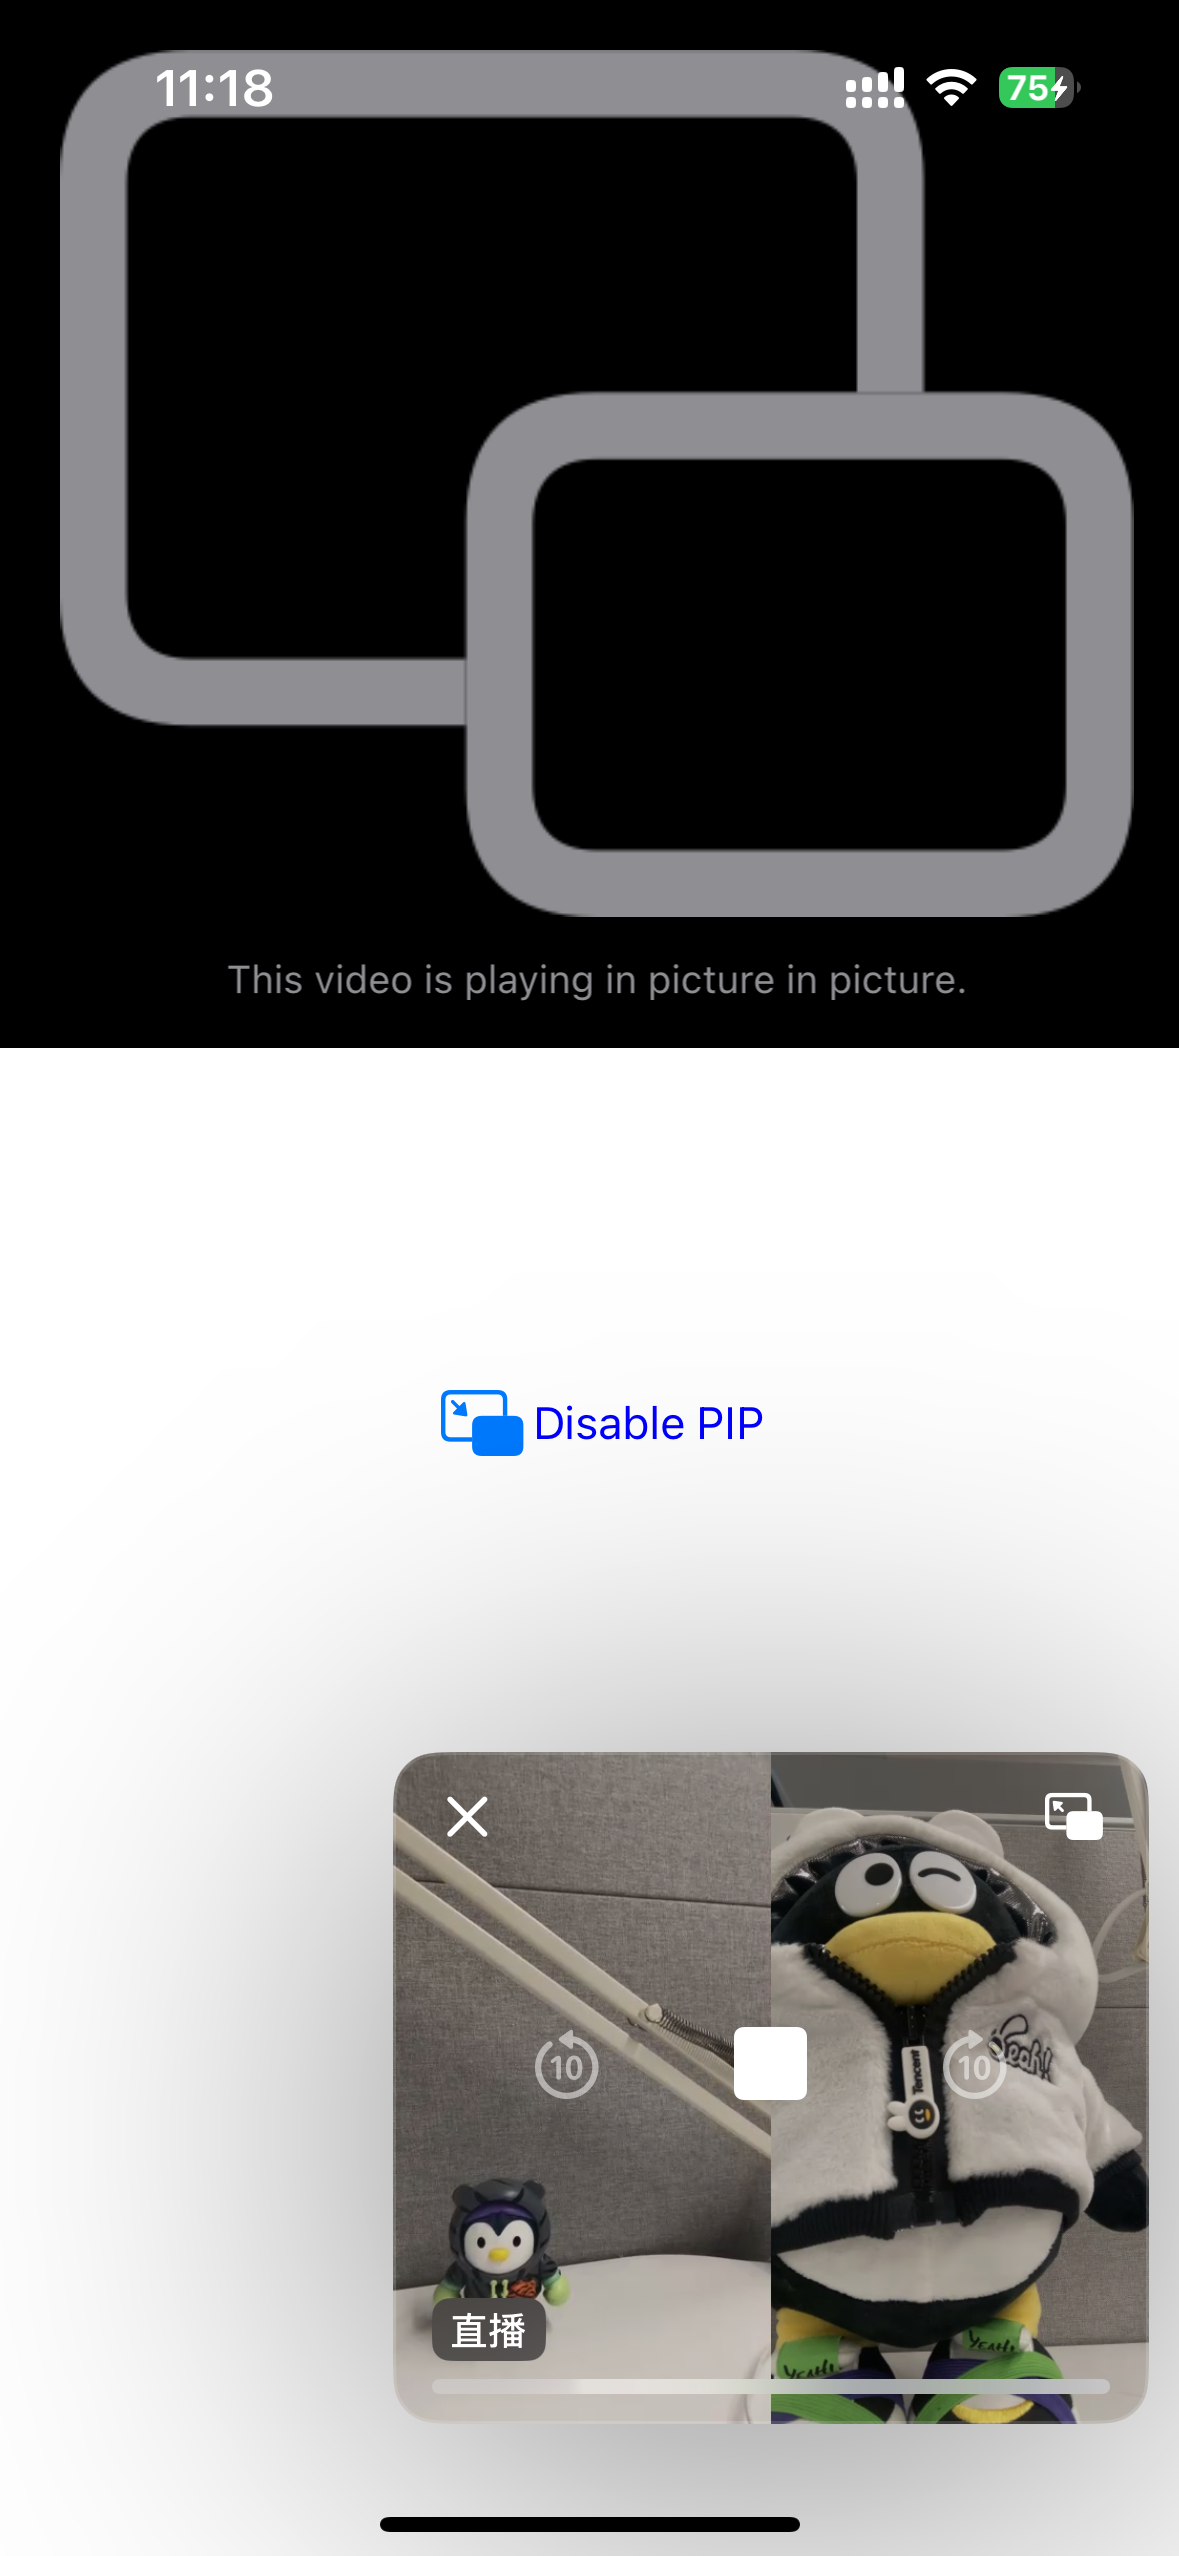
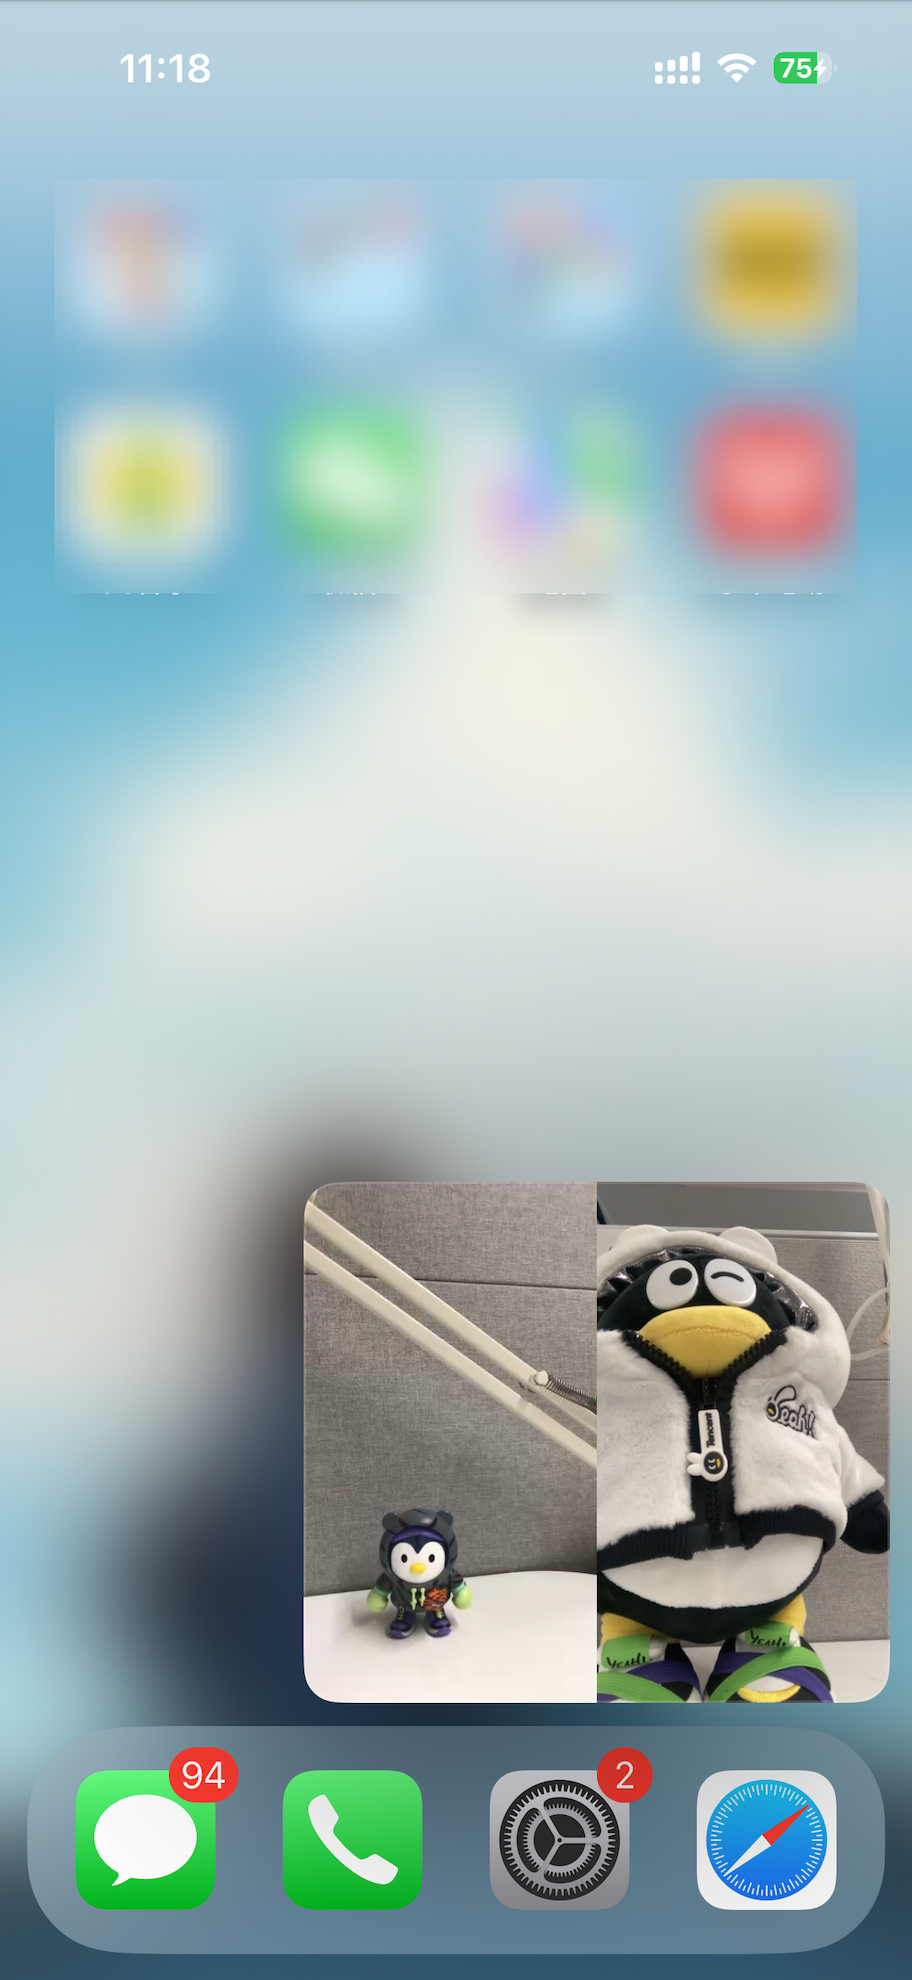
// 화면 속 화면의 끄기pipController?.stopPictureInPicture()// 화면 속 화면의 켜기pipController?.startPictureInPicture()
<activityandroid:name="com.tencent.trtc.pictureinpicture.PictureInPictureActivity"android:theme="@style/Theme.AppCompat.Light.NoActionBar"android:configChanges="screenSize|smallestScreenSize|screenLayout|orientation"android:supportsPictureInPicture="true"
android:supportsPictureInPicture="true"는 PIP 지원을 선언함을 나타냅니다.private void startPictureInPicture() {if (Build.VERSION.SDK_INT >= Build.VERSION_CODES.O) {PictureInPictureParams.Builder pictureInPictureBuilder = new PictureInPictureParams.Builder();Rational aspectRatio = new Rational(mVideoView.getWidth(), mVideoView.getHeight());pictureInPictureBuilder.setAspectRatio(aspectRatio);화면 속 화면에 진입합니다enterPictureInPictureMode(pictureInPictureBuilder.build());} else {Toast.makeText(this, R.string.picture_in_picture_not_supported, Toast.LENGTH_SHORT).show();}}
pictureInPictureBuilder.setAspectRatio(aspectRatio); 화면 속 화면의 가로세로 비율을 설정하며, 여기서는 재생 중인 비디오 View의 가로및 세로 비율로 설정합니다.enterPictureInPictureMode(pictureInPictureBuilder.build()); 화면 속 화면으로 진입합니다.@Overridepublic void onPictureInPictureModeChanged(boolean isInPictureInPictureMode, Configuration configuration) {super.onPictureInPictureModeChanged(isInPictureInPictureMode, configuration);if (isInPictureInPictureMode) {//화면 속 화면으로 진입한 후, 숨겨야 할 뷰} else{//화면 속 화면에서 퇴출 후 표시해야 할 뷰}}
// mTRTCCloud은 왼쪽의 비디오 View(TXCloudVideoView)에 해당하며, Real-Time Communication Engine_VIDEO_RENDER_MODE_FIT를 설정했습니다TRTCCloudDef.TRTCRenderParams param = new TRTCCloudDef.TRTCRenderParams();param.fillMode = TRTCCloudDef.TRTC_VIDEO_RENDER_MODE_FIT;mTRTCCloud.setRemoteRenderParams(remoteUserIdA,TRTCCloudDef.TRTC_VIDEO_STREAM_TYPE_BIG, param);mTRTCCloud.startRemoteView(remoteUserIdA, TRTCCloudDef.TRTC_VIDEO_STREAM_TYPE_BIG, mTXCloudRemoteView);// mTRTCCloud는 오른쪽의 비디오 뷰(TXCloudVideoView)에 해당합니다mTRTCCloud.startRemoteView(remoteUserIdB, TRTCCloudDef.TRTC_VIDEO_STREAM_TYPE_BIG, mTXCloudRemoteView);
<com.tencent.rtmp.ui.TXCloudVideoViewandroid:id="@+id/video_view"android:layout_width="192dp"android:layout_height="108dp"android:layout_alignParentStart="true"android:background="#00BCD4"/><com.tencent.rtmp.ui.TXCloudVideoViewandroid:id="@+id/video_view2"android:layout_width="192dp"android:layout_height="108dp"android:layout_alignTop="@+id/video_view"android:layout_toEndOf="@+id/video_view"android:background="#3F51B5"/>
@Overridepublic void onPictureInPictureModeChanged(boolean isInPictureInPictureMode, Configuration configuration) {super.onPictureInPictureModeChanged(isInPictureInPictureMode, configuration);if (isInPictureInPictureMode) {// mVideoView의 너비를 100dp로 설정합니다RelativeLayout.LayoutParams layoutParams = (RelativeLayout.LayoutParams) mVideoView.getLayoutParams();layoutParams.width = (int) TypedValue.applyDimension(TypedValue.COMPLEX_UNIT_DIP, 100, getResources().getDisplayMetrics());} else {// 화면 속 화면을 나가면 video_view의 너비를 복원합니다.RelativeLayout.LayoutParams layoutParams = (RelativeLayout.LayoutParams) mVideoView.getLayoutParams();layoutParams.width = (int) TypedValue.applyDimension(TypedValue.COMPLEX_UNIT_DIP, 192, getResources().getDisplayMetrics());}}
trtcCloud.callExperimentalAPI(jsonEncode({"api": "enablePictureInPictureFloatingWindow","params": {"enable": true}}));
var pipCode = await _livePlayer!.enablePictureInPicture(true);if (pipCode != V2TXLIVE_OK) {print("error: $pipCode");}
final channel = MethodChannel('flutter_ios_pip_demo');await channel.invokeMethod('enablePip', {'marginTop': appBarHeight + topSafeAreaHeight,'pkLeft': pkLeftUserId,'pkRight': pkRightUserId,});
var channel: FlutterMethodChannel?let pipListener = PipRender()guard let controller = window?.rootViewController as? FlutterViewController else {fatalError("Invalid root view controller")}channel = FlutterMethodChannel(name: "flutter_ios_pip_demo", binaryMessenger: controller.binaryMessenger)channel?.setMethodCallHandler({ [weak self] call, result inguard let self = self else { return }switch (call.method) {case "enablePip":if let arg = call.arguments as? [String: Any] {let marginTop = arg["marginTop"] as? CGFloat ?? 0let pkLeft = arg["pkLeft"] as? String ?? ""let pkRight = arg["pkRight"] as? String ?? ""pipListener.enablePip(mainView: vc.view, mt: mt, pkLeft: pkLeft, pkRight: pkRight)}result(nil)breakcase "disablePip":pipListener.disablePip()result(nil)breakdefault:break}})
import UIKitimport AVKitimport TXLiteAVSDK_Professionalclass PipRender: NSObject {// 나머지 변수는 네이티브 iOS에서 시스템 API를 호출해 구현한 부분을 참고하세요.var mainView: UIView?var mt: CGFloat?// trtcCloud는 단일 인스턴스이므로 코드에서 다음과 같이 가져올 수 있습니다.let trtcCloud = TRTCCloud.sharedInstance()func disablePip() {pipDisplayLayer?.removeFromSuperlayer()pipController?.stopPictureInPicture()}func enablePip(mainView: UIView, mt: CGFloat, pkLeft: String, pkRight: String) {self.mainView = mainViewself.mt = mttrtcCloud.addDelegate(self)enableBGDecode()setupAudioSession()setupPipController()pipController?.startPictureInPicture()if pkLeft.count > 0 {trtcCloud.startRemoteView(pkLeft, streamType: .big, view: nil)trtcCloud.setRemoteVideoRenderDelegate(pkLeft, delegate: self, pixelFormat: ._NV12, bufferType: .pixelBuffer);}if pkRight.count > 0 {trtcCloud.startRemoteView(pkRight, streamType: .big, view: nil)trtcCloud.setRemoteVideoRenderDelegate(pkRight, delegate: self, pixelFormat: ._NV12, bufferType: .pixelBuffer);}}// 해당 방법은 업무 요구에 따라 화면 속 화면의 표시 위치를 조정하여 Flutter 측과 일치하게 표시되도록 해야 합니다.func setupPipController() {let screenWidth = UIScreen.main.bounds.widthlet videoHeight = screenWidth / 2 / 9 * 16pipDisplayLayer = AVSampleBufferDisplayLayer()// 여기서 실제 필요에 따라 화면 속 화면의 표시 위치를 조정합니다.let tsa = self.mainView?.safeAreaInsets.top ??let vmt = tsa + (self.mt ?? 0)pipDisplayLayer.frame = CGRect(x: 0, y: vmt, width: screenWidth, height: videoHeight) // Adjust size as neededpipDisplayLayer.videoGravity = .resizeAspectpipDisplayLayer.isOpaque = truepipDisplayLayer.backgroundColor = CGColor(red: 0, green: 0, blue: 0, alpha: 1)// 여기서 enablePip로 전달된 mainView를 사용하여 PIP 화면을 추가합니다mainView?.layer.addSublayer(pipDisplayLayer)if AVPictureInPictureController.isPictureInPictureSupported() {let contentSource = AVPictureInPictureController.ContentSource(sampleBufferDisplayLayer: pipDisplayLayer,playbackDelegate: self)pipController = AVPictureInPictureController(contentSource: contentSource)pipController?.delegate = selfpipController?.canStartPictureInPictureAutomaticallyFromInline = true} else {print("+> PiP not supported")}}// 나머지 메서드는 네이티브 iOS 측에서 시스템 API를 호출해 구현한 부분과 동일합니다}
// 업무 측에서 화면 속 화면 중지를 트리거할 때trtcCloud.startRemoteView(pkLeftUserId, TRTCCloudDef.TRTC_VIDEO_STREAM_TYPE_BIG, pkLeftId);trtcCloud.startRemoteView(pkRightUserId, TRTCCloudDef.TRTC_VIDEO_STREAM_TYPE_BIG, pkRightId);await channel.invokeMethod('disablePip');
@overridedispose() {channel.invokeMethod('disablePip');super.dispose();}
MethodChannel _channel = MethodChannel('samples.flutter.dev');final int? result = await _channel.invokeMethod('pictureInPicture');
private void startPictureInPicture() {if (Build.VERSION.SDK_INT >= Build.VERSION_CODES.O) {PictureInPictureParams.Builder pictureInPictureBuilder = new PictureInPictureParams.Builder();// 구체적인 업무 요구 사항에 따라 지정된 화면 속 화면의 크기를 설정합니다.Rational aspectRatio = new Rational(100, 100);pictureInPictureBuilder.setAspectRatio(aspectRatio);//화면 속 화면로 진입하기enterPictureInPictureMode(pictureInPictureBuilder.build());} else {Toast.makeText(this, R.string.picture_in_picture_not_supported, Toast.LENGTH_SHORT).show();}}@Overridepublic void configureFlutterEngine(@NonNull FlutterEngine flutterEngine) {super.configureFlutterEngine(flutterEngine);MethodChannel channel = new MethodChannel(flutterEngine.getDartExecutor().getBinaryMessenger(), "samples.flutter.dev");channel.setMethodCallHandler((call, result) -> {if (call.method.equals("pictureInPicture")) {startPictureInPicture();} else {result.notImplemented();}});}
android:supportsPictureInPicture="true"을 구성합니다. 다음과 같습니다.<activityandroid:name="example.android.app.src.main.java.com.tencent.live.example.MainActivity"android:supportsPictureInPicture="true"android:configChanges="orientation|keyboardHidden|keyboard|screenSize|smallestScreenSize|locale|layoutDirection|fontScale|screenLayout|density|uiMode">...</activity>
피드백