Managing Account
Download
포커스 모드
폰트 크기
Scenarios
TencentDB for Redis® provides read/write permission control and routing policy control through account mechanisms to meet the requirements for business permission control in complex business scenarios.
Note:
Only TencentDB for Redis (excluding Redis 2.8) supports account settings.
Account Classification
Redis/Valkey Edition supports two types of accounts: default accounts and custom accounts.
Note:
During authentication, the system first attempts to match the entered password with the default account as a whole. If it fails, the system splits the input at the first @ symbol as <account_name>@<password> to match against custom accounts. To avoid ambiguity, it is recommended that the default account password and custom account names do not contain the @ character.
Account Type | Creation Method | Permission Management | Authentication Format |
Default account | Automatically generated when an instance is created | The account cannot be deleted, and its read/write permissions cannot be modified. | -a <password> |
Custom account | Manually created by users | The account can be deleted, and its permissions can be modified. | -a <account_name>@<password> |
Permission Settings
TencentDB for Redis® supports the following two permission types:
Permission Type | Data Reading | Data Modification | Scenarios |
Read-only permission | ✓ | ✗ | Data query, report analysis, and read-only replica access |
Read/write permission | ✓ | ✓ | Read/write operations of routine workloads |
Read-only Routing Policy
By configuring the read-only routing policy, you can distribute read requests from specified accounts to specified nodes.
Routing Target
Routing Target | Description |
Master node | Read requests are sent to the master node for processing. |
Replica node | Read requests are sent to the replica node for processing, and the read-only replica feature needs to be enabled. |
Usage Restrictions
Restriction | Description |
Read-only replica disabled | Routing to replica nodes is not supported. You need to enable the read-only replica feature on the Node Management page. |
Replica nodes accessed by an existing account | Disabling the read-only replica feature is not allowed. You must delete this account before you can disable the feature. |
Prerequisites
The instance has been created and is running.
You have planned the accounts to be defined and their passwords, read-write permissions, and read-only routing policies.
Creating a custom account
1. Log in to the TencentDB for Redis® console.
2. Above the Instance List on the right, select the region.
3. In the instance list, find the target instance.
4. Click the target instance ID to enter the Instance Details page.
5. Select the Account Management tab and click Create Account.

6. In the Create Account pop-up window, set the custom account name and password.
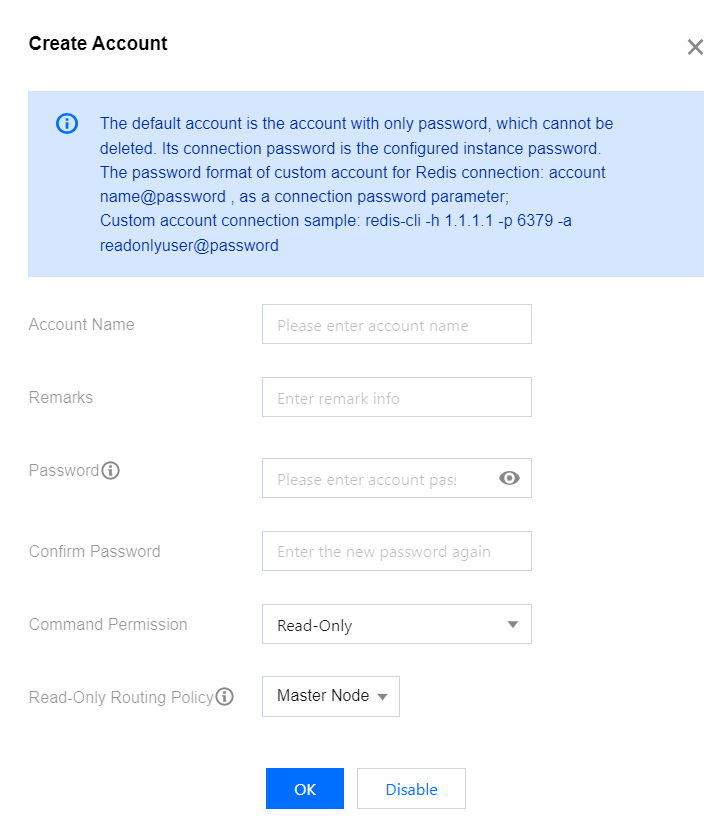
Parameter | Description |
Account Name | Set the custom account name. Contain only letters, digits, or symbols (-_). Contain up to 32 characters. |
Password | Set the custom account password. Contain [8,30] characters. Contain at least two of the following four types: lowercase letters, uppercase letters, digits, and symbols (()`~!@#$%^&*-+=_|{}[]:;<>,.?/). Cannot start with a slash (/). |
Confirm Password | Enter the password again. |
Command Permission | Select the account permission in the drop-down list, which can be read-only or read-write. |
Read-only Routing Policy | Specify to distribute the read requests of the account to the master or replica node. If the read-only replica feature is not enabled, you cannot select replica node here. For detailed directions, see Enabling/Disabling Read/Write Separation. |
7. Click OK. Then, you can use the created custom account to access the database as instructed in Connecting to TencentDB for Redis® Instance.
Deleting a custom account
1. Log in to the TencentDB for Redis® console.
2. Above the Instance List on the right, select the region.
3. In the instance list, find the target instance.
4. Click the target instance ID to enter the Instance Details page.
5. In the account list on the Account Management tab, find the target custom account.
6. Click Delete in the Operation column.
7. In the Delete Account pop-up window, confirm the information of the account to be deleted and click Confirm Deletion.
Note:
The default account (i.e., the account with a password only) cannot be deleted.
After the account is deleted, existing connections using the account will not be closed. New connections using the account cannot be verified.
Modifying the account permission
1. Log in to the TencentDB for Redis® console.
2. Above the Instance List on the right, select the region.
3. In the instance list, find the target instance.
4. Click the target instance ID to enter the Instance Details page.
5. In the account list on the Account Management tab, find the target custom account.
6. Click Modify Permissions in the Operation column.
7. In the Modify Permission pop-up window, select the read-write permission of the account in the drop-down list after Command Permission, and select the target node for read-only routing in the drop-down list after Read-only Routing Policy.
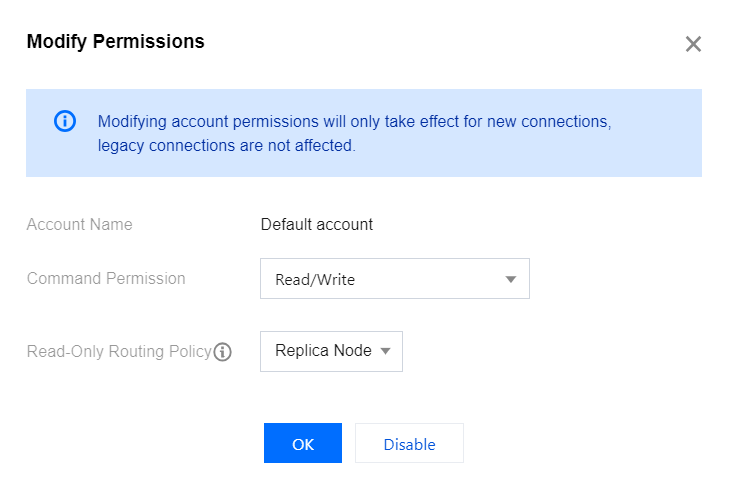
Note:
The command permission of the default account can only be read-write but not read-only.
If the read-only replica feature is not enabled, you cannot select replica node for the read-only routing policy. For detailed directions, see Enabling/Disabling Read/Write Separation.
8. Click OK.
피드백