tencent cloud

Serverless Cloud Function

Release Notes and Announcements
Release Notes
Announcements
User Guide
Product Introduction
Overview
Related Concepts
How It Works
Strengths
Scenarios
Related Products
Purchase Guide
Billing Overview
Billing Mode
Billable Items and Billing Modes
Function Computing Power Support
Free Tier
SCF Pricing
Billing Example
Payment Overdue
Getting Started
Creating Event Function in Console
User Guide
Quota Management
Managing Functions
Web Function Management
Log Management
Concurrence Management
Trigger Management
Function URL
A Custom Domain Name
Version Management
Alias Management
Permission Management
Running Instance Management
Plugin Management
Managing Monitors and Alarms
Network Configuration
Layer Management
Execution Configuration
Extended Storage Management
DNS Caching Configuration
Resource Managed Mode Management
Near-Offline Resource Hosting Model
Workflow
Triggers
Trigger Overview
Trigger Event Message Structure Summary
API Gateway Trigger
COS Trigger
CLS Trigger
Timer Trigger
CKafka Trigger
Apache Kafka Trigger
MQTT Trigger
Trigger Configuration Description
MPS Trigger
CLB Trigger Description
TencentCloud API Trigger
Development Guide
Basic Concepts
Testing a Function
Environment Variables
Dependency Installation
Using Container Image
Error Types and Retry Policies
Dead Letter Queue
Connecting SCF to Database
Automated Deployment
Cloud Function Status Code
Common Errors and Solutions
Developer Tools
Serverless Web IDE
Calling SDK Across Functions
Third-Party Tools
Code Development
Python
Node.js
Golang
PHP
Java
Custom Runtime
Deploying Image as Function
Web Framework Development
Deploying Framework on Command Line
Quickly Deploying Egg Framework
Quickly Deploying Express Framework
Quickly Deploying Flask Framework
Quickly Deploying Koa Framework
Quickly Deploying Laravel Framework
Quickly Deploying Nest.js Framework
Quickly Deploying Next.js Framework
Quickly Deploying Nuxt.js Framework
Quickly Deploying Django Framework
Use Cases
Overview
Solutions with Tencent Cloud Services
Business Development
TRTC Practices
COS Practices
CKafka Practice
CLS
CLB Practice
MPS
CDN
CDWPG
VOD
SMS
ES
Scheduled Task
Video Processing
Success Stories
Tencent Online Education
Online Video Industry
Tencent Online Education
Best Practice of Tencent IEG Going Global
API Documentation
History
Introduction
API Category
Making API Requests
Other APIs
Namespace APIs
Layer Management APIs
Async Event Management APIs
Trigger APIs
Function APIs
Function and Layer Status Description
Data Types
Error Codes
SDK Documentation
FAQs
General
Web Function
Billing FAQs
Network FAQs
Log FAQs
SCF utility class
Event Handling FAQs
API Gateway Trigger FAQs
Related Agreement
Service Level Agreement
Contact Us
Glossary

Using layer

PDF
포커스 모드
폰트 크기
마지막 업데이트 시간: 2024-12-02 20:11:42
This document describes how to use a layer in the Serverless console.

Instructions

Files in the layer are all under the /opt/ directory, which can be accessed through their absolute paths in the function code. In addition, the built-in environment variables of each runtime also include layer paths, so files can be uploaded according to such paths, and then they can be imported through their relative paths in the code.
For the environment variables in Python, Java, and Node.js, see the table below:
Environment Variable
Path
PYTHONPATH
/var/user:/opt
CLASSPATH
/var/runtime/java8:/var/runtime/java8/lib/*:/opt
NODE_PATH
/var/user:/var/user/node_modules:/var/lang/node6/lib/node_modules:/opt:/opt/node_modules


Procedure

Node.js

The following takes importing the cos-nodejs-sdk-v5 dependency from node_modules in a layer in the code in the Node.js runtime environment as an example:
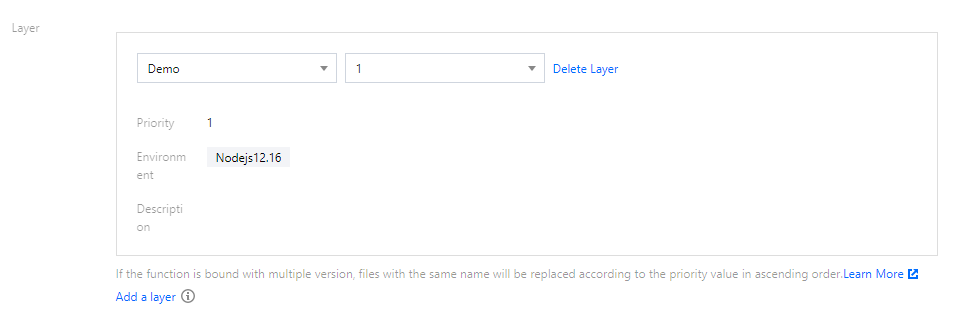
1. Upload node_modules to generate a layer as instructed in Creating layer. The local function directory structure is as shown below:


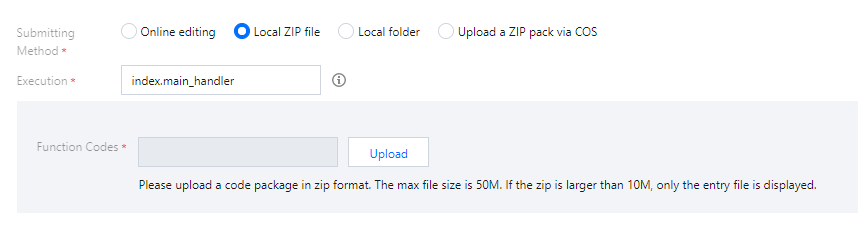
2. Package and upload the local function code as instructed in Deploying Function. During the packaging, run the following command to exclude the node_modules folder:
zip -r package name.zip . -x "node_modules/*"
See the figure below:


3. Bind the created layer to the deployed function as instructed in Binding function to layer.
4. You can import files at the layer in the function after completing the steps above.
'use strict'
var COS = require('cos-nodejs-sdk-v5')
Note:
As the NODE_PATH environment variable already includes the /opt/node_modules path, there is no need to specify the absolute path of the dependency. SCF will load the file according to the path specified in the environment variable during execution.
If the file path in the layer and the path included in the environment variable are different, you need to use the absolute path when importing the file.

Python

The following takes importing the cos-python-sdk-v5 dependency from a layer in the code in the Python runtime environment as an example:
1. Upload cos-python-sdk-v5 to generate a layer as instructed in Creating layer.
2. Package and upload the local function code as instructed in Deploying Function. Files that have already been uploaded to the layer don't need to be uploaded again together with the function code.
3. Bind the created layer to the deployed function as instructed in Binding function to layer.
4. You can import files at the layer in the function after completing the steps above.
# -*- coding: utf8 -*-
import cos-python-sdk-v5
Note:
As the PYTHONPATH environment variable already includes the /opt path, there is no need to specify the absolute path of the dependency. SCF will load the file according to the path specified in the environment variable during execution.
If the file path in the layer and the path included in the environment variable are different, you need to use the absolute path when importing the file.

Sample

Using layer and testing function

1. 
Go to
scf_layer_demo and select Clone or download > Download ZIP to download the demo and decompress it.
2. 
Create a layer as instructed
in Creating layer. Set the parameters as shown below:


Layer Name: enter a custom name. This document uses demo as an example.
Submission Method: select Local folder and select and upload the layer folder in the folder obtained in step 1.
Runtime Environment: select Nodejs12.16.
3. Go to the Function Service page and click Create to enter the Create Function page.
4. Set the basic information of the function in Basic Info on the Create Function page and click Next as shown below:


Function Name: enter a custom name. This document uses layerDemo as an example.
Runtime Environment: select Nodejs 12.16.
Creation Method: select Blank function.
5. In Function Configuration, select Local folder as Submission Method and select and upload the function folder in the folder obtained in step 1.


6. Click Advanced Settings and add the function layer in Layer Configuration as shown below:


Layer Name: select the layer demo created in step 2.
Layer Version: select v1.
7. Click Complete at the bottom to complete the function creation.
8. Select the Function Code tab on the Function Management page. You can click Test at the bottom to view the result as shown below:


도움말 및 지원

문제 해결에 도움이 되었나요?

피드백