Release Notes
Broker Release Notes
Announcement
Kafka Version | spark-streaming-kafka-0.8 | spark-streaming-kafka-0.10 |
Broker Version | 0.8.2.1 or later | 0.10.0 or later |
API Maturity | Deprecated | Stable |
Language Support | Scala, Java, and Python | Scala and Java |
Receiver DStream | Yes | No |
Direct DStream | Yes | Yes |
SSL / TLS Support | No | Yes |
Offset Commit API | No | Yes |
Dynamic Topic Subscription | No | Yes |
bootstrap-server required by production and consumption.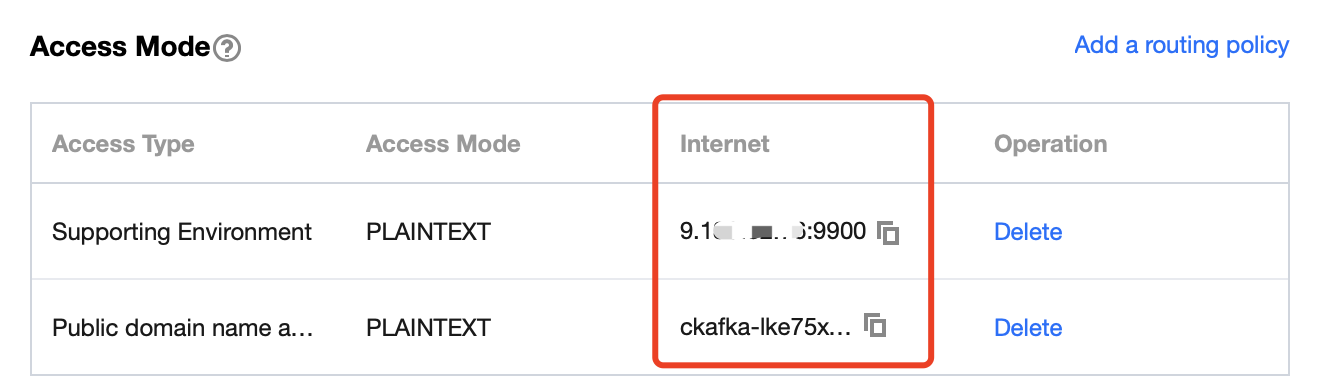
test. This topic is used as an example below to describe how to produce and consume messages.
Package | Version |
sbt | 0.13.16 |
Hadoop | 2.7.3 |
Spark | 2.1.0 |
Protobuf | 2.5.0 |
SSH | Installed on CentOS by default |
Java | 1.8 |
build.sbt:name := "Producer Example"version := "1.0"scalaVersion := "2.11.8"libraryDependencies += "org.apache.kafka" % "kafka-clients" % "0.10.2.1"
producer_example.scala:import java.util.Propertiesimport org.apache.kafka.clients.producer._object ProducerExample extends App {val props = new Properties()props.put("bootstrap.servers", "172.16.16.12:9092") // Private IP and port in the instance informationprops.put("key.serializer", "org.apache.kafka.common.serialization.StringSerializer")props.put("value.serializer", "org.apache.kafka.common.serialization.StringSerializer")val producer = new KafkaProducer[String, String](props)val TOPIC="test" // Specify the topic to produce tofor(i<- 1 to 50){val record = new ProducerRecord(TOPIC, "key", s"hello $i") // Produce a message whose `key` is "key" and `value` is "hello i"producer.send(record)}val record = new ProducerRecord(TOPIC, "key", "the end "+new java.util.Date)producer.send(record)producer.close() // Disconnect at the end}
build.sbt:name := "Consumer Example"version := "1.0"scalaVersion := "2.11.8"libraryDependencies += "org.apache.spark" %% "spark-core" % "2.1.0"libraryDependencies += "org.apache.spark" %% "spark-streaming" % "2.1.0"libraryDependencies += "org.apache.spark" %% "spark-streaming-kafka-0-10" % "2.1.0"
DirectStream_example.scala:import org.apache.kafka.clients.consumer.ConsumerRecordimport org.apache.kafka.common.serialization.StringDeserializerimport org.apache.kafka.common.TopicPartitionimport org.apache.spark.streaming.kafka010._import org.apache.spark.streaming.kafka010.LocationStrategies.PreferConsistentimport org.apache.spark.streaming.kafka010.ConsumerStrategies.Subscribeimport org.apache.spark.streaming.kafka010.KafkaUtilsimport org.apache.spark.streaming.kafka010.OffsetRangeimport org.apache.spark.streaming.{Seconds, StreamingContext}import org.apache.spark.SparkConfimport org.apache.spark.SparkContextimport collection.JavaConversions._import Array._object Kafka {def main(args: Array[String]) {val kafkaParams = Map[String, Object]("bootstrap.servers" -> "172.16.16.12:9092","key.deserializer" -> classOf[StringDeserializer],"value.deserializer" -> classOf[StringDeserializer],"group.id" -> "spark_stream_test1","auto.offset.reset" -> "earliest","enable.auto.commit" -> "false")val sparkConf = new SparkConf()sparkConf.setMaster("local")sparkConf.setAppName("Kafka")val ssc = new StreamingContext(sparkConf, Seconds(5))val topics = Array("spark_test")val offsets : Map[TopicPartition, Long] = Map()for (i <- 0 until 3){val tp = new TopicPartition("spark_test", i)offsets.updated(tp , 0L)}val stream = KafkaUtils.createDirectStream[String, String](ssc,PreferConsistent,Subscribe[String, String](topics, kafkaParams))println("directStream")stream.foreachRDD{ rdd=>// Output the obtained messagerdd.foreach{iter =>val i = iter.valueprintln(s"${i}")}// Get the offsetval offsetRanges = rdd.asInstanceOf[HasOffsetRanges].offsetRangesrdd.foreachPartition { iter =>val o: OffsetRange = offsetRanges(TaskContext.get.partitionId)println(s"${o.topic} ${o.partition} ${o.fromOffset} ${o.untilOffset}")}}// Start the computationssc.start()ssc.awaitTermination()}}
build.sbt in the way as detailed here.RDD_example:import org.apache.kafka.clients.consumer.ConsumerRecordimport org.apache.kafka.common.serialization.StringDeserializerimport org.apache.spark.streaming.kafka010._import org.apache.spark.streaming.kafka010.LocationStrategies.PreferConsistentimport org.apache.spark.streaming.kafka010.ConsumerStrategies.Subscribeimport org.apache.spark.streaming.kafka010.KafkaUtilsimport org.apache.spark.streaming.kafka010.OffsetRangeimport org.apache.spark.streaming.{Seconds, StreamingContext}import org.apache.spark.SparkConfimport org.apache.spark.SparkContextimport collection.JavaConversions._import Array._object Kafka {def main(args: Array[String]) {val kafkaParams = Map[String, Object]("bootstrap.servers" -> "172.16.16.12:9092","key.deserializer" -> classOf[StringDeserializer],"value.deserializer" -> classOf[StringDeserializer],"group.id" -> "spark_stream","auto.offset.reset" -> "earliest","enable.auto.commit" -> (false: java.lang.Boolean))val sc = new SparkContext("local", "Kafka", new SparkConf())val java_kafkaParams : java.util.Map[String, Object] = kafkaParams// Pull messages in the corresponding offset range from the partition in order. The request will be blocked if no messages can be pulled, until the specified waiting time elapses or the number of produced new messages reaches the number for messages to be pulledval offsetRanges = Array[OffsetRange](OffsetRange("spark_test", 0, 0, 5),OffsetRange("spark_test", 1, 0, 5),OffsetRange("spark_test", 2, 0, 5))val range = KafkaUtils.createRDD[String, String](sc,java_kafkaParams,offsetRanges,PreferConsistent)range.foreach(rdd=>println(rdd.value))sc.stop()}}
sbt_run.sh script with the following content in the sbt directory and add executable permissions:#!/bin/bashSBT_OPTS="-Xms512M -Xmx1536M -Xss1M -XX:+CMSClassUnloadingEnabled -XX:MaxPermSize=256M"java $SBT_OPTS -jar `dirname $0`/bin/sbt-launch.jar "$@"
chmod u+x ./sbt_run.sh
./sbt-run.sh sbt-version
./configuremake && make install
protoc --version
useradd -m hadoop -s /bin/bash
visudo
root ALL=(ALL) ALL:hadoop ALL=(ALL) ALLsu hadoop
cd ~/.ssh/ # If there is no such directory, run `ssh localhost` firstssh-keygen -t rsa # There will be prompts. Simply press Entercat id_rsa.pub >> authorized_keys # Add authorizationchmod 600 ./authorized_keys # Modify file permission
sudo yum install java-1.8.0-openjdk java-1.8.0-openjdk-devel
${JAVA_HOME}.vim /etc/profile
export JAVA_HOME=/usr/lib/jvm/java-1.8.0-openjdk-1.8.0.121-0.b13.el6_8.x86_64/jreexport PATH=$PATH:$JAVA_HOME
./bin/hadoop version
vim /etc/profile
export HADOOP_HOME=/usr/local/hadoopexport PATH=$HADOOP_HOME/bin:$PATH
/etc/hadoop/core-site.xml.<configuration><property><name>hadoop.tmp.dir</name><value>file:/usr/local/hadoop/tmp</value><description>Abase for other temporary directories.</description></property><property><name>fs.defaultFS</name><value>hdfs://localhost:9000</value></property></configuration>
/etc/hadoop/hdfs-site.xml.<configuration><property><name>dfs.replication</name><value>1</value></property><property><name>dfs.namenode.name.dir</name><value>file:/usr/local/hadoop/tmp/dfs/name</value></property><property><name>dfs.datanode.data.dir</name><value>file:/usr/local/hadoop/tmp/dfs/data</value></property></configuration>
JAVA_HOME in /etc/hadoop/hadoop-env.sh to the Java path.export JAVA_HOME=/usr/lib/jvm/java-1.8.0-openjdk-1.8.0.121-0.b13.el6_8.x86_64/jre
./bin/hdfs namenode -format
Exitting with status 0 indicates a success../sbin/start-dfs.sh
NameNode, DataNode, and SecondaryNameNode processes will exist upon successful startup.Pre-build with user-provided Apache Hadoop here.hadoop user for operations.cp ./conf/spark-env.sh.template ./conf/spark-env.shvim ./conf/spark-env.sh
export SPARK_DIST_CLASSPATH=$(/usr/local/hadoop/bin/hadoop classpath)
bin/run-example SparkPi
π output by the program indicates a successful installation.피드백