제품 업데이트
Tencent Cloud 오디오/비디오 단말 SDK 재생 업그레이드 및 권한 부여 인증 추가
TRTC 월간 구독 패키지 출시 관련 안내
sudo gem install cocoapods
pod init
platform :ios, '8.0'# Modify the 'App' to the name of your projecttarget 'App' dopod 'TXLiteAVSDK_TRTC', :podspec => 'https://liteav.sdk.qcloud.com/pod/liteavsdkspec/TXLiteAVSDK_TRTC.podspec'end
pod install
pod install executed, a new .xcworkspace project file is generated. Double-click the .xcworkspace file to open it.Build Settings TAB, search for User Script Sandboxing and set its value to No, which could allow the user script access to a wider range of system resources and files.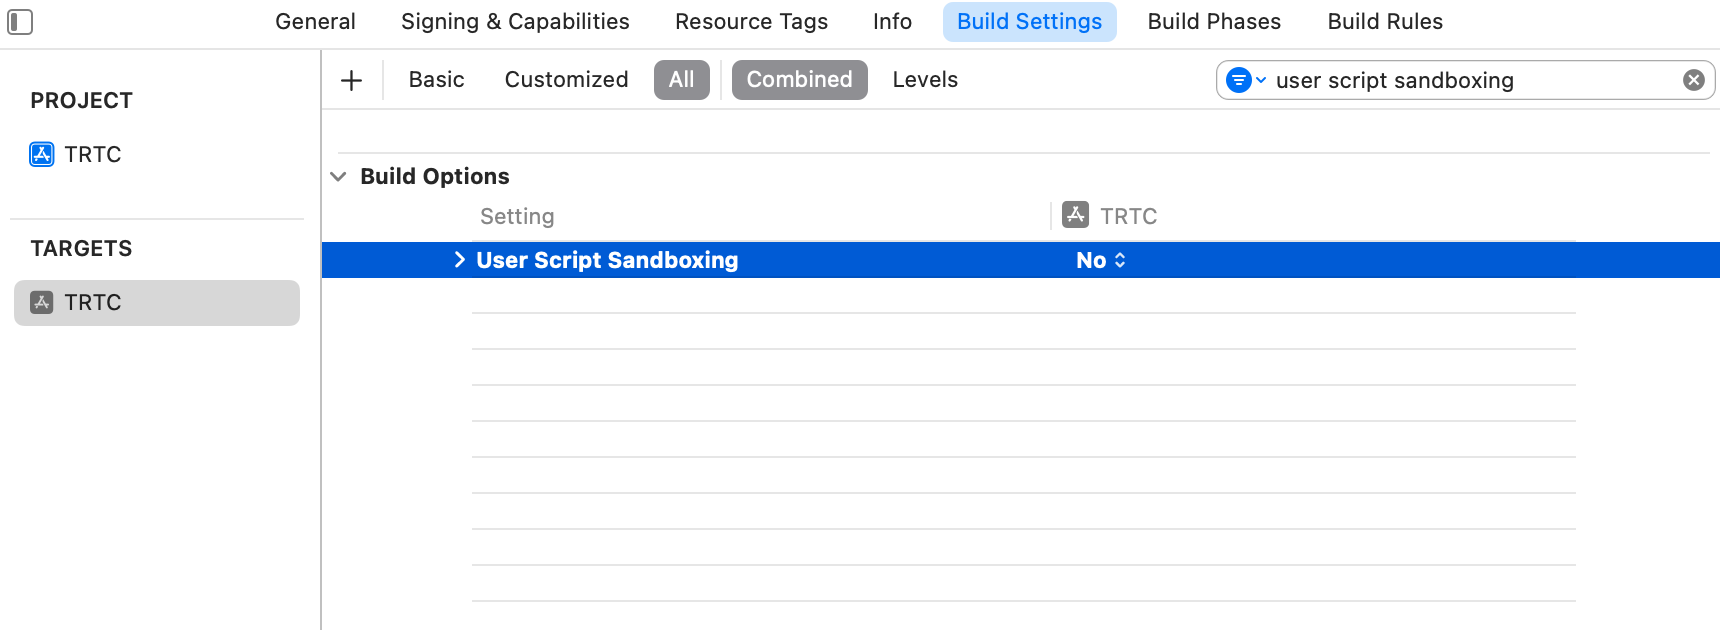
Info.plist TAB, add the Privacy-Microphone Usage Description and Privacy-Microphone Usage Description, and fill in the target prompt words used by the Microphone/Camera to obtain the permission to use the microphone and camera.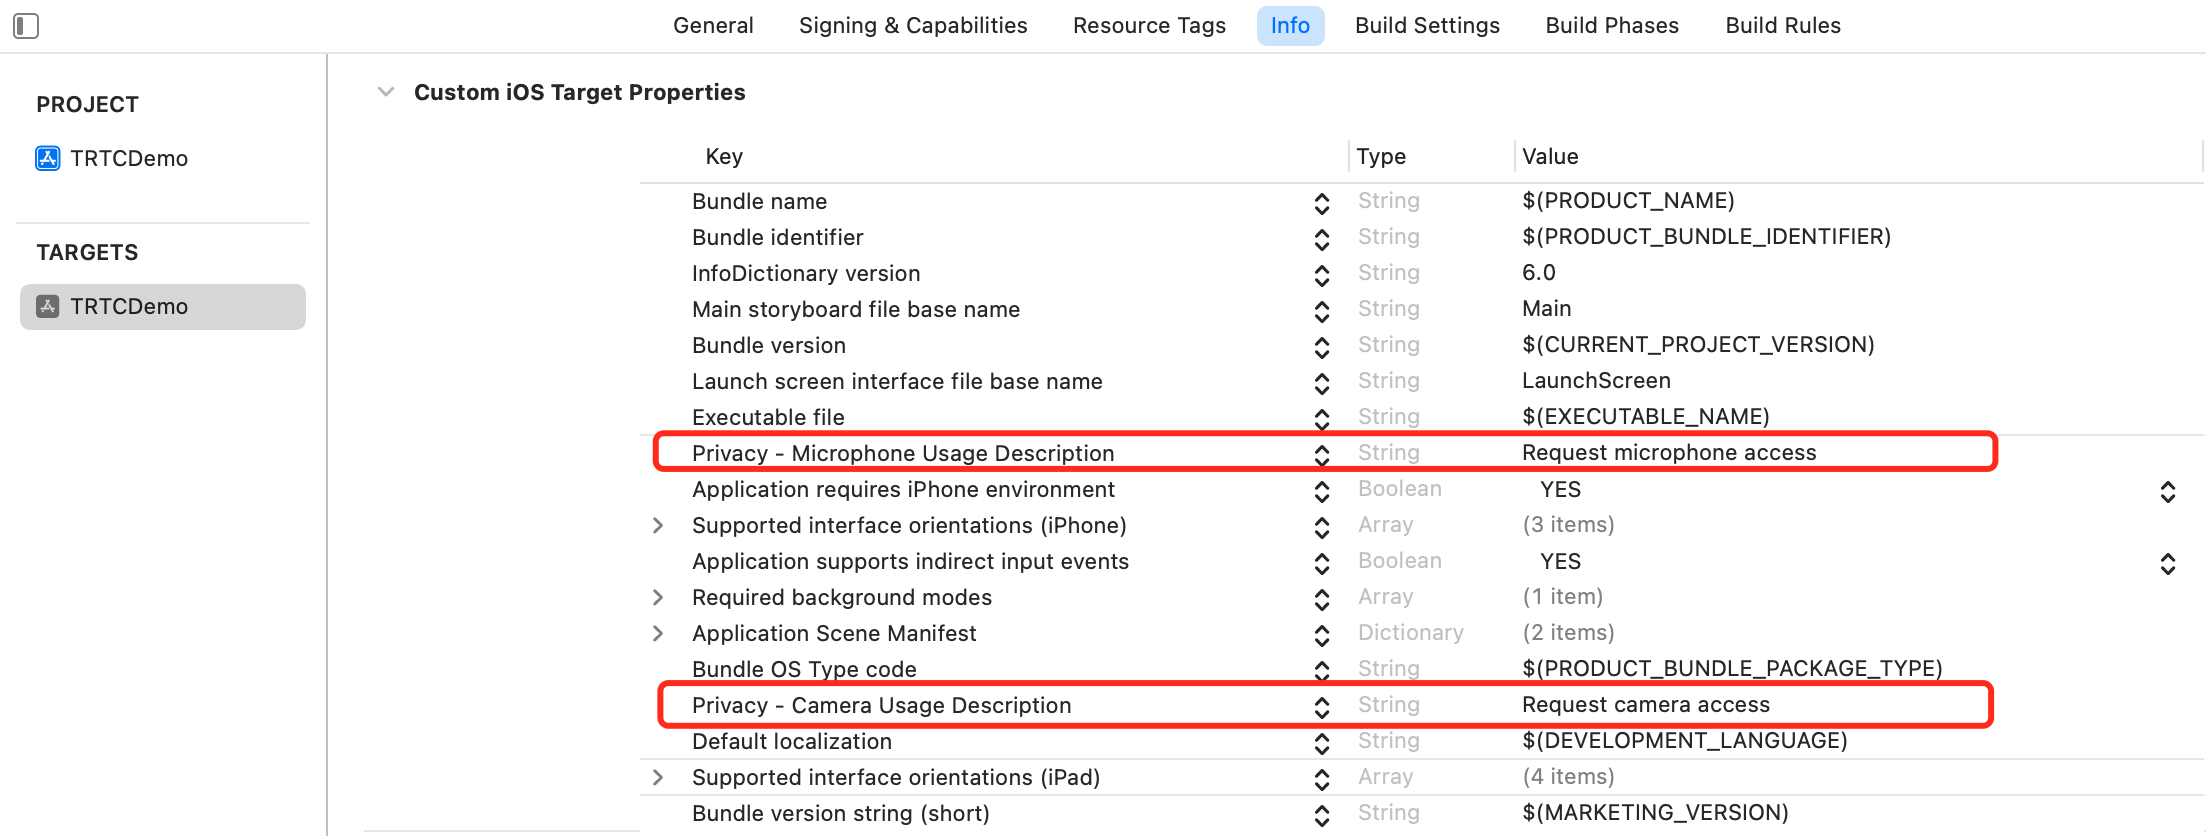
Signing & Capabilities TAB, add the Background Modes and check Audio, AirPlay and Picture in Picture to allow the app to run audio, AirPlay and picture-in-picture functions in the background.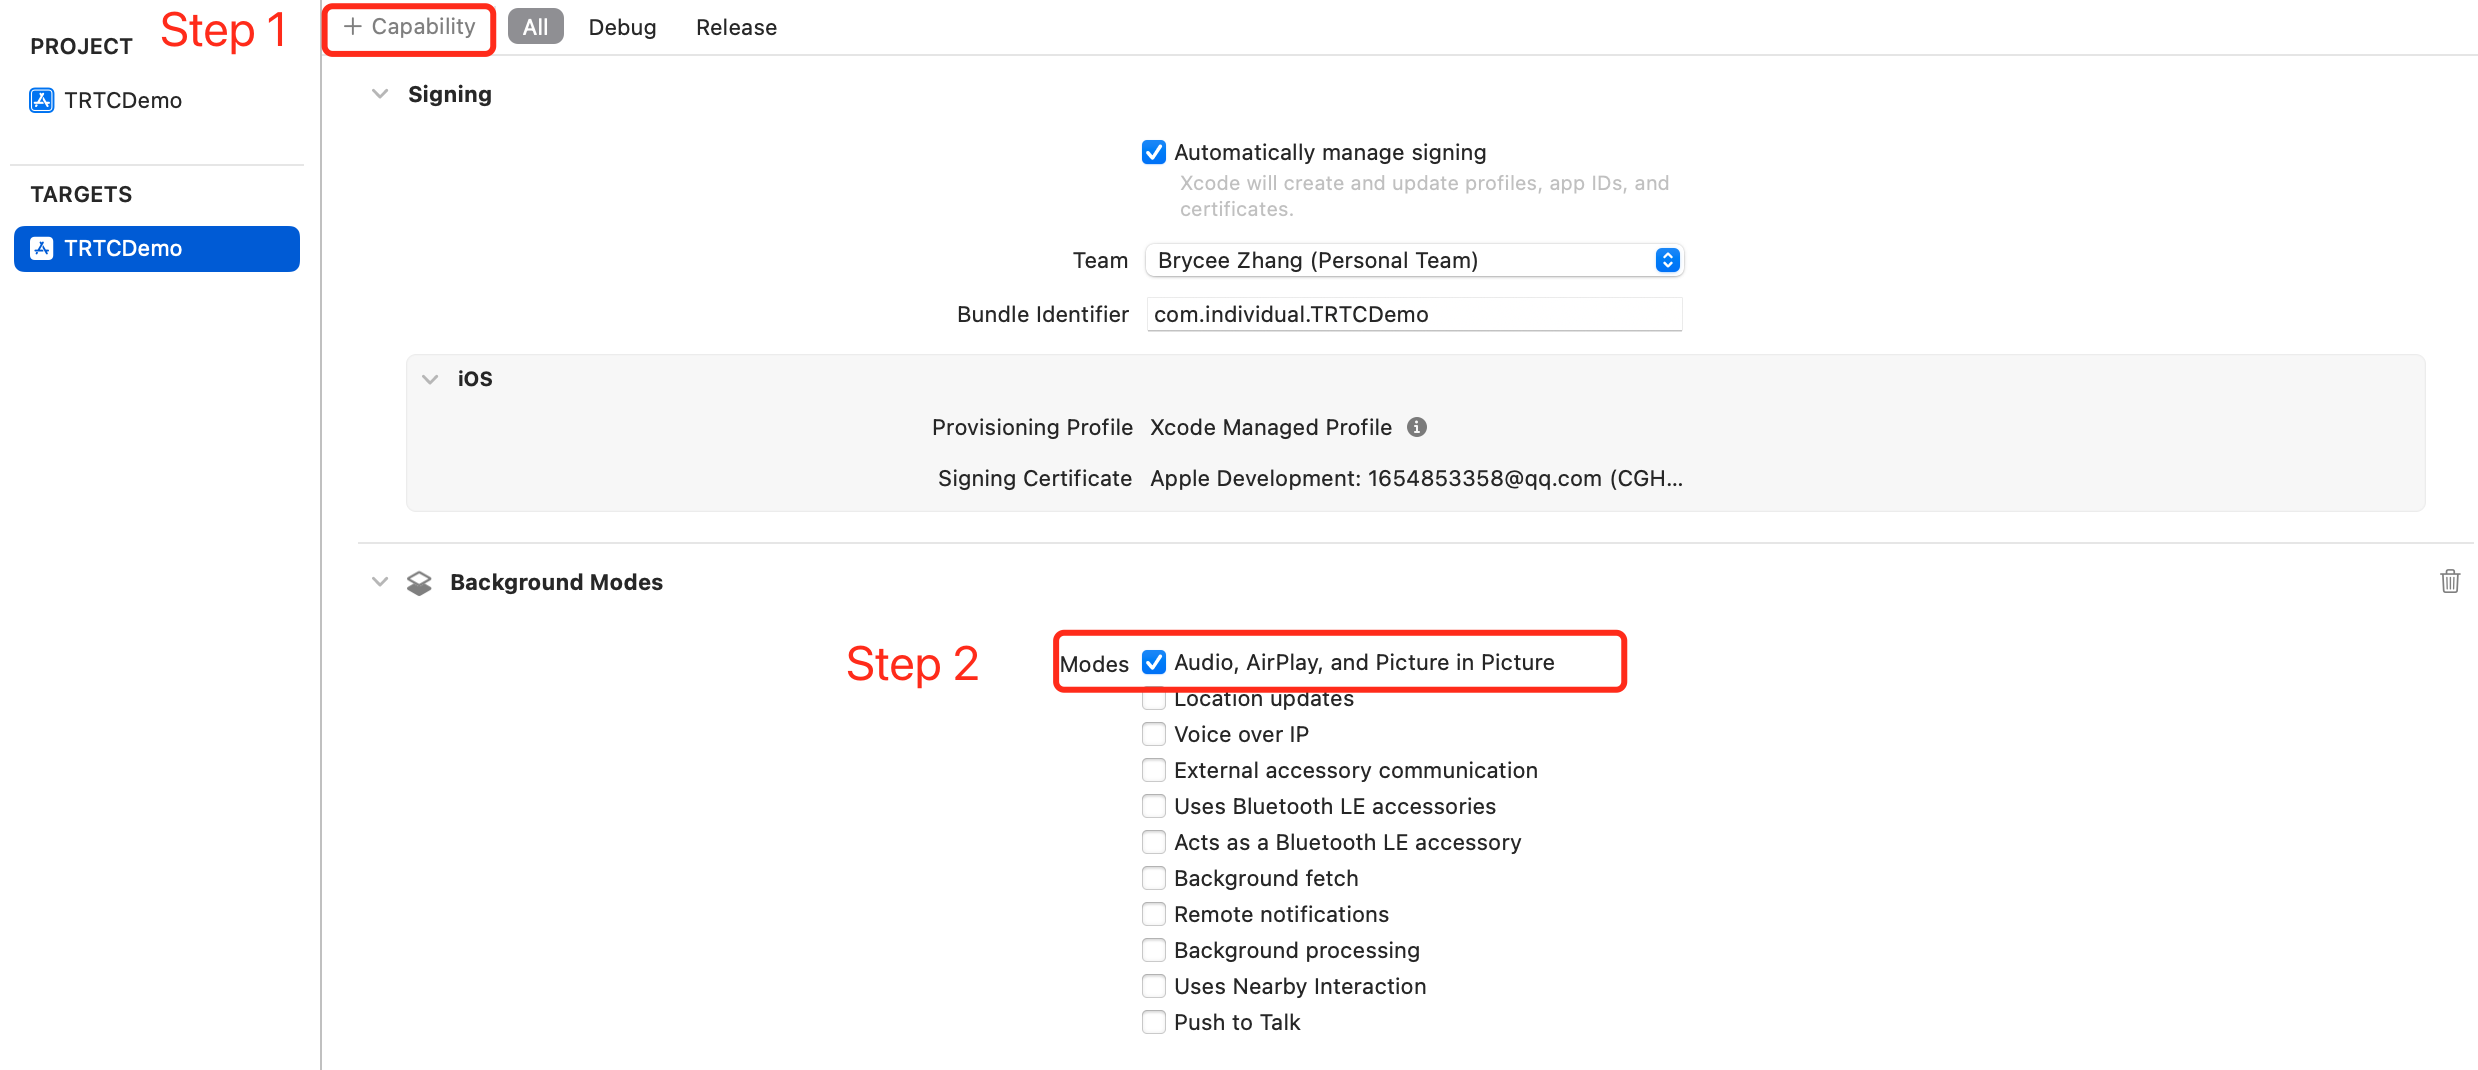
AppDelegate.h file.@import TXLiteAVSDK_TRTC; // Import TRTC SDK Module
AppDelegate.h file.@interface AppDelegate : UIResponder <UIApplicationDelegate, TRTCCloudDelegate> // Declare the TRTCCloudDelegate interface@property (nonatomic, strong) TRTCCloud *trtcCloud; // Declare the TRTCCloud property
AppDelegate.m file, call sharedInstance to create the TRTC instance in the didFinishLaunchingWithOptionsmethod and set up the event listener.- (BOOL)application:(UIApplication *)application didFinishLaunchingWithOptions:(NSDictionary *)launchOptions {// Create a TRTC instance and set up a listener_trtcCloud = [TRTCCloud sharedInstance];_trtcCloud.delegate = self;return YES;}// Listen for the 'onError' event- (void)onError:(TXLiteAVError)errCodeerrMsg:(nullable NSString *)errMsgextInfo:(nullable NSDictionary *)extInfo{// Handle the 'onError' event// Recommend to display OnError information via 'toastTip:'NSString *errCodeStr = [NSString stringWithFormat:@"%ld", (long)errCode];NSString *extInfoStr = extInfo ? [extInfo description] : @"";NSString *notification = [NSString stringWithFormat:@"%@, %@, %@", errCodeStr, errMsg, extInfoStr];[self toastTip:notification];}// Implement 'toastTip:'- (void)toastTip:(NSString *)tip {UIAlertController *alert = [UIAlertController alertControllerWithTitle:@"Tip"message:tippreferredStyle:UIAlertControllerStyleAlert];UIAlertAction *okAction = [UIAlertAction actionWithTitle:@"Confirm"style:UIAlertActionStyleDefaulthandler:nil];[alert addAction:okAction];[self.window.rootViewController presentViewController:alert animated:YES completion:nil];dispatch_after(dispatch_time(DISPATCH_TIME_NOW, (int64_t)(2.0 * NSEC_PER_SEC)), dispatch_get_main_queue(), ^{[alert dismissViewControllerAnimated:YES completion:nil];});}
TRTCParams and call enterRoom to successfully enter the room, which is usually called after clicking the Start Call button.Parameter | Type | Description |
sdkAppId | number | |
userId | string | User ID specified by you. |
userSig | string | |
roomId | number | Room ID specified by you, usually a unique room ID. |
#import "AppDelegate.h" // Import the "AppDelegate.h" file- (void)enterRoom {// Modify the following parameters to your ownTRTCParams *trtcParams = [[TRTCParams alloc] init];trtcParams.sdkAppId = 1400000123;trtcParams.userId = @"denny";trtcParams.userSig = @"";trtcParams.roomId = 123321;// For multi-party video calls, `TRTC_APP_SCENE_LIVE` is recommendedAppDelegate *appDelegate = (AppDelegate *)[[UIApplication sharedApplication] delegate];[appDelegate.trtcCloud enterRoom:trtcParams appScene:TRTCAppSceneLIVE];}// Listen for the 'onEnterRoom' event- (void)onEnterRoom:(NSInteger)result {// Handle the 'onEnterRoom' event// Recommend to display OnError information via 'toastTip:'}
ViewController.h file.@property (strong, nonatomic) UIWindow *window; // Declare the UIWindow property@property (nonatomic, strong) UIView *localCameraVideoView; // Declare the UIView property
setLocalRenderParams for the local preview, and call startLocalPreview for the local preview, and start the push after successfully calling enterRoom.- (void)startLocalPreview {// Set the local preview rendering parameterTRTCRenderParams *trtcRenderParams = [[TRTCRenderParams alloc] init];trtcRenderParams.fillMode = TRTCVideoFillMode_Fill;trtcRenderParams.mirrorType = TRTCVideoMirrorTypeAuto;AppDelegate *appDelegate = (AppDelegate *)[[UIApplication sharedApplication] delegate];[appDelegate.trtcCloud setLocalRenderParams:trtcRenderParams];// Preview the collected content locally[appDelegate.trtcCloud startLocalPreview:YES view:self.localCameraVideoView];}
stopLocalPreview to turn off the camera preview and stop pushing local video information.AppDelegate *appDelegate = (AppDelegate *)[[UIApplication sharedApplication] delegate];[appDelegate.trtcCloud stopLocalPreview];
// By default, the front camera is enabled and switch to the rear cameraAppDelegate *appDelegate = (AppDelegate *)[[UIApplication sharedApplication] delegate];TXDeviceManager * deviceManager = [appDelegate.trtcCloud getDeviceManager];if([deviceManager isFrontCamera]) {[deviceManager switchCamera:false];}// Switch to the front cameraAppDelegate *appDelegate = (AppDelegate *)[[UIApplication sharedApplication] delegate];TXDeviceManager * deviceManager = [appDelegate.trtcCloud getDeviceManager];[deviceManager switchCamera:true];
// If the automatic face recognition supported, enable the auto focus functionAppDelegate *appDelegate = (AppDelegate *)[[UIApplication sharedApplication] delegate];TXDeviceManager * deviceManager = [appDelegate.trtcCloud getDeviceManager];if([deviceManager isAutoFocusEnabled]) {[deviceManager enableCameraAutoFocus:true];}// Disable the autofocus functionAppDelegate *appDelegate = (AppDelegate *)[[UIApplication sharedApplication] delegate];TXDeviceManager * deviceManager = [appDelegate.trtcCloud getDeviceManager];[deviceManager enableCameraAutoFocus:false];
// The flash can be turned on when using the rear cameraAppDelegate *appDelegate = (AppDelegate *)[[UIApplication sharedApplication] delegate];TXDeviceManager * deviceManager = [appDelegate.trtcCloud getDeviceManager];if(![deviceManager isFrontCamera]) {[deviceManager enableCameraTorch:true];}// Turn off the flashAppDelegate *appDelegate = (AppDelegate *)[[UIApplication sharedApplication] delegate];TXDeviceManager * deviceManager = [appDelegate.trtcCloud getDeviceManager];[deviceManager enableCameraTorch:false];
ViewController.m file, and add it to the view hierarchy of the current view.#import "AppDelegate.h" // Import the "AppDelegate.h" file- (void)viewDidLoad {[super viewDidLoad];// Do any additional setup after loading the view.// Initialize localCameraVideoViewself.localCameraVideoView = [[UIView alloc] initWithFrame:self.view.bounds];self.localCameraVideoView.backgroundColor = [UIColor blackColor];[self viewDidAppear];}- (void)viewDidAppear {AppDelegate *appDelegate = (AppDelegate *)[[UIApplication sharedApplication] delegate];// Add the localCameraVideoView to the view hierarchy of the current view[self.view addSubview:self.localCameraVideoView];// Start local preview[appDelegate.trtcCloud startLocalPreview:YES view:self.localCameraVideoView];}@end
startLocalAudio to turn on microphone capture. Select one of the following sound Quality parameters according to your requirements.// Enable microphone acquisition and set the current scene to: Voice mode// For high noise suppression capability, strong and weak network resistanceAppDelegate *appDelegate = (AppDelegate *)[[UIApplication sharedApplication] delegate];[appDelegate.trtcCloud startLocalAudio:TRTCAudioQualitySpeech];
// Enable microphone acquisition, and set the current scene to: Music mode// For high fidelity acquisition, low sound quality loss, recommended to use with professional sound cardsAppDelegate *appDelegate = (AppDelegate *)[[UIApplication sharedApplication] delegate];[appDelegate.trtcCloud startLocalAudio:TRTCAudioQualityMusic];
stopLocalAudio to turn off microphone collection and stop pushing local audio information.AppDelegate *appDelegate = (AppDelegate *)[[UIApplication sharedApplication] delegate];[appDelegate.trtcCloud stopLocalAudio];
onUserVideoAvailable(userId, true) notification, it means that there are video frames available to play in the road screen.startRemoteView to play the video content collected by the remote side.- (void)startRemoteView{// Play the remote side's videoAppDelegate *appDelegate = (AppDelegate *)[[UIApplication sharedApplication] delegate];[appDelegate.trtcCloud startRemoteView:@"denny" streamType:TRTCVideoStreamTypeBig view:self.localCameraVideoView];}
stopRemoteView to stop the remote video.// Stop the videoAppDelegate *appDelegate = (AppDelegate *)[[UIApplication sharedApplication] delegate];[appDelegate.trtcCloud stopRemoteView:@"denny"]; // Only stop denny's video[appDelegate.trtcCloud stopAllRemoteView]; // Stop all videos
muteRemoteAudio to mute or unmute the remote side's sound.// MuteAppDelegate *appDelegate = (AppDelegate *)[[UIApplication sharedApplication] delegate];[appDelegate.trtcCloud muteRemoteAudio:@"denny" mute:YES]; // Only mute denny[appDelegate.trtcCloud muteAllRemoteAudio:YES]; // Mute all remote users
// UnmuteAppDelegate *appDelegate = (AppDelegate *)[[UIApplication sharedApplication] delegate];[appDelegate.trtcCloud muteRemoteAudio:@"denny" mute:NO]; // Only unmute denny[appDelegate.trtcCloud muteAllRemoteAudio:NO]; // Unmute all remote users
exitRoom to exit the current room, and the TRTC SDK will notify you after check-out via the onExitRoom callback event.// Exit current roomAppDelegate *appDelegate = (AppDelegate *)[[UIApplication sharedApplication] delegate];[appDelegate.trtcCloud exitRoom];// Listen for the onExitRoom callback to find out why you checked out- (void)onExitRoom:(NSInteger)reason {if (reason == 0) {NSLog(@"Exit current room by calling the 'exitRoom' api of sdk ...");} else if (reason == 1) {NSLog(@"Kicked out of the current room by server through the restful api...");} else if (reason == 2) {NSLog(@"Current room is dissolved by server through the restful api...");}}
info_rtc@tencent.com.피드백