제품 업데이트
Tencent Cloud 오디오/비디오 단말 SDK 재생 업그레이드 및 권한 부여 인증 추가
TRTC 월간 구독 패키지 출시 관련 안내
sudo gem install cocoapods
pod init
platform :osx, '10.10'# Modify the 'Your Target' to the name of your projecttarget 'Your Target' dopod 'TXLiteAVSDK_TRTC_Mac', :podspec => 'https://liteav.sdk.qcloud.com/pod/liteavsdkspec/TXLiteAVSDK_TRTC_Mac.podspec'end
pod install
pod install executed, a new .xcworkspace project file is generated. Double-click the .xcworkspace file to open it.General TAB, add TXLiteAVSDK_TRTC_Mac.xcframework and ScreenCaptureKit.framework tto the the Frameworks, Libraries, and Embedded Content section.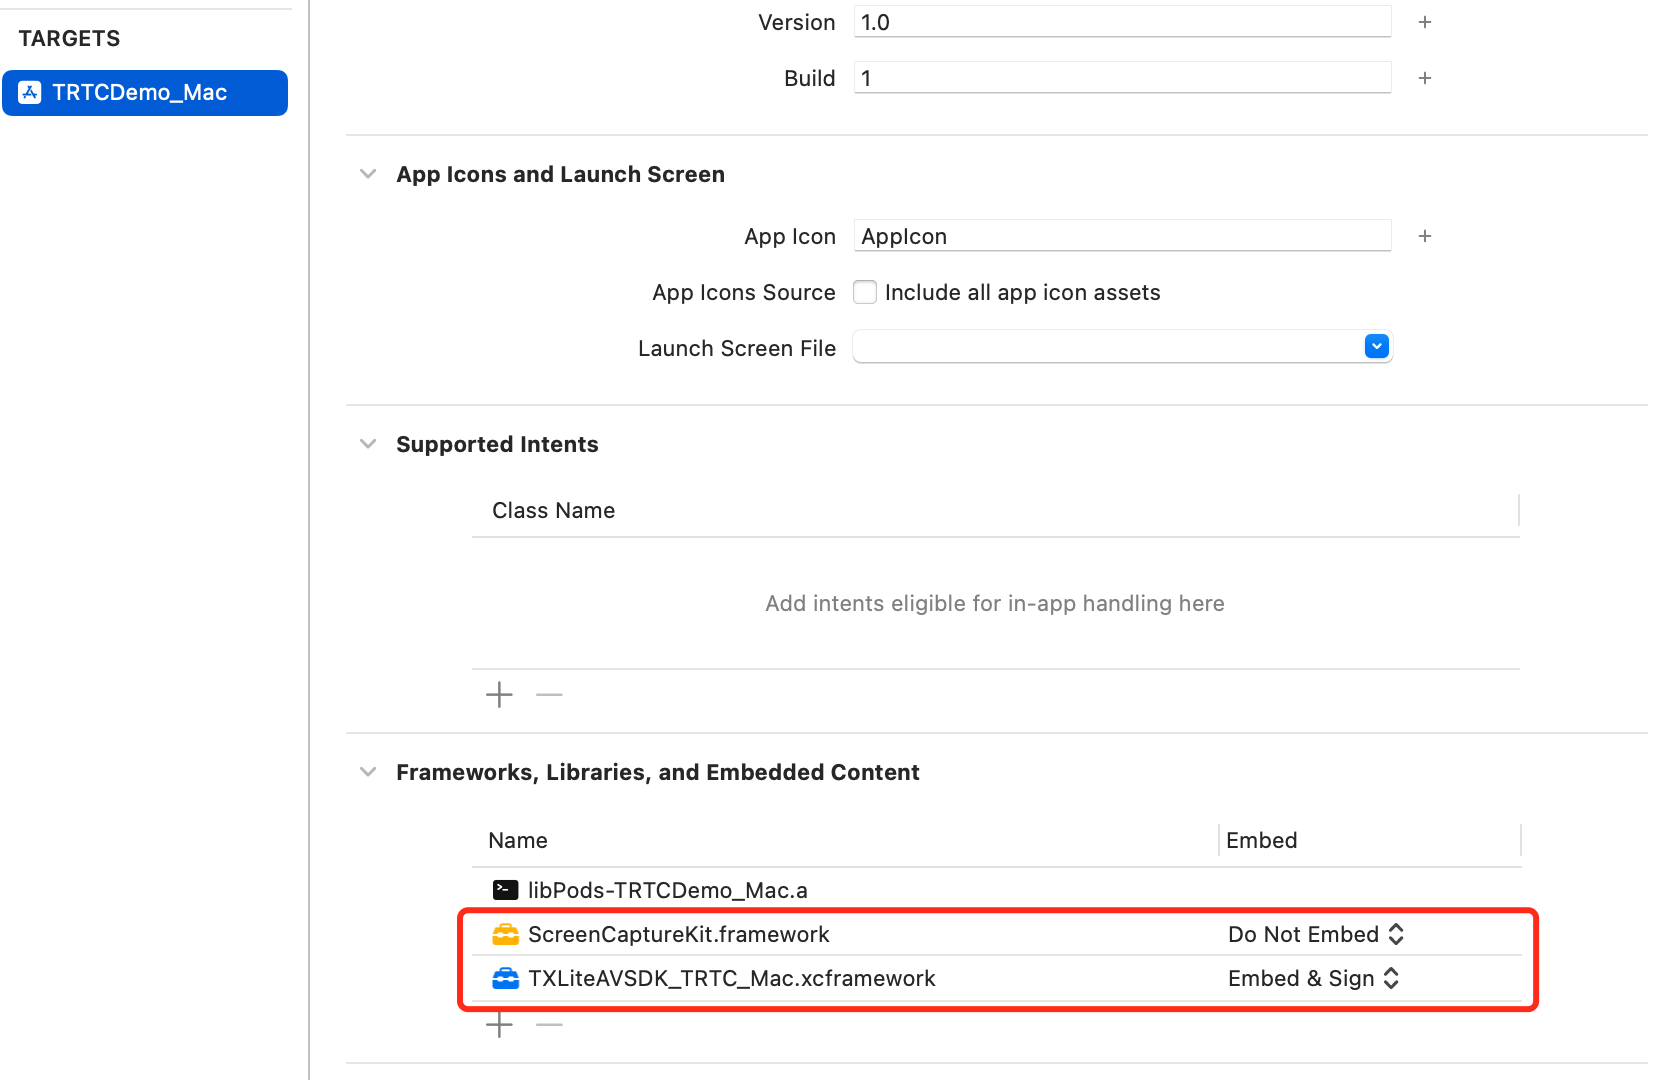
Build Settings TAB, search for User Script Sandboxing and set its value to No, which could allow the user script access to a wider range of system resources and files.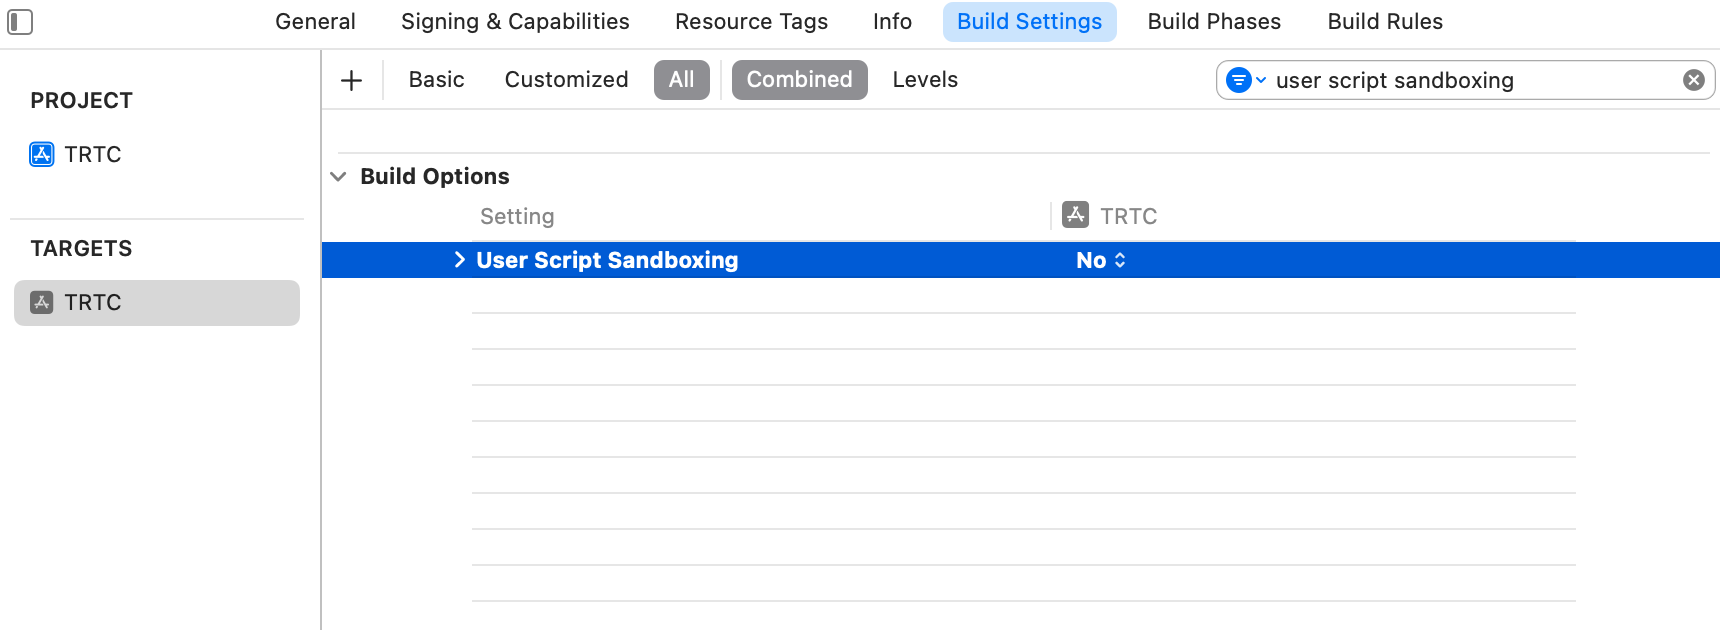
Info.plist TAB, add the Privacy-Microphone Usage Description and Privacy-Microphone Usage Description, and fill in the target prompt words used by the Microphone/Camera to obtain the permission to use the microphone and camera.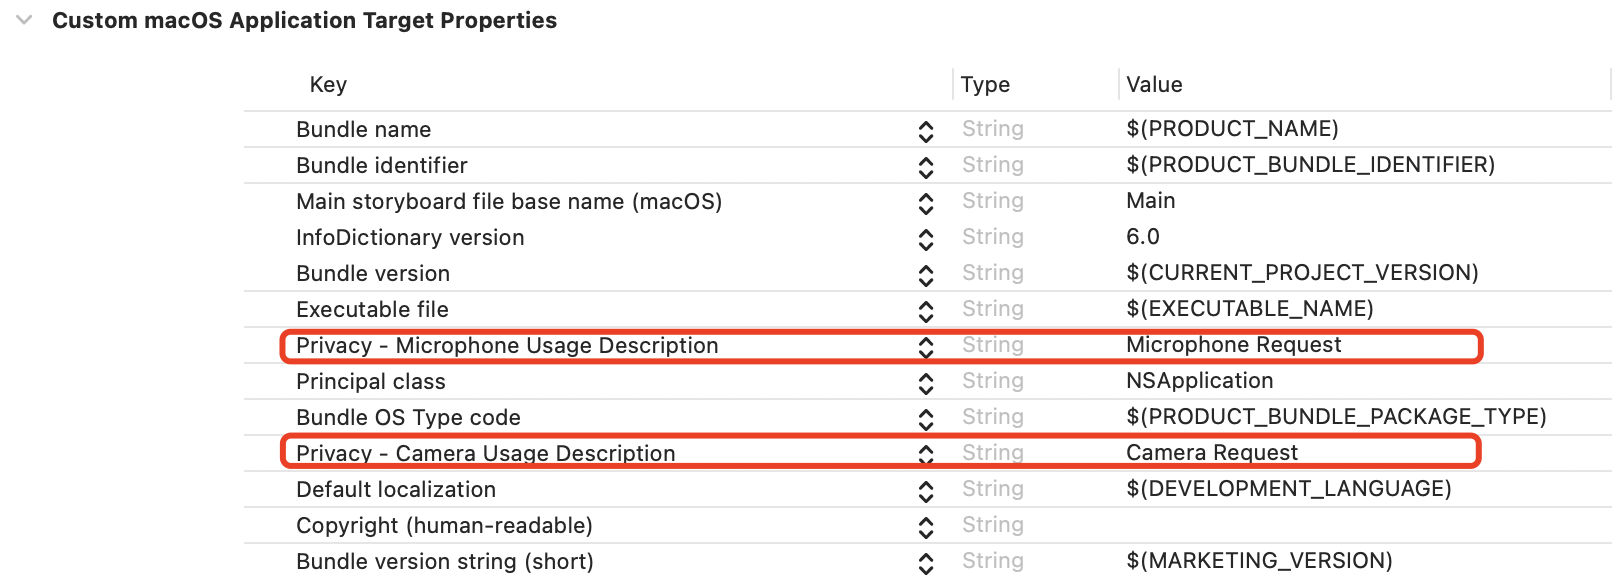
Signing & Capabilities TAB, check the following in the App Sandbox section.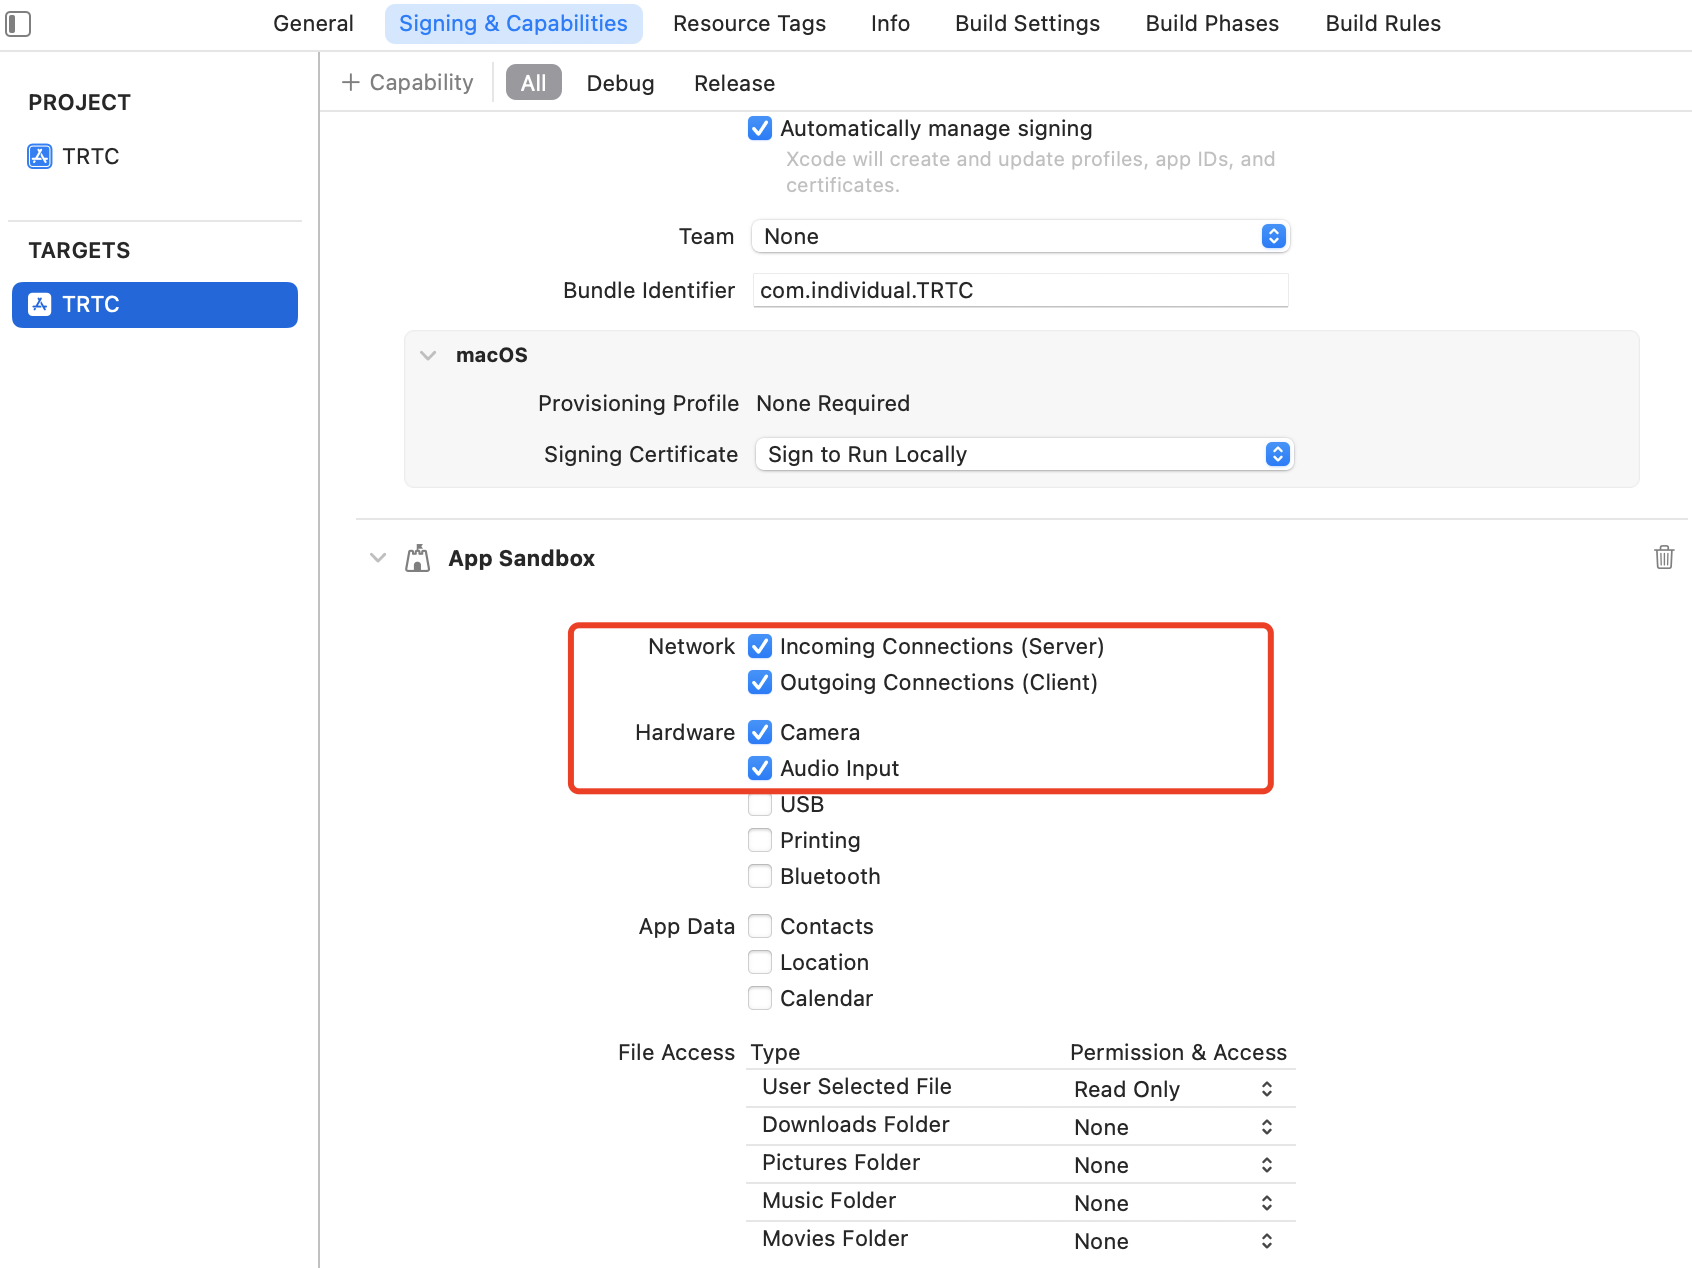
AppDelegate.h file.@import TXLiteAVSDK_TRTC_Mac; // Import TRTC SDK Module
AppDelegate.h file.@property (nonatomic, strong) TRTCCloud *trtcCloud; // Declare the TRTCCloud property
AppDelegate.m file, call sharedInstance to create the TRTC instance in the applicationDidFinishLaunchingmethod and set up the event listener.#import <UserNotifications/UserNotifications.h> // Import the UserNotifications framework- (void)applicationDidFinishLaunching:(NSNotification *)aNotification {// Create a TRTC instance and set up a listener_trtcCloud = [TRTCCloud sharedInstance];_trtcCloud.delegate = self;}// Listen for the 'onError' event- (void)onError:(TXLiteAVError)errCodeerrMsg:(nullable NSString *)errMsgextInfo:(nullable NSDictionary *)extInfo{// Handle the 'onError' event// Recommend to request notification permission for OnError information as followings// Create a user notification center instanceNSString *tip = [NSString stringWithFormat:@"Error Code: %ld, Message: %@", (long)errCode, errMsg];// Request notification authorityUNUserNotificationCenter *center = [UNUserNotificationCenter currentNotificationCenter];[center requestAuthorizationWithOptions:(UNAuthorizationOptionAlert | UNAuthorizationOptionSound)completionHandler:^(BOOL granted, NSError * _Nullable error) {if (granted) {// Create notification contentUNMutableNotificationContent *content = [[UNMutableNotificationContent alloc] init];content.title = @"RTC Error";content.body = tip;// Create notification triggerUNTimeIntervalNotificationTrigger *trigger = [UNTimeIntervalNotificationTrigger triggerWithTimeInterval:5 repeats:NO];// Create notification requestUNNotificationRequest *request = [UNNotificationRequest requestWithIdentifier:@"RTCErrorNotification" content:content trigger:trigger];// Add notifications to the Notification Center[center addNotificationRequest:request withCompletionHandler:^(NSError * _Nullable error) {if (error != nil) {NSLog(@"Error adding notification: %@", error);}}];}}];}
TRTCParams and call enterRoom to successfully enter the room, which is usually called after clicking the Start Call button.Parameter | Type | Description |
sdkAppId | number | |
userId | string | User ID specified by you. |
userSig | string | |
roomId | number | Room ID specified by you, usually a unique room ID. |
#import "AppDelegate.h" // Import the "AppDelegate.h" file-(void)enterRoom {// Modify the following parameters to your ownTRTCParams *trtcParams = [[TRTCParams alloc] init];trtcParams.sdkAppId = 1400000123;trtcParams.userId = @"denny";trtcParams.userSig = @"";trtcParams.roomId = 123321;// For multi-party video calls, `TRTC_APP_SCENE_LIVE` is recommendedAppDelegate *appDelegate = (AppDelegate *)[[NSApplication sharedApplication] delegate];[appDelegate.trtcCloud enterRoom:trtcParams appScene:TRTCAppSceneLIVE];}// Listen for the 'onEnterRoom' event- (void)onEnterRoom:(NSInteger)result {// Handle the 'onEnterRoom' eventif (result > 0) {[self toastTip:@"Enter room succeed!"];} else {[self toastTip:@"Enter room failed!"];}}// Implement the 'toastTip'- (void)toastTip:(NSString *)tip {NSAlert *alert = [[NSAlert alloc] init];[alert setMessageText:tip];[alert runModal];}
ViewController.h file.@property (nonatomic, strong) NSWindow *window; // Declare the NSWindow property@property (nonatomic, strong) NSView *localCameraVideoView; // Declare the NSView property
setLocalRenderParams for local preview, then call startLocalPreview for local preview. After successfully calling enterRoom, the stream push will start.-(void) startLocalPreview {// Create a windowself.window = [[NSWindow alloc] initWithContentRect:NSMakeRect(0, 0, 800, 600) styleMask:NSWindowStyleMaskTitled | NSWindowStyleMaskClosable | NSWindowStyleMaskMiniaturizable | NSWindowStyleMaskResizable backing:NSBackingStoreBuffered defer:NO];[self.window center];[self.window setTitle:@"TRTCDemo_Mac"];[self.window makeKeyAndOrderFront:nil];self.window.releasedWhenClosed = NO;// Initialize localCameraVideoViewself.localCameraVideoView = [[NSView alloc] initWithFrame:NSMakeRect(0, 0, 300, 300)];[self.window.contentView addSubview:self.localCameraVideoView];// Adjust the localCameraVideoView frameself.localCameraVideoView.frame = self.window.contentView.bounds;// Set local preview rendering parametersTRTCRenderParams *trtcRenderParams = [[TRTCRenderParams alloc] init];trtcRenderParams.fillMode = TRTCVideoFillMode_Fill;trtcRenderParams.mirrorType = TRTCVideoMirrorTypeAuto;AppDelegate *appDelegate = (AppDelegate *)[[NSApplication sharedApplication] delegate];[appDelegate.trtcCloud setLocalRenderParams:trtcRenderParams];// Preview the collected content locally[appDelegate.trtcCloud startLocalPreview:self.localCameraVideoView];}
stopLocalPreview to turn off the camera preview and stop pushing local video information.AppDelegate *appDelegate = (AppDelegate *)[[NSApplication sharedApplication] delegate];[appDelegate.trtcCloud stopLocalPreview];
startLocalAudio to turn on microphone capture. Select one of the following sound Quality parameters according to your requirements.// Enable microphone acquisition and set the current scene to: Voice mode// For high noise suppression capability, strong and weak network resistanceAppDelegate *appDelegate = (AppDelegate *)[[NSApplication sharedApplication] delegate];[appDelegate.trtcCloud startLocalAudio:TRTCAudioQualitySpeech];
// Enable microphone acquisition, and set the current scene to: Music mode// For high fidelity acquisition, low sound quality loss, recommended to use with professional sound cardsAppDelegate *appDelegate = (AppDelegate *)[[NSApplication sharedApplication] delegate];[appDelegate.trtcCloud startLocalAudio:TRTCAudioQualityMusic];
stopLocalAudio to turn off microphone collection and stop pushing local audio information.AppDelegate *appDelegate = (AppDelegate *)[[NSApplication sharedApplication] delegate];[appDelegate.trtcCloud stopLocalAudio];
onUserVideoAvailable(userId, true) notification, it means that there are video frames available to play in the road screen.setLocalRenderParams and call startRemoteView to play the video content collected by the remote side.- (void)startRemotePreview {/// Play the remote side's videoAppDelegate *appDelegate = (AppDelegate *)[[UIApplication sharedApplication] delegate];[appDelegate.trtcCloud startRemoteView:@"denny" streamType:TRTCVideoStreamTypeBig view:self.localCameraVideoView];}
stopRemoteView to stop the remote video.// Stop the videoAppDelegate *appDelegate = (AppDelegate *)[[NSApplication sharedApplication] delegate];[appDelegate.trtcCloud stopRemoteView:@"denny"]; // Only stop denny's video[appDelegate.trtcCloud stopAllRemoteView]; // Stop all videos
muteRemoteAudio to mute or unmute the remote side's sound.// MuteAppDelegate *appDelegate = (AppDelegate *)[[NSApplication sharedApplication] delegate];[appDelegate.trtcCloud muteRemoteAudio:@"denny" mute:YES]; // Only mute denny[appDelegate.trtcCloud muteAllRemoteAudio:YES]; // Mute all remote users
// UnmuteAppDelegate *appDelegate = (AppDelegate *)[[NSApplication sharedApplication] delegate];[appDelegate.trtcCloud muteRemoteAudio:@"denny" mute:NO]; // Only unmute denny[appDelegate.trtcCloud muteAllRemoteAudio:NO]; // Unmute all remote users
exitRoom to exit the current room, and the TRTC SDK will notify you after check-out via the onExitRoom callback event.// Exit current roomAppDelegate *appDelegate = (AppDelegate *)[[NSApplication sharedApplication] delegate];[appDelegate.trtcCloud exitRoom];// Listen for the onExitRoom callback to find out why you checked out- (void)onExitRoom:(NSInteger)reason {if (reason == 0) {NSLog(@"Exit current room by calling the 'exitRoom' api of sdk ...");} else if (reason == 1) {NSLog(@"Kicked out of the current room by server through the restful api...");} else if (reason == 2) {NSLog(@"Current room is dissolved by server through the restful api...");}}
info_rtc@tencent.com.피드백