数据科学实践教程
Download
聚焦模式
字号
深度学习实践教程:基于 GPU 资源组的图像分类模型开发
说明:
本教程的前置条件为:已经开通数据科学功能,且已经购买 DLC 的 GPU 资源,并创建带 GPU 卡的机器学习资源组。
基础信息
数据
本教程采用CIFAR-10 数据集进行操作说明,该数据集是由加拿大高级研究所(CIFAR)提供的图像识别数据集,广泛用于深度学习和计算机视觉领域的研究和实验。详情为:
数据量:共 60,000 张彩色图像。
数据分布:其中 50,000 张为训练图像,10,000 张为测试图像。
图像尺寸:每张图像大小为 32×32 像素。
类别:分为 10 个类,每类 6,000 张图像,分别是飞机、汽车、鸟、猫、鹿、狗、青蛙、马、船、卡车。
特性:图像明亮且小巧,适合初学者和快速实验。每个类别的图像具有多样性,且有一定的重叠特性,增加了分类的挑战性。
模型
本教程采用ResNet-18模型,是微软何恺明团队 2015 年提出的轻量级残差网络,核心是残差连接解决深层网络梯度消失 / 退化问题,共 18 层参数化层(卷积 + 全连接),参数量约 11.7M,是一个常用于图像分类、特征提取与轻量化场景的经典视觉模型。
资源
DLC 的 GPU 资源组:
20CU/1GPU [GN7-t4]
环境
spark3.5-tensorflow2.20-gpu-py311-cu124
Studio 中编辑代码发起模型训练
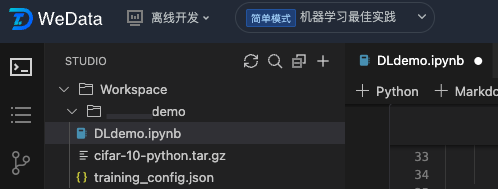
1. 第一步,我们创建一个文件夹,上传数据文件,并创建好配置文件和ipynb文件。
2. 第二步,我们定义好读取数据和进行数据转换的函数。
import tensorflow as tfimport numpy as npimport osimport tarfileimport picklefrom typing import Dict, Anydef load_cifar10_from_local(local_path):"""从本地cifar-10-python.tar.gz文件加载CIFAR-10数据集""""""Load the CIFAR-10 dataset from the local cifar-10-python.tar.gz file."""if not os.path.exists(local_path):raise FileNotFoundError(f"未找到CIFAR-10数据集文件: {local_path}")# 解压目录# Extraction directoryextract_dir = 'cifar-10-batches-py'# 如果解压目录不存在,则解压文件# If the extraction directory does not exist, extract the file.if not os.path.exists(extract_dir):print("解压CIFAR-10数据集...Extract CIFAR-10")with tarfile.open(local_path, 'r:gz') as tar:tar.extractall()print("解压完成!Extraction completed")else:print("CIFAR-10数据集已解压,跳过解压步骤The CIFAR-10 dataset has been extracted, skipping the extraction step.")return extract_dirdef unpickle(file):"""读取CIFAR-10的pickle文件""""""Read the CIFAR-10 pickle files"""with open(file, 'rb') as fo:dict = pickle.load(fo, encoding='bytes')return dictdef create_cifar10_tfrecord(local_path='cifar-10-python.tar.gz'):"""从本地文件创建CIFAR-10数据集的TFRecord文件""""""Create TFRecord files for the CIFAR-10 dataset from local files."""# 从本地文件加载数据集# Load the dataset from local files.cifar_dir = load_cifar10_from_local(local_path)# 加载训练数据# Load training datax_train = []y_train = []# 加载5个训练批次# Load 5 train batchfor i in range(1, 6):batch_file = os.path.join(cifar_dir, f'data_batch_{i}')dict = unpickle(batch_file)# 获取图像数据和标签# Get data and labeldata = dict[b'data']labels = dict[b'labels']x_train.append(data)y_train.extend(labels)x_train = np.concatenate(x_train, axis=0)y_train = np.array(y_train)# 加载测试数据# Load test datatest_file = os.path.join(cifar_dir, 'test_batch')dict_test = unpickle(test_file)x_test = dict_test[b'data']y_test = np.array(dict_test[b'labels'])# 重塑图像形状为32x32x3# Reshape picture to 32x32x3x_train = x_train.reshape(-1, 3, 32, 32).transpose(0, 2, 3, 1)x_test = x_test.reshape(-1, 3, 32, 32).transpose(0, 2, 3, 1)# 创建输出目录# Create output directoryos.makedirs('./tfrecords', exist_ok=True)def _bytes_feature(value):"""转换为字节特征""""""Convert to byte feature"""if isinstance(value, type(tf.constant(0))):value = value.numpy()return tf.train.Feature(bytes_list=tf.train.BytesList(value=[value]))def _int64_feature(value):"""转换为整数特征""""""Convert to Int feature"""return tf.train.Feature(int64_list=tf.train.Int64List(value=[value]))# 写入训练集TFRecord# Write trainset TFRecordwith tf.io.TFRecordWriter('./tfrecords/cifar10_train.tfrecord') as writer:for i in range(len(x_train)):image = x_train[i]label = y_train[i]# 确保图像数据是uint8类型# Make sure the image data type is uint8.image = image.astype(np.uint8)feature = {'image': _bytes_feature(tf.compat.as_bytes(image.tobytes())),'label': _int64_feature(label),'height': _int64_feature(32),'width': _int64_feature(32),'depth': _int64_feature(3)}example = tf.train.Example(features=tf.train.Features(feature=feature))writer.write(example.SerializeToString())# 写入验证集TFRecord# Write valset TFRecordwith tf.io.TFRecordWriter('./tfrecords/cifar10_val.tfrecord') as writer:for i in range(len(x_test)):image = x_test[i]label = y_test[i]image = image.astype(np.uint8)feature = {'image': _bytes_feature(tf.compat.as_bytes(image.tobytes())),'label': _int64_feature(label),'height': _int64_feature(32),'width': _int64_feature(32),'depth': _int64_feature(3)}example = tf.train.Example(features=tf.train.Features(feature=feature))writer.write(example.SerializeToString())print(f"TFRecord文件创建完成: 训练样本 {len(x_train)}, 验证样本 {len(x_test)}")return len(x_train), len(x_test)def parse_tfrecord_fn(example_proto, config: Dict[str, Any], is_training: bool = True):"""解析TFRecord示例""""""Parse TFRecord examples"""feature_description = {'image': tf.io.FixedLenFeature([], tf.string),'label': tf.io.FixedLenFeature([], tf.int64),'height': tf.io.FixedLenFeature([], tf.int64),'width': tf.io.FixedLenFeature([], tf.int64),'depth': tf.io.FixedLenFeature([], tf.int64)}example = tf.io.parse_single_example(example_proto, feature_description)# 解析图像数据# Parse image dataimage = tf.io.decode_raw(example['image'], tf.uint8)image = tf.reshape(image, [32, 32, 3])image = tf.cast(image, tf.float32) / 255.0# 数据增强# Data augmentationif is_training and config.get('data_augmentation', True):if config.get('horizontal_flip', True):image = tf.image.random_flip_left_right(image)if config.get('brightness_delta', 0) > 0:image = tf.image.random_brightness(image, config['brightness_delta'])if config.get('contrast_range'):image = tf.image.random_contrast(image,config['contrast_range'][0],config['contrast_range'][1])# 标准化处理# Normalizationimage = (image - tf.constant([0.4914, 0.4822, 0.4465])) / tf.constant([0.2023, 0.1994, 0.2010])label = tf.cast(example['label'], tf.int32)return image, labeldef create_dataset(config: Dict[str, Any], is_training: bool = True):"""创建TensorFlow数据集管道""""""Create TensorFlow dataset pipe"""tfrecord_path = config['train_tfrecord_path'] if is_training else config['val_tfrecord_path']# 检查TFRecord文件是否存在# Check TFRecord fileif not os.path.exists(tfrecord_path):raise FileNotFoundError(f"TFRecord文件不存在: {tfrecord_path}")dataset = tf.data.TFRecordDataset(tfrecord_path)dataset = dataset.map(lambda x: parse_tfrecord_fn(x, config, is_training),num_parallel_calls=tf.data.experimental.AUTOTUNE)if is_training:dataset = dataset.shuffle(buffer_size=10000)dataset = dataset.batch(config.get('batch_size', 128))dataset = dataset.prefetch(tf.data.experimental.AUTOTUNE)return dataset
3. 第三步,我们定义好ResNet模型。
import tensorflow as tffrom tensorflow.keras import layers, Modelclass BasicBlock(layers.Layer):"""ResNet基础残差块""""""ResNet Basic Residual Block"""def __init__(self, filter_num, stride=1):super(BasicBlock, self).__init__()self.conv1 = layers.Conv2D(filter_num, (3, 3), strides=stride,padding='same', use_bias=False)self.bn1 = layers.BatchNormalization()self.relu = layers.ReLU()self.conv2 = layers.Conv2D(filter_num, (3, 3), strides=1,padding='same', use_bias=False)self.bn2 = layers.BatchNormalization()# 捷径连接处理# Connection Handlingif stride != 1:self.downsample = tf.keras.Sequential([layers.Conv2D(filter_num, (1, 1), strides=stride, use_bias=False),layers.BatchNormalization()])else:self.downsample = lambda x: xdef call(self, inputs, training=None):residual = inputsx = self.conv1(inputs)x = self.bn1(x, training=training)x = self.relu(x)x = self.conv2(x)x = self.bn2(x, training=training)identity = self.downsample(residual)output = tf.nn.relu(x + identity)return outputclass ResNet(Model):"""ResNet模型""""""ResNet model"""def __init__(self, layer_dims, num_classes=10):super(ResNet, self).__init__()# 预处理层# Preprocessing Layerself.stem = tf.keras.Sequential([layers.Conv2D(64, (3, 3), strides=1, padding='same', use_bias=False),layers.BatchNormalization(),layers.ReLU(),])# 构建残差层# Construct the Residual Layerself.layer1 = self._build_resblock(64, layer_dims[0], stride=1)self.layer2 = self._build_resblock(128, layer_dims[1], stride=2)self.layer3 = self._build_resblock(256, layer_dims[2], stride=2)self.layer4 = self._build_resblock(512, layer_dims[3], stride=2)# 分类器# Classifierself.avgpool = layers.GlobalAveragePooling2D()self.fc = layers.Dense(num_classes)def _build_resblock(self, filter_num, blocks, stride=1):"""构建残差块序列""""""Construct the sequence of residual blocks"""res_blocks = tf.keras.Sequential()res_blocks.add(BasicBlock(filter_num, stride))for _ in range(1, blocks):res_blocks.add(BasicBlock(filter_num, stride=1))return res_blocksdef call(self, inputs, training=None):x = self.stem(inputs, training=training)x = self.layer1(x, training=training)x = self.layer2(x, training=training)x = self.layer3(x, training=training)x = self.layer4(x, training=training)x = self.avgpool(x)x = self.fc(x)return xdef resnet18(num_classes=10):"""创建ResNet-18模型""""""Construct ResNet-18 model"""return ResNet([2, 2, 2, 2], num_classes)
4. 第四步,我们定义好MLFlow的训练流程。
import mlflowimport mlflow.tensorflowimport jsonimport matplotlib.pyplot as pltfrom datetime import datetimeclass CIFAR10Trainer:def __init__(self, config_path='config/training_config.json'):self.config = self.load_config(config_path)self.setup_mlflow()self.model = Noneself.optimizer = Nonedef load_config(self, config_path):"""从JSON文件加载超参数配置""""""Load hyperparam config from JSON file"""with open(config_path, 'r') as f:return json.load(f)def setup_mlflow(self):"""设置MLflow实验跟踪""""""Set MLflow experiment tracking"""mlflow.set_tracking_uri("30.22.40.186:5000")mlflow.set_experiment("cifar10-resnet-tf2.2-local")def create_optimizer(self):"""创建优化器""""""Construct optimizer"""if self.config['optimizer'] == 'adam':return tf.keras.optimizers.Adam(learning_rate=self.config['learning_rate'])else:return tf.keras.optimizers.SGD(learning_rate=self.config['learning_rate'],momentum=self.config.get('momentum', 0.9))def train(self):"""训练模型""""""Training model"""# 创建TFRecord文件(如果不存在)# Construct TFRecord file(if not exist)if not os.path.exists(self.config['train_tfrecord_path']):print("创建TFRecord文件...Construct TFRecord file...")try:train_samples, test_samples = create_cifar10_tfrecord(self.config['cifar10_local_path'])print(f"成功加载: 训练样本 {train_samples}, 测试样本 {test_samples}.Load success: {train_samples},{test_samples}")except FileNotFoundError as e:print(f"错误: {e} error: {e}")print("请确保cifar-10-python.tar.gz文件存在于当前目录.Please make sure cifar-10-python.tar.gz exist in current directory")returnwith mlflow.start_run():# 记录超参数# Log hyperparammlflow.log_params(self.config)mlflow.log_param("framework", "TensorFlow 2.2")mlflow.log_param("dataset", "CIFAR-10")mlflow.log_param("data_source", "local_file")mlflow.log_param("start_time", datetime.now().isoformat())# 创建数据集# Construct datasettrain_dataset = create_dataset(self.config, is_training=True)val_dataset = create_dataset(self.config, is_training=False)# 创建模型和优化器# Construct model and optimizerself.model = resnet18(num_classes=self.config['num_classes'])self.optimizer = self.create_optimizer()# 编译模型# Compile modelself.model.compile(optimizer=self.optimizer,loss=tf.keras.losses.SparseCategoricalCrossentropy(from_logits=True),metrics=['accuracy'])# 构建模型并显示摘要# Construct model and show abstractself.model.build((None, self.config['image_size'],self.config['image_size'], 3))self.model.summary()# 训练参数# train paramtrain_loss = tf.keras.metrics.Mean(name='train_loss')train_accuracy = tf.keras.metrics.SparseCategoricalAccuracy(name='train_accuracy')val_loss = tf.keras.metrics.Mean(name='val_loss')val_accuracy = tf.keras.metrics.SparseCategoricalAccuracy(name='val_accuracy')@tf.functiondef train_step(images, labels):with tf.GradientTape() as tape:predictions = self.model(images, training=True)loss = tf.keras.losses.sparse_categorical_crossentropy(labels, predictions, from_logits=True)gradients = tape.gradient(loss, self.model.trainable_variables)self.optimizer.apply_gradients(zip(gradients, self.model.trainable_variables))train_loss(loss)train_accuracy(labels, predictions)return lossbest_val_acc = 0.0train_losses = []train_accs = []val_losses = []val_accs = []print("开始训练...Start training")for epoch in range(self.config['epochs']):# 重置指标# Reset metricstrain_loss.reset_state()train_accuracy.reset_state()val_loss.reset_state()val_accuracy.reset_state()# 训练阶段# Training stepfor batch, (images, labels) in enumerate(train_dataset):loss = train_step(images, labels)if batch % 50 == 0:#print(f'Epoch {epoch+1}, Batch {batch}, Loss: {loss.numpy():.4f}')print(f'Epoch {epoch+1}, Batch {batch}, Loss: {tf.reduce_mean(loss).numpy():.4f}')# 验证阶段# Validate stepfor images, labels in val_dataset:predictions = self.model(images, training=False)v_loss = tf.keras.losses.sparse_categorical_crossentropy(labels, predictions, from_logits=True)val_loss(v_loss)val_accuracy(labels, predictions)# 计算epoch指标# Calculate epoch metricepoch_train_loss = train_loss.result().numpy()epoch_train_acc = train_accuracy.result().numpy()epoch_val_loss = val_loss.result().numpy()epoch_val_acc = val_accuracy.result().numpy()# 记录到MLflow# Log to MLflowmlflow.log_metric("train_loss", epoch_train_loss, step=epoch)mlflow.log_metric("train_accuracy", epoch_train_acc, step=epoch)mlflow.log_metric("val_loss", epoch_val_loss, step=epoch)mlflow.log_metric("val_accuracy", epoch_val_acc, step=epoch)mlflow.log_metric("learning_rate",self.optimizer.learning_rate.numpy(), step=epoch)# 保存训练历史# Save training historytrain_losses.append(epoch_train_loss)train_accs.append(epoch_train_acc)val_losses.append(epoch_val_loss)val_accs.append(epoch_val_acc)print(f'Epoch {epoch+1}/{self.config["epochs"]}: 'f'Train Loss: {epoch_train_loss:.4f}, Train Acc: {epoch_train_acc*100:.2f}%, 'f'Val Loss: {epoch_val_loss:.4f}, Val Acc: {epoch_val_acc*100:.2f}%')# 保存最佳模型# Save best modelif epoch_val_acc > best_val_acc:best_val_acc = epoch_val_accmlflow.tensorflow.log_model(self.model, "best_model")print(f"新的最佳模型已保存,验证准确率: {epoch_val_acc*100:.2f}%The new best model is saved, validate accuracy: {epoch_val_acc*100:.2f}%")# 记录最终结果# Log final resultmlflow.log_metric("best_val_accuracy", best_val_acc)mlflow.tensorflow.log_model(self.model, "final_model")# 绘制训练曲线# Plot the training curves。self.plot_training_history(train_losses, train_accs, val_losses, val_accs)print(f"训练完成!最佳验证准确率: {best_val_acc*100:.2f}%Training complete!The best validate accuracy: {best_val_acc*100:.2f}%")def plot_training_history(self, train_losses, train_accs, val_losses, val_accs):"""绘制训练历史曲线""""""Plot the training history curves"""fig, (ax1, ax2) = plt.subplots(1, 2, figsize=(15, 5))# 损失曲线# Loss curvesax1.plot(train_losses, label='Train Loss')ax1.plot(val_losses, label='Val Loss')ax1.set_title('Training and Validation Loss')ax1.set_xlabel('Epoch')ax1.set_ylabel('Loss')ax1.legend()ax1.grid(True)# 准确率曲线# Accuracy curvesax2.plot(train_accs, label='Train Accuracy')ax2.plot(val_accs, label='Val Accuracy')ax2.set_title('Training and Validation Accuracy')ax2.set_xlabel('Epoch')ax2.set_ylabel('Accuracy')ax2.legend()ax2.grid(True)plt.tight_layout()plt.savefig('training_history.png')mlflow.log_artifact('training_history.png')plt.show()
5. 第五步,我们创建训练的main代码。
# 初始化训练器,并且从training_config.json中读取训练超参数# Initial trainer, and read training hyperparam from training_config.jsontrainer = CIFAR10Trainer('training_config.json')# 开始训练trainer.train()# 启动MLflow UI(在终端中运行)print("训练完成!请在实验管理中查看运行结果。Training complete!Please check task result")
6. 第六步,我们在配置的JSON文件中,定义好训练超参数。
{"model_name": "resnet18","num_classes": 10,"batch_size": 128,"learning_rate": 0.001,"epochs": 5,"optimizer": "adam","weight_decay": 0.0001,"momentum": 0.9,"image_size": 32,"train_tfrecord_path": "./tfrecords/cifar10_train.tfrecord","val_tfrecord_path": "./tfrecords/cifar10_val.tfrecord","data_augmentation": true,"horizontal_flip": true,"brightness_delta": 0.1,"contrast_range": [0.9, 1.1],"cifar10_local_path": "cifar-10-python.tar.gz","local_path": "cifar-10-python.tar.gz"}
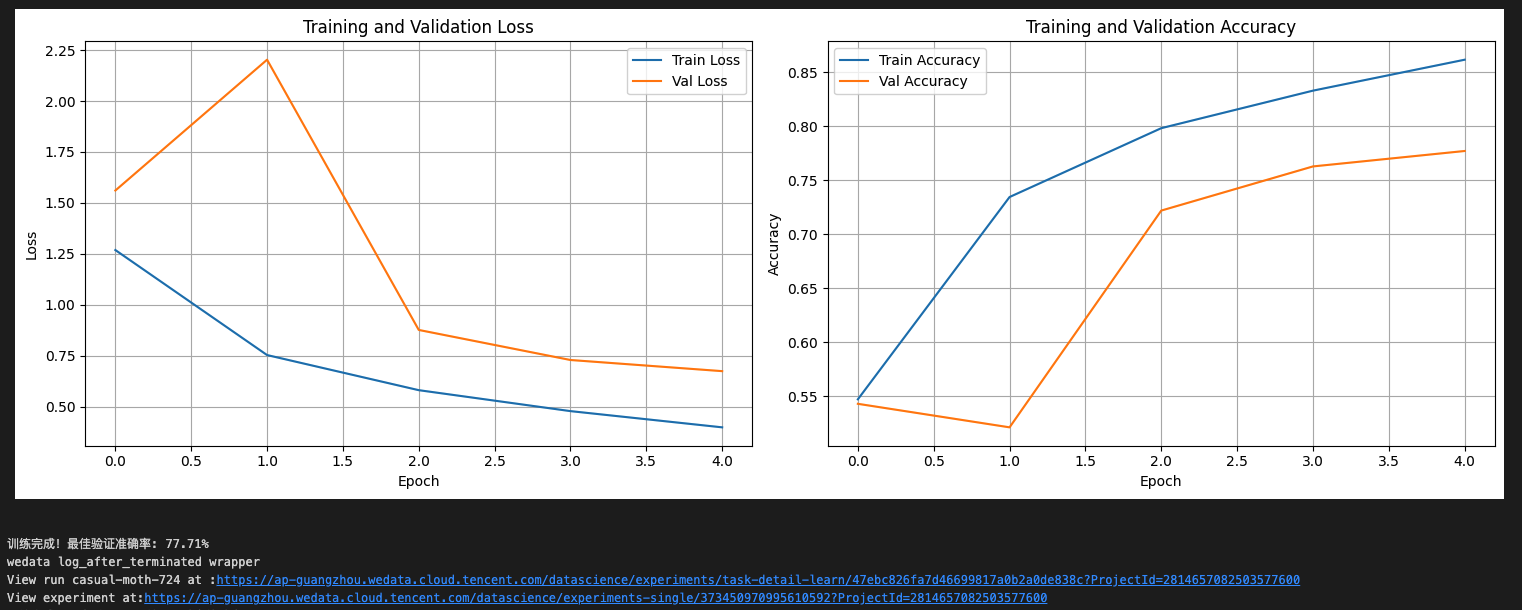
7. 最后我们将每一段代码都按顺序运行一遍,查看打印结果,已经训练完成并且成功上报结果。
实验管理中查看运行结果
1. 单击进入数据科学的实验管理模块,发现刚刚代码中运行的记录已经在实验管理中可以被查看到,在界面显示实验名称、实验类型、实验描述、创建时间、负责人、操作项等信息。

2. 单击实验名称,进入运行记录页面,可以查看刚刚上报的任务记录,在界面显示任务名称、任务状态、创建时间、持续时间、代码文件、注册模型等信息。

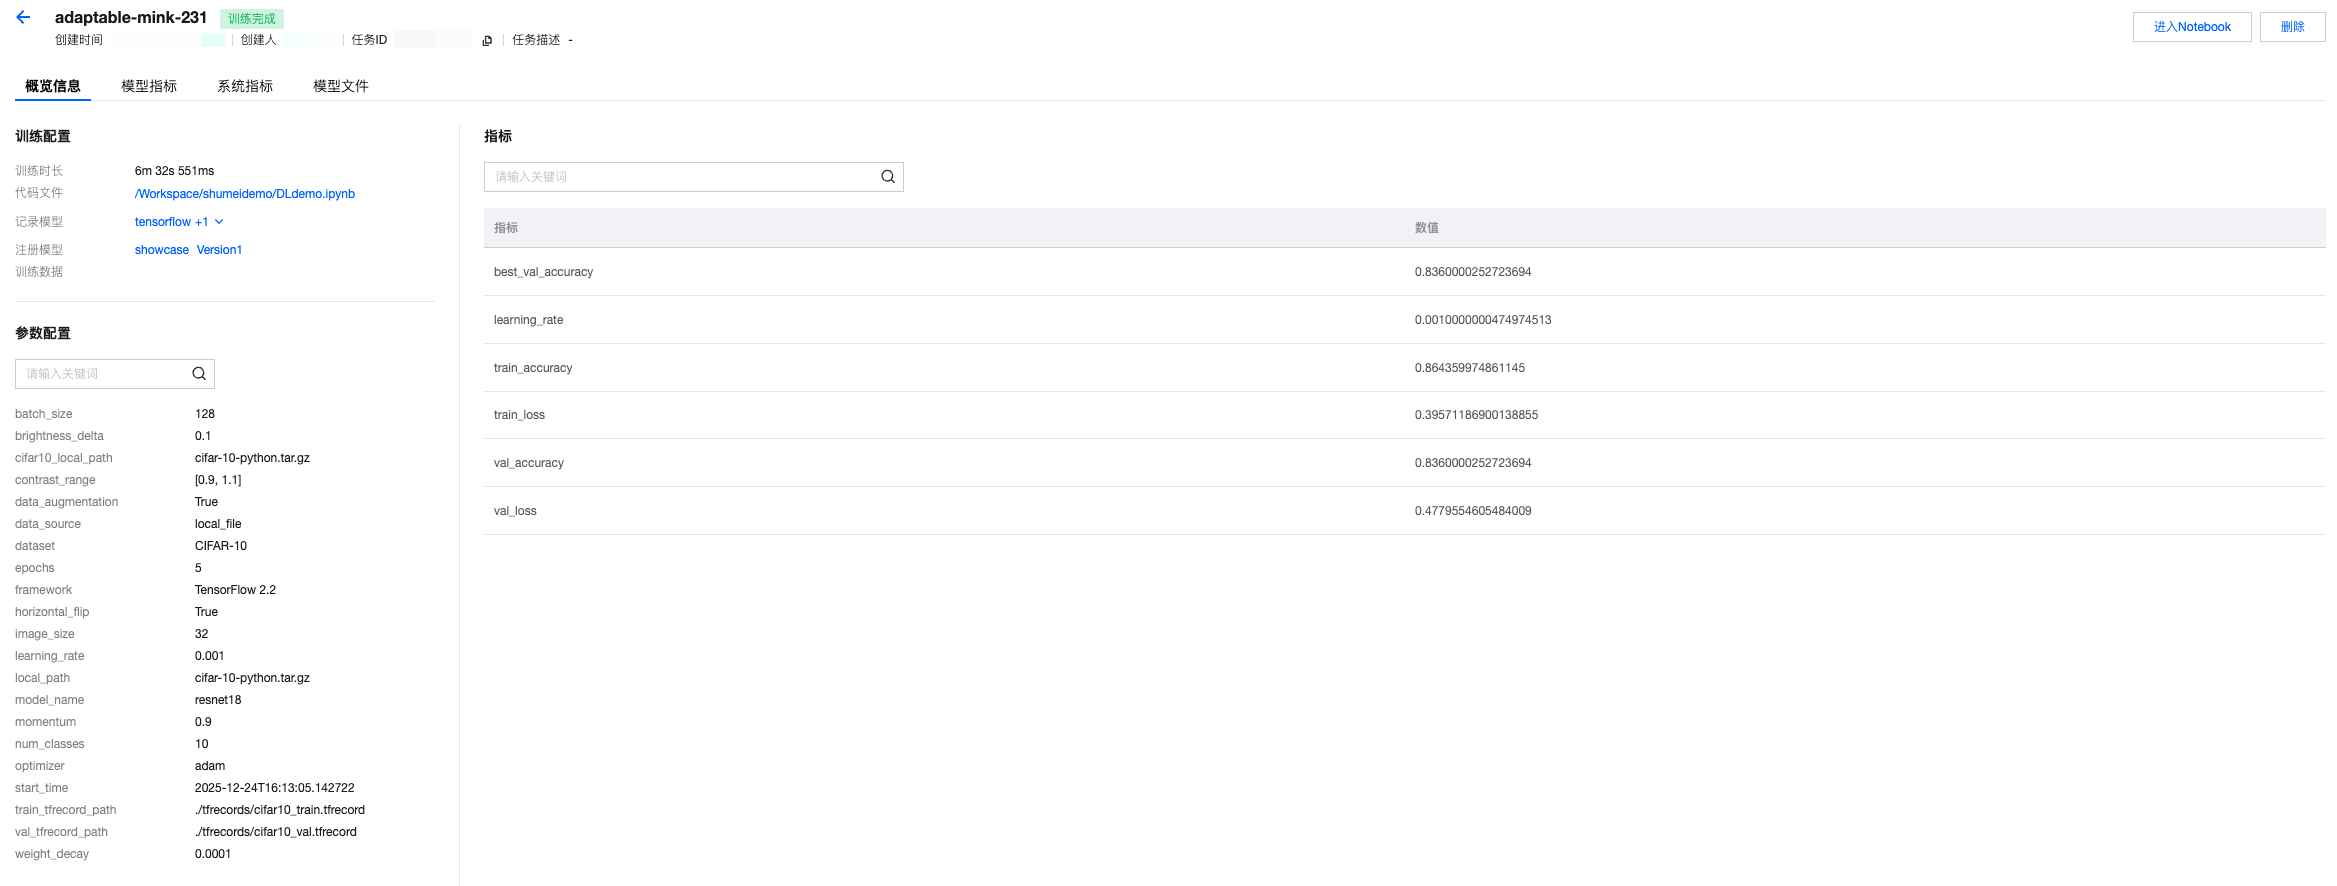
3. 单击任务名称,进入运行详情的概览页面,支持查看所上报的训练超参数、模型指标等。
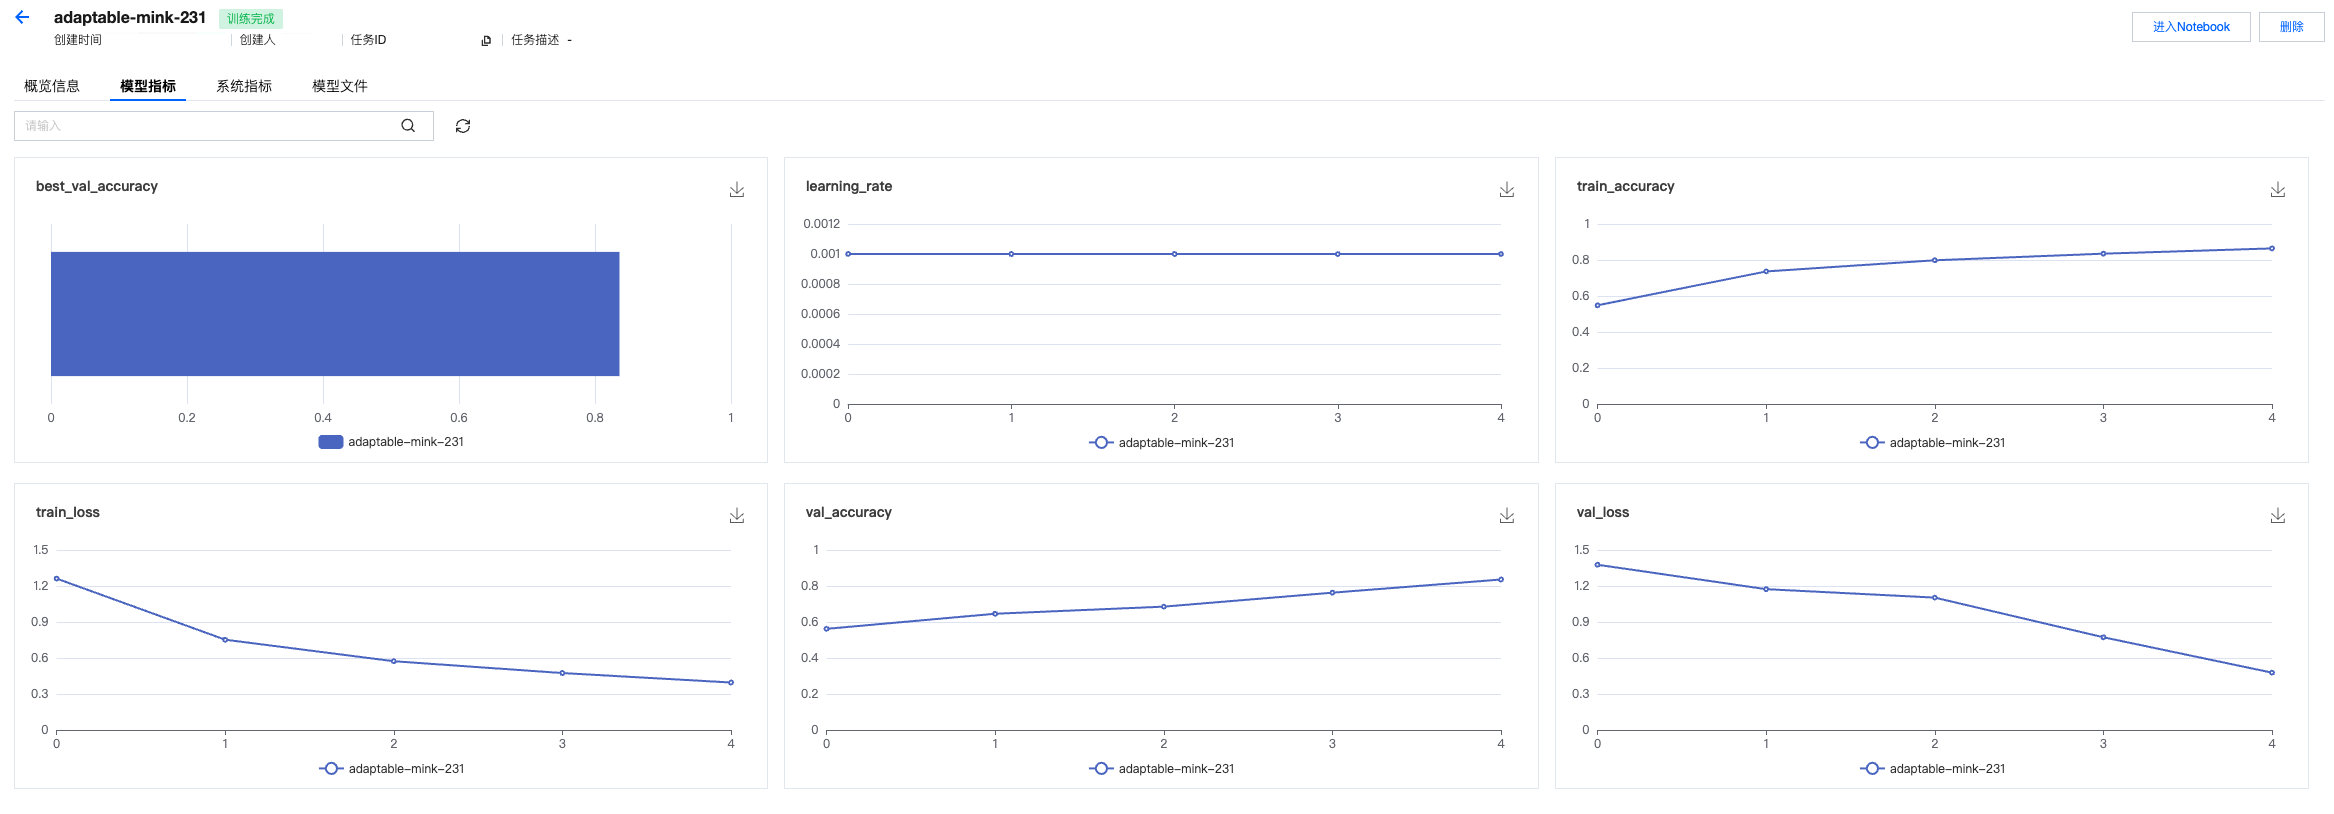
4. 查看模型指标记录。
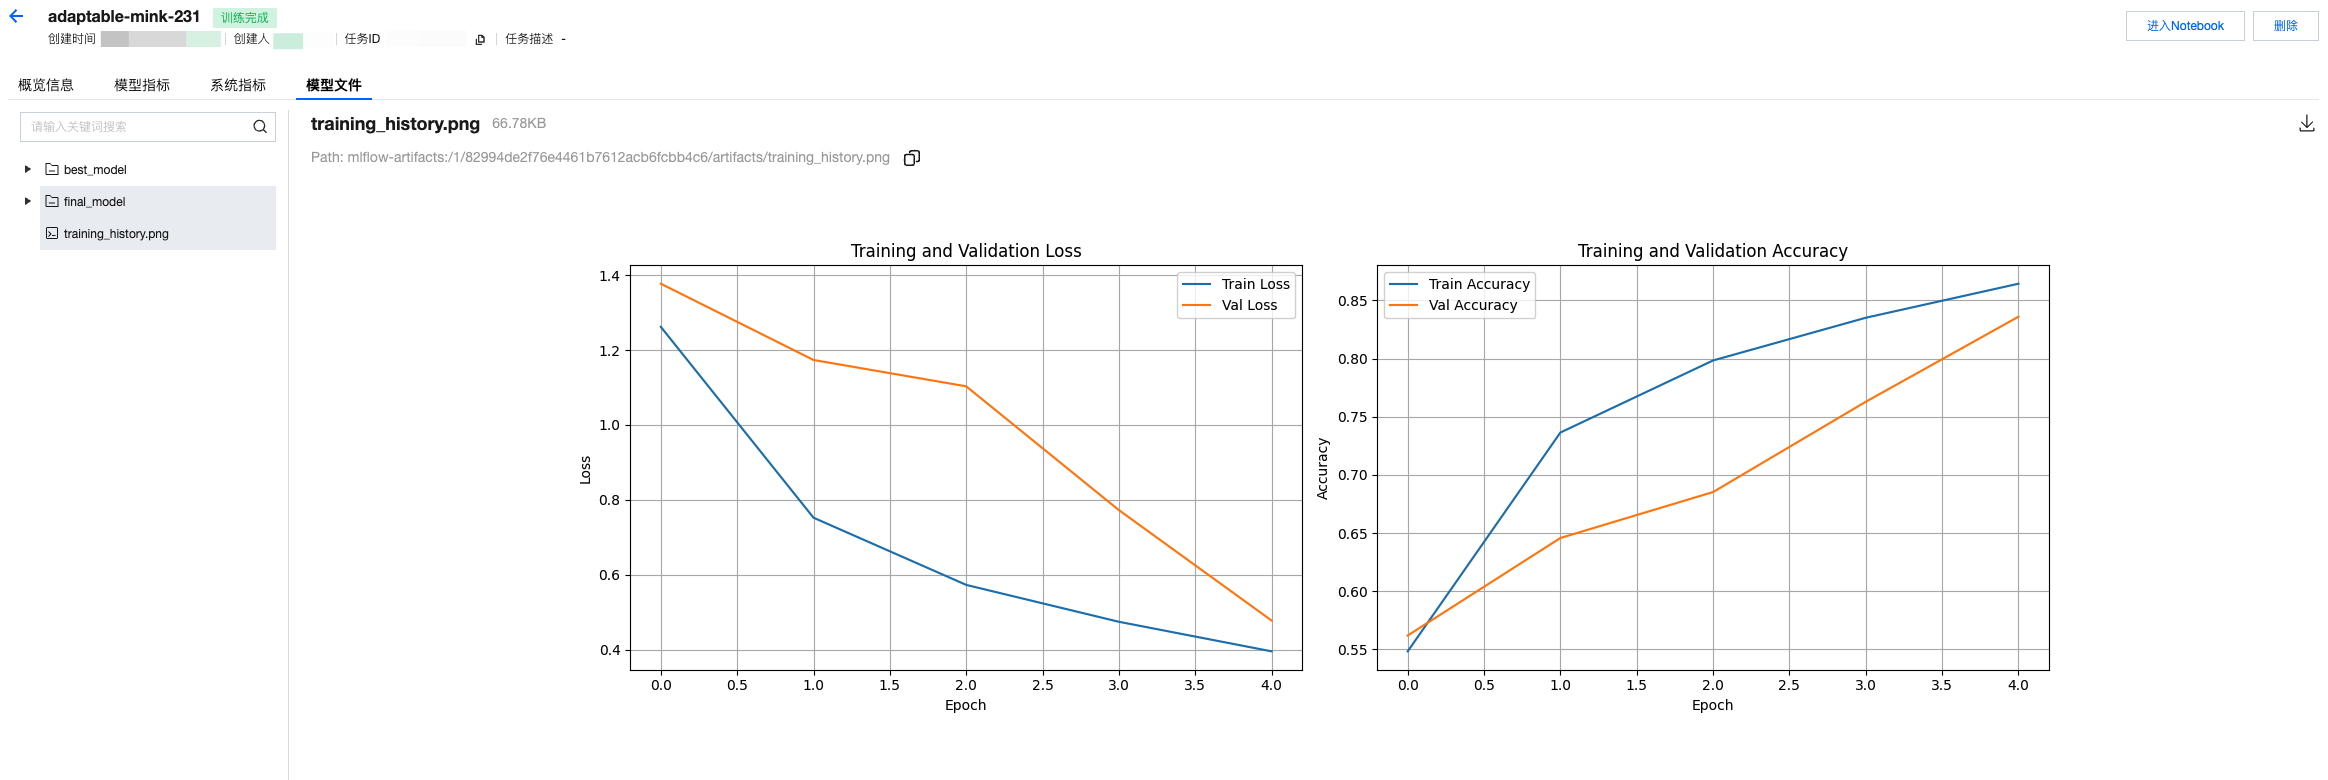
5. 查看模型文件,以及上报的图片等其他记录。
模型管理中查看注册的模型
1. 单击模型管理页面,可以查看所记录的模型。

2. 单击模型名称,可以进入模型版本列表查看版本记录。

机器学习实践教程:基于特征管理的红酒预测模型开发
说明:
本教程的前置条件为:已经开通数据科学功能,且已经购买 DLC 的 CPU 资源,并创建机器学习资源组。
基础信息
数据
本教程采用的红酒预测数据集(通常指 Wine Quality Dataset)是机器学习领域经典的多分类 / 回归任务数据集,由葡萄牙阿威罗大学的研究团队提供,常用于评估模型在理化指标与品质评分关联预测任务中的性能。
模型
本教程采用ResNet-18模型,是微软何恺明团队 2015 年提出的轻量级残差网络,核心是残差连接解决深层网络梯度消失 / 退化问题,共 18 层参数化层(卷积 + 全连接),参数量约 11.7M,是一个常用于图像分类、特征提取与轻量化场景的经典视觉模型。
资源
DLC的CPU资源:"Standard-S 1.1"或者是EMR的CPU资源:"350版本,包含EG组件"
环境
StandardSpark
Studio 中编辑代码发起模型训练
1. 第一步,我们启用特征工程客户端。
# 构建特征工程的客户端# Construct Feature Store Clientfrom datetime import datetime,datefrom pytz import timezonefrom wedata.feature_store.client import FeatureStoreClientfrom wedata.feature_store.entities.feature_lookup import FeatureLookupfrom wedata.feature_store.entities.training_set import TrainingSetfrom pyspark.sql.types import StructType, StructField, StringType, TimestampType, IntegerType, DoubleType, DateTypefrom pyspark.sql.functions import colfrom wedata.feature_store.common.store_config.redis import RedisStoreConfigimport os# 腾讯云的密钥SecretID和SecretKey# SecretID and SecretKey of Tencent cloudcloud_secret_id = ""cloud_secret_key = ""# 数据源名称# Data source namedata_source_name = ""# 构建特征工程客户端实例# Construct Feature Store Clientclient = FeatureStoreClient(spark, cloud_secret_id=cloud_secret_id, cloud_secret_key=cloud_secret_key)# 定义特征表名称# Define feature table nametable_name = ""database_name = ""register_table_name = ""
2. 第二步,我们定义特征查找,从已有的特征表中创建训练集。
from wedata.feature_store.utils import env_utilsproject_id = env_utils.get_project_id()expirement_name = f"{table_name}_{project_id}"model_name = f"{table_name}_{project_id}"# 定义特征查找# Define feature lookupwine_feature_lookup = FeatureLookup(table_name=table_name,lookup_key="wine_id",timestamp_lookup_key="event_timestamp")# 构建训练数据# Construct train datainference_data_df = wine_df.select(f"wine_id", "quality", "event_timestamp")# 创建训练集# Construct trainsettraining_set = client.create_training_set(df=inference_data_df, # 基础数据dataframefeature_lookups=[wine_feature_lookup], # 特征查找配置set feature lookuplabel="quality", # 标签列lable columnexclude_columns=["wine_id", "event_timestamp"] # 排除不需要的列exclude columns)# 获取最终的训练DataFrame# Get final train DataFrametraining_df = training_set.load_df()# 打印训练集数据# print trainset dataprint(f"\\n=== 训练集数据 ===")training_df.show(10, True)
3. 第三步,我们发起模型训练。
# 训练模型# Train modelfrom sklearn.model_selection import train_test_splitfrom sklearn.metrics import classification_reportfrom sklearn.ensemble import RandomForestClassifierimport mlflow.sklearnimport pandas as pdimport osproject_id=os.environ["WEDATA_PROJECT_ID"]mlflow.set_experiment(experiment_name=expirement_name)# 将Spark DataFrame转换为Pandas DataFrame用于训练# Convert Spark DataFrame to Pandas DataFrame for trainingtrain_pd = training_df.toPandas()# 删除时间戳列# Delete timestamp columns# train_pd.drop('event_timestamp', axis=1)# 准备特征和标签# Prepare features and tagsX = train_pd.drop('quality', axis=1)y = train_pd['quality']# 划分训练集和测试集# Split trainset and testsetX_train, X_test, y_train, y_test = train_test_split(X, y, test_size=0.2, random_state=42)# 把日期转成时间戳(秒)# Convert datatime to timestamp(second)for col in X_train.select_dtypes(include=['datetime', 'datetimetz']):X_train[col] = X_train[col].astype('int64') // 10**9 # 纳秒→秒# 确认没有缺失值导致 dtype 被降级为 object# Verify that no missing values cause the dtype to be downgraded to object.X_train = X_train.fillna(X_train.median(numeric_only=True))# 初始化并训练模型# Initialize, train and log the model.model = RandomForestClassifier(n_estimators=100, max_depth=3, random_state=42)model.fit(X_train, y_train)with mlflow.start_run():client.log_model(model=model,artifact_path="wine_quality_prediction", # 模型文件路径名model artifact pathflavor=mlflow.sklearn,training_set=training_set,registered_model_name=model_name, # 模型名称(开启catalog后需要写catalog的模型名称)model name(if enable catalog, must be catalog model name))
实验管理中查看运行结果
1. 单击进入数据科学的实验管理模块,发现刚刚代码中运行的记录已经在实验管理中可以被查看到,在界面显示实验名称、实验类型、实验描述、创建时间、负责人、操作项等信息。

2. 单击实验名称,进入运行记录页面,可以查看刚刚上报的任务记录,在界面显示任务名称、任务状态、创建时间、持续时间、代码文件、注册模型等信息。

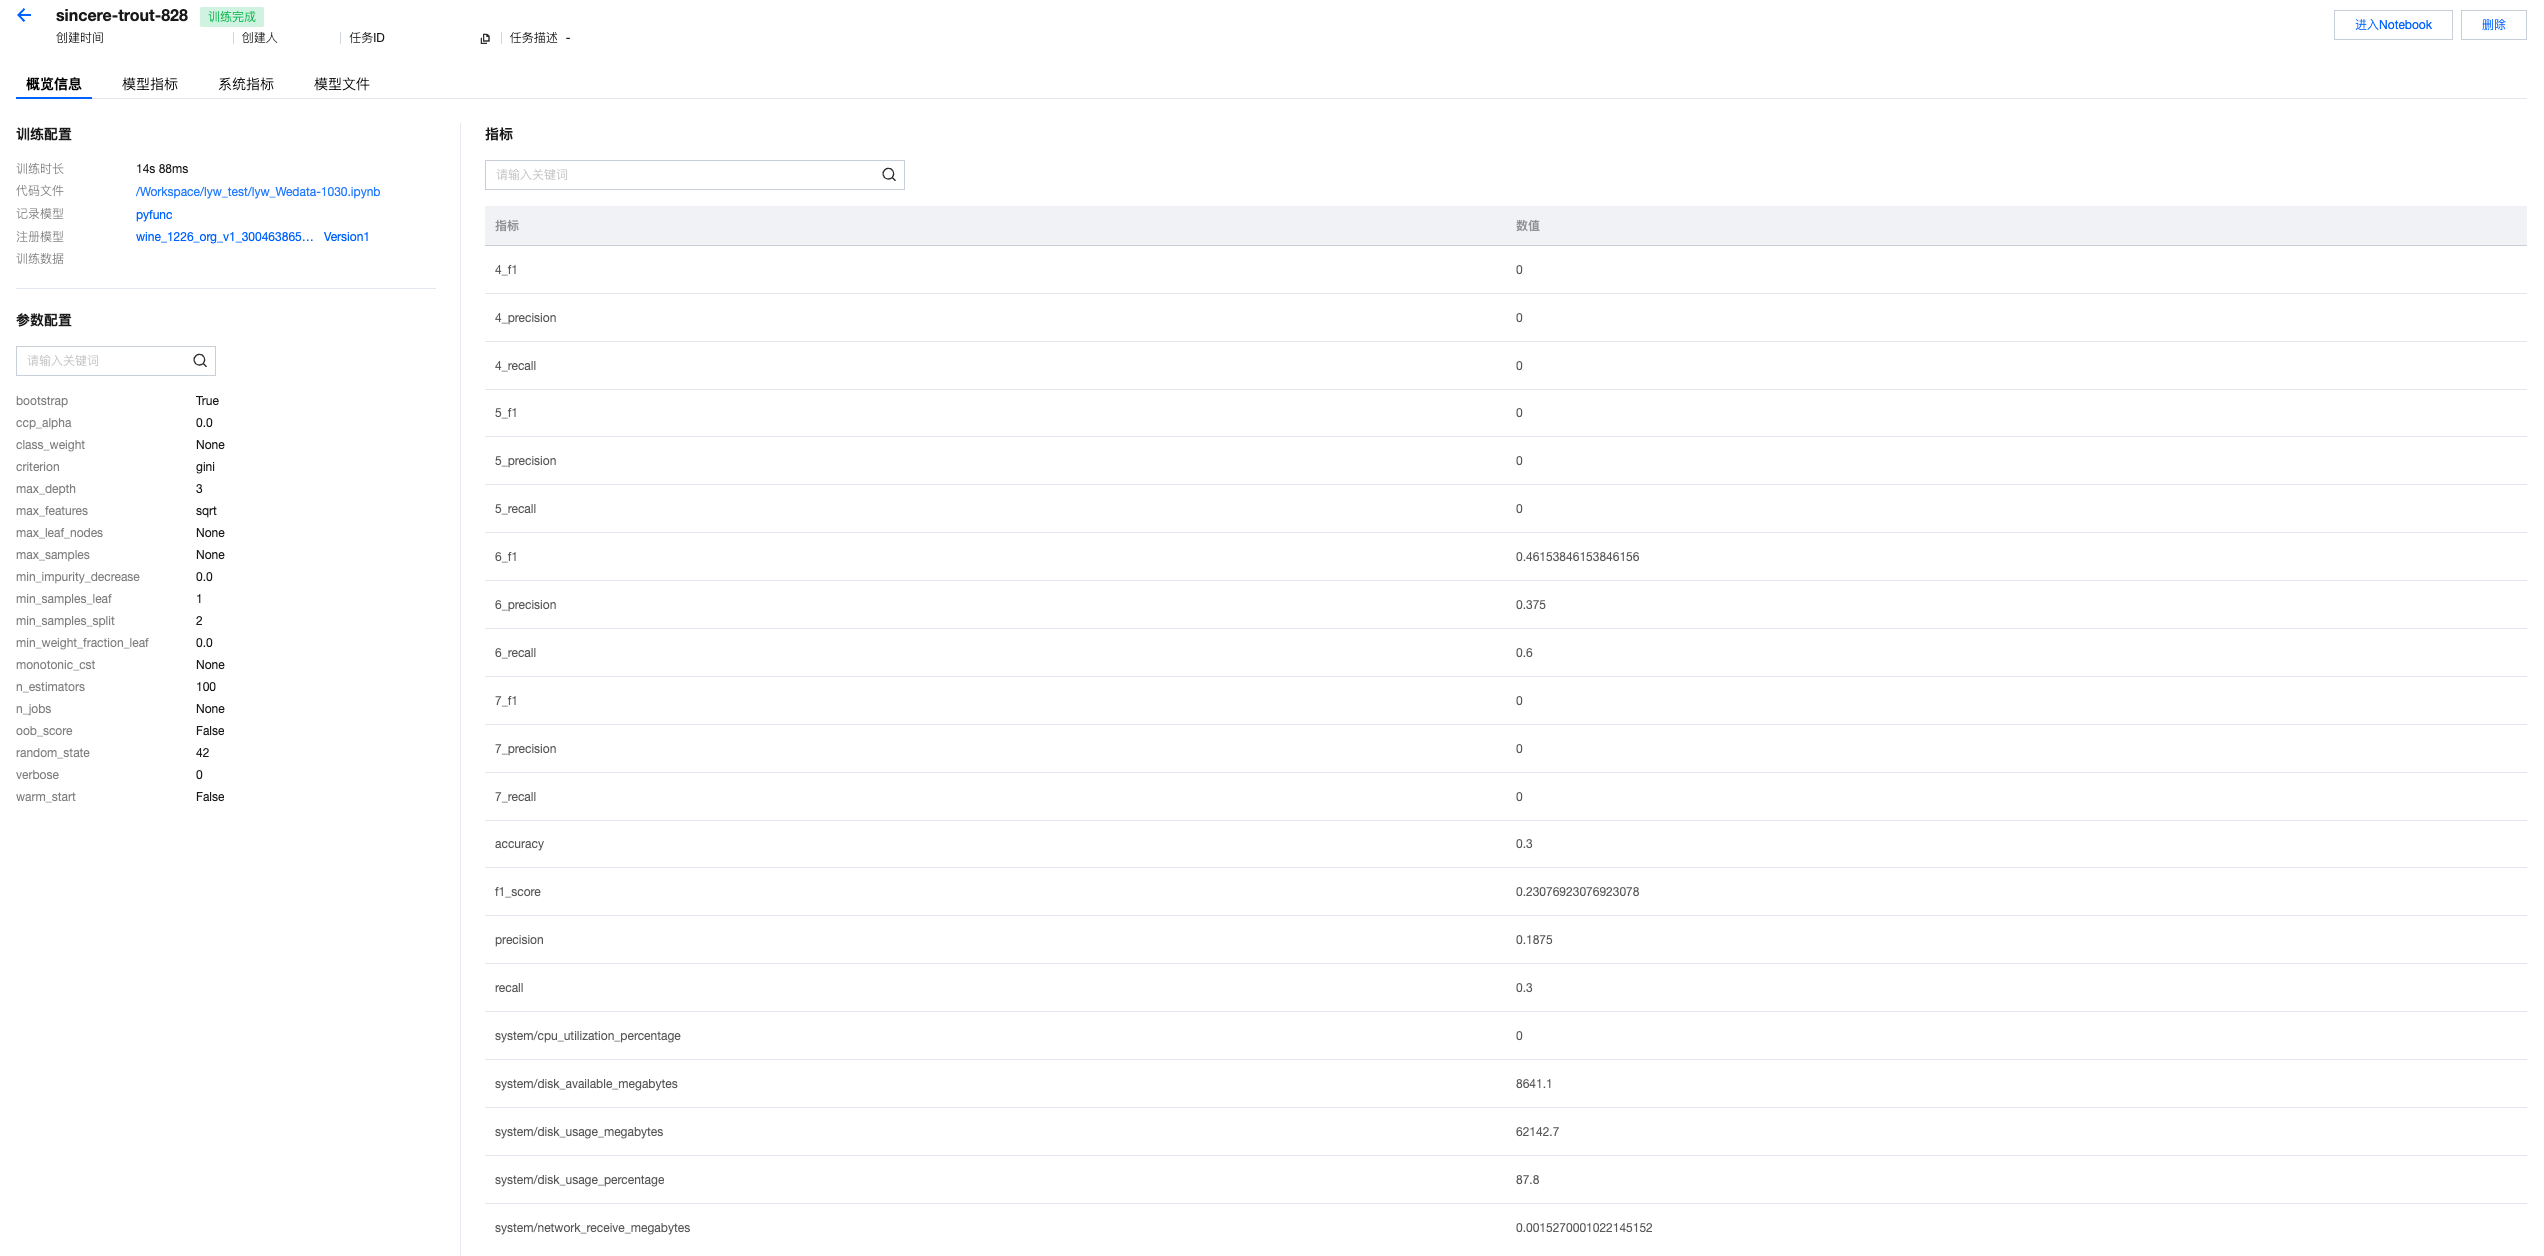
3. 单击任务名称,进入运行详情的概览页面,支持查看所上报的训练超参数、模型指标等。
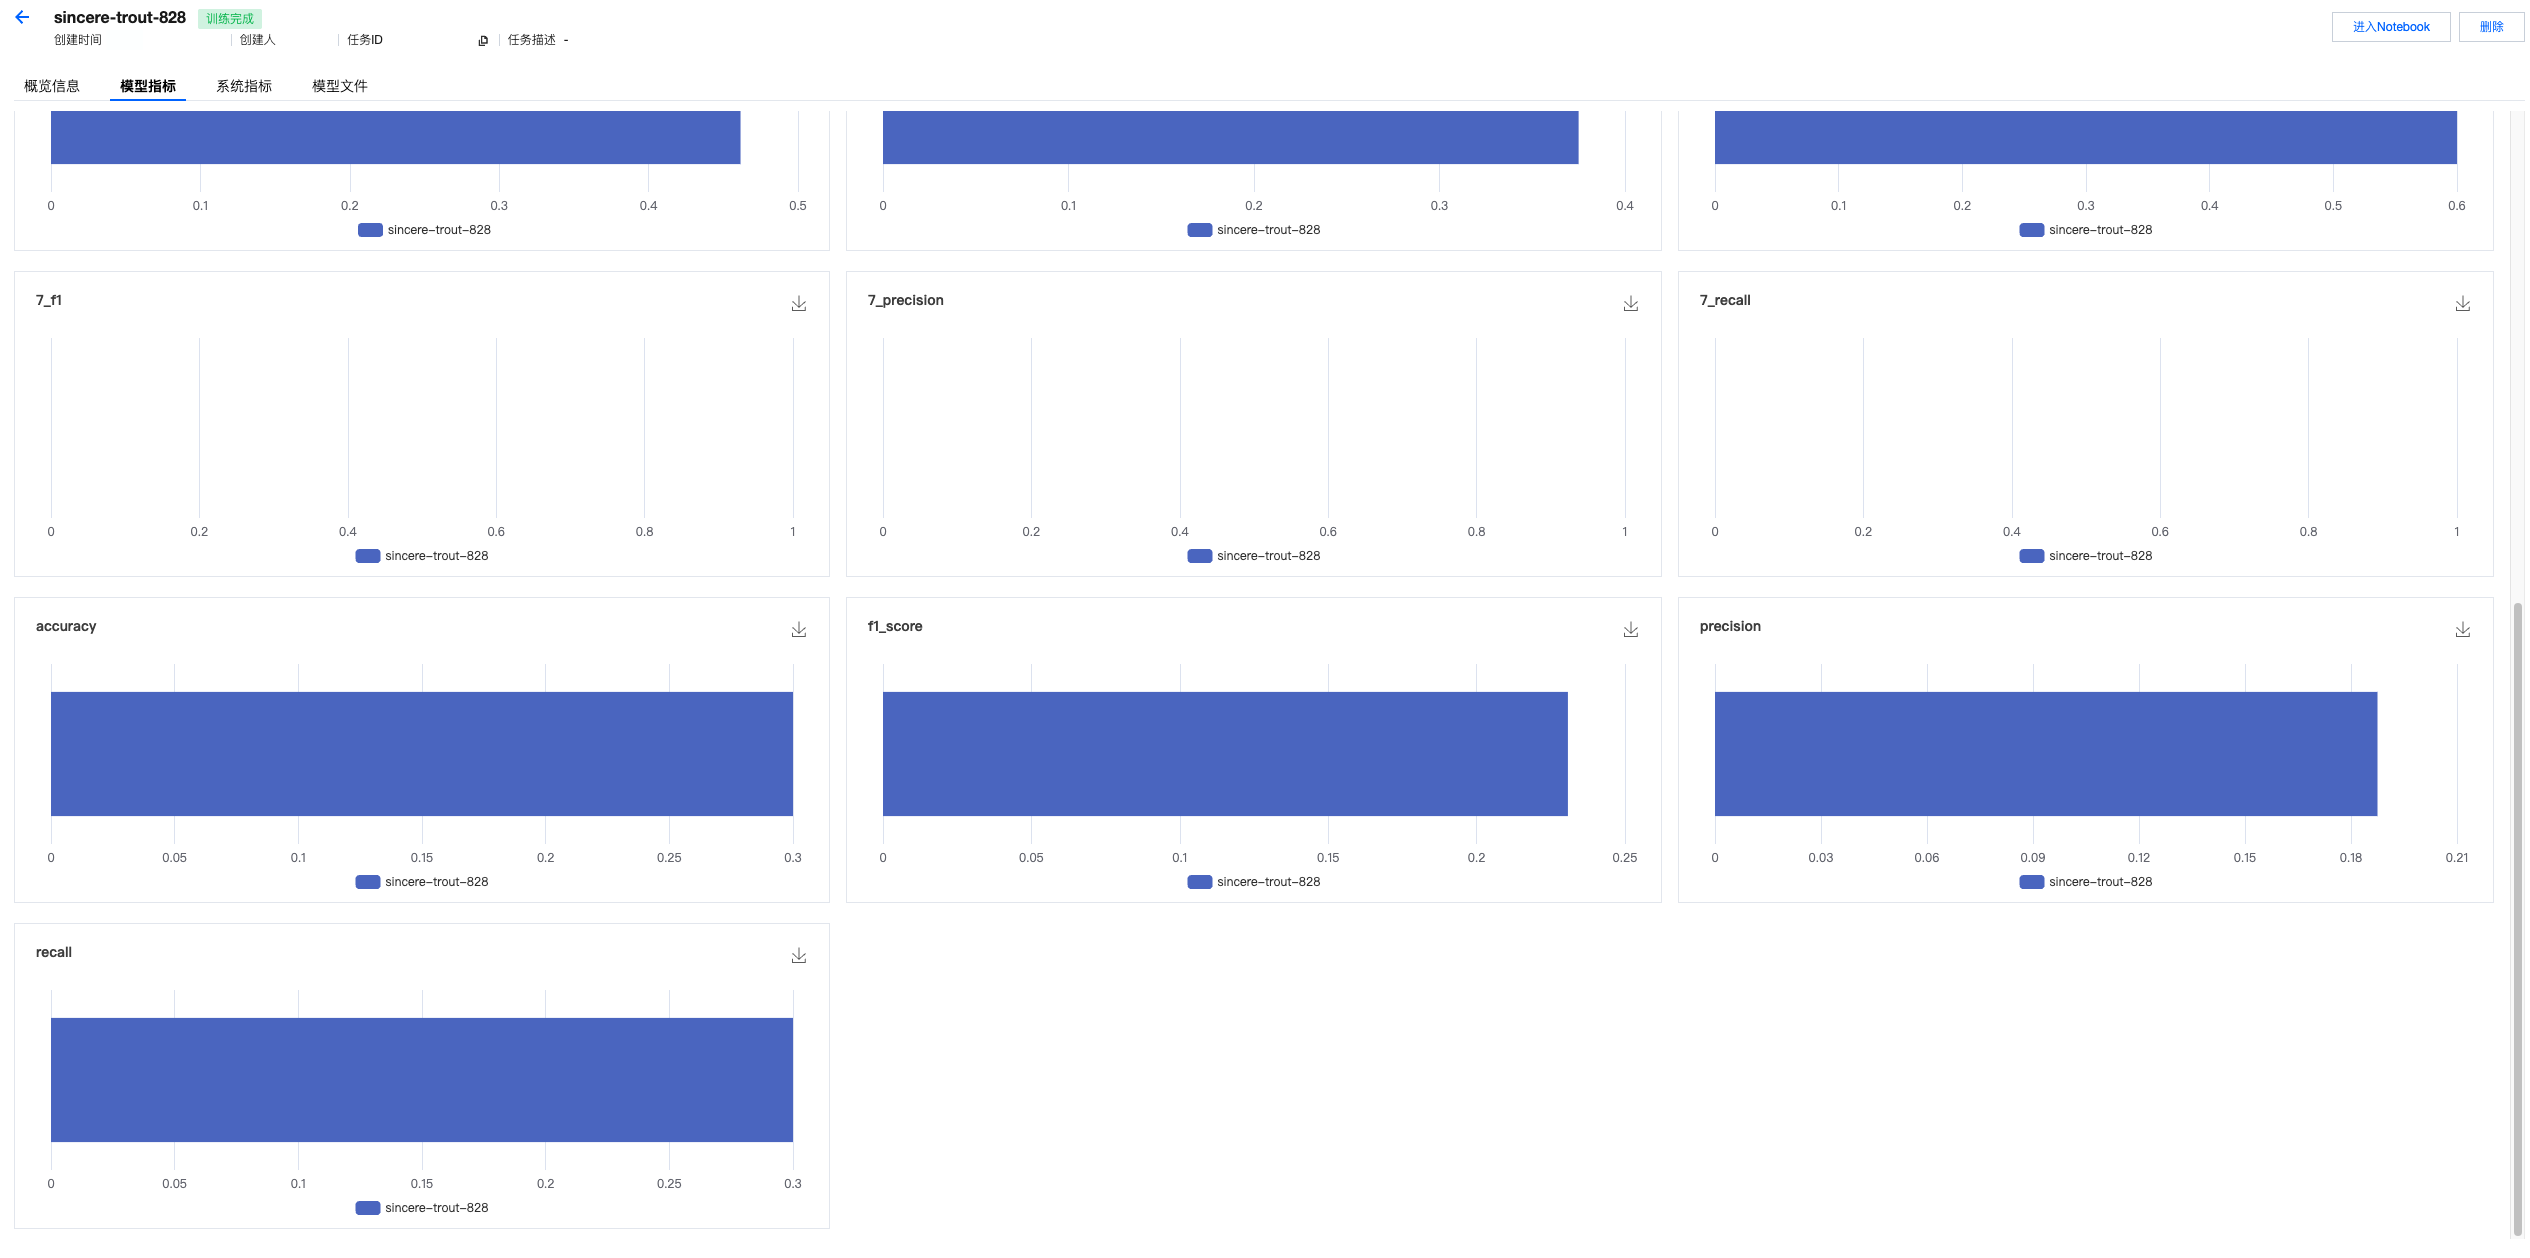
4. 查看模型指标。
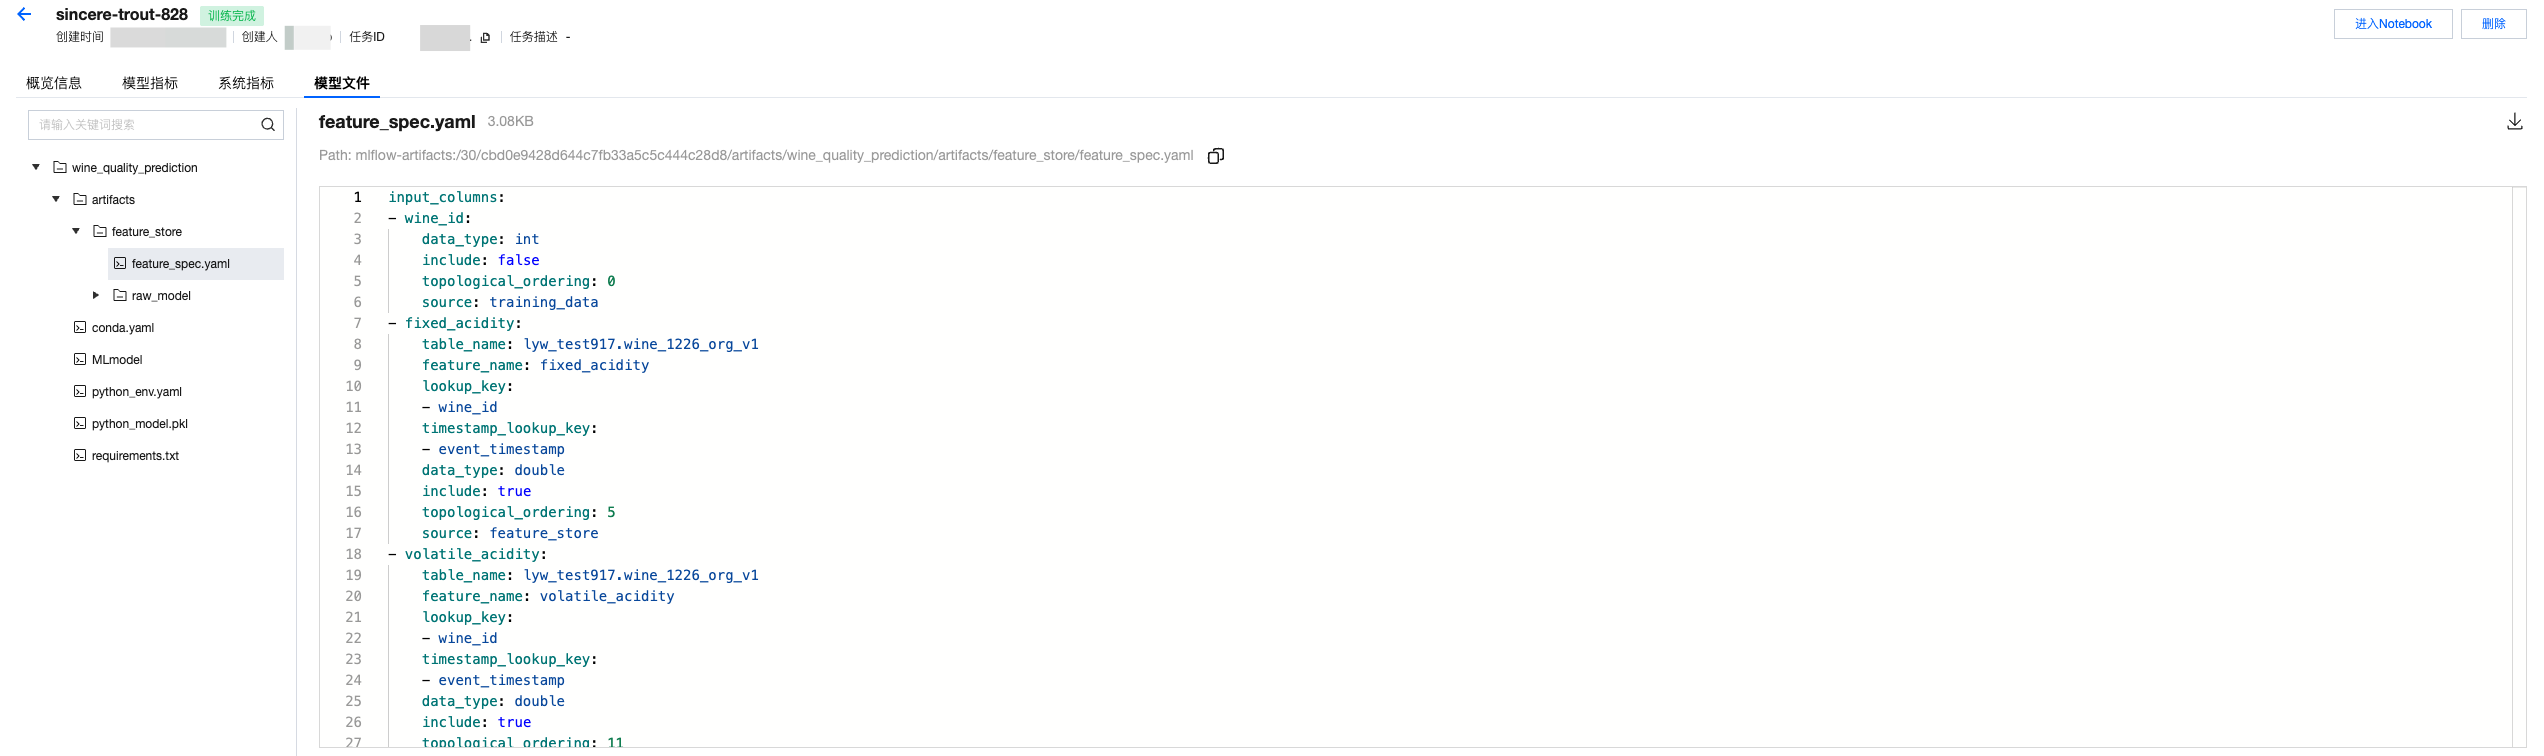
5. 查看模型文件。如果使用特征构建训练数据集,并且用特征工程API记录模型的话,会同时存储一个feature spec文件,帮助指引训练特征的来源。
模型管理中查看注册的模型
1. 单击模型管理页面,可以查看所记录的模型。

2. 单击模型名称,可以进入模型版本列表查看版本记录。

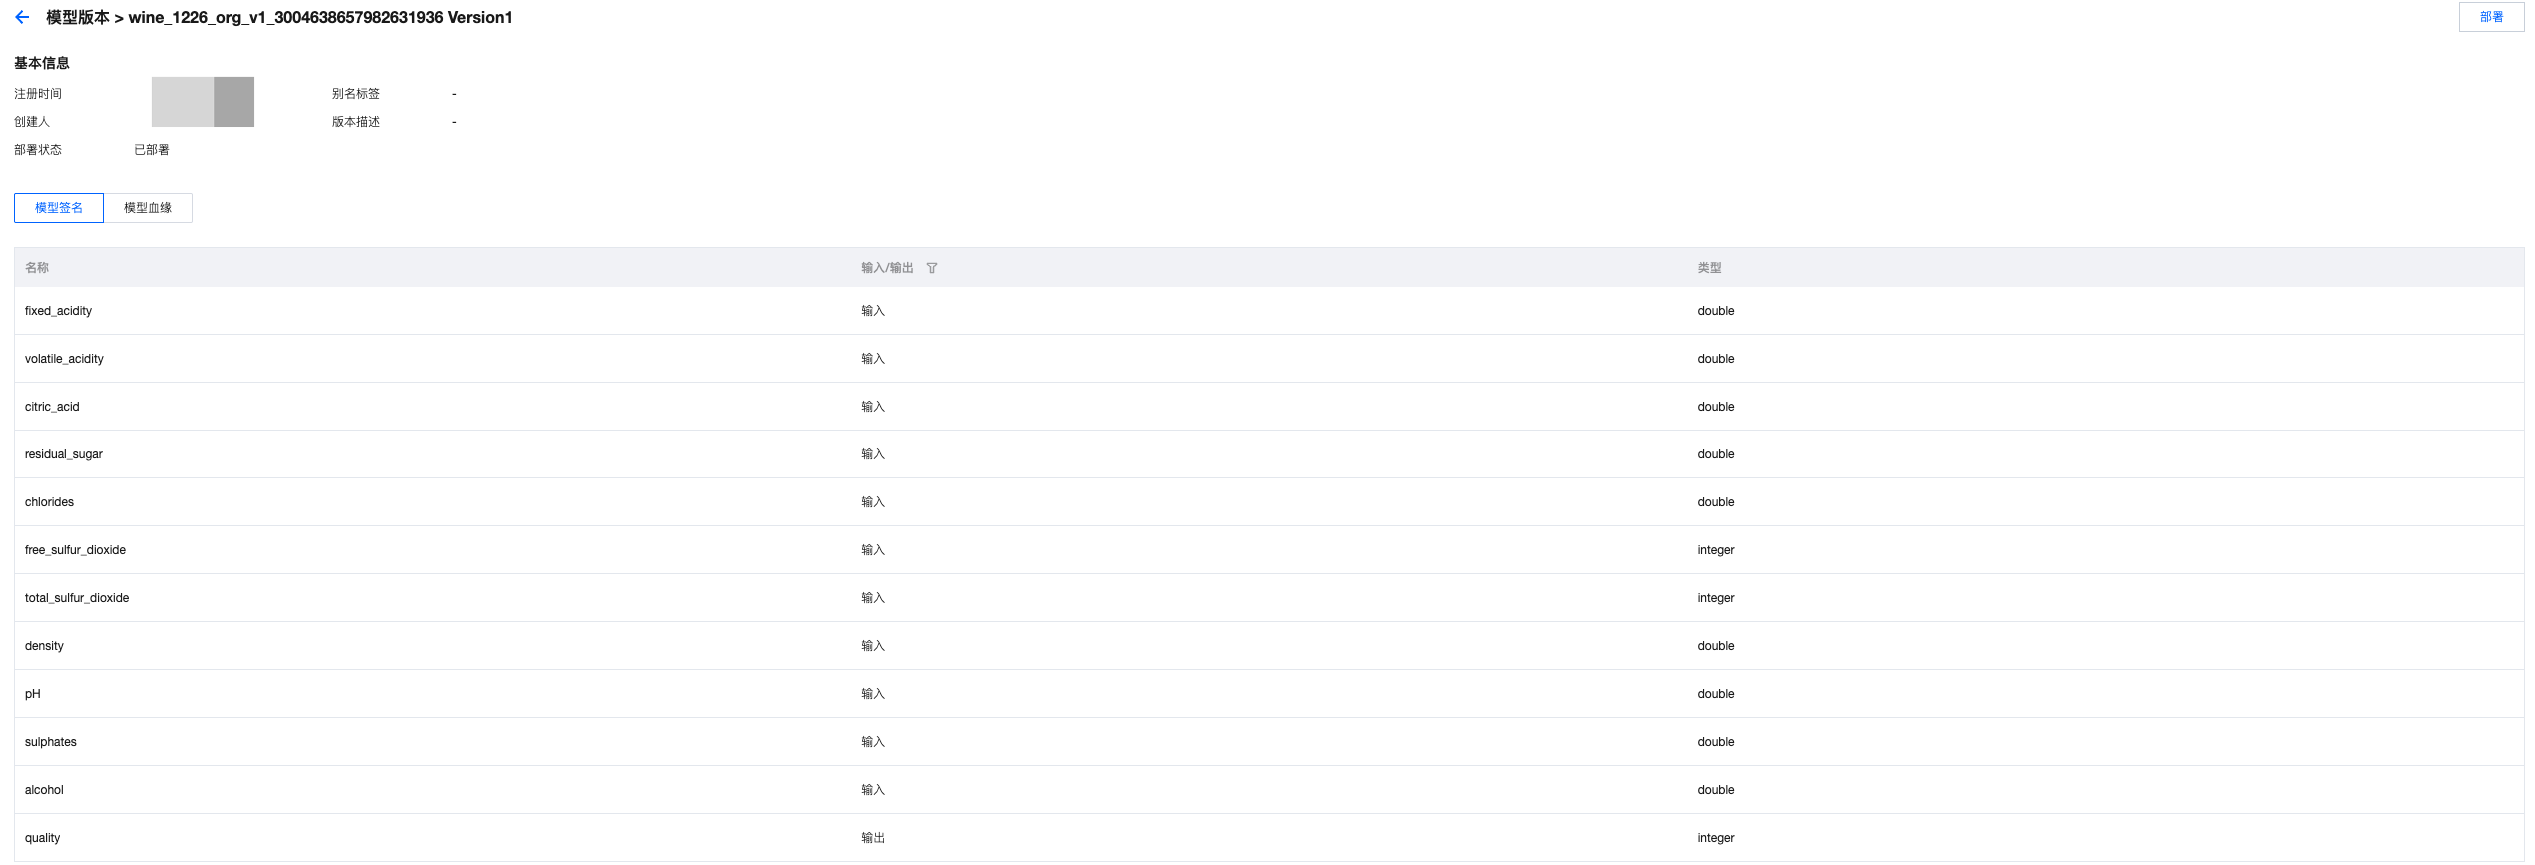
3. 单击模型版本,可以查看模型签名、模型血缘等信息。
文档反馈