Tutorial on Blocking High-Risk Ports with Enterprise Security Groups
Download
Focus Mode
Font Size
This tutorial guides you on how to use the policy management feature of FWM to batch block specified high-risk ports (such as TCP 20, 3389) and create exception allow rules for specific IP addresses on the private network.
Prerequisites
You have been authorized to use the Tencent Cloud FWM product. For specific operations, see the Welcome page.
Step 1: Create High-Risk Port Blocking Rule Set
1. Log in to the FWM console. In the left-side navigation pane, select Rule Group.
2. Click Cloud Firewall - Enterprise Security Group to switch to the Cloud Firewall - Enterprise Security Group page.
3. Click Create Rule Group. In the Add Rule Group window, configure the relevant parameters.
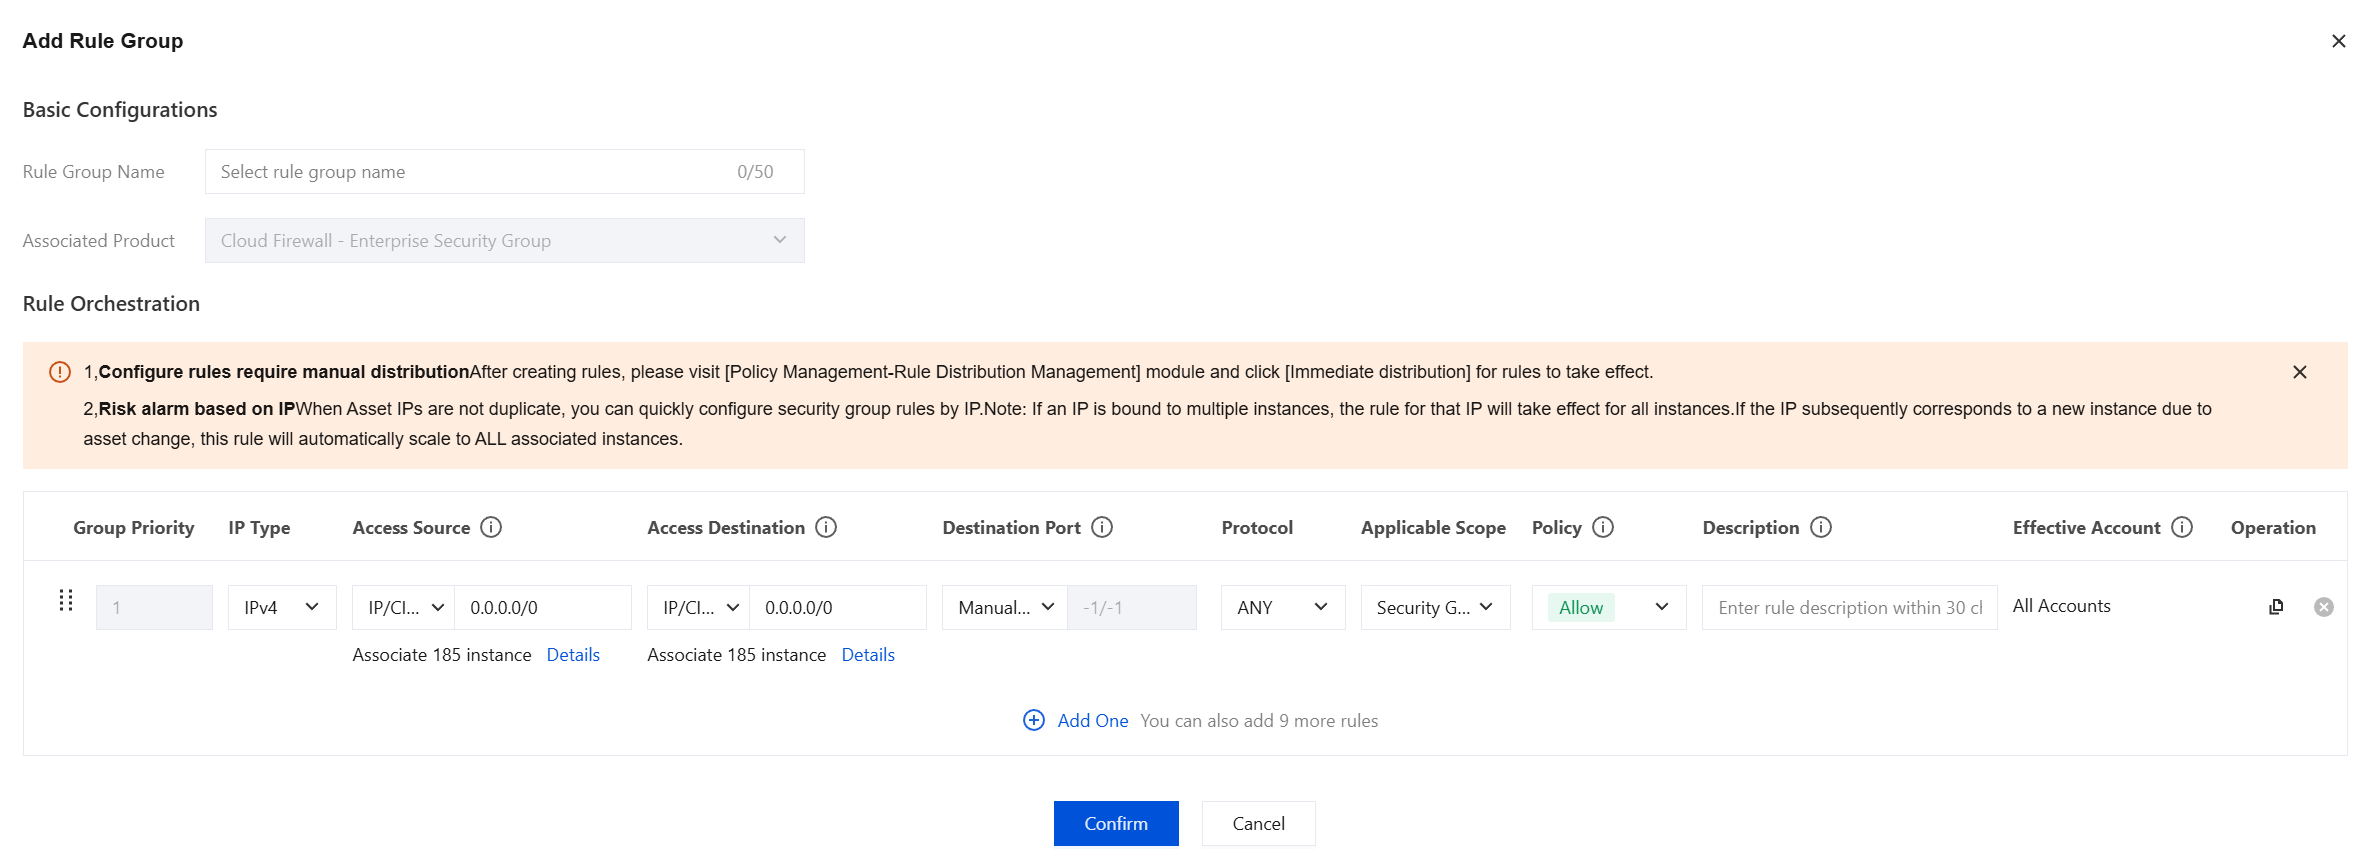
Parameter Name | Description |
Rule Group Name | Enterprise Security Group: Block High-Risk Ports Practice Tutorial |
Associated Product | Select Cloud Firewall - Enterprise Security Group. |
Group Priority | Automatically set to 1. |
IP Type | Select IPv4. |
Access Source | Select IP/CIDR and enter an all-zero IP address to synchronize all instances. Alternatively, select resource tags. For configuration steps, refer to Creating Tags and Tagging Resources. |
Access Destination | Select IP/CIDR and enter an all-zero IP address to synchronize all instances. Alternatively, select resource tags. For configuration steps, refer to Creating Tags and Tagging Resources. |
Destination Port | Select Manually Full In and enter 20,3389. |
Protocol | Select TCP. |
Applicable Scope | Select Security Group. |
Policy | Select Reject. |
Description | Block High-Risk Ports#Apply to Destination Only |
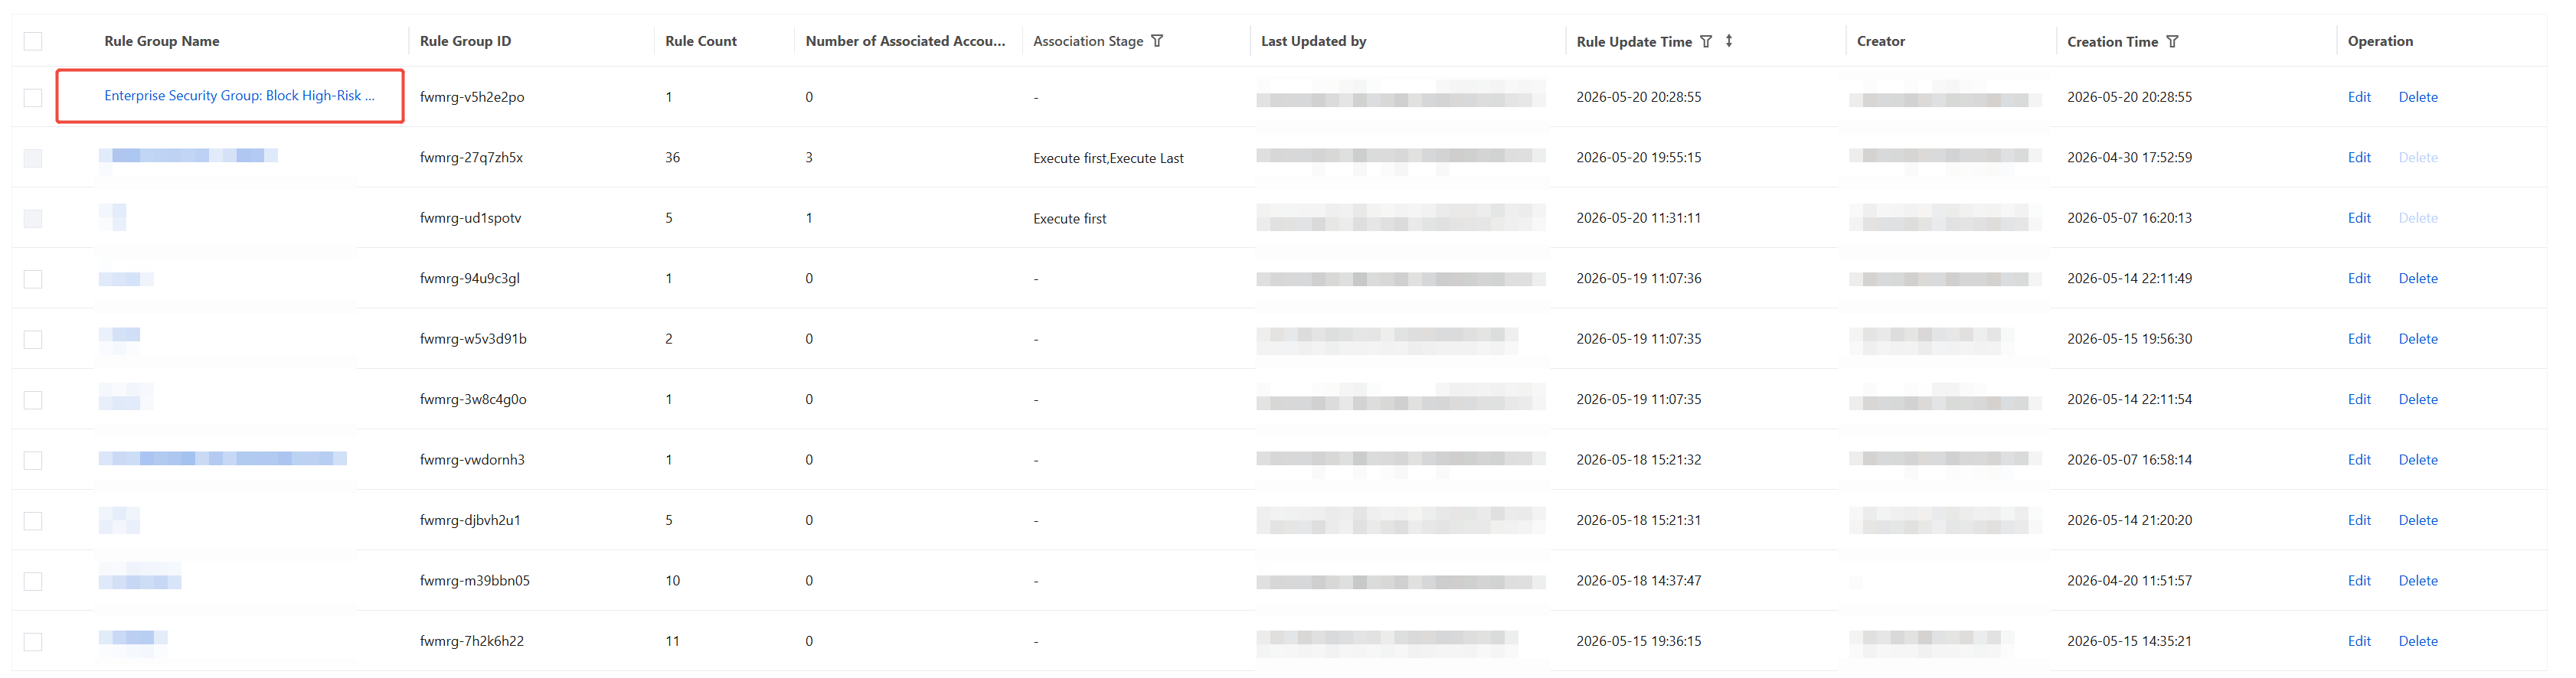
4. Click Confirm. The rule group will appear in the list. At this point, the rules have not been deployed and will not take effect.
Step 2: Creating Private Network Allowlist IP Address
To allow specific IP addresses on the private network to access high-risk ports normally, you must first create an IP address parameter template in the VPC as an allowlist.
1. Access the VPC console. In the left-side navigation pane, choose Security > Parameter Template.
2. On the Parameter Template > IP address page, click Create.
3. Refer to Managing Parameter Templates to configure the relevant parameters. Then, click OK.
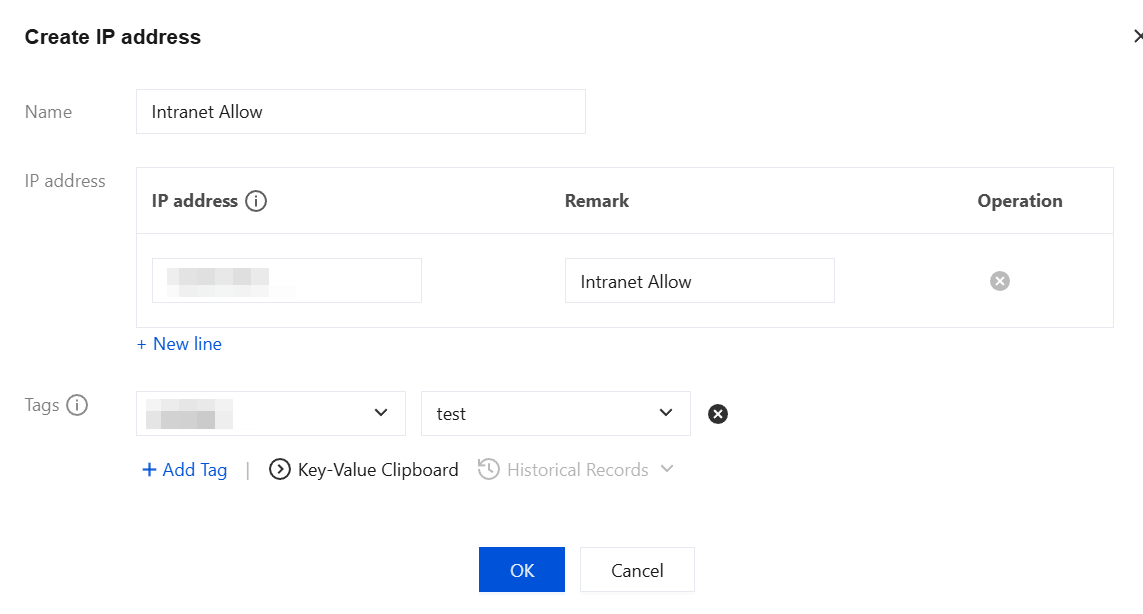
4. On the IP Address tab, you can view the newly created allowlist IP address parameter template.

Step 3: Adding Private Network Allow Rule to the Rule Set
Return to the CFW console. In the created rule group, add an allow rule with a higher priority.
1. Return to the FWM console. In the left-side navigation pane, select Rule Group.
2. Click Cloud Firewall - Enterprise Security Group to switch to the Cloud Firewall - Enterprise Security Group page.
3. In the rule group list, locate the rule group you created in Step 1: Create High-Risk Port Blocking Rule Set. Then, click Edit in its operation column.
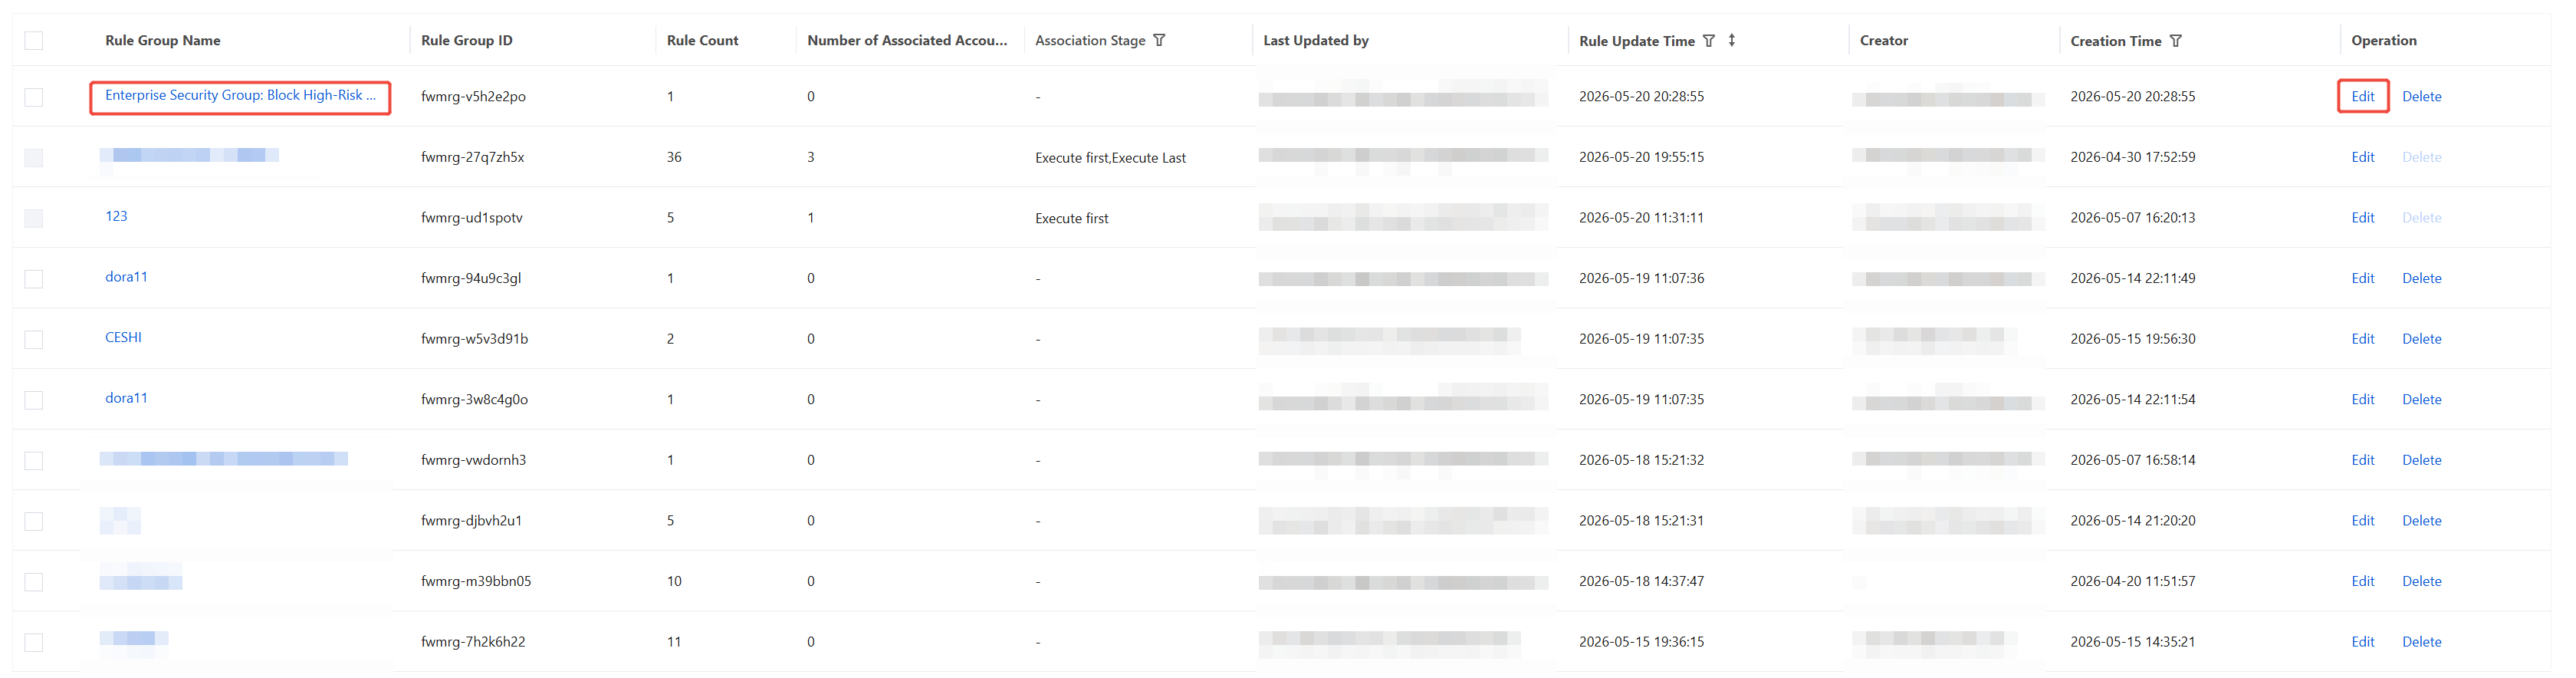
4. On the edit page, click Create Rule and configure the relevant parameters.
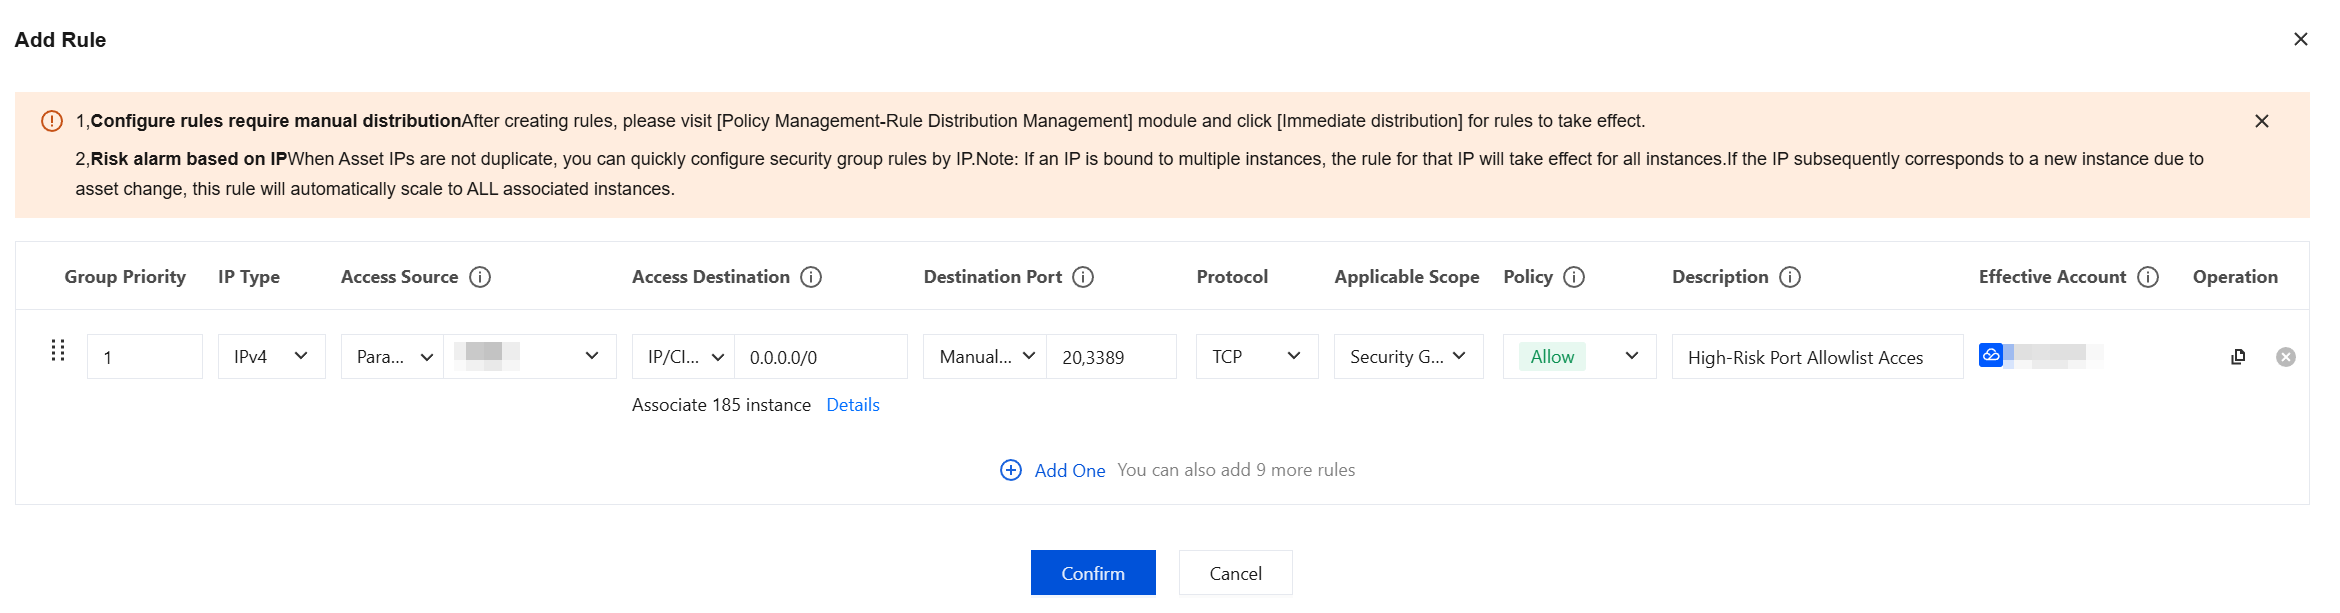
Parameter Name | Description |
Group Priority | Set to 1 (to ensure that the priority is higher than that of the rule created in Step 1: Create High-Risk Port Blocking Rule Set). |
IP type | Selecting IPv4. |
Access Source | Select Parameter Template, and then select the private network allowlist that you created in Step 2: Creating Private Network Allowlist IP Address. |
Access Destination | Select IP/CIDR and enter an all-zero IP address to synchronize all instances. Alternatively, select resource tags. For configuration steps, refer to Creating Tags and Tagging Resources. |
Destination Port | Select Manual Input and enter 20,3389. |
Protocol | Select TCP. |
Applicable Scope | Select Security Group. |
Policy | Select Allow. |
Description | High-Risk Port Allowlist Access Rule |
5. Click Confrim. The rule group will appear in the list. At this point, the rules have not been deployed and will not take effect.
Step 4: Preview and Deploy Rule
After configuration, rules must be deployed to take effect. Before deployment, it is recommended to preview the changes.
1. Log in to the FWM console. In the left-side navigation pane, select Rule Management.
2. Click Cloud Firewall - Enterprise Security Group to switch to the Cloud Firewall - Enterprise Security Group page.
3. On the Cloud Firewall - Enterprise Security Group page, click Preview Changes.
4. On the Preview Changes page, you can view the details of changes to the enterprise security group.
The left side of the page displays asset instances, including CVM, ENI, Tencent DB, CLB, and Lighthouse Firewall.
The right side of the page displays the security groups and rules bound to the instance, sorted by priority. They are categorized into inbound rules and outbound rules. For a change that is an addition, the background color is green. For a change that is a deletion, the background color is red.
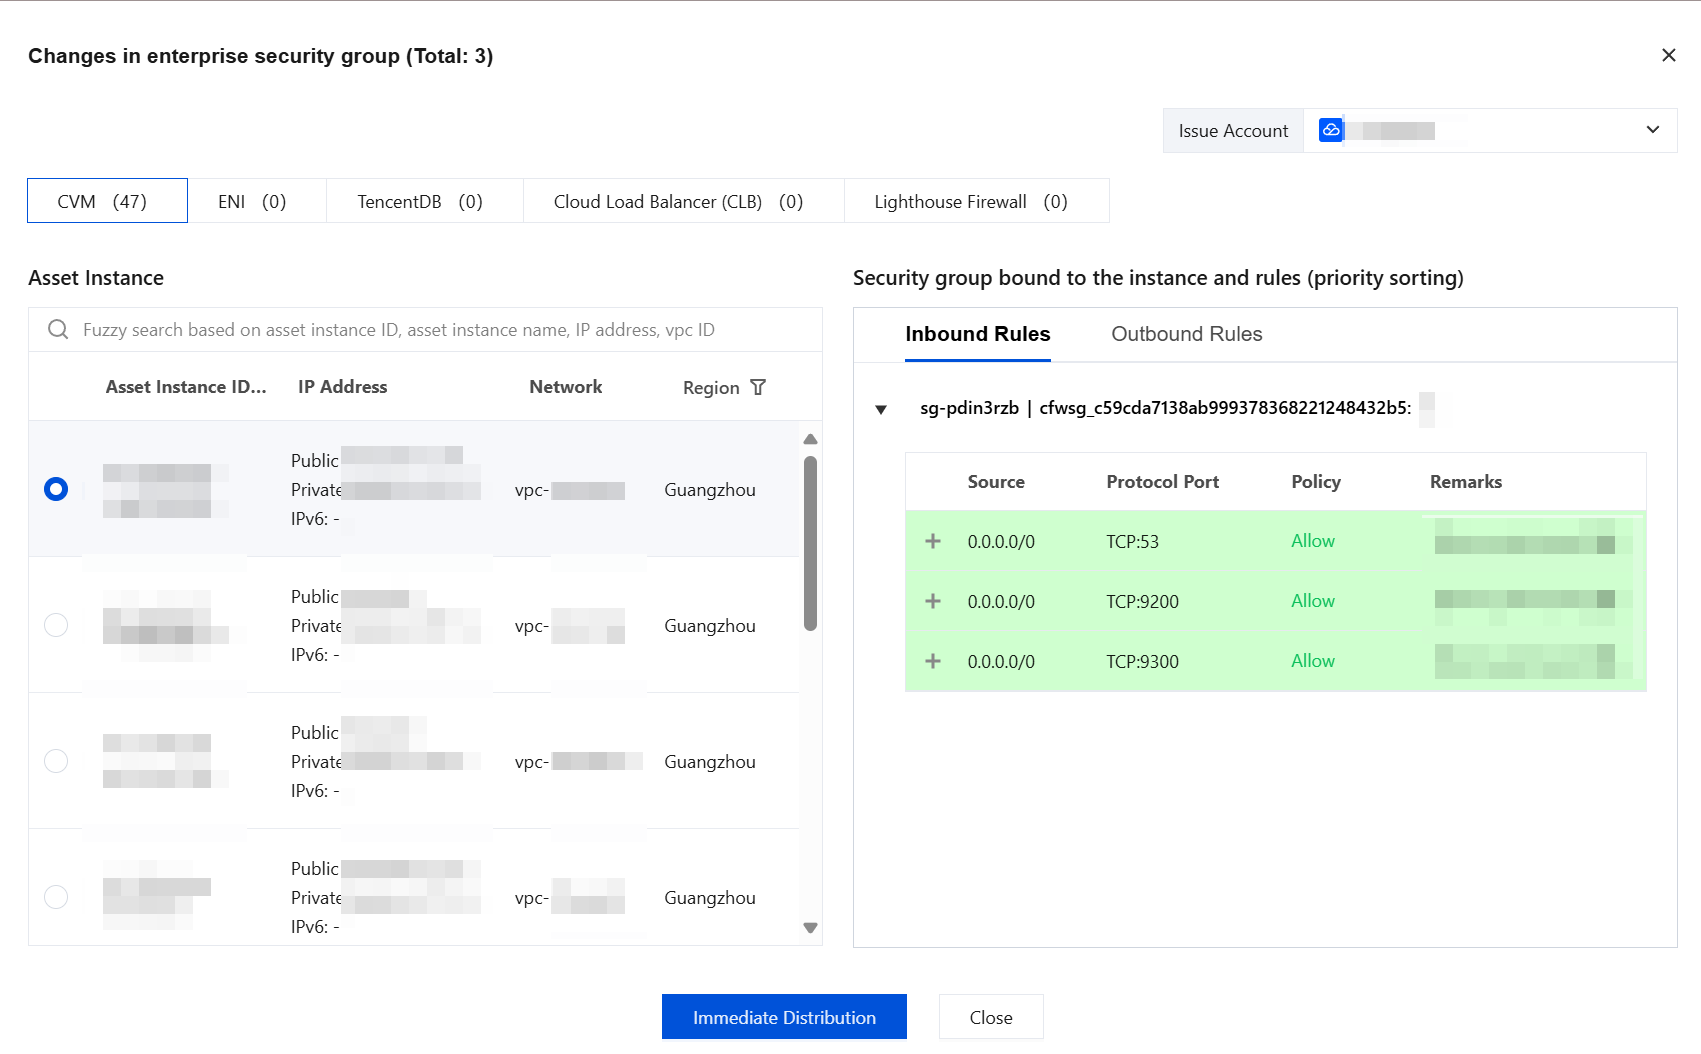
5. After confirming the preview is correct, click Immediate Distribution.
Note:
Deployment will deploy all rules across all security products that are not deployed, pending deployment, or failed to deploy.
Step 5: Viewing Operation Log
You can trace all configuration operations in logs for auditing and troubleshooting.
1. Log in to the FWM console. In the left-side navigation pane, choose Log Audit > Rule Group.
2. On the Rule Group page, the system logs all operations related to rule groups, such as "Create Rule Group". You can view the operation time, account, product, operation behavior, and the associate rule group name and ID.

3. Click Details to view the detailed information of the rule group operation logs.
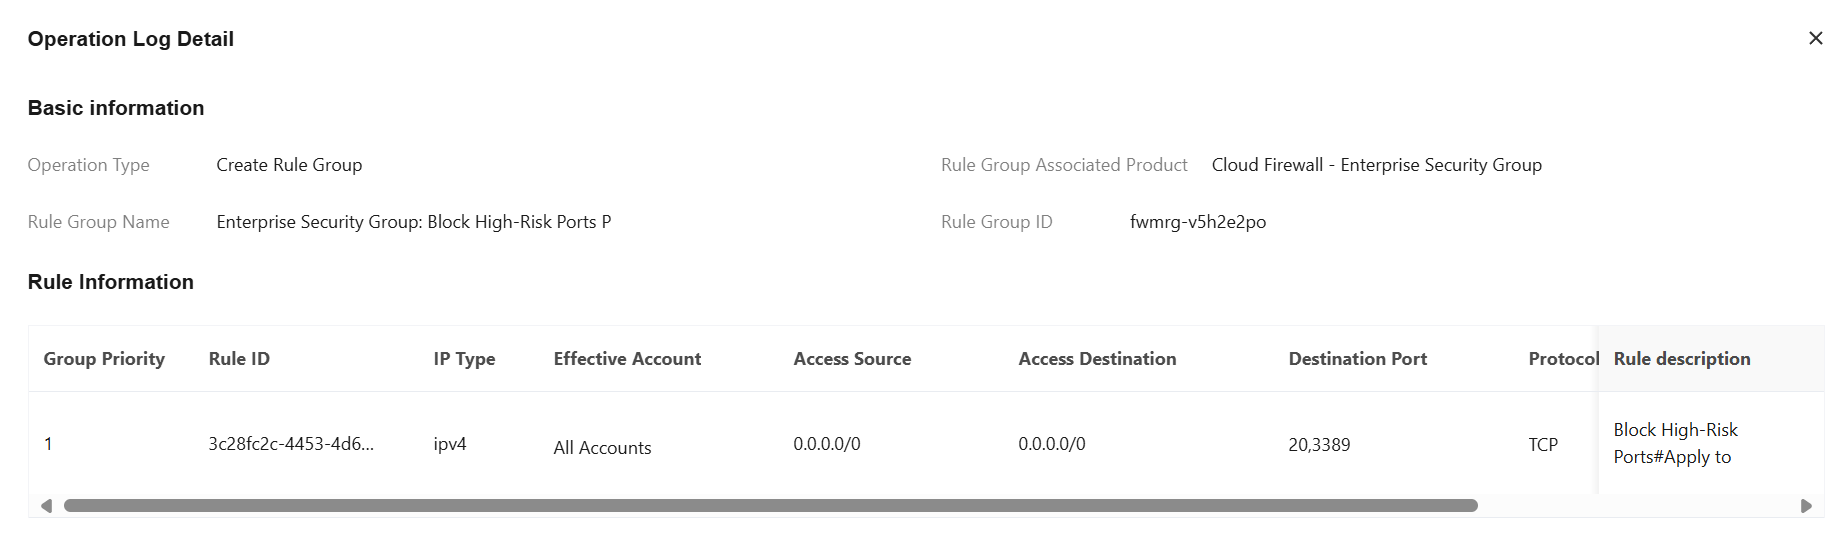
4. In the left-side navigation pane, choose Log Audit > Rule Management.
5. On the Rule Management page, the system logs all operations related to rules and deployment, such as "Add Rule" and "Dispatch Now". You can view the operation time, account, product, operation behavior, and the associate rule group name and ID.

6. Click Details to view the detailed information of the rule management operation logs.
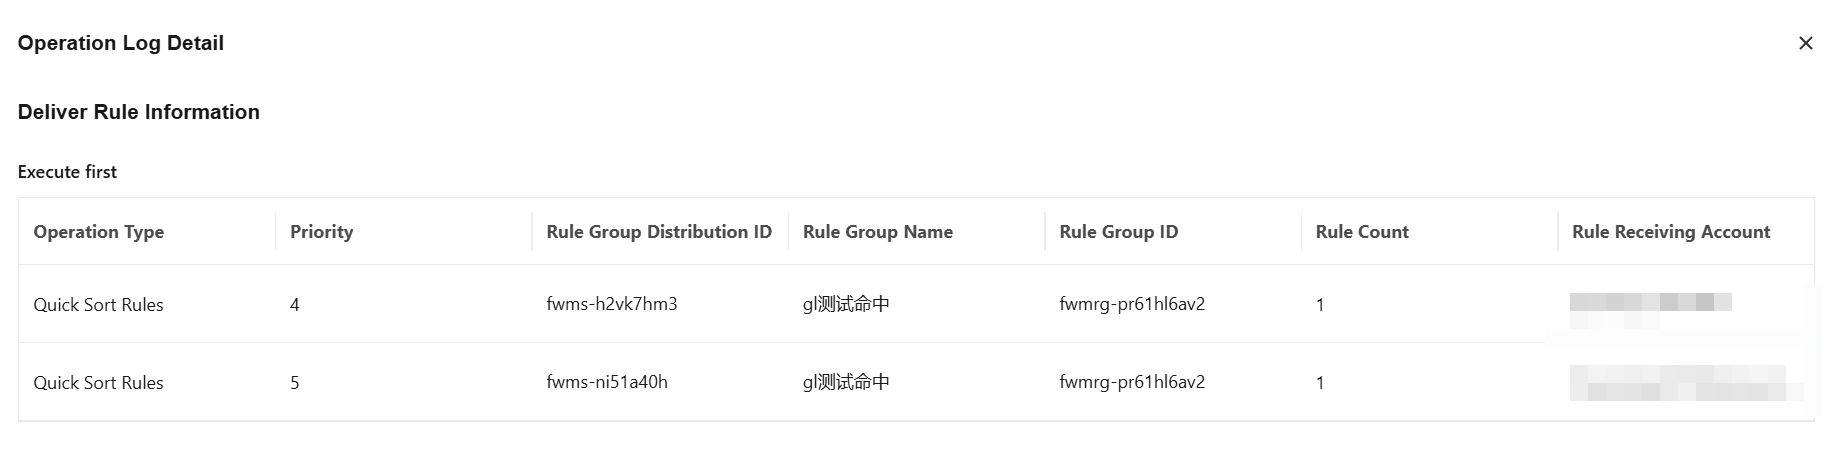
References
When your Tencent Cloud account contains various cloud product resources, such as CVM instances, CBS instances, and COS buckets, you can categorize and centrally manage these resources by creating Tags and binding them to the resources. For configuration steps, refer to Create Tags and Tagging Resources.
Help and Support
Was this page helpful?
You can also Contact sales or Submit a Ticket for help.
Help us improve! Rate your documentation experience in 5 mins.
Feedback