This document describes the operational procedure for managing the entire lifecycle of devices in the Multiple Network Acceleration console, including operations such as creating, authorizing, monitoring, and managing traffic for self-owned devices/vendor devices/dynamic applications.
Preparations
Registered Tencent Cloud account and completed real-name authentication. For an introduction to real-name authentication, please see Real-name Authentication Basic Introduction.
To complete identity verification, click Identity Verification.
Log in to the console with your Tencent Cloud account.
Device management
On the device management page, you can create, view, modify, and delete devices.
Currently, Multiple Network Acceleration supports acceleration binding for three device types. Select the desired device type from the list below to perform operations on the page.
Device Type
Description
self-owned device
Devices owned and used by the customer.
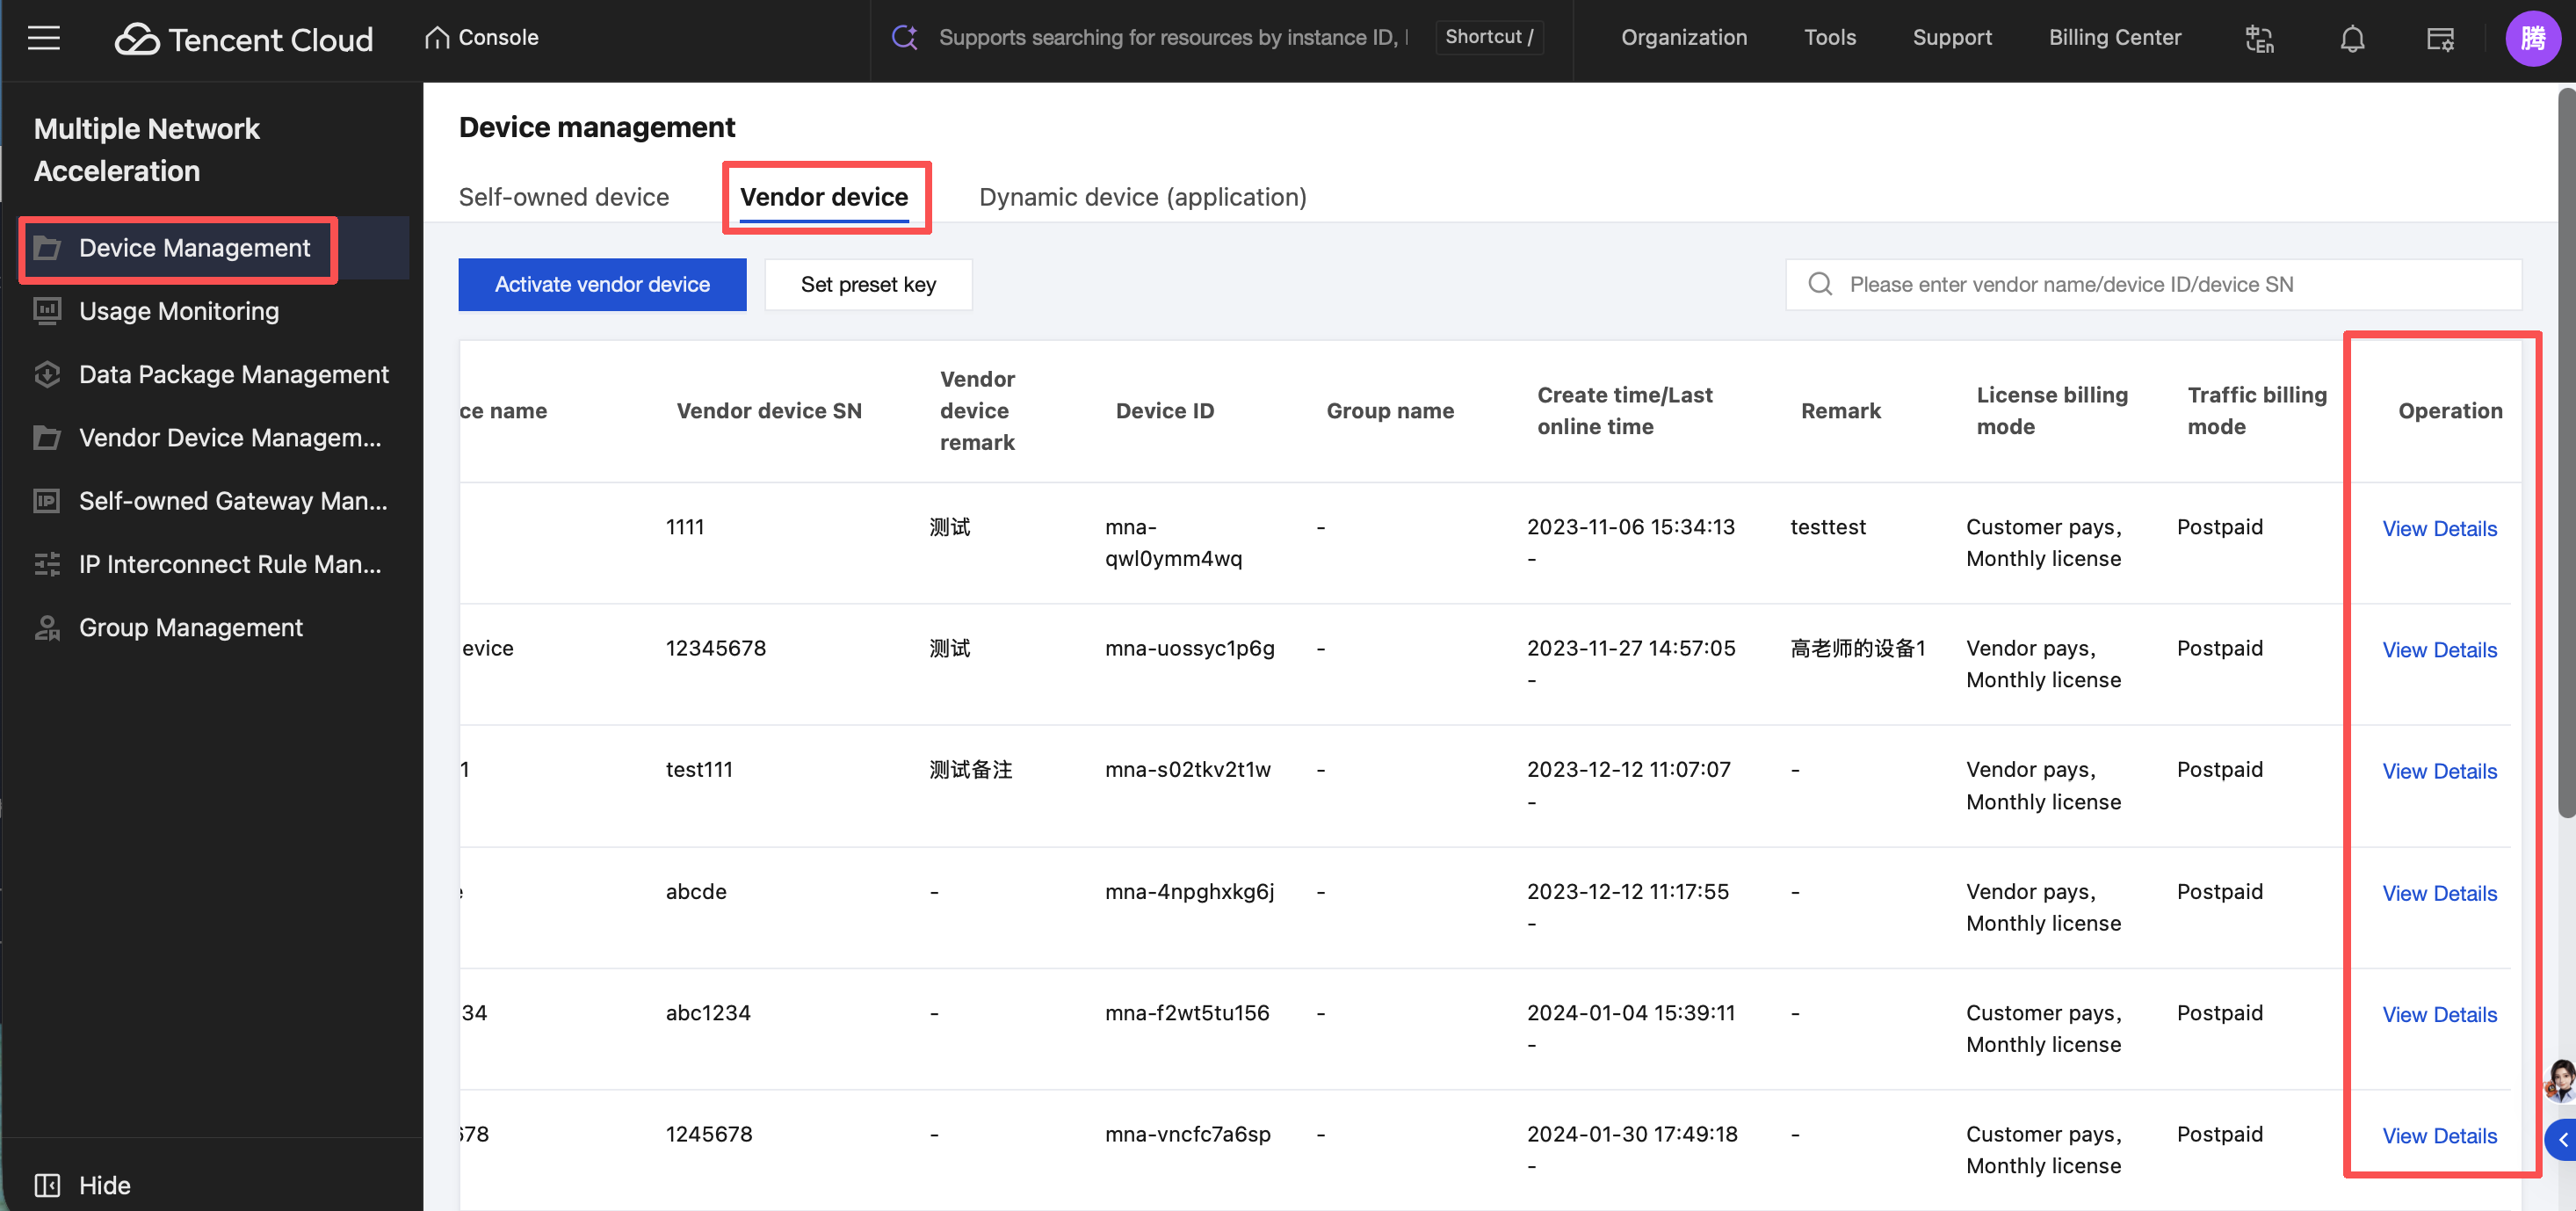
vendor device
Devices produced and directly supplied by the manufacturer. These devices typically feature standardized designs and functionalities, are marketed for sale, and are available for purchase and use by various enterprises and users.
dynamic device(application)
For scenarios involving massive device access (such as mobile applications), the original one-device-one-secret model is no longer applicable. Therefore, a dynamic device/application form can be used: a single key can dynamically create a collection of devices, which can correspond to a customer's application. Based on the application key, the customer can initiate connections from the client without needing to create one-device-one-secret keys.
Operation Steps
Self-Owned Device Management
1.Creating a New Device
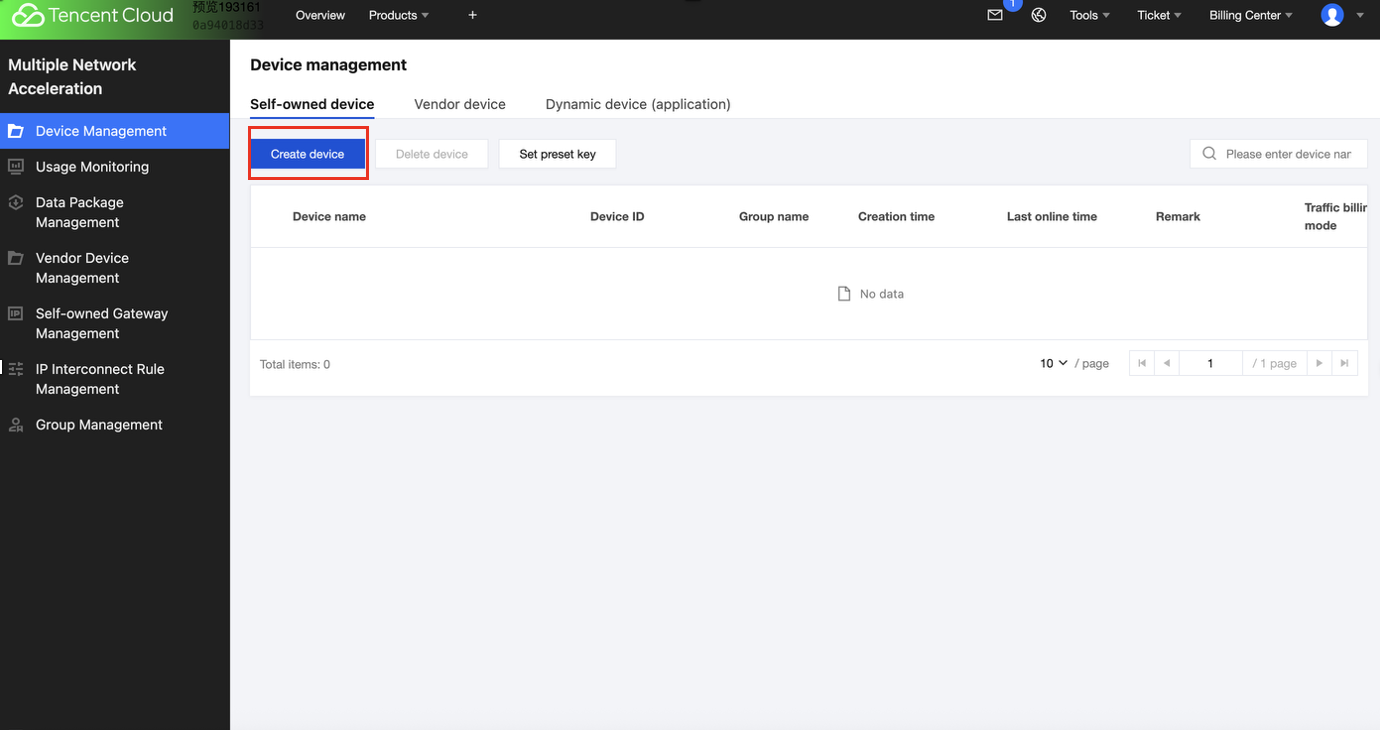
Enter the Console of the product, go to Device Management in the left menu bar, click self-owned device and you can manage your self-owned device on this page.
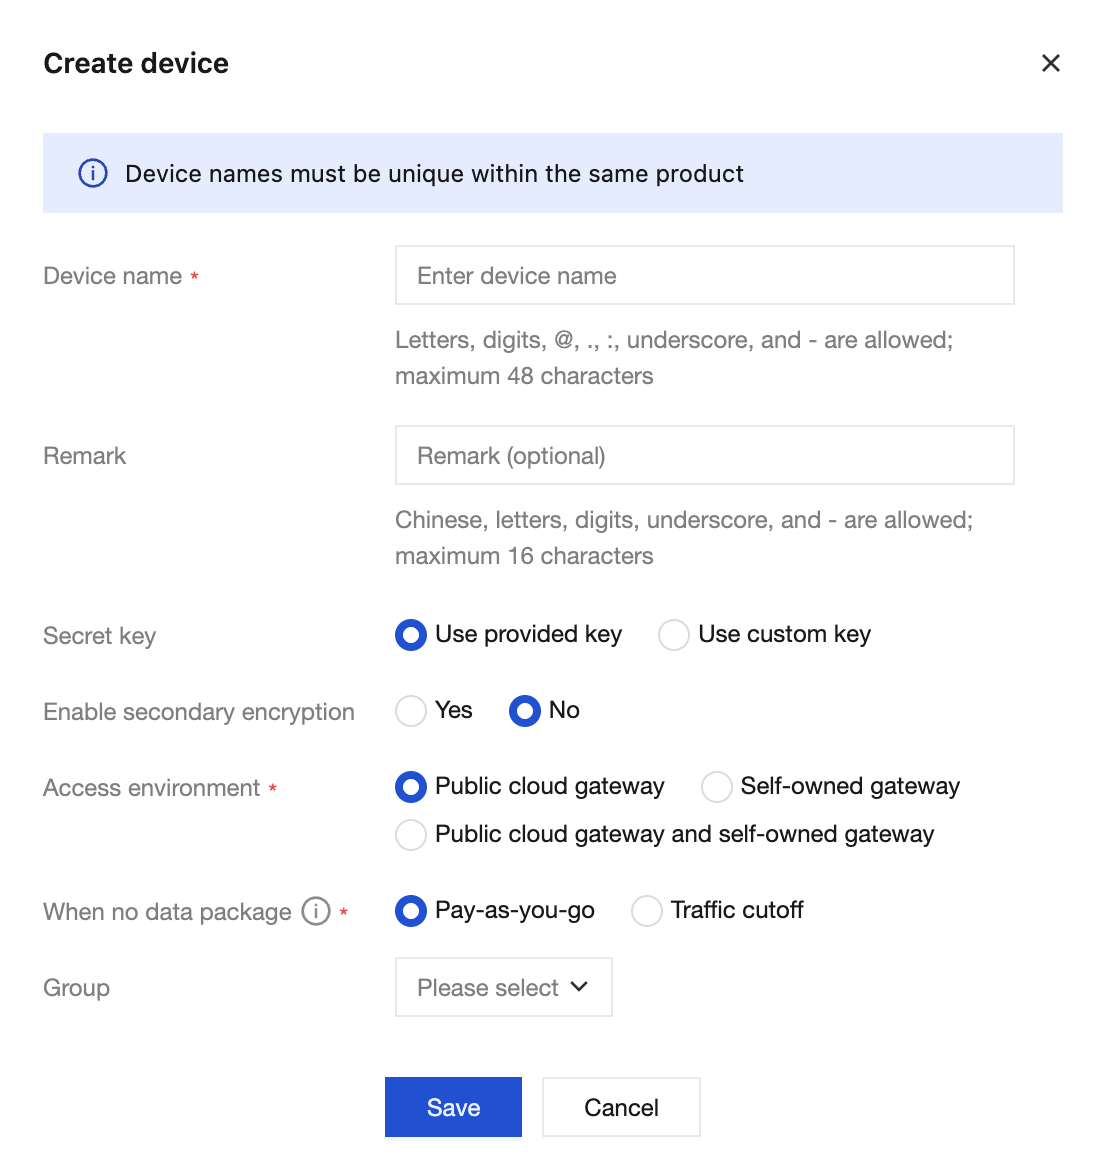
Click Create device to enter the new device page. On the page, fill in the information sequentially and click Save to successfully create a new device.
Note:
Key: It is recommended to preferentially select use the provided key.
License validity period: Supports one-time authorization, permanent use, and monthly authorization. To select, contact staff.
No data transfer plan processing method: pay-as-you-go and traffic cutoff.
Pay-as-you-go means continuing usage after the data transfer plan expires or is exhausted, with usage billed based on amount at the time of settlement, settled at the end of month.
Traffic cutoff means directly blocking traffic when the data package expires or is exhausted, making it no longer usable.
Note:
A one-time authorized device must be paid before it can be started and used.
Upon successful device creation, the page will return the device key dataKey. The key must be properly saved and recorded. If it is missing or forgotten subsequently, consult with staff for inquiry.
Multiple Network Acceleration (Tencent Cloud Jutong) requires a unique key per device. Ensure that each physical device uses an independent key.
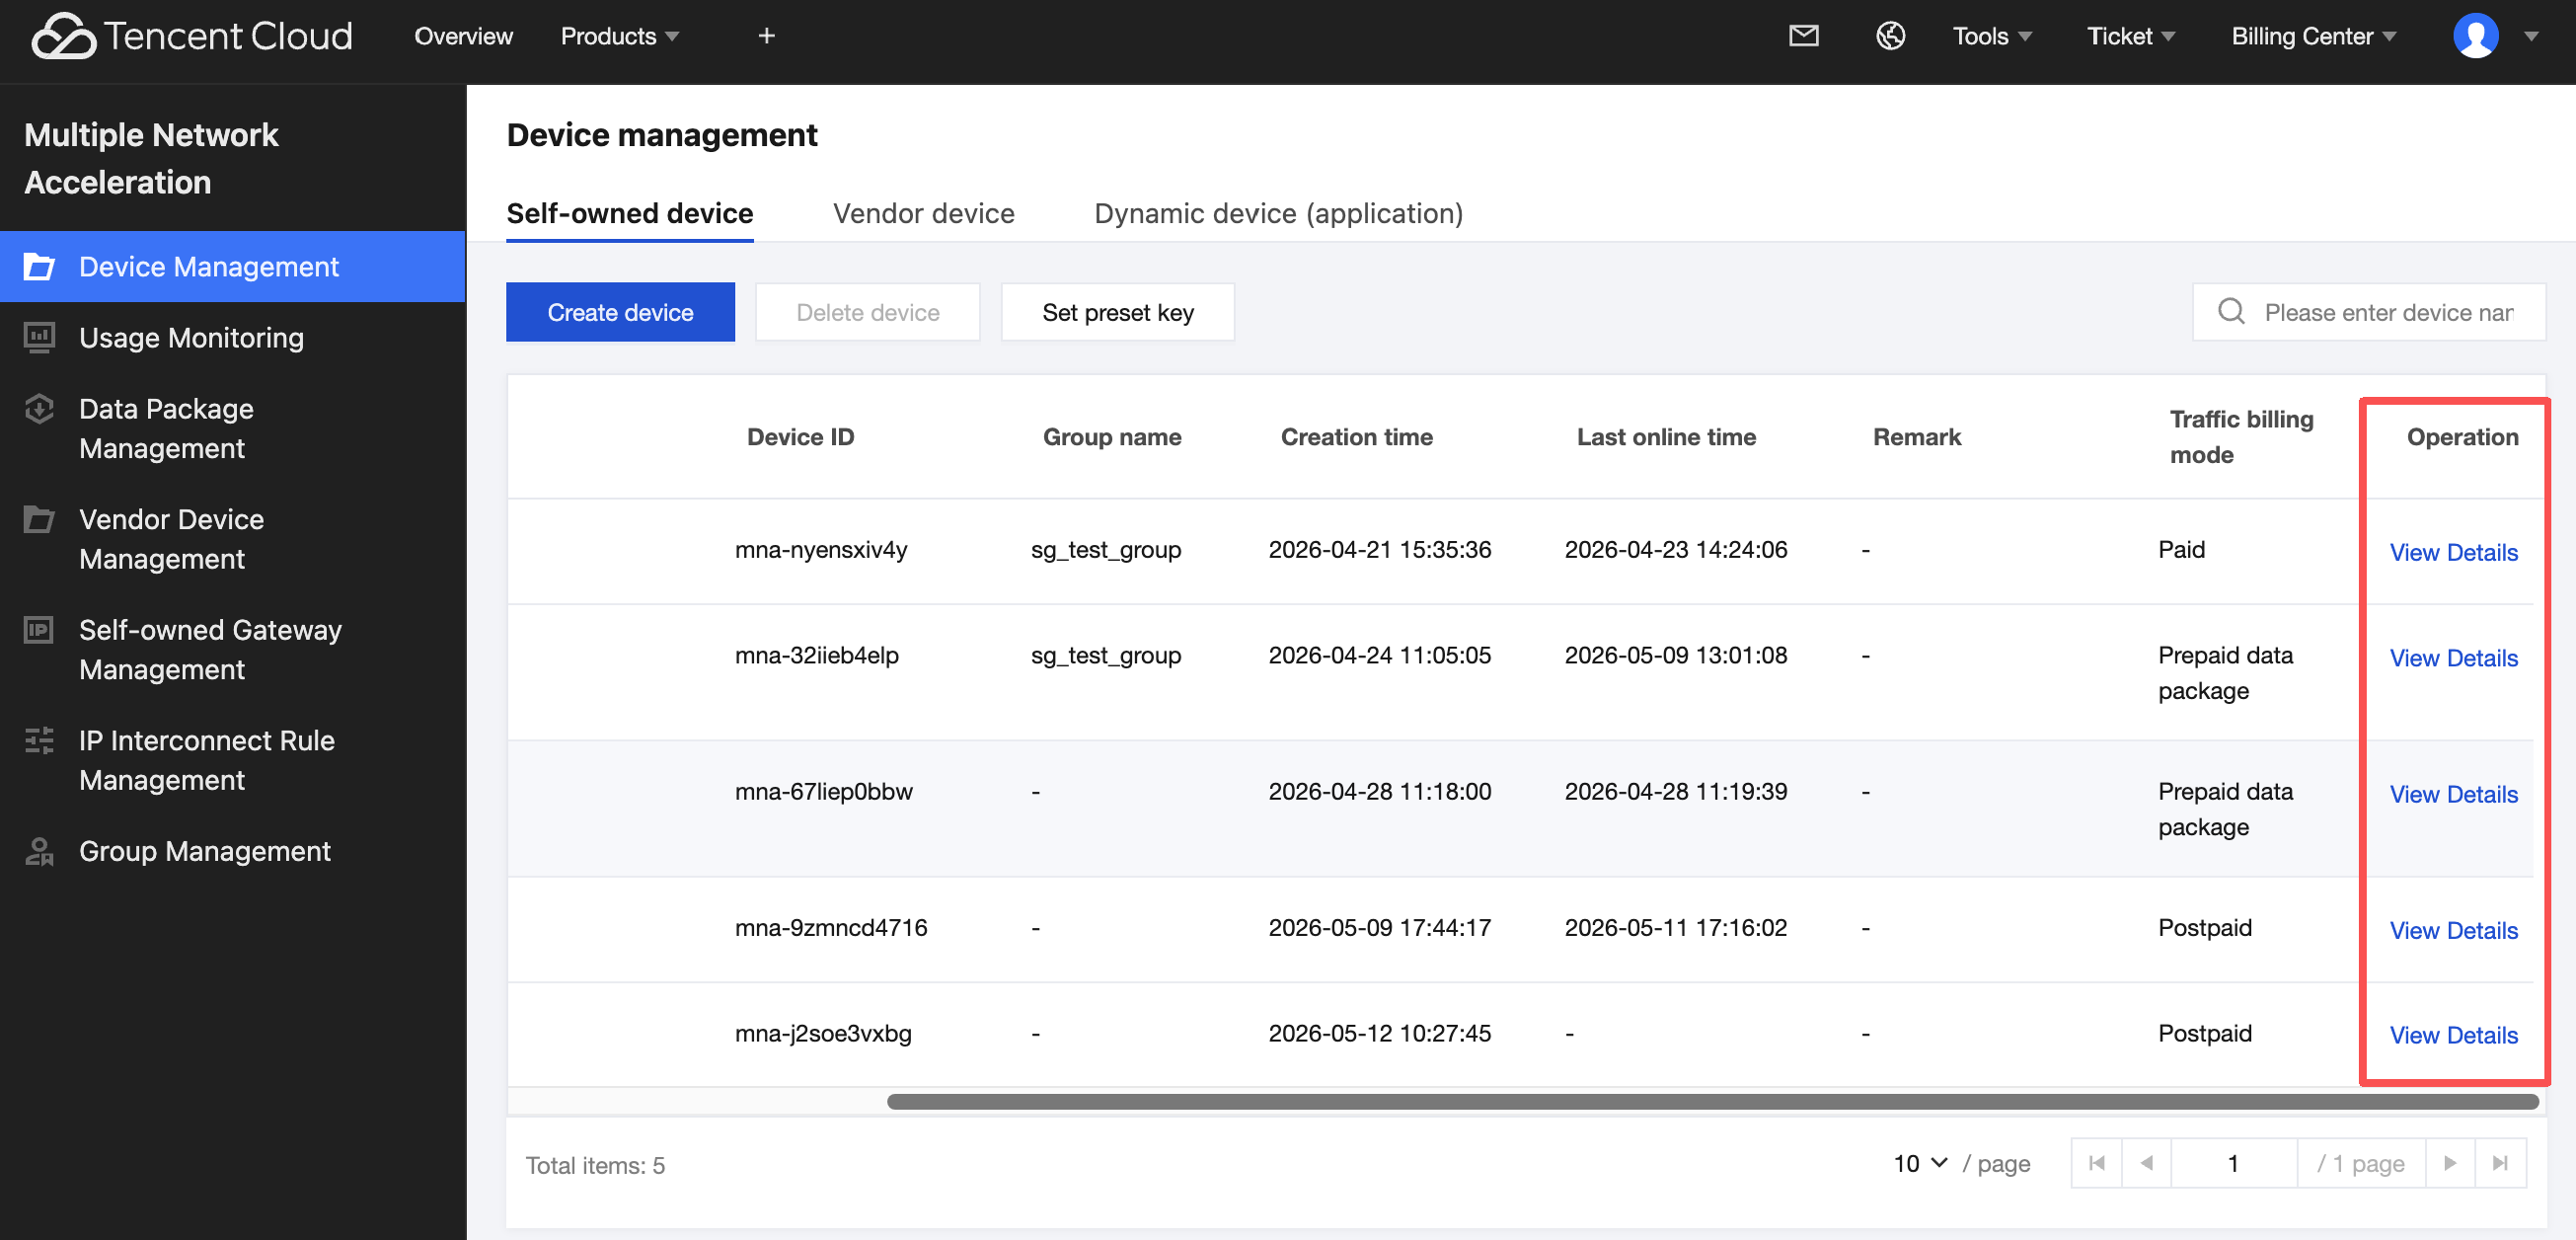
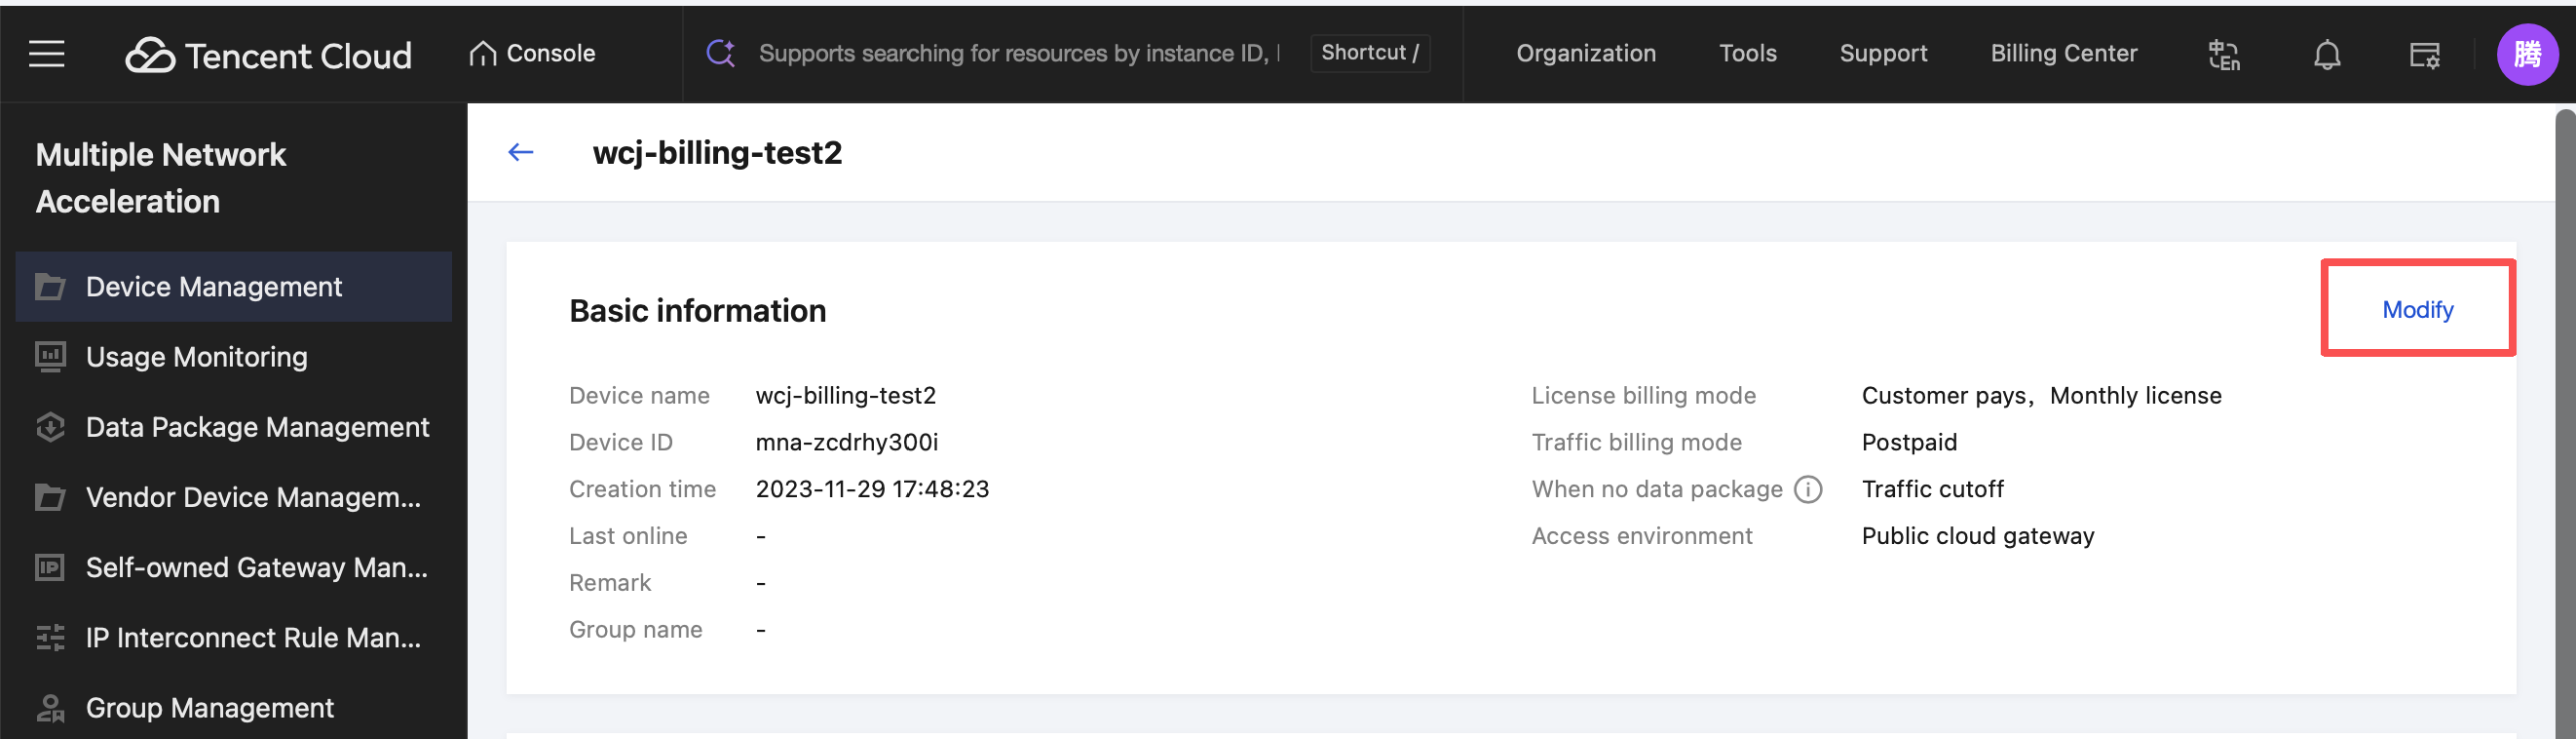
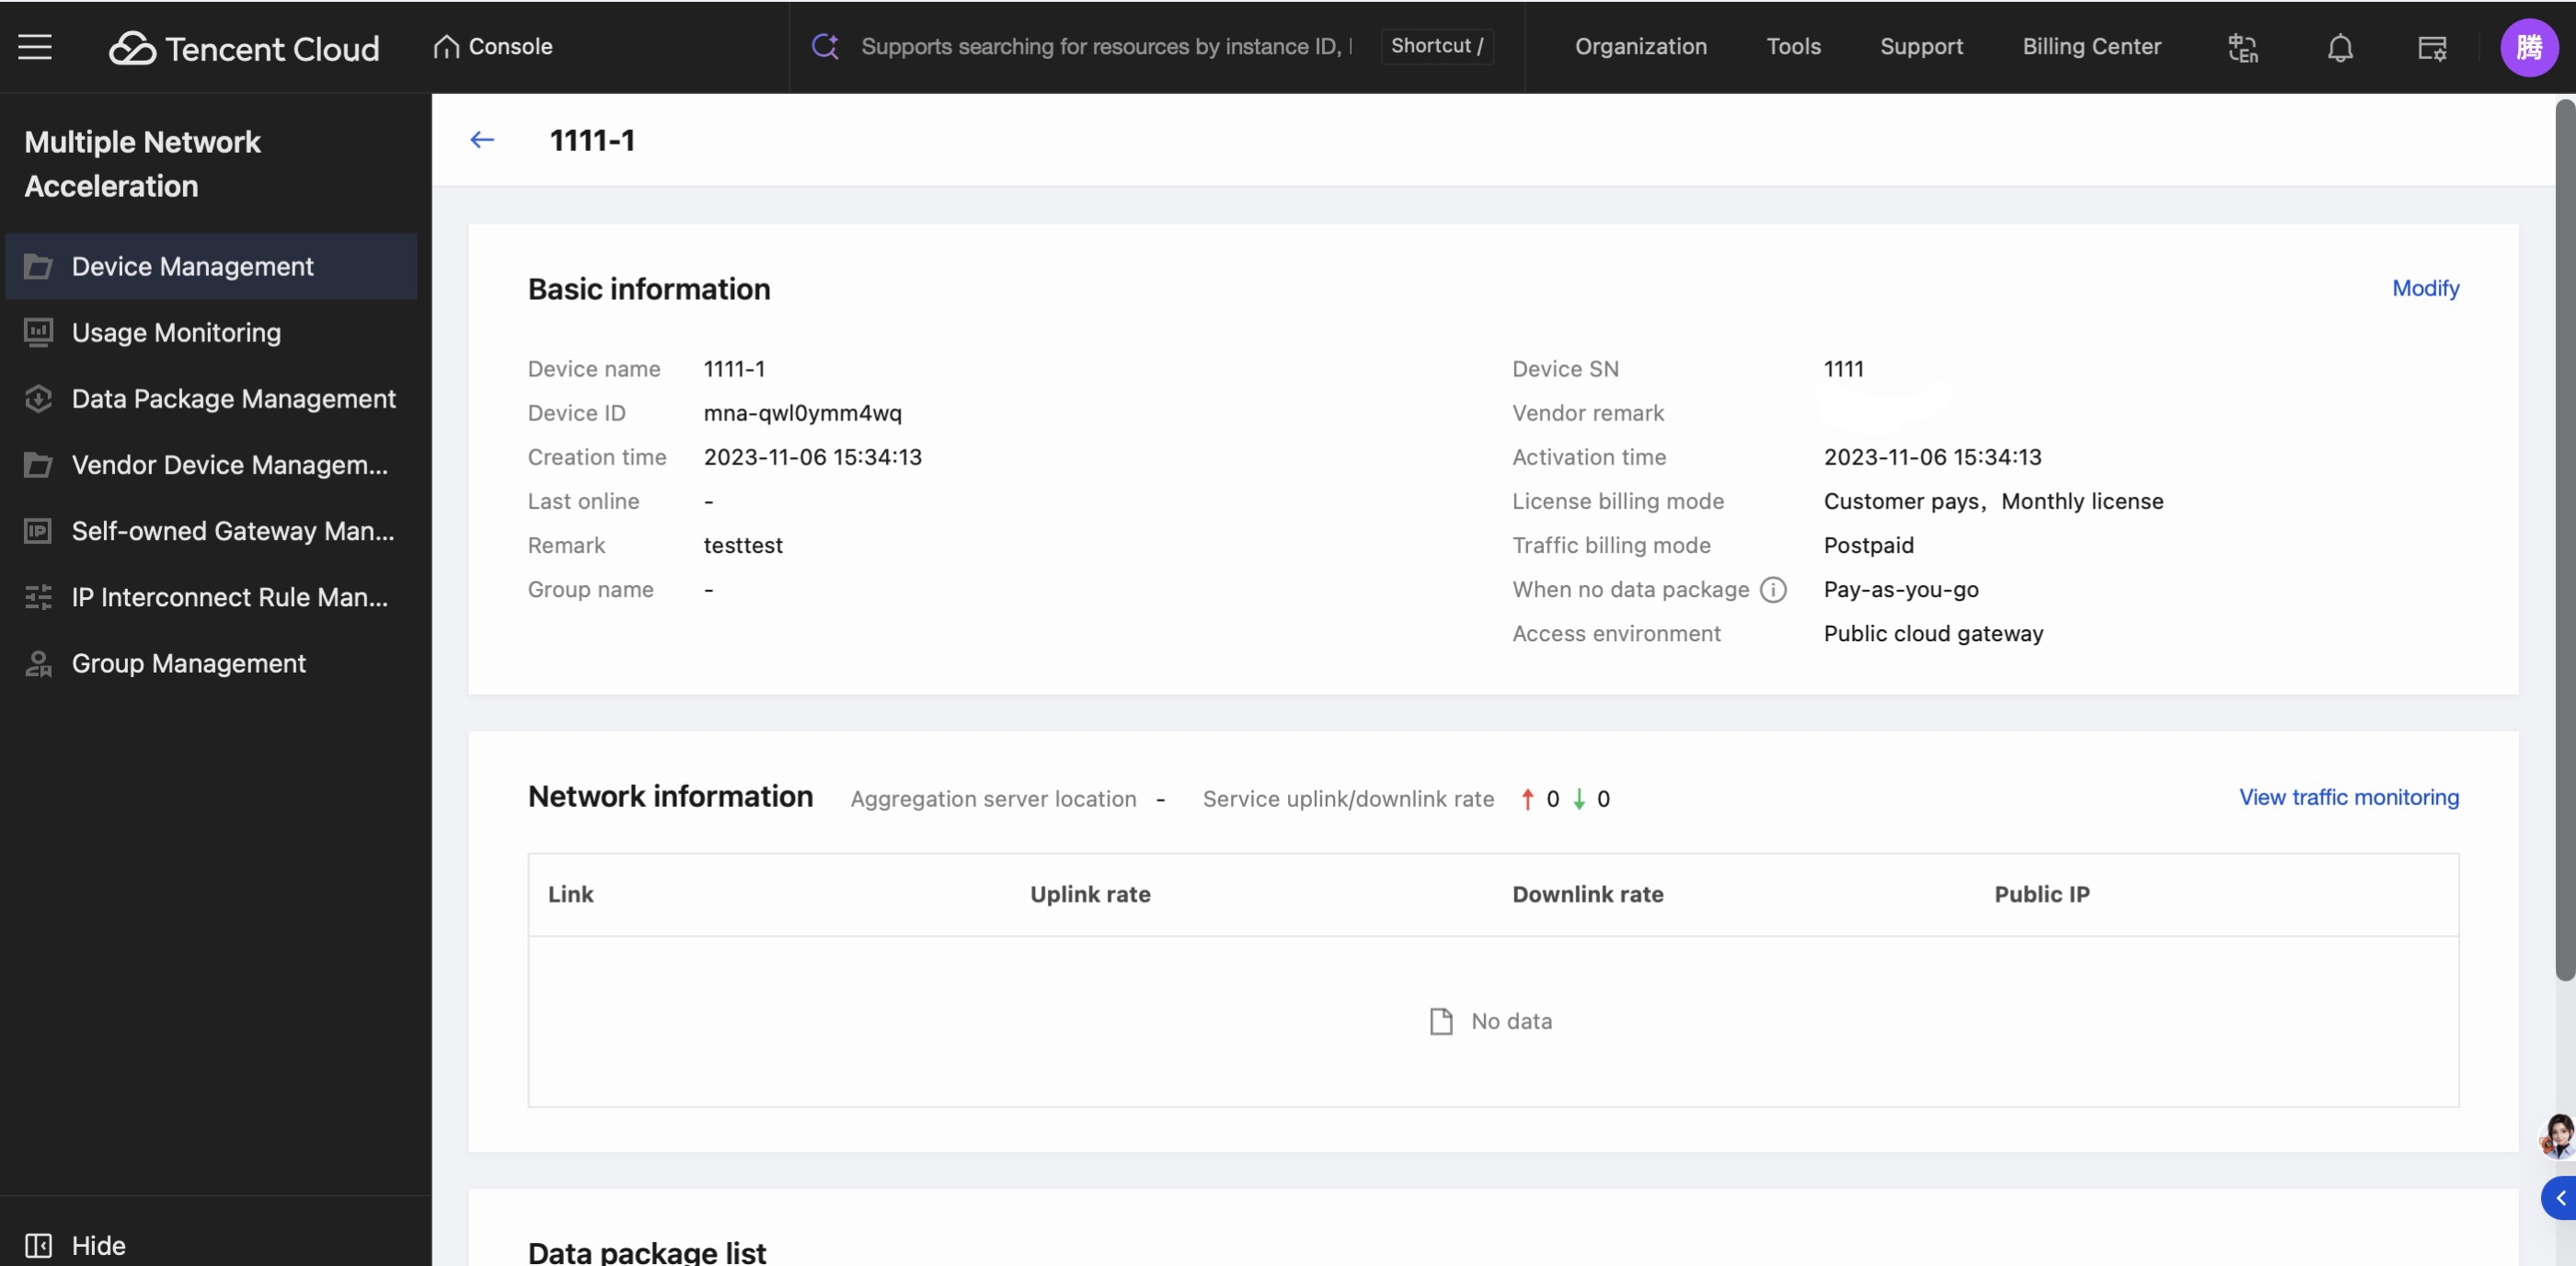
2.View Device Detail
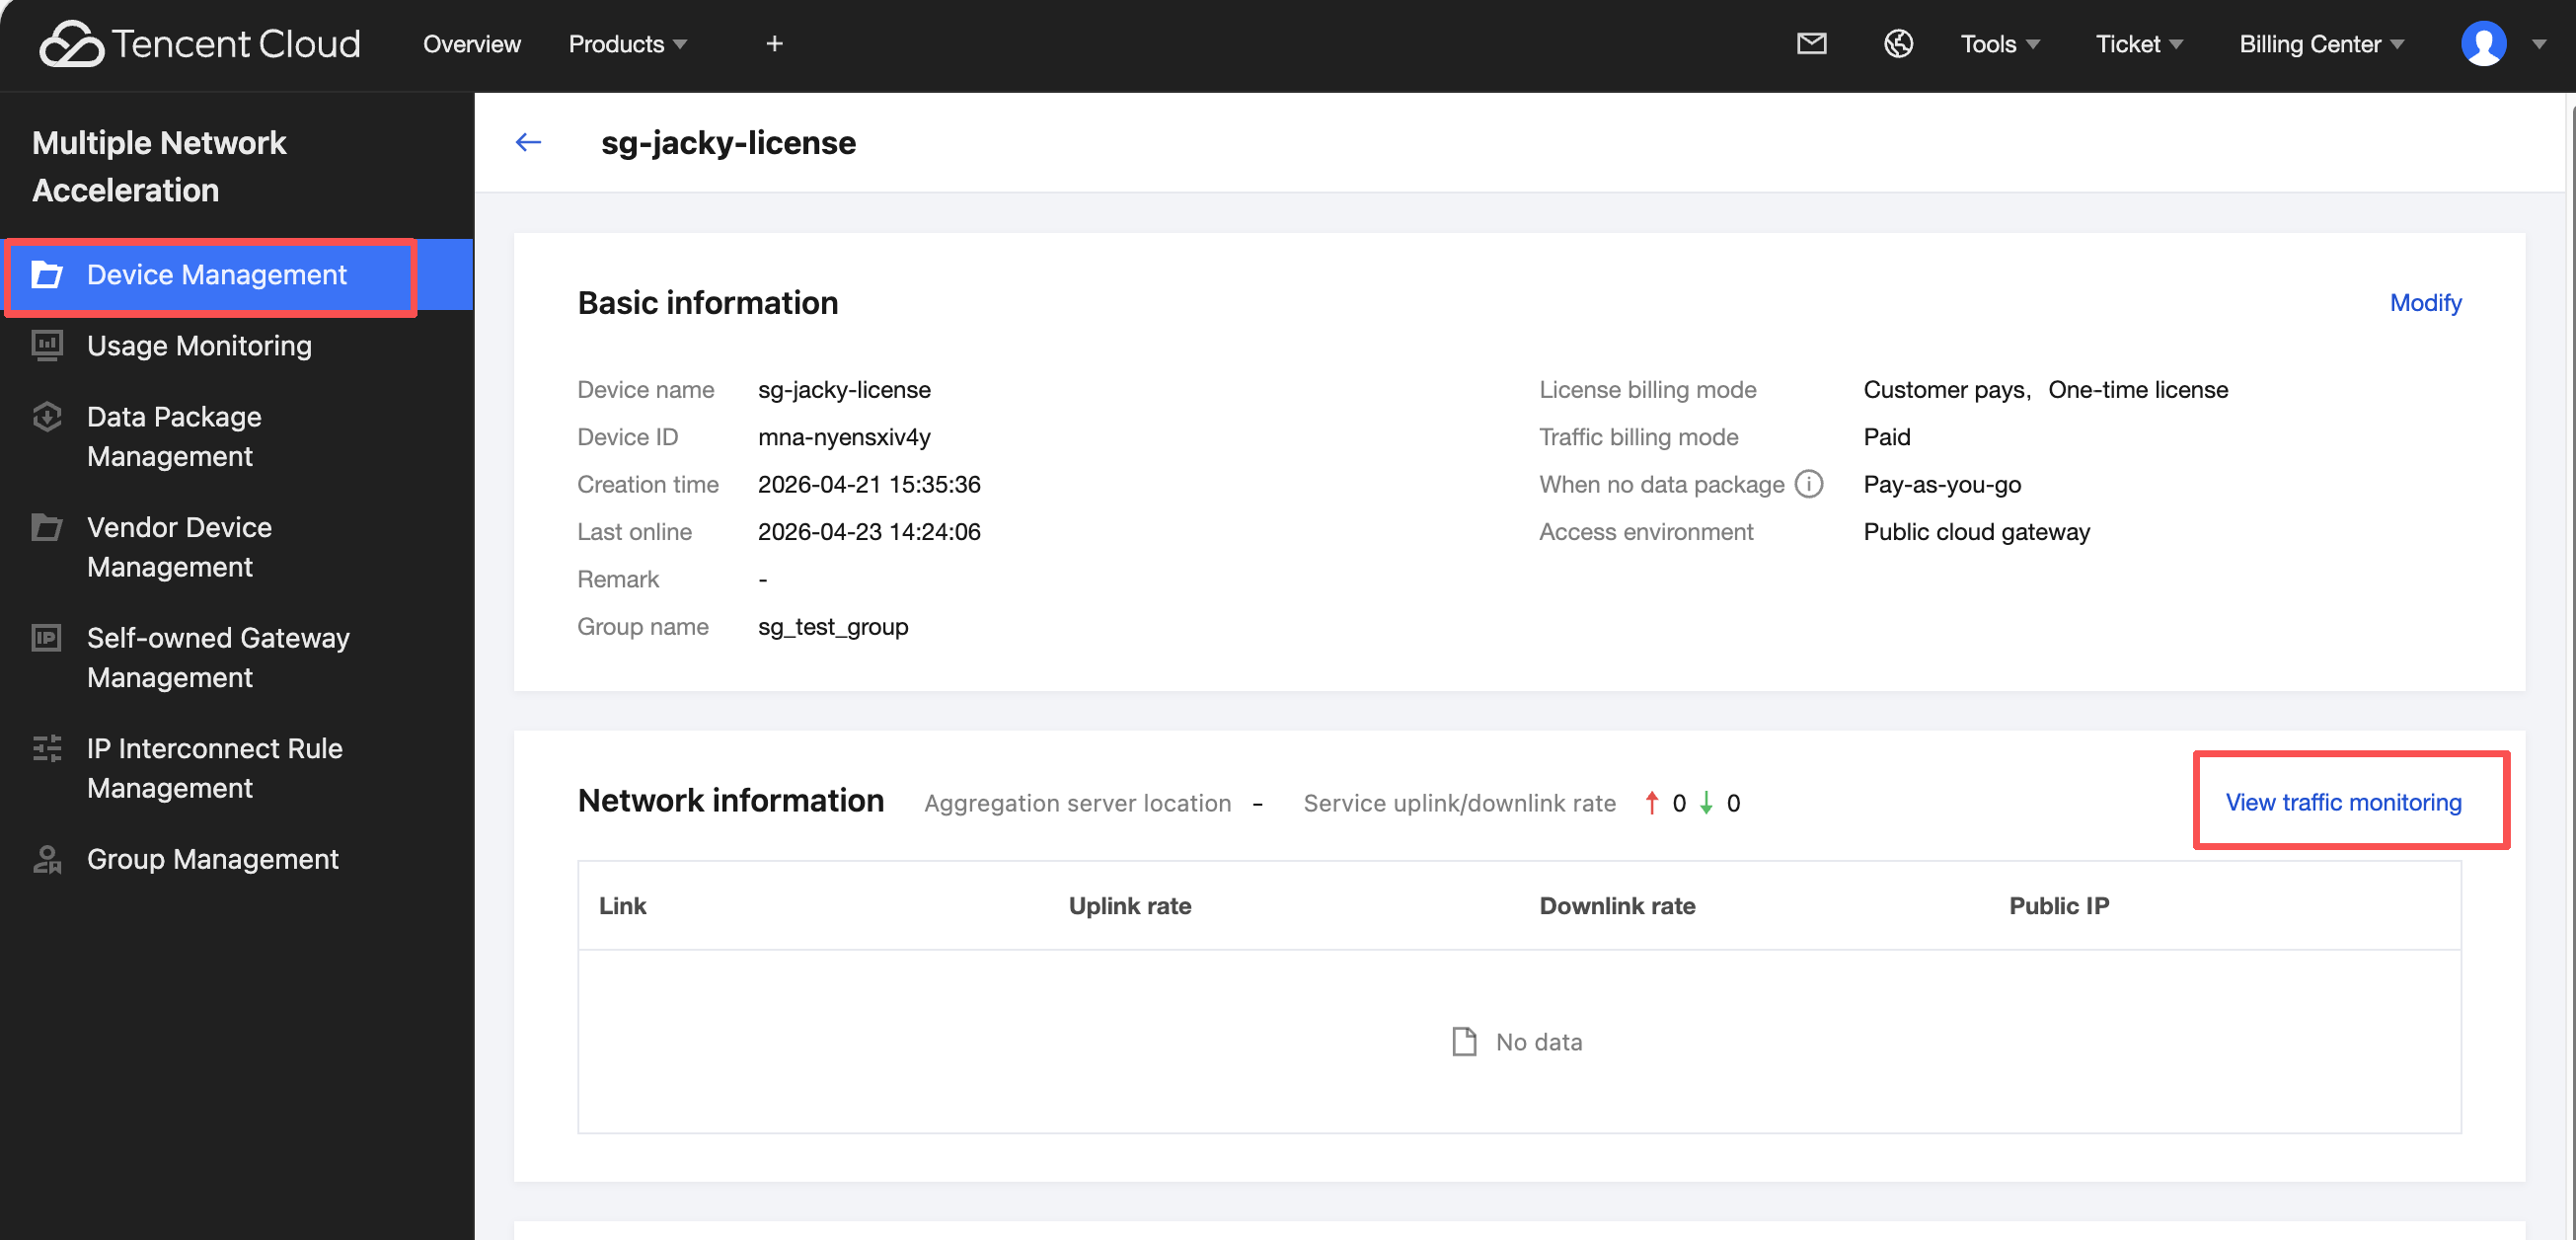
Click View Details to enter the details page of the device.
The device details page shows device information and device-related network conditions, displays aggregation server nodes and uplink/downlink rate statistics, and also shows the traffic package list.
On the Device Management > Network Information page, click View traffic monitoring to jump to the real-time traffic monitoring page of the device.
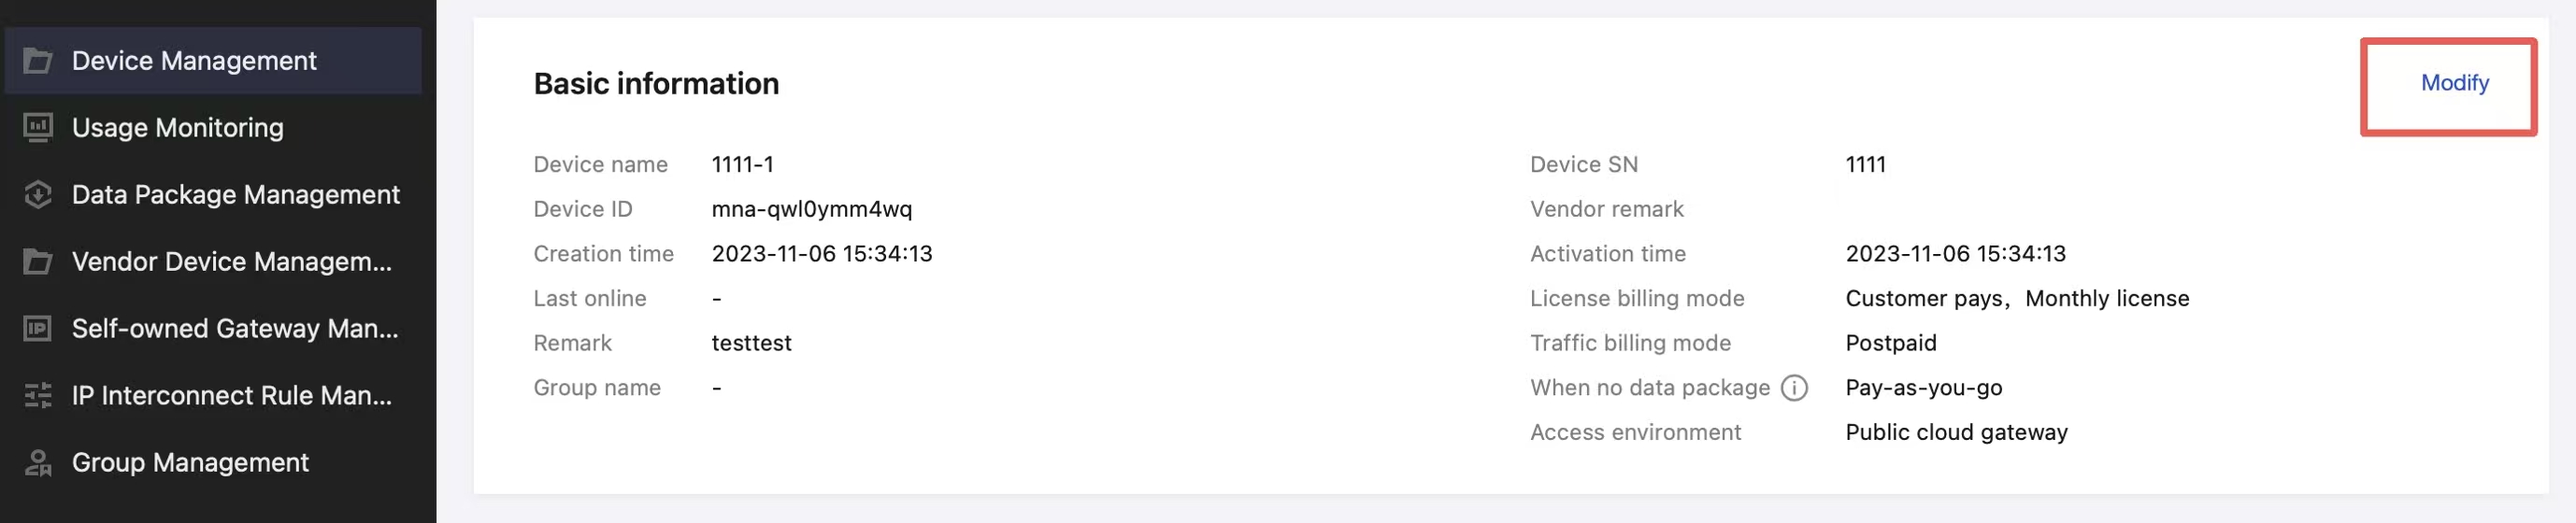
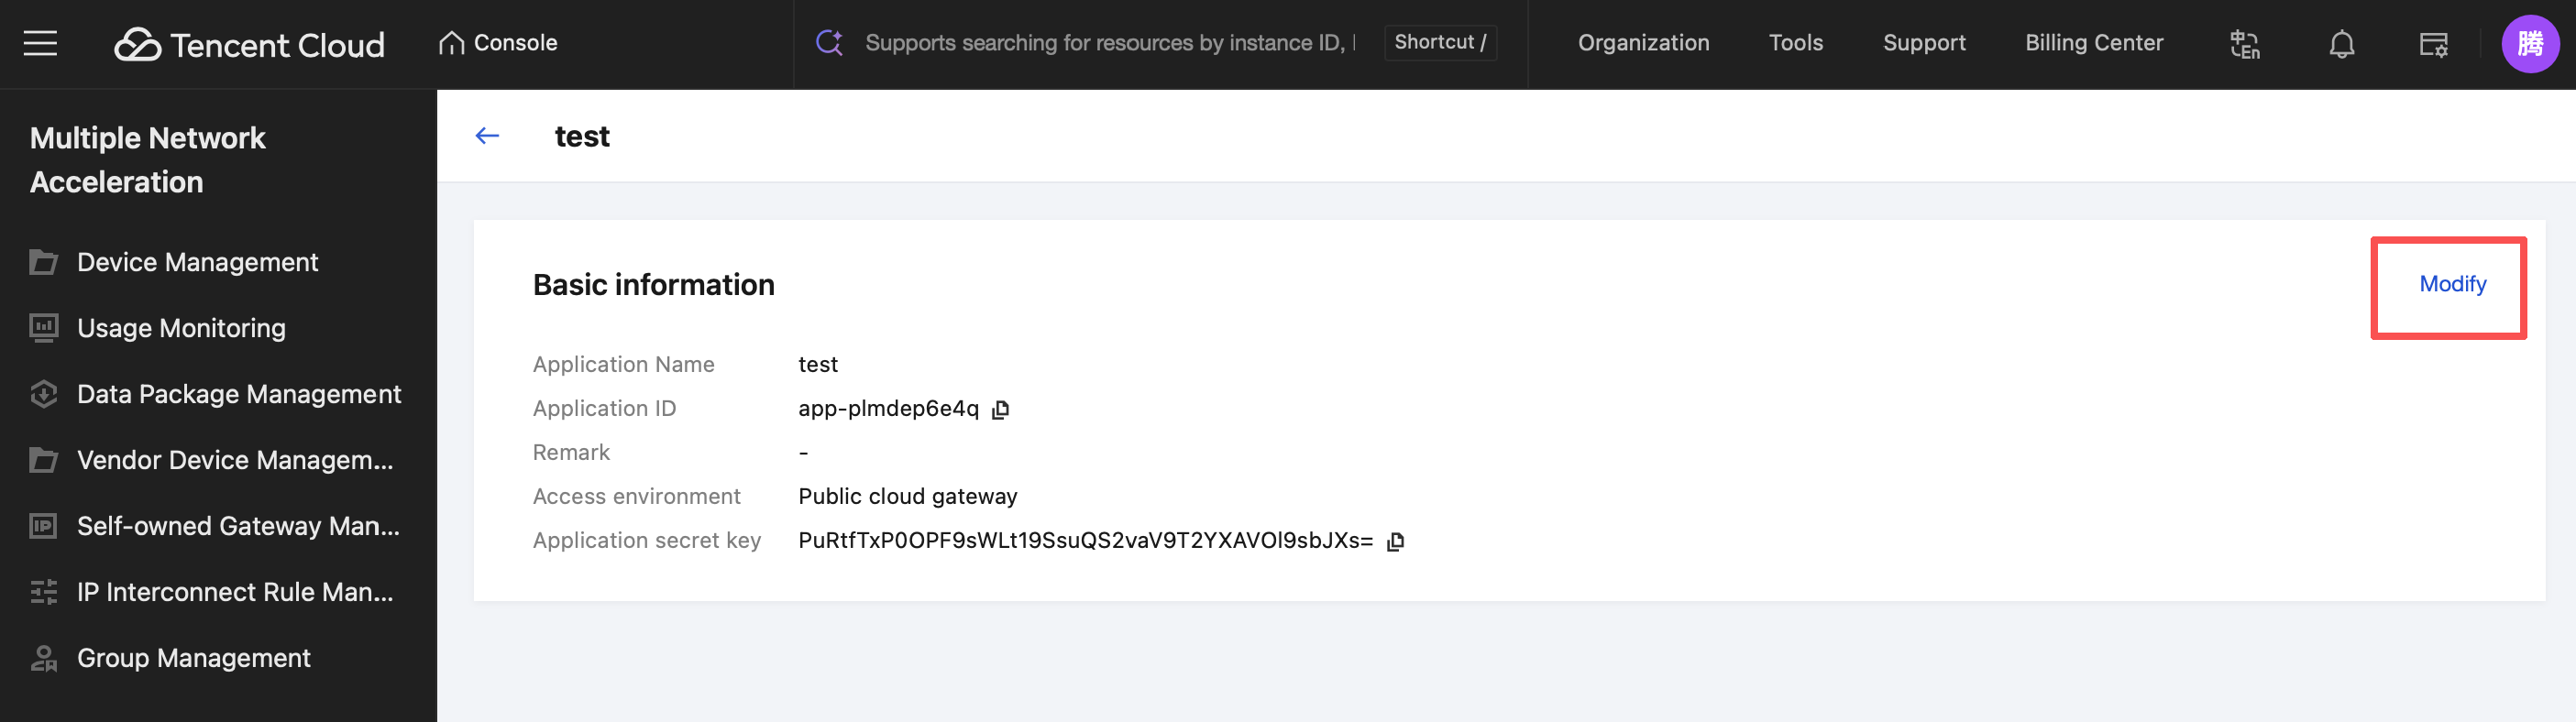
3.Modifying Device Information
Enter Device Management, on the basic information page, click Modify to modify the device name and remark field.
Manufacturer Equipment Management
1. Creating a Device to Be Activated
This module is used for manufacturer and customer use in third-party mode integration.
The manufacturer's device management module is used by the manufacturer to create a device to be activated, corresponding to a physical device to be delivered to the customer. After receiving the physical device, the customer activates the manufacturer's device in the device management module and gains actual management permissions for the device.
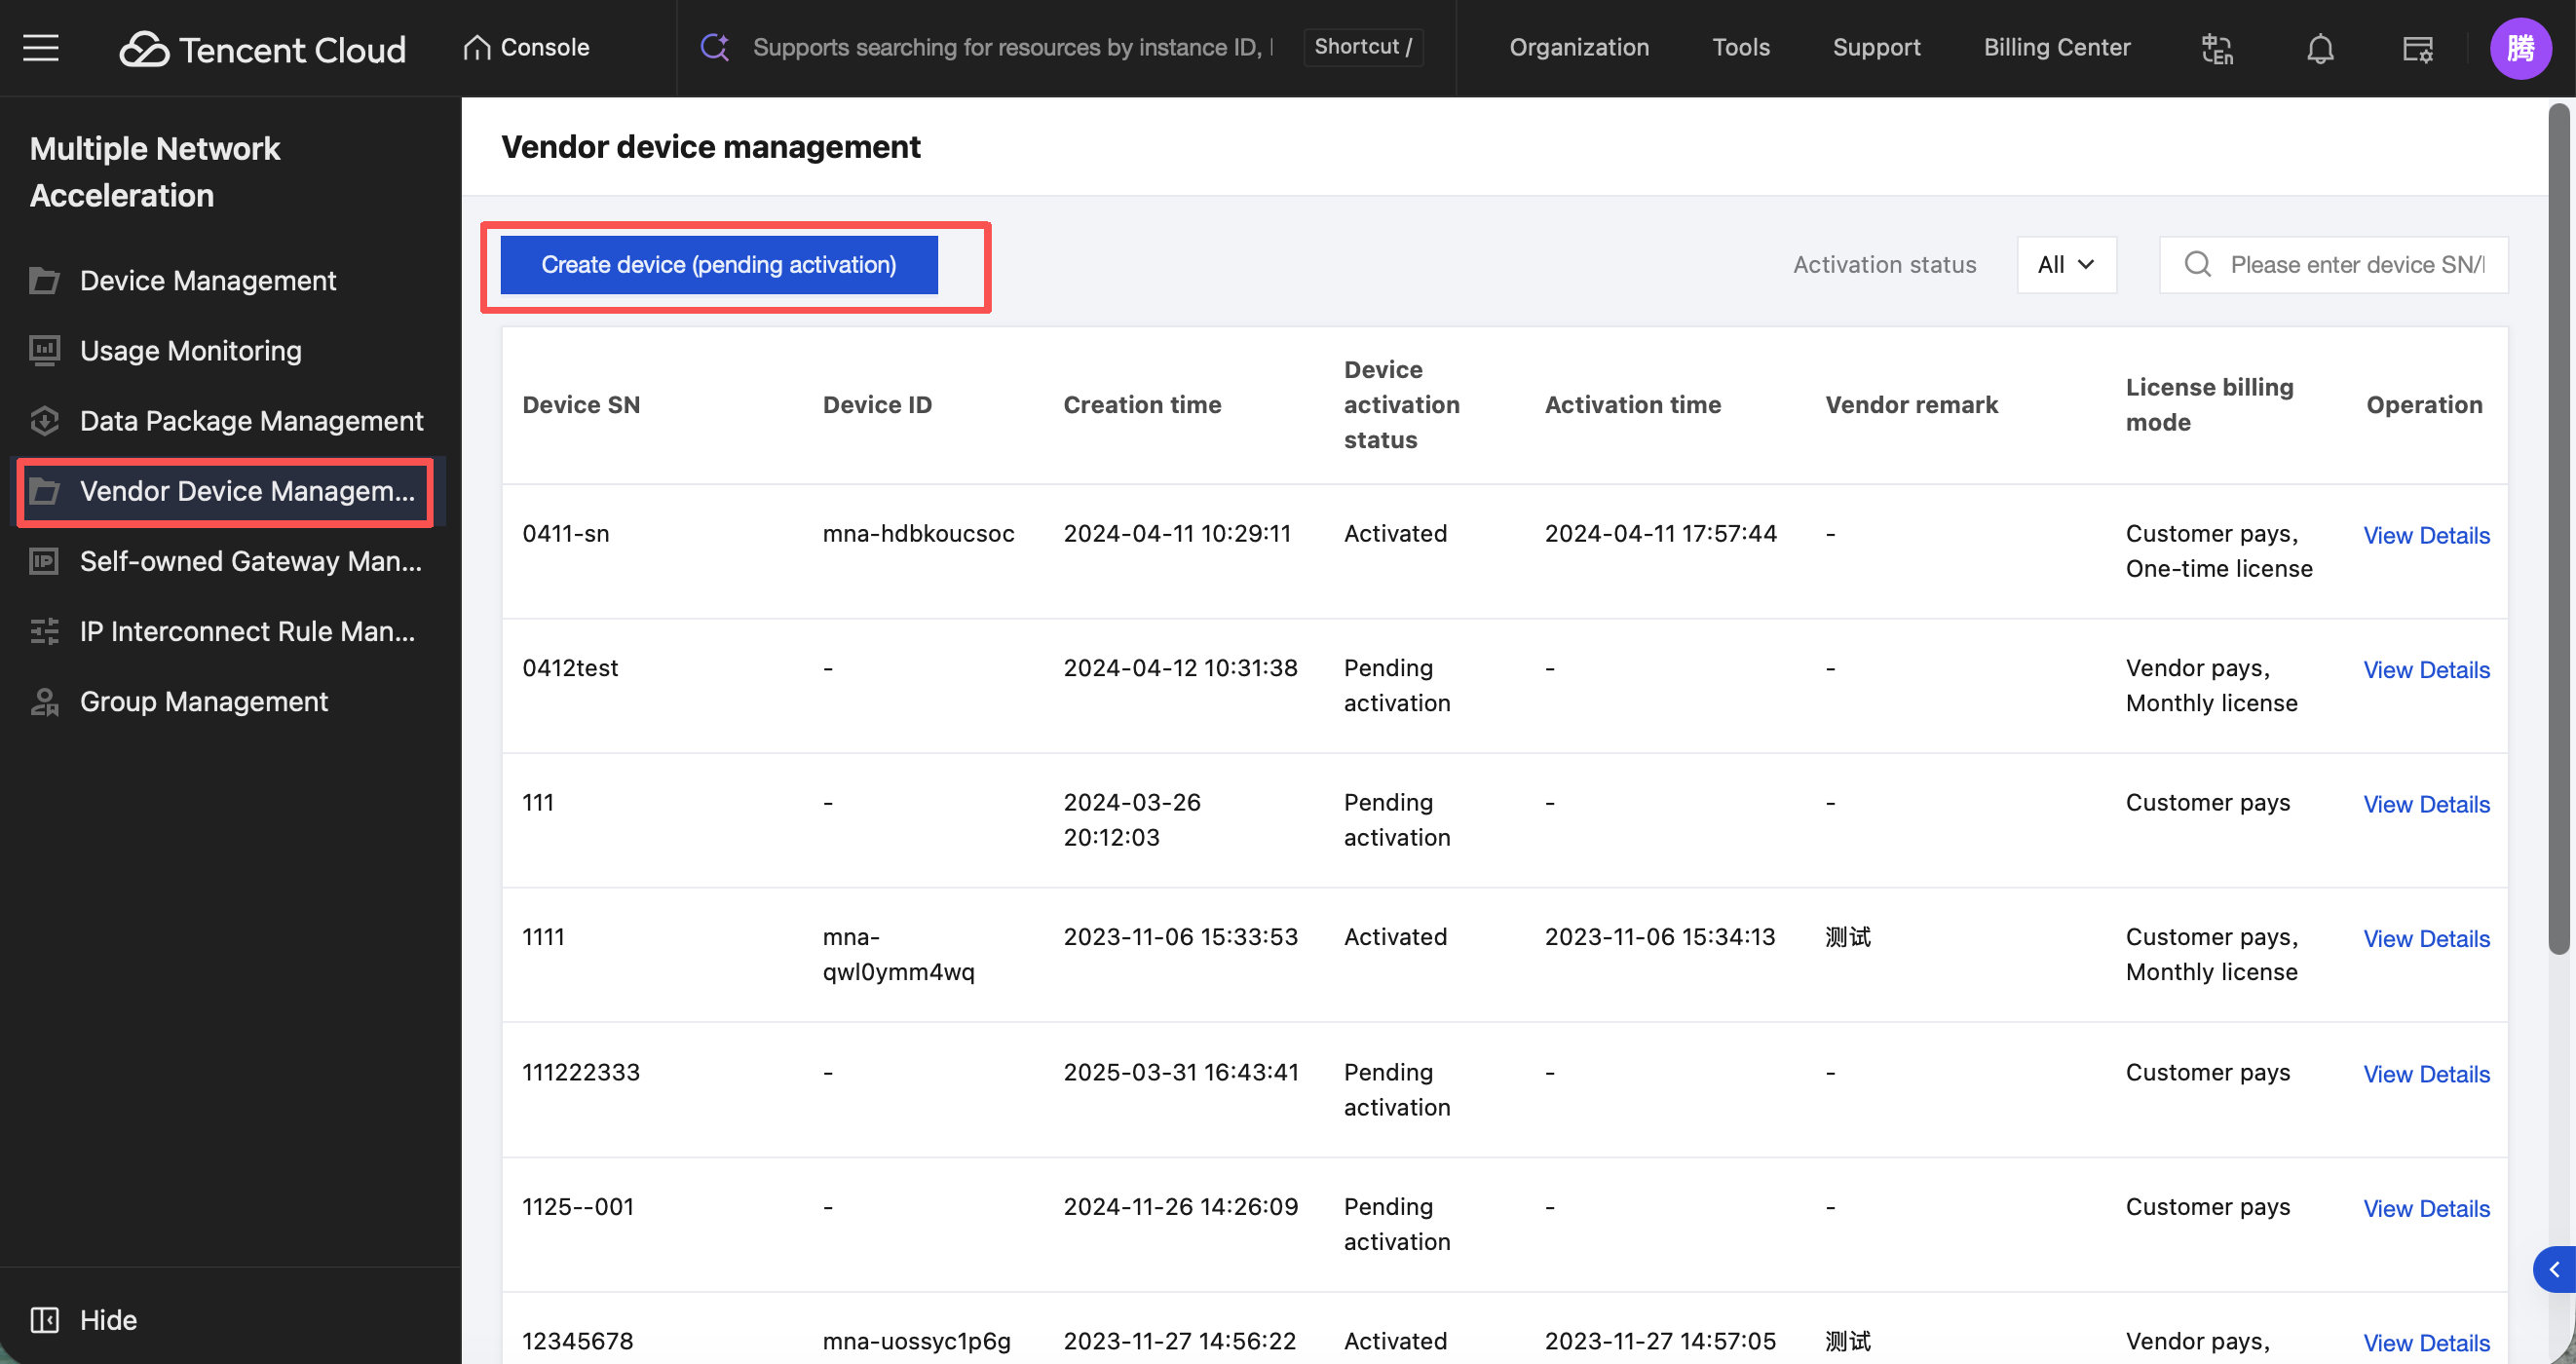
In the left menu bar, click Vendor Device to enter Vendor Equipment Management.
Note:
Public cloud gateway integration: Refers to the aggregation gateway deployed in Tencent Cloud IDC. Terminals/clients will automatically connect to nearby.
Customer-owned gateway integration: Refers to an aggregation gateway deployed in a customer's data center or on a third-party cloud. The customer provides the underlying resources, but the gateway is centrally managed by the Tencent Cloud Jutong service.
Two-party mode integration: Refers to customers directly integrating the SDK on the device to achieve acceleration. Tencent Cloud is the service provider, and the customer is the recipient. Most customers belong to this mode.
Three-party mode integration: Refers to a scenario where a customer purchases devices with multiple network acceleration capabilities from a supplier and acquires the Multiple Network Acceleration (Tencent Cloud Jutong) software from Tencent Cloud. This model, involving Tencent Cloud, the customer, and the device supplier, is termed the three-party integration mode.
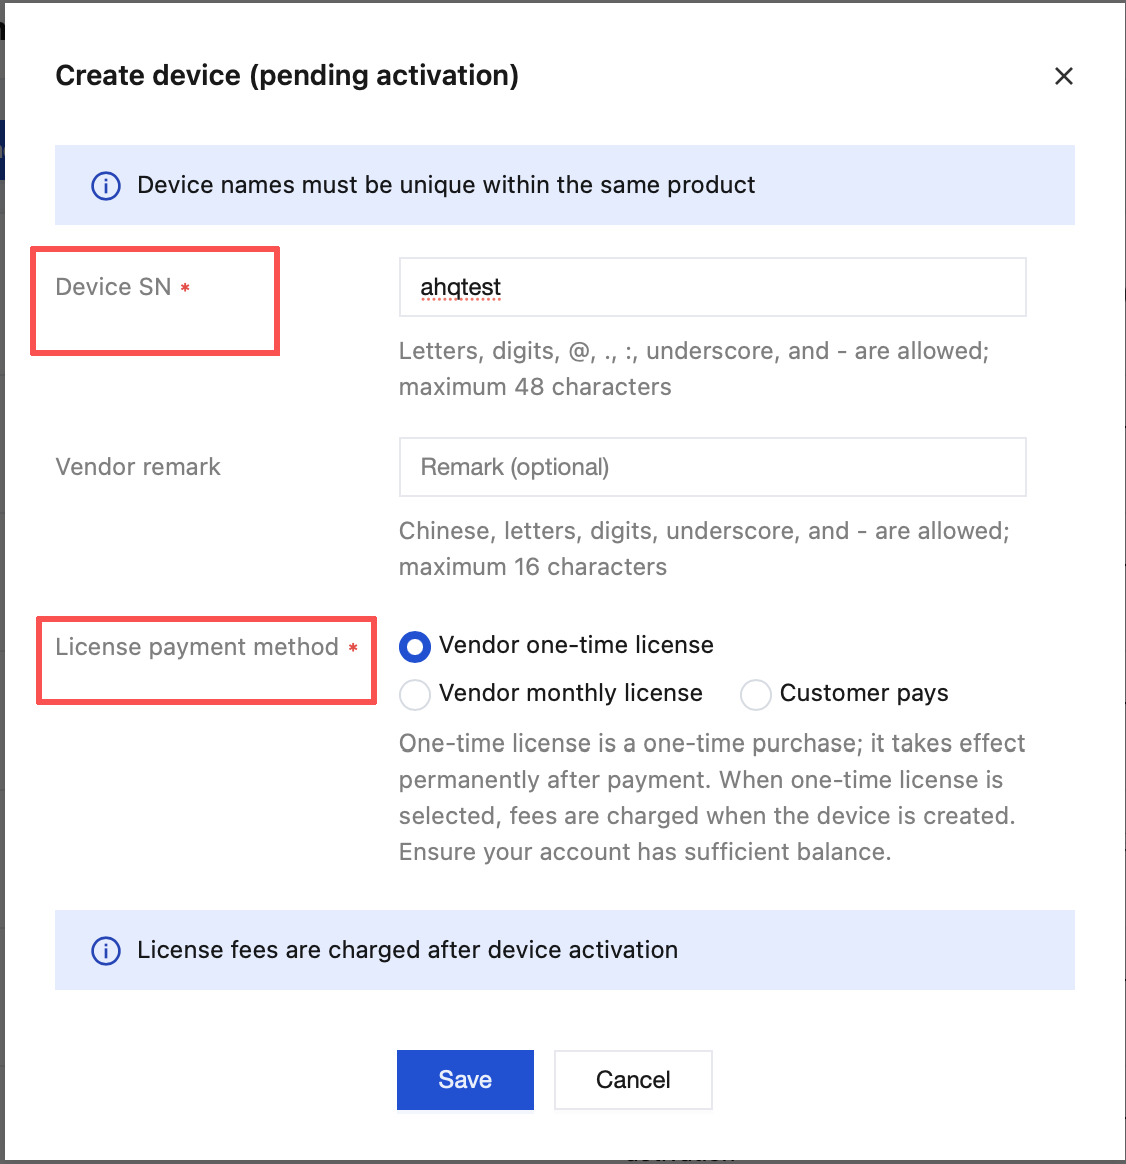
Click Create Device to be Activated to enter the creation interface, input the device SN and select the License payment method, then click Save.
2. Activating a Manufacturer Device
In the left menu bar, click Device Management, select Vendor Device List, and enter the vendor equipment management page.
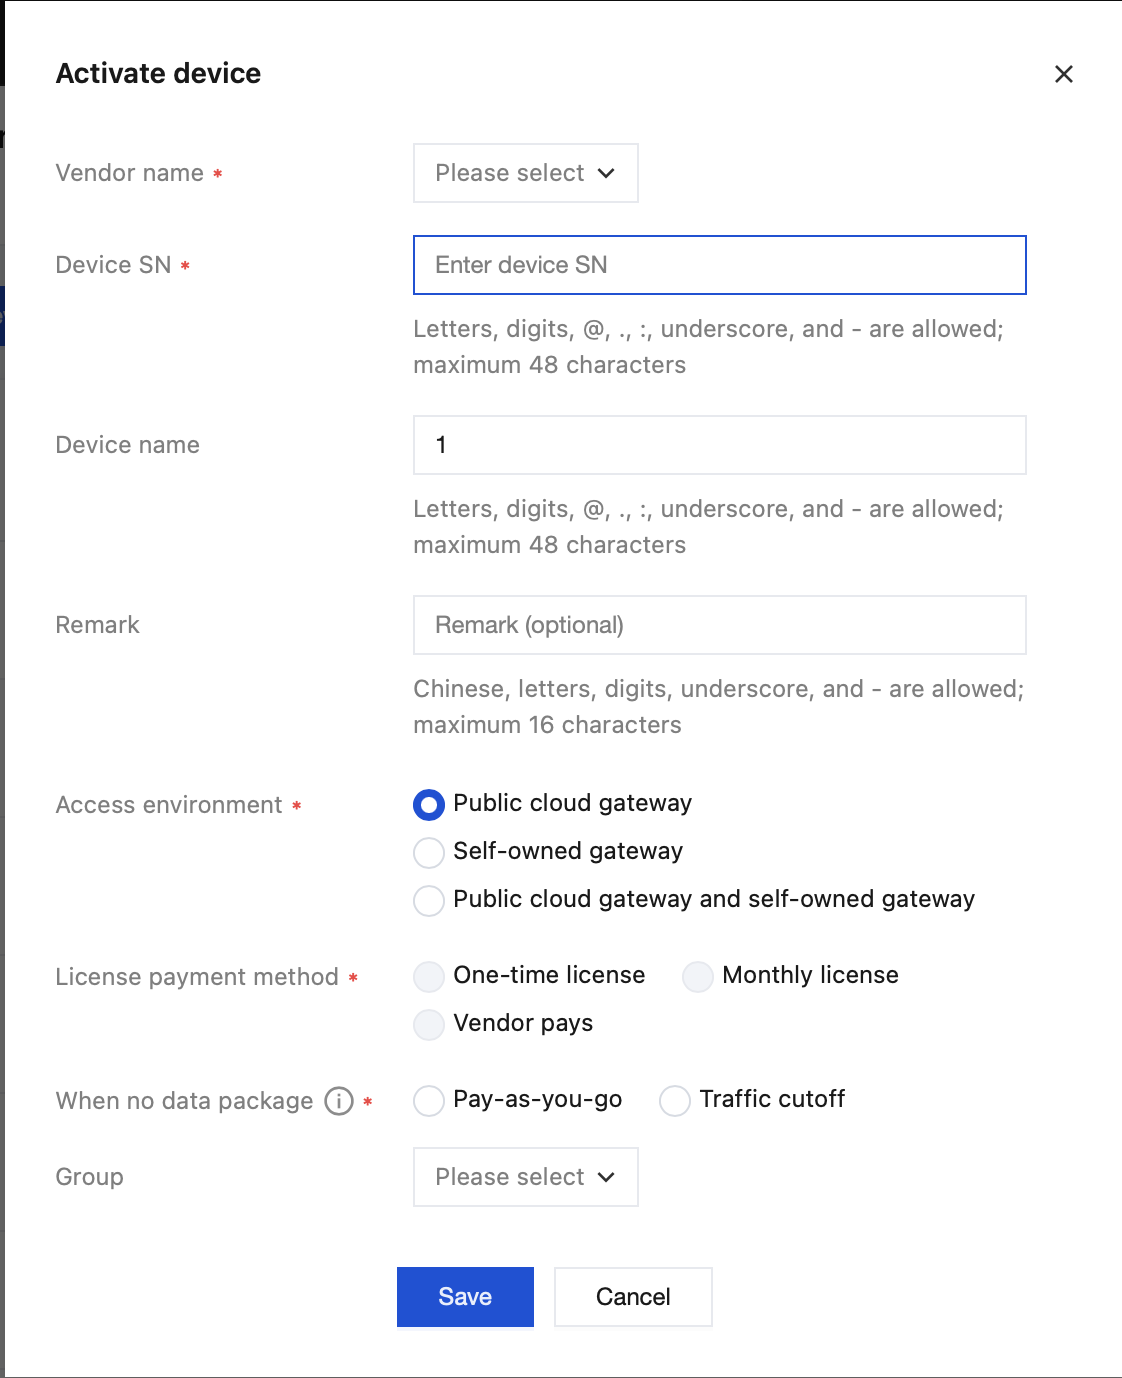
Click Activate Vendor Equipment to enter the activation interface, select the vendor name, and input the created SN to activate.
Note: Acceleration can only be performed after activation.
3.Querying Vendor Equipment Details
In Device Management > Vendor Device, select a device, click View Details, and enter the details page of the device.
The details page shows device information and device-related network conditions, displays aggregation server nodes and uplink/downlink rate statistics, and also shows the traffic package list.
Go to Device Management > Network Information, click View Real-Time Monitoring, and you will be redirected to the device's real-time traffic monitoring page.
4.Modify Manufacturer Equipment Information
In the Basic Info section, click Modify to modify the device name and remark field.
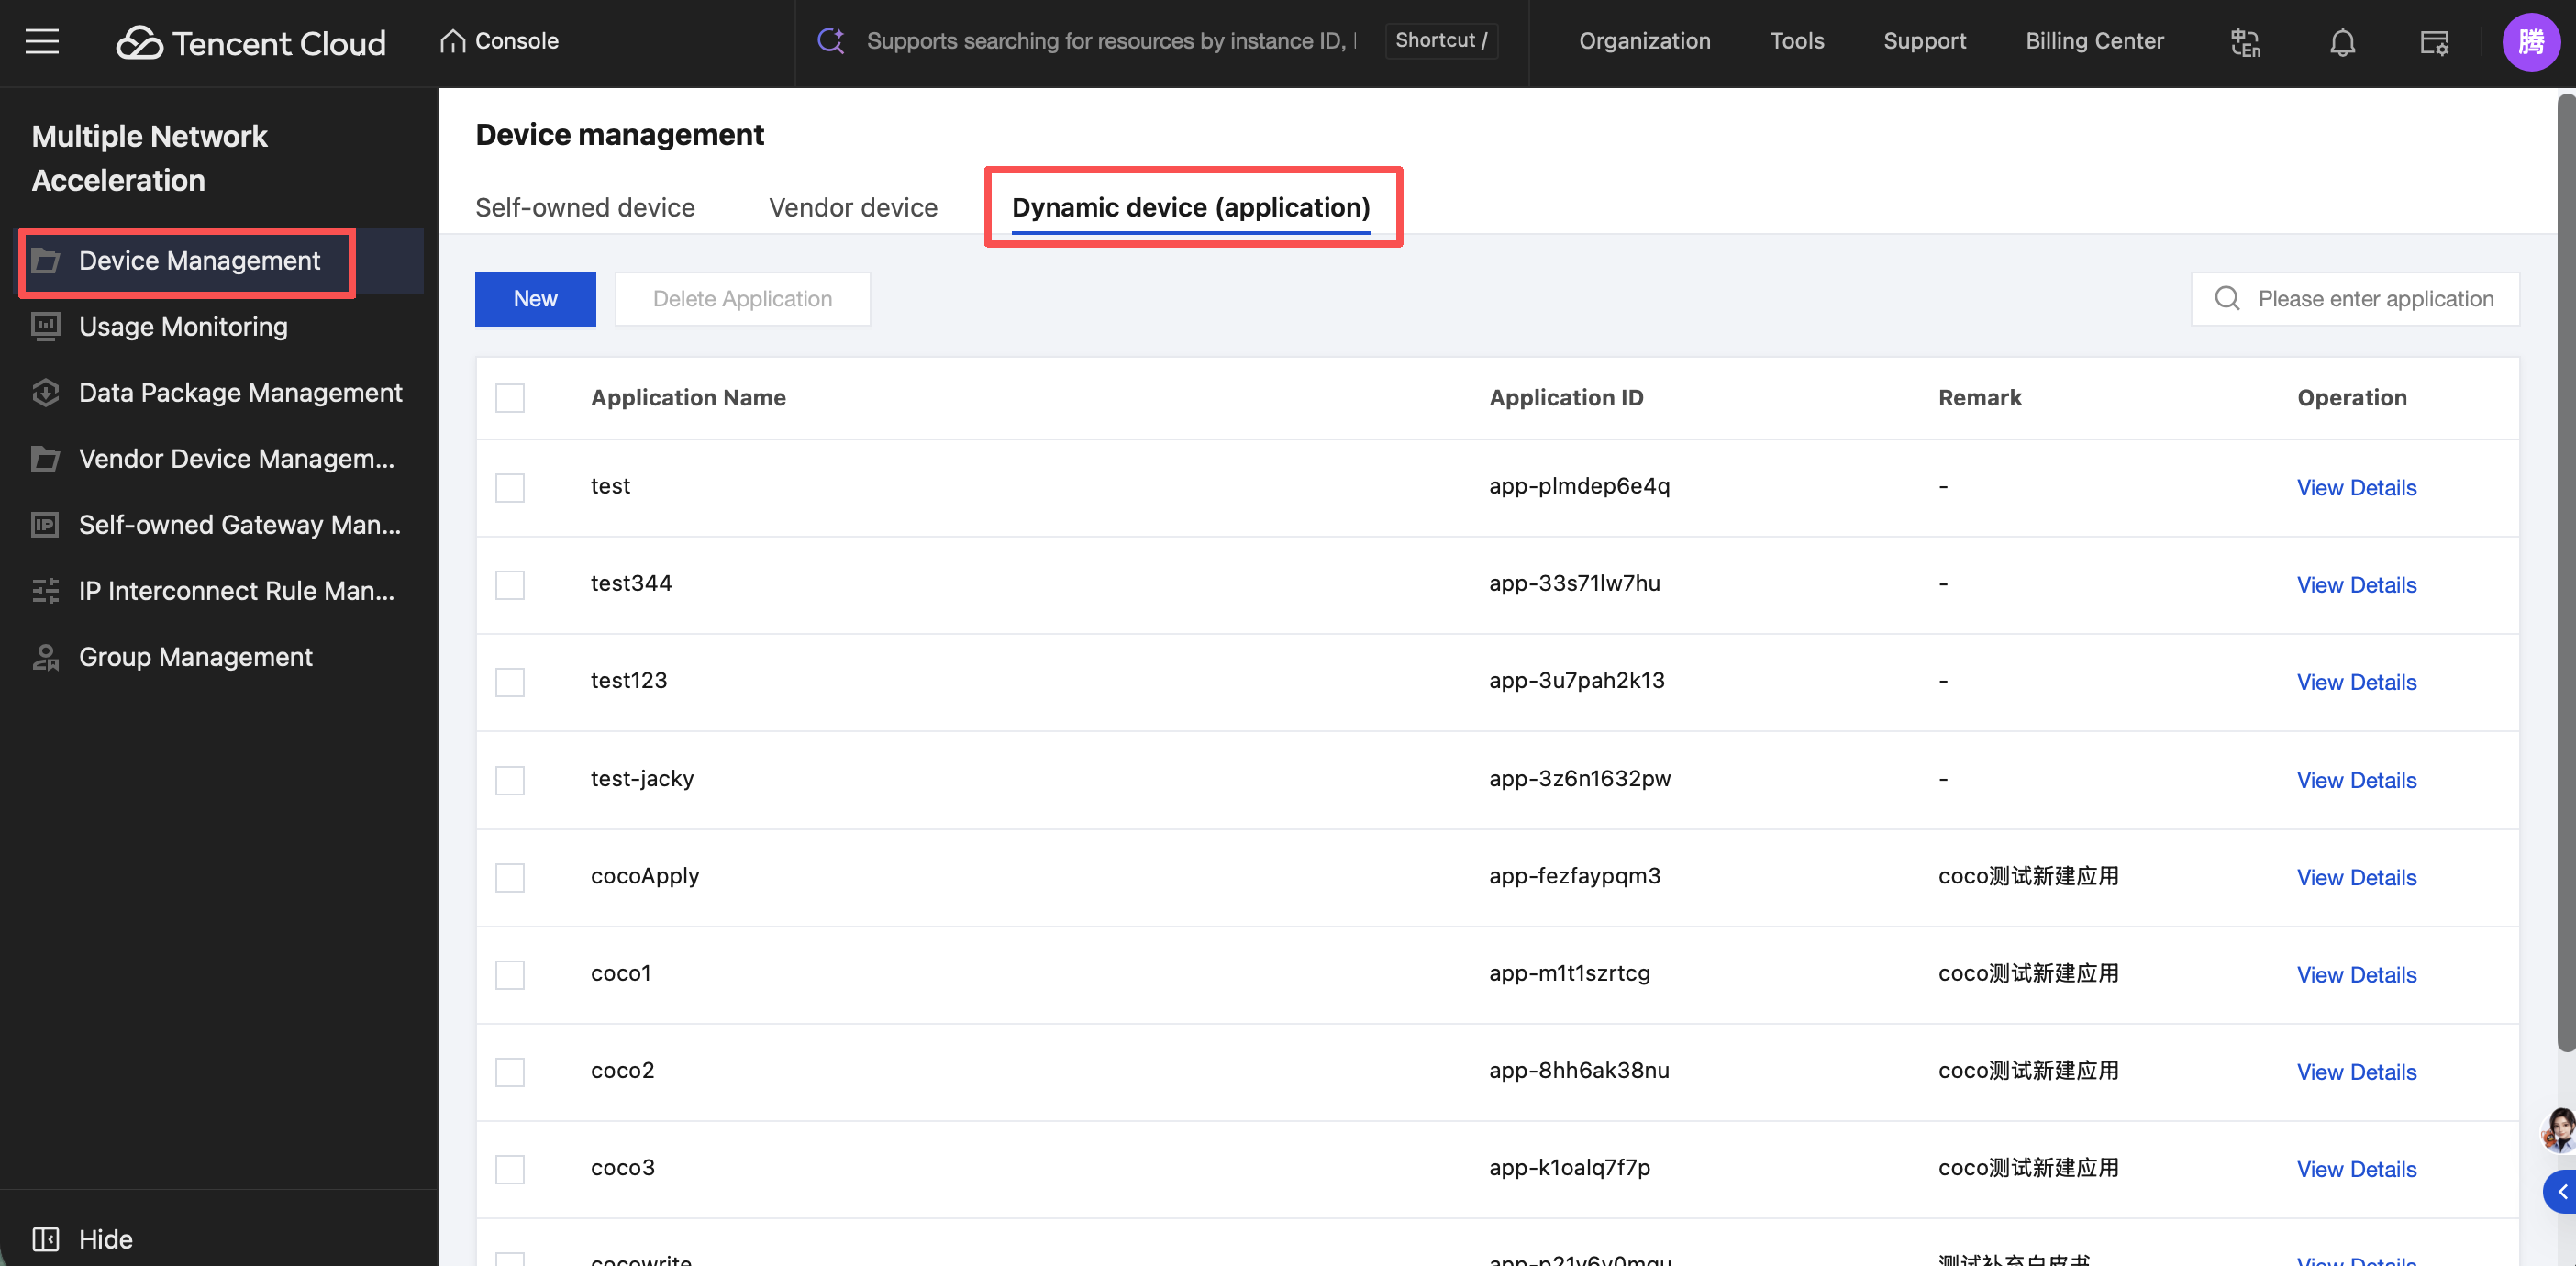
Dynamic Device (Application) Management
1.Creating a New App
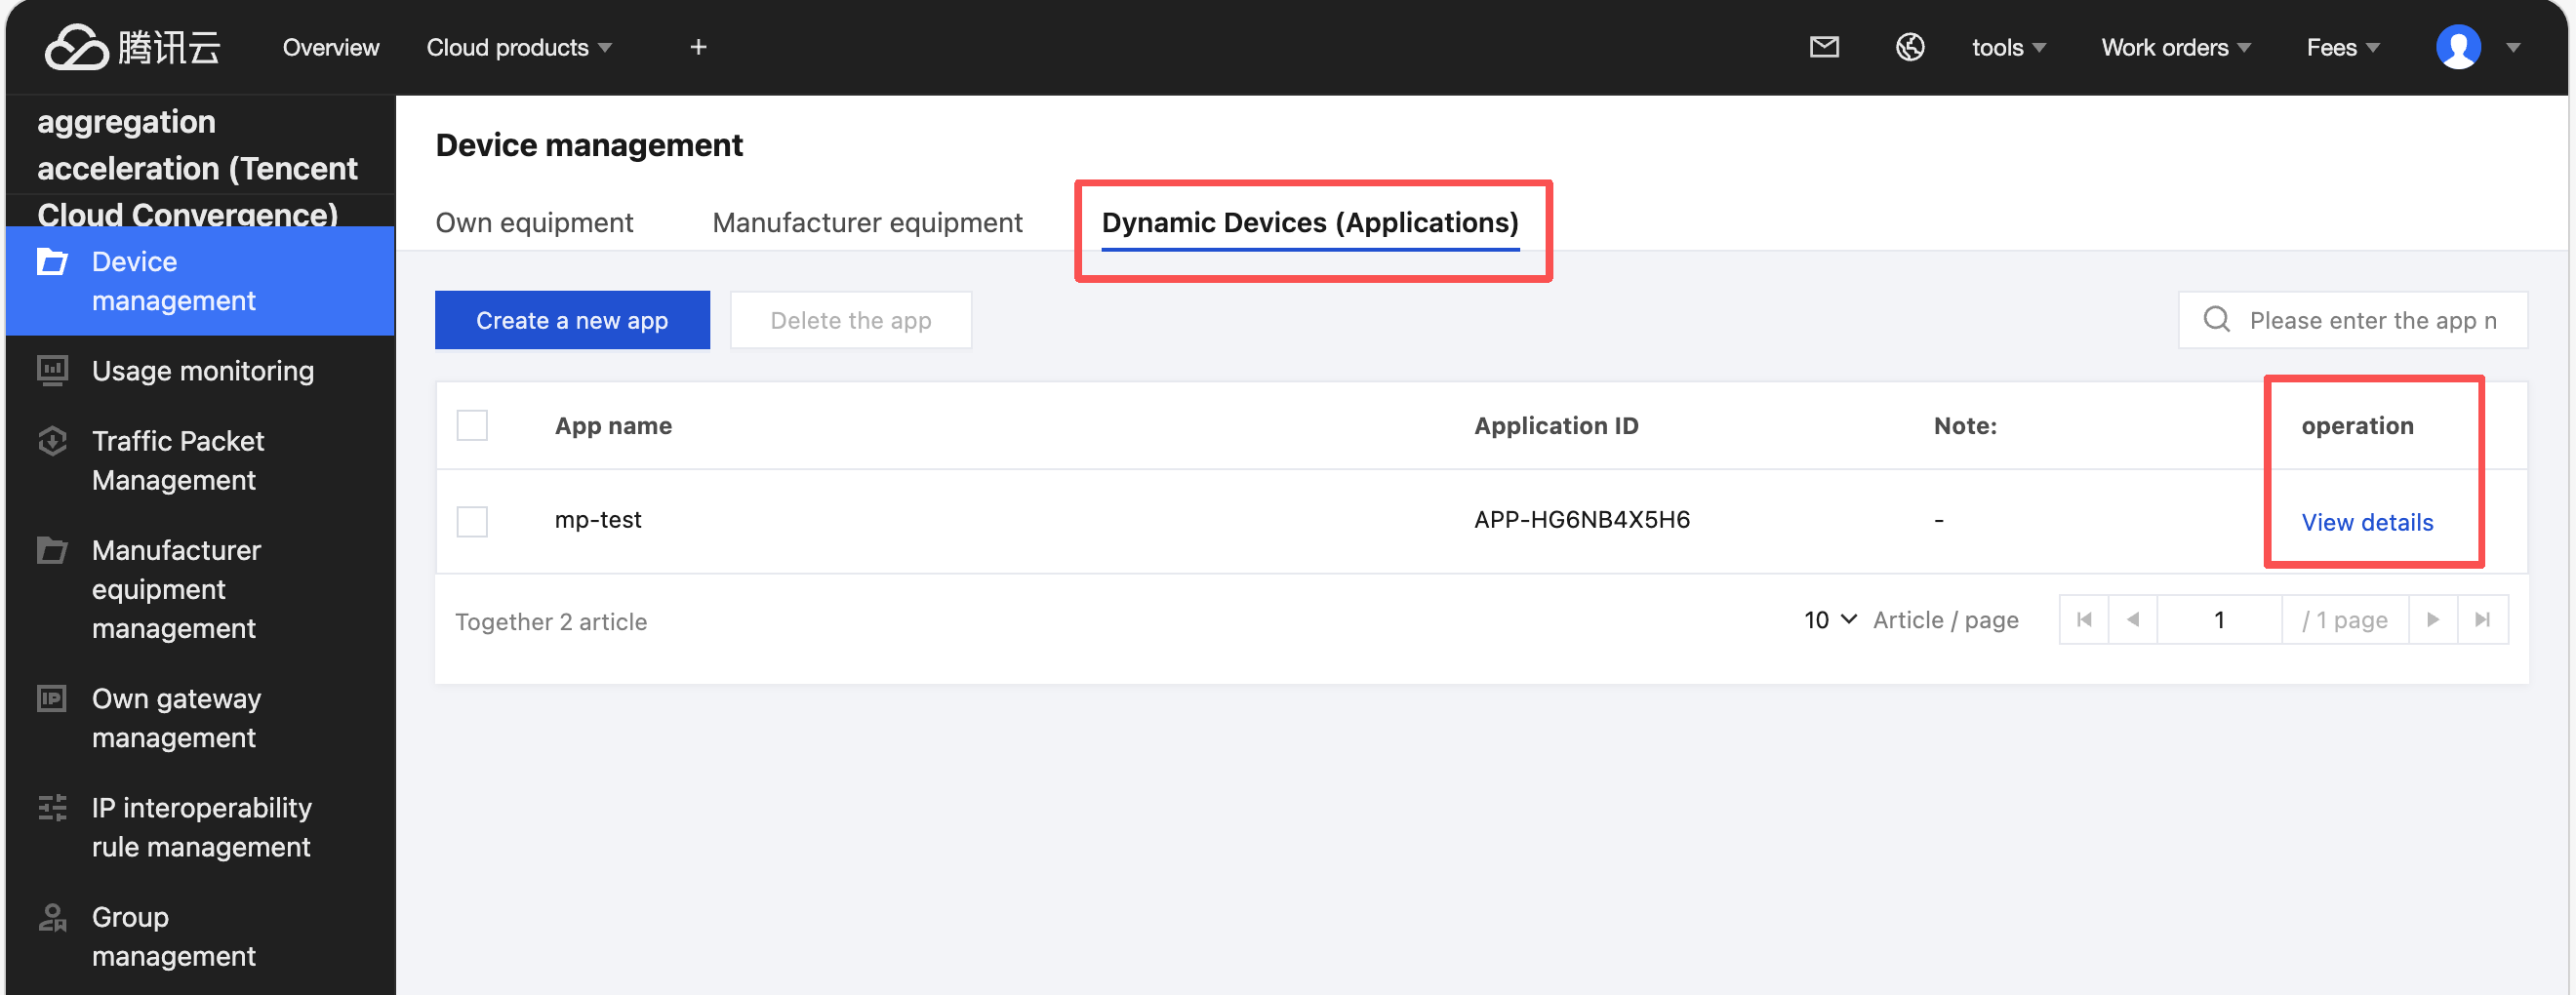
In the left menu bar, click Device Management, select Dynamic Devices (Applications) list, and enter the dynamic application management page.
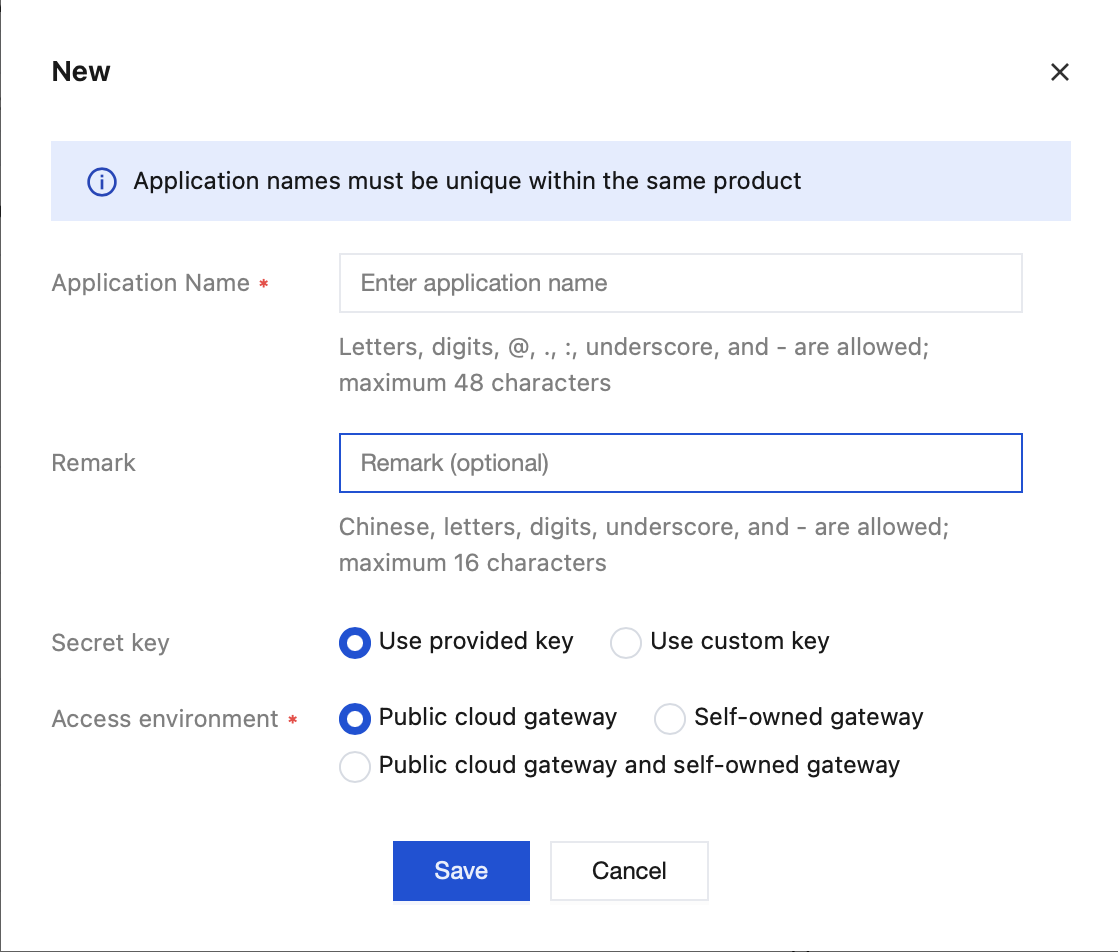
Click New to enter the new application page. On the page, enter the application name, fill in and set information sequentially, then click Save to successfully create a new application.
Note:
Key: It is recommended to preferentially select use the provided key.
Access environment: Customers can choose the gateway type to integrate.
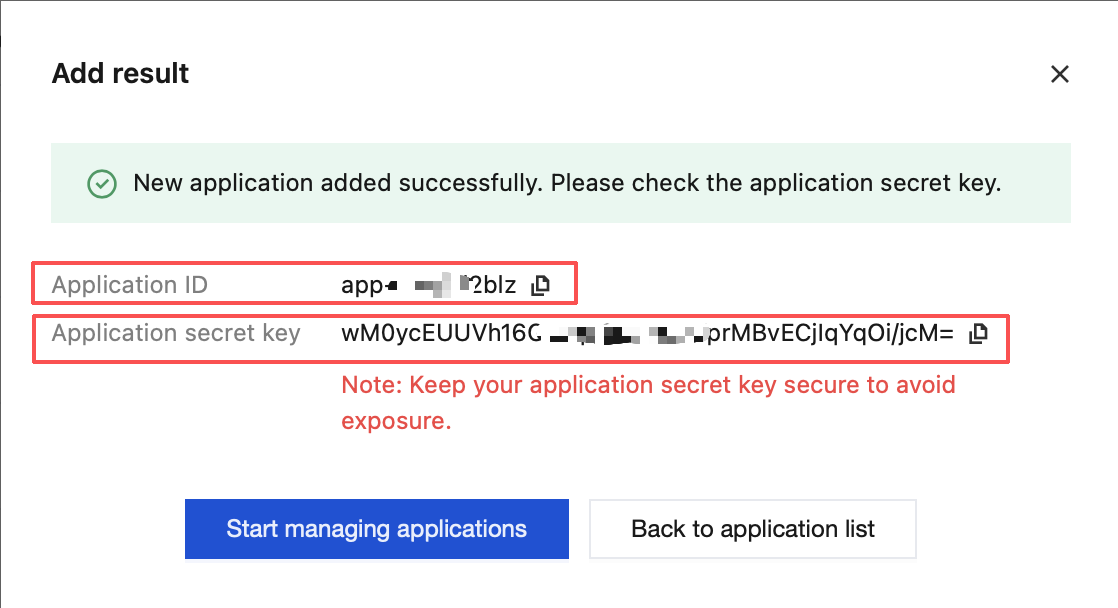
Upon successful device/application creation, the page will return the key dataKey. Keep it secure. If it is missing or forgotten subsequently, contact us for inquiry.
Customers using SDK integration need to perform signature operations, which are divided into Java, Objective-C, and Go language versions. See the introduction below.
Record the app ID and application key displayed on the console to assist in the subsequent generation and authentication of device Sign signatures for application creation.
Generate device Sign signatures for application creation
Generating device Sign signatures for application creation requires two parameters: the customer-defined business control device unique identifier (deviceName) and the application key returned upon successful creation in the figure. Use both parameters to launch the script and complete the generation of device Sign signatures for application creation.
Java Language
Option 1
package com.android.tencentvpn.util;
import io.jsonwebtoken.Jwts;
import io.jsonwebtoken.SignatureAlgorithm;
import java.security.Key;
import java.util.Date;
import javax.crypto.spec.SecretKeySpec;
public class SignGenerate{
private static final long EXPIRE_TIME = 72 * 60 * 60 * 1000; // expiration time, milliseconds
/**
* @param deviceName unique device identifier controlled by the business
* @param SecretKey application key returned by the cloud api
* @return The signature string required by the multi-network sdk Call via setSign finally
*
*/
public static String generateSign(String deviceName, String SecretKey){
try{
Date now = new Date();
Date expireDate = new Date(now.getTime() + EXPIRE_TIME);
Key key =
new SecretKeySpec(SecretKey.getBytes(), SignatureAlgorithm.HS256.getJcaName());
return Jwts.builder()
.claim("deviceName", deviceName)
.notBefore(now)
.expiration(expireDate)
.signWith(key)
.compact();
}catch (Exception e){
e.printStackTrace();
}
return "";
}
}
Objective-C Language
Option 1
Add pod 'JWT' to the podfile for JWT library integration
// .h file:
@interface SignGenerator: NSObject
/**
* @deviceName unique device identifier controlled by the business
* @param SecretKey application key returned by the cloud api
* @return The signature string required by the multi-network sdk Call via setSign finally
Call API setSign, input the app ID recorded when creating an application and the signature string, complete the device created by application creation, and set application signature authentication.
2.View Dynamic Device/App Details
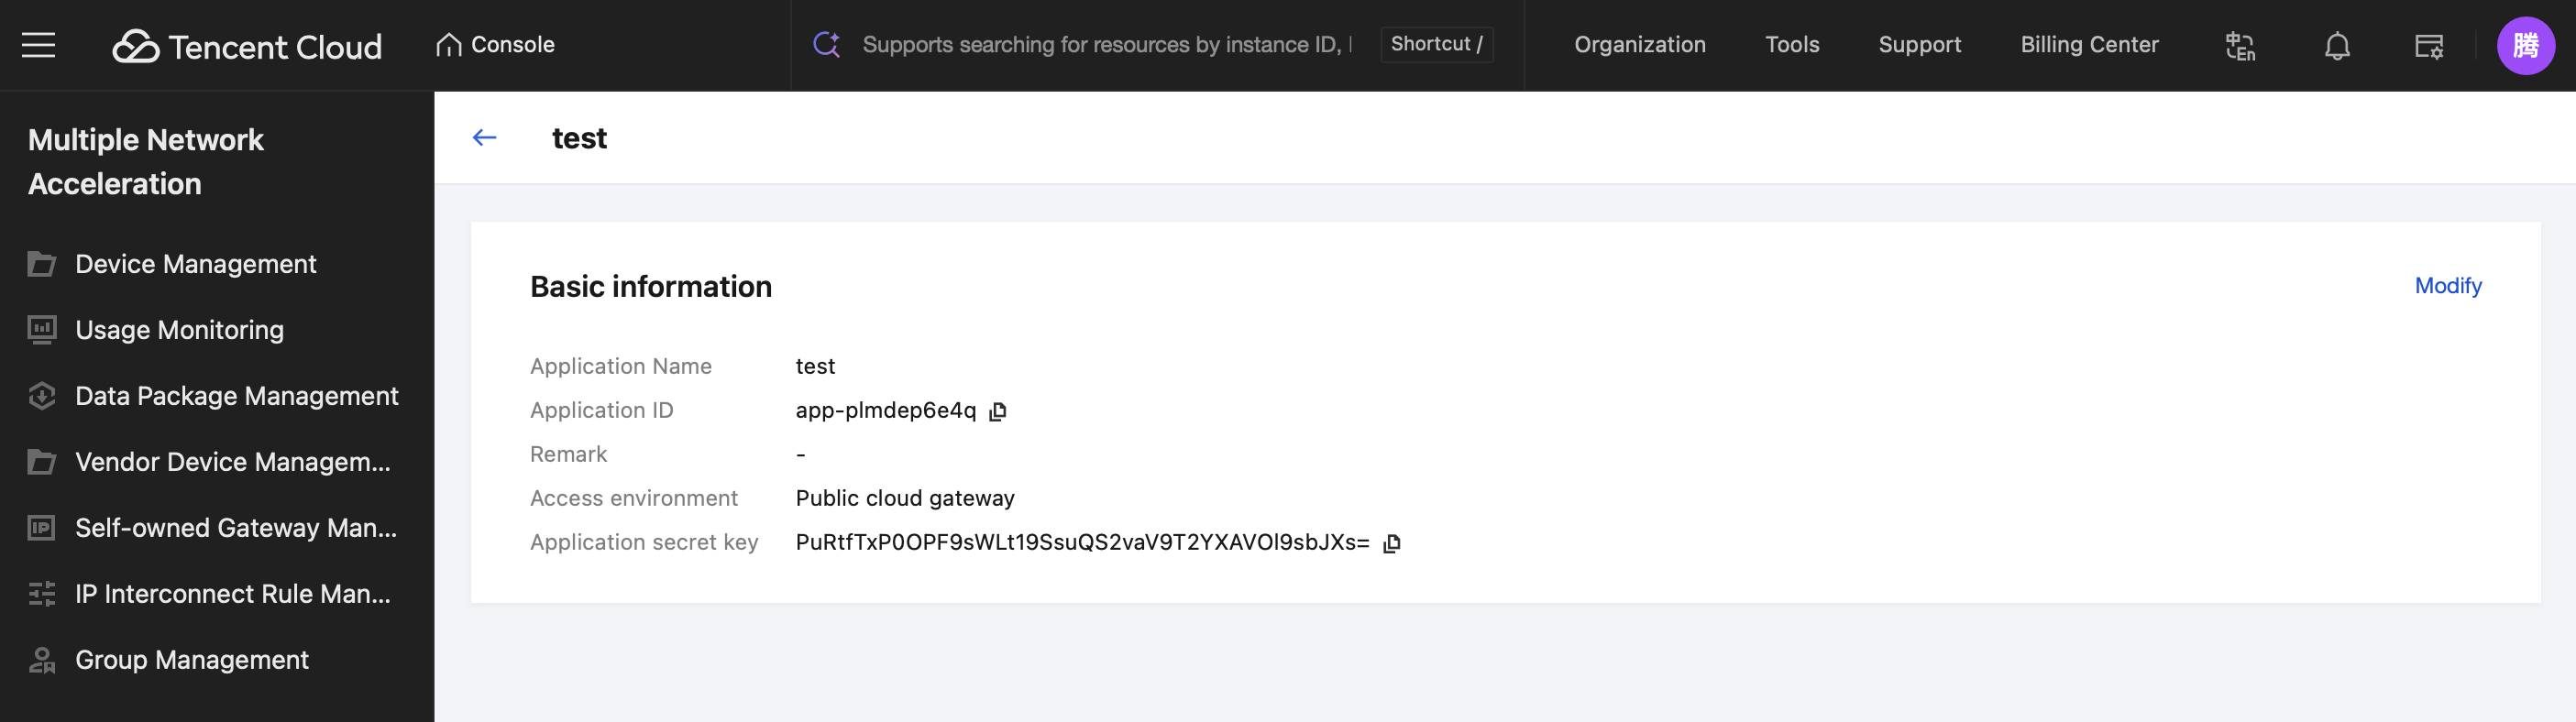
Click View Detail to enter the details page of the device/application.
The details page shows device information and device-related network conditions, displays aggregation server nodes and uplink/downlink rate statistics, and also shows the traffic package list.
Go to Device Management > Network Information, click View Real-Time Monitoring, and you will be redirected to the device's real-time traffic monitoring page.
3.Modify Real-Time Device/Application Information
In the Basic Info section of the application details page, click Modify to modify the device name and remark field.
4.Deleting the Application
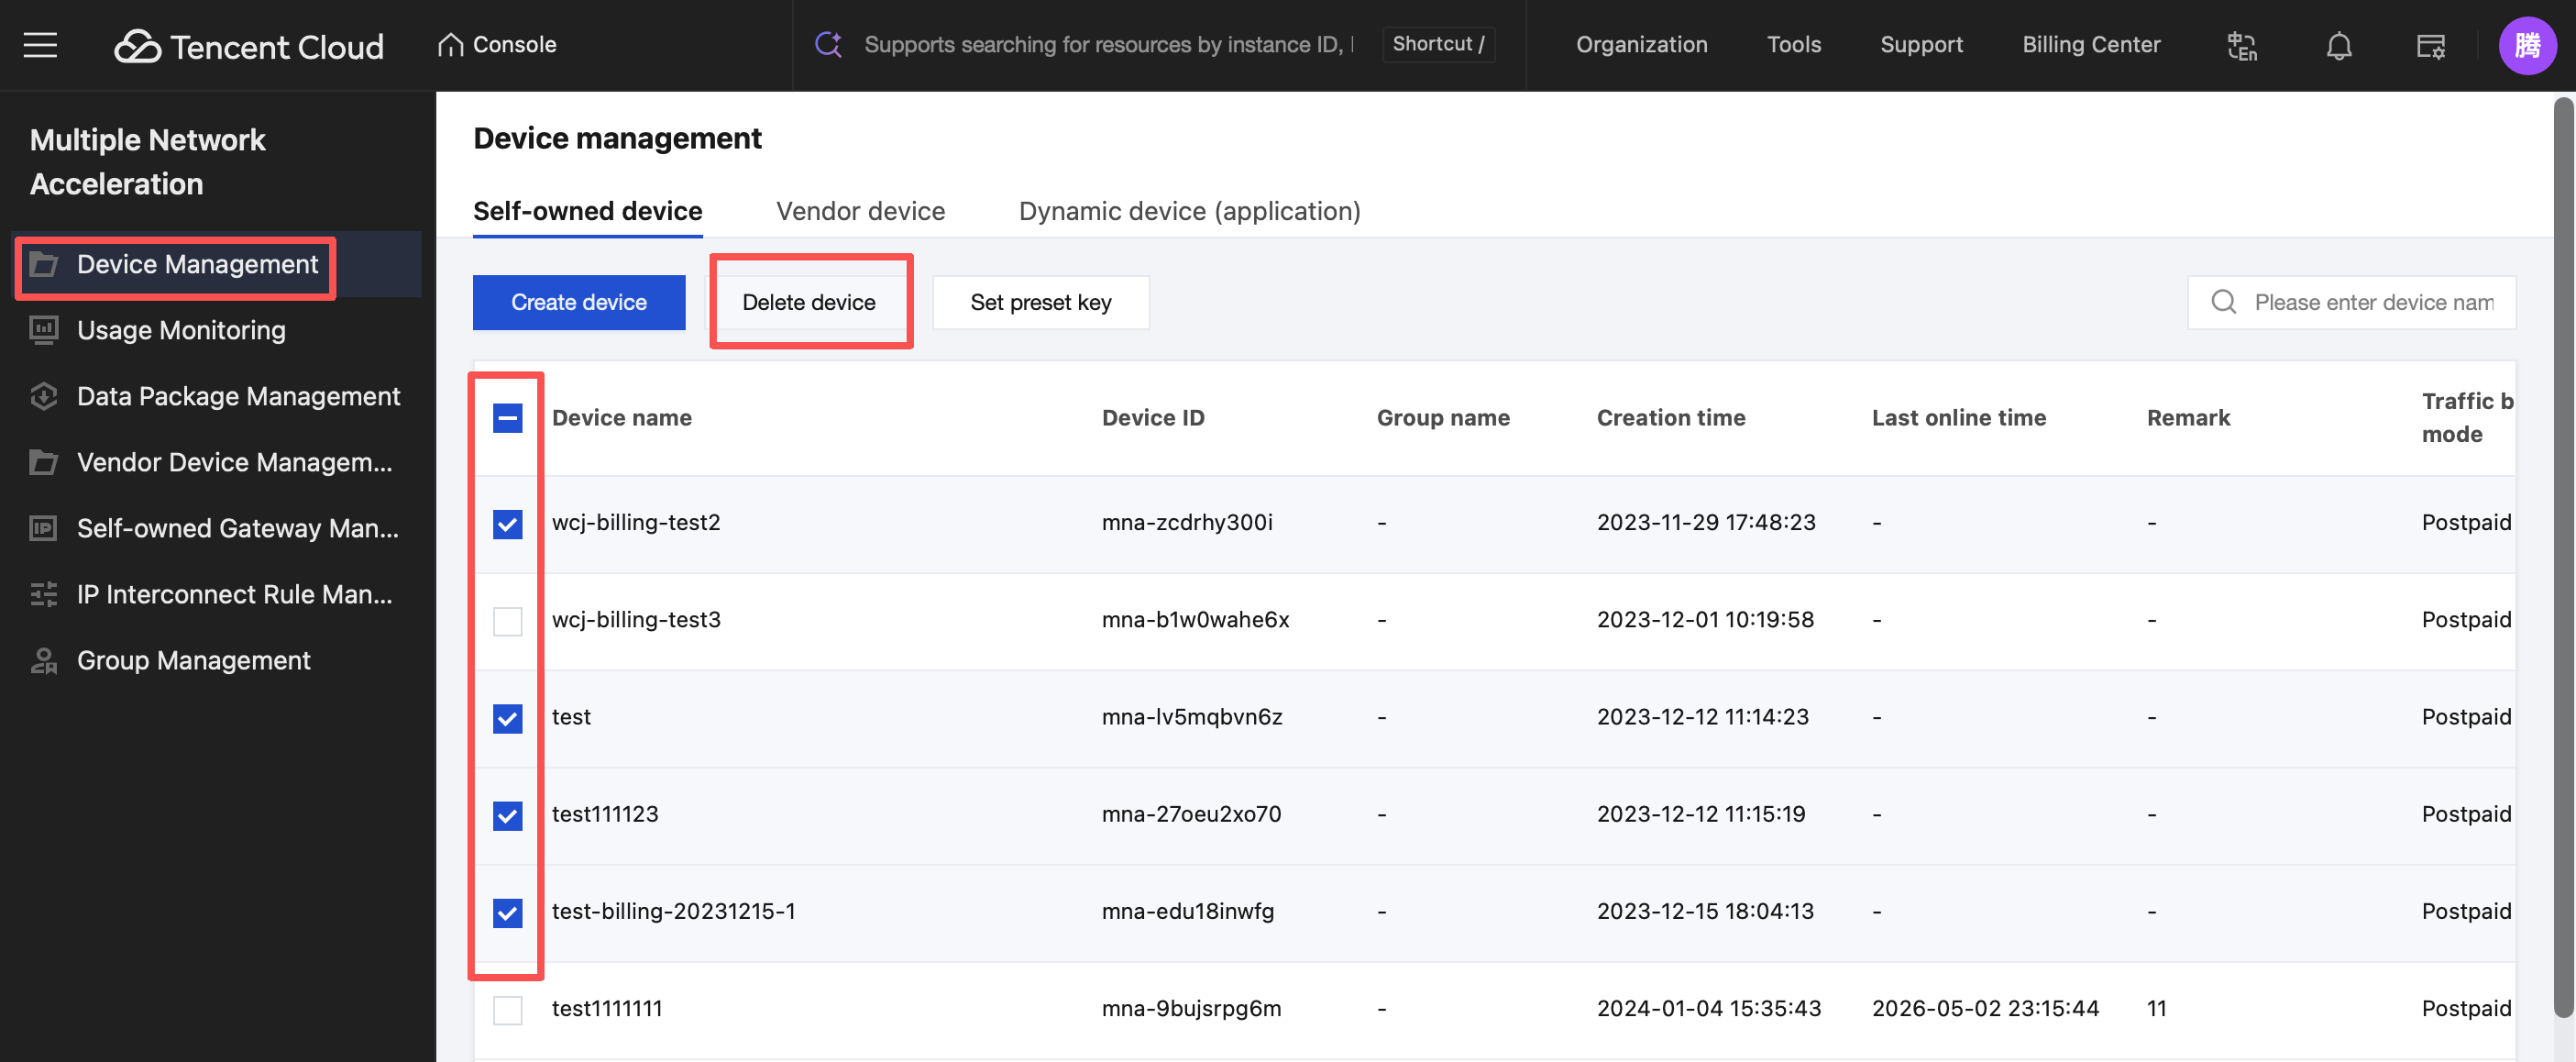
You can delete your device/application on the device management page. Deletion supports single selection and multiple selection of devices.
Select the checkbox in front of the device that needs to be deleted. At the top of the list, click Delete Device, and a double confirmation popup will pop up. Click Confirm to delete the device.
Note:
After the device/application is deleted, the device key will become invalid. The generated License authorization fees and traffic charges will not be discounted and will be settled based on the normal billing cycle.
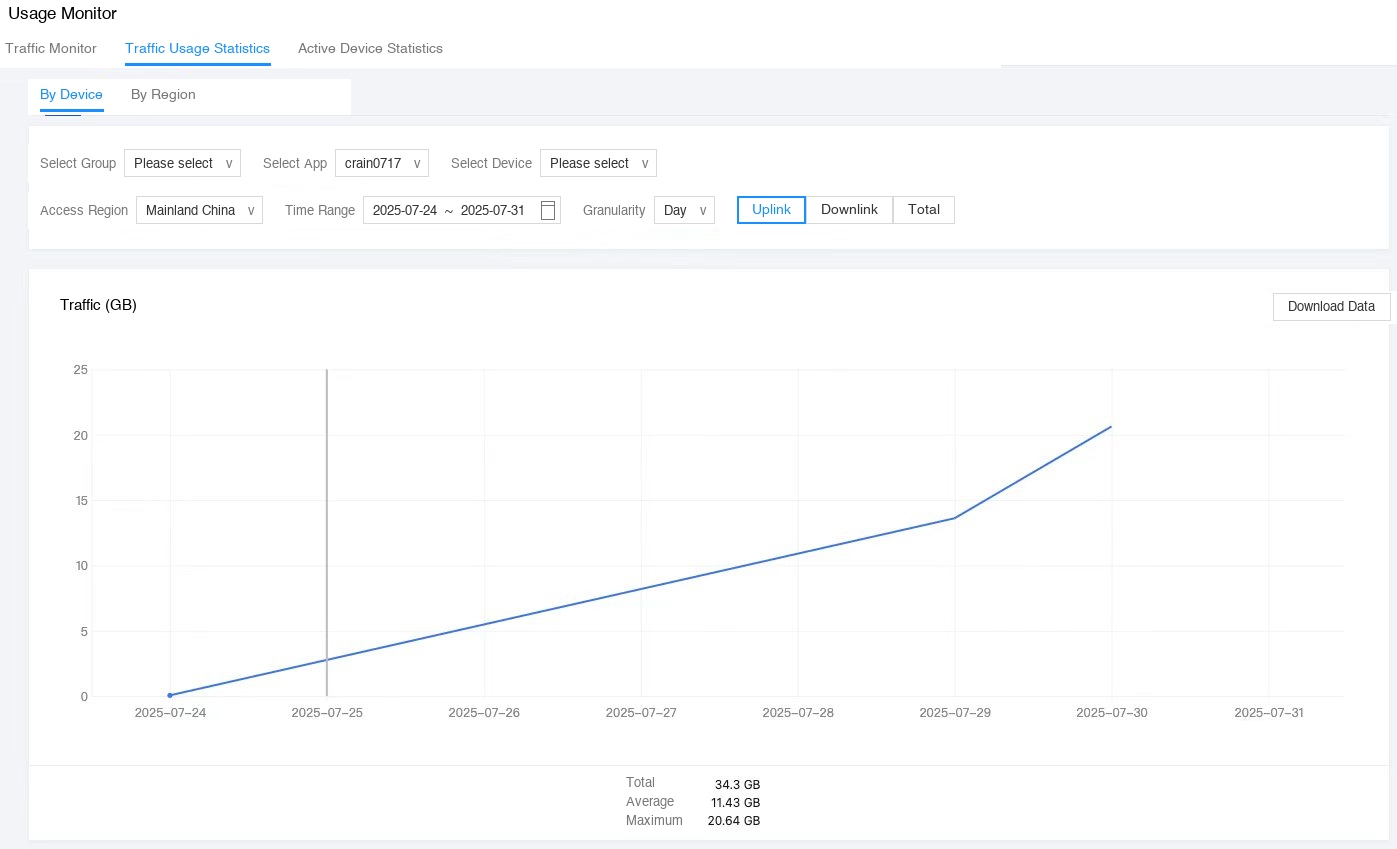
Usage Monitoring
The usage monitoring page displays the real-time network status of the selected device. Click the select device pull-down menu to switch the selected device. Multiple selection can be used to set the metrics for display.
In the operation card, click data download to export the current data content being shown.
Traffic Package Management
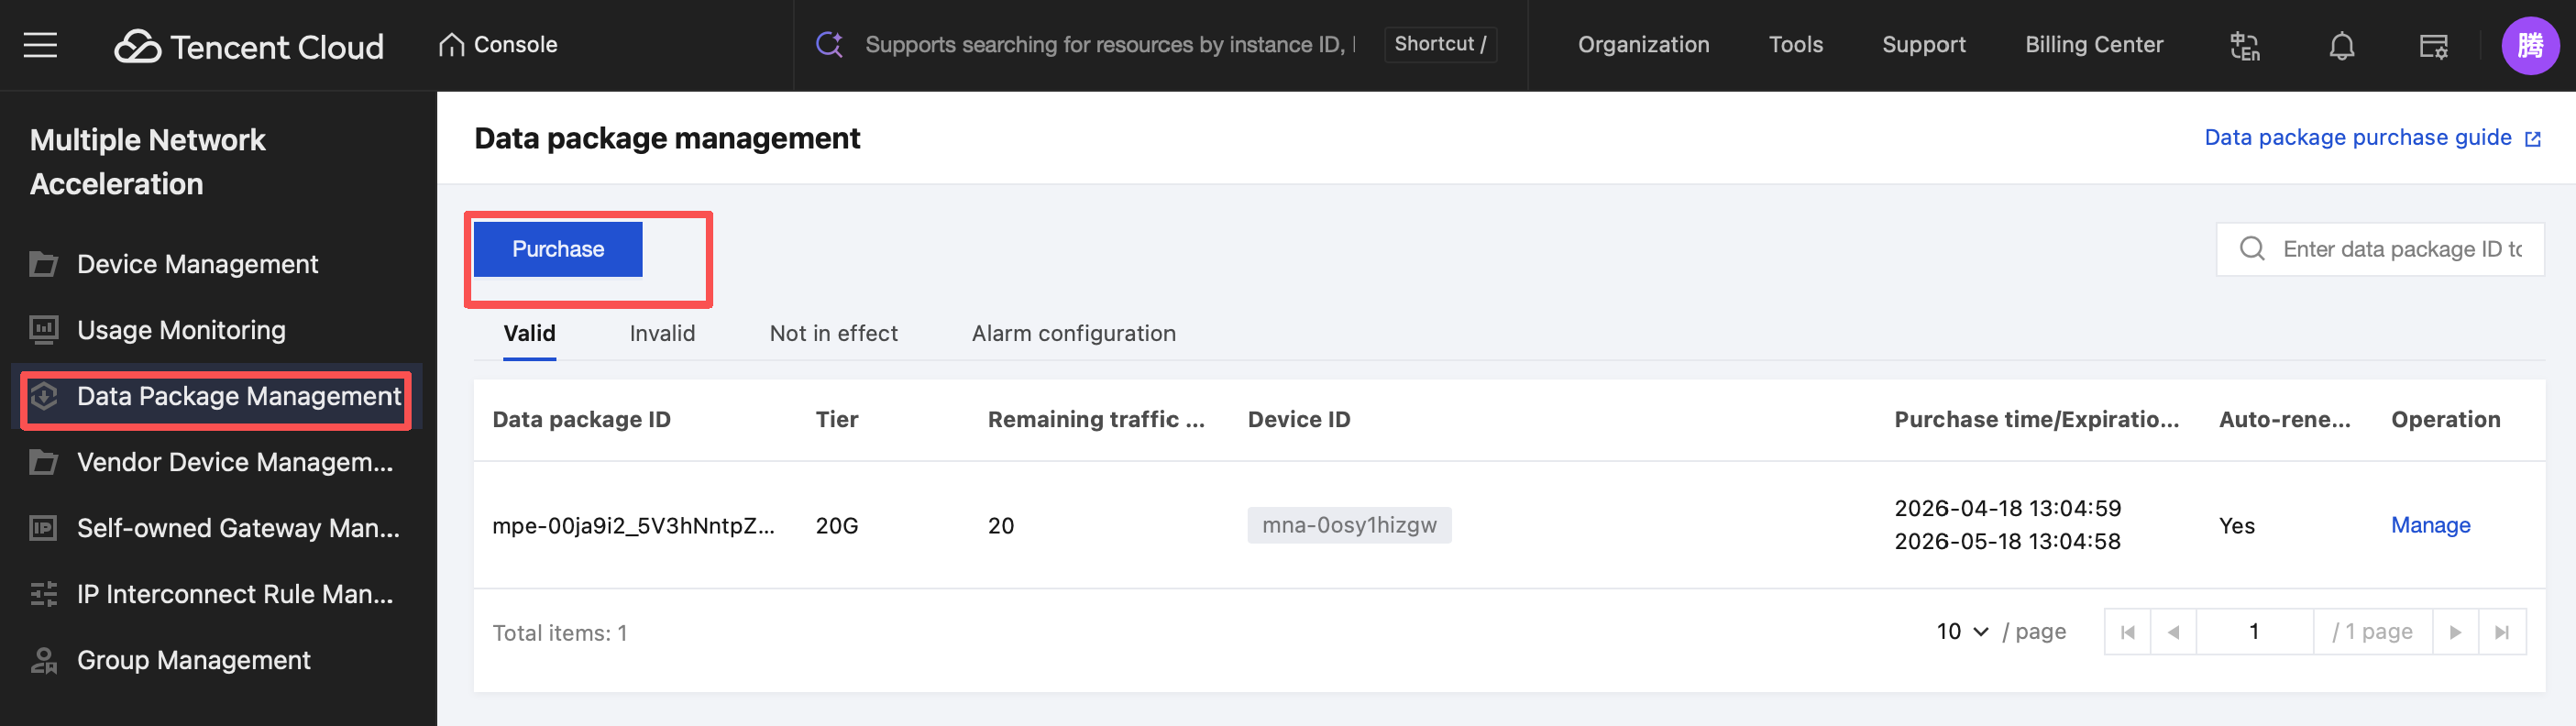
Multiple Network Acceleration allows you to view the usage of data transfer plans under your account through the console. Click Data Package Management in the left sidebar to view active, inactive, and pending data transfer plans, as well as alarm configurations, in the plan list.
The following table describes the information items on the page shown in the figure above.
Information Item
Description
Traffic Package ID
The system automatically generates a unique traffic package ID after a successful purchase.
Tier
The resource tier included in the purchased traffic package.
Remaining Traffic (GB)
The remaining traffic usage, allowing you to more intuitively view the usage and remaining balance of the traffic package.
Device ID
The device bound after a traffic package is purchased. The system automatically generates a unique device ID when the device is created.
Purchase Time/Expiration Time
The time when the traffic package is successfully purchased / the time when the current traffic package expires, which is generally the same day of the next month.
Auto-renewal or Not
Whether to enable auto-renewal when a traffic package is purchased (auto-renewal after the traffic package expires).
Operation
Go to the traffic package management configuration page to further modify the details of the traffic package, including the bound device, whether to enable auto-renewal, and change the traffic package tier.
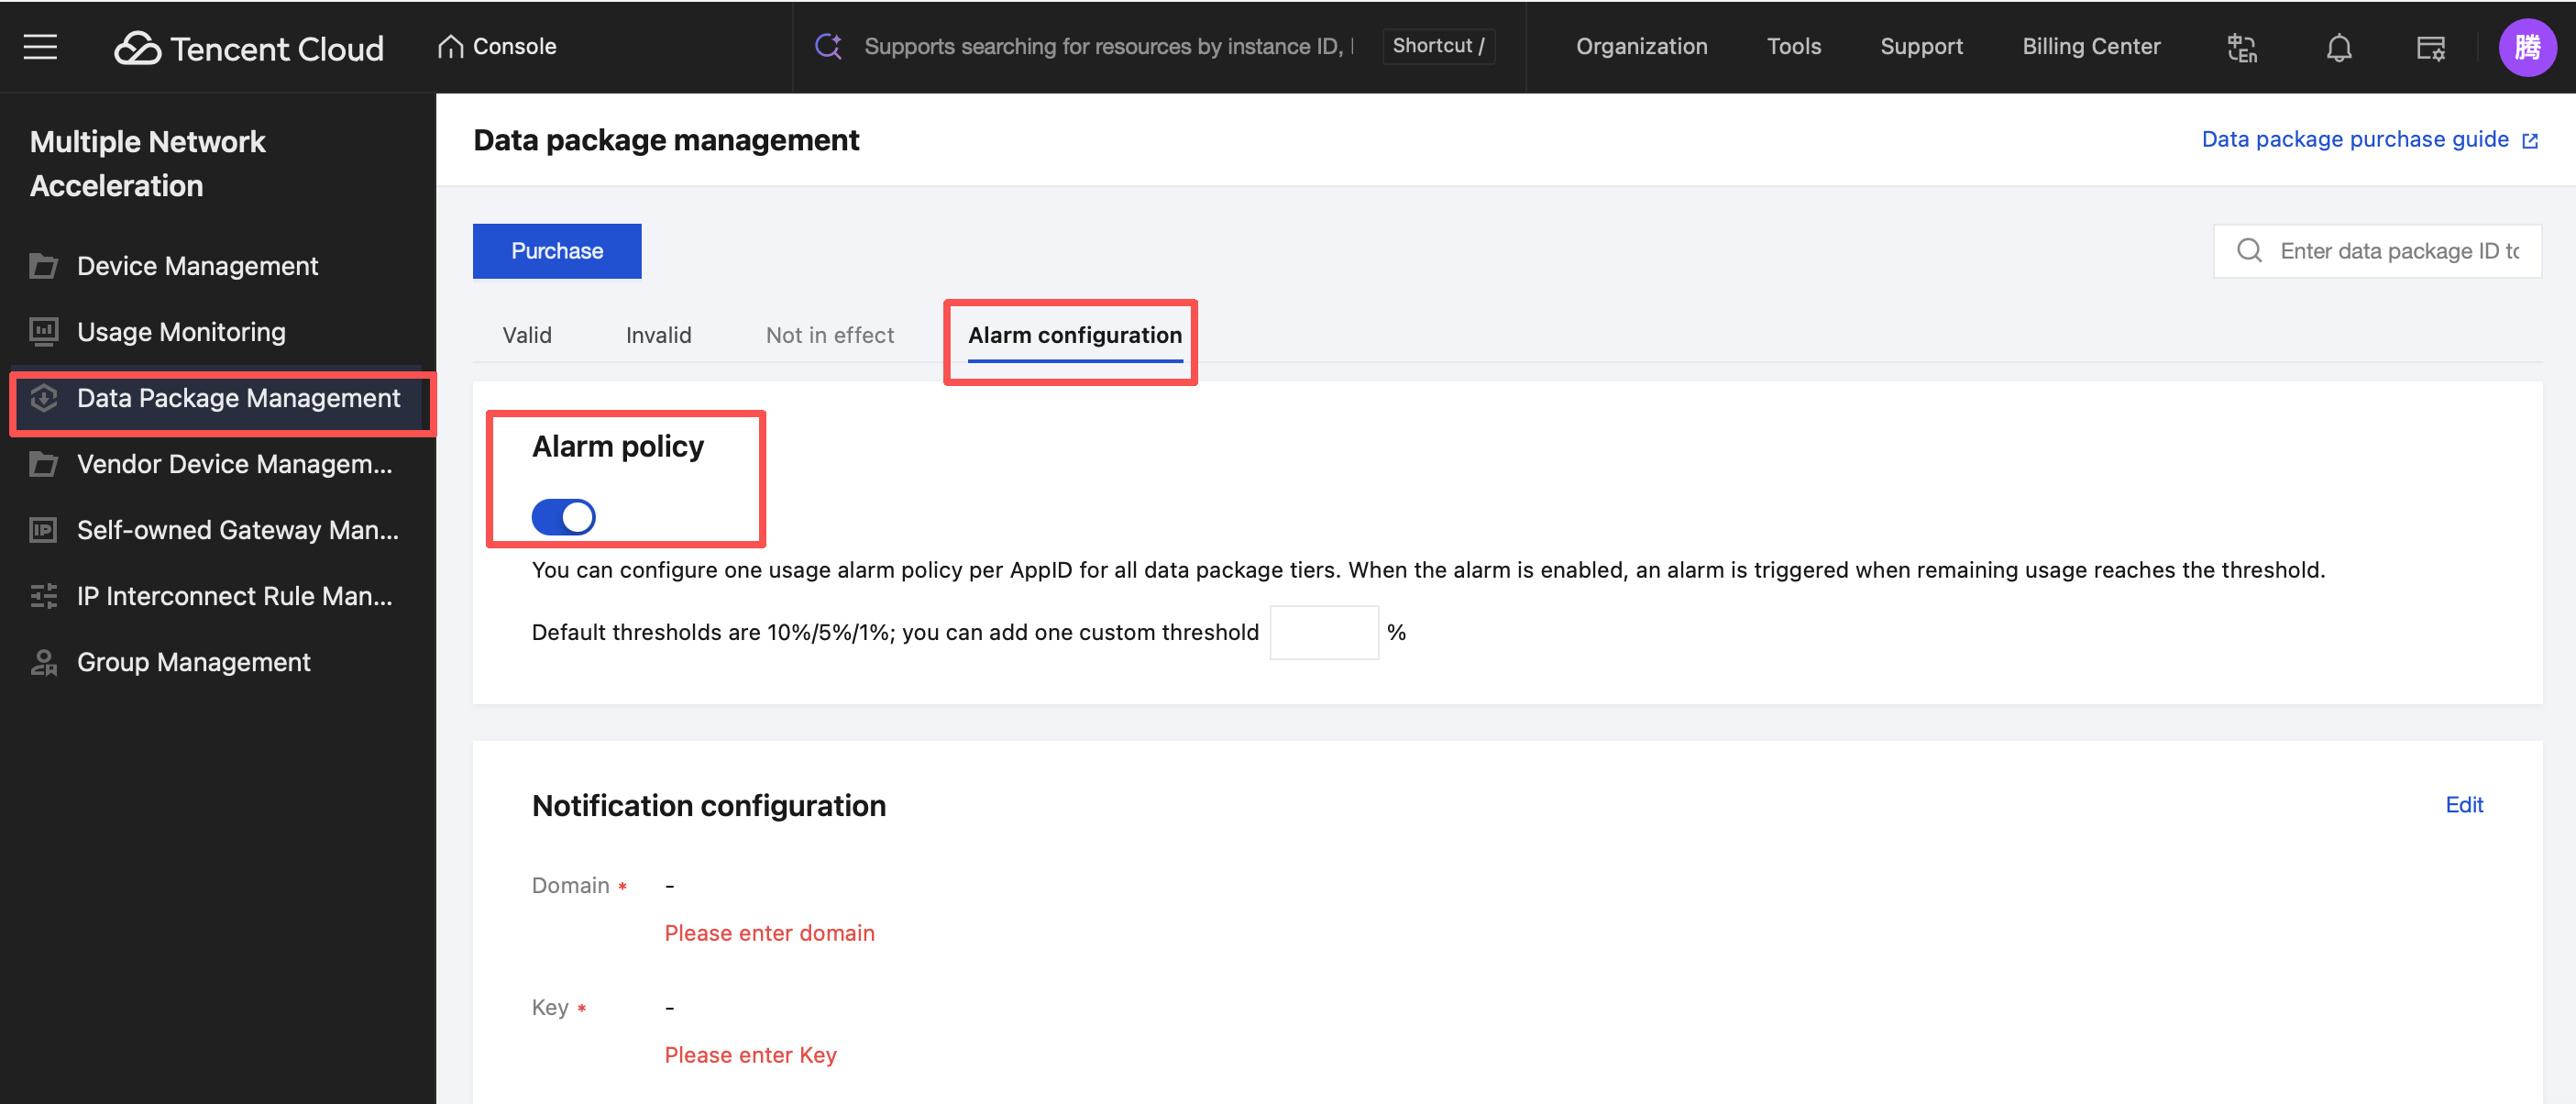
Alarm Configuration
On the Traffic Package Management > Alarm Configuration page, click Alarm policy to set alarm policies and customize the alarm threshold.
Multiple Network Acceleration supports setting alarm configuration for data transfer plans. When the remaining quota is consumed to the alert threshold, you will receive an alert reminder.
When the remaining quota of the current traffic package reaches the set threshold, you will receive an alert notification: "Traffic package ID: xxxx remaining quota is below xx% and about to run out. If automatic renewal is enabled, it will auto-renew after exhausted. Automatic renewal can be canceled at any time."
When the purchased traffic package is fully used, you will receive an alarm notification again: "Traffic package ID: xxxx has been exhausted. If automatic renewal is enabled, it will auto-renew upon expiration."
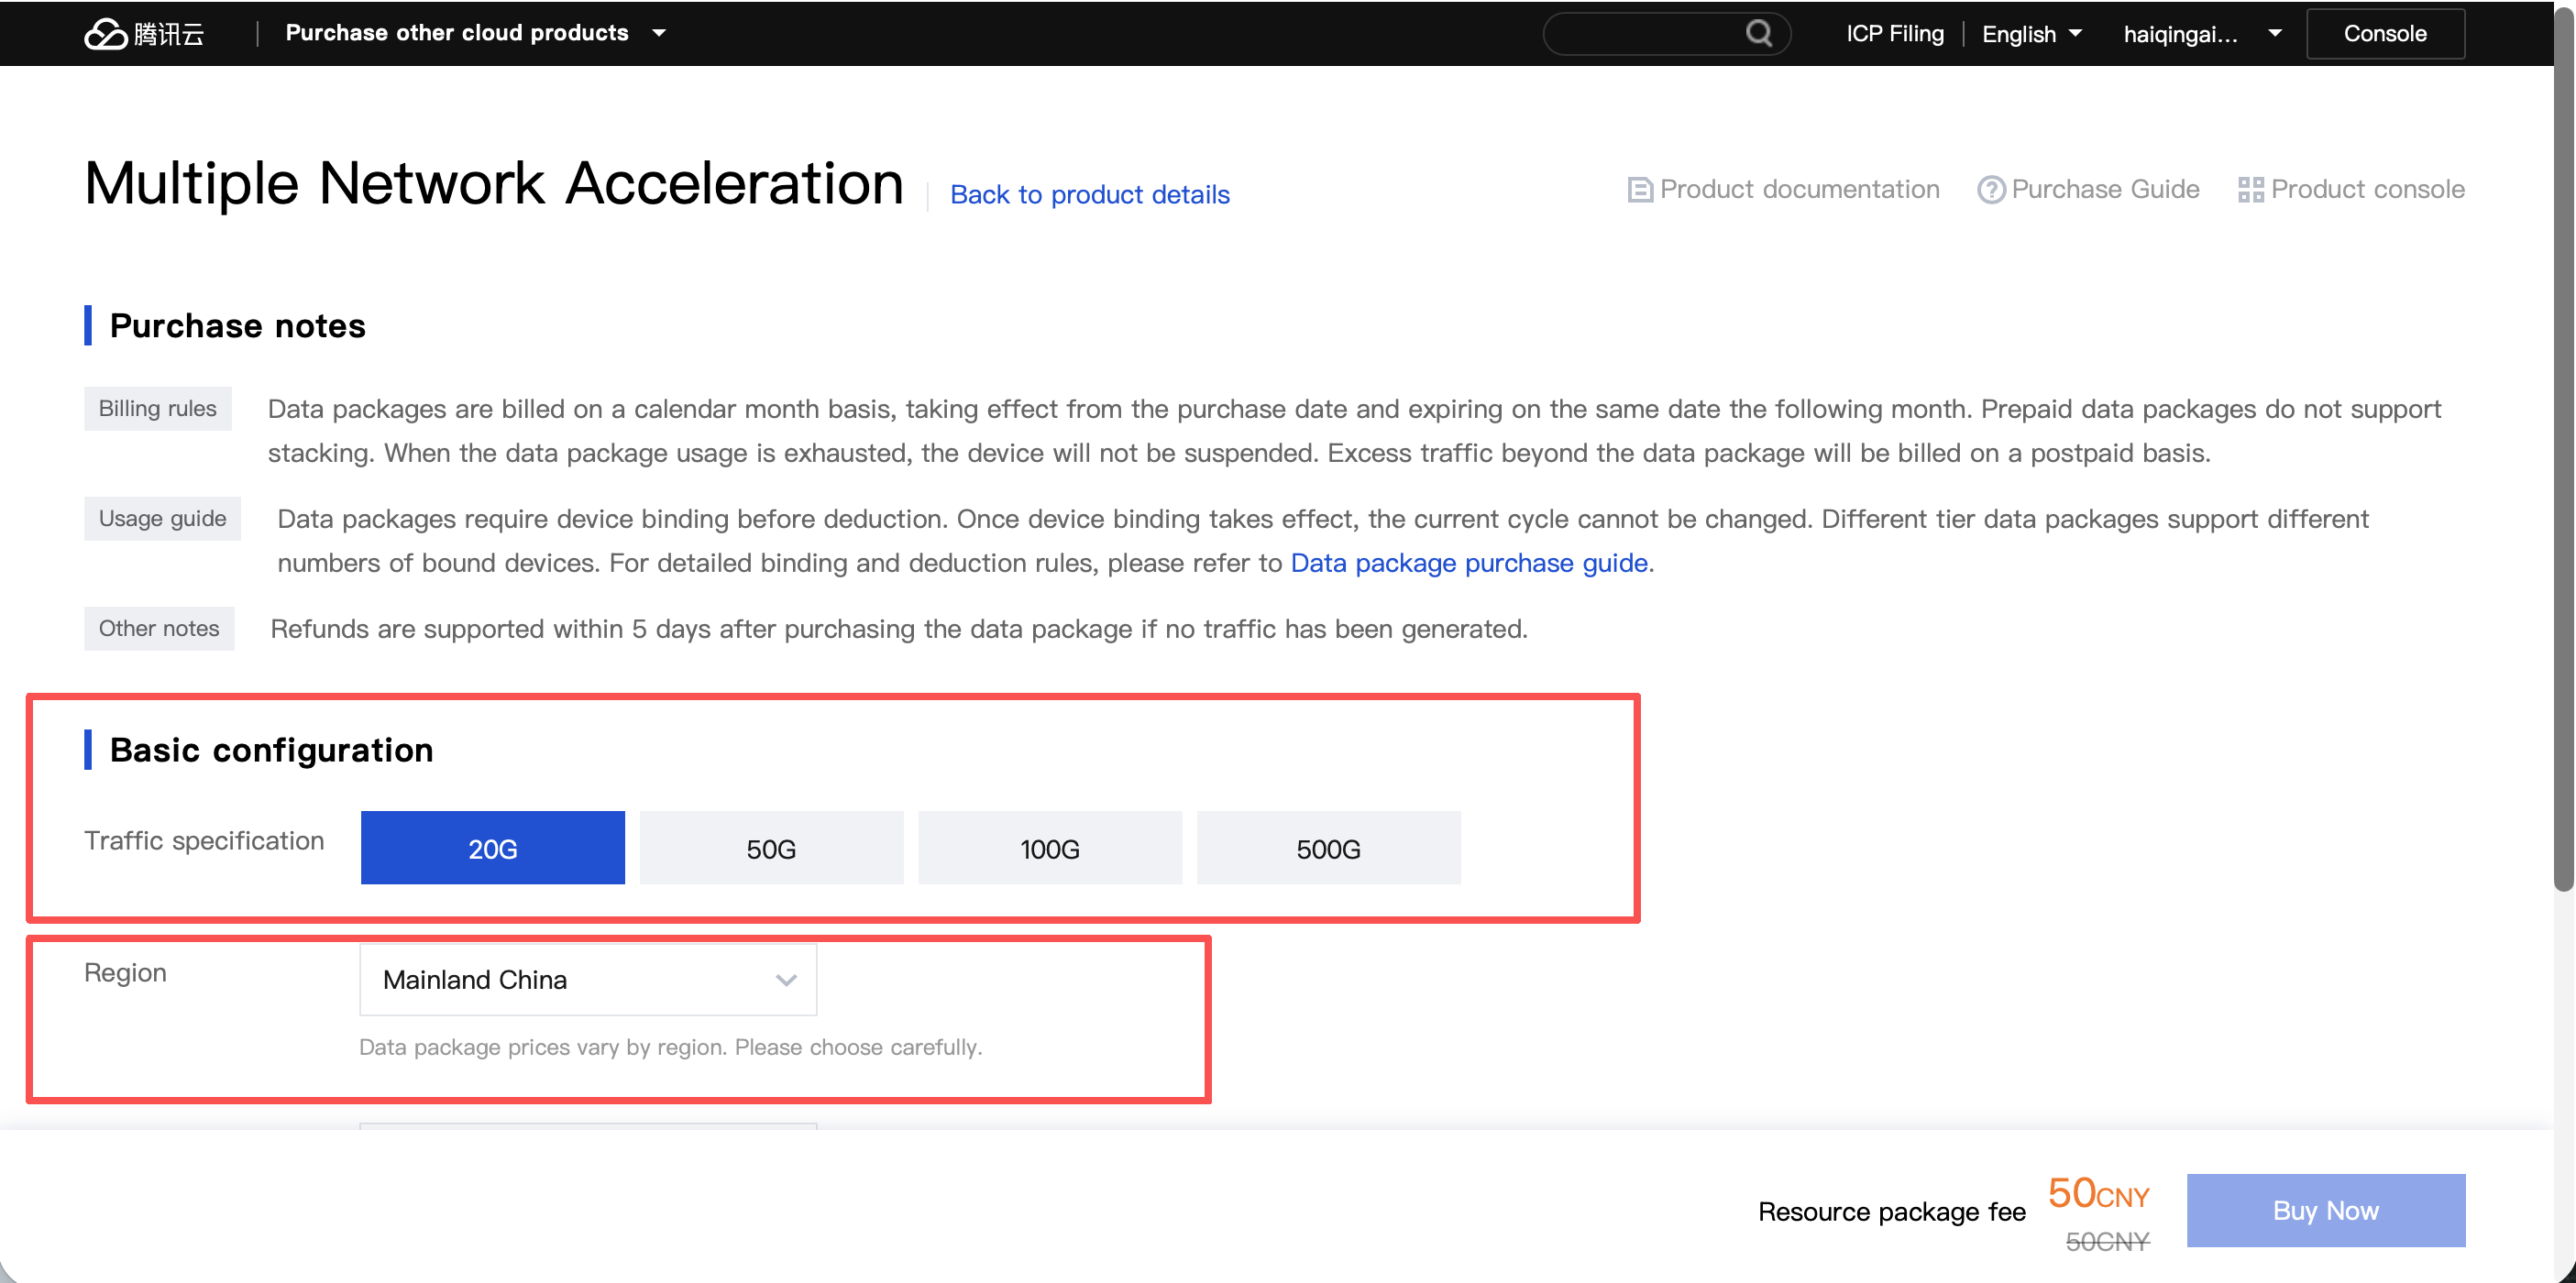
Data Transfer Plan Purchase
Click Purchase to enter the data transfer plan purchase interface.
Select the traffic specification, device, and whether auto-renewal or not, then click Purchase Now in the bottom-right corner to complete the data transfer plan purchase.
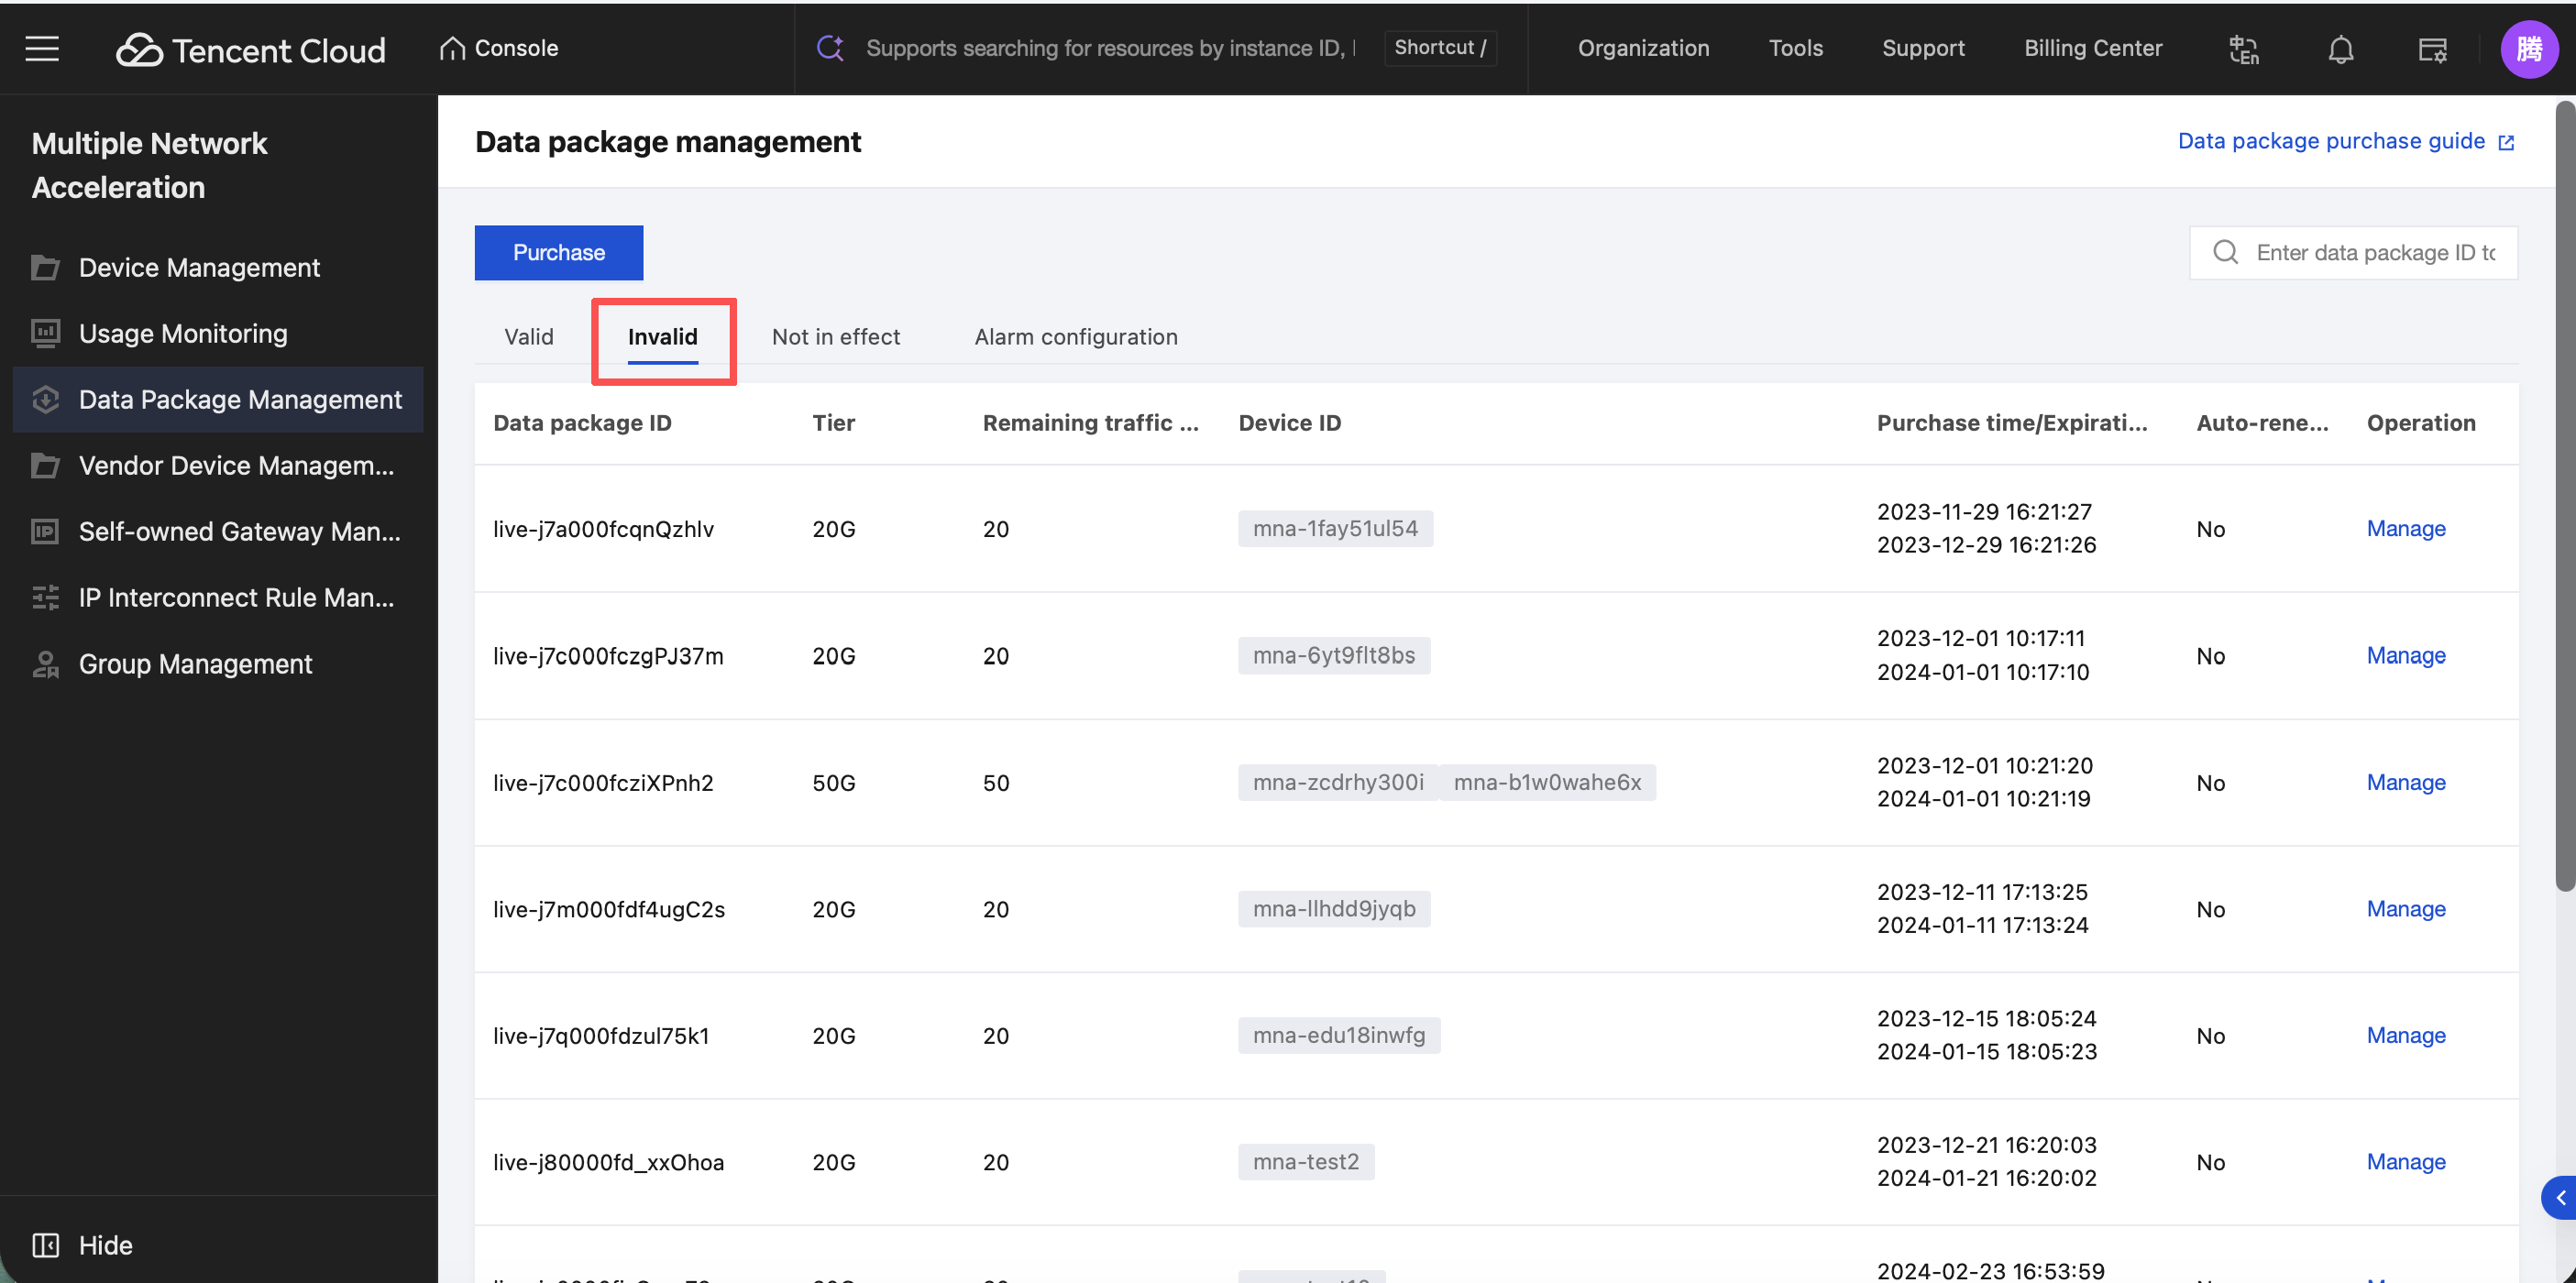
Invalid Traffic Package Viewing
Click Invalid to view expired or used up data transfer plans.
Private Gateway Management
After a customer's private gateway is managed, active gateways can be seen on the private gateway management page and searched by name.
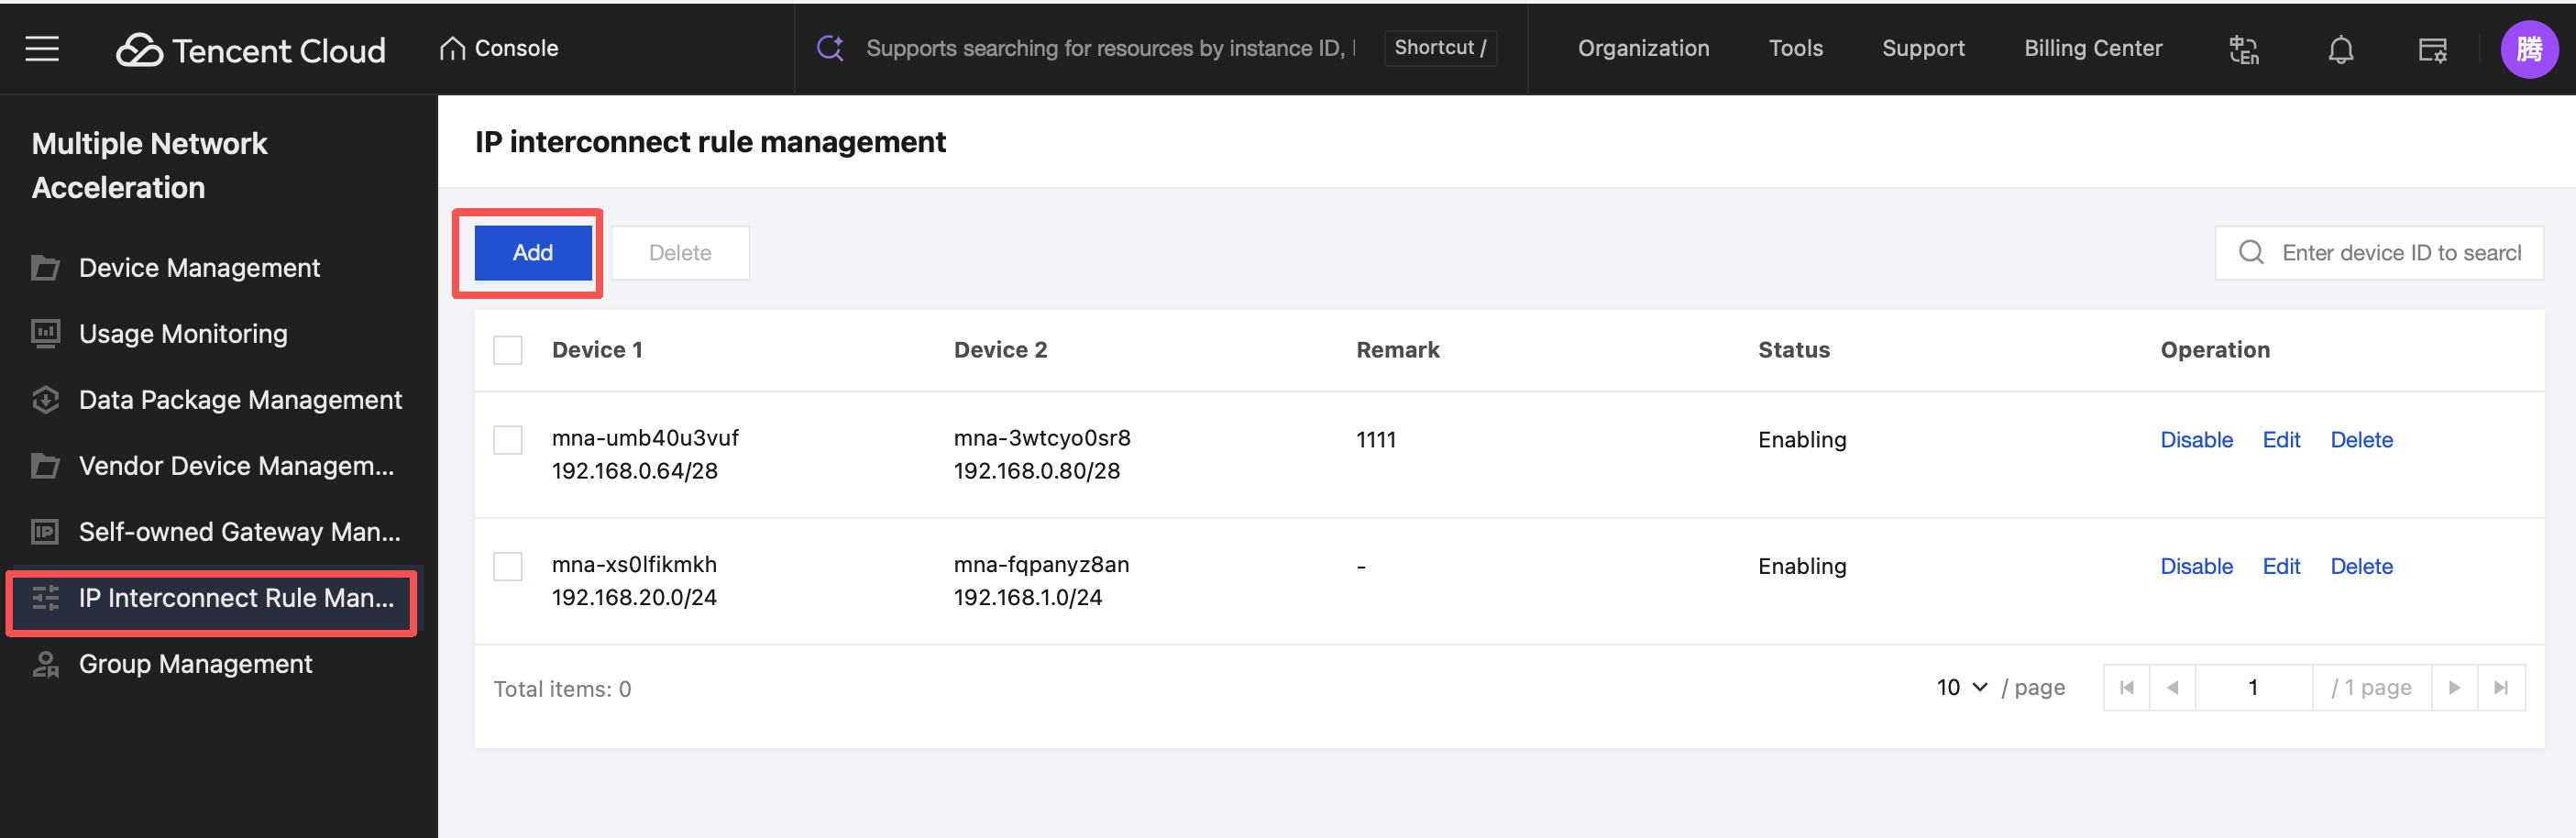
IP Interconnection Rule Management
IP Interconnection Configuration
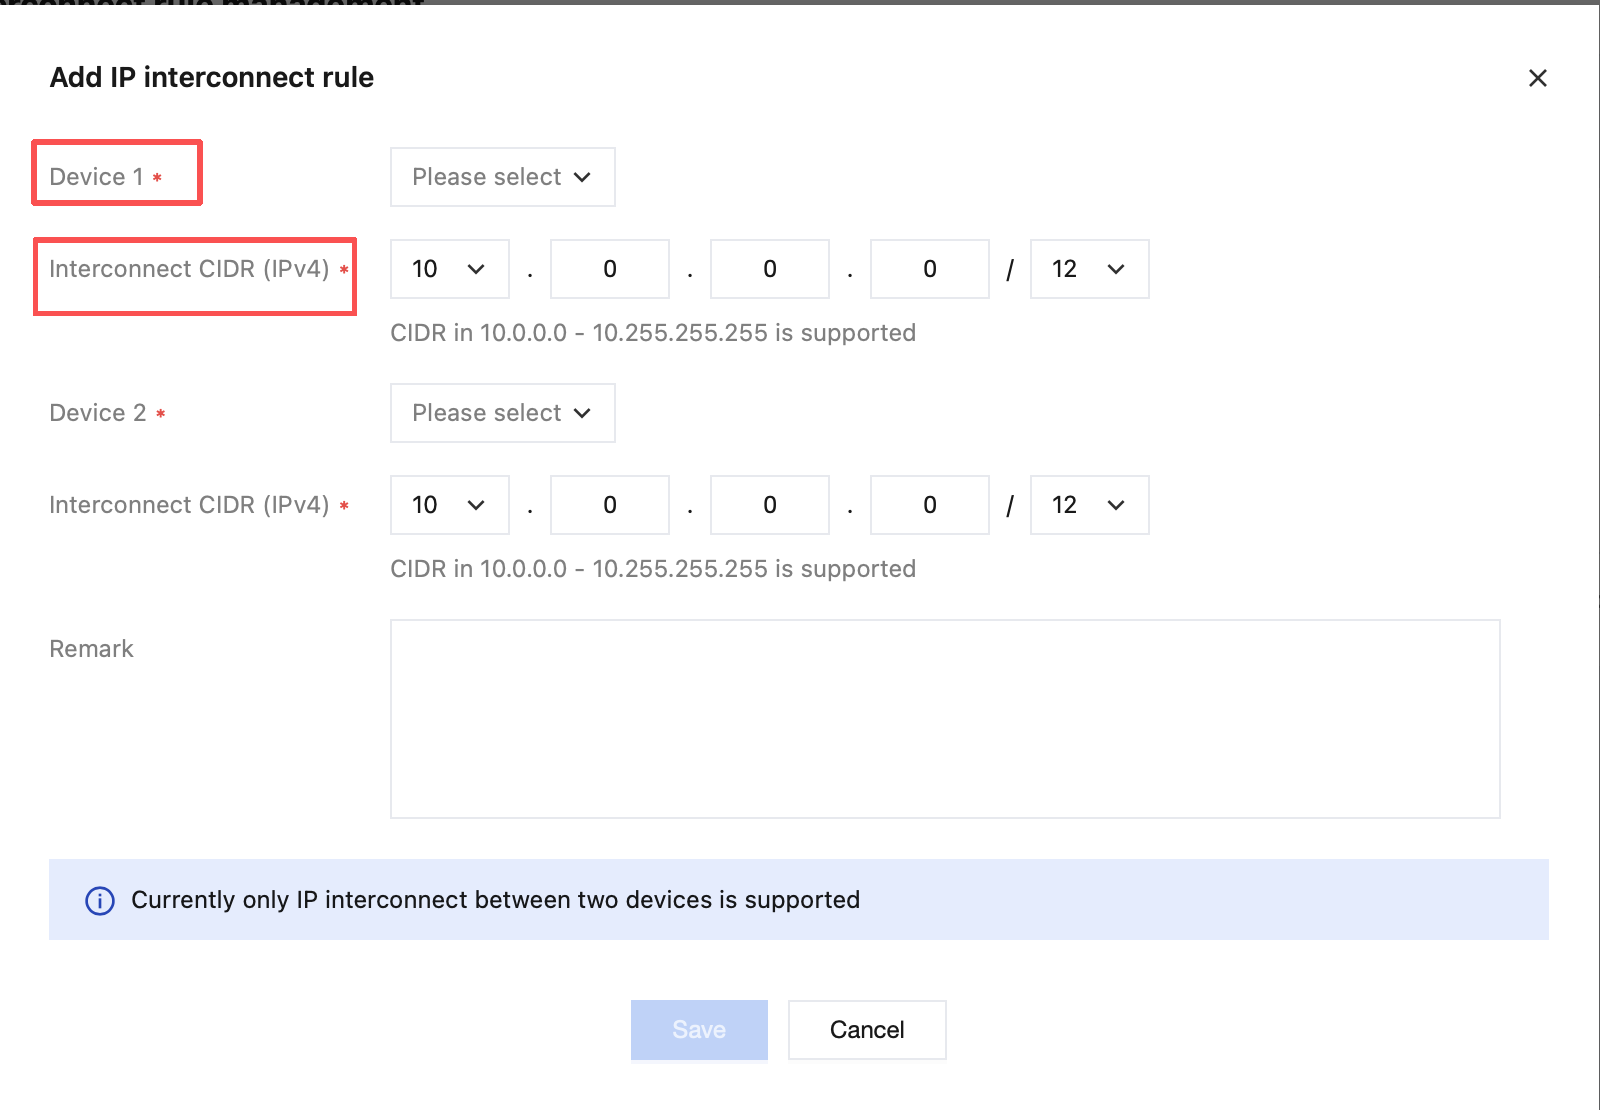
To use IP interconnection capability, you need to configure it first. Click IP Interconnection Rule Management in the left sidebar of the console, enter the management interface, and click Add to enter the configuration interface.
Select the devices to interconnect and set the IP range for interconnection.
Note:
IP interconnection is a feature that configures Layer 3 mutual access between the private network segments of two devices. After pairing, the corresponding devices can achieve bidirectional IP-layer communication within their respective private network segments.
Note that two exactly the same peer IP ranges cannot exist on a device.
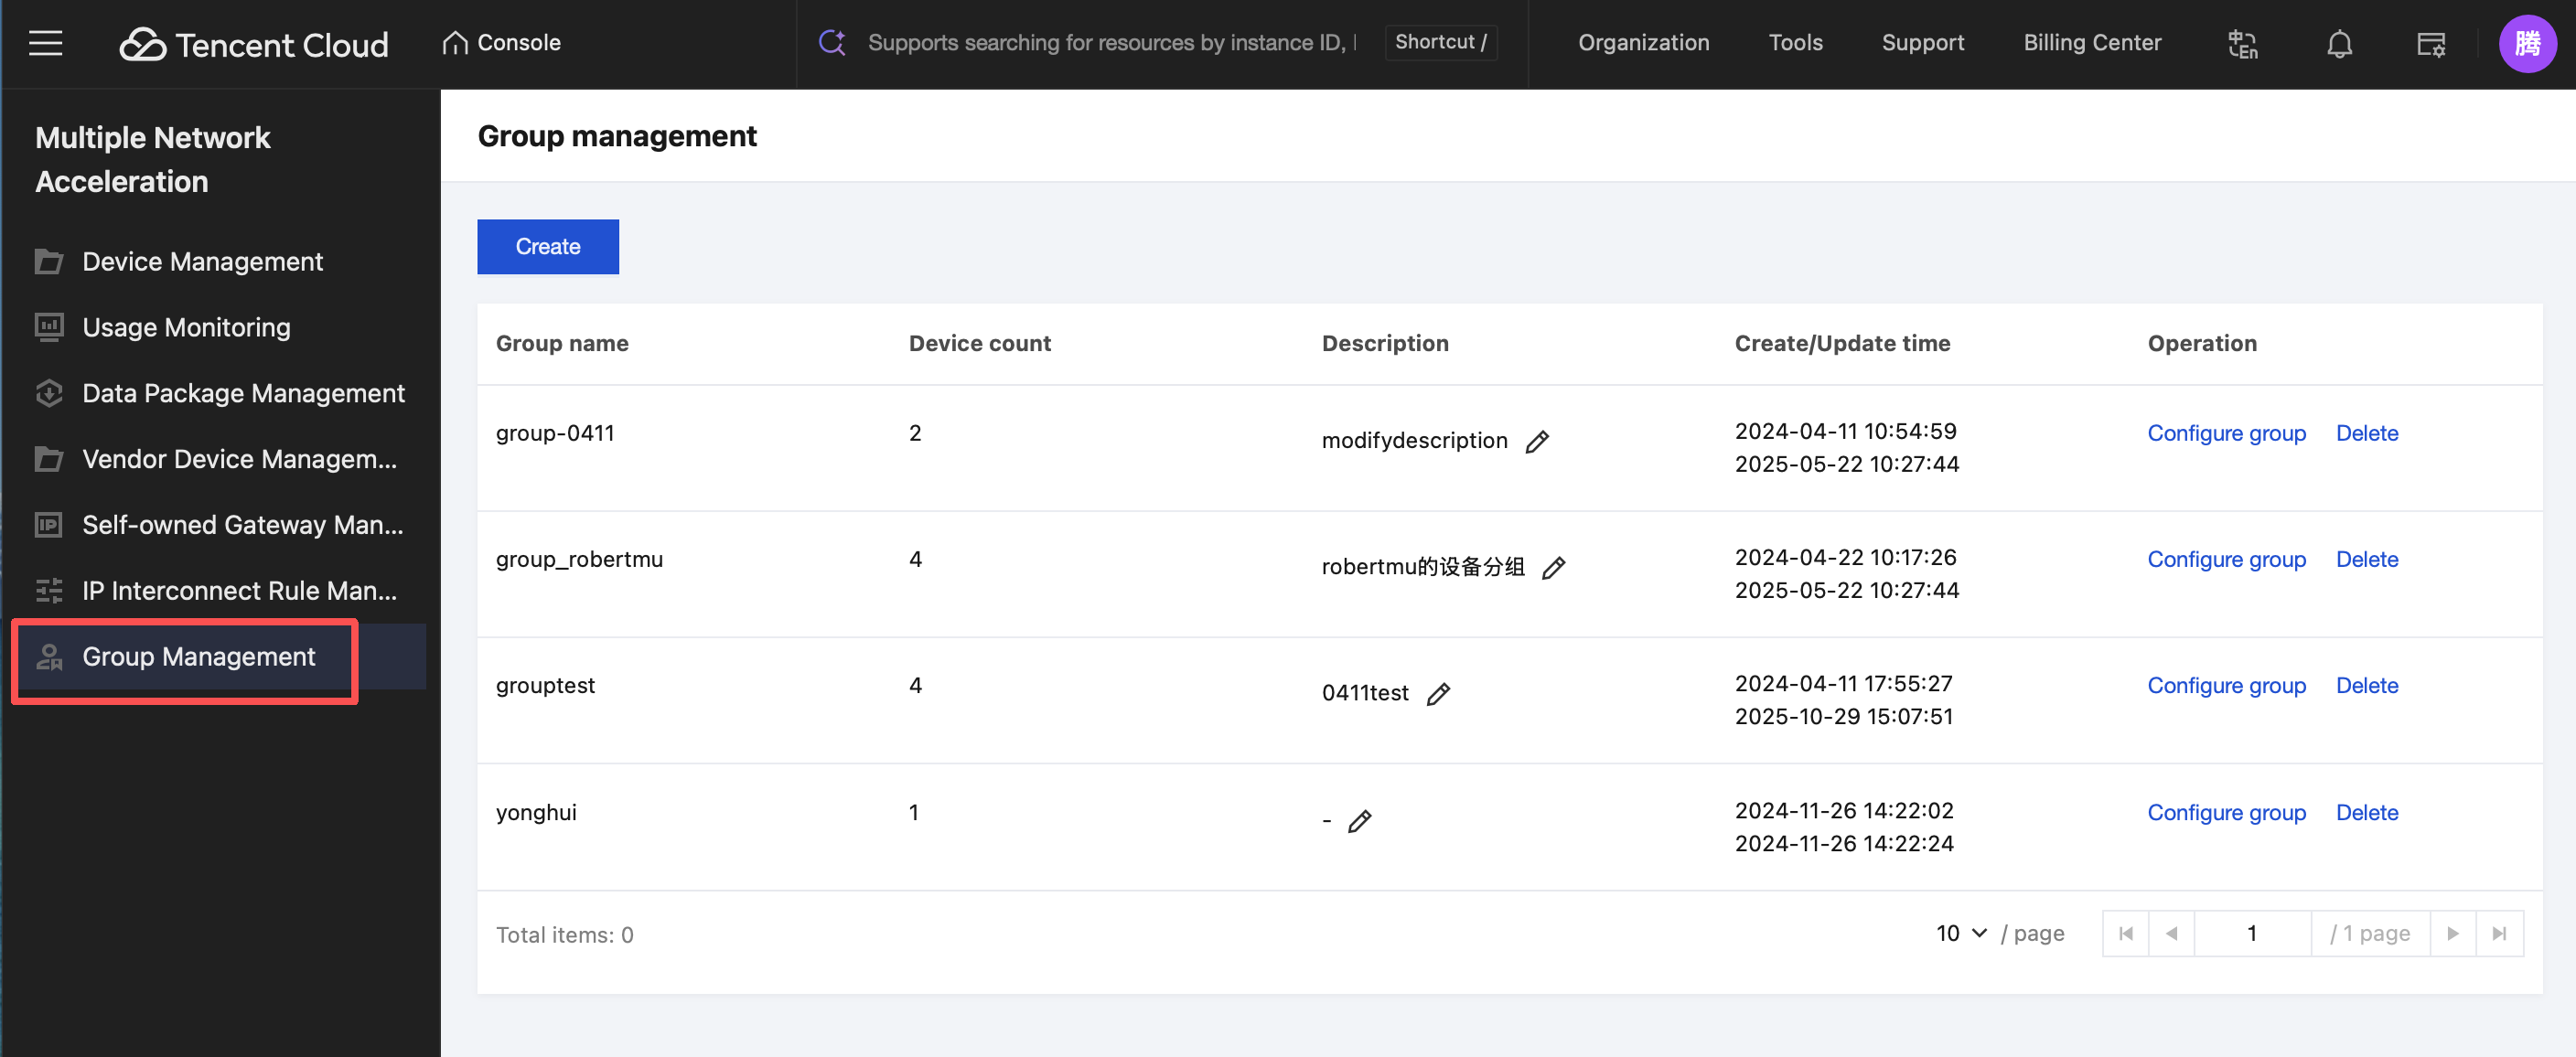
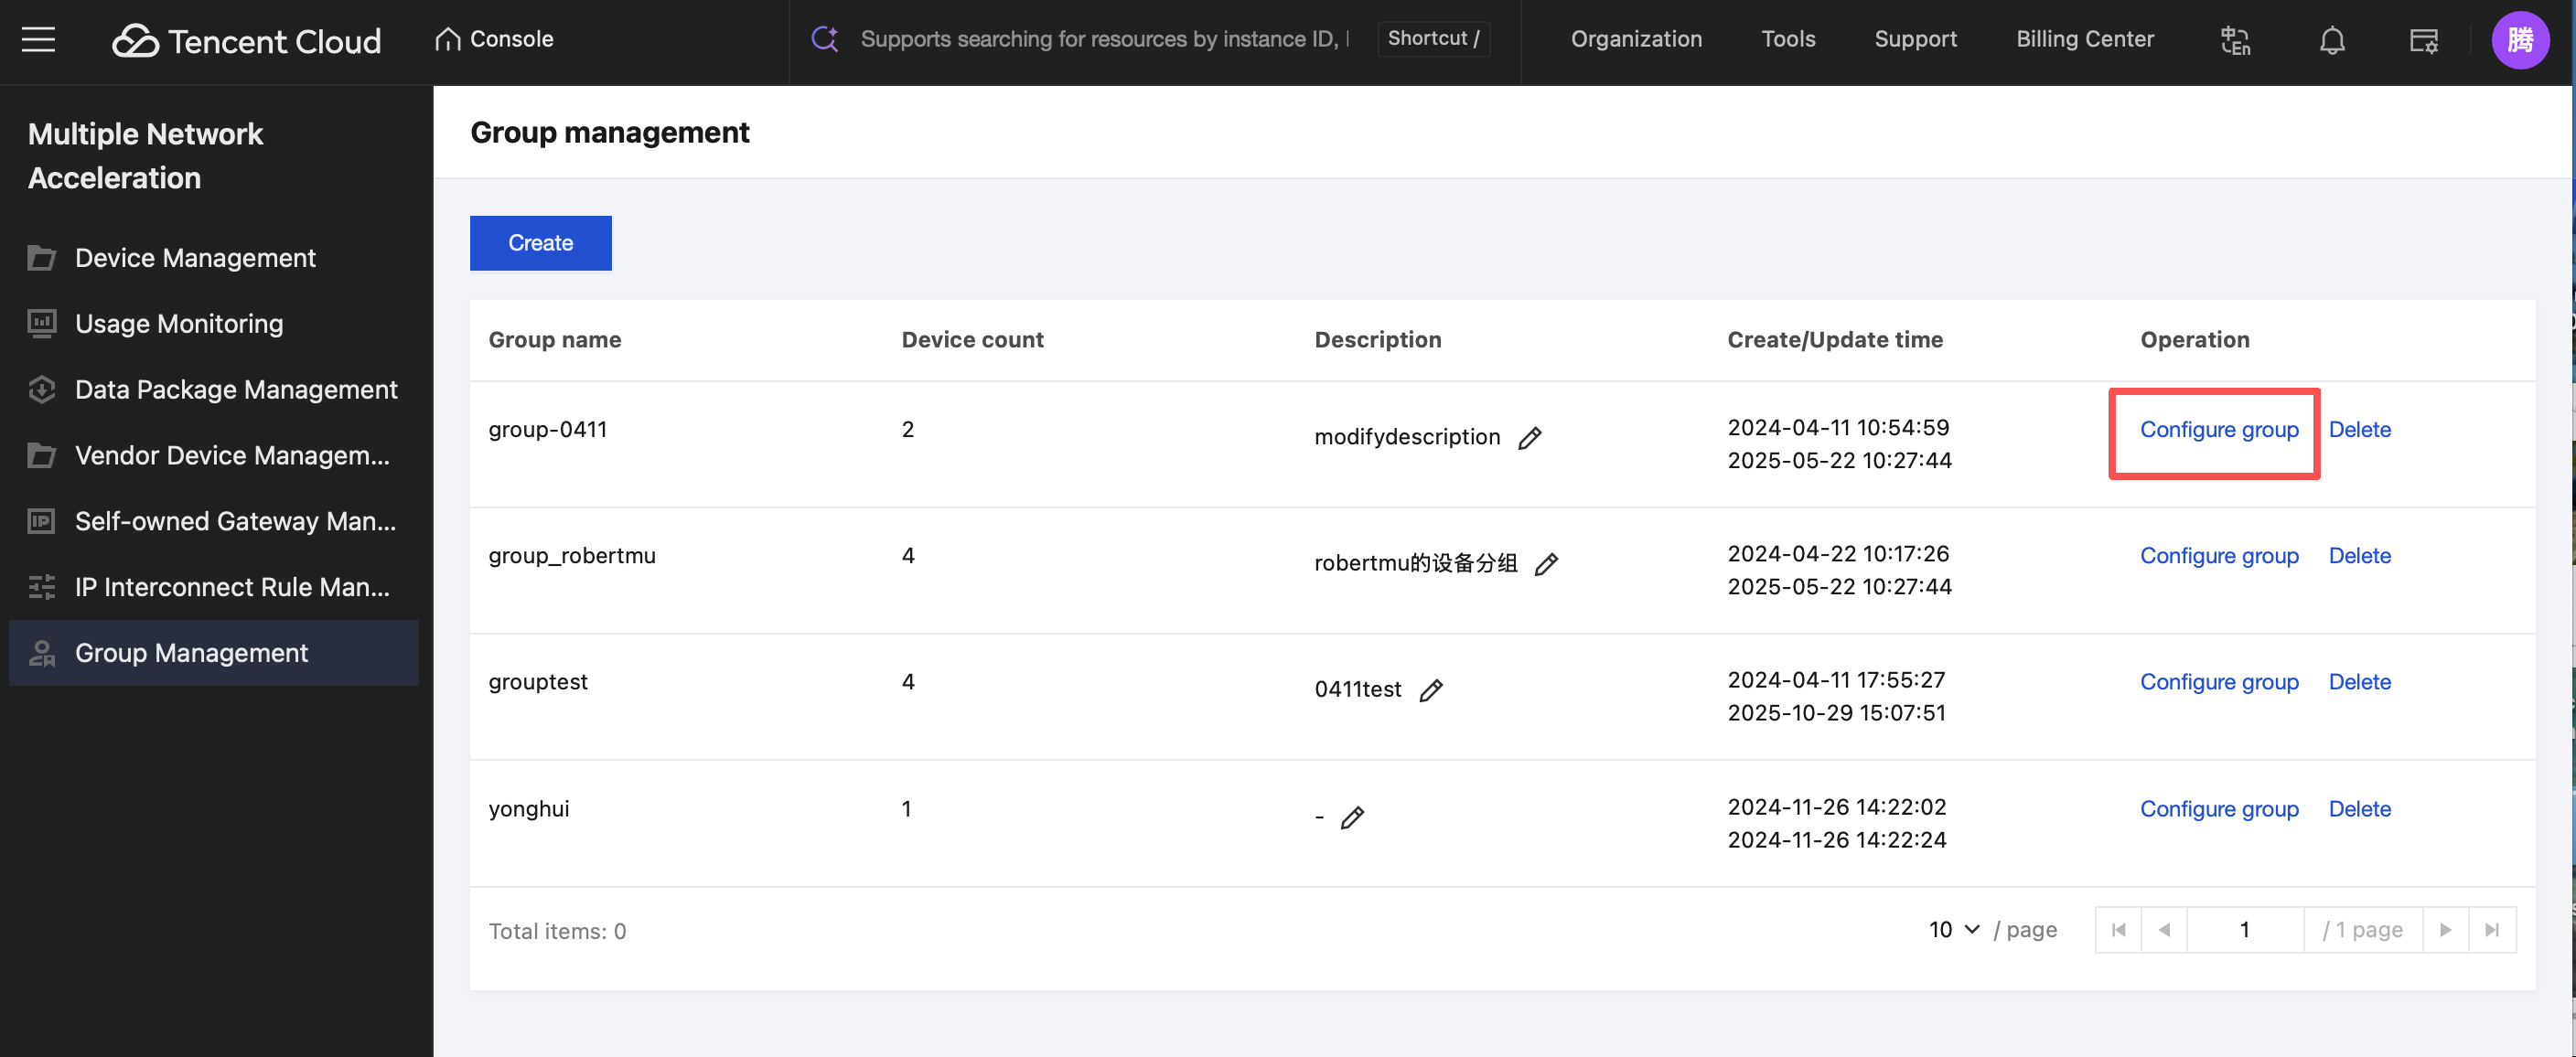
Group Management
On the Multiple Network Acceleration group management page, you can manage devices by groups and view acceleration stats by group.
In the group list, click Configure group to view all devices in the current group and further view device details.