Sound Effects (Flutter)
Download
포커스 모드
폰트 크기
This guide shows you how to use the
AudioEffectStore and DeviceStore modules from the AtomicXCore framework to quickly add audio effect controls to your live streaming app. With these modules, you can implement features like microphone volume adjustment, in-ear monitoring, and a range of engaging voice changer and reverb effects.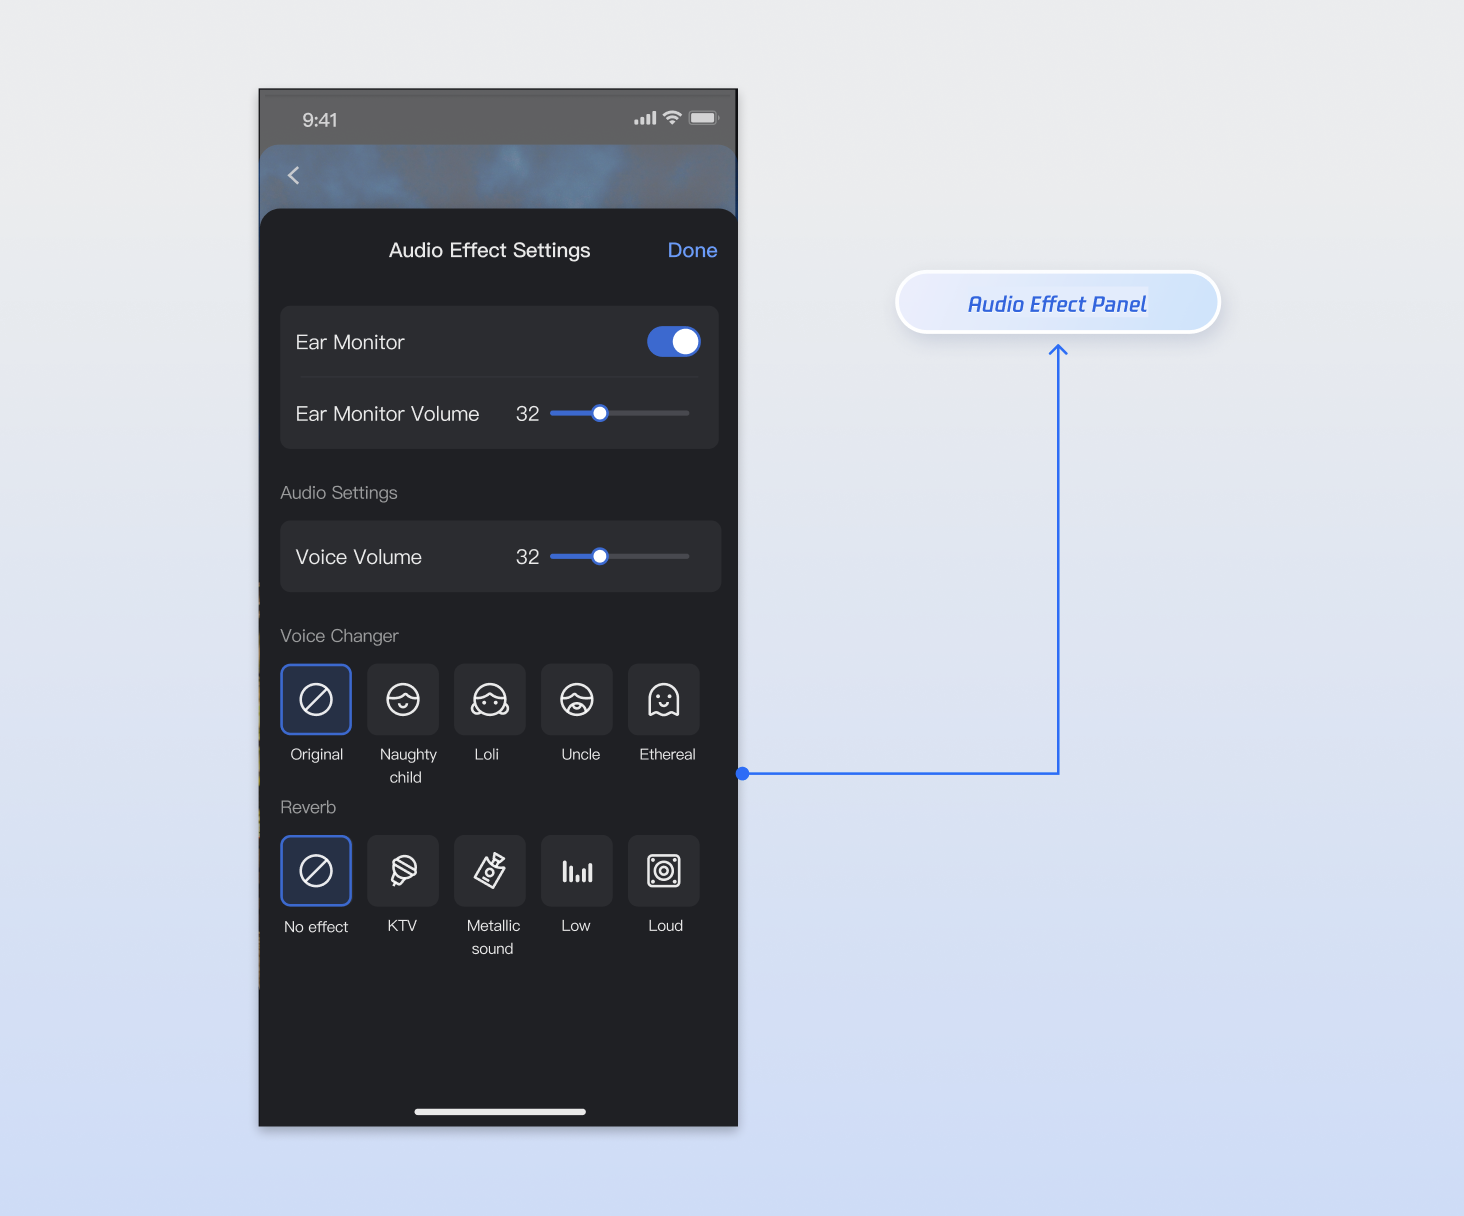
Core Features
By integrating
AudioEffectStore and DeviceStore, you can enable the following features in your live streaming app:Microphone Volume Control: Adjust the local capture volume to control how loud the host sounds to the audience.
In-Ear Monitor: Let hosts or guests hear their own voice in real time through headphones for monitoring and pronunciation correction.
Voice Changer Effects: Provide multiple voice changer options, such as Child, Girl, Uncle, and more.
Reverb Effects: Simulate various acoustic environments, including KTV, metallic, deep, bright, and others.
Concept Overview
Core Concept | Type | Key Responsibilities & Description |
class | Tracks the current state of the audio effects module, typically for UI rendering. Includes voice changer status, reverb status, in-ear monitor enabled status, and in-ear monitor volume. All properties are ValueListenable and support state change subscriptions. | |
class | Singleton data manager for the audio effects module. Use this to call audio effect APIs. After you call an API, the relevant audioEffectState property updates automatically; subscribe to this reactive state for real-time updates. | |
class | Tracks the current state of the device module, typically for UI rendering. Key properties include camera and microphone device status, capture volume, and more. All properties are ValueListenable and support state change subscriptions. | |
class | Singleton data manager for the device module. Use this to control camera and microphone APIs. After you call an API, the relevant state property updates automatically; subscribe to this reactive state for real-time updates. |
Implementation Steps
Step 1: Integrate the Component
Live streaming: Refer to Quick Integration to integrate AtomicXCore and complete service access.
Voice chat room: Refer to Quick Integration to integrate AtomicXCore and complete service access.
Step 2: Obtain a Store Instance
Both
AudioEffectStore and DeviceStore are singletons. You can access their instances anywhere in your project using the shared property. For a full implementation example, refer to the audio_effect_panel_widget.dart file in the TUILiveKit open-source UI demo project.import 'package:flutter/material.dart';import 'package:atomic_x_core/atomicxcore.dart';class _AudioEffectPanelWidgetState {final _audioEffectStore = AudioEffectStore.shared;final _deviceStore = DeviceStore.shared;}
Step 3: Implement the In-Ear Monitor
In-ear monitor allows users to hear their own microphone input in real time. You can manage this feature using the APIs described below.
Note:
The in-ear monitoring feature typically needs to connect to headphones to work properly.
1. Enable/Disable Ear Monitoring: Use a Switch widget to enable or disable in-ear monitor.
2. Set the Volume of IEMs: Use a Slider widget to set the volume. Map the slider value to the volume parameter and call
setVoiceEarMonitorVolume(volume). The valid range is [0, 150], so map your UI control's value (e.g., slider 0.0 - 1.0) to 0 - 150.3. Listen for Status Updates to Update UI: Listen for real-time in-ear monitor state changes to update your UI accordingly.
Sample Code
import 'package:flutter/material.dart';import 'package:atomic_x_core/atomicxcore.dart';/// Ear Monitoring Control Componentclass EarMonitorWidget extends StatelessWidget {const EarMonitorWidget({super.key});@overrideWidget build(BuildContext context) {final audioEffectStore = AudioEffectStore.shared;return Column(crossAxisAlignment: CrossAxisAlignment.start,children: [// 1. Toggle ear monitoringValueListenableBuilder<bool>(valueListenable: audioEffectStore.audioEffectState.isEarMonitorOpened,builder: (context, isOpened, child) {return SwitchListTile(title: const Text('Ear Monitoring'),subtitle: const Text('Insert a headset')value: isOpened,onChanged: (value) {audioEffectStore.setVoiceEarMonitorEnable(value);},);},),// 2. Adjust ear return volumeValueListenableBuilder<int>(valueListenable: audioEffectStore.audioEffectState.earMonitorVolume,builder: (context, volume, child) {return ListTile(title: const Text('Ear Monitoring Volume'),subtitle: Slider(value: volume.toDouble(),min: 0,max: 150,divisions: 150,onChanged: (value) {audioEffectStore.setVoiceEarMonitorVolume(value.toInt());},),trailing: Text('$volume'),);},),],);}}
SetVoiceEarMonitorEnable API Parameters
Parameter Name | Type | Description |
enable | bool | Enable in-ear monitor: true: Enable.false: Disable. |
SetVoiceEarMonitorVolume API Parameters
Parameter Name | Type | Description |
volume | int | Ear return volume. Value ranges from 0 to 150. Default value: 100. |
Step 4: Adjust Microphone Volume
To control the host's microphone capture volume, call
DeviceStore.setCaptureVolume(volume) with your desired value.1. Set Capturing Volume: You can use the
Slider control to drag the slider left and right to adjust volume, and map the Slider value to the volume value before calling setCaptureVolume(volume). Please note, this API accepts a parameter range of [0, 150], so you need to map the UI control value (such as the Slider's 0.0 - 1.0) to the 0 - 150 range.2. Subscribe to State Updates: Listen for real-time capture volume changes to update your UI.
Sample Code
import 'package:flutter/material.dart';import 'package:atomic_x_core/atomicxcore.dart';/// Voice Volume Control Componentclass CaptureVolumeWidget extends StatelessWidget {const CaptureVolumeWidget({super.key});@overrideWidget build(BuildContext context) {final deviceStore = DeviceStore.shared;return ValueListenableBuilder<int>(valueListenable: deviceStore.state.captureVolume,builder: (context, volume, child) {return ListTile(title: const Text('Voice Volume'),subtitle: Slider(value: volume.toDouble(),min: 0,max: 150,divisions: 150,onChanged: (value) {deviceStore.setCaptureVolume(value.toInt());},),trailing: Text('$volume'),);},);}}
SetCaptureVolume API Parameters
Parameter Name | Type | Description |
volume | int | Capture volume size. Value ranges from 0 to 150. Default value: 100. |
Step 5: Apply Voice Changer Effects
To change the host's voice, call
setAudioChangerType(type) and pass the desired enum value.Sample Code
import 'package:flutter/material.dart';import 'package:atomic_x_core/atomicxcore.dart';/// Voice changing effect selection componentclass VoiceChangerWidget extends StatelessWidget {const VoiceChangerWidget({super.key});@overrideWidget build(BuildContext context) {final audioEffectStore = AudioEffectStore.shared;return Column(crossAxisAlignment: CrossAxisAlignment.start,children: [const Padding(padding: EdgeInsets.all(16),child: Text('Voice-changing effect', style: TextStyle(fontSize: 18, fontWeight: FontWeight.bold)),),ValueListenableBuilder<AudioChangerType>(valueListenable: audioEffectStore.audioEffectState.audioChangerType,builder: (context, changerType, child) {return Padding(padding: const EdgeInsets.symmetric(horizontal: 16),child: Wrap(spacing: 8,runSpacing: 8,children: AudioChangerType.values.map((type) {return ChoiceChip(label: Text(_getChangerTypeName(type)),selected: changerType == type,onSelected: (selected) {if (selected) {audioEffectStore.setAudioChangerType(type);}},);}).toList(),),);},),],);}String _getChangerTypeName(AudioChangerType type) {switch (type) {case AudioChangerType.none:return 'Disable';case AudioChangerType.child:return 'mischievous child';case AudioChangerType.girl:return 'loli';case AudioChangerType.uncle:return 'uncle';case AudioChangerType.ethereal:return 'ethereal';}}}
SetAudioChangerType API Parameters
Parameter Name | Type | Description |
type | Voice-changing effects enumeration. |
Step 6: Apply Reverb Effects
To add reverb effects to the host's voice, call
setAudioReverbType(type) and pass the desired enum value.Sample Code
import 'package:flutter/material.dart';import 'package:atomic_x_core/atomicxcore.dart';/// Reverb effect selection componentclass ReverbWidget extends StatelessWidget {const ReverbWidget({super.key});@overrideWidget build(BuildContext context) {final audioEffectStore = AudioEffectStore.shared;return Column(crossAxisAlignment: CrossAxisAlignment.start,children: [const Padding(padding: EdgeInsets.all(16),child: Text('Reverb effect', style: TextStyle(fontSize: 18, fontWeight: FontWeight.bold)),),ValueListenableBuilder<AudioReverbType>(valueListenable: audioEffectStore.audioEffectState.audioReverbType,builder: (context, reverbType, child) {return Padding(padding: const EdgeInsets.symmetric(horizontal: 16),child: Wrap(spacing: 8,runSpacing: 8,children: AudioReverbType.values.map((type) {return ChoiceChip(label: Text(_getReverbTypeName(type)),selected: reverbType == type,onSelected: (selected) {if (selected) {audioEffectStore.setAudioReverbType(type);}},);}).toList(),),);},),],);}String _getReverbTypeName(AudioReverbType type) {switch (type) {case AudioReverbType.none:return 'Disable';case AudioReverbType.ktv:return 'KTV';case AudioReverbType.room:return 'Small room';case AudioReverbType.hall:return 'Great hall';case AudioReverbType.deep:return 'deep';case AudioReverbType.loud:return 'resonant';case AudioReverbType.metallic:return 'metallic sound';case AudioReverbType.magnetic:return 'magnetic';case AudioReverbType.recordingStudio:return 'studio';}}}
SetAudioReverbType API Parameters
Parameter Name | Type | Description |
type | Reverb effects enumeration. |
Step 7: Reset Sound Effect Settings
Important:
AudioEffectStore and DeviceStore are singletons, so audio effects and device settings take effect globally. If you do not want the settings of the current live streaming room to affect other live streaming rooms created later, you need to reset the audio effects and device settings when the current live streaming room ends.
You may need to reset sound effect settings in the following two scenarios:
1. When the current live streaming room ends, call the
store's reset() method to reset sound effects.2. When you need to reset all devices and sound effect settings, call the
store's reset() method to reset sound effects.import 'package:flutter/material.dart';import 'package:atomic_x_core/atomicxcore.dart';/// Sound effect reset componentclass AudioEffectResetWidget extends StatelessWidget {const AudioEffectResetWidget({super.key});void _resetAudioEffect() {AudioEffectStore.shared.reset();DeviceStore.shared.reset();}@overrideWidget build(BuildContext context) {return ElevatedButton(onPressed: _resetAudioEffect,child: const Text('Reset sound effect settings'),);}}
Complete Sample Code
import 'package:flutter/material.dart';import 'package:atomic_x_core/atomicxcore.dart';/// Sound effect settings pageclass AudioEffectPage extends StatelessWidget {const AudioEffectPage({super.key});@overrideWidget build(BuildContext context) {final audioEffectStore = AudioEffectStore.shared;final deviceStore = DeviceStore.shared;return Scaffold(appBar: AppBar(title: const Text('Sound effect settings')),body: ListView(children: [// Voice volumeconst Padding(padding: EdgeInsets.all(16),child: Text('Voice volume', style: TextStyle(fontSize: 18, fontWeight: FontWeight.bold)),),ValueListenableBuilder<int>(valueListenable: deviceStore.state.captureVolume,builder: (context, volume, child) {return ListTile(title: const Text('Capture Volume'),subtitle: Slider(value: volume.toDouble(),min: 0,max: 150,divisions: 150,onChanged: (value) {deviceStore.setCaptureVolume(value.toInt());},),trailing: Text('$volume'),);},),const Divider(),// Ear return settingsconst Padding(padding: EdgeInsets.all(16),child: Text('Ear monitoring', style: TextStyle(fontSize: 18, fontWeight: FontWeight.bold)),),ValueListenableBuilder<bool>(valueListenable: audioEffectStore.audioEffectState.isEarMonitorOpened,builder: (context, isOpened, child) {return SwitchListTile(title: const Text('Enable Ear Monitoring'),subtitle: const Text('Insert a headset')value: isOpened,onChanged: (value) {audioEffectStore.setVoiceEarMonitorEnable(value);},);},),ValueListenableBuilder<int>(valueListenable: audioEffectStore.audioEffectState.earMonitorVolume,builder: (context, volume, child) {return ListTile(title: const Text('Ear Monitoring Volume'),subtitle: Slider(value: volume.toDouble(),min: 0,max: 150,divisions: 150,onChanged: (value) {audioEffectStore.setVoiceEarMonitorVolume(value.toInt());},),trailing: Text('$volume'),);},),const Divider(),// Voice changing settingsconst Padding(padding: EdgeInsets.all(16),child: Text('Voice-changing', style: TextStyle(fontSize: 18, fontWeight: FontWeight.bold)),),ValueListenableBuilder<AudioChangerType>(valueListenable: audioEffectStore.audioEffectState.audioChangerType,builder: (context, changerType, child) {return Padding(padding: const EdgeInsets.symmetric(horizontal: 16),child: Wrap(spacing: 8,runSpacing: 8,children: AudioChangerType.values.map((type) {return ChoiceChip(label: Text(_getChangerTypeName(type)),selected: changerType == type,onSelected: (selected) {if (selected) {audioEffectStore.setAudioChangerType(type);}},);}).toList(),),);},),const SizedBox(height: 16),const Divider(),// Reverb settingsconst Padding(padding: EdgeInsets.all(16),child: Text('Reverb', style: TextStyle(fontSize: 18, fontWeight: FontWeight.bold)),),ValueListenableBuilder<AudioReverbType>(valueListenable: audioEffectStore.audioEffectState.audioReverbType,builder: (context, reverbType, child) {return Padding(padding: const EdgeInsets.symmetric(horizontal: 16),child: Wrap(spacing: 8,runSpacing: 8,children: AudioReverbType.values.map((type) {return ChoiceChip(label: Text(_getReverbTypeName(type)),selected: reverbType == type,onSelected: (selected) {if (selected) {audioEffectStore.setAudioReverbType(type);}},);}).toList(),),);},),const SizedBox(height: 24),// reset buttonPadding(padding: const EdgeInsets.all(16),child: ElevatedButton(onPressed: () {audioEffectStore.reset();deviceStore.reset();},child: const Text('Reset sound effect settings'),),),],),);}String _getChangerTypeName(AudioChangerType type) {switch (type) {case AudioChangerType.none:return 'Disable';case AudioChangerType.child:return 'mischievous child';case AudioChangerType.girl:return 'loli';case AudioChangerType.uncle:return 'uncle';case AudioChangerType.ethereal:return 'ethereal';}}String _getReverbTypeName(AudioReverbType type) {switch (type) {case AudioReverbType.none:return 'Disable';case AudioReverbType.ktv:return 'KTV';case AudioReverbType.room:return 'Small room';case AudioReverbType.hall:return 'Great hall';case AudioReverbType.deep:return 'deep';case AudioReverbType.loud:return 'resonant';case AudioReverbType.metallic:return 'metallic sound';case AudioReverbType.magnetic:return 'magnetic';case AudioReverbType.recordingStudio:return 'studio';}}}
API documentation
For detailed information about all public interfaces and attributes of AudioEffectStore, DeviceStore and its related classes, see the official API documentation of the AtomicXCore framework.
Store/Component | Feature Description | API Reference |
AudioEffectStore | Audio effect management: Perform audio effect settings and obtain real-time audio effect status. | |
DeviceStore | Device management: perform camera and microphone operations and obtain real-time device status. |
FAQs
Are there any restrictions on when to call audio effect and device APIs?
No, there are no restrictions. Settings in
AudioEffectStore and DeviceStore are global. You can call related APIs (such as setting voice changer, reverb, or in-ear monitor) at any time before or after joining a live room. Changes take effect immediately and persist.What is the difference between "Microphone Volume" and "In-Ear Monitor Volume"?
This is a common source of confusion. The differences are:
Microphone Volume (Capture Volume): Set via
DeviceStore.shared.setCaptureVolume(). Controls how loud the host sounds to the audience.In-Ear Monitor Volume (Ear Monitor Volume): Set via
AudioEffectStore.shared.setVoiceEarMonitorVolume(). Controls only how loud the host hears themselves in their headphones and does not affect the audience.Why does a newly created live room already have audio effects, or the volume is unexpectedly high or low?
Because
AudioEffectStore and DeviceStore are singletons, audio effect and device settings are global. This usually happens if you previously set audio effects and didn't reset them. Be sure to call reset() when appropriate.Why can't I hear myself after enabling "In-Ear Monitor"?
Check the following:
1. Are headphones connected? In-ear monitor usually requires headphones. Make sure wired or Bluetooth headphones are connected.
2. Is the volume set to 0? Verify that "In-Ear Monitor Volume" is not set to 0.
3. Is the microphone enabled? Ensure that the microphone in DeviceStore is enabled (i.e., openLocalMicrophone() has been called).
Can I use voice changer and reverb effects at the same time?
Yes.
AudioChangerType and AudioReverbType can be used together. For example, you can apply both AudioChangerType.girl and AudioReverbType.ktv simultaneously.피드백