tencent cloud

Tencent Real-Time Communication

소식 및 공지 사항
제품 업데이트
Tencent Cloud 오디오/비디오 단말 SDK 재생 업그레이드 및 권한 부여 인증 추가
TRTC 월간 구독 패키지 출시 관련 안내
제품 소개
제품 개요
기본 개념
제품 기능
제품 장점
응용 시나리오
성능 데이터
구매 가이드
Billing Overview
무료 시간 안내
Monthly subscription
Pay-as-you-go
TRTC Overdue and Suspension Policy
과금 FAQ
Refund Instructions
신규 사용자 가이드
Demo 체험
Call
개요(TUICallKit)
Activate the Service
Run Demo
빠른 통합(TUICallKit)
오프라인 푸시
Conversational Chat
온클라우드 녹화(TUICallKit)
AI Noise Reduction
UI 사용자 정의
Calls integration to Chat
Additional Features
No UI Integration
Server APIs
Client APIs
Solution
ErrorCode
릴리스 노트
FAQs
라이브 스트리밍
Billing of Video Live Component
Overview
Activating the Service (TUILiveKit)
Demo 실행
No UI Integration
UI Customization
Live Broadcast Monitoring
Video Live Streaming
Voice Chat Room
Advanced Features
Client APIs
Server APIs
Error Codes
Release Notes
FAQs
RTC Engine
Activate Service
SDK 다운로드
API 코드 예시
Usage Guidelines
API 클라이언트 API
고급 기능
RTC RESTFUL API
History
Introduction
API Category
Room Management APIs
Stream mixing and relay APIs
On-cloud recording APIs
Data Monitoring APIs
Pull stream Relay Related interface
Web Record APIs
AI Service APIs
Cloud Slicing APIs
Cloud Moderation APIs
Making API Requests
Call Quality Monitoring APIs
Usage Statistics APIs
Data Types
Appendix
Error Codes
콘솔 가이드
애플리케이션 관리
사용량 통계
모니터링 대시보드
개발 보조
Solution
Real-Time Chorus
FAQs
과금 개요
기능 관련
UserSig 관련
방화벽 제한 처리
설치 패키지 용량 축소 관련 질문
Andriod 및 iOS 관련
Web 관련
Flutter 관련
Electron 관련
TRTCCalling Web 관련
멀티미디어 품질 관련
기타 질문
Protocols and Policies
컴플라이언스 인증
보안 백서
정보 보안에 관한 참고 사항
Service Level Agreement
Apple Privacy Policy: PrivacyInfo.xcprivacy
TRTC 정책
개인 정보 보호 정책
데이터 처리 및 보안 계약
용어집

Integration Offline Push (FCM)

PDF
포커스 모드
폰트 크기
마지막 업데이트 시간: 2026-03-05 17:29:11
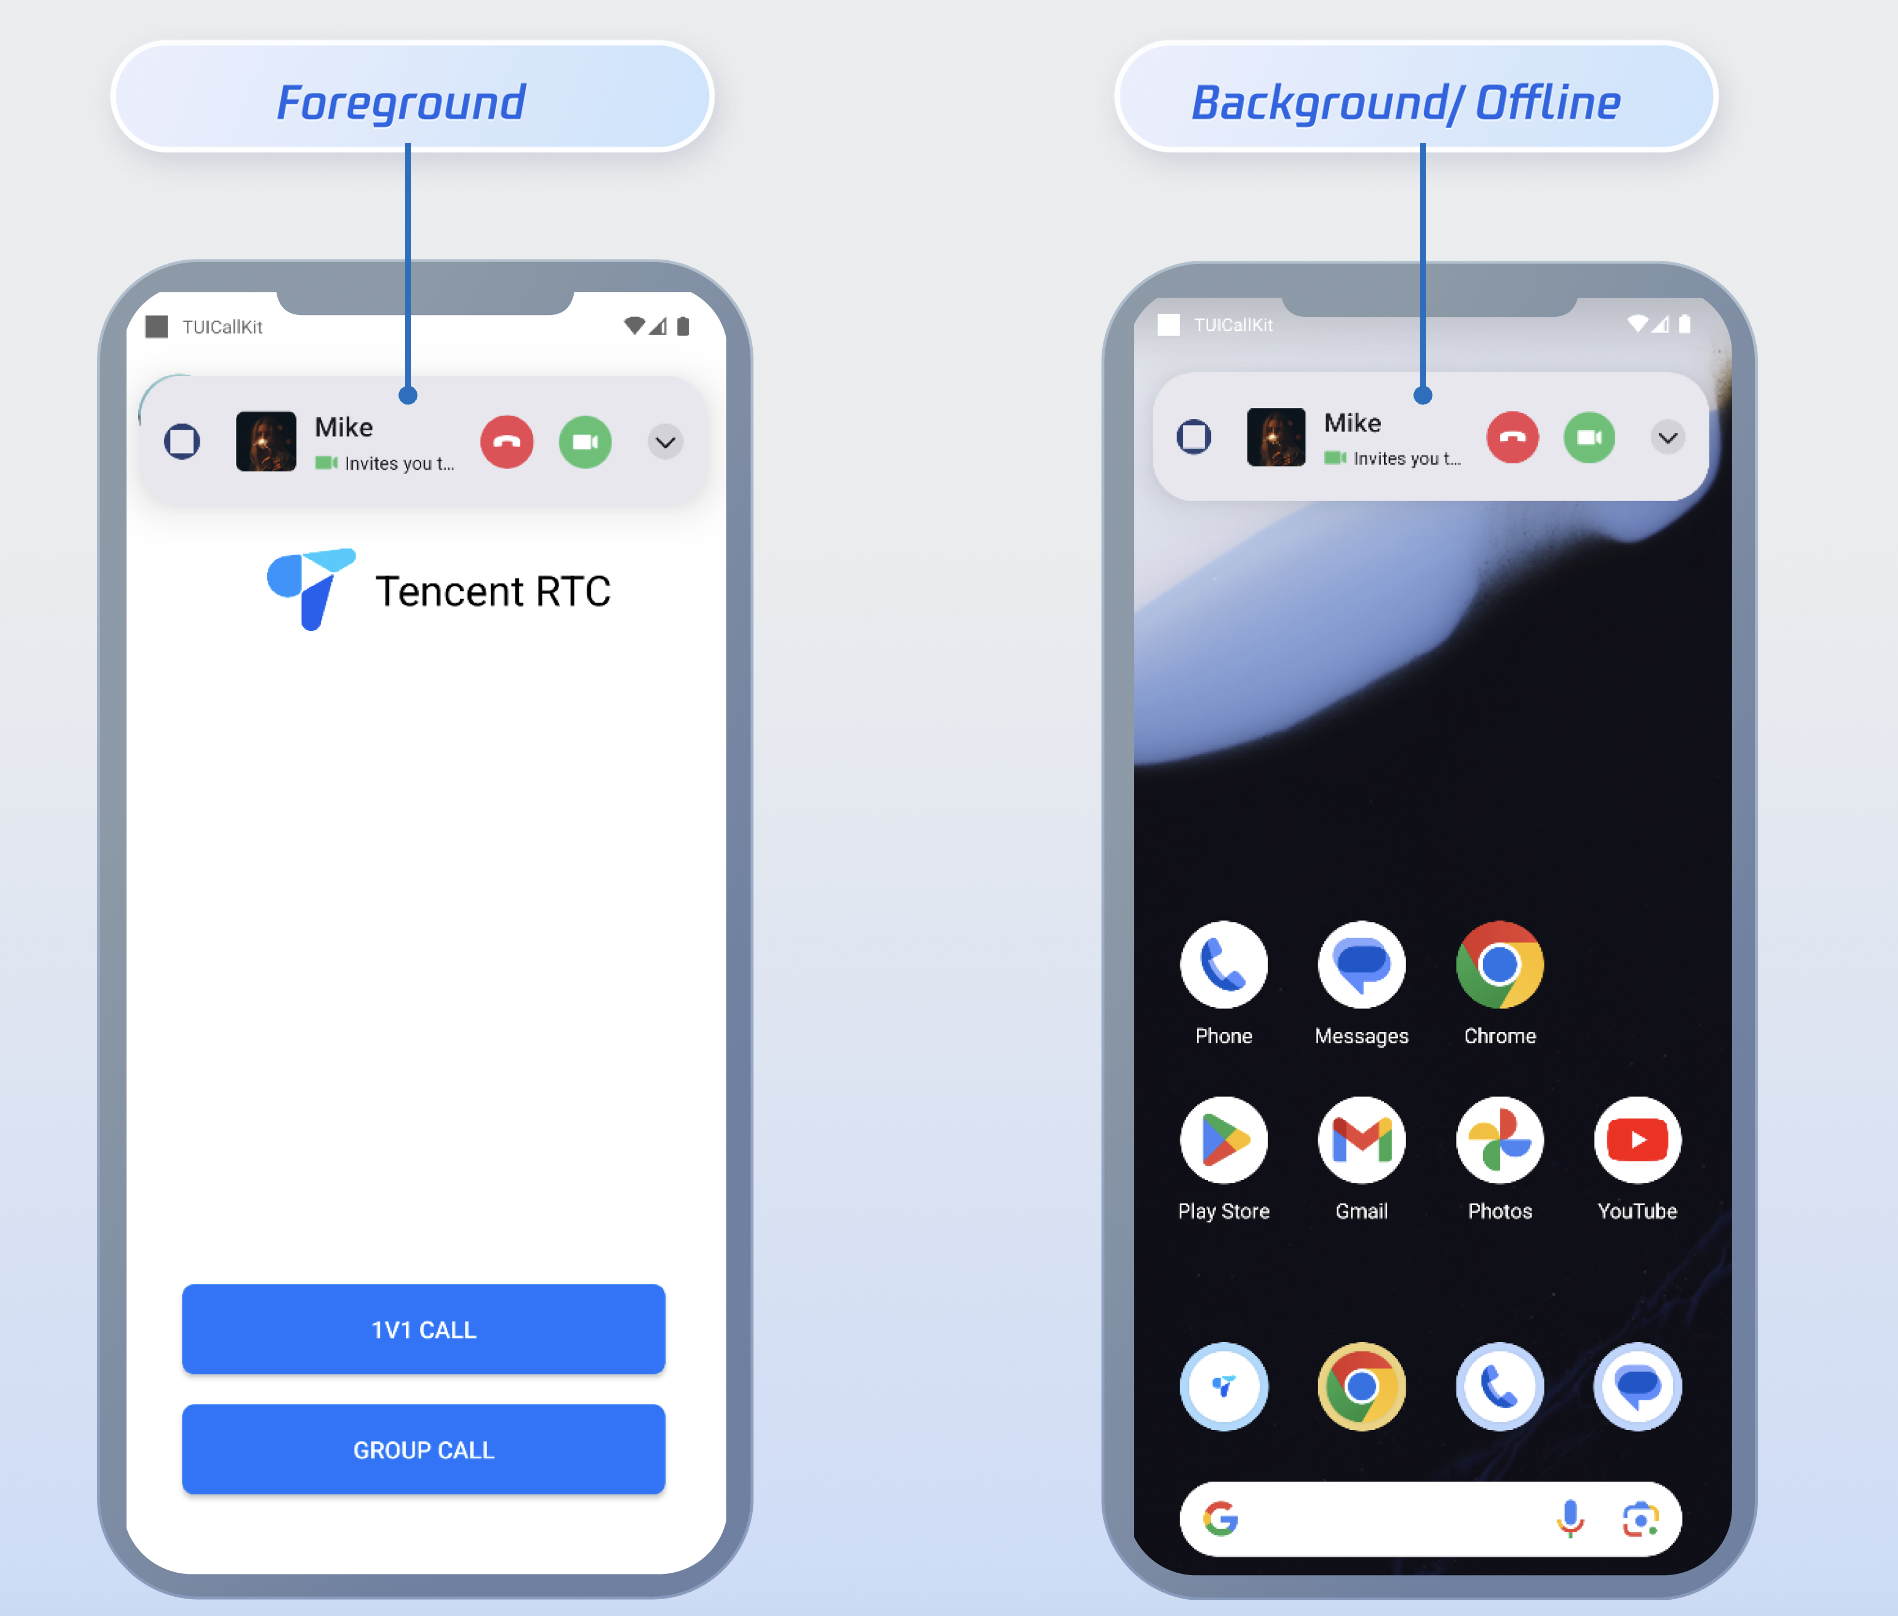
On Android, incoming audio/video call invitations won't trigger notifications when your app is killed or running in the background. This prevents users from receiving and answering calls when the app isn't actively running.
To solve this, you need to integrate offline push notifications using FCM Data Messages. This allows critical signaling—like call invitations—to reach the device and wake up your app, even when it's completely closed, launching the call interface so users can answer incoming calls.
Note:
Offline push is not required if users are only calling always-online web agents.
This guide shows you how to integrate FCM Data Message push for audio/video calls.


Activate the Service

Go to the Chat Console > App Push > Access settings , and click Purchase Now or Free Trial (each app is eligible for one free trial, valid for 7 days).

Note:
When your push plugin trial or subscription expires, all push services (including offline push for regular messages, broadcast/tag push, etc.) will be automatically suspended. To ensure uninterrupted service, please purchase or renew your subscription in advance.

Integration Considerations

Improve Call Reach Rate

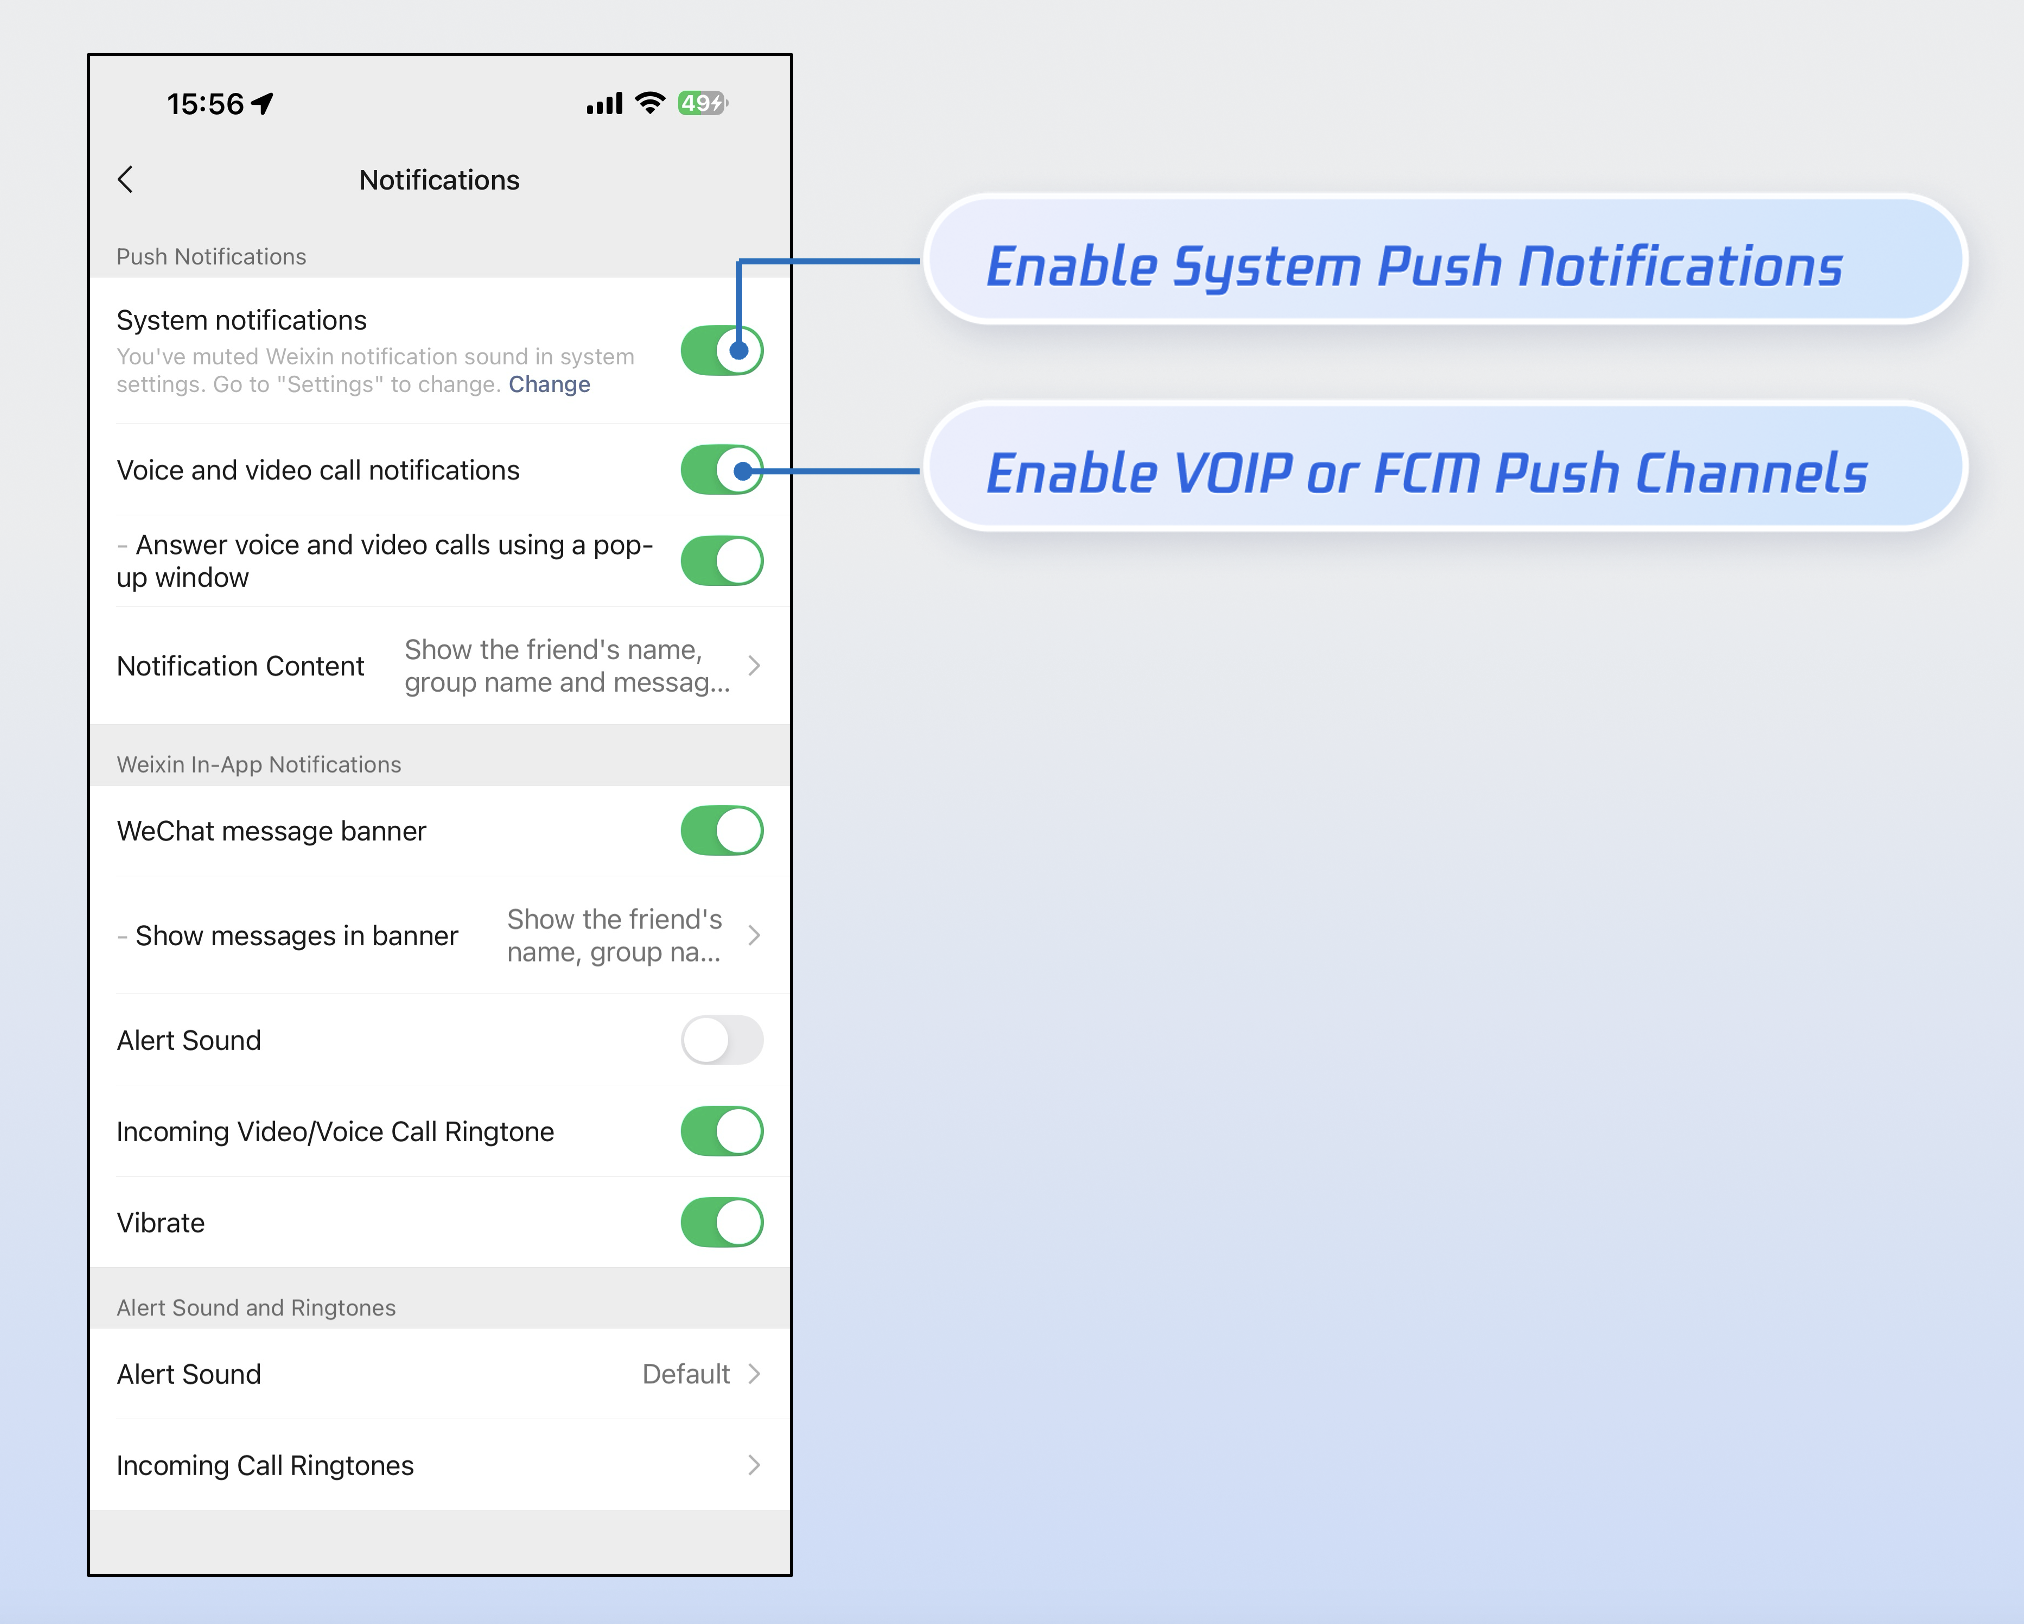
Over 90% of missed call notifications are due to users manually disabling app notification permissions. To maximize call delivery, we strongly recommend:
1. Send notifications responsibly: Avoid sending low-quality or irrelevant notifications to reduce the risk of users disabling notification permissions due to spam.
2. Offer granular notification controls: Like WeChat, provide separate toggles in your app settings for Notification and FCM Data Message instead of instructing users to disable all notifications in system settings.


Implementation Steps

Step 1: Configure Vendor

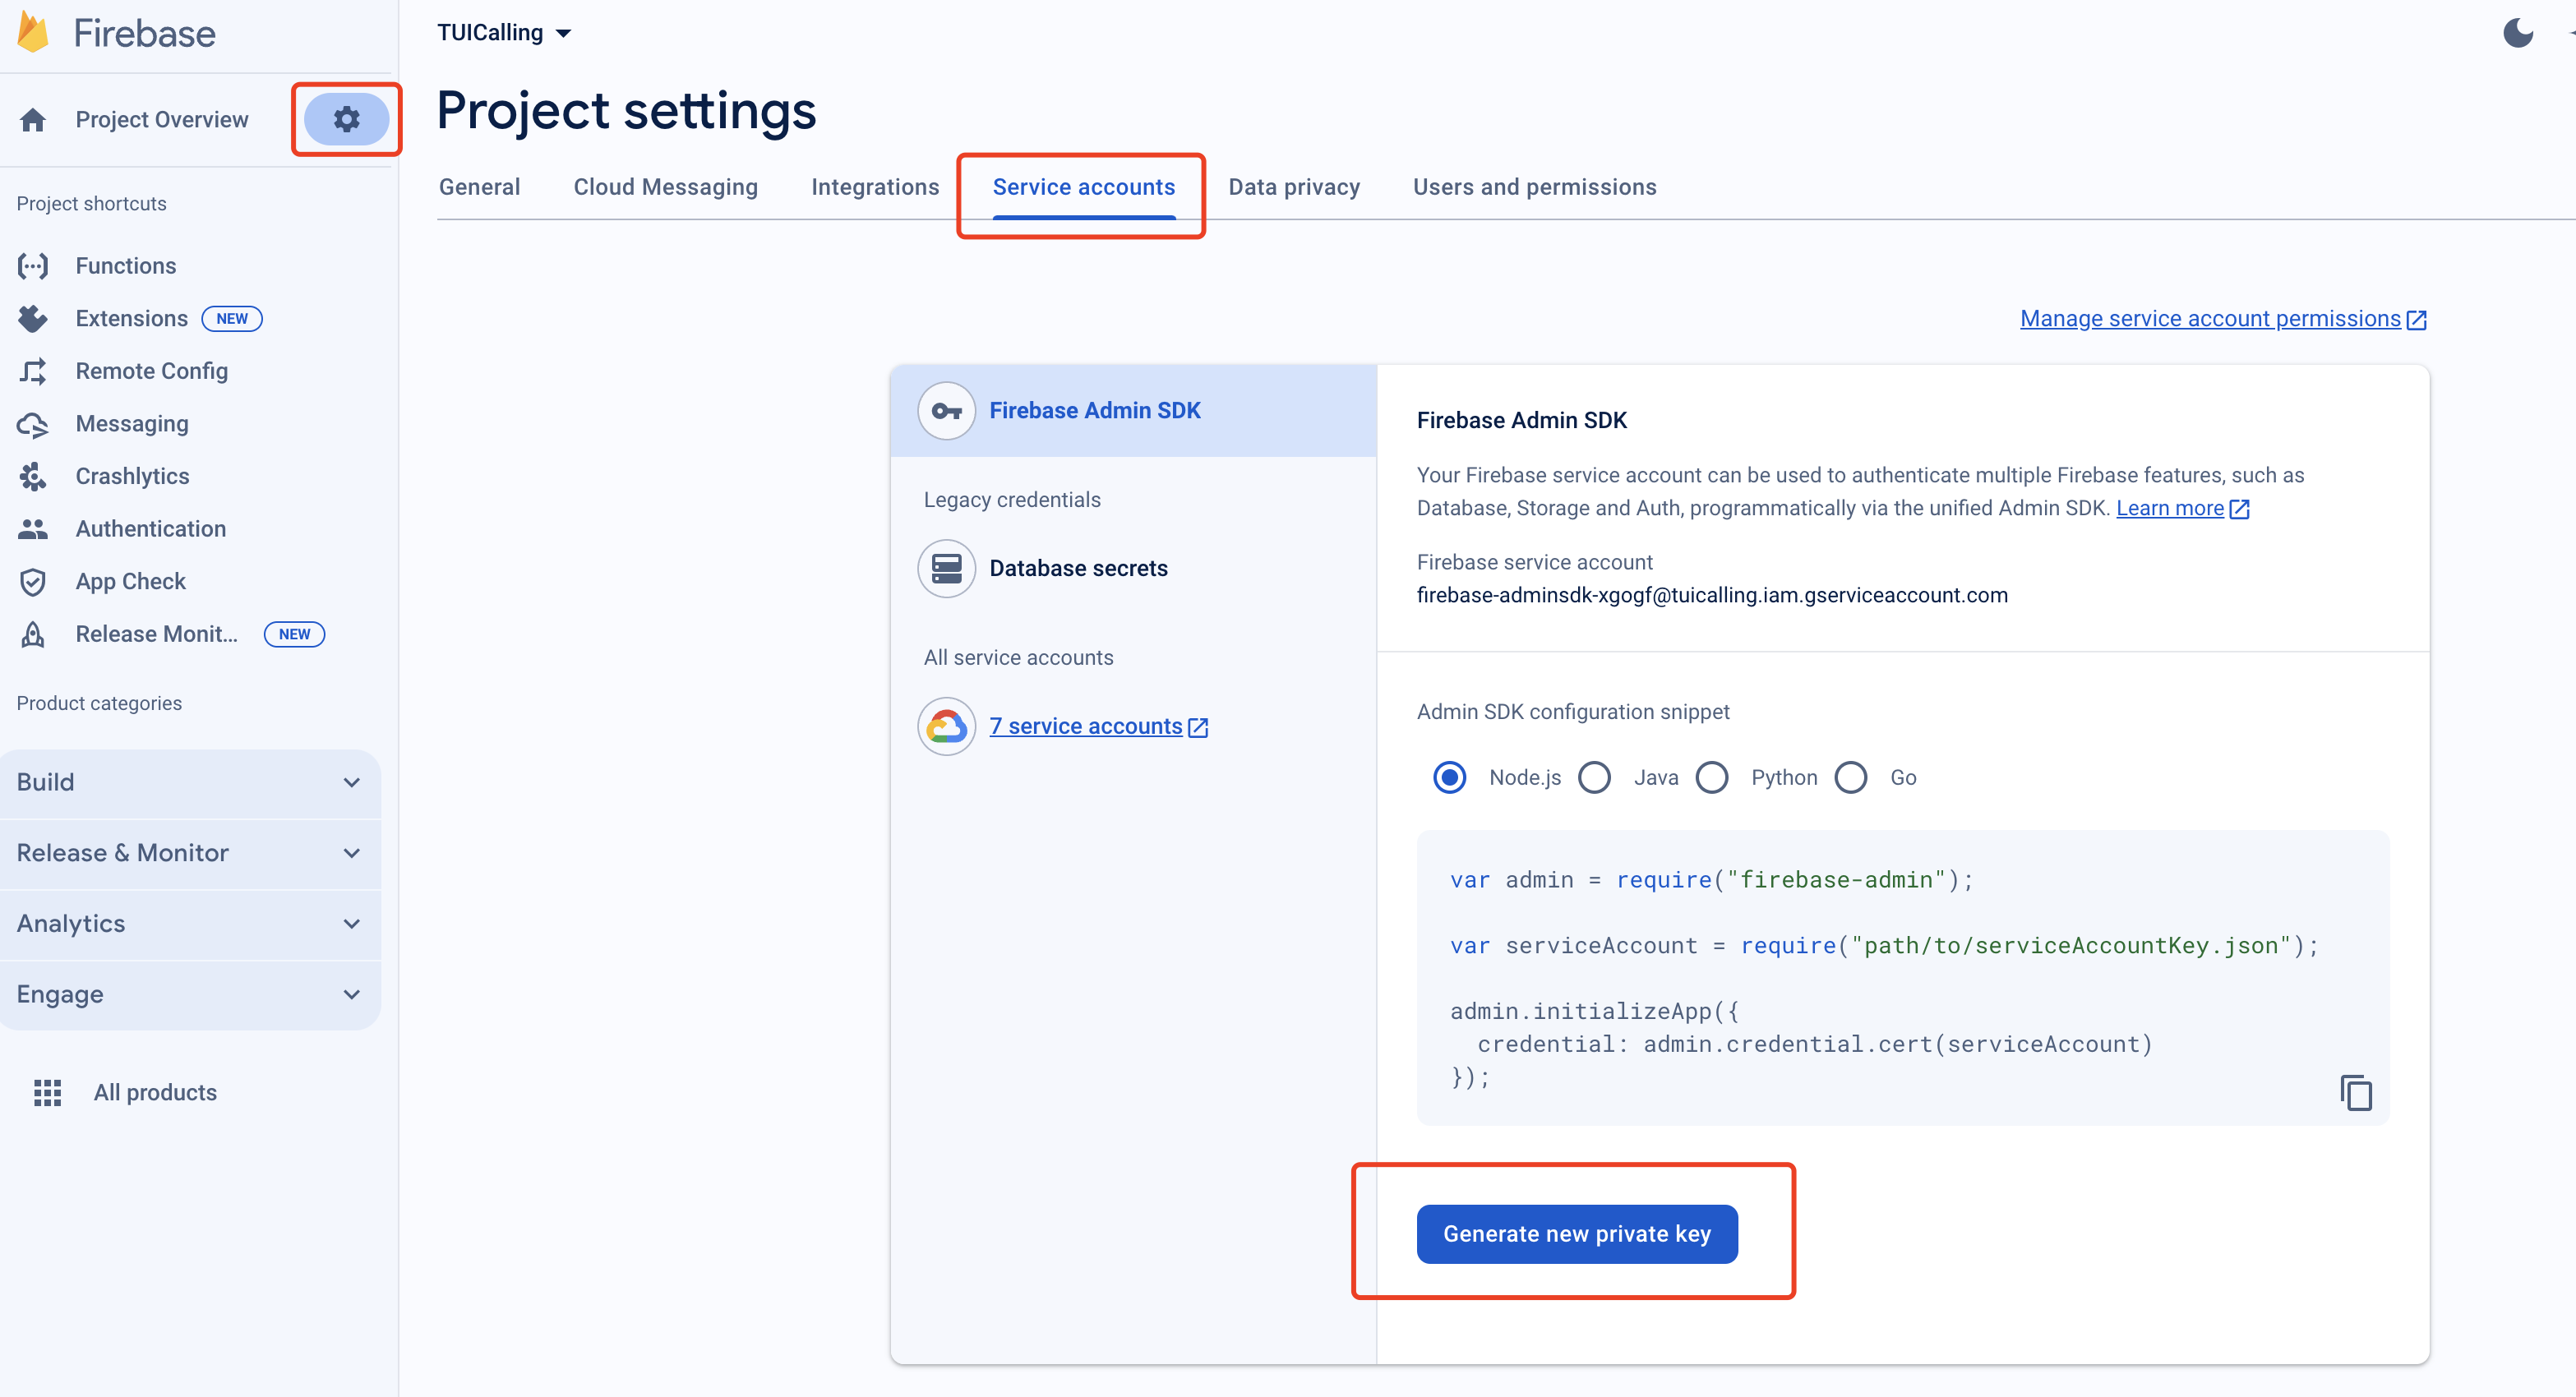
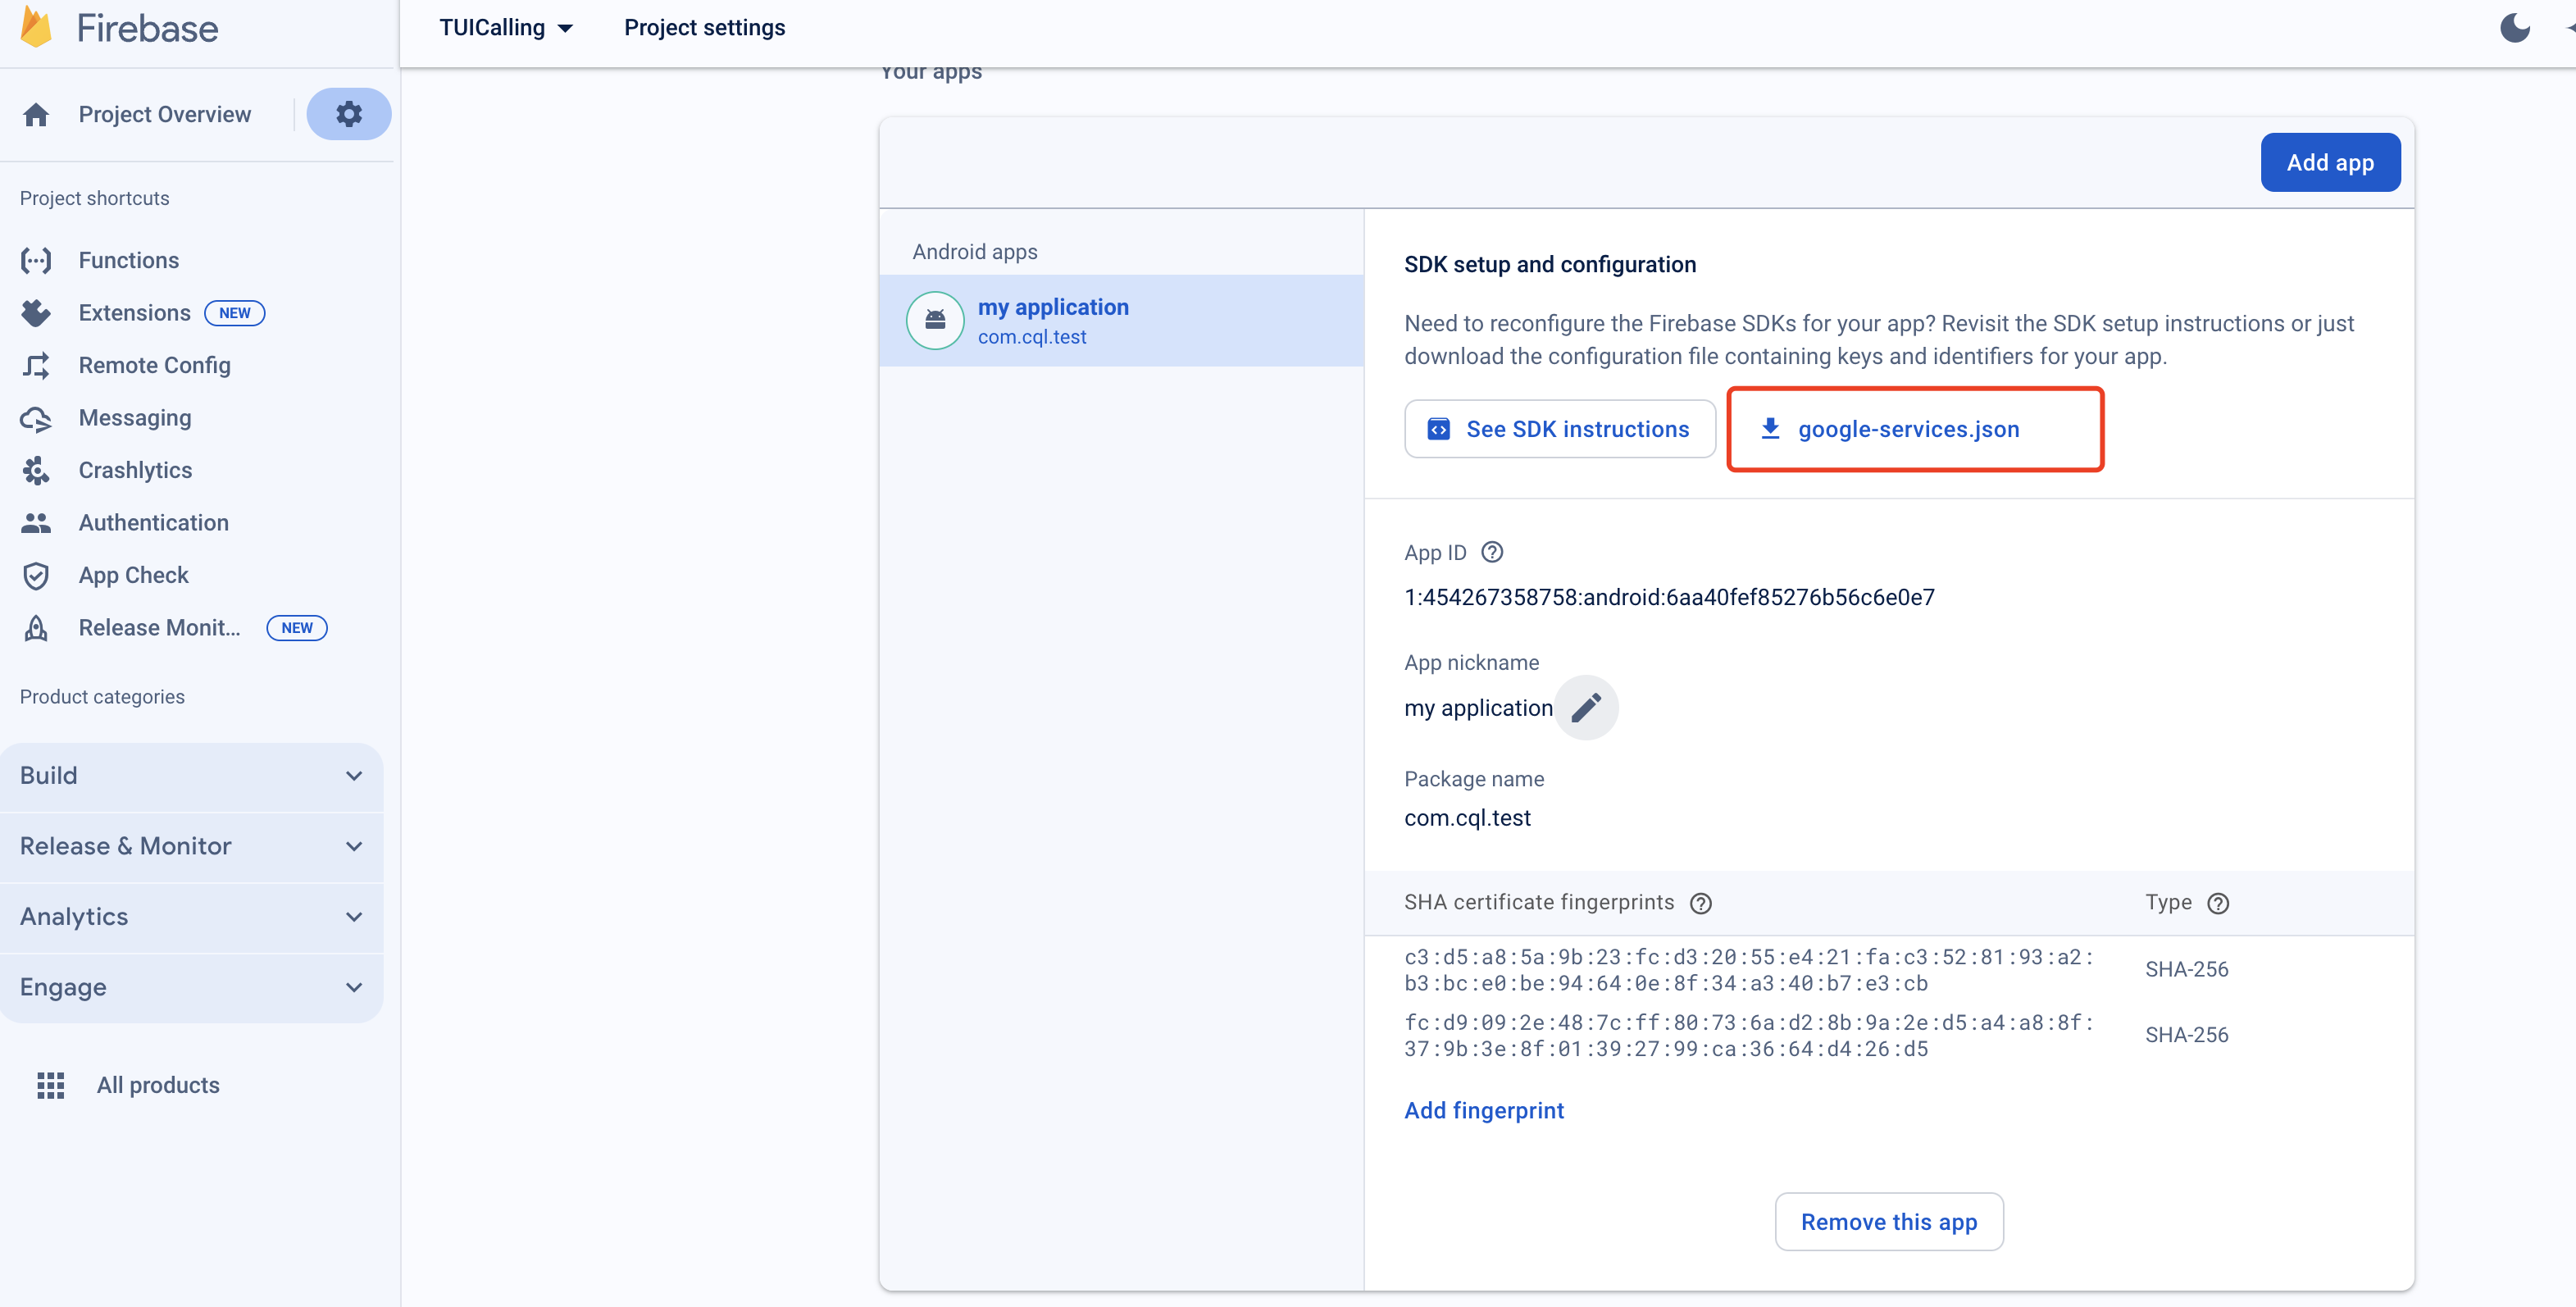
1. Register your app on the FCM Push Platform to obtain your AppID, AppKey, and the google-services.json file required for offline push.
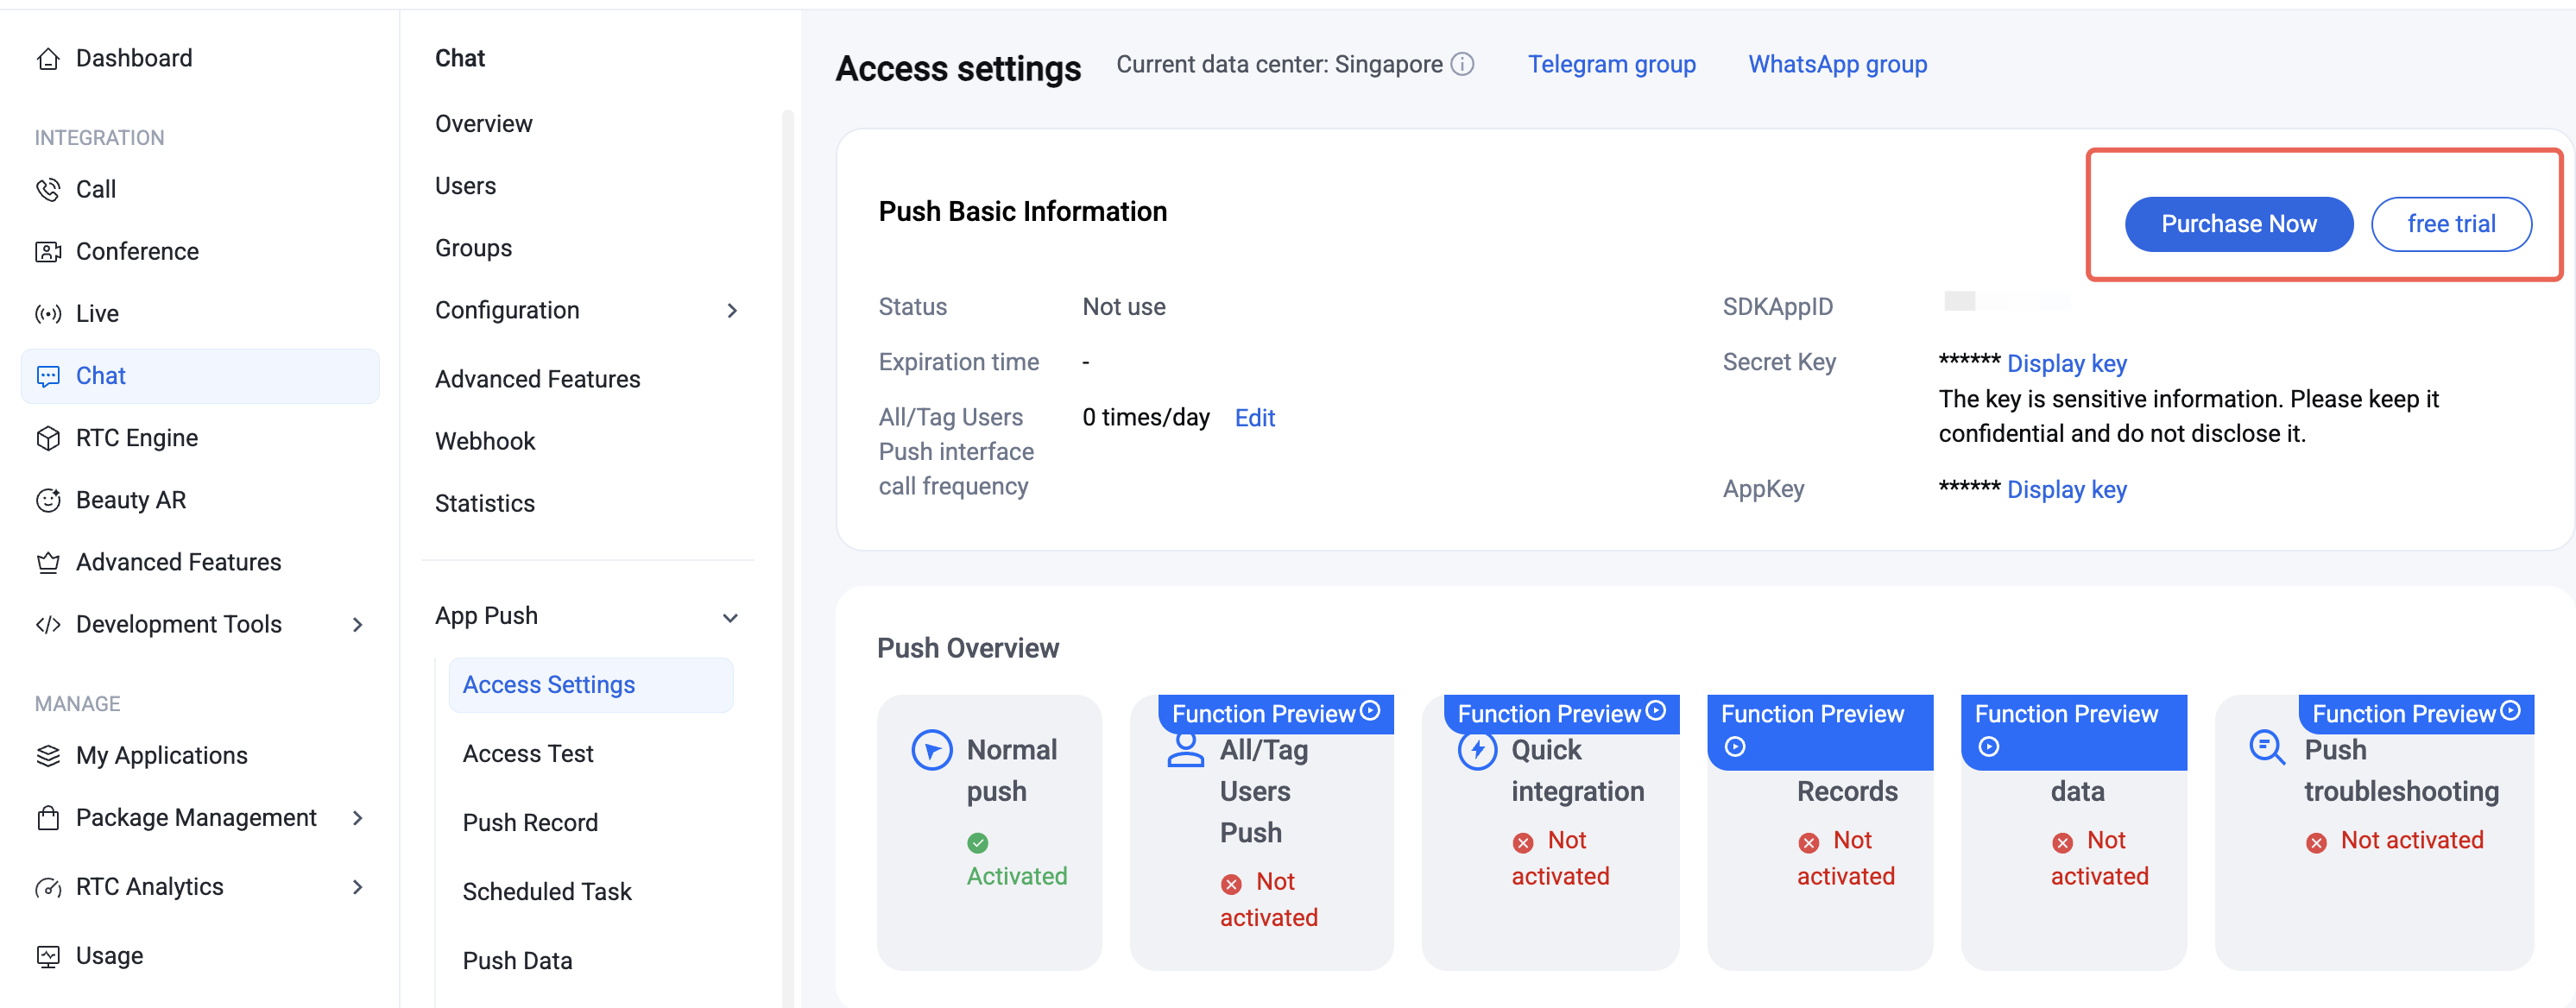
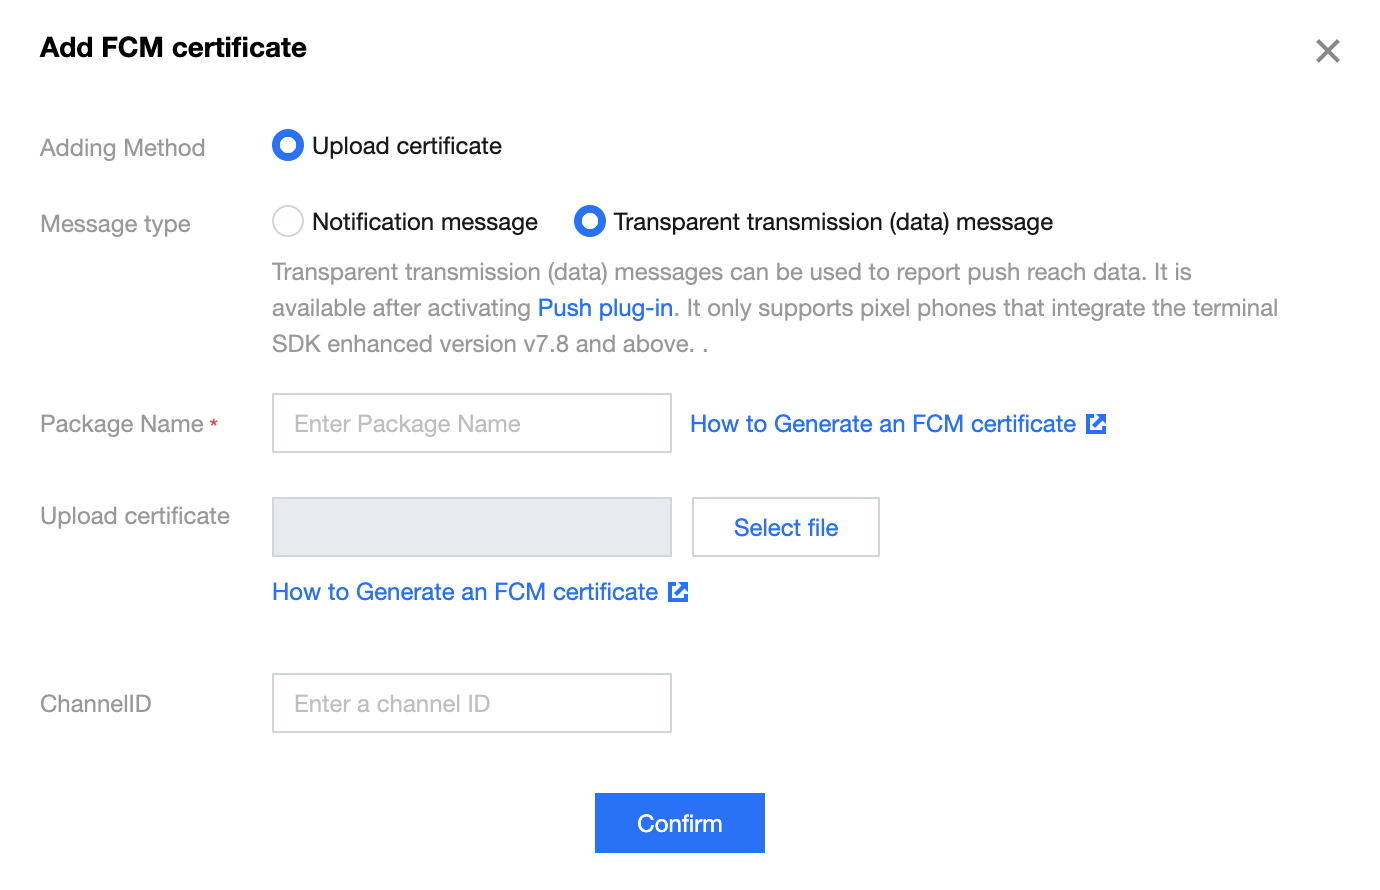
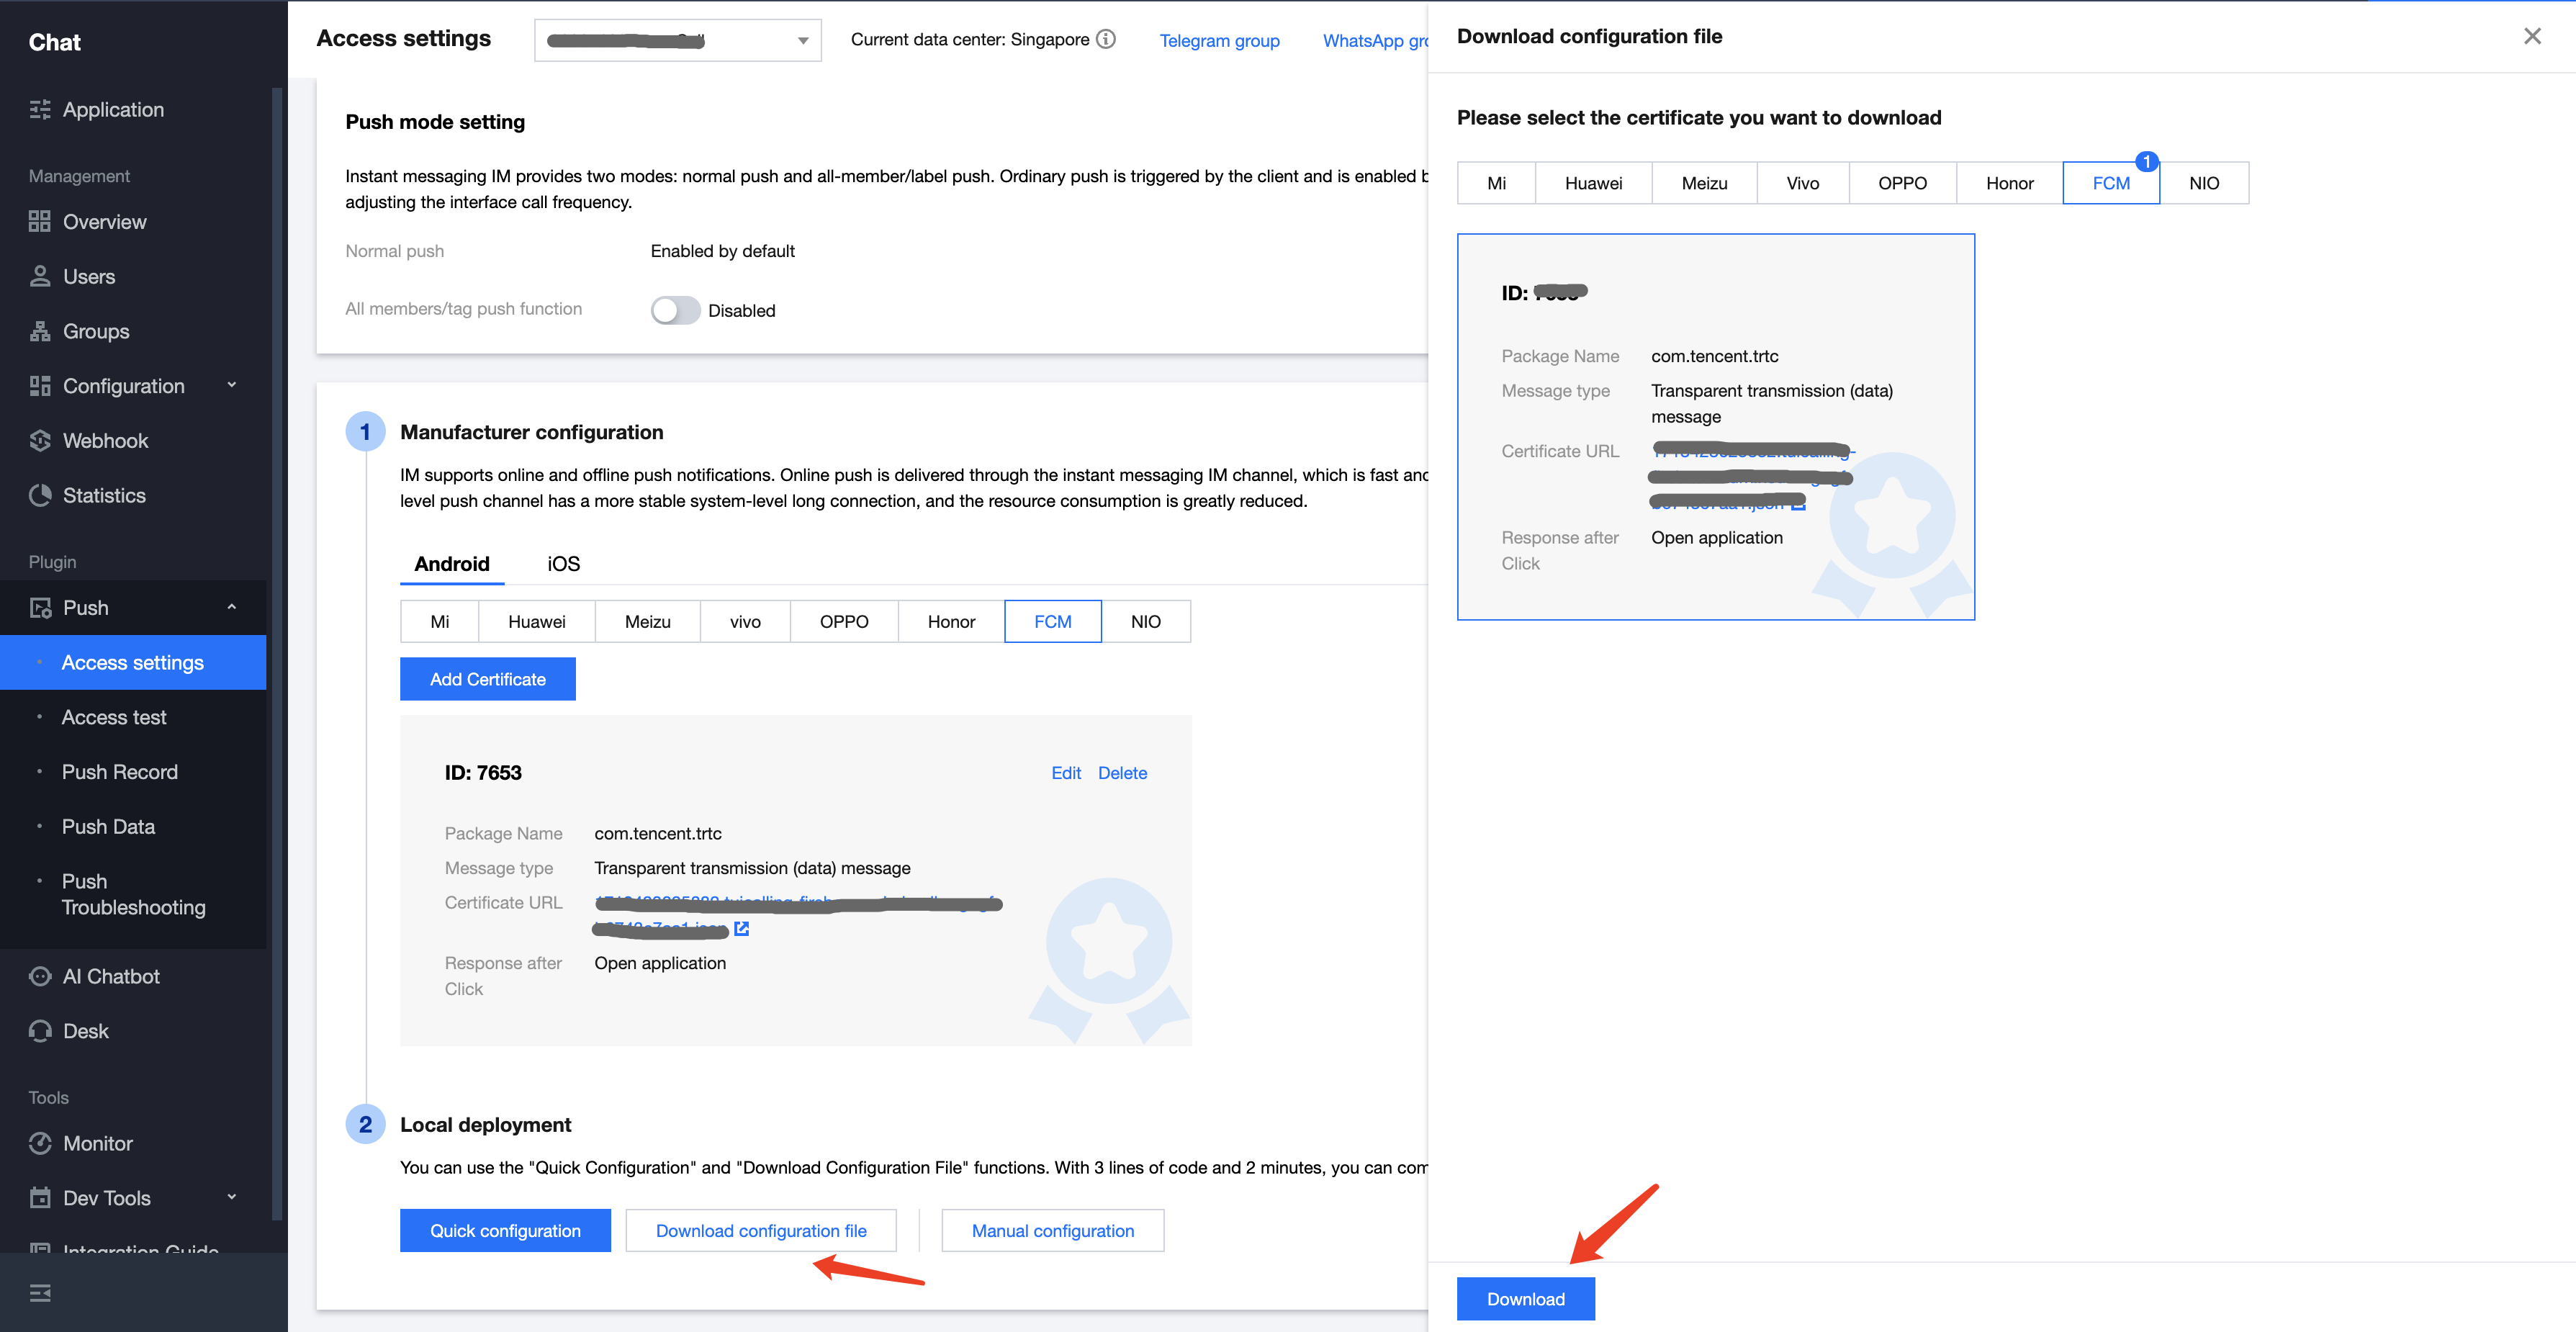
2. Log in to the Chat Console, go to App Push > Access settings feature tab, select FCM, add FCM's certificate, and select Transparent transmission(data) message.
Vendor Push Platform
IM Console Configuration


Step 2: Integrate the Push Plugin

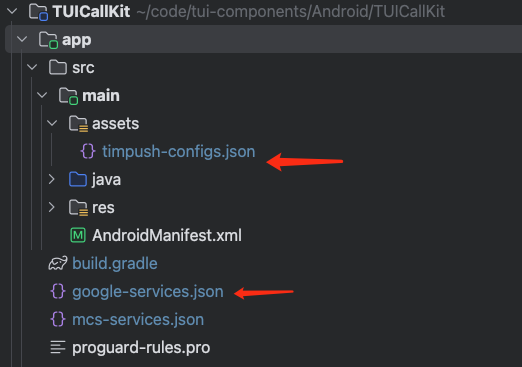
1. Add configuration files: After completing the vendor push setup in the console, download the configuration files and add them to your project. Place the downloaded timpush-configs.json file in your app module's assets directory, and add google-services.json to your project's app directory.
Download the file timpush-configs.json
Download file google-services.json
Add to your project


2. Integrate the push plugin: Add the following dependencies to your project's app module build.gradle file:
implementation "com.tencent.timpush:timpush:latest.release"
implementation "com.tencent.timpush:fcm:latest.release"
Note:
TIMPush requires IM SDK version 7.9.5666 or above.
You can update the Chat SDK version in the tuicallkit-kt/build.gradle file.

Step 3: Project Configuration

1. Add the following to the buildscript > dependencies section of your project-level build.gradle file:
buildscript {
dependencies {
classpath 'com.google.gms:google-services:4.3.15'
}
}
2. In your app module's build.gradle file, apply the following plugin:
apply plugin: 'com.google.gms.google-services'
3. In the same build.gradle file, set the applicationId to your actual app package name:
applicationId 'com.****.callkit'

Customize Incoming Call Notifications

Step 1: Listen for FCM Push

When FCM push wakes up your app, the TIMPush plugin sends an "app wakeup" broadcast. To display incoming call notifications correctly, follow these steps:
1. Listen for the app wakeup broadcast: Register a broadcast receiver to handle the wakeup event sent by TIMPush.
2. Perform auto login: After logging in, the call service becomes available. For login implementation, see login.
import android.content.BroadcastReceiver
import android.content.Context
import android.content.Intent
import android.content.IntentFilter
import android.os.Bundle
import androidx.localbroadcastmanager.content.LocalBroadcastManager

class PushWakeupReceiver : BroadcastReceiver() {
override fun onReceive(context: Context?, intent: Intent?) {
if (intent?.action == "TIMPush.BROADCAST_IM_LOGIN_AFTER_APP_WAKEUP") {
val bundle = intent.getExtras()
// 2.Execute Auto-Login
// autoLogin()
}
}
}

class MainActivity : AppCompatActivity() {
private val wakeupReceiver = PushWakeupReceiver()
private var callListener: CallListener? = null

override fun onCreate(savedInstanceState: Bundle?) {
super.onCreate(savedInstanceState)
// 1.Listen for App Wakeup Broadcast
observeAppWeakup()
}
private fun observeAppWeakup() {
val filter = IntentFilter("TIMPush.BROADCAST_IM_LOGIN_AFTER_APP_WAKEUP")
LocalBroadcastManager.getInstance(this).registerReceiver(wakeupReceiver, filter)
}
}

Step 2: Customize Notification Style

Use the NotificationManager class to display a custom incoming call notification interface:
1. Create an incoming call notification manager class (IncomingCallNotificationManager): Encapsulate the logic for creating and displaying notifications.
2. Customize the notification UI: Use RemoteViews to define the notification layout. For details on configuring notifications with NotificationCompat.Builder (such as Channel, PendingIntent, priority, etc.), refer to the Android documentation: NotificationCompat.Builder.
import android.app.Notification
import android.app.NotificationChannel
import android.app.NotificationManager
import android.content.Context
import android.content.Intent
import android.os.Build
import android.widget.RemoteViews
import androidx.core.app.NotificationCompat

class IncomingCallNotificationManager(private val context: Context) {
private val channelId = "incoming_call_channel"
private val channelName = "Call notification"
private val notificationId = 1001
private var remoteViews: RemoteViews? = null
private val notificationManager: NotificationManager =
context.getSystemService(Context.NOTIFICATION_SERVICE) as NotificationManager

init {
// 1.Create notification channels
createNotificationChannel()
}
private fun createNotificationChannel() {
if (Build.VERSION.SDK_INT >= Build.VERSION_CODES.O) {
val channel = NotificationChannel(
channelId, // Channel ID (Unique Identifier)
"Call notification", // Channel Name (Visible to Users)
NotificationManager.IMPORTANCE_HIGH // Importance: High priority
).apply {
description = "Display incoming call notification" // Channel description
enableLights(true) // Enable notification light
enableVibration(true) // Enable vibration
setShowBadge(false) // Do not display badges
}
notificationManager.createNotificationChannel(channel)
}
}
// 2. Display custom call notification UI style
fun showIncomingCallNotification(
callerName: String,
callerAvatar: Int?,
isVideoCall: Boolean
) {
// RemoteViews are used to display custom layouts in notifications.
remoteViews = RemoteViews(context.packageName, R.layout.incoming_call_notification)
// Set caller name
remoteViews?.setTextViewText(R.id.tv_caller_name, callerName)
// Set the call type description (video call or voice call).
remoteViews?.setTextViewText(R.id.tv_call_desc, if (isVideoCall) "Video" else "Audio")
// Set call type icon
val callTypeIcon = if (isVideoCall) {R.drawable.ic_video_call} else {R.drawable.ic_audio_call}
remoteViews?.setImageViewResource(R.id.img_call_type, callTypeIcon)
// Set caller avatar
remoteViews?.setImageViewResource(R.id.img_avatar, callerAvatar)
// Create a notification object
val notification = NotificationCompat.Builder(context, channelId)
.setSmallIcon(R.drawable.ic_notification_small) // Small icons displayed in the status bar
.setContent(remoteViews) // Set custom layout
.setCustomContentView(remoteViews) // Standard view (when the notification bar is collapsed)
.setCustomBigContentView(remoteViews) // Expanded view (when the notification bar is expanded)
.setOngoing(false) // Continuous notification (cannot be swiped to delete)
.setAutoCancel(true) // Automatically cancel after tapping
.setCategory(NotificationCompat.CATEGORY_CALL) // Category as call notification
.setVisibility(NotificationCompat.VISIBILITY_PUBLIC) // Visible on lock screen
.setTimeoutAfter(60000) // Automatically cancel after 60 seconds
.build()
notificationManager.notify(notificationId, notification)
}
}
The layout file for the above notification (R.layout.incoming_call_notification):
<?xml version="1.0" encoding="utf-8"?>
<LinearLayout xmlns:android="http://schemas.android.com/apk/res/android"
android:layout_width="match_parent"
android:layout_height="wrap_content"
android:orientation="horizontal"
android:padding="16dp"
android:background="#FFFFFF"
android:gravity="center_vertical">

<!-- User avatar -->
<ImageView
android:id="@+id/img_avatar"
android:layout_width="56dp"
android:layout_height="56dp"
android:layout_gravity="center_vertical"
android:scaleType="centerCrop"
android:src="@drawable/callview_ic_avatar"
android:background="@drawable/avatar_background" />

<!-- User info and description -->
<LinearLayout
android:layout_width="0dp"
android:layout_height="wrap_content"
android:layout_weight="1"
android:layout_gravity="center_vertical"
android:layout_marginStart="16dp"
android:orientation="vertical">

<TextView
android:id="@+id/tv_caller_name"
android:layout_width="wrap_content"
android:layout_height="wrap_content"
android:textSize="18sp"
android:textStyle="bold"
android:textColor="#212121"
android:maxLines="1"
android:ellipsize="end"
android:text="Incoming Call" />

<LinearLayout
android:layout_width="wrap_content"
android:layout_height="wrap_content"
android:layout_marginTop="6dp"
android:orientation="horizontal"
android:gravity="center_vertical">

<ImageView
android:id="@+id/img_call_type"
android:layout_width="16dp"
android:layout_height="16dp"
android:src="@drawable/ic_audio_call" />

<TextView
android:id="@+id/tv_call_desc"
android:layout_width="wrap_content"
android:layout_height="wrap_content"
android:layout_marginStart="6dp"
android:textSize="14sp"
android:textColor="#757575"
android:text="Audio Call" />
</LinearLayout>
</LinearLayout>
</LinearLayout>

Step 3: Display Incoming Call Notification

Listen for incoming call events. After a successful login (Step 1), if there are offline incoming call events, CallStore will automatically resend them. You can then display your custom notification (from Step 2) as follows:
1. Listen for incoming call events: Subscribe to the onCallReceived event. This event is triggered when an incoming call is received and contains key call information.
2. Display the incoming call notification: When the onCallReceived event is received, display the notification interface using the call information from the event. In the callback, use the event data to trigger your custom notification (see Step 2).
class MainActivity : AppCompatActivity() {
private val wakeupReceiver = PushWakeupReceiver()
private var callListener: CallListener? = null

override fun onCreate(savedInstanceState: Bundle?) {
super.onCreate(savedInstanceState)
// 1.Listening to incoming call events
observeCallReceived()
}
private fun observeCallReceived() {
callListener = object : CallListener() {
override fun onCallReceived(callId: String, mediaType: CallMediaType, userData: String) {
super.onCallReceived(callId, mediaType, userData)
// 2.Display incoming call notification
showIncomingCallNotification(mediaType)
}
}
callListener?.let { CallStore.shared.addListener(it) }
}
private fun showIncomingCallNotification(mediaType: CallMediaType) {
try {
val callerName = CallStore.shared.observerState.activeCall.value.inviterId
val notificationManager = IncomingCallNotificationManager(this)
notificationManager.showIncomingCallNotification(
callerName = callerName,
callerAvatar = R.drawable.callview_ic_avatar,
isVideoCall = mediaType == CallMediaType.Video
)
} catch (e: Exception) {
}
}
}
onCallReceived: Triggered when an incoming call event is received.
Parameter
Type
Description
callId
String
Unique identifier for this call.
mediaType
Call media type, used to specify whether to initiate an audio or video call.
CallMediaType.Video: Video call.
CallMediaType.Audio: Audio call.
activeCall: Contains real-time data for the active call, including call ID, inviter ID, invitee IDs, media type, duration, and other key information.
Field
Type
Description
callId
String
Unique identifier for this call.
roomId
String
Room ID for this call.
inviterId
String
ID of the user who initiated the call.
inviteeIds
LinkedHashSet
List of invitee user IDs.
chatGroupId
String
Group ID for this call, used in conjunction with Chat.
mediaType
Media type for this call.
CallMediaType.Video: Video call.
CallMediaType.Audio: Audio call.
result
Call result/direction.
CallDirection.Unknown: Unknown call.
CallDirection.Missed: Missed call.
CallDirection.Incoming: Incoming call.
CallDirection.Outgoing: Outgoing call.
duration
Long
Call duration.
startTime
Long
Call start time.

Demo Effect

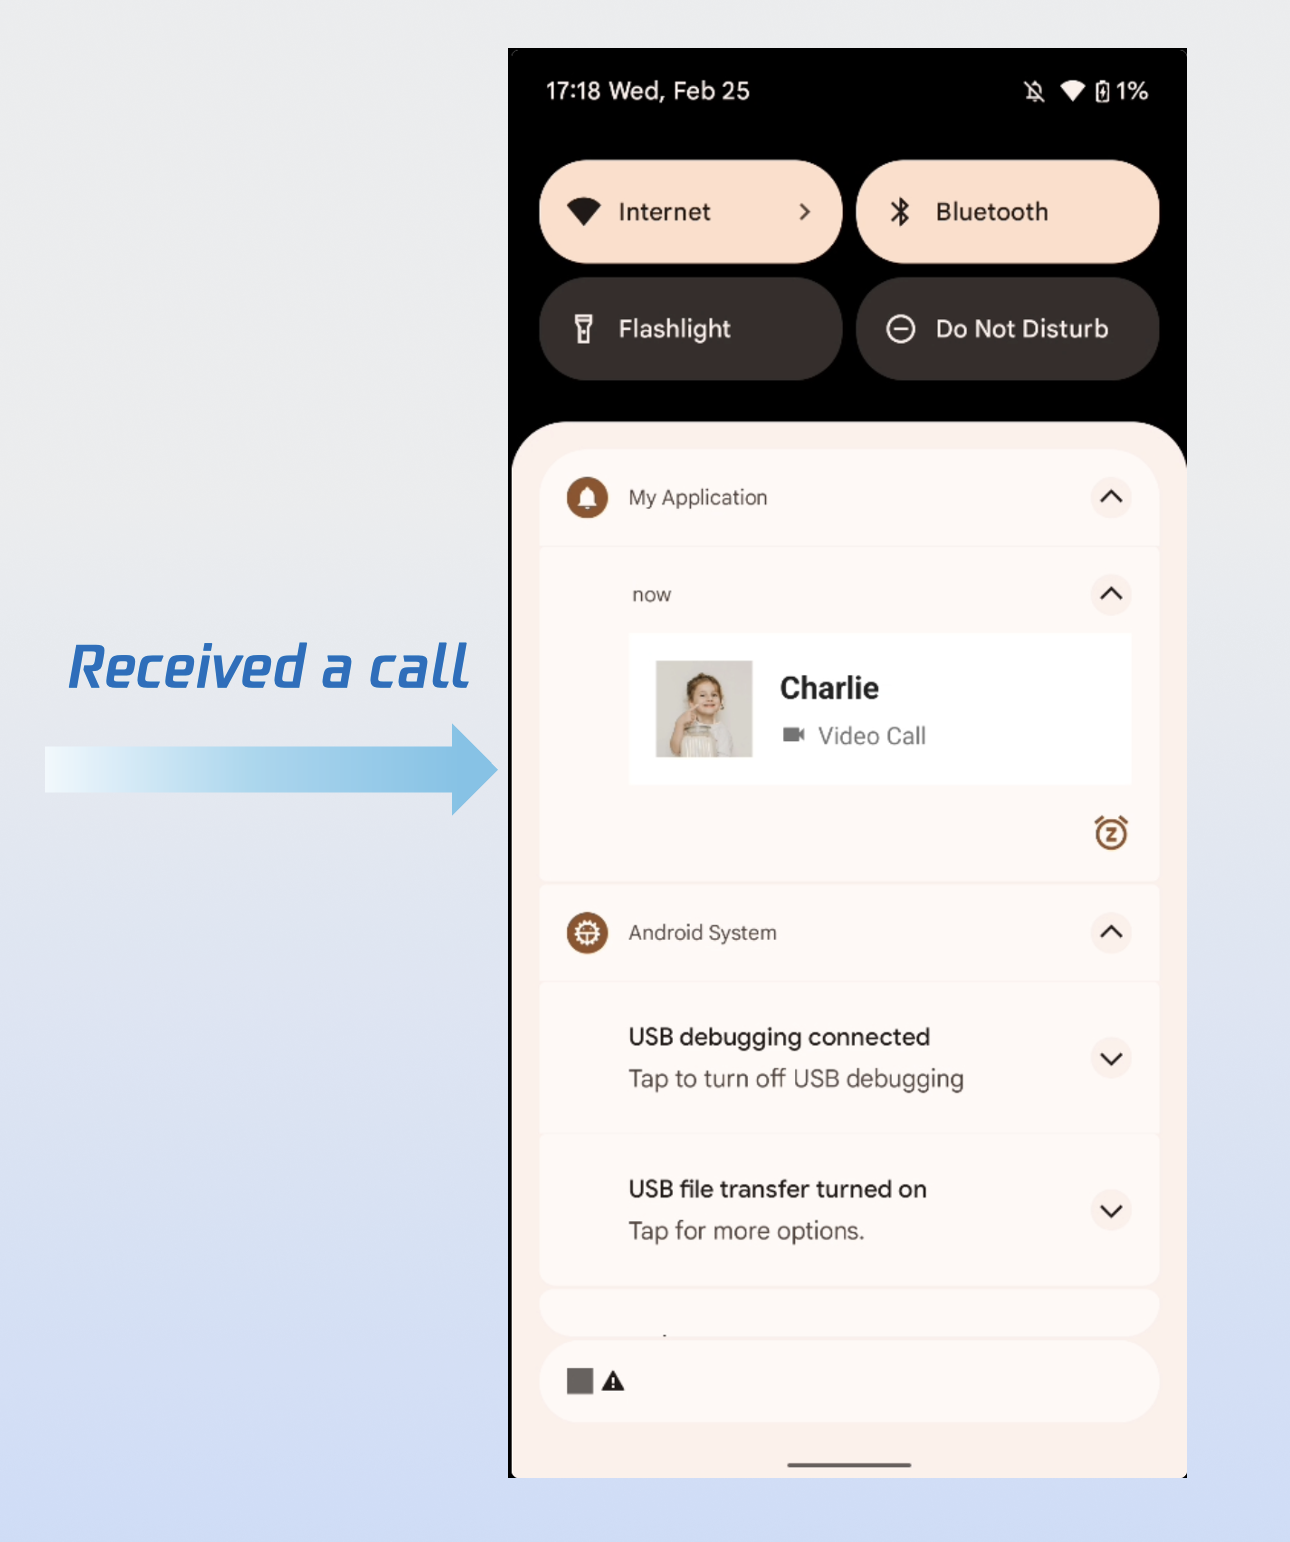
After completing all three steps above, the incoming call notification will appear as shown below:


FAQs

Unable to Display Incoming Call Interface After App Is Killed?

Check if push notifications are being received. If not, verify that the IM Console certificate was uploaded correctly. Refer to Step 1 of Quick Integration in this guide.
Ensure that FCM Data Message is selected in the console, as described in Step 2 of Prerequisites above.
Confirm that data messages are being received. Filter your logs (keyword: TIMPush) and look for the following log output:

Make sure auto login is implemented. Only after auto login will call requests be pulled and the incoming call interface displayed.

How to Force FCM Channel Usage?

To force your app to always use the FCM channel, call the following method:
TIMPushManager.getInstance().forceUseFCMPushChannel(true);

Contact Us

If you have any questions or suggestions during integration or use, join the Telegram technical group or Contact Us for support.

도움말 및 지원

문제 해결에 도움이 되었나요?

피드백