接入流程说明
Download
聚焦模式
字号
本文介绍 eKYC 活体比对(移动端 H5)整体接入的流程。
接入准备
注册腾讯云企业账号,请参见 注册指引。
完成企业实名认证,请参见 企业实名指引。
登录 eKYC 控制台 开通服务。
整体架构图
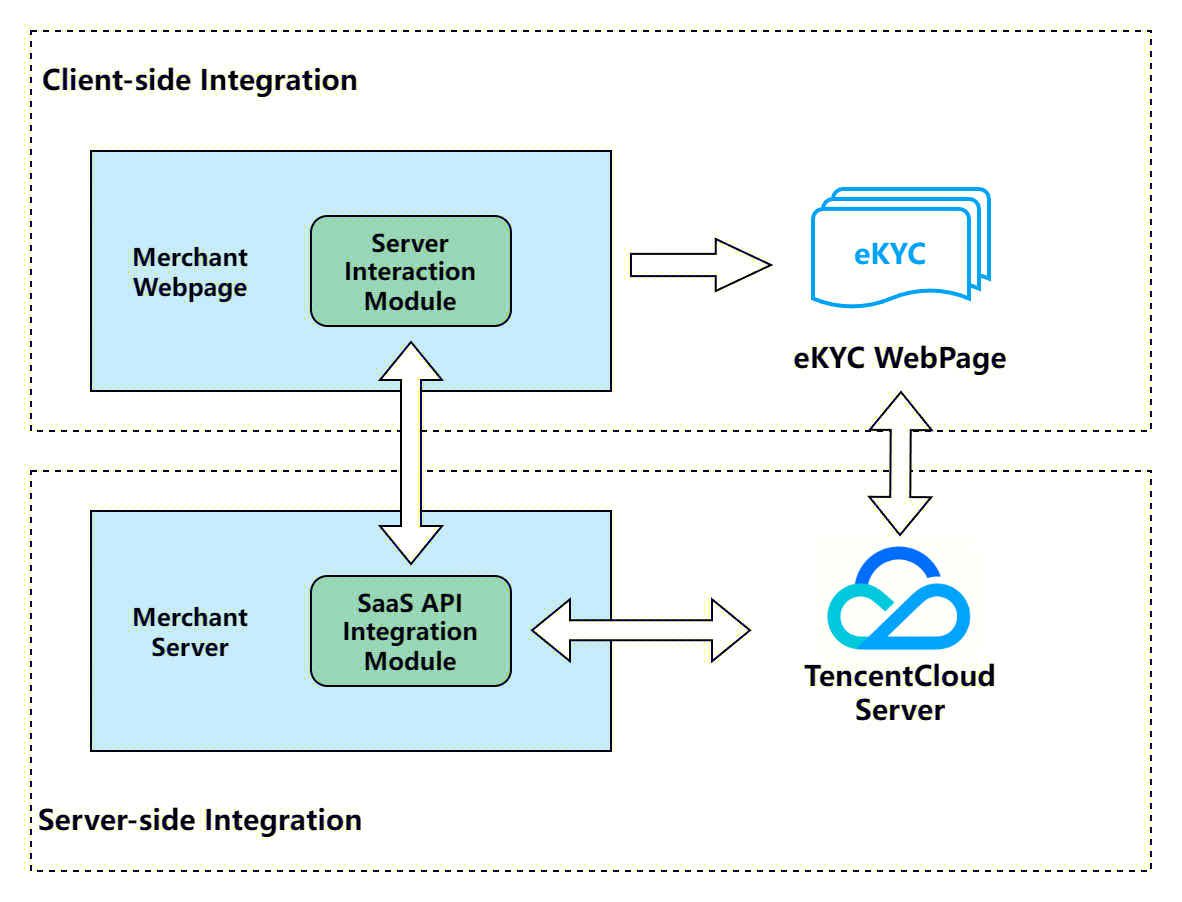
下图为 eKYC 活体比对(移动端 H5)的架构图:
整体交互流程
下图展示了客户和腾讯云 eKYC 的整体交互逻辑,图中角色说明:
User:移动端 H5 用户
Merchant WebPage:客户前端页面
Merchant Server:客户后端服务
eKYC WebPage:eKYC 前端页面
eKYC Server:eKYC 后端服务
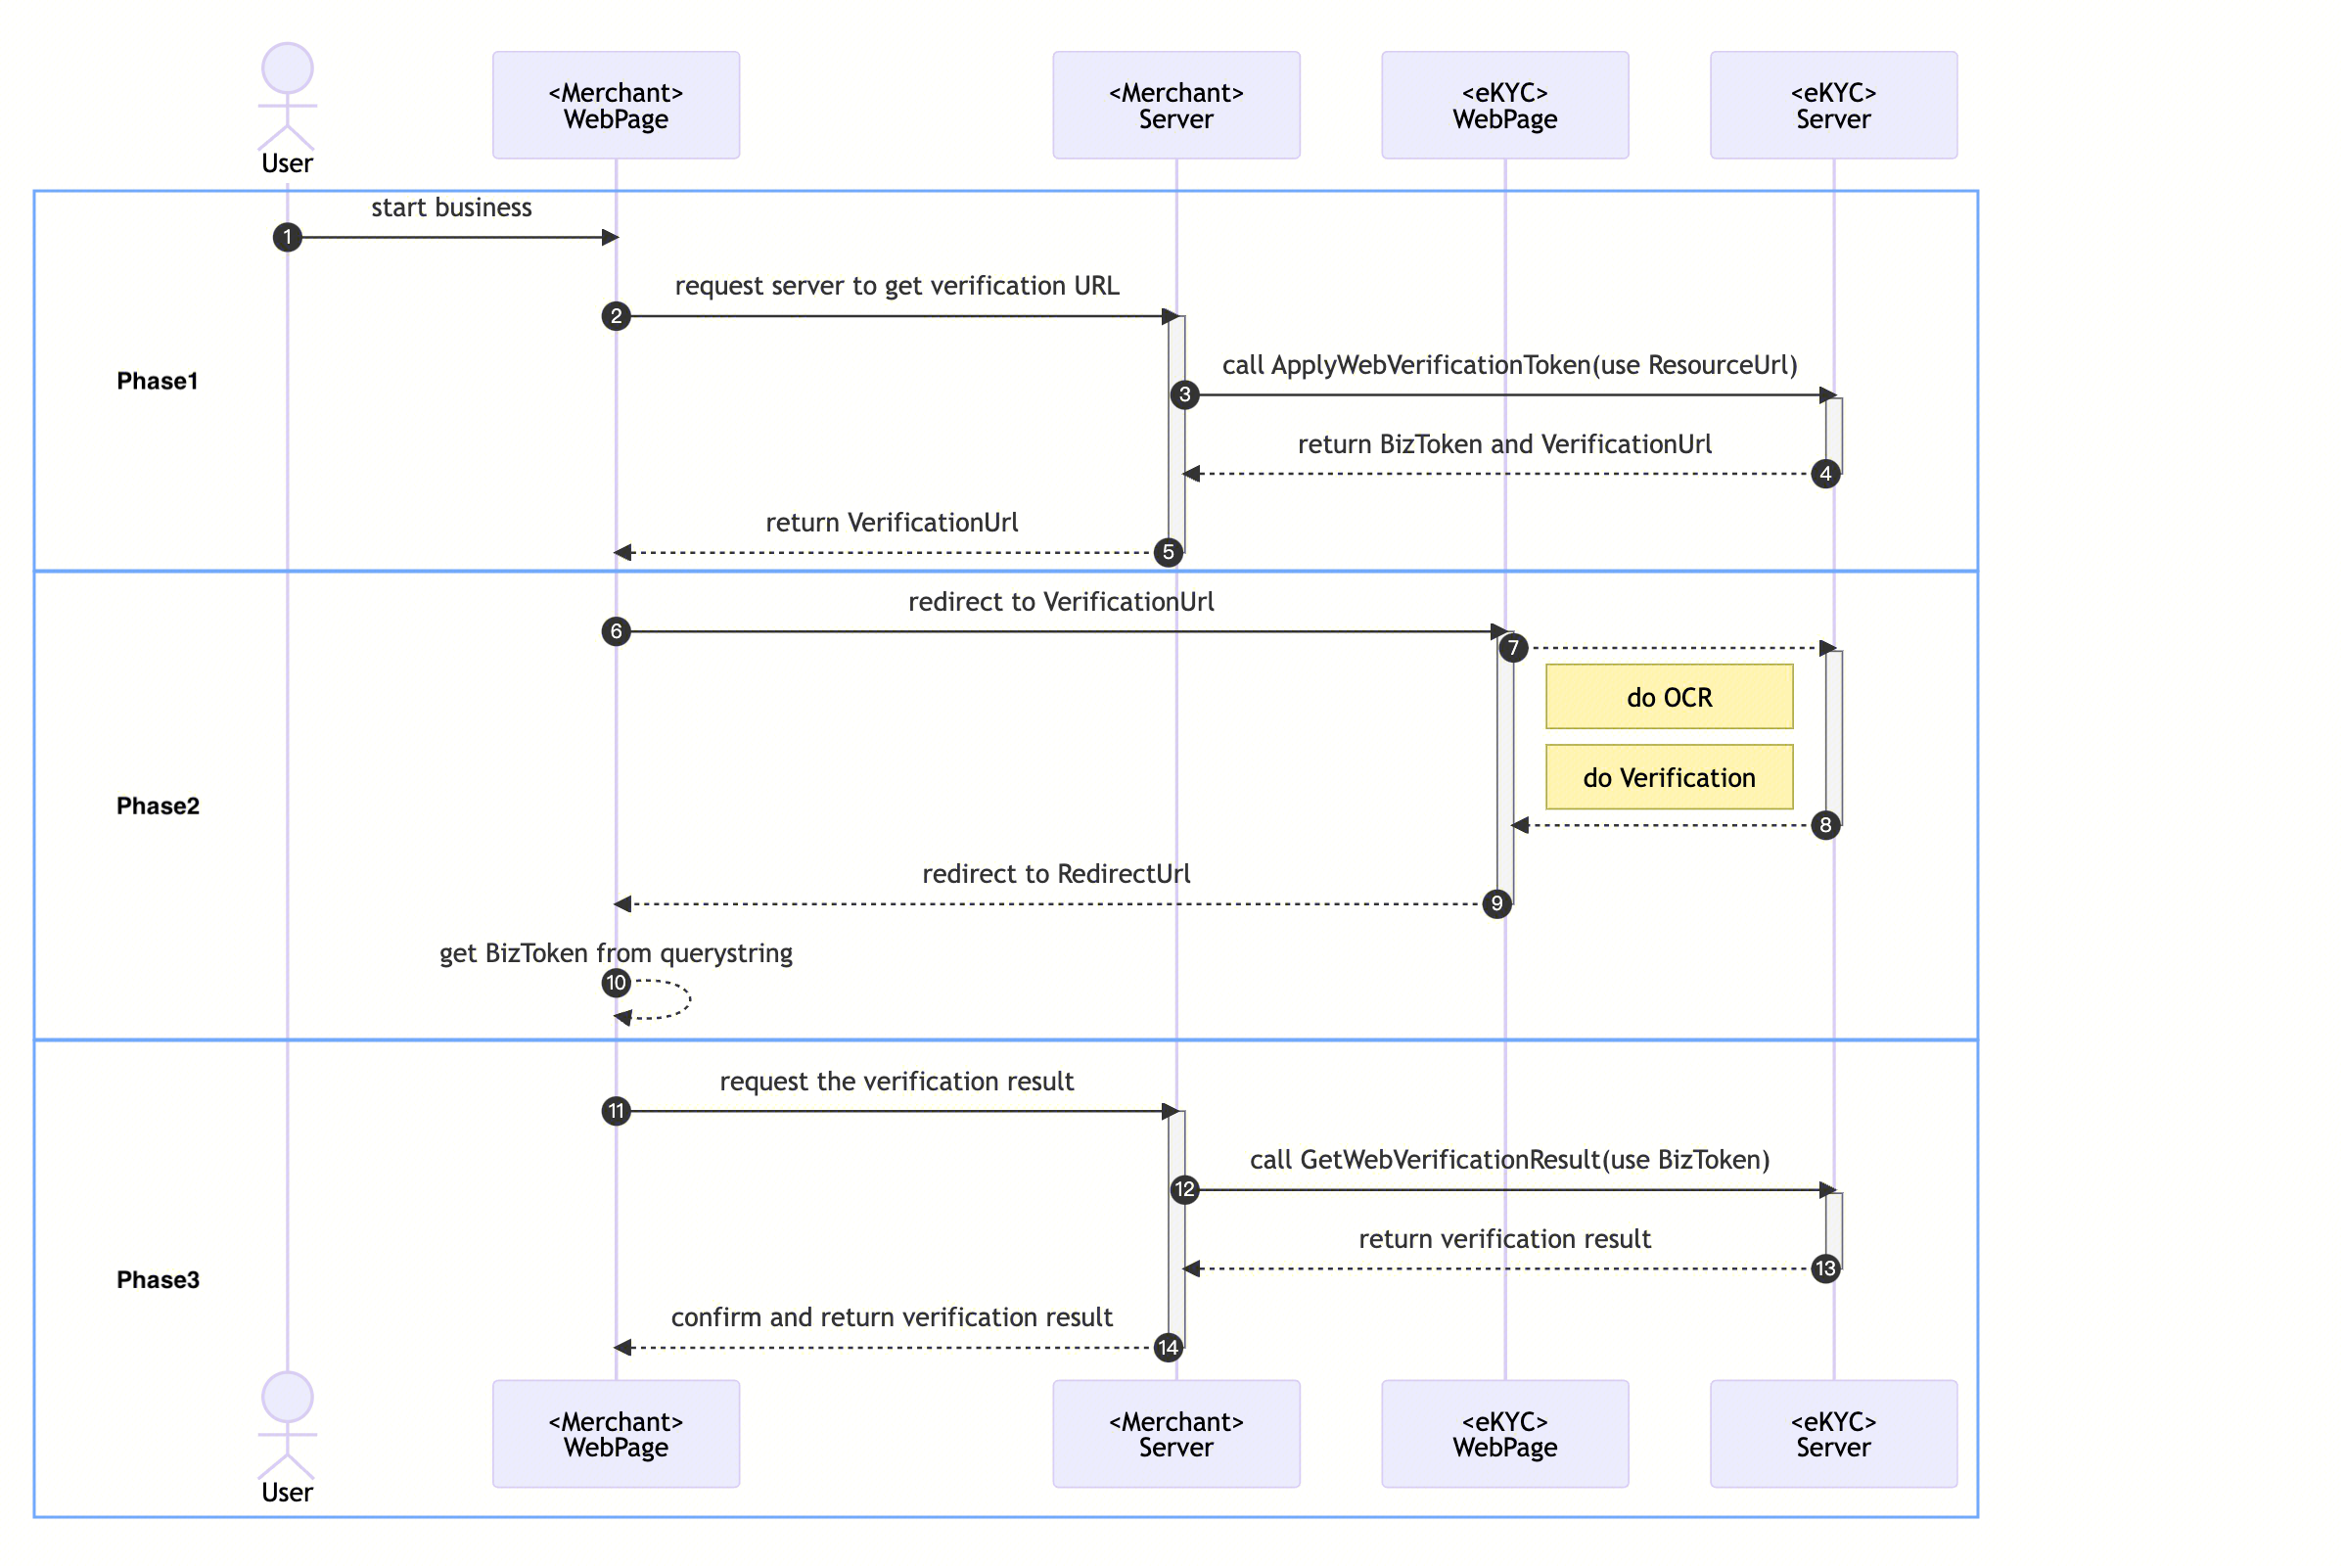
具体的推荐交互流程详细如下:
创建 RuleId
RuleId 用于调用配置的业务流程,创建步骤如下:
1. 登录 腾讯云 eKYC 控制台,在自助接入页面,单击创建业务流程。
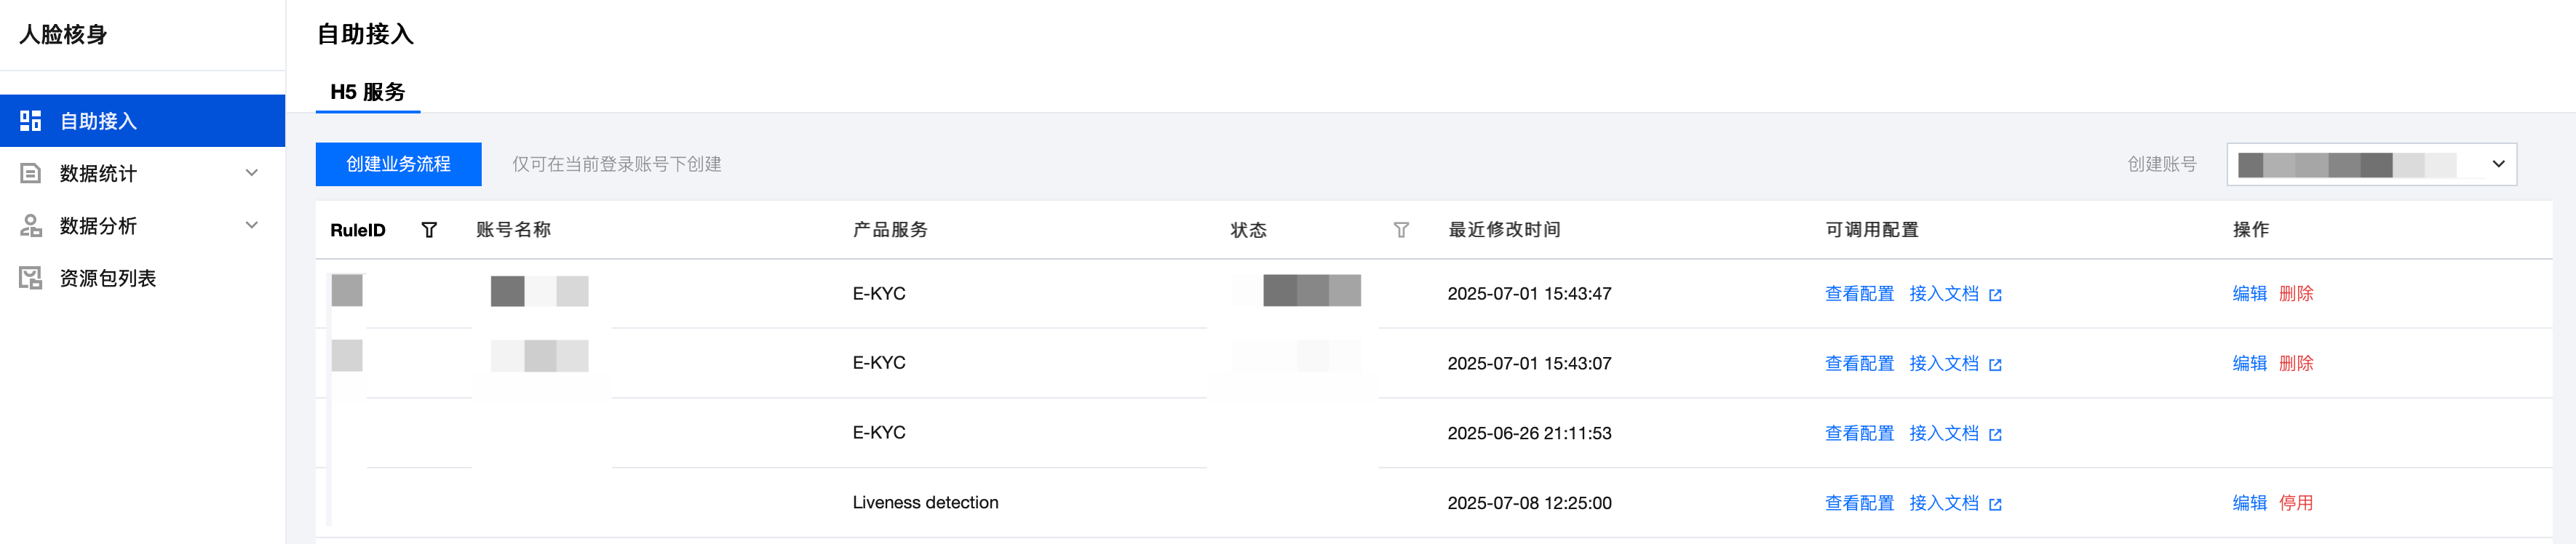
2. 选择需要的产品服务,然后单击下一步。

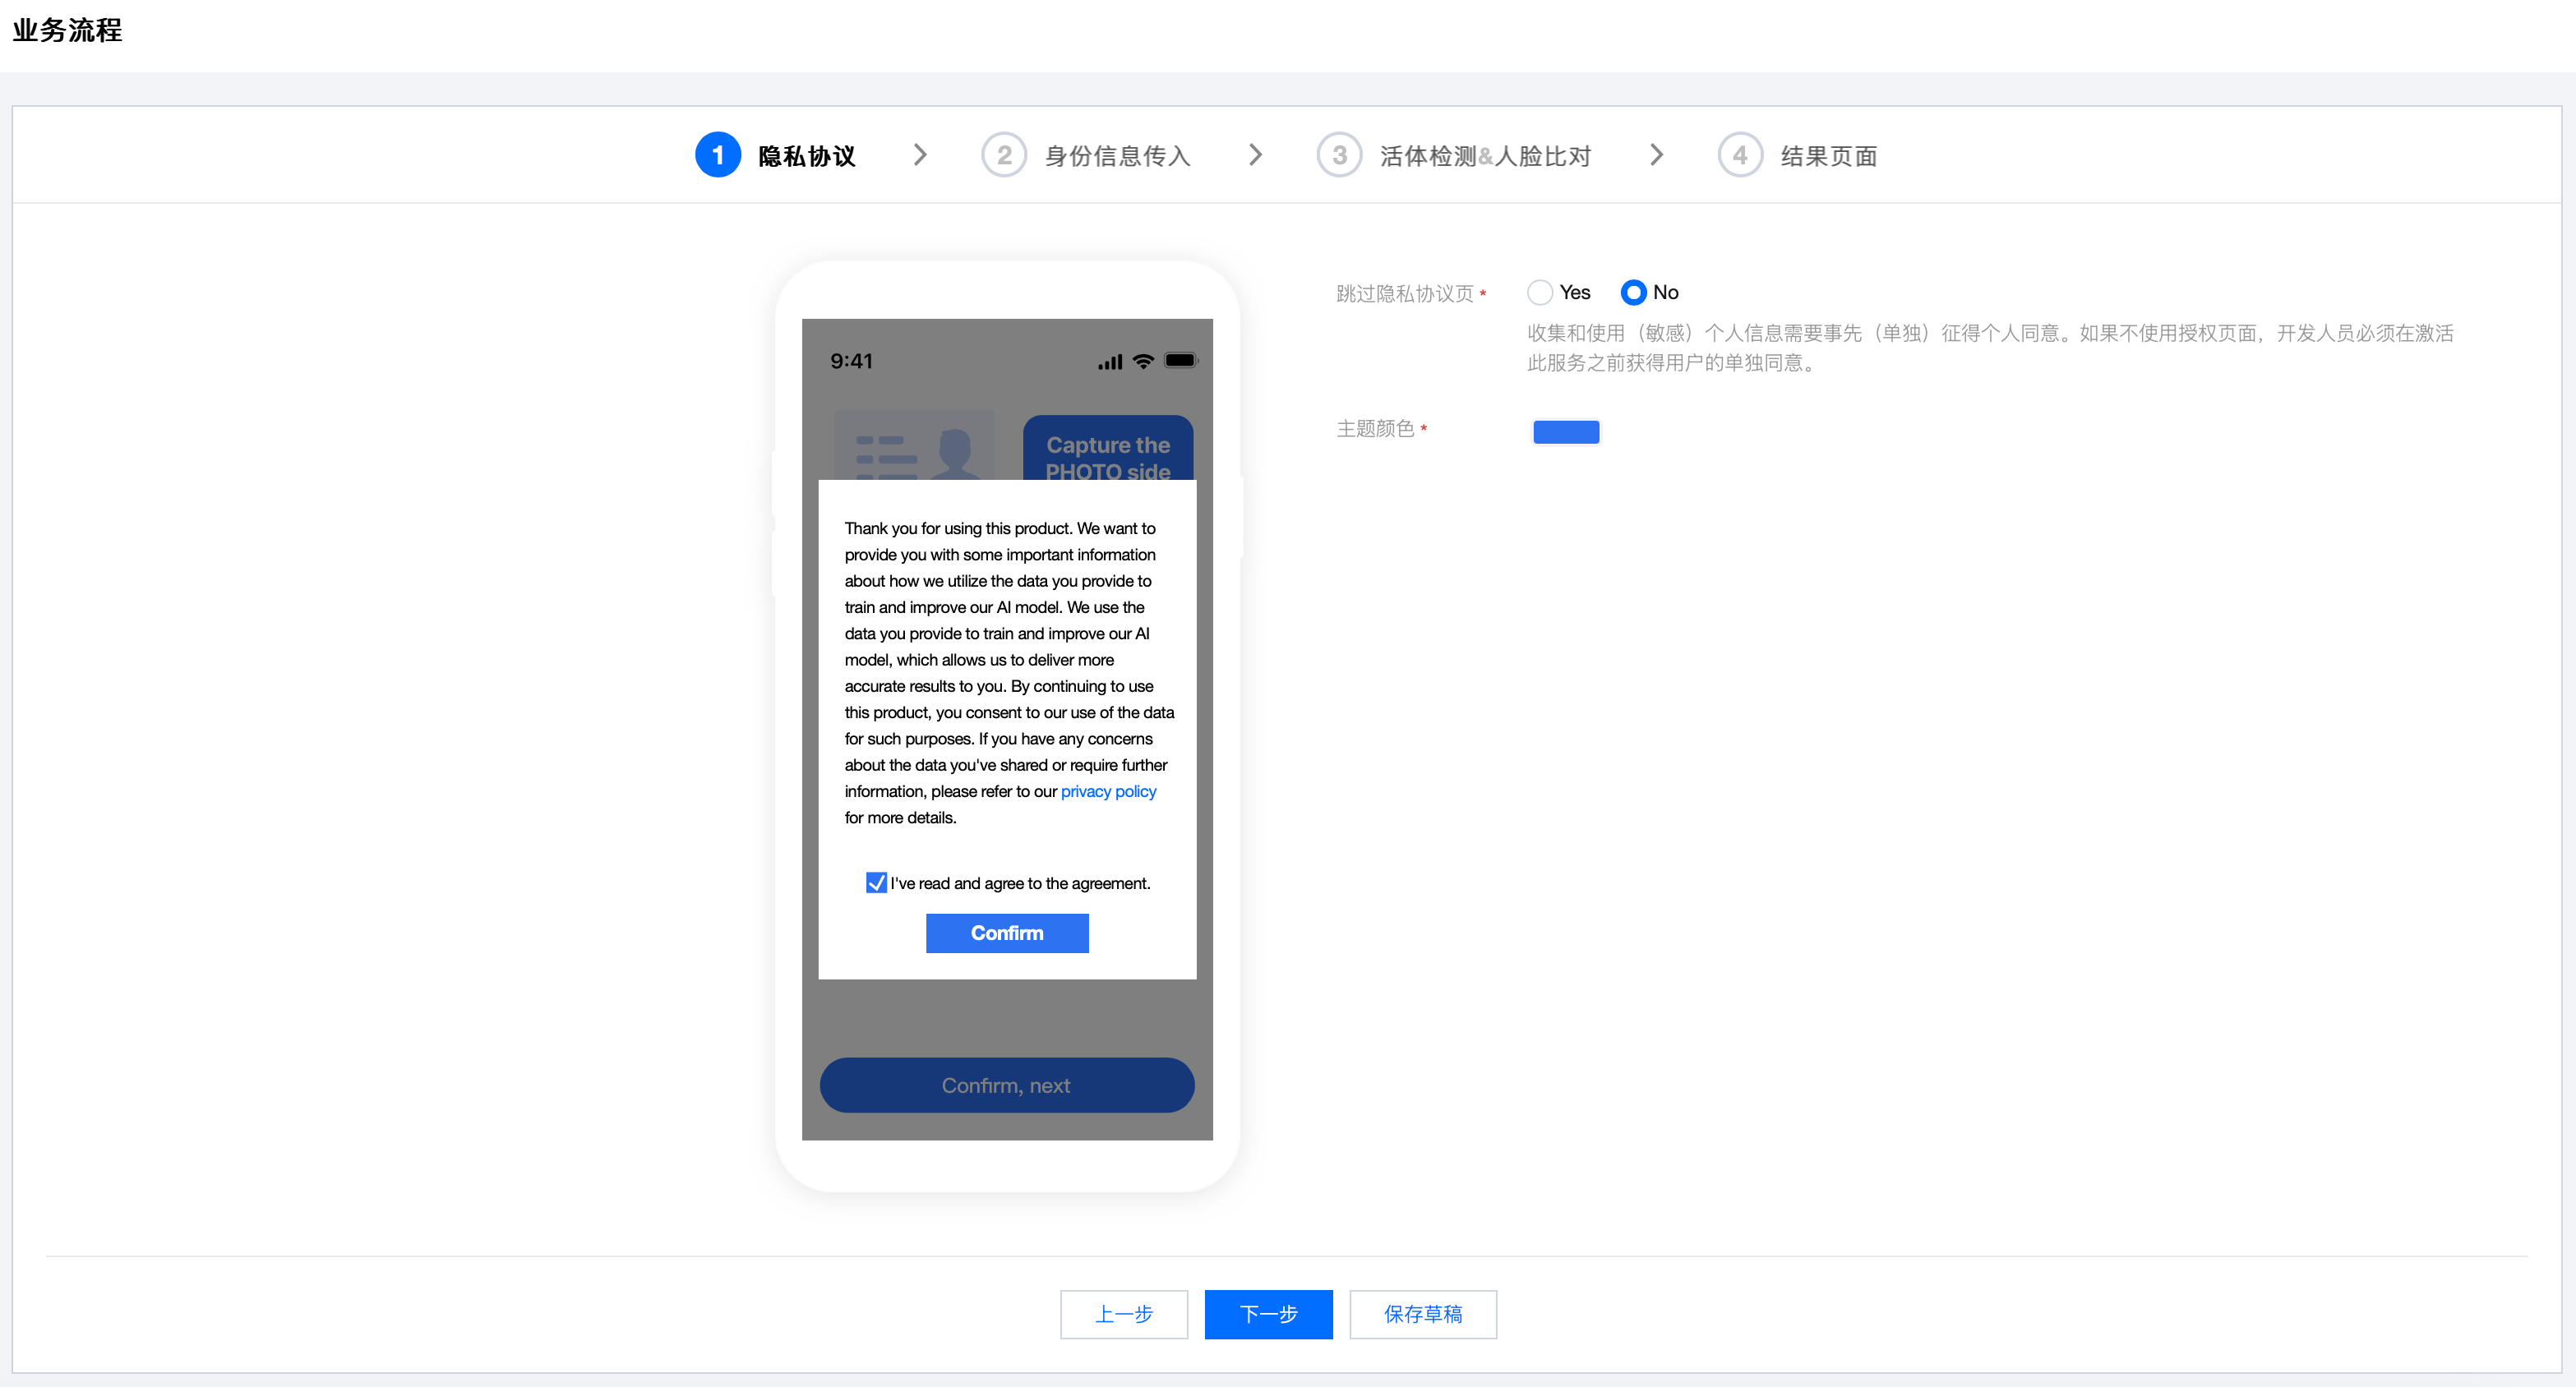
3. 进入隐私协议配置页。根据您业务的实际需要选择是否跳过隐私协议页、选择主题颜色后单击下一步。
4. 进入 OCR 配置页,选择业务要识别的卡证类型以及要呈现在识别结果页的字段,然后单击下一步。

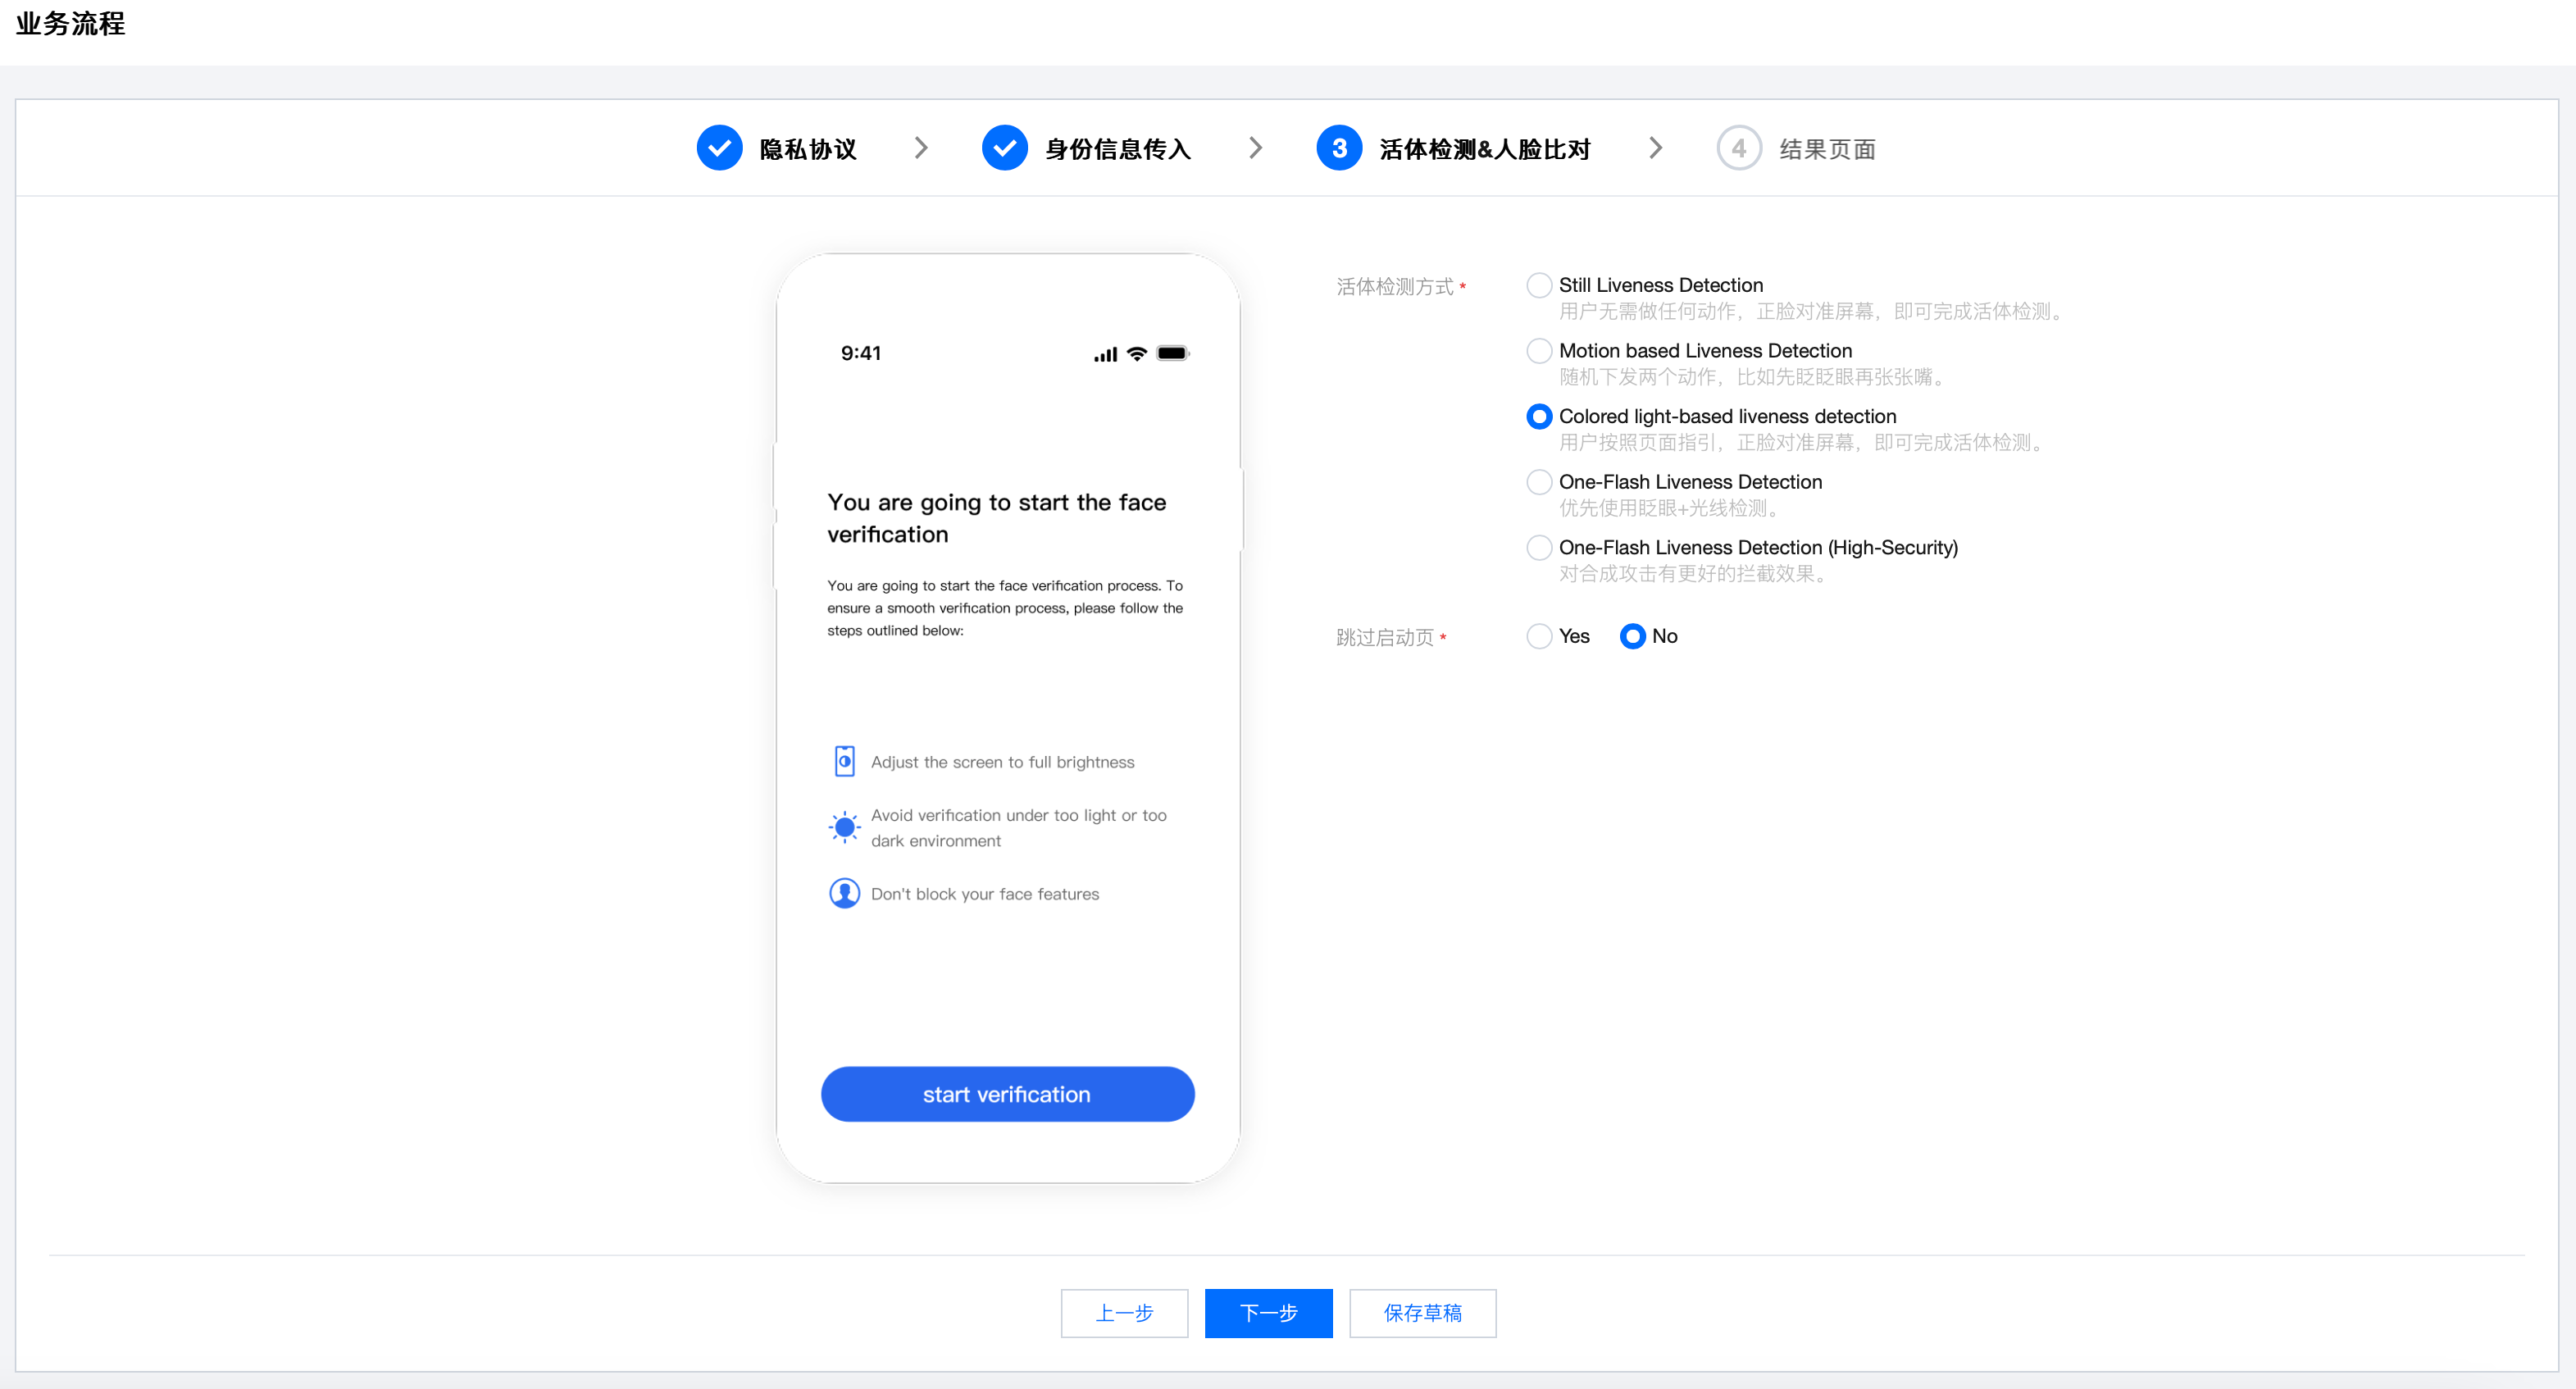
5. 进入活体检测配置页,选择要应用的活体检测模式,并确认是否要跳过活体启动页,然后单击下一步。
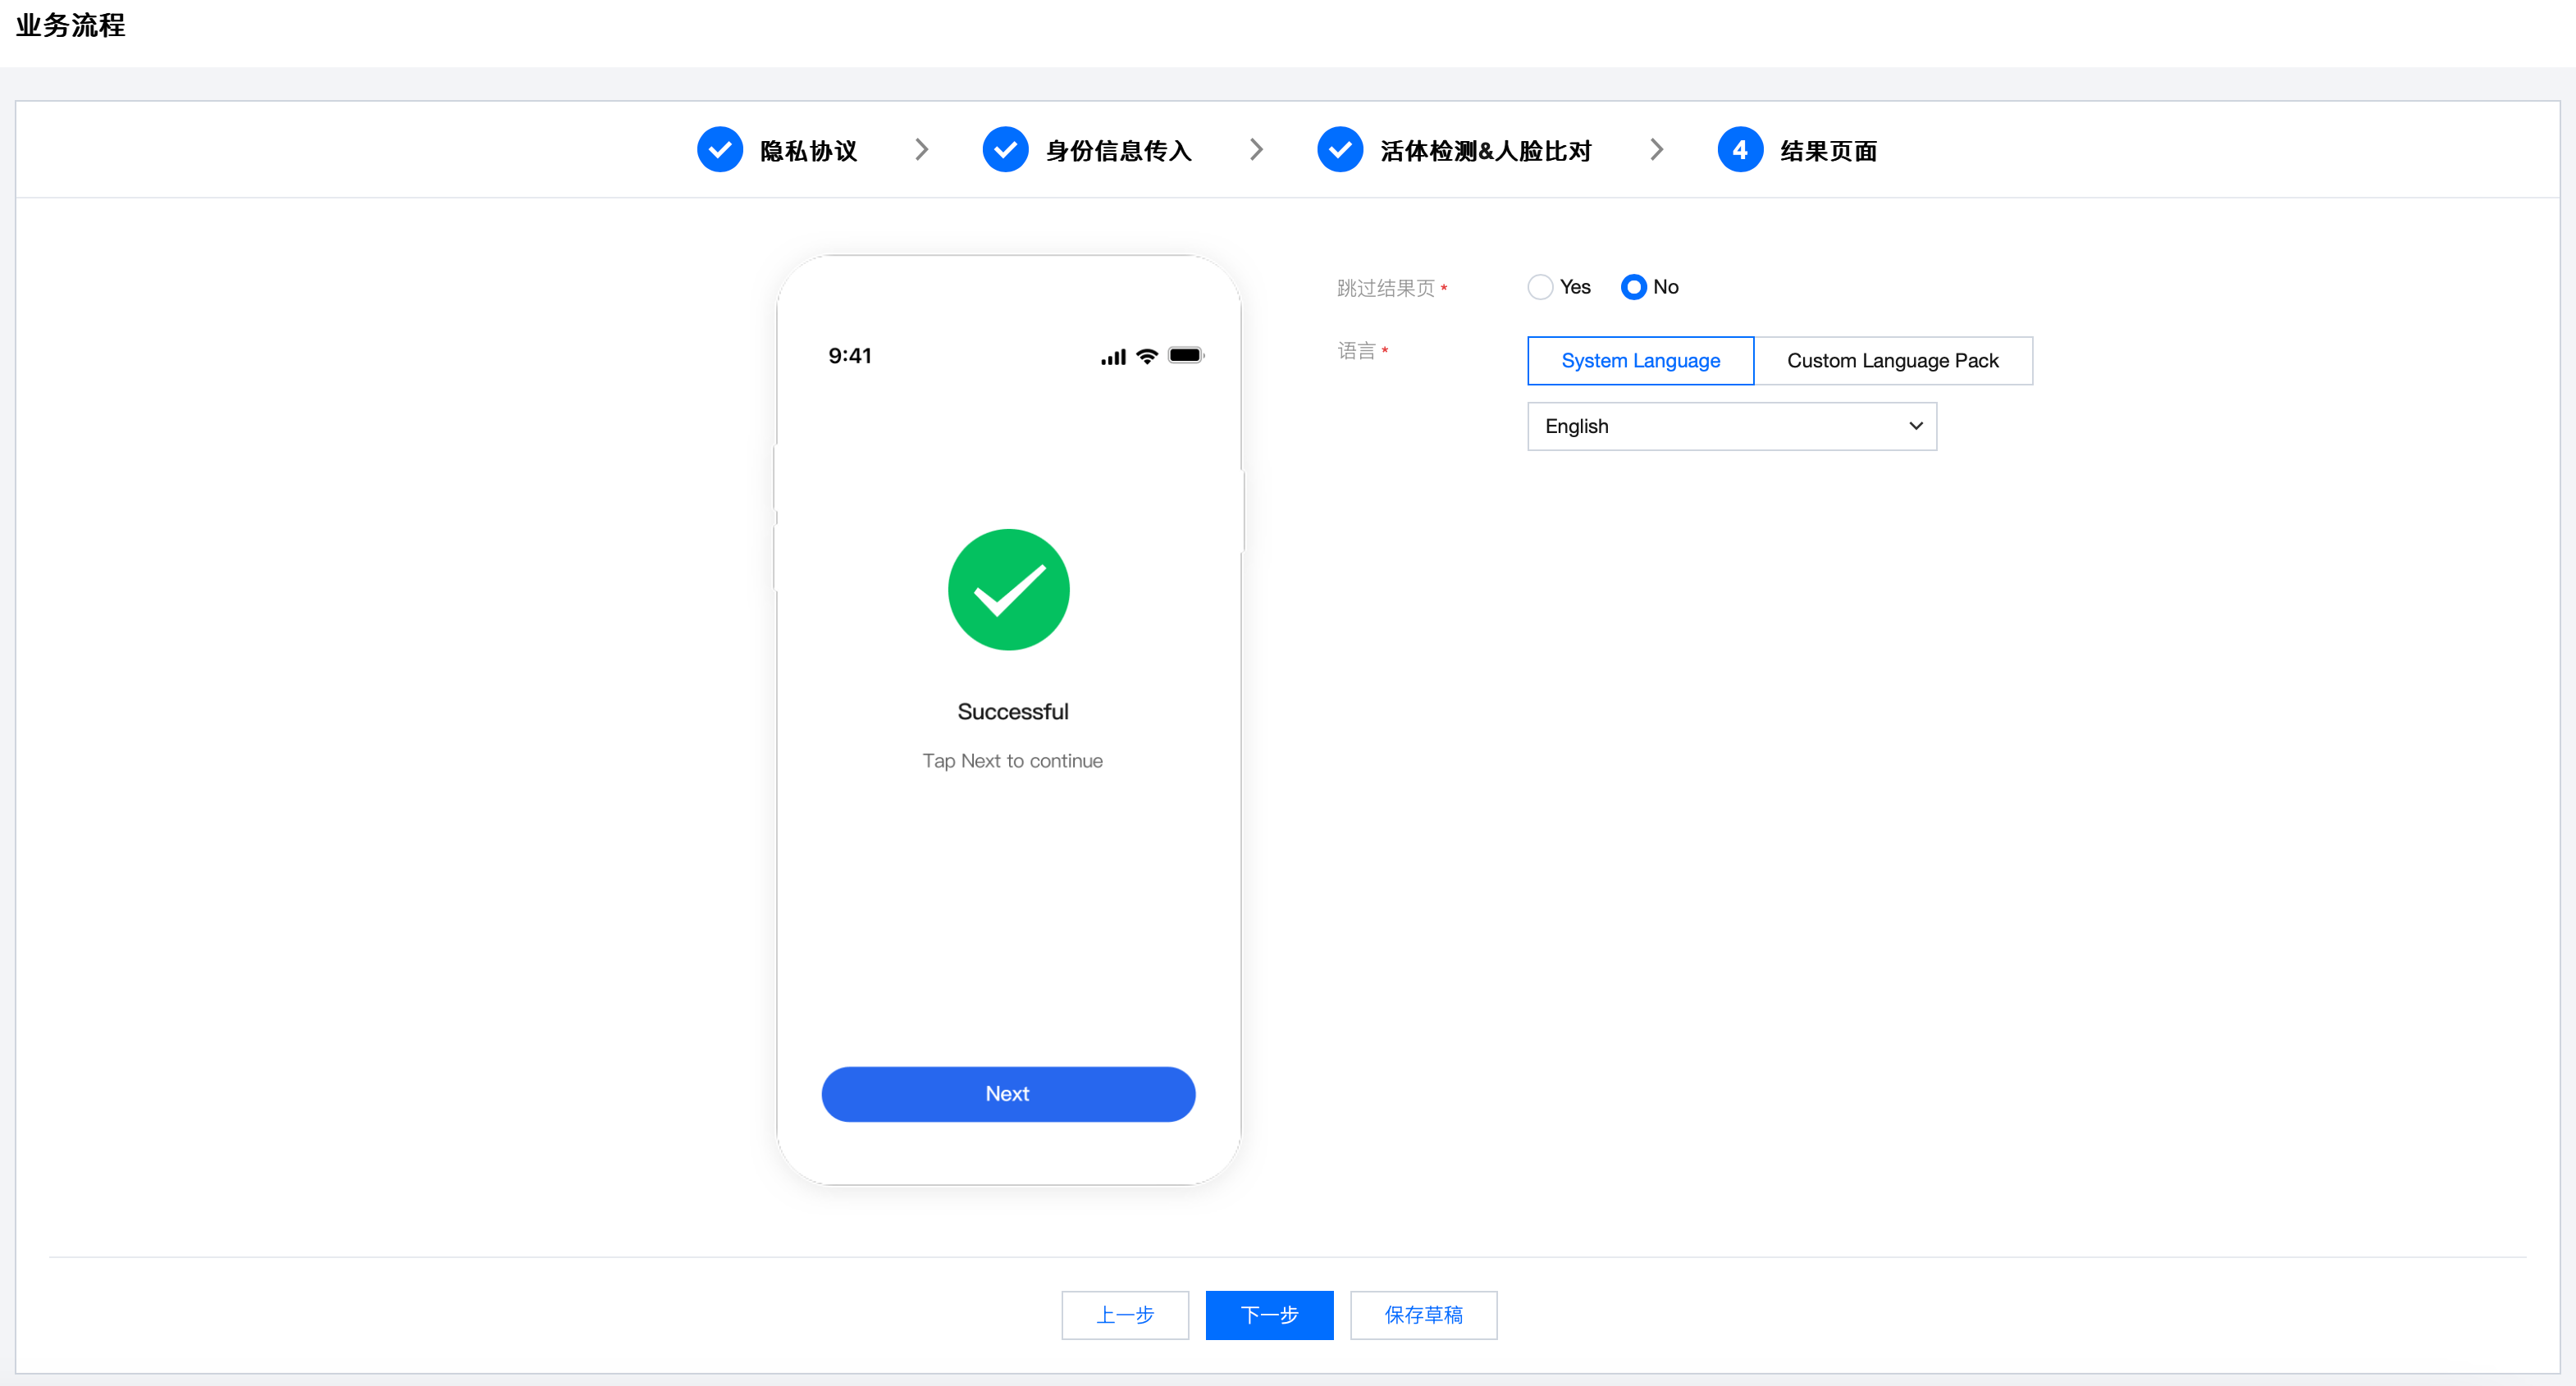
6. 配置是否跳过结果页并选择语言。您可以选择系统内置语言,或根据附件模板自定义语言包上传,然后单击下一步。
7. 确认您的配置信息无误,然后单击确认。提交后 RuleId 将在一个工作日内审核生效。

阶段一
1. 用户端业务触发核验流程。
2. Merchant WebPage 发送请求到 Merchant Server,告知 Merchant Server 需要发起一次核验流程。
3. Merchant Server 传入相关参数调用 ApplyWebVerificationBizTokenIntl 接口,参考服务端集成第一步。
4. eKYC Server 接收到请求后,将该次核验流程的 BizToken 和 VerificationURL 返回给 Merchant Server。
5. Merchant Server 将获取到的 BizToken 进行保存,并将 VerificationURL 下发给 Merchant WebPage。
阶段二
1. Merchant WebPage 跳转到 VerificationURL,打开 eKYC WebPage,参考前端集成第一步。
2. 用户在 eKYC WebPage 上进行 OCR 证件识别和核验流程。
3. 核验完成后,eKYC Server 将核验结果下发给 eKYC WebPage,Merchant WebPage 展示结果页面。
4. 用户点击下一步后,eKYC WebPage 会跳转回 RedirectURL 地址,并在 URL 上拼接 Token 参数。
5. Merchant WebPage 通过地址获取到当前核验流程的 token 参数,参考前端集成第二步。
阶段三
1. Merchant WebPage 发送请求到 Merchant Server,告知 Merchant Server 获取核验的结果信息。
2. Merchant Server 传入相关参数调用 GetWebVerificationResultIntl 接口,参考服务端集成第二步。
3. eKYC Server 接收到请求后,将该次核验流程的详细信息返回给 Merchant Server。
4. Merchant Server 将结果信息返回给 Merchant WebPage,Merchant WebPage 根据结果进行后续业务流程。
服务端集成
1. 调用申请 Web 核验令牌生成核验地址(对应阶段一)
RedirectURL:核验结束后重定向的 Web 回调地址,包含协议头,主机名和路径,如:
https://www.tencentcloud.com/products/faceid。核验流程完成后,回调地址会拼接当次流程的 BizToken,以https://www.tencentcloud.com/products/faceid?token={BizToken}的格式进行跳转。Extra:业务透传参数,最大长度为1000个字符,会在 GetWebVerificationResultIntl 接口中返回,如无需要可以不传。
RuleId:腾讯云 eKYC 控制台配置生成的业务流程 ID,使用 RuleId 后可以简化 Config 传参,优先级关系为“Config 配置 > RuleId 配置 > 默认配置”。
Config:自定义核验页面的相关配置。
AutoSkip:验证成功时,是否跳过结果展示页面,自动跳转到 RedirectURL,默认为 false。
CheckMode:检测模式,此参数为必填。参数取值如下: 1:OCR + 活体检测 + 人脸比对;
IDCardType: 支持识别的卡证类型,此参数为必填。当前支持的卡证如下所示:
HKIDCard:中国香港身份证
MLIDCard:马来西亚身份证
IndonesiaIDCard:印度尼西亚身份证
PhilippinesVoteID:菲律宾选民卡
PhilippinesDrivingLicense:菲律宾驾驶证
PhilippinesTinID:菲律宾 TinID
PhilippinesSSSID:菲律宾 SSSID
PhilippinesUMID:菲律宾 UMID
InternationalIDPassport:港澳台地区以及境外护照
ThailandIDCard:泰国身份证
SingaporeIDCard:新加坡身份证
MainlandIDCard:大陆身份证
DisableCheckOcrWarnings:是否关闭证件告警,默认为 false(开启告警检测功能)。当开启时,身份认证流程将会根据证件的告警情况进行拦截。若您需要使用证件鉴伪功能,请 联系我们。
接口调用代码示例
import com.tencentcloudapi.common.Credential;import com.tencentcloudapi.common.profile.ClientProfile;import com.tencentcloudapi.common.profile.HttpProfile;import com.tencentcloudapi.common.exception.TencentCloudSDKException;import com.tencentcloudapi.faceid.v20180301.FaceidClient;import com.tencentcloudapi.faceid.v20180301.models.*;;public class ApplyWebVerificationBizTokenIntl{public static void main(String [] args) {try{// 实例化一个认证对象,入参需要传入腾讯云账户secretId,secretKey,此处还需注意密钥对的保密// 密钥可前往https://console.tencentcloud.com/cam/capi网站进行获取Credential cred = new Credential("TENCENTCLOUD_SECRET_ID","TENCENTCLOUD_SECRET_KEY");// 实例化一个http选项,可选的,没有特殊需求可以跳过HttpProfile httpProfile = new HttpProfile();httpProfile.setEndpoint("faceid.tencentcloudapi.com");// 实例化一个client选项,可选的,没有特殊需求可以跳过ClientProfile clientProfile = new ClientProfile();clientProfile.setHttpProfile(httpProfile);// 实例化要请求产品的client对象,clientProfile是可选的FaceidClient client = new FaceidClient(cred, "ap-singapore", clientProfile);// 实例化一个请求对象,每个接口都会对应一个request对象ApplyWebVerificationBizTokenIntlRequest req = new ApplyWebVerificationBizTokenIntlRequest();req.setRedirectURL("https://www.tencentcloud.com/products/faceid");WebVerificationConfigIntl webVerificationConfigIntl = new WebVerificationConfigIntl();webVerificationConfigIntl.setCheckMode(1L);webVerificationConfigIntl.setIDCardType("HKIDCard");req.setConfig(webVerificationConfigIntl);// 返回的resp是一个ApplyWebVerificationBizTokenIntlResponse的实例,与请求对象对应ApplyWebVerificationBizTokenIntlResponse resp = client.ApplyWebVerificationBizTokenIntl(req);// 输出json格式的字符串回包System.out.println(ApplyWebVerificationBizTokenIntlResponse.toJsonString(resp));String bizToken = resp.getBizToken();String verificationURL = resp.getVerificationURL();System.out.printf("BizToken: %s, VerificationURL: %s", bizToken, verificationURL);} catch (TencentCloudSDKException e) {System.out.println(e.toString());}}}
2. 确认当次核验流程的结果(对应阶段三)
本次核验的最终结果应以该接口返回的信息为准,当响应的 ErrorCode 字段为0时,视为本次核验流程通过,其他情况下视为未通过。详细的错误码列表请参考Liveness Detection and Face Comparison (Mobile HTML5) Error Codes。
BizToken:由 ApplyWebVerificationBizTokenIntl 接口生成的 BizToken,当次核验流程的唯一标识。
接口调用代码示例
import com.tencentcloudapi.common.Credential;import com.tencentcloudapi.common.profile.ClientProfile;import com.tencentcloudapi.common.profile.HttpProfile;import com.tencentcloudapi.common.exception.TencentCloudSDKException;import com.tencentcloudapi.faceid.v20180301.FaceidClient;import com.tencentcloudapi.faceid.v20180301.models.*;import java.util.Arrays;public class GetWebVerificationResultIntl {public static void main(String [] args) {try{// 实例化一个认证对象,入参需要传入腾讯云账户secretId,secretKey,此处还需注意密钥对的保密// 密钥可前往https://console.tencentcloud.com/cam/capi网站进行获取Credential cred = new Credential("TENCENTCLOUD_SECRET_ID","TENCENTCLOUD_SECRET_KEY");// 实例化一个http选项,可选的,没有特殊需求可以跳过HttpProfile httpProfile = new HttpProfile();httpProfile.setEndpoint("faceid.tencentcloudapi.com");// 实例化一个client选项,可选的,没有特殊需求可以跳过ClientProfile clientProfile = new ClientProfile();clientProfile.setHttpProfile(httpProfile);// 实例化要请求产品的client对象,clientProfile是可选的FaceidClient client = new FaceidClient(cred, "ap-singapore", clientProfile);// 实例化一个请求对象,每个接口都会对应一个request对象GetWebVerificationResultIntlRequest req = new GetWebVerificationResultIntlRequest();req.setBizToken("xxx"); //输入ApplyWebVerificationBizTokenIntl阶段返回的BizToken// 返回的resp是一个GetWebVerificationResultIntlResponse的实例,与请求对象对应GetWebVerificationResultIntlResponse resp = client.GetWebVerificationResultIntl(req);// 输出json格式的字符串回包System.out.println(GetWebVerificationResultIntlResponse.toJsonString(resp));Long errorCode = resp.getErrorCode();String errorMsg = resp.getErrorMsg();//详细 OCRResult 字段,请参考OCRResult相关文档https://www.tencentcloud.com/document/api/1061/49423#ocrresult。OCRResult[] ocrResult = resp.getOCRResult();if (errorCode == 0) {// 核验通过System.out.println("Success");System.out.printf("OCRResult:%s", Arrays.toString(ocrResult));}else {// 核验不通过System.out.printf("Fail: %s\\n", errorMsg);}} catch (TencentCloudSDKException e) {System.out.println(e.toString());}}}
前端集成
1. 获取 VerificationURL 并跳转,发起核验流程(对应阶段二)
客户前端页面获取服务端请求到的 VerificationURL,并跳转到该地址进入核验流程,用户按照提示完成活体比对流程。对应时序图的第6点。
代码示例
// 从服务端获取VerificationURLconst VerificationURL = 'https://sg.faceid.qq.com/reflect/?token=*****';// 前端页面跳转window.location.href = VerificationURL;
2. 从回调地址获取 BizToken,向后端请求核验结果(对应阶段二)
在核验完成后,页面会跳转到 RedirectURL 上。RedirectURL 会拼接当次流程的 BizToken 参数,通过解析 RedirectURL 获取 BizToken 参数,用于拉取本次活体比对的结果信息。对应时序图的第12点。
代码示例
// 获取RedirectURLconst RedirectURL = "https://*****?token={BizToken}";// 解析获得RedirectURL的BizToken参数,用于拉取本次活体比对的结果信息const bizToken = getURLParameter(RedirectURL, "token");if (bizToken) {// 使用bizToken用于拉取本次活体比对的结果信息}/**/ * 解析url的参数/* @params url 查询url/* @params variable 查询参数*/function getURLParameter(url, variable) {const query = url.split('?')[1] || '';const vars = query.split('&');for (let i = 0; i < vars.length; i++) {const pair = vars[i].split('=');if (pair[0] == variable) {return pair[1];}}return (false);}
文档反馈