SSL Encryption Settings
Download
Mode fokus
Ukuran font
SSL Encryption Overview
SSL authentication is a process that authenticates the connection from the client to the cloud database server. It is performed for both users and the server. After you enable SSL encryption, you can obtain a CA certificate and upload it to the server. When the client accesses the database, the SSL protocol will be activated to establish an SSL-based secure channel between the client and the database server to achieve encrypted data transmission. This prevents data interception, tampering, and eavesdropping during transmission and ensures data transmission security for both parties.
The SSL protocol is required to run over a reliable transport layer protocol (such as TCP). SSL is independent of application layer protocols, and high-layer application layer protocols (such as HTTP, FTP, and TELNET) can transparently run over the SSL protocol. The SSL protocol has completed data encryption, communication key negotiation, and server authentication before application layer protocols transmit data. In this way, the data transmitted by application layer protocols is encrypted, which ensures communication privacy.
Background
If encryption is not performed during database access, all data transmitted over the network is in plaintext. As a result, data may be eavesdropped, tampered with, and intercepted by users with malicious purposes. The SSL protocol is designed to address such risks. In theory, it has the following capabilities:
The information is encrypted and cannot be eavesdropped by third parties.
There is a verification mechanism. Once the information is tampered with, both the communicating parties will detect it promptly.
The identity certificate is equipped to prevent identity impersonation.
TencentDB for PostgreSQL supports enabling SSL encryption to enhance linkage security. It also supports downloading the SSL CA certificate and installing it on application services.
Note:
To ensure the traffic security between the database and the server, SSL encryption does not protect data. You can encrypt network connections at the transport layer to improve communication data security and integrity, but the response time of network connections will increase.
Must-Knows
The instance version is PostgreSQL 11 or later.
TLS 1.0, TLS 1.1, TLS 1.2, and TLS 1.3 are supported.
SSL encryption is not enabled by default for instances cloned from existing ones. You can enable it manually.
If you need to enable SSL encryption for a read-only instance, it is strongly recommended that you enable SSL encryption for all read-only instances in the read-only group. Otherwise, some requests may fail because the protected connection address is the VIP of the read-only group.
When you enable SSL encryption, your database instance will be restarted to load the SSL certificate. Make sure that your businesses are configured with a reconnection mechanism.
Enabling SSL Encryption
1. Log in to the TencentDB for PostgreSQL console. In the instance list, click Instance ID or Manage in the Operation column to go to the Instance Management page.
2. Go to Data Security on the Instance Management page and click the SSL tab.

3. This feature is disabled by default. Click the switch and then click Confirm to enable SSL encryption.
The area for enabling SSL encryption is as follows:
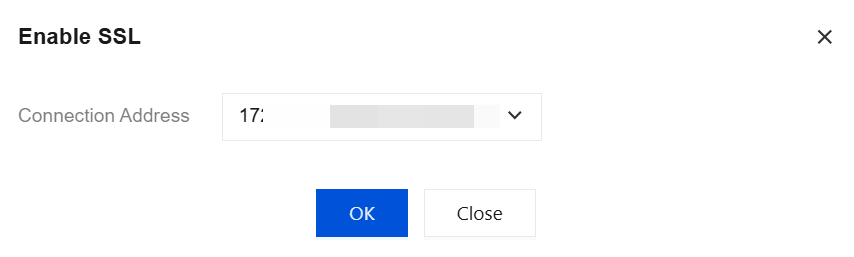
The system supports specifying a VIP or public network domain name as the protected connection address when SSL connection encryption is enabled. When an instance has multiple connection addresses, you can select one of them. Each time SSL connection encryption is enabled, only one VIP or public network domain name can be selected.
Click Download to download the SSL CA certificate, which is valid for 20 years. The downloaded file is a compressed package (TencentDB-PG-SSL-CA.zip) containing the following three files:
.p7b file: It is used to import the CA certificate to Windows systems.
.jks file: A certificate storage file for truststore and keystore in Java. The password is tencentdb_pg. It is used to import the CA certificate chain to Java programs.
.pem file: It is used to import the CA certificate to other operating systems or applications.
Connecting to a Database via SSL
Using psql for Connection via SSL
Note:
This step requires the built-in psql command-line tool in the local PostgreSQL client. Ensure that you have installed the PostgreSQL client. For specific installation and operations, see the PostgreSQL official documentation.
1. Create a
.postgresql folder under the /usr/local/pgsql/ directory.mkdir -p /usr/local/pgsql/.postgresql
2. Copy the downloaded server certificates
ca.pem and ca.jks to the .postgresql folder.[root@VM-0-6-tencentos .postgresql]# lltotal 4-rw------- 1 postgres postgres 2681 Feb 6 11:13 ca.pem
3. Modify the permissions of the
.postgresql folder.chown postgres:postgres /usr/local/pgsql/.postgresql/*chmod 600 /usr/local/pgsql/.postgresql/*
4. Set the environment variables for the
postgres user.[root@VM-0-6-tencentos .postgresql]# export PGSSLROOTCERT="/usr/local/pgsql/.postgresql/ca.pem"[root@VM-0-6-tencentos .postgresql]# echo $PGSSLROOTCERT/usr/local/pgsql/.postgresql/ca.pem
5. Set the authentication method for the client to connect to the database.
[root@VM-0-6-tencentos .postgresql]# export PGSSLMODE="require"[root@VM-0-6-tencentos .postgresql]# echo $PGSSLMODErequire
Note:
6. Connect to the database.
[root@VM-0-6-tencentos .postgresql]# psql -h10.6.0.1 -p5432 -Udbadmin -dpostgresPassword for user dbadmin:psql (16.4, server 11.22)SSL connection (protocol: TLSv1.3, cipher: TLS_AES_256_GCM_SHA384, compression: off)Type "help" for help.postgres=>
As shown above, if the output contains
SSL connection, it indicates that the current connection uses SSL encryption.Using JDBC for Connection via SSL
Note:
This method requires that you have installed the JDK and downloaded the JDBC driver.
1. Create a
.postgresql folder under the /usr/local/pgsql/ directory.mkdir -p /usr/local/pgsql/.postgresql
2. Copy the downloaded server-side certificates ca.pem and
ca.jks to the .postgresql folder.[root@VM-0-6-tencentos .postgresql]# lltotal 8-rw------- 1 postgres postgres 2840 Feb 6 19:55 ca.jks-rw------- 1 postgres postgres 2681 Feb 6 11:13 ca.pem
3. Modify the permissions of the
.postgresql folder.chown postgres:postgres /usr/local/pgsql/.postgresql/*chmod 600 /usr/local/pgsql/.postgresql/*
4. Configure the business code to use SSL to connect to PostgreSQL and run the program.
The configuration example for the
.pem certificate is as follows. Specific parameters are configured based on your business details.import java.sql.Connection;import java.sql.DriverManager;import java.sql.ResultSet;import java.sql.Statement;import java.util.Properties;public class Main {public static void main(String[] args) {try {Class.forName("org.postgresql.Driver");Properties props = new Properties();props.setProperty("user", "xxxxxxx");props.setProperty("password", "xxxxxxxx");props.setProperty("ssl", "true");props.setProperty("sslmode", "require");props.setProperty("sslrootcert", "/usr/local/pgsql/.postgresql/ca.pem");Connection conn = DriverManager.getConnection("jdbc:postgresql://10.6.0.1:5432/postgres",props);Statement stmt = conn.createStatement();ResultSet rs = stmt.executeQuery("SELECT * FROM mytable");while (rs.next()) {System.out.println(rs.getString("id"));}conn.close();} catch (Exception e) {e.printStackTrace();}}}
The configuration sample for the
jks certificate is as follows. Specific parameters are configured based on your business details.import java.sql.Connection;import java.sql.DriverManager;import java.sql.ResultSet;import java.sql.Statement;import java.util.Properties;public class Main1 {public static void main(String[] args) {try {Class.forName("org.postgresql.Driver");System.setProperty("javax.net.ssl.trustStore", "/usr/local/pgsql/.postgresql/ca.jks");System.setProperty("javax.net.ssl.trustStorePassword","tencentdb_pg");System.setProperty("javax.net.ssl.keyStore","/usr/local/pgsql/.postgresql/ca.jks");System.setProperty("javax.net.ssl.keyStorePassword","tencentdb_pg");Properties props = new Properties();props.setProperty("user", "xxxxx");props.setProperty("password", "xxxxx");props.setProperty("ssl", "true");props.setProperty("sslmode", "require");props.setProperty("sslfactory", "org.postgresql.ssl.DefaultJavaSSLFactory");Connection conn = DriverManager.getConnection("jdbc:postgresql://10.6.0.1:5432/postgres",props);Statement stmt = conn.createStatement();ResultSet rs = stmt.executeQuery("SELECT * FROM mytable");while (rs.next()) {System.out.println(rs.getString("id"));}conn.close();} catch (Exception e) {e.printStackTrace();}
Using Go for Connection via SSL
Note:
This method requires that you have installed Go and completed the driver configuration.
1. Create a
.postgresql folder under the /usr/local/pgsql/ directory.mkdir -p /usr/local/pgsql/.postgresql
2. Copy the downloaded server certificate
ca.pem to the .postgresql folder.[root@VM-0-6-tencentos .postgresql]# lltotal 4-rw------- 1 postgres postgres 2681 Feb 6 11:13 ca.pem
3. Modify the permissions of the
.postgresql folder.chown postgres:postgres /usr/local/pgsql/.postgresql/*chmod 600 /usr/local/pgsql/.postgresql/*
4. Configure the business code to use SSL to connect to PostgreSQL and run the program. The configuration example is as follows. Specific parameters are configured based on your business details.
package mainimport ("database/sql""fmt""log"_ "github.com/lib/pq")func main() {connStr := "user=dbadmin password=xxxxx dbname=postgres host=10.6.0.1 port=5432 sslmode=require sslrootcert=/usr/local/pgsql/.postgresql/ca.pem"db, err := sql.Open("postgres", connStr)if err != nil {log.Fatal(err)}err = db.Ping()if err != nil {log.Fatal(err)}fmt.Println("Successfully connected!")}
Node.js SSL Connection
1. Create a
.postgresql folder under the /usr/local/pgsql/ directory.mkdir -p /usr/local/pgsql/.postgresql
2. Copy the downloaded server certificate
ca.pem to the .postgresql folder.[root@VM-0-6-tencentos .postgresql]# lltotal 4-rw------- 1 postgres postgres 2681 Feb 6 11:13 ca.pem
3. Modify the permissions of the
.postgresql folder.chown postgres:postgres /usr/local/pgsql/.postgresql/*chmod 600 /usr/local/pgsql/.postgresql/*
4. Configure the business code to use SSL to connect to PostgreSQL and run the program. The configuration example is as follows. Specific parameters are configured based on your business details.
const { Client } = require('pg');const fs = require('fs');const tls = require('tls');// Configure database connection parametersconst client = new Client({user: '****',host: '**.**.**.**',database: '*****',password: '*****',port: 5432, // Default portssl: {host: '**.**.**.**',ca: fs.readFileSync('./ca.pem').toString(), // CA certificate path},});// Connect to the databaseclient.connect().then(() => {console.log('Connected to PostgreSQL');// Query the pg_stat_ssl view to obtain detailed SSL information of the current connection. The query here can be customized by the business.const query = `SELECT ssl, version, cipher, bitsFROM pg_stat_sslWHERE pid = pg_backend_pid();`;return client.query(query);}).then(res => {if (res.rows.length > 0) {const sslInfo = res.rows[0];console.log('SSL connection:', sslInfo.ssl);console.log('SSL version:', sslInfo.version);console.log('SSL cipher:', sslInfo.cipher);console.log('SSL bits:', sslInfo.bits);} else {console.log('No SSL information available for this connection.');}return client.end();}).catch(err => console.error('Connection error', err.stack));
Refreshing the Server Certificate
If you want to change the VIP protected through SSL encryption in the following scenarios, you can refresh the server certificate.
Adding a network for an instance
A new VIP will be added after you add a network for an instance. If the instance has enabled SSL encryption and the selected protected address is the original VIP, an error is reported when you use the new VIP to connect to the instance from the client and enable SSL encryption. In this case, you need to refresh the server certificate and re-select a VIP you want to protect.
Deleting a network for an instance
The corresponding VIP will be deleted after you delete a network for an instance. If the instance has enabled SSL encryption and the selected protected address is the deleted VIP, an error is reported when you use the deleted VIP or other VIPs of the instance to connect to the instance from the client and enable SSL encryption. In this case, you need to refresh the server certificate and re-select a VIP you want to protect.
Enabling public network access for an instance
After public network access is enabled for the instance, a new public network connection address will be added. If the instance has already enabled SSL encryption and the selected protected address is not this public network address, an error will occur when the client uses this public network address to connect to the instance and enables SSL encryption. In this case, you need to refresh the server-side certificate and re-select the connection address you want to protect as this public network address.
Disabling public network access for an instance
After public network access is disabled for the instance, the public network address will be reclaimed. If the instance has enabled SSL encryption and the selected protected address is still this public network address, an error will occur when the client uses this public network address to connect to the instance and enables SSL encryption. In this case, you need to refresh the server-side certificate and re-select the connection VIP you want to protect.
Adding read-only instances to a read-only group
All read-only instances in the read-only group have enabled SSL encryption, and a new read-only instance is added to the group. This instance has not enabled SSL encryption or has enabled SSL encryption but the selected protected address is not the VIP of the read-only group. As a result, some requests may fail when you use the VIP of the read-only group to connect to instances from the client. In this case, you need to enable SSL encryption for all read-only instances in the read-only group and select the VIP of the read-only group as the protected address.
Changing the protected address for a read-only instance
When enabling SSL encryption for a read-only instance, you can choose either the VIP of the read-only group or the VIP of the read-only instance as the connection address. If you need to change the protected address, you must refresh the server-side certificate.
The steps for refreshing the server certificate are as follows:
1. Log in to the TencentDB for PostgreSQL console. In the instance list, click Instance ID or Manage in the Operation column to go to the Instance Management page.
2. Go to Data Security on the Instance Management page and click the SSL tab.
3. Check the current protected connection address on the SSL tab.
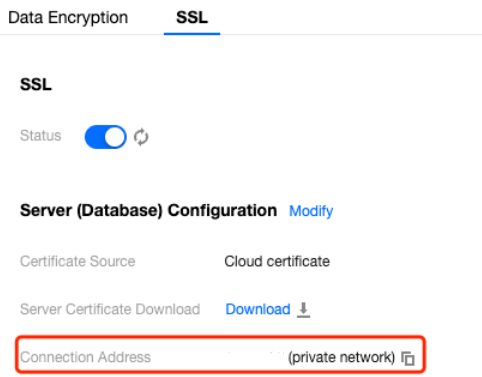
4. Click the modification icon to modify the address.

Disabling SSL Encryption
Note:
When you disable SSL encryption, your database instance will be restarted to uninstall the SSL certificate. Make sure that your businesses are configured with a reconnection mechanism.
1. Log in to the TencentDB for PostgreSQL console. In the instance list, click Instance ID or Manage in the Operation column to go to the Instance Management page.
2. Go to Data Security on the Instance Management page and click the SSL tab.
3. Click the switch and then click OK in the dialog box.

Bantuan dan Dukungan
Apakah halaman ini membantu?
Anda juga dapat Menghubungi Penjualan atau Mengirimkan Tiket untuk meminta bantuan.
masukan