Hadoop
Download
Mode fokus
Ukuran font
Hadoop (2.7.2 or above) tool provides the capability to run computing tasks using Tencent Cloud COS as the underlying file storage system. The Hadoop cluster can be launched in three modes: stand-alone, pseudo-distributed, and fully-distributed. This document uses Hadoop-2.7.4 as an example to describe how to build a fully-distributed Hadoop environment and how to use wordcount to execute a simple test.
Preparation
Prepare several servers.
Install and configure the system by downloading from the CentOS Official Website. This document uses CentOS 7.3.1611.
Install the Java environment. For more information, see Installing and Configuring Java.
Install the available Hadoop package: Apache Hadoop Releases Download.
Network Configuration
Use
ifconfig -a to check the IP of each server, then use the ping command to check if they can ping each other, and record the IP of each server.Configuring CentOS
Configure a Hostname
Set the corresponding hostname for each machine, such as "master", "slave*", etc.
hostnamectl set-hostname master
Configure hosts
vi /etc/hosts
Edit the content:
202.xxx.xxx.xxx master202.xxx.xxx.xxx slave1202.xxx.xxx.xxx slave2202.xxx.xxx.xxx slave3# Replace IPs with the real ones
Turn off firewall
systemctl status firewalld.service # Check firewall statussystemctl stop firewalld.service # Turn off firewallsystemctl disable firewalld.service # Disable firewall to start on boot
Time synchronization
yum install -y ntp # Install ntp servicentpdate cn.pool.ntp.org # Sync network time
Install and configure JDK
Upload JDK installer package (such as jdk-8u144-linux-x64.tar.gz) to the
root directory.mkdir /usr/javatar -zxvf jdk-8u144-linux-x64.tar.gz -C /usr/java/rm -rf jdk-8u144-linux-x64.tar.gz
Copy JDKs among hosts
scp -r /usr/java slave1:/usrscp -r /usr/java slave2:/usrscp -r /usr/java slave3:/usr.......
Configure environment variables for JDK of each host
vi /etc/profile
Edit the content:
export JAVA_HOME=/usr/java/jdk1.8.0_144export PATH=$JAVA_HOME/bin:$PATHexport CLASSPATH=.:$JAVA_HOME/lib/dt.jar:$JAVA_HOME/lib/tools.jar
After saving the file, make /etc/profile take effect by executing the following command:
source /etc/profile # Make the configuration file effectivejava -version # View java version
Configuring Keyless Access via SSH
Check the SSH service status on each host:
systemctl status sshd.service # Check the SSH service status.yum install openssh-server openssh-clients # Install the SSH service. Ignore this step if it is already installed.systemctl start sshd.service # Enable the SSH service. Ignore this step if it is already enabled.
Generate a key on each host:
ssh-keygen -t rsa # Generate Keys
On slave1:
cp ~/.ssh/id_rsa.pub ~/.ssh/slave1.id_rsa.pubscp ~/.ssh/slave1.id_rsa.pub master:~/.ssh
On slave2:
cp ~/.ssh/id_rsa.pub ~/.ssh/slave2.id_rsa.pubscp ~/.ssh/slave2.id_rsa.pub master:~/.ssh
And so on...
On master:
cd ~/.sshcat id_rsa.pub >> authorized_keyscat slave1.id_rsa.pub >>authorized_keyscat slave2.id_rsa.pub >>authorized_keysscp authorized_keys slave1:~/.sshscp authorized_keys slave2:~/.sshscp authorized_keys slave3:~/.ssh
Installing and Configuring Hadoop
Installing Hadoop
Upload the Hadoop installer package (such as hadoop-2.7.4.tar.gz) to the
root directory.tar -zxvf hadoop-2.7.4.tar.gz -C /usrrm -rf hadoop-2.7.4.tar.gzmkdir /usr/hadoop-2.7.4/tmpmkdir /usr/hadoop-2.7.4/logsmkdir /usr/hadoop-2.7.4/hdfmkdir /usr/hadoop-2.7.4/hdf/datamkdir /usr/hadoop-2.7.4/hdf/name
Go to the
hadoop-2.7.4/etc/hadoop directory and proceed to the next step.Configure Hadoop
1. Add the following to the
hadoop-env.sh file.export JAVA_HOME=/usr/java/jdk1.8.0_144
If the SSH port is not 22 (default value), modify it in the
hadoop-env.sh file:export HADOOP_SSH_OPTS="-p 1234"
2. Modify
yarn-env.shexport JAVA_HOME=/usr/java/jdk1.8.0_144
3. Modify
slavesConfigure the content:
Delete:localhostAdd:slave1slave2slave3
4. Modify
core-site.xml<configuration><property><name>fs.default.name</name><value>hdfs://master:9000</value></property><property><name>hadoop.tmp.dir</name><value>file:/usr/hadoop-2.7.4/tmp</value></property></configuration>
5. Modify
hdfs-site.xml<configuration><property><name>dfs.datanode.data.dir</name><value>/usr/hadoop-2.7.4/hdf/data</value><final>true</final></property><property><name>dfs.namenode.name.dir</name><value>/usr/hadoop-2.7.4/hdf/name</value><final>true</final></property></configuration>
6. Copy
mapred-site.xml.template and name it mapred-site.xmlcp mapred-site.xml.template mapred-site.xml
7. Modify
mapred-site.xml<configuration><property><name>mapreduce.framework.name</name><value>yarn</value></property><property><name>mapreduce.jobhistory.address</name><value>master:10020</value></property><property><name>mapreduce.jobhistory.webapp.address</name><value>master:19888</value></property></configuration>
8. Modify
yarn-site.xml<configuration><property><name>yarn.nodemanager.aux-services.mapreduce.shuffle.class</name><value>org.apache.mapred.ShuffleHandler</value></property><property><name>yarn.nodemanager.aux-services</name><value>mapreduce_shuffle</value></property><property><name>yarn.resourcemanager.address</name><value>master:8032</value></property><property><name>yarn.resourcemanager.scheduler.address</name><value>master:8030</value></property><property><name>yarn.resourcemanager.resource-tracker.address</name><value>master:8031</value></property><property><name>yarn.resourcemanager.admin.address</name><value>master:8033</value></property><property><name>yarn.resourcemanager.webapp.address</name><value>master:8088</value></property></configuration>
9. Copy Hadoop among hosts
scp -r /usr/ hadoop-2.7.4 slave1:/usrscp -r /usr/ hadoop-2.7.4 slave2:/usrscp -r /usr/ hadoop-2.7.4 slave3:/usr
10. Configure environment variables for Hadoop of each host
Open the configuration file:
vi /etc/profile
Edit the content:
export HADOOP_HOME=/usr/hadoop-2.7.4export PATH=$HADOOP_HOME/bin:$HADOOP_HOME/sbin:$PATHexport HADOOP_LOG_DIR=/usr/hadoop-2.7.4/logsexport YARN_LOG_DIR=$HADOOP_LOG_DIR
Implement the configuration file:
source /etc/profile
Start Hadoop
1. Format namenode
cd /usr/hadoop-2.7.4/sbinhdfs namenode -format
2. Start
cd /usr/hadoop-2.7.4/sbinstart-all.sh
3. Check processes
If processes on master contain ResourceManager, SecondaryNameNode and NameNode, Hadoop starts successfully. For example:
2212 ResourceManager2484 Jps1917 NameNode2078 SecondaryNameNode
If processes on each slave contain DataNode and NodeManager, Hadoop starts successfully. For example:
17153 DataNode17334 Jps17241 NodeManager
Running wordcount
The wordcount built in Hadoop can be called directly. After Hadoop starts, use the following command to work with files in HDFS:
hadoop fs -mkdir inputhadoop fs -put input.txt /inputhadoop jar share/hadoop/mapreduce/hadoop-mapreduce-examples-2.7.4.jar wordcount /input /output/
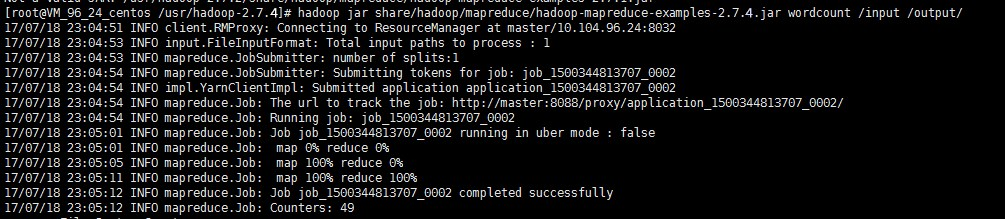
The above result shows that Hadoop is installed successfully.
View output directory
hadoop fs -ls /output
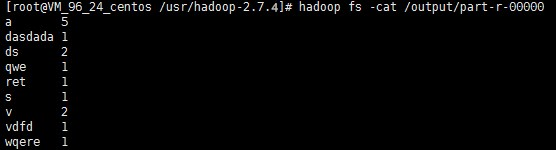
View output result
hadoop fs -cat /output/part-r-00000
Note:
For more information on how to run Hadoop in stand-alone and pseudo-distributed modes, see Get Started with Hadoop on the official website.
Bantuan dan Dukungan
Apakah halaman ini membantu?
Anda juga dapat Menghubungi Penjualan atau Mengirimkan Tiket untuk meminta bantuan.
masukan