When using the data processing workflow feature, you usually need to set a series of parameters, which can be combined through a template. This simplifies your operations and allows you to reuse the configured parameters with no need to enter them repeatedly.
For media processing features such as audio/video transcoding, audio/video splicing, video frame capturing, and video to animated image conversion, you need to specify a template when creating a job or workflow. The template page provides system templates, and you can also customize templates based on your business needs.
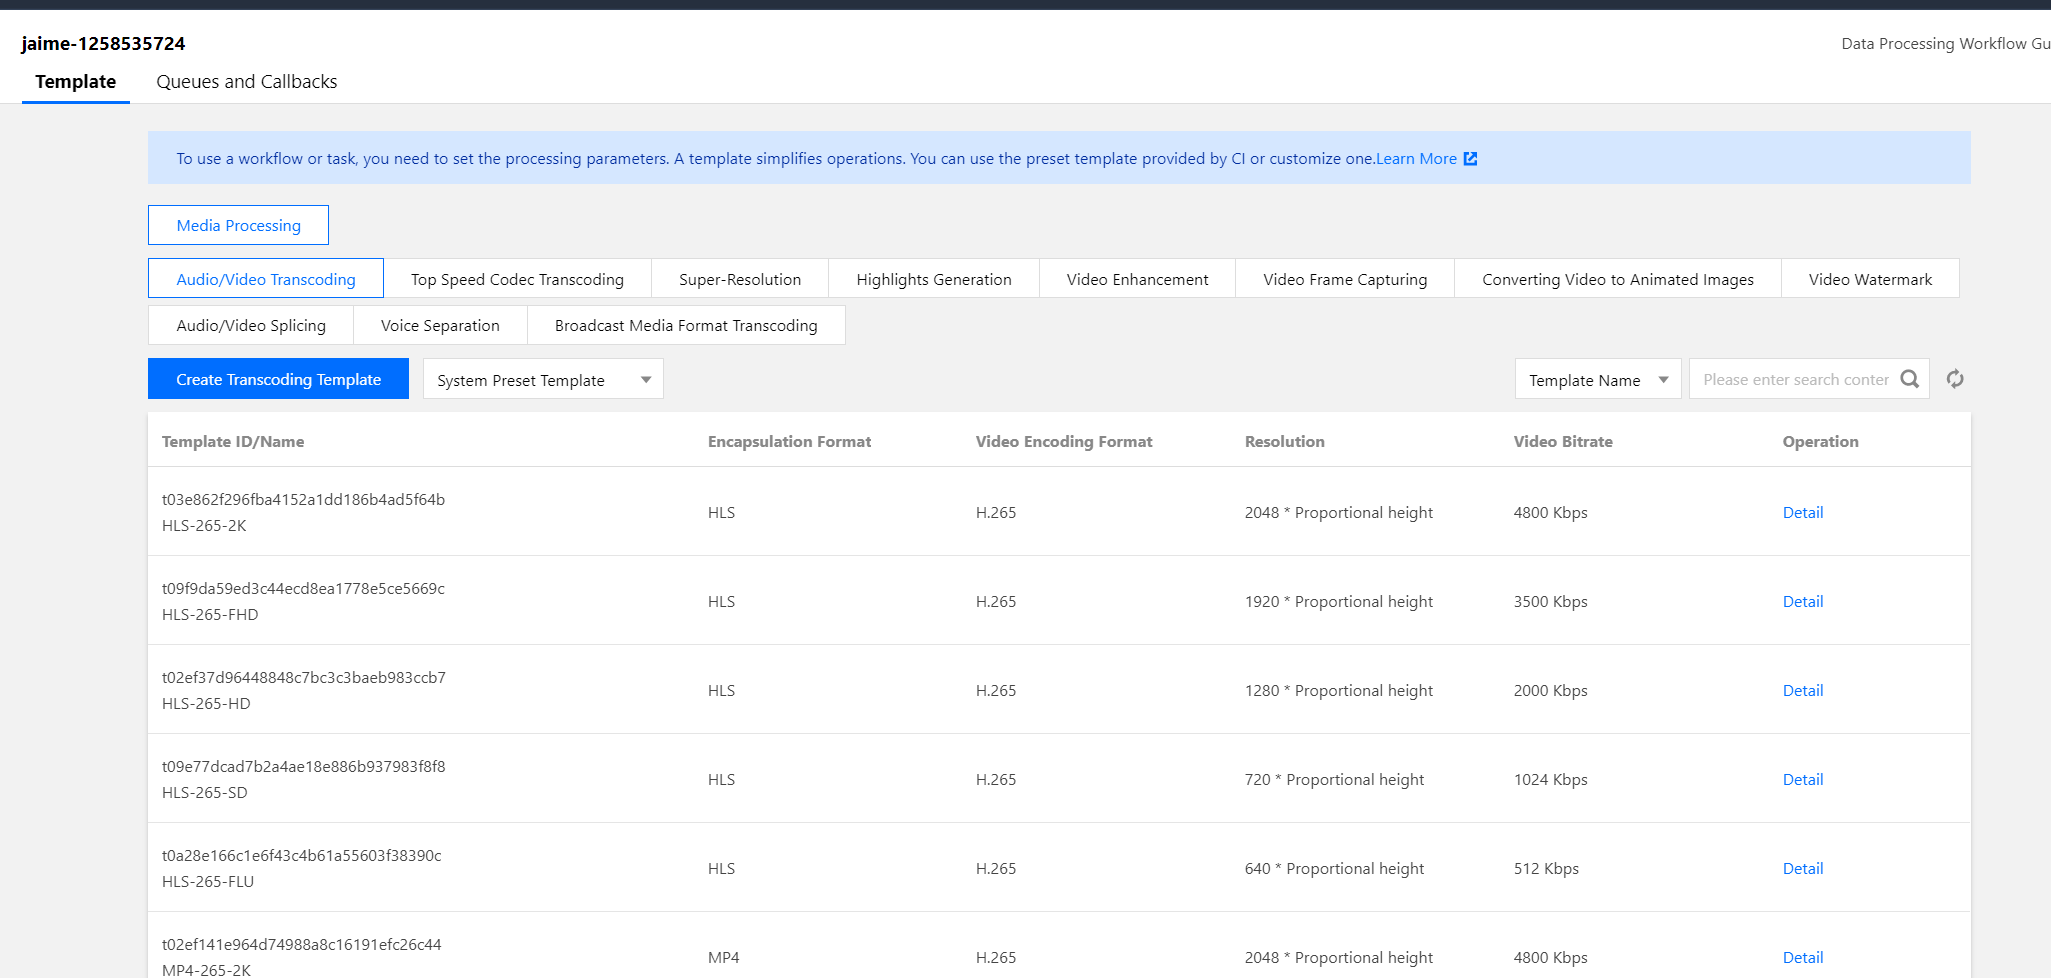
System Templates
The system combines common parameters in advance into system templates, so that you can use them directly. When creating a job or workflow, you can select such a template by the template name.
3. Click the name of the bucket that you want to operate.
4. On the left sidebar, select Data Processing Workflow > Template Configuration to view templates of different processing types.
Click View in the Operation column to view template details.
Note:
Currently, the system provides 15 audio/video transcoding, 3 video frame capturing, and 18 video to animated image conversion templates.
You can view the information of system templates but cannot edit or delete them.
System templates for audio/video transcoding
Template ID
Template Name
Container Format
Video Encoding Format
Resolution
Video Bitrate
Audio Encoding Format
Audio Bitrate
t0e2b9f4cd25184c6ab73d0c85a6ee9cb5
H264-MP4-LD-360P
MP4
H.264
640 * proportionally scaled
512 Kbps
AAC
128 Kbps
t0876739cd865042d1957d73c78f0484fb
H264-MP4-SD-480P
MP4
H.264
720 * proportionally scaled
1024 Kbps
AAC
128 Kbps
t0852e7ff4acd4484e99ba104f3840d3cb
H264-MP4-HD-720P
MP4
H.264
1280 * proportionally scaled
2000 Kbps
AAC
128 Kbps
t04df9eb0c373c4a8780ec894ce05469a7
H264-MP4-FHD-1080P
MP4
H.264
1920 * proportionally scaled
3500 Kbps
AAC
128 Kbps
t09d027135634d47048e5a30dc1e19ee90
H264-MP4-2K
MP4
H.264
2048 * proportionally scaled
4800 Kbps
AAC
128 Kbps
t0e634622e8dfb49339ba478d60ddc7188
H264-HLS-LD-360P
M3U8
H.264
640 * proportionally scaled
512 Kbps
AAC
128 Kbps
t0fa5bdbf58bb348e88bf73fae5d674fdf
H264-HLS-SD-480P
M3U8
H.264
720 * proportionally scaled
1024 Kbps
AAC
128 Kbps
t09d0f419921e44ed98190f355ec9fd629
H264-HLS-HD-720P
M3U8
H.264
1280 * proportionally scaled
2000 Kbps
AAC
128 Kbps
t080ae8a06f9074f3daa46201078f8d4b1
H264-HLS-FHD-1080P
M3U8
H.264
1920 * proportionally scaled
3500 Kbps
AAC
128 Kbps
t0ab68939cef0f40d19c4a135df540239f
H264-HLS-2K
M3U8
H.264
2048 * proportionally scaled
4800 Kbps
AAC
128 Kbps
t0e165bef65ed24d568eeecc8661248af6
H264-FLV-LD-360P
M3U8
H.264
640 * proportionally scaled
512 Kbps
AAC
128 Kbps
t057d0410c32444e48b9220f9571e6097a
H264-FLV-SD-480P
M3U8
H.264
720 * proportionally scaled
1024 Kbps
AAC
128 Kbps
t00daf332ba39049f8bfb899c1ed0134b0
H264-FLV-HD-720P
M3U8
H.264
1280 * proportionally scaled
2000 Kbps
AAC
128 Kbps
t0d41905a814434c8a81897ecb54d53a32
H264-FLV-FHD-1080P
M3U8
H.264
1920 * proportionally scaled
3500 Kbps
AAC
128 Kbps
t0e287e59454b94a8983ba78a6a30ee864
H264-FLV-2K
M3U8
H.264
2048 * proportionally scaled
4800 Kbps
AAC
128 Kbps
System templates for video frame capturing
Template ID
Template Name
Frame Capturing Start Time
Frame Capturing Interval
Max Frame Count Per Video
Output Image Size
Output Format
t01d40e440761448fc8c538fb8d5a5b81e
snapshot_320 * 180_1
0s
2s
5
320 * 180 px
JPEG
t0a60a2bc71a4b40c7b3d7f7e8a2779a81
snapshot_640 * 360_2
0s
10s
5
640 * 360 px
JPEG
t07740e32081b44ad7a0aea03adcffd54a
snapshot_1280 * 720_3
0s
10s
5
1280 * 720 px
JPEG
System templates for video to animated image conversion
Template ID
Template Name
Transcoding Start Time
Transcoding Duration
Frame Extraction Method
Output Animated Image Frame Rate
Output Animated Image Size
Output Format
Output Animated Image Quality
t04373959a69c04d47b62fd214dd13d8e9
gif_320 * 180_1
0s
600s
Only keyframes are extracted
Adaptive
320 * 180 px
GIF
\\
t0341b0ab2b8a340ff826e9cb4f3a7baea
gif_320 * 180_2
0s
600s
One frame is extracted every 10s
Adaptive (0.1 FPS)
320 * 180 px
GIF
\\
t046b1d8e5bdf842c6a58d8028b48eafee
gif_320 * 180_3
0s
600s
Ten frames are extracted per second
Adaptive (10 FPS)
320 * 180 px
GIF
\\
t0ef2077f215864c018a2fca73614ceca6
gif_640 * 360_4
0s
600s
Only keyframes are extracted
Adaptive
640 * 360 px
GIF
\\
t0d21406ca737a40869973a37a5daa349a
gif_640 * 360_5
0s
600s
One frame is extracted every 10s
Adaptive (0.1 FPS)
640 * 360 px
GIF
\\
t0878a9c9c1f054cb5bca68b8b06e556c2
gif_640 * 360_6
0s
600s
Ten frames are extracted per second
Adaptive (10 FPS)
640 * 360 px
GIF
\\
t0dae821708cea4ba5b3e271810ac80a21
gif_1280 * 720_7
0s
600s
Only keyframes are extracted
Adaptive
1280 * 720 px
GIF
\\
t03fef67ad94d2466b9c0c89252ed72e87
gif_1280 * 720_8
0s
600s
One frame is extracted every 10s
Adaptive (0.1 FPS)
1280 * 720 px
GIF
\\
t030a64e9f9f5a4f53a9ef64bb7ce490b5
gif_1280 * 720_9
0s
600s
Ten frames are extracted per second
Adaptive (10 FPS)
1280 * 720 px
GIF
\\
t03b0e9eca4fc34e2cba9da89d9c7c13a2
webp_320 * 180_1
0s
60s
Only keyframes are extracted
Adaptive
320 * 180 px
WEBP
75
t016fcddf6bc3c44b793e9b7b07119b4ee
webp_320 * 180_2
0s
600s
One frame is extracted every 10s
Adaptive (0.1 FPS)
320 * 180 px
WEBP
75
t0bf1f1ce6d2404b258c0f81fbb9aaece1
webp_320 * 180_3
0s
600s
One frame is extracted every 10s
Adaptive (10 FPS)
320 * 180 px
WEBP
75
t098d6d3fcfd2c45309a408594a42559f6
webp_640 * 360_4
0s
60s
Only keyframes are extracted
Adaptive
640 * 360 px
WEBP
75
t0169a6a9c2eec4b51972eb63bafcbf08d
webp_640 * 360_5
0s
600s
One frame is extracted every 10s
Adaptive (0.1 FPS)
640 * 360 px
WEBP
75
t0ef9ba537011e4876b8777aebc19d10a5
webp_640 * 360_6
0s
600s
One frame is extracted every 10s
Adaptive (10 FPS)
640 * 360 px
WEBP
75
t02743d344b5e74c579e50e9e135b432b8
webp_1280 * 720_7
0s
60s
Only keyframes are extracted
Adaptive
1280 * 720 px
WEBP
75
t0dd27c136ff2741538bec96981e058868
webp_1280 * 720_8
0s
600s
One frame is extracted every 10s
Adaptive (0.1 FPS)
1280 * 720 px
WEBP
75
t00ad05235d67a45a9a697b553052b7346
webp_1280 * 720_9
0s
600s
One frame is extracted every 10s
Adaptive (10 FPS)
1280 * 720 px
WEBP
75
Custom Template
If system templates cannot meet your needs, use custom templates. Currently, you can create custom templates for audio/video transcoding, top speed codec transcoding, highlights generation, video frame capturing, video to animated image conversion, video watermark, audio/video splicing, voice/sound separation, video enhancement, super-resolution, image processing, and broadcast media format transcoding.
Audio/Video transcoding
The audio/video transcoding feature converts an audio/video file bitstream. It changes parameters of the source bitstream, such as codec, resolution, and bitrate, to adapt to different devices and network conditions. You can customize the template parameters in a custom audio/video transcoding template.
3. Click the name of the bucket where you want to store the video.
4. On the left sidebar, select Data Processing Workflow > Template Configuration to enter the template configuration page.
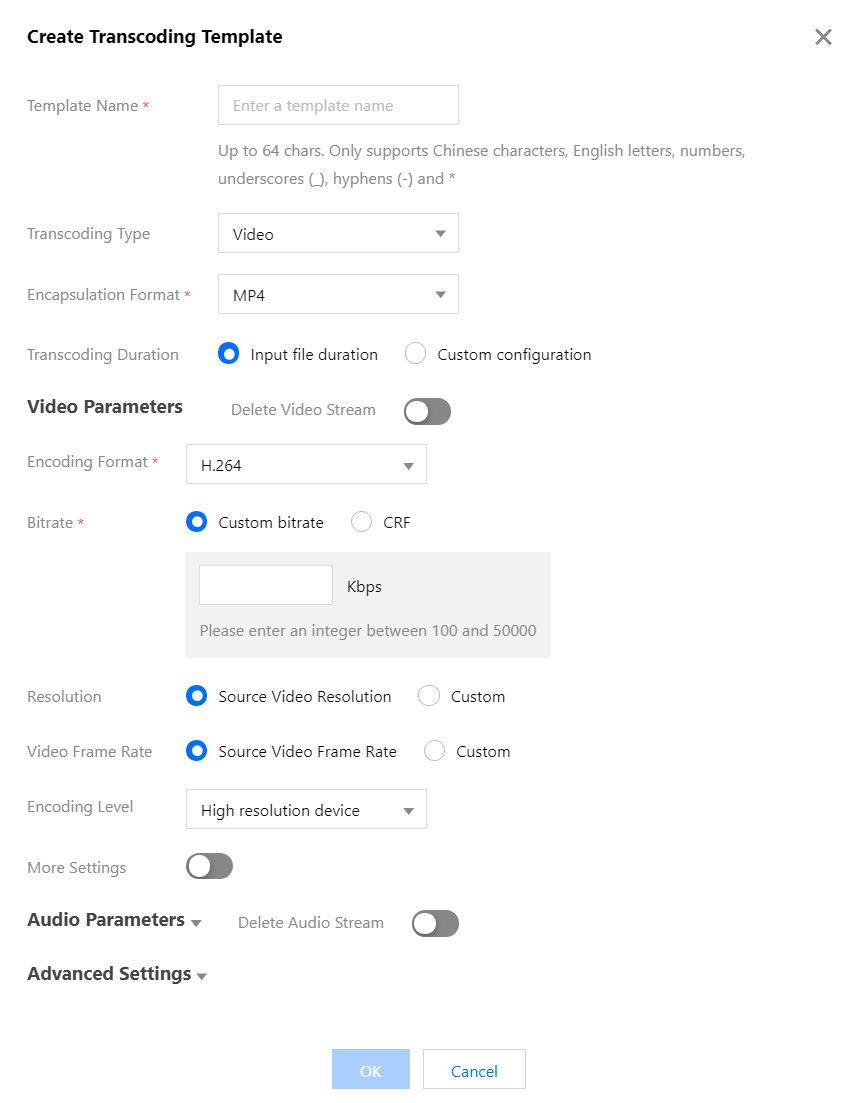
5. Select Media Processing > Audio/Video Transcoding and click Create Transcoding Template.
6. In the Create Transcoding Template window, configure the following items:
Template Name: It can contain up to 64 letters, digits, underscores (_), hyphens (-), and asterisks (*).
Transcoding Type: You can select video or audio transcoding.
Container Format: Video transcoding supports the MP4, FLV, HLS, TS, MKV, and WebM formats. Audio transcoding supports the MP3, AAC, AMR, FLAC, and WebM formats.
Encoding Format: H264, H265, AV1, VP8, and VP9 are supported.
Bitrate: Adaptive bitrate is supported, which can automatically analyze the video content to set the optimal bitrate.
Transcoding Duration: You can select the input file duration or customize the duration.
Audio/Video Parameters: You can customize audio/video parameters as needed.
7. Click OK.
After successfully creating the template, you can view, edit, or delete it in the custom template list.
Note:
You can use the template when creating an audio/video transcoding job as instructed in Configuring Job or creating a workflow as instructed in Configuring Workflow.
TSC transcoding
The top speed codec transcoding feature improves the subjective image quality of a video at a low bitrate. Compared with regular audio/video transcoding, it outputs smaller files and clearer video images and delivers a better visual experience with guaranteed low network resource usage. You can customize parameters such as codec, resolution, and bitrate in a custom top speed codec transcoding template.
3. Click the name of the bucket where you want to store the video.
4. On the left sidebar, select Data Processing Workflow > Template Configuration to enter the template configuration page.
5. Select Top Speed Codec Transcoding and click Create Top Speed Codec Transcoding Template.
6. In the Create Broadcast Media Format Transcoding Template window, configure the following items:
Template Name: It can contain up to 64 letters, digits, underscores (_), hyphens (-), and asterisks (*).
Transcoding Type: It is video transcoding by default.
Container Format: Supported formats include MP4 and HLS.
Transcoding Duration: You can select the input file duration or customize the duration.
Audio/Video Parameters: You can customize audio/video parameters as needed.
7. Click OK.
After successfully creating the template, you can view, edit, or delete it in the custom template list.
Note:
You can use the template when creating a broadcast media format transcoding job as instructed in Configuring Job or creating a workflow as instructed in Configuring Workflow.
Broadcast media format transcoding
This feature processes special formats such as XAVC and ProRes.
3. Click the name of the bucket where you want to store the video.
4. On the left sidebar, select Data Processing Workflow > Template Configuration to enter the template configuration page.
5. Select Broadcast Media Format Transcoding and click Create Broadcast Media Format Transcoding Template.
6. In the Create Broadcast Media Format Transcoding Template window, configure the following items:
Template Name: It can contain up to 64 letters, digits, underscores (_), hyphens (-), and asterisks (*).
Preset Encoder Configuration: Select the default values of encoder parameters such as sample rate.
Container Format: Supported formats include MXF.
Transcoding Duration: You can select the input file duration or customize the duration.
Audio/Video Parameters: You can customize audio/video parameters as needed.
7. Click OK.
After successfully creating the template, you can view, edit, or delete it in the custom template list.
Note:
You can use the template when creating a broadcast media format transcoding job as instructed in Configuring Job or creating a workflow as instructed in Configuring Workflow.
Highlights generation
The highlights generation feature automatically extracts highlights from a video. You can use a custom template to set the highlights generation template name and specify the maximum duration, resolution, and format of the output highlight video.
3. Click the name of the bucket where you want to store the video.
4. On the left sidebar, select Data Processing Workflow > Template Configuration to enter the template configuration page.
5. Select Highlights Generation and click Create Highlights Generation Template.
6. In the Create Voice Separation Template window, configure the following items:
Note:
Currently, highlights generation can be used only for landscape, food, street, and vlog scenarios and will support more scenarios in the future. If you want to customize this feature, contact us for assistance.
Template Name: It can contain up to 64 letters, digits, underscores (_), hyphens (-), and asterisks (*).
Container Format: Supported formats include MP4, FLV, HLS, TS, and MKV.
Highlight Video Duration: You can select the duration of the complete output highlight video after automatic analysis or customize the duration.
Audio/Video Parameters: You can customize audio/video parameters as needed.
7. Click OK.
After successfully creating the template, you can view, edit, or delete it in the custom template list.
Note:
You can use the template when creating a highlights generation job as instructed in Configuring Job or creating a workflow as instructed in Configuring Workflow.
Video frame capturing
The video frame capturing feature captures the frames of a video at specified time points. The output screenshots are in JPG format by default. If you enable captured frame compression, screenshots can be output in HEIF or TPG format. You can customize the template name, frame capturing start time, frame capturing interval, captured frames, and output image size and format in a custom video frame capturing template.
3. Click the name of the bucket where you want to store the video.
4. On the left sidebar, select Data Processing Workflow > Template Configuration to enter the template configuration page.
5. Select Video Frame Capturing and click Create Video Frame Capturing Template.
6. In the Create Video Frame Capturing Template window, configure the following items:
Template Name: It can contain up to 64 letters, digits, underscores (_), hyphens (-), and asterisks (*).
Frame Capturing Start Time: You can select any time point within the full video length.
Frame Capturing Method:
All frames will be captured by default: Every video frame will be captured.
Custom Frame Capturing Interval: Frames will be captured at specified time intervals from the frame capturing start time to the end of the video.
Even Frame Capturing: Frames will be captured at even intervals calculated based on the specified number of captured frames from the frame capturing start time to the end of the video.
Capture Keyframes: Capture only keyframes.
Max Frame Count Per Video: This parameter is required if you select All frames will be captured by default, Custom Frame Capturing Interval, or Capture Keyframes as the frame capturing method.
Captured Frames: This parameter is required if you select Even Frame Capturing as the frame capturing method. Frames will be captured at even intervals calculated based on the specified number of frames captured from the frame capturing start time to the end of the video.
Output Image Size: The default output screenshot size is the same as that of the original video image. If you select custom image size, you must enter an integer between 128 and 4096 for the width and height respectively.
Video Frame Compression: If it is enabled, captured images can be compressed.
7. Click OK.
After successfully creating the template, you can view, edit, or delete it in the custom template list.
Note:
You can use the template when creating a video frame capturing job as instructed in Configuring Job or creating a workflow as instructed in Configuring Workflow.
Video-to-animated image conversion
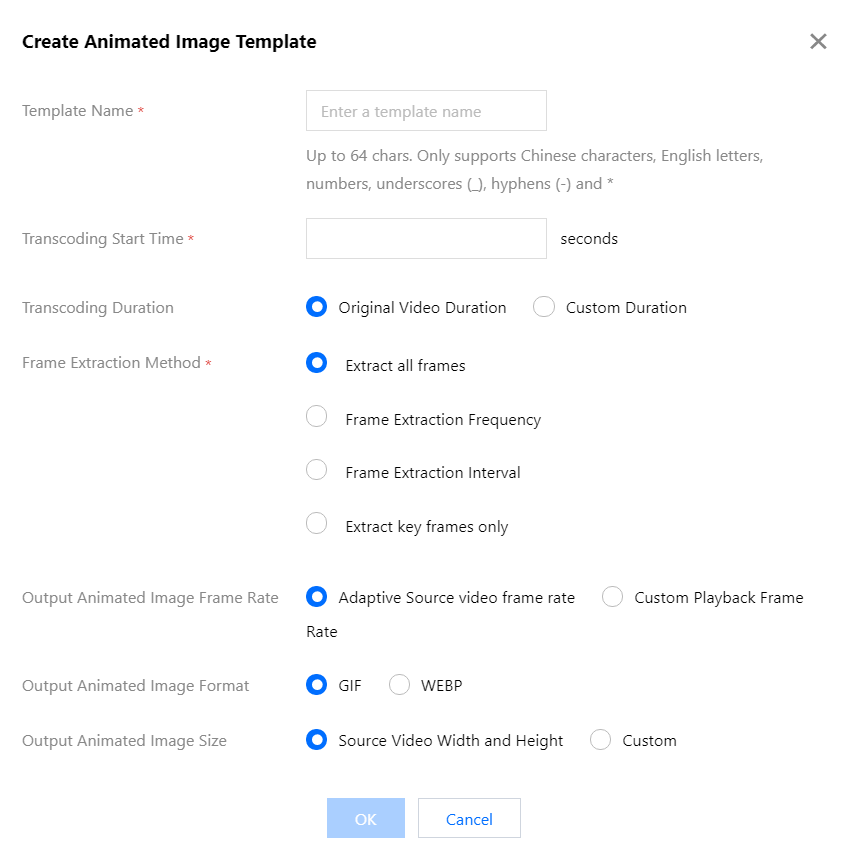
The video to animated image conversion feature converts a video to animated images. You can customize the template name, transcoding start time, transcoding duration, frame extraction method, output animated image frame rate, and output animated image size in a custom video to animated image conversion template.
3. Click the name of the bucket where you want to store the video.
4. On the left sidebar, select Data Processing Workflow > Common Configuration. Then, select the Template tab to go to the template configuration page.
5. Select Video to Animated Image Conversion and click Create Video to Animated Image Conversion Template.
6. In the Create Video to Animated Image Conversion Template window, configure the following items:
Template Name: It can contain up to 64 letters, digits, underscores (_), hyphens (-), and asterisks (*).
Transcoding Start Time: You can select any time point within the full video length.
Transcoding Duration: It specifies the duration of video transcoding after the transcoding start time. You can select Original Video Duration or Custom Duration.
Frame Extraction Method:
Extract all frames: Every video frame will be extracted.
Frame Extraction Frequency: You can set the number of frames to be extracted per second (an integer between 1 and 50).
Frame Extraction Interval: Frame will be extracted at the specified intervals in seconds.
Extract key frames only: The system will intelligently identify and extract the optimal set of frames based on AI understanding of the video content and output them as an animated image.
Output Animated Image Frame Rate: If Adaptive is selected, the system will automatically select an appropriate frame rate based on the settings of the above parameters. You can also select Custom Playback Frame Rate to restrict the frame rate to 1–60 FPS.
Output Animated Image Format: The output animated image is in GIF format by default. If you select the WEBP format, you need to select the animated image quality, which ranges from 1 to 99 and is 75 by default.
Output Animated Image Size: The default output animated image size is the same as that of the original video. If you select custom width and height, you must enter an integer between 128 and 4096 for the width and height respectively.
7. Click OK.
After successfully creating the template, you can view, edit, or delete it in the custom template list.
Note:
You can use the template when creating a video-to-animated image conversion job as instructed in Configuring Job or creating a workflow as instructed in Configuring Workflow.
Video watermark
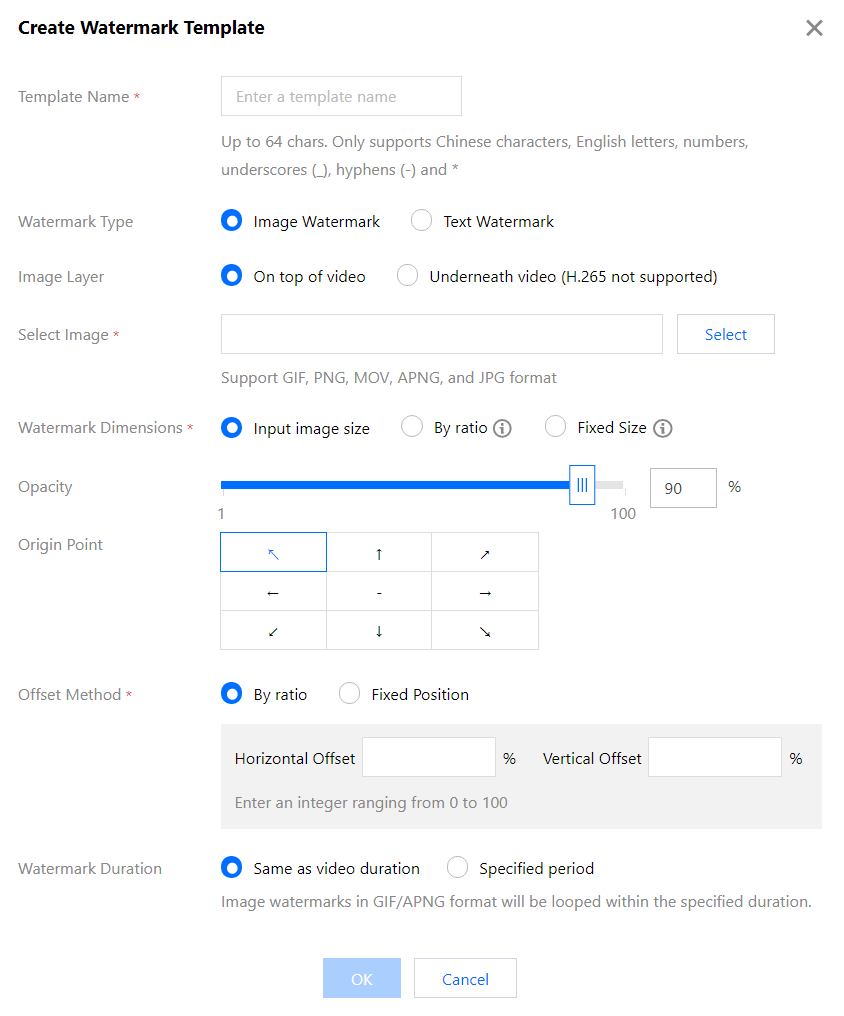
The video watermark feature adds a text or image watermark to a video during transcoding.
Note:
Currently, you can add up to three watermarks in the console or five via API at a time. To add more watermarks, contact us for assistance.
3. Click the name of the bucket where you want to store the video.
4. On the left sidebar, select Data Processing Workflow > Template Configuration to enter the template configuration page.
5. Select Video Watermark and click Create Video Watermark Template.
6. In the Create Video Watermark Template window, configure the following items:
Common parameters
Template Name: It can contain up to 64 letters, digits, underscores (_), hyphens (-), and asterisks (*).
Watermark Type: Select image or text watermark.
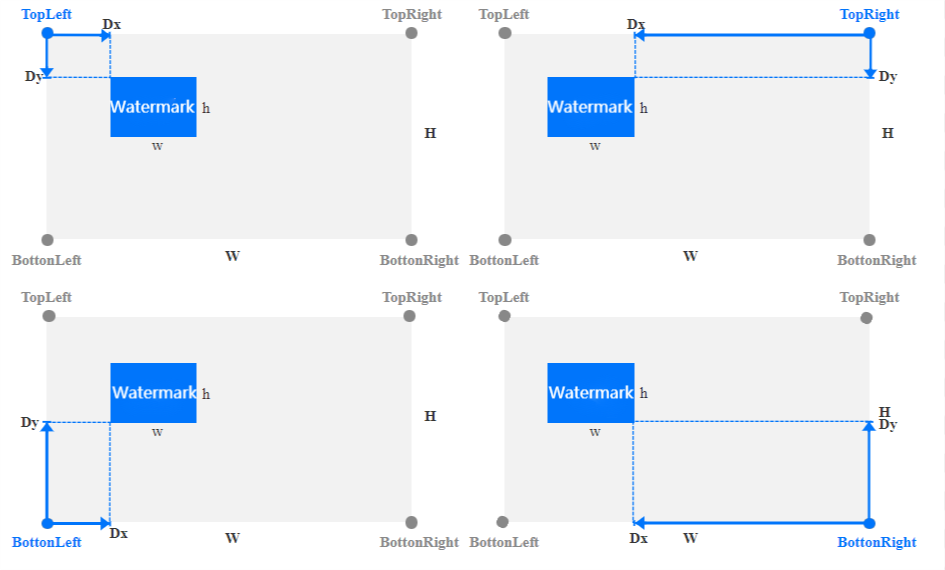
Origin Point: Select the top-left, top-right, bottom-left, or bottom-right corner.
Opacity: Select a value between 1% and 100%.
Offset Method: The watermark offset is based on the origin point. You can select offset by ratio or fixed position.
Watermark Duration: Select Same as video duration or Specified period. If you select the latter, you can set the watermark start time and end time. If you set the start time only, the watermark will be displayed until the video ends by default.
Image watermark parameters
Select Image: If you select image watermark, you need to select its source. Currently, only a watermark image in the same bucket can be selected. If the bucket doesn't have desired images, you need to upload a new one.
Image Layer: Select whether to place the image on top of or underneath the video.
If the image is placed on top of the video, the effect is as shown below:
If the image is placed underneath the video (as the background), the effect is as shown below:
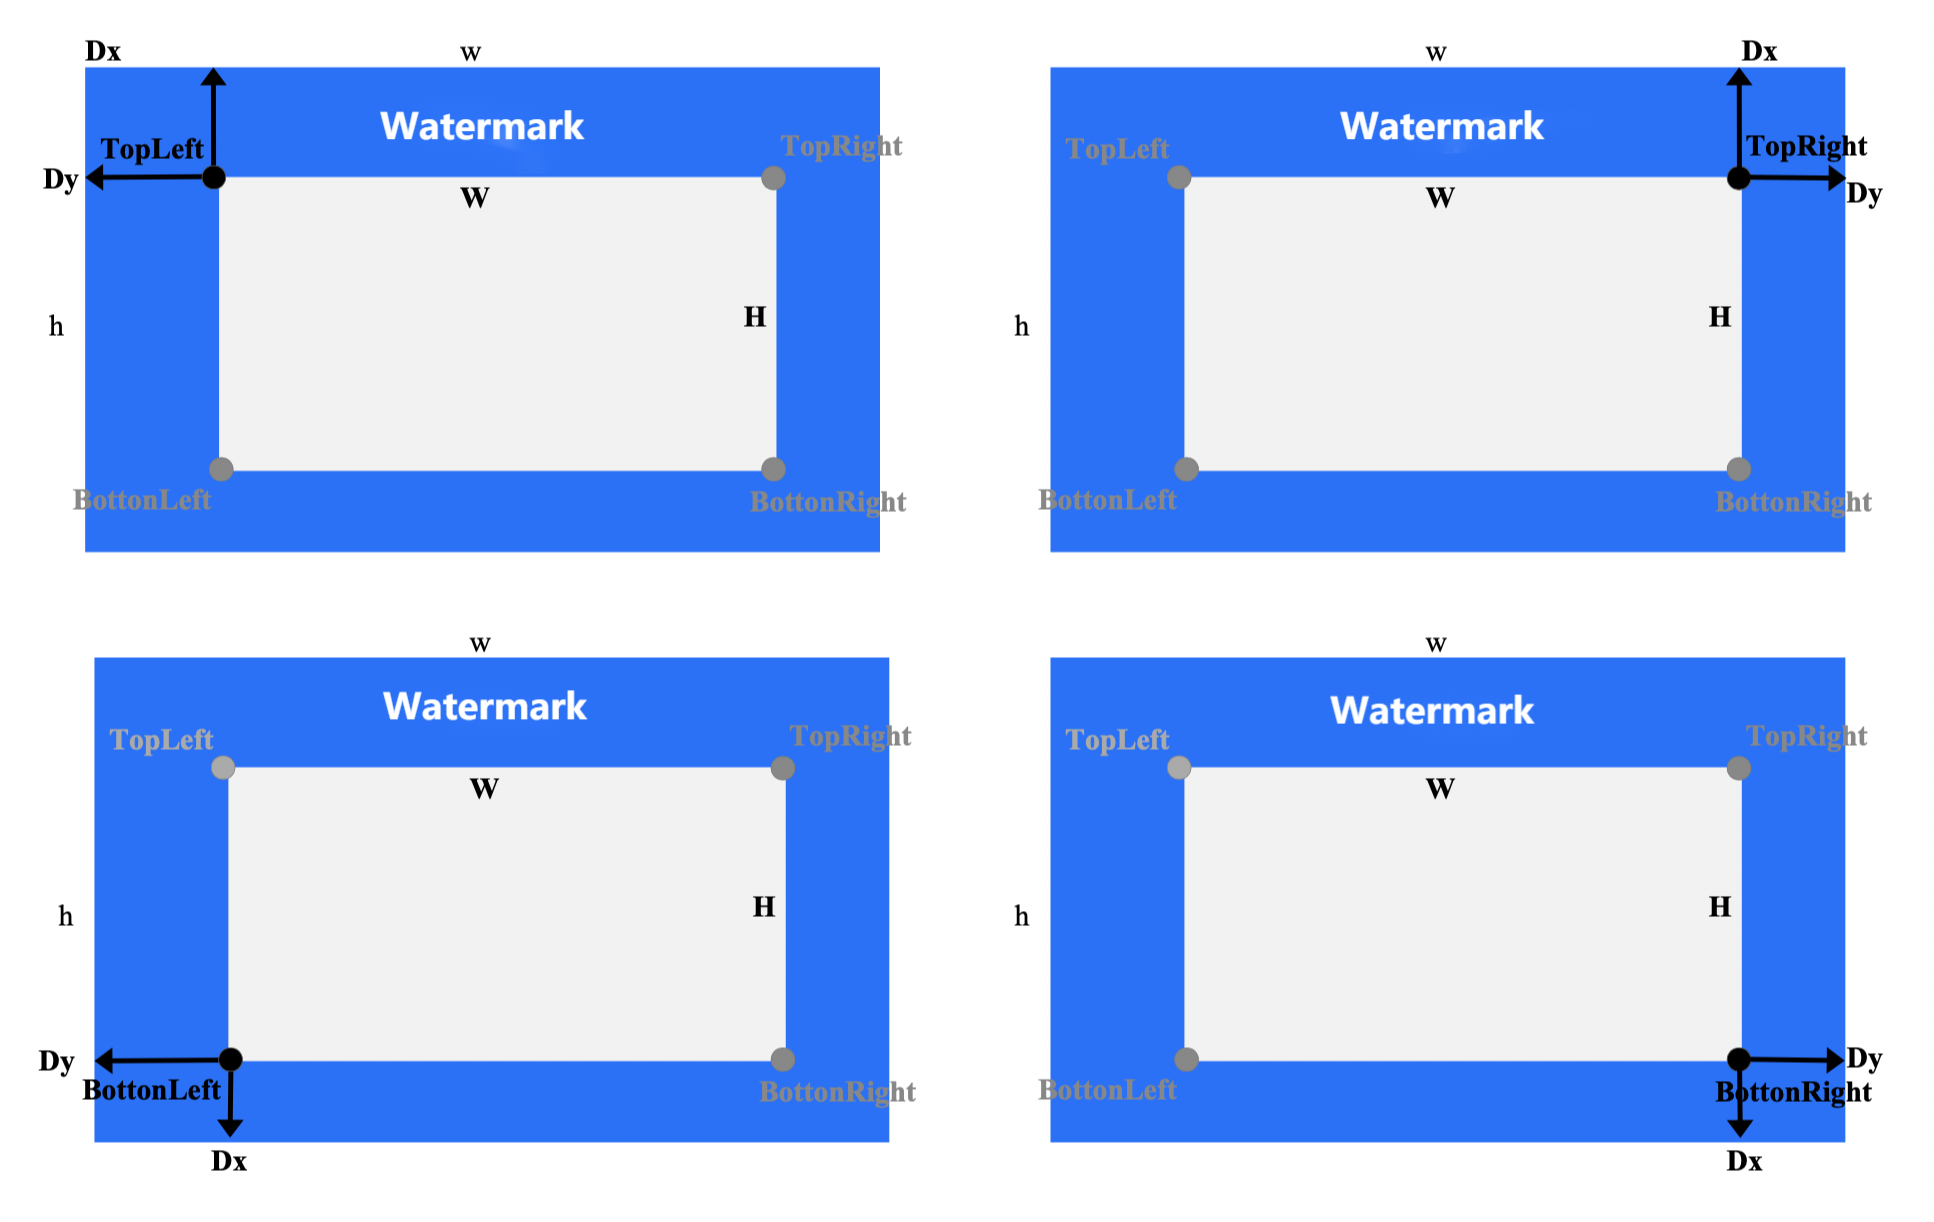
Watermark Dimensions:
Input image size: The original watermark image size will be retained without any processing. Note that if the watermark image is larger than the video image, the watermark cannot be completely displayed.
By ratio: You can set the percentage (1–100) of only the width or height or both of them. If the width or height is not set, it will be scaled proportionally. Suppose the width ratio is a and height ratio is b, then the watermark width will be w = W * a, and the watermark height will be h = H * b (here, W and H are the video width and height respectively).
Fixed size: You can specify the watermark width and height between 8 and 4096 px.
Offset Method (On top of video):
By ratio: You can set the percentage (0–100) of the width or height. As shown below, suppose the horizontal offset ratio is a and the vertical ratio is b, then the horizontal offset will be Dx = W * a, and the vertical offset will be Dy = H * b (here, W and H are the video width and height respectively).
Fixed position: Select a value between 0 and 4096 px. The horizontal offset is Dx, and the vertical offset is Dy.
Watermark Dimensions:
Input image size: The original watermark image size will be retained without any processing. Note that if the watermark image is smaller than the video image, the watermark cannot be completely displayed.
By ratio: You can set the percentage (100–300) of only the width or height or both of them. If the width or height is not set, it will be scaled proportionally. Suppose the width ratio is a and height ratio is b, then the watermark width will be w = W * a, and the watermark height will be h = H * b (here, W and H are the video width and height respectively).
Fixed size: You can specify the watermark width and height between 8 and 4096 px.
Offset Method (Underneath video):
By ratio: You can set the percentage (-300–0) of the width or height. As shown below, suppose the horizontal offset ratio is a and the vertical ratio is b, then the horizontal offset will be Dx = W * a, and the vertical offset will be Dy = H * b (here, W and H are the video width and height respectively).
Fixed position: Select a value between -4096 and 0 px. The horizontal offset is Dx, and the vertical offset is Dy.
Text watermark parameters
Watermark Text: It can contain up to 64 letters, digits, underscores (_), hyphens (-), and asterisks (*).
Font Size: Select a value between 5 and 100 px.
Font: Select Ariblk, Arial, Ahronbd, Helvetica, or HelveticaNeue.
Font Color: It is in the format of 0xRRGGBB.
7. Click OK.
After successfully creating the template, you can view, edit, or delete it in the custom template list.
You can click Preview to view the position and dimensions of the watermark in videos of three common resolutions and quickly adjust the template.
Note:
You can use the template when [creating an audio/video transcoding, SDR-to-HDR, video enhancement, or super resolution job as instructed in Configuring Job or creating a workflow as instructed in Configuring Workflow.
Audio/Video splicing
The video/audio splicing feature adds the specified video/audio segment at the beginning or end of a video/audio file to generate a new one.
3. Click the name of the bucket where you want to store the video.
4. On the left sidebar, select Data Processing Workflow > Common Configuration. Then, select the Template tab to go to the template configuration page.
5. Select Audio/Video Splicing and click Create Audio/Video Splicing Template.
6. In the Create Audio/Video Splicing Template window, configure the following items:
Template Name: It can contain up to 64 letters, digits, underscores (_), hyphens (-), and asterisks (*).
Container Format: Supported formats include AAC, MP3, MP4, FLV, HLS, and TS.
Splicing Position: Select whether to add the file at the beginning or end of the source file.
Other parameters: You can customize the audio/video parameters as needed.
7. Click OK.
After successfully creating the template, you can view, edit, or delete it in the custom template list.
Note:
You can use the template when creating an audio/video splicing job as instructed in Configuring Job or creating a workflow as instructed in Configuring Workflow.
Voice separation
You can separate the same audio file into a voice file and a background sound file for subsequent video editing and playback.
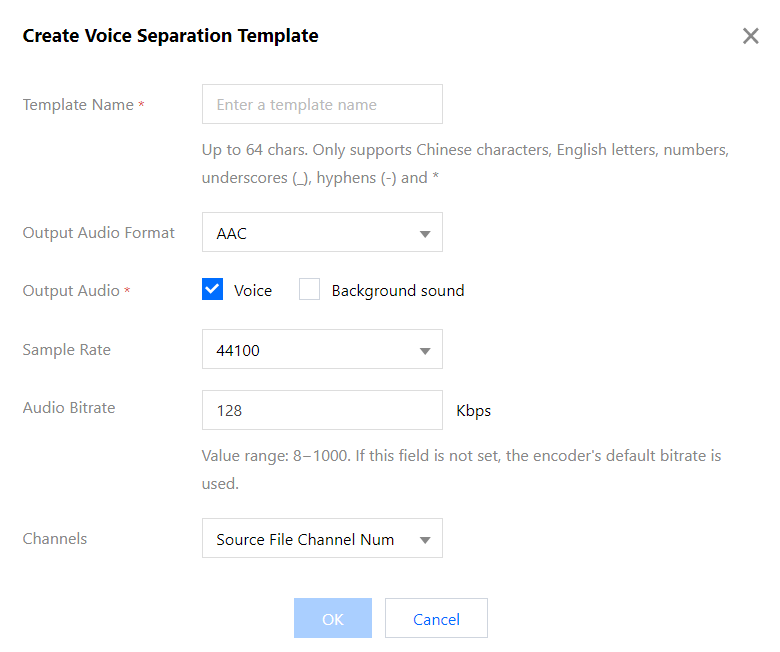
6. In the Create Voice Separation Template window, configure the following items:
Template Name: It can contain up to 64 letters, digits, underscores (_), hyphens (-), and asterisks (*).
Output Audio Format: Supported formats include MP3, AAC, AMR, and FLAC.
Output Audio: Specify to output voice or background sound.
Sample Rate: Select an option as needed.
Audio Bitrate: Enter a value as needed.
Channels: Select an option as needed.
7. Click OK.
After successfully creating the template, you can view, edit, or delete it in the custom template list.
Note:
You can use the template when creating a voice separation job as instructed in Configuring Job or creating a workflow as instructed in Configuring Workflow.
Text to speech
You can convert text to speeches in different voices for use in audiobook, navigation, and other scenarios.
3. Click the name of the bucket where you want to store the video.
4. On the left sidebar, select Data Processing Workflow > Template Configuration to enter the template configuration page.
5. Select Smart Audio > Text to Speech and click Create Text-to-Speech Template.
6. In the Create Text-to-Speech Template window, configure the following items:
Template Name: It can contain up to 64 letters, digits, underscores (_), hyphens (-), and asterisks (*).
Output Audio Format: Supported formats include MP3, AAC, AMR, and FLAC.
Voice: Specify the output voice.
Processing Mode: Select async or sync processing.
Volume: Adjust the output volume.
Speech Speed: Adjust the output speech speed.
7. Click OK.
After successfully creating the template, you can view, edit, or delete it in the custom template list.
Note:
You can use the template when creating a text-to-speech job as instructed in Configuring Job or creating a workflow as instructed in Configuring Workflow.
Image quality enhancement
Video enhancement uses AI to improve the video quality and enhance the video colors and details visually. It includes super resolution, detail enhancement, SDR-to-HDR, and frame interpolation features.
6. In the Create Image Quality Enhancement Template window, configure the following items:
Note:
Currently, video enhancement supports color enhancement, detail enhancement, super resolution, and SDR-to-HDR. Other features will be provided in the future.
The input video for enhancement must be shorter than 30 minutes.
Template Name: It can contain up to 64 letters, digits, underscores (_), hyphens (-), and asterisks (*).
Color Enhancement: Select automatic system analysis for color enhancement or customize the color enhancement parameters.
Detail Enhancement: Select automatic system analysis for detail enhancement or customize the detail enhancement parameters.
7. Click OK.
After successfully creating the template, you can view, edit, or delete it in the custom template list.
Note:
You can use the template when creating a video enhancement job as instructed in Configuring Job or creating a workflow as instructed in Configuring Workflow.
Image processing
Image processing is a rich-featured, cost-effective, and high-reliability image processing service provided by CI. It supports flexible image editing, such as rotation, cropping, transcoding, and scaling. It provides multiple image downsizing solutions like Guetzli compression, TPG transcoding, and HEIF transcoding, as well as diversified copyright protection solutions like image/text/blind watermarking. This meets your image processing needs in different business scenarios.
3. Click the name of the bucket where you want to store the video.
4. On the left sidebar, select Data Processing Workflow > Common Configuration. Then, select the Template tab to go to the template configuration page.
5. Select Video Processing and click Create Video Processing Template.
6. In the Create Video Processing Template window, configure the following items:
Template Name: It can contain up to 64 letters, digits, underscores (_), hyphens (-), and asterisks (*).
Editing Mode: Select Basic or Enhanced. The latter delivers greater image reconstruction and restoration effects.
Basic Processing: Select the output target resolution.
Text Watermark: After it is enabled, you can add a single or tiled watermark to the image.
Image Watermark: After it is enabled, you can add an animated or static watermark at the specified position on the image.
Preview: You can preview the processing effect.
7. Click OK.
After successfully creating the template, you can view, edit, or delete it in the custom template list.
Note:
You can use the template when creating an image processing job as instructed in Configuring Job or creating a workflow as instructed in Configuring Workflow.