This document describes how to install an SSL certificate in a Lighthouse instance and enable HTTPS access, with a Windows Server 2012 R2 system image-based instance as an example.
Note:
The SSL certificate used in the document is provided by Tencent Cloud. For more information on this service, see Overview and Purchase Guide.
Sample information
Certificate name: cloud.tencent.com
Apache version: Apache/2.4.53. You can download it here. If you need another version, contact us.
OS: Windows Server 2012 R2. The detailed steps may differ by version.
Prerequisites
Install the Apache service on the current server.
Open port 443 and 80 in your firewall policy. For more information, see Managing Firewall.
The data required to install the SSL certificate includes the following:
Name
Description
Lighthouse instance's public IP address
Instance IP address used to connect a local computer to the instance.
Username
The username used to log in to the Lighthouse instance, such as `Administrator`.
Password
The password matching the username used to log in to the Lighthouse instance.
Note:
You can log into the Lighthouse console, find the target instance, and enter its details page to view its public IP address. After the instance is created, first reset the password and remember it. For more information, see Resetting Password.
2. In the pop-up window, select Apache for the server type, click Download, and decompress the cloud.tencent.com certificate file package to a local directory.
After decompression, you can get the certificate file of the corresponding type, which includes the cloud.tencent.com_apache folder.
Folder: cloud.tencent.com_apache
Files in the folder:
root_bundle.crt: Certificate file
cloud.tencent.com.crt: Certificate file
cloud.tencent.com.key: Private key file
cloud.tencent.com.csr: CSR file
Note:
You can upload the CSR file when applying for a certificate or have it generated online by the system. It is provided to the CA and irrelevant to the installation.
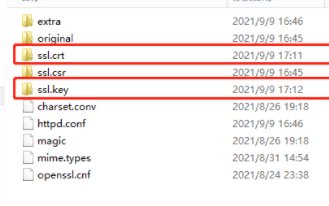
4. Copy the obtained root_bundle.crt, cloud.tencent.com.crt, and cloud.tencent.com.key files from the local directory to the Apache server. For more information on how to upload a certificate file, see How to Upload Local File to Lighthouse Instance.
Here, the files are copied to the ssl.crt and ssl.key folders under the \\conf directory. You can specify the file location. The sample directory in this document is as shown below:
SSL Certificate File
Folder
root_bundle.crt
ssl.crt
cloud.tencent.com.crt
cloud.tencent.com.key
ssl.key
Configuration file
1. Open the httpd.conf file in the conf directory of the Apache server with a text editor and delete the # before the following fields.
#LoadModule ssl_module modules/mod_ssl.so
#Include conf/extra/httpd-ssl.conf
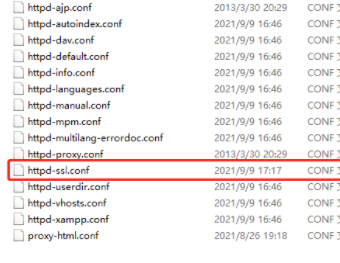
2. Open the httpd-ssl.conf file in the conf\\extra directory of the Apache server with a text editor as shown below:
3. Modify the httpd-ssl.conf file and set the following field parameters to the paths of the uploaded certificate files as shown below:
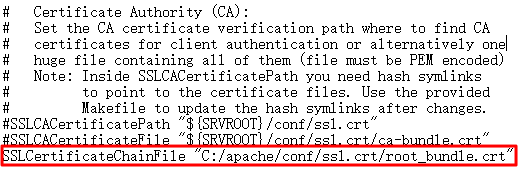
If there is no SSLCertificateChainFile entry in the httpd-ssl.conf configuration file, add it to the corresponding location as shown below:
4. Restart the Apache server and then you access it through https://cloud.tencent.com.
If the "AH00526: Syntax error on line 18 of C:/apache/conf/extra/httpd-ahssl.conf:Cannot define multiple Listeners on the same IP:port" error is reported during the restart, there is a listening port conflict. Replace the listening port 443 in conf\\extra\\httpd-ahssl.conf with another port.
(Optional) Security configuration for automatic redirect from HTTP to HTTPS
1. Open the httpd.conf file in the conf directory of the Apache server with a text editor and delete the # before the following fields.
#LoadModule rewrite_module modules/mod_rewrite.so
2. Configure the fields in the website running directory. For example, add the following content to the <Directory "C:/xampp/htdocs"> field:
3. Restart the Apache server and then you can access it through both http://cloud.tencent.com (which will be automatically redirected to https://cloud.tencent.com) and https://cloud.tencent.com.