Building LVM Logic Volumes with Multiple Elastic Cloud Disks
Download
포커스 모드
폰트 크기
마지막 업데이트 시간: 2023-12-22 10:50:53
Introduction to LVM
Logical Volume Manager (LVM) creates a logical layer over your disks or partitions to divide them into physical extent (PE) units with the same size. This categorizes disks or partitions into a volume group (VG), on which you can create a logical volume (LV), and then create file systems on the LV.
Different from direct disk partitioning, LVM allows elastic scaling of file system.
The file system is not limited by the size of a physical disk. Instead, it can be distributed among multiple disks:
For example, you can purchase three 4-TB elastic cloud disks, and use LVM to create a massive file system nearly 12 TB.
You can resize the LVs dynamically instead of repartitioning your disks.
When the LVM VG capacity cannot meet your needs, you can purchase a elastic cloud disk, attach it to your CVM instance, and add it to the LVM VG to expand capacity.
Building LVM
Note:
The following example uses three elastic cloud disks to create a dynamically resizable file system through LVM.
Take /dev/vdc, /dev/vdd and /dev/vde as an example, then run:
pvcreate /dev/vdc /dev/vdd /dev/vde
The following figure shows the command output when the creation is successful:
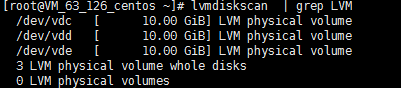
3. Run the following command to view physical volumes of the system.
lvmdiskscan |grep LVM
Step 2: Create a volume group (VG)
1. Run the following command to create a VG.
vgcreate [-s <specified PE size>]<VG name><PV path>.
Assume you want to create a VG named "lvm_demo0", then run:
vgcreate lvm_demo0 /dev/vdc /dev/vdd
The following figure shows the command output when the creation is successful:
When Volume group" <VG name> "successfully created is displayed, the VG has been created.
Then you can run the following commands to add a new PV to the VG.
vgextend VG name New PV path
The following figure shows the command output when the operation is successful:
After the VG is created, you can run vgs, vgdisplay or other commands to query information about VGs of the system, as shown below:
Step 3: Create a logical volume (LV)
1. Run the following command to create a LV.
lvcreate [-L <LV size>][-n <LV name>]<VG name>.
Assume you want to create an 8 GB logical volume named "lv_0", then run:
lvcreate -L 8G -n lv_0 lvm_demo0
The following figure shows the command output when the creation is successful:
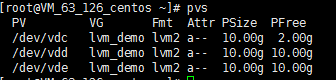
Note:
Run the pvs command. You can see that only the capacity of the /dev/vdc disk is reduced by 8 GB, as shown below:
Step 4: Create and mount a file system
1. Run the following command to create a file system on an existing LV.
mkfs.ext3 /dev/lvm_demo0/lv_0
2. Run the following command to create the mount point /vg0.
mkdir /vg0
3. Run the following command to mount the file system.
mount /dev/lvm_demo0/lv_0 /vg0
The following figure shows the command output when the mount is successful:
Step 5: Resize the logical volume and file system dynamically
Note:
LVs can be extended dynamically only when the VG capacity is not used up. After increasing the LV capacity, you need to extend the file system created on this LV.
1. Run the following command to extend the LV.
lvextend [-L +/- <scale capacity>]<LV path>
Assume you want to scale up the capacity of LV named "lv_0" by 4 GB, then run:
lvextend -L +4G /dev/lvm_demo0/lv_0
The following figure shows the command output when the scaling is successful:
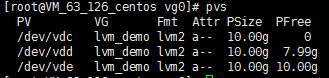
Note:
Run the pvs command. You can find that the /dev/vdc disk capacity has been fully used, and the /dev/vdd disk capacity has been used by 2 GB, as shown below:
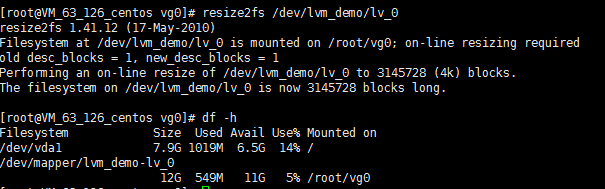
2. Run the following command to extend the file system.
resize2fs /dev/lvm_demo0/lv_0
The following figure shows the command output when the scaling is successful:
After the extension, run the following command to check whether the LV capacity is 12 GB.