Plugins can add additional abilities to Agent applications, supporting developer customization of plugin functions. You can refer to the steps below to create plugins through API and code method.
1. Filling in Plugin Basic Info
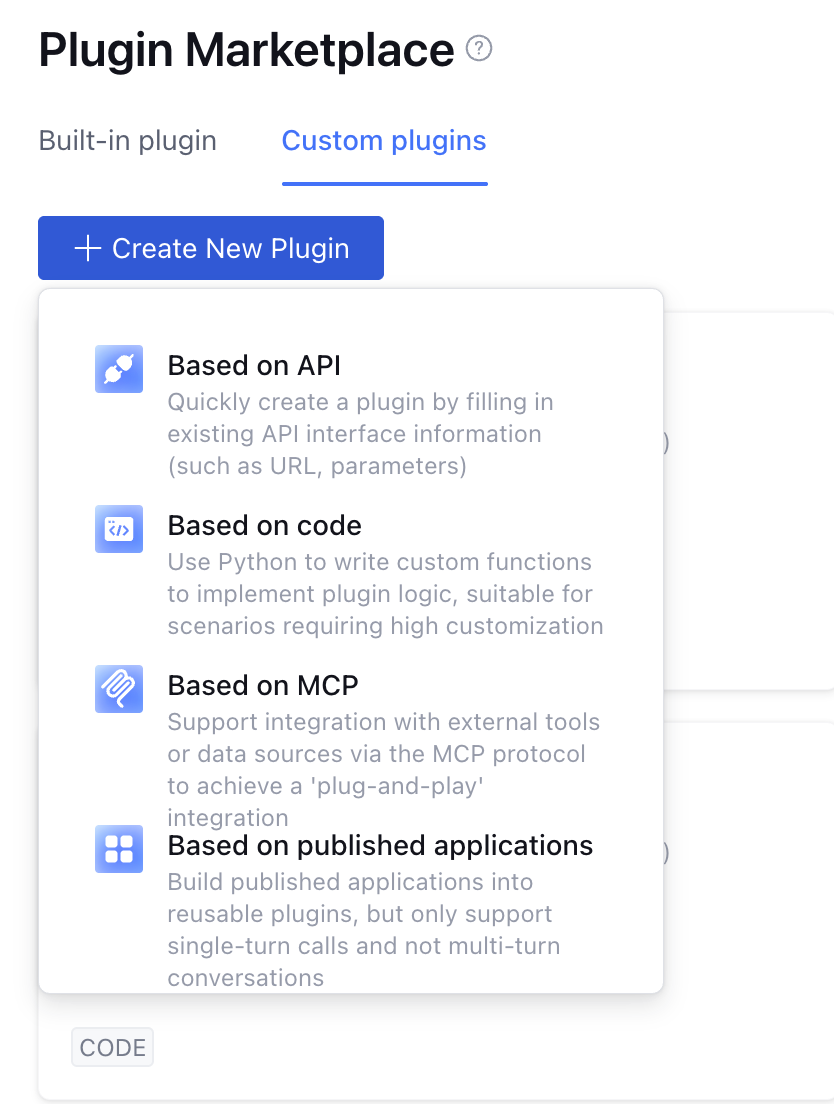
Click on the Plugin Maketplace > Custom Plugins > Create New Plugin, and select to create a plugin based on API or code creation.
Based on API: Manually fill in the basic information, input, and output parameters of the API.
Based on code: Use Python custom function code to achieve API functionality.
Taking API creation as an example:
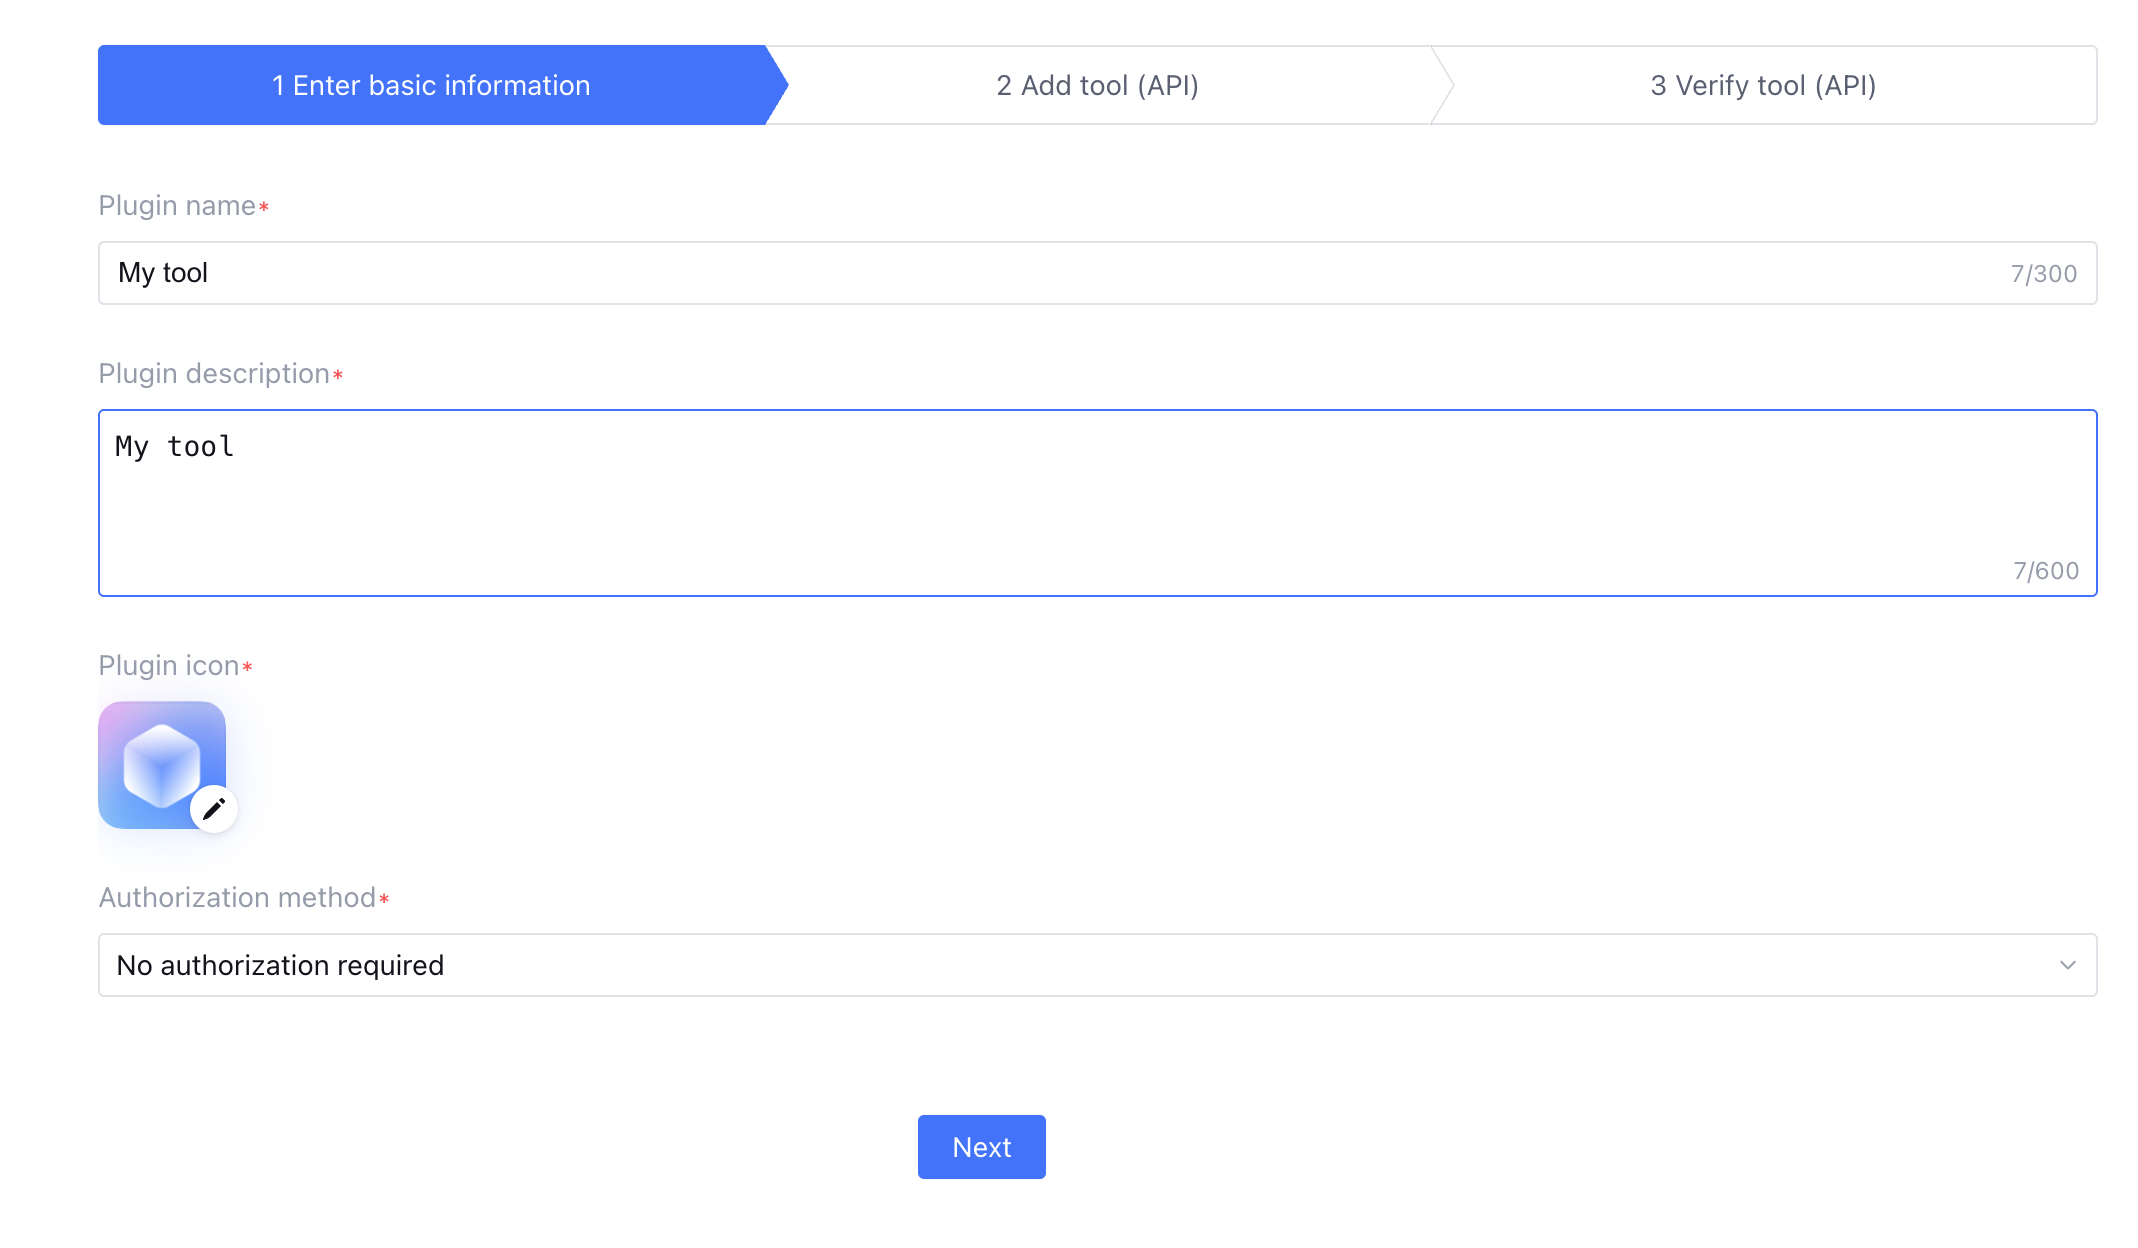
1.1 Fill in Plugin Basic Information
Fill in plugin basic information, including the name, description and upload plugin icon.
1.2 Specify Plugin Authorization Method
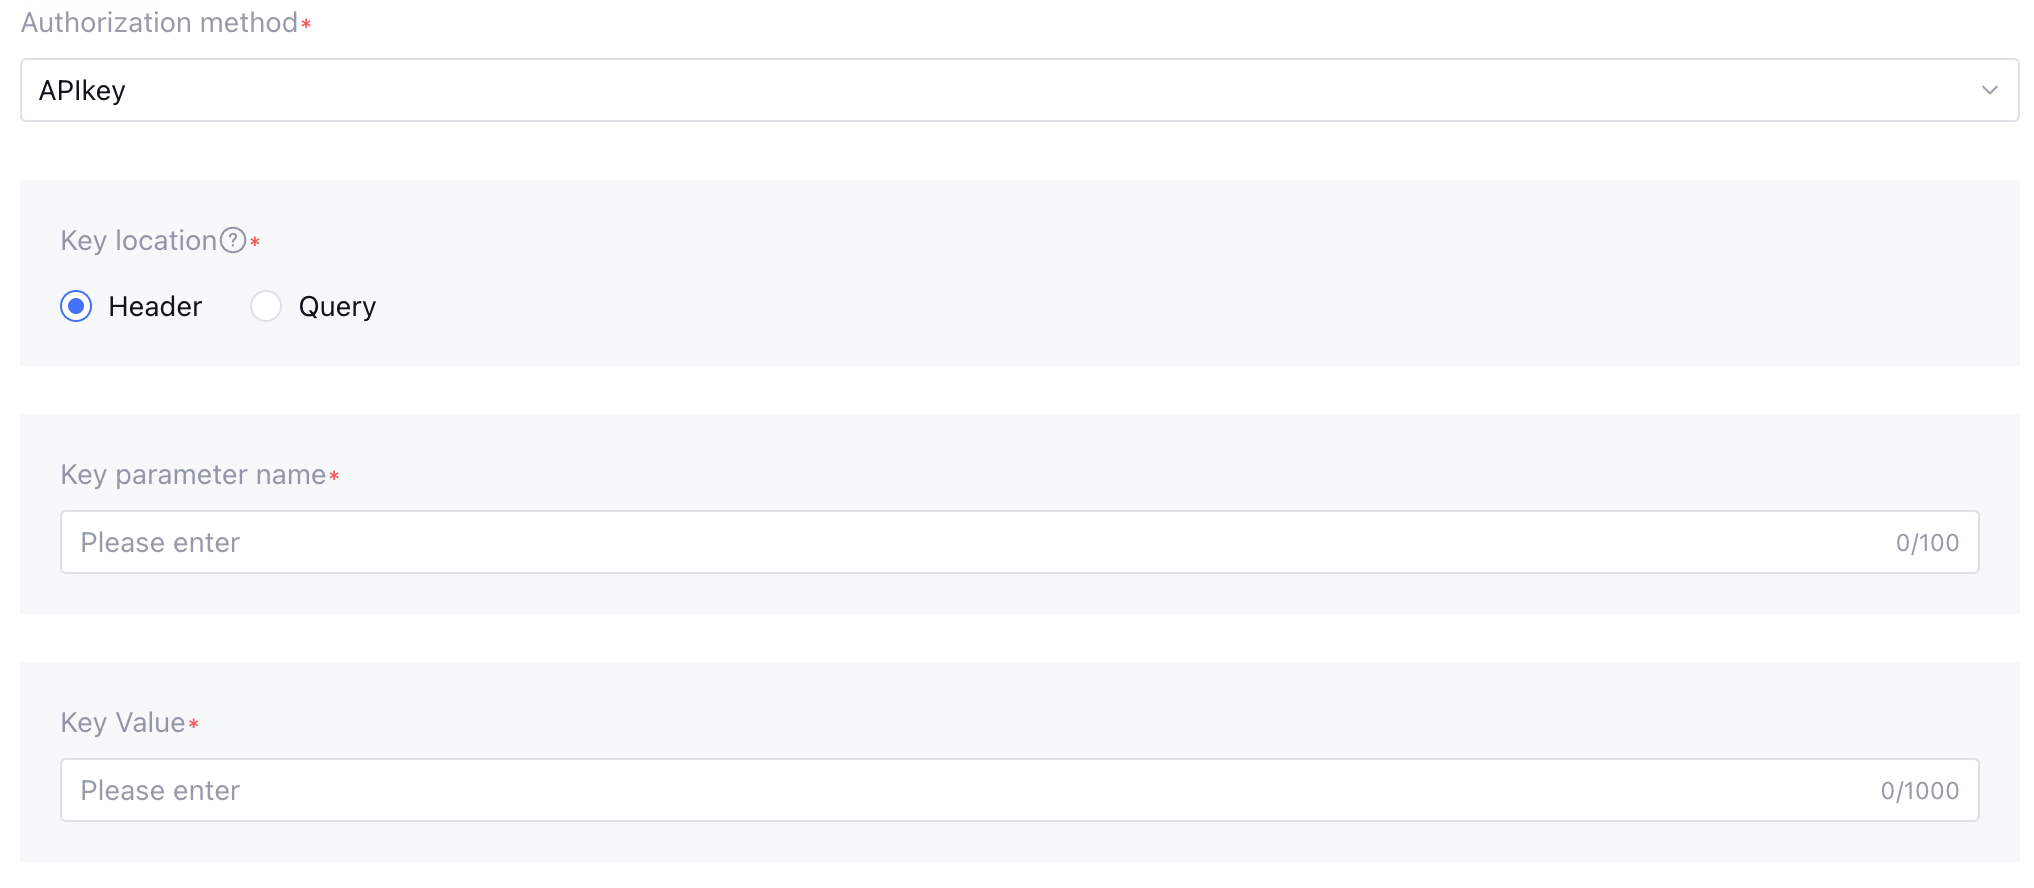
According to the actual authentication requirements of the tool API, select Authorization Method.
APIKey Authorization
APIKey is actually an authentication method that uses a key or token to verify the requester identity.
Select APIkey in the authorization mode, then configure the corresponding parameter name and key value in the Header (request header) or Query (query parameter).
2. Configuration Tool
You can add an API tool by manually adding a tool or importing a code file in yaml/json format. Take manual addition as an example, fill in the tool name, API call address, etc. in the "Add Tool (API)" procedure, then complete the configuration by setting the corresponding input and output parameters of the configuration interface.
You can import plugins through different types of code formats. The following is the API integration instruction and example for different standards:
OpenAPI
OpenAPI is an open standard for describing and defining RESTful API interfaces. It allows developers to describe API requests, responses, parameters, authentication, etc. in a standardized way.
Filling Instructions
File format: YAML format and JSON format are supported.
Key field description:
Field
Description
Required or Not
OpenAPI
Specify the version number, for example, 3.0.0
Yes
servers
Define the BaseURL list for APIs
No, but it is advisable to fill in to generate a valid URL.
info
API metadata, including title, version, and description.
Yes
paths
Define all endpoints (such as /users) and its HTTP methods (GET/POST)
Yes
components
Store reusable models, parameters, and responses, such as schemas defining data structure
No
Example:
YAML
JSON
openapi:"3.0.0"
info:
title:"Test API"
version:"1.0.0"
description:"Fill in the plugin description herein"
servers:
-url:"https://example.com/api"
description:"Fill in the plugin description herein"
paths:
"/weatherInfo":
get:
summary:"API name"
description:"Fill in the API description of the plugin herein"
operationId:"getWeatherInfo"
parameters:
-name:"city"
in:"query"
description:"Parameter description"
required:true
schema:
type:"string"
responses:
"200":
description:"Successful response"
content:
application/json:
schema:
type:"object"
properties:
status:
type:"integer"
description:"Return status"
enum:[0,1]
"400":
description:"Error request"
"401":
description:"Unauthorized"
"500":
description:"Server error"
{
"openapi":"3.0.0",
"info":{
"title":"Test API",
"version":"1.0.0",
"description":"Fill in the plugin description herein"
},
"servers":[
{
"url":"https://example.com/api",
"description":"Fill in the plugin description herein"
}
],
"paths":{
"/weatherInfo":{
"get":{
"summary":"API name",
"description":"Fill in the API description of the plugin herein",
"operationId":"getWeatherInfo",
"parameters":[
{
"name":"city",
"in":"query",
"description":"Parameter description",
"required":true,
"schema":{
"type":"string"
}
}
],
"responses":{
"200":{
"description":"Successful response",
"content":{
"application/json":{
"schema":{
"type":"object",
"properties":{
"status":{
"type":"integer",
"description":"Return status"
"enum":[
0,
1
]
}
}
}
}
}
},
"400":{
"description":"Error request"
},
"401":{
"description":"Unauthorized"
},
"500":{
"description":"Server error"
}
}
}
}
}
}
Swagger
Swagger is the predecessor and implementation tool of the OpenAPI standard (Swagger 2.0 is the legacy version), for description of, documentation, and test of RESTful APIs, using the same file format as OpenAPI.
Filling Instructions
File format: YAML format and JSON format are supported.
Key field description:
Field
Description
Required or Not
swagger
Specify the version number, for example, 2.0
Yes
host
Domain name
No, but it is advisable to fill in to generate a valid URL.
basePath
Base path
No, but it is advisable to fill in to generate a valid URL.
schemes
Supported protocols, such as HTTP or HTTPS
No, but it is advisable to fill in to generate a valid URL.
info
API metadata, including title, version, and description.
Yes
paths
Define all endpoints (such as /users) and its HTTP methods (GET/POST)
Yes
definition
Data model, equivalent to OpenAPI's components/schemas
No
Example:
YAML
JSON
swagger:"2.0"
info:
title: User API
version: 1.0.0
description: Example Swagger 2.0 document
host:"example.com"
basePath:"/api"
schemes:
-"https"
paths:
/users:
# GET request
get:
summary: Get all users
responses:
'200':
description: return successfully the list of users
schema:
type: object
properties:
users:
type: array
items:
$ref:'#/definitions/User'
# POST request
post:
summary: Create a new user
parameters:
-in: body
name: user
required:true
schema:
$ref:'#/definitions/User'
responses:
'201':
description: user created successfully
definitions:
User:
type: object
required:
- name
properties:
id:
type: integer
readOnly:true
example:1
name:
type: string
example:"Tom"
email:
type: string
format: email
example:"user@example.com"
{
"swagger":"2.0",
"info":{
"title":"User API",
"version":"1.0.0",
"description":"Example Swagger 2.0 document"
},
"host":"example.com",
"basePath":"/api",
"schemes":["https"],
"paths":{
"/users":{
"get":{
"summary":"Get all users",
"responses":{
"200":{
"description":"return successfully the list of users",
"schema":{
"type":"object",
"properties":{
"users":{
"type":"array",
"items":{
"$ref":"#/definitions/User"
}
}
}
}
}
}
},
"post":{
"summary":"Create a new user",
"parameters":[
{
"in":"body",
"name":"user",
"required":true,
"schema":{
"$ref":"#/definitions/User"
}
}
],
"responses":{
"201":{
"description":"user created successfully"
}
}
}
}
},
"definitions":{
"User":{
"type":"object",
"required":["name"],
"properties":{
"id":{
"type":"integer",
"readOnly":true,
"example":1
},
"name":{
"type":"string",
"example":"Tom"
},
"email":{
"type":"string",
"format":"email",
"example":"user@example.com"
}
}
}
}
}
Postman
Postman is an API development and testing tool. Its Collection format is used to store requests, test scripts and environment variables, suitable for manual testing and team collaboration.
Filling Instructions
File format: JSON format is supported.
Key field description:
Field
Description
Required or Not
info
Collection metadata, including Collection Name and collection version
Yes
item
Request list, each request requires a specific method and URL
Yes
request
Request detail, including header, body, auth
Yes
auth
Configure authentication, such as API Key
No
event
Pre-request Script or Test Script
No
Example:
{
"info":{
"name":"User API Collection",
"version":"1.0.0",
"description":"Sample Postman collection with GET and POST requests"
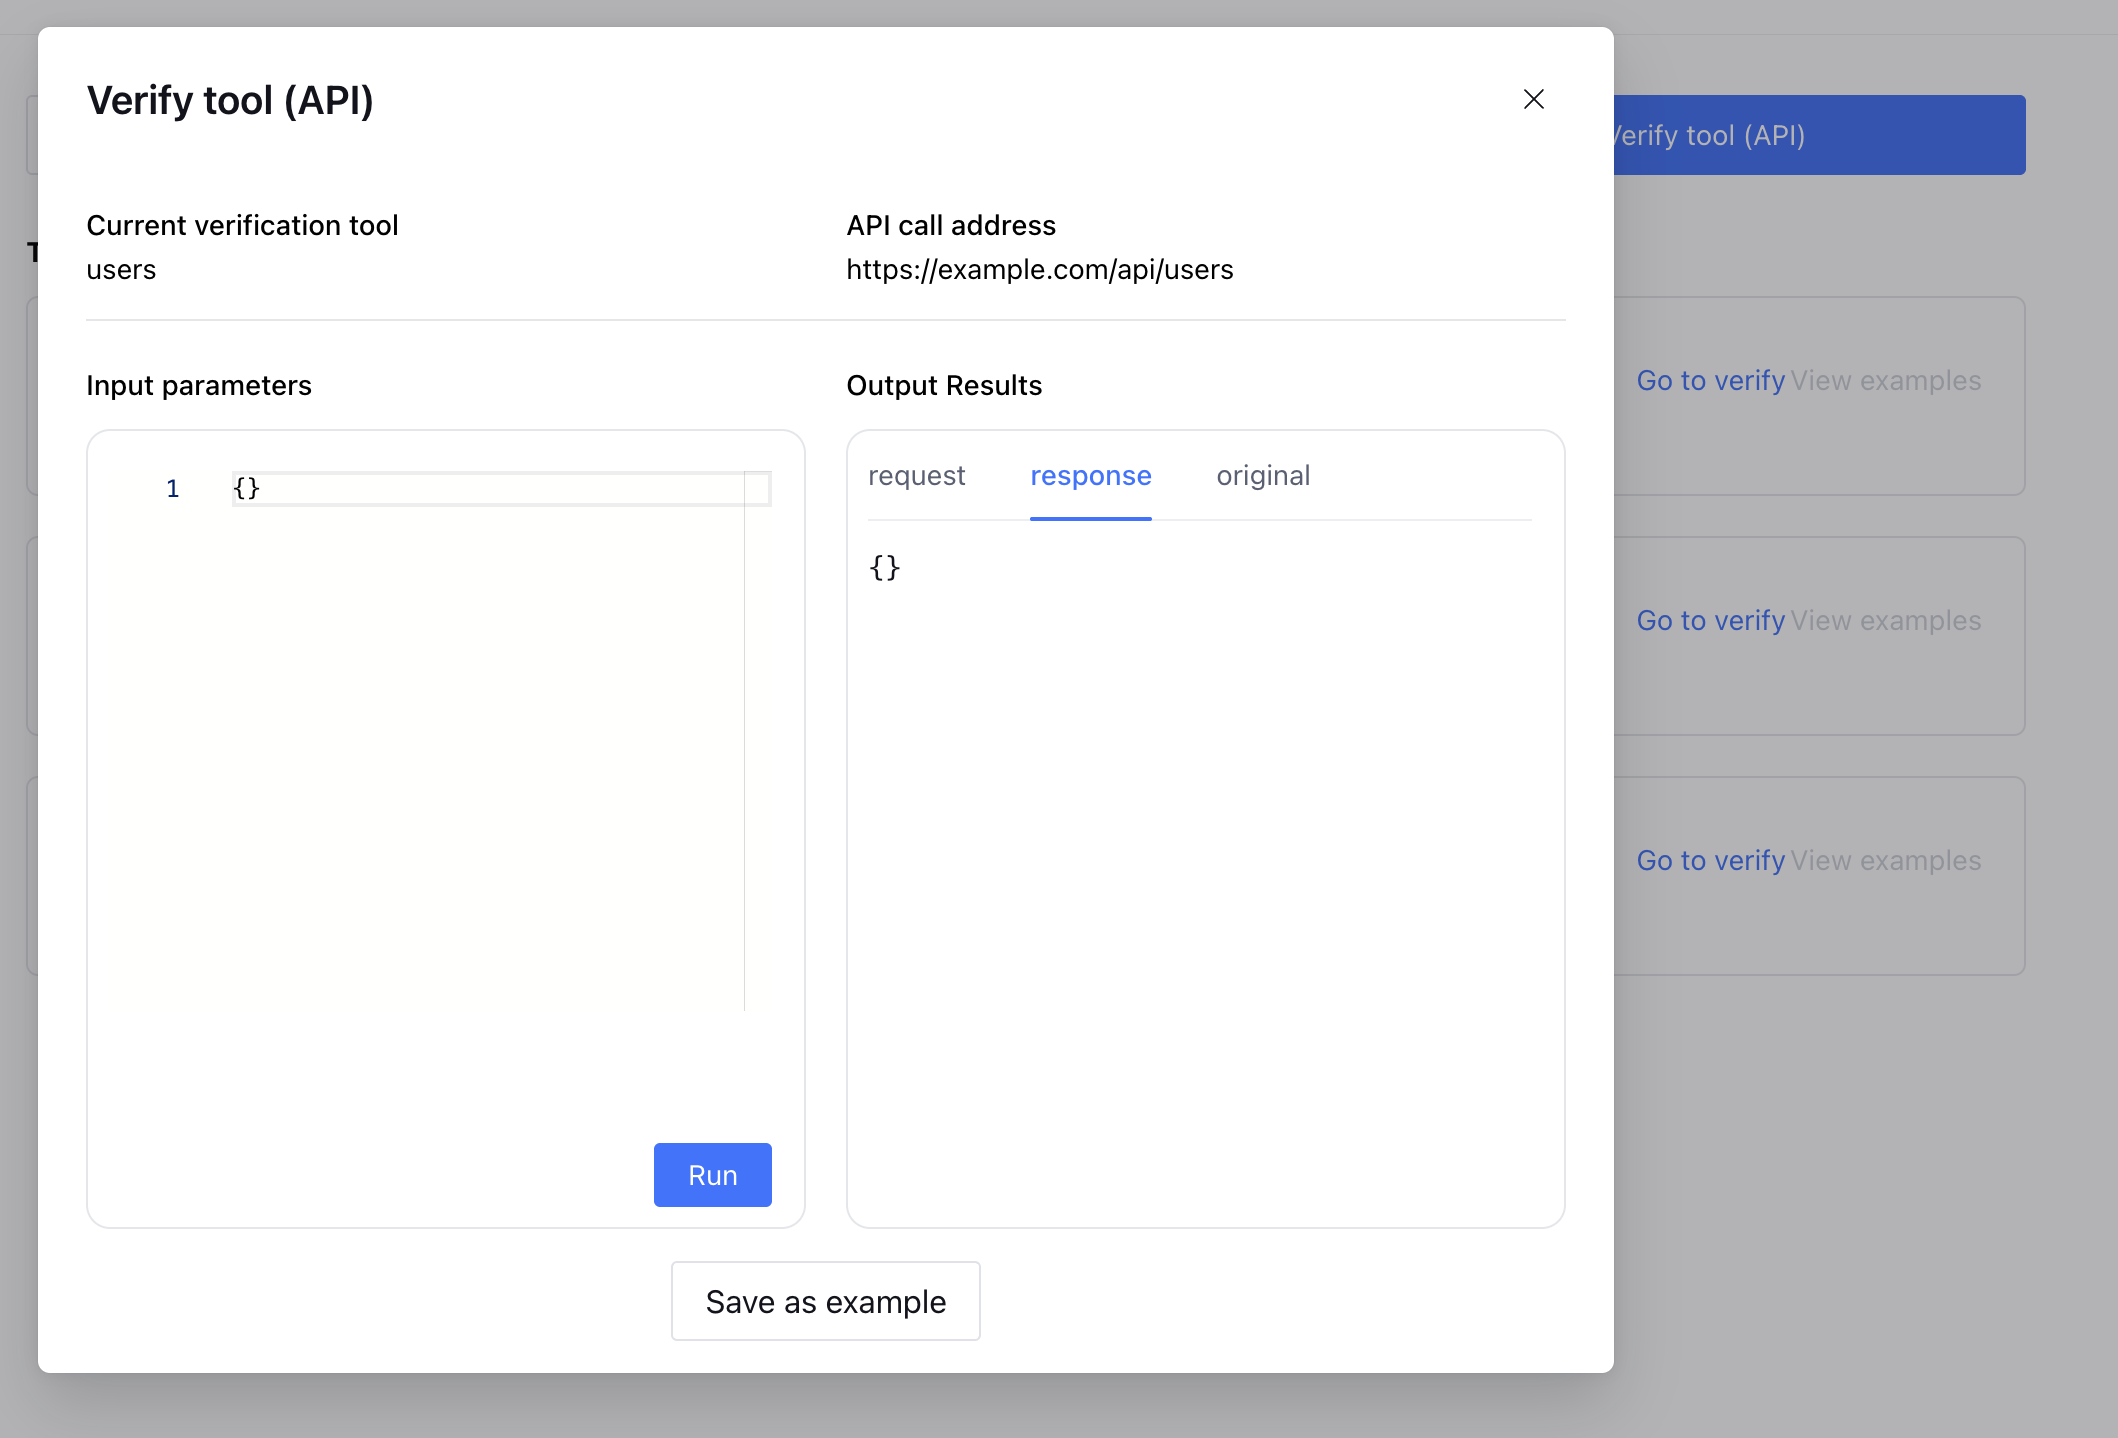
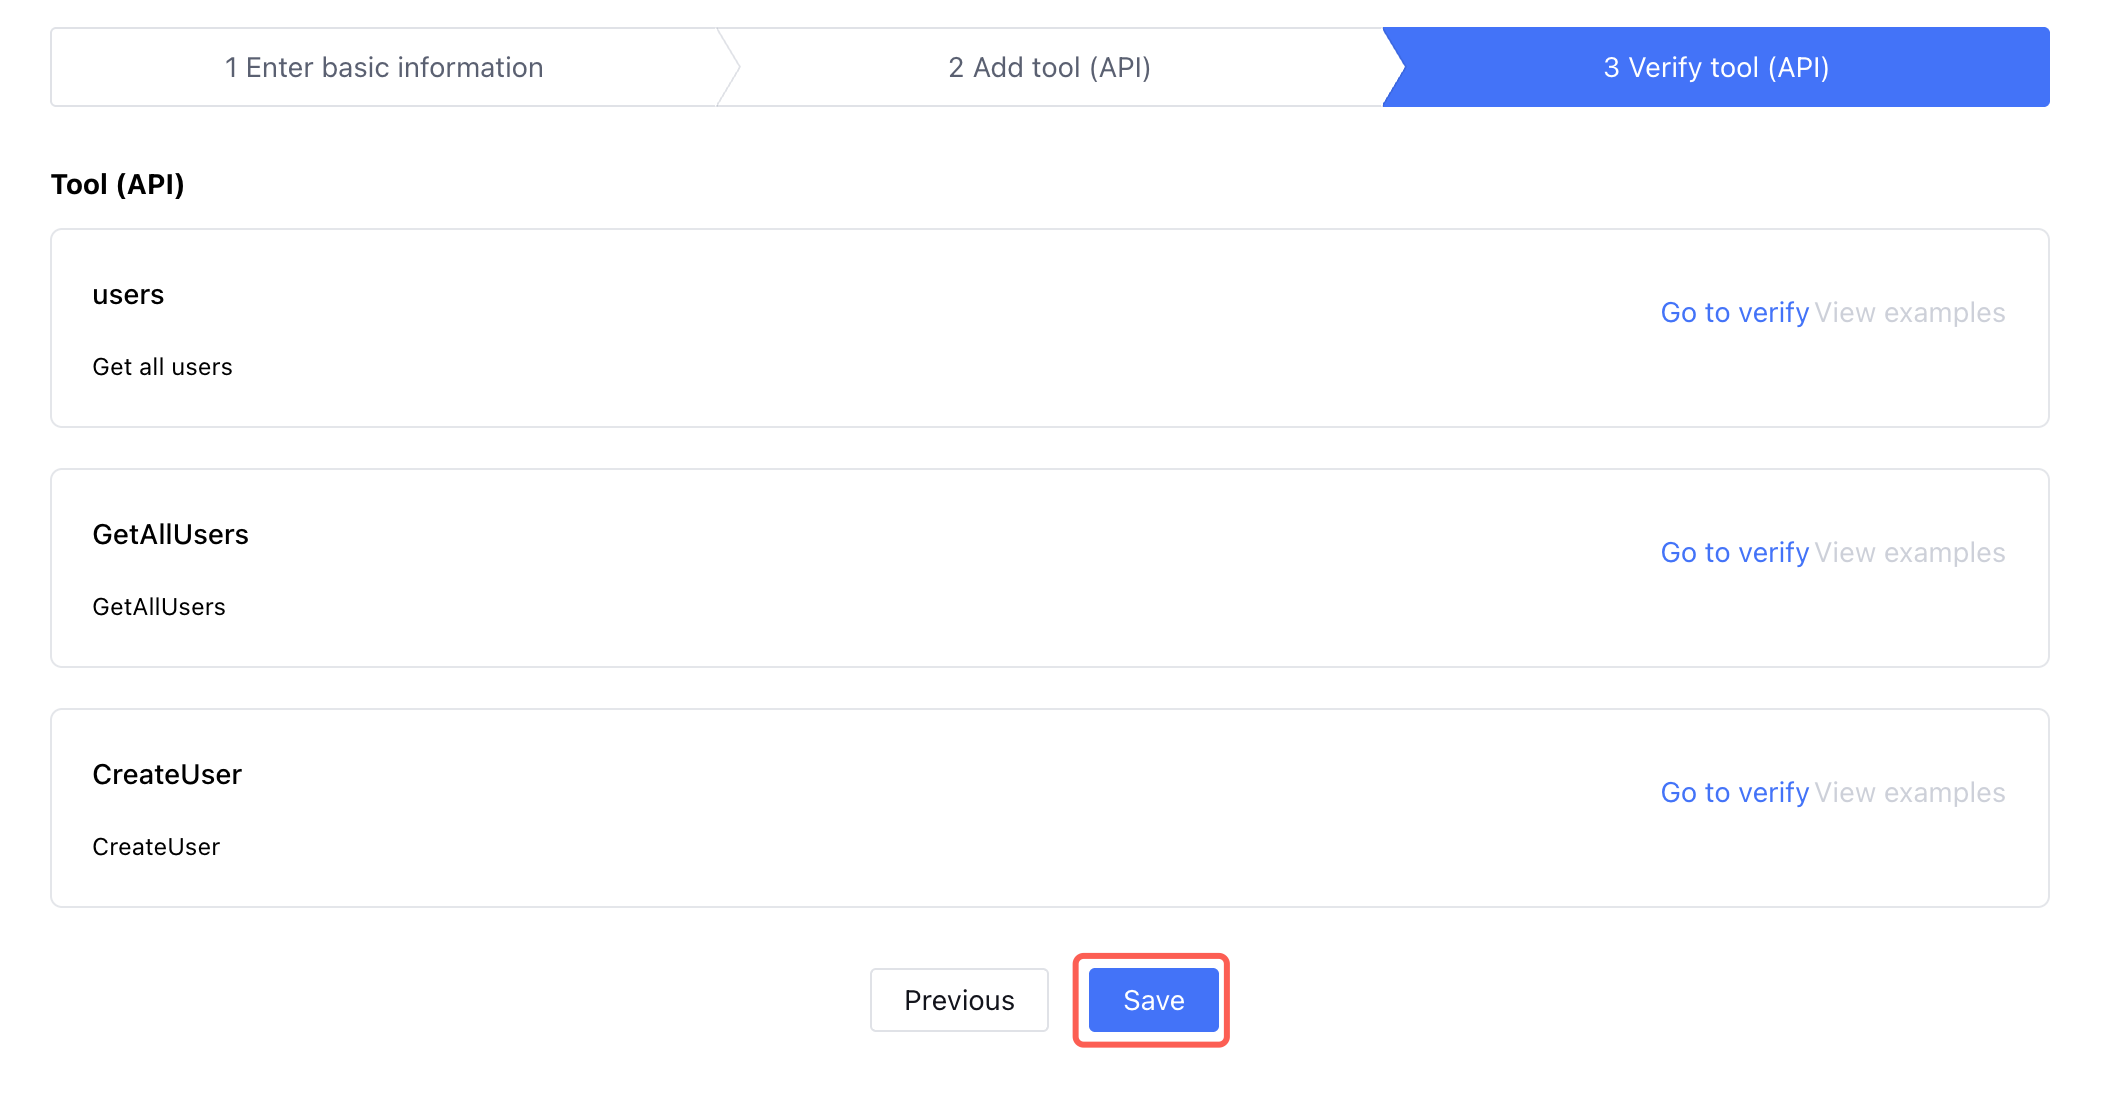
After configuring the tool, enter the verification phase. In the verification window, fill in the input parameters and perform a trial run to view call results and test whether the plugin can be normally called. You can save the current test results as sample code.
After the trial run passes, save the current edited plugin.
Note:
The plugin can only be saved after verification passed.
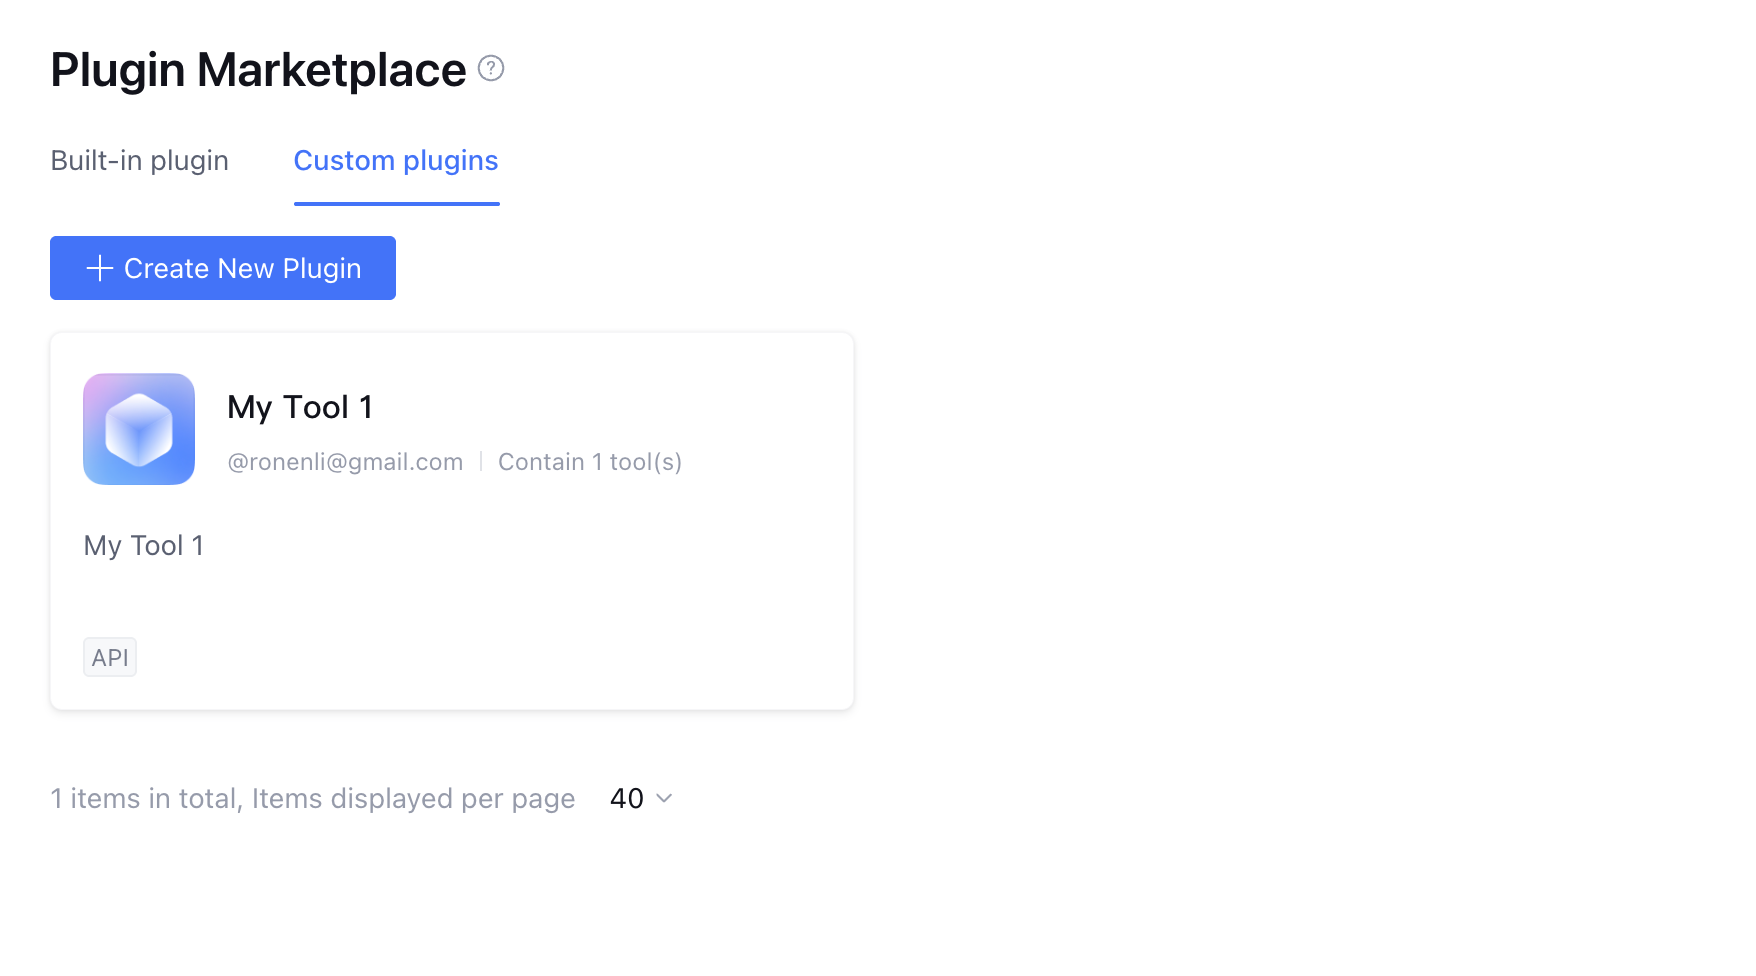
Saved plugins can be viewed, edited, and exported in the plugin plaza.
4. Using a Plugin
To understand how to use a plugin within application, for details, see Using the Plugin.
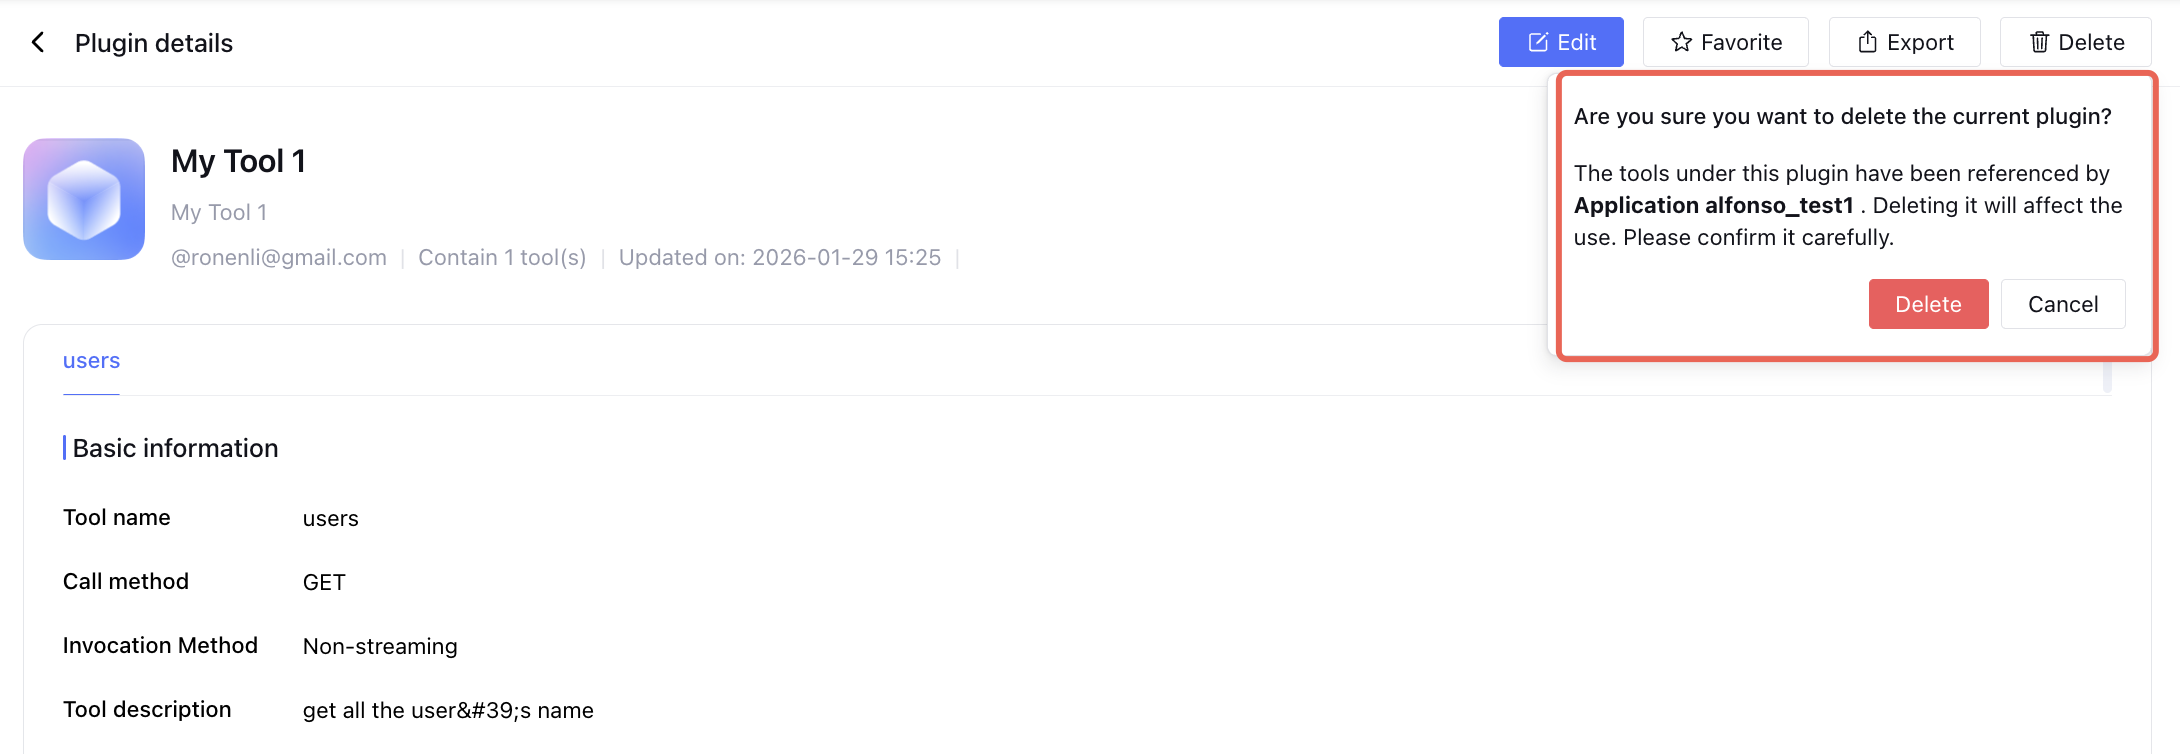
5. Deleting a Plugin
When deleting a custom plugin, if the plugin is referenced, a delete prompt will be displayed.