Using the 5.x SDK to Send and Receive Normal Messages for 5.x Clusters
Download
フォーカスモード
フォントサイズ
Scenarios
TDMQ for RocketMQ supports SDKs in multiple languages for sending and receiving different types of messages. This document describes how to use the 5.x SDK (taking the Java SDK as an example) to connect to the TDMQ for RocketMQ server for normal message sending and receiving.
Prerequisites
You have created TDMQ for RocketMQ cluster resources.
You have prepared the Linux server and configured the environment by referring to Preparations.
Operation Steps
Step 1: Installing the Java Dependency Library
Introduce related dependencies into the Java project. Taking the Maven project as an example, add the following dependencies to pom.xml:
<dependencies><dependency><groupId>org.apache.rocketmq</groupId><artifactId>rocketmq-client-java</artifactId><version>5.0.6</version></dependency><dependency><groupId>org.slf4j</groupId><artifactId>slf4j-api</artifactId><version>1.7.7</version></dependency></dependencies>
Step 2: Producing Messages
1. Create and run a program for sending normal messages in the created Java project.
import java.io.IOException; import java.nio.charset.StandardCharsets; import java.util.concurrent.CompletableFuture; import java.util.concurrent.ExecutorService; import java.util.concurrent.Executors; import org.apache.rocketmq.client.apis.ClientConfiguration; import org.apache.rocketmq.client.apis.ClientException; import org.apache.rocketmq.client.apis.ClientServiceProvider; import org.apache.rocketmq.client.apis.SessionCredentialsProvider; import org.apache.rocketmq.client.apis.StaticSessionCredentialsProvider; import org.apache.rocketmq.client.apis.message.Message; import org.apache.rocketmq.client.apis.producer.Producer; import org.apache.rocketmq.client.apis.producer.SendReceipt; import org.apache.rocketmq.client.java.example.AsyncProducerExample; import org.slf4j.Logger; import org.slf4j.LoggerFactory;public class NormalMessageSyncProducer {private static final Logger log = LoggerFactory.getLogger(NormalMessageSyncProducer.class);private NormalMessageSyncProducer() {}public static void main(String[] args) throws ClientException, IOException {final ClientServiceProvider provider = ClientServiceProvider.loadService();// Add the configured AccessKey and SecretKey.String accessKey = "yourAccessKey"; //akString secretKey = "yourSecretKey"; //skSessionCredentialsProvider sessionCredentialsProvider =new StaticSessionCredentialsProvider(accessKey, secretKey);// Enter the access address provided by Tencent Cloud.String endpoints = "rmq-xxx.rocketmq.xxxtencenttdmq.com:8081";ClientConfiguration clientConfiguration = ClientConfiguration.newBuilder().setEndpoints(endpoints).enableSsl(false).setCredentialProvider(sessionCredentialsProvider).build();String topic = "yourNormalTopic";// Usually, it is not necessary to create excessive producers within a single client.final Producer producer = provider.newProducerBuilder().setClientConfiguration(clientConfiguration)// Set the topic name. This setting is not required but highly recommended, as it allows the producer to pre-fetch message routes before formally sending messages..setTopics(topic)// If the producer is not initialized, it may throw an M {@link ClientException} error..build();// Define the message body here.byte[] body = "This is a normal message for Apache RocketMQ".getBytes(StandardCharsets.UTF_8);String tag = "yourMessageTagA";final Message message = provider.newMessageBuilder()// Set topic for the current message..setTopic(topic)// A secondary classification of messages under a topic, used to distinguish different types of messages within the same topic..setTag(tag)// The message key, which serves as an alternative method to distinguish between different messages, in addition to the message ID..setKeys("yourMessageKey-1c151062f96e").setBody(body).build();try {final SendReceipt sendReceipt = producer.send(message);log.info("Send message successfully, messageId={}", sendReceipt.getMessageId());} catch (Throwable t) {log.error("Failed to send message", t);}// After sending is complete, you can close the producer client if there are no other needs.producer.close();}}
Parameter | Description |
accessKey | Role token. You can copy it from the AccessKey column on the Cluster Permission page in the console.  |
secretKey | Role name. You can copy the role name from the SecretKey column on the Cluster Permissions page in the console. |
endpoints | Cluster access address. You can obtain the access address from the Access Information module on the Cluster Basic Information page in the console. 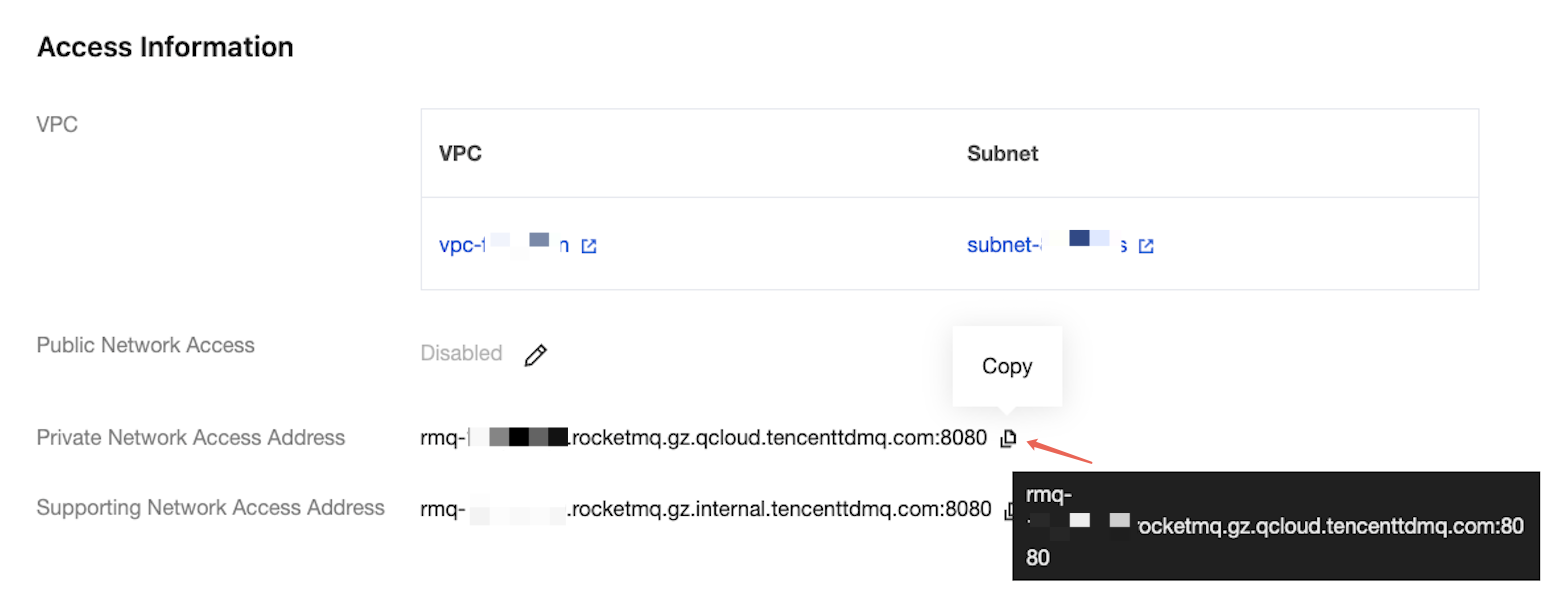 |
topic | Topic name. You can copy the name from the Topic Management page in the console.  |
2. The result is as follows:
INFO: Send message successfully, messageId={a specific message ID}
Step 3: Consuming Messages
1. Create and run a program to subscribe to normal messages in the created Java project.
TDMQ for RocketMQ 5.x series supports two consumption modes: Push Consumer and Simple Consumer. The following sample code takes Push Consumer as an example.
import java.io.IOException; import java.util.Collections; import org.apache.rocketmq.client.apis.ClientConfiguration; import org.apache.rocketmq.client.apis.ClientException; import org.apache.rocketmq.client.apis.ClientServiceProvider; import org.apache.rocketmq.client.apis.SessionCredentialsProvider; import org.apache.rocketmq.client.apis.StaticSessionCredentialsProvider; import org.apache.rocketmq.client.apis.consumer.ConsumeResult; import org.apache.rocketmq.client.apis.consumer.FilterExpression; import org.apache.rocketmq.client.apis.consumer.FilterExpressionType; import org.apache.rocketmq.client.apis.consumer.PushConsumer; import org.slf4j.Logger; import org.slf4j.LoggerFactory;public class NormalPushConsumer {private static final Logger log = LoggerFactory.getLogger(NormalPushConsumer.class);private NormalPushConsumer() {}public static void main(String[] args) throws ClientException, IOException, InterruptedException {final ClientServiceProvider provider = ClientServiceProvider.loadService();// Add the configured AccessKey and SecretKey.String accessKey = "yourAccessKey"; //akString secretKey = "yourSecretKey"; //skSessionCredentialsProvider sessionCredentialsProvider =new StaticSessionCredentialsProvider(accessKey, secretKey);// Enter the access address provided by Tencent Cloud.String endpoints = "rmq-xxx.rocketmq.xxxtencenttdmq.com:8081";ClientConfiguration clientConfiguration = ClientConfiguration.newBuilder().setEndpoints(endpoints).enableSsl(false).setCredentialProvider(sessionCredentialsProvider).build();String tag = "*";FilterExpression filterExpression = new FilterExpression(tag, FilterExpressionType.TAG);String consumerGroup = "yourConsumerGroup";String topic = "yourTopic";// Usually, it is not necessary to create excessive consumers within a single client.PushConsumer pushConsumer = provider.newPushConsumerBuilder().setClientConfiguration(clientConfiguration)// Set the consumer group name..setConsumerGroup(consumerGroup)// Set the consumer subscription name..setSubscriptionExpressions(Collections.singletonMap(topic, filterExpression)).setMessageListener(messageView -> {// Process messages and return the message consumption result.log.info("Consume message={}", messageView);return ConsumeResult.SUCCESS;}).build();// Do not block the main thread in the production environment.Thread.sleep(Long.MAX_VALUE);// After consumption is complete, you can close the consumer client if there are no other needs.pushConsumer.close();}}
Parameter | Description |
accessKey | Role token. You can copy it from the AccessKey column on the Cluster Permissions page in the console.  |
secretKey | Role name. You can copy the role name from the SecretKey column on the Cluster Permissions page in the console. |
endpoints | Cluster access address. You can obtain the access address from the Access Information module on the Cluster Basic Information page in the console.  |
consumerGroup | Consumer group name. You can copy the name from the Group Management page in the console.  |
topic | Topic name. You can copy the name from the Topic Management page in the console.  |
2. The result is as follows:
INFO: Consume message=MessageView{messageId='...', topic='yourTopic', body=...}
フィードバック