tencent cloud

Tencent Real-Time Communication

お知らせ・リリースノート
製品アップデート情報
Tencent Cloudオーディオビデオ端末SDKの再生アップグレードおよび承認チェック追加に関するお知らせ
TRTCアプリケーションのサブスクリプションパッケージサービスのリリースに関する説明について
製品の説明
製品概要
基礎概念
製品の機能
製品の強み
ユースケース
性能データ
購入ガイド
Billing Overview
無料時間の説明
Monthly subscription
Pay-as-you-go
TRTC Overdue and Suspension Policy
課金に関するよくあるご質問
Refund Instructions
初心者ガイド
Demo体験
Call
コンポーネントの説明(TUICallKit)
Activate the Service
Run Demo
クイック導入
オフライン通知
Conversational Chat
クラウドレコーディング(TUICallKit)
AI Noise Reduction
インターフェースのカスタマイズ
Calls integration to Chat
Additional Features
No UI Integration
Server APIs
Client APIs
Solution
ErrorCode
公開ログ
よくある質問
ライブ配信
Billing of Video Live Component
Overview
Activating the Service (TUILiveKit)
Demo のクイックスタート
No UI Integration
UI Customization
Live Broadcast Monitoring
Video Live Streaming
Voice Chat Room
Advanced Features
Client APIs
Server APIs
Error Codes
Release Notes
FAQs
RTC Engine
Activate Service
SDKのダウンロード
APIコードサンプル
Usage Guidelines
クライアント側 API
高度な機能
RTC RESTFUL API
History
Introduction
API Category
Room Management APIs
Stream mixing and relay APIs
On-cloud recording APIs
Data Monitoring APIs
Pull stream Relay Related interface
Web Record APIs
AI Service APIs
Cloud Slicing APIs
Cloud Moderation APIs
Making API Requests
Call Quality Monitoring APIs
Usage Statistics APIs
Data Types
Appendix
Error Codes
コンソールガイド
アプリケーション管理
使用統計
監視ダッシュボード
開発支援
Solution
Real-Time Chorus
よくあるご質問
課金関連問題
機能関連
UserSig関連
ファイアウォールの制限の対応関連
インストールパッケージの圧縮に関するご質問
AndriodおよびiOS関連
Web端末関連
Flutter関連
Electron関連
TRTCCalling Web関連
オーディオビデオ品質関連
その他のご質問
旧バージョンのドキュメント
TUIRoom(Web)の統合
TUIRoom (Android)の統合
TUIRoom (iOS)の統合
TUIRoom (Flutter)の統合
TUIRoom (Electron)の統合
TUIRoom APIのクエリー
クラウドレコーディングと再生の実現(旧)
Protocols and Policies
セキュリティコンプライアンス認証
セキュリティホワイトペーパー
情報セキュリティの説明
Service Level Agreement
Apple Privacy Policy: PrivacyInfo.xcprivacy
TRTC ポリシー
プライバシーポリシー
データ処理とセキュリティ契約
用語集

Flutter

PDF
フォーカスモード
フォントサイズ
最終更新日: 2025-12-22 14:41:19
This article will introduce how to quickly integrate the Flutter RTC Engine and implement a basic audio and video call.

Environment preparations

Flutter 3.22 or above.
Developing for Android:
Android Studio Bumblebee (2021.1.1) and above.
The app requires devices with Android 4.3 (API level 18) and above.
Developing for iOS:
Xcode 13.0 and above.
Please ensure your project is set up with a valid developer signature.

Step 1. Import the SDK

Install the component using the following command tencent_rtc_sdk:
flutter pub add tencent_rtc_sdk

Step 2. Configure the project

iOS
Android
macOS
1. Add requests for camera and mic permissions under the first-level <dict> directory in Info.plist:
<key>NSCameraUsageDescription</key>
<string>Video calls require camera permission.</string>
<key>NSMicrophoneUsageDescription</key>
<string>Voice calls require microphone permission.</string>
2. Add the field io.flutter.embedded_views_preview and set its value to YES.
Note:
Since Tencent_RTC_SDK calls APIs through Flutter FFI, Xcode's symbol clipping optimization during the iOS Release build may mistakenly remove TRTC's C symbols, causing a `symbol not found` error. The solutions are as follows:
1. In the project's Build Settings, find deployment postprocessing and set it to Yes.

2. In the project's Build Settings, find strip style and set the value for Release to Non-Global Symbols.

1. Open /android/app/src/main/AndroidManifest.xml.
2. Add the following permissions:
<uses-permission android:name="android.permission.INTERNET" />
<uses-permission android:name="android.permission.ACCESS_NETWORK_STATE" />
<uses-permission android:name="android.permission.ACCESS_WIFI_STATE" />
<uses-permission android:name="android.permission.RECORD_AUDIO" />
<uses-permission android:name="android.permission.MODIFY_AUDIO_SETTINGS" />
<uses-permission android:name="android.permission.BLUETOOTH" />
<uses-permission android:name="android.permission.CAMERA" />
<uses-feature android:name="android.hardware.camera.autofocus" />
3. If you need to compile and run on the Android platform, you also need to do the following configuration:
First, add the following to the corresponding location in your project's android/app/build.gradle file:
android {
.....
packagingOptions {
pickFirst 'lib/**/libliteavsdk.so'
}
buildTypes {
release {
......
minifyEnabled true
proguardFiles getDefaultProguardFile('proguard-android.txt'), 'proguard-rules.pro'
}
}
}
Create a proguard-rules.pro file in the android/app directory of your project and add the following code to the proguard-rules.pro file:
-keep class com.tencent.** { *; }
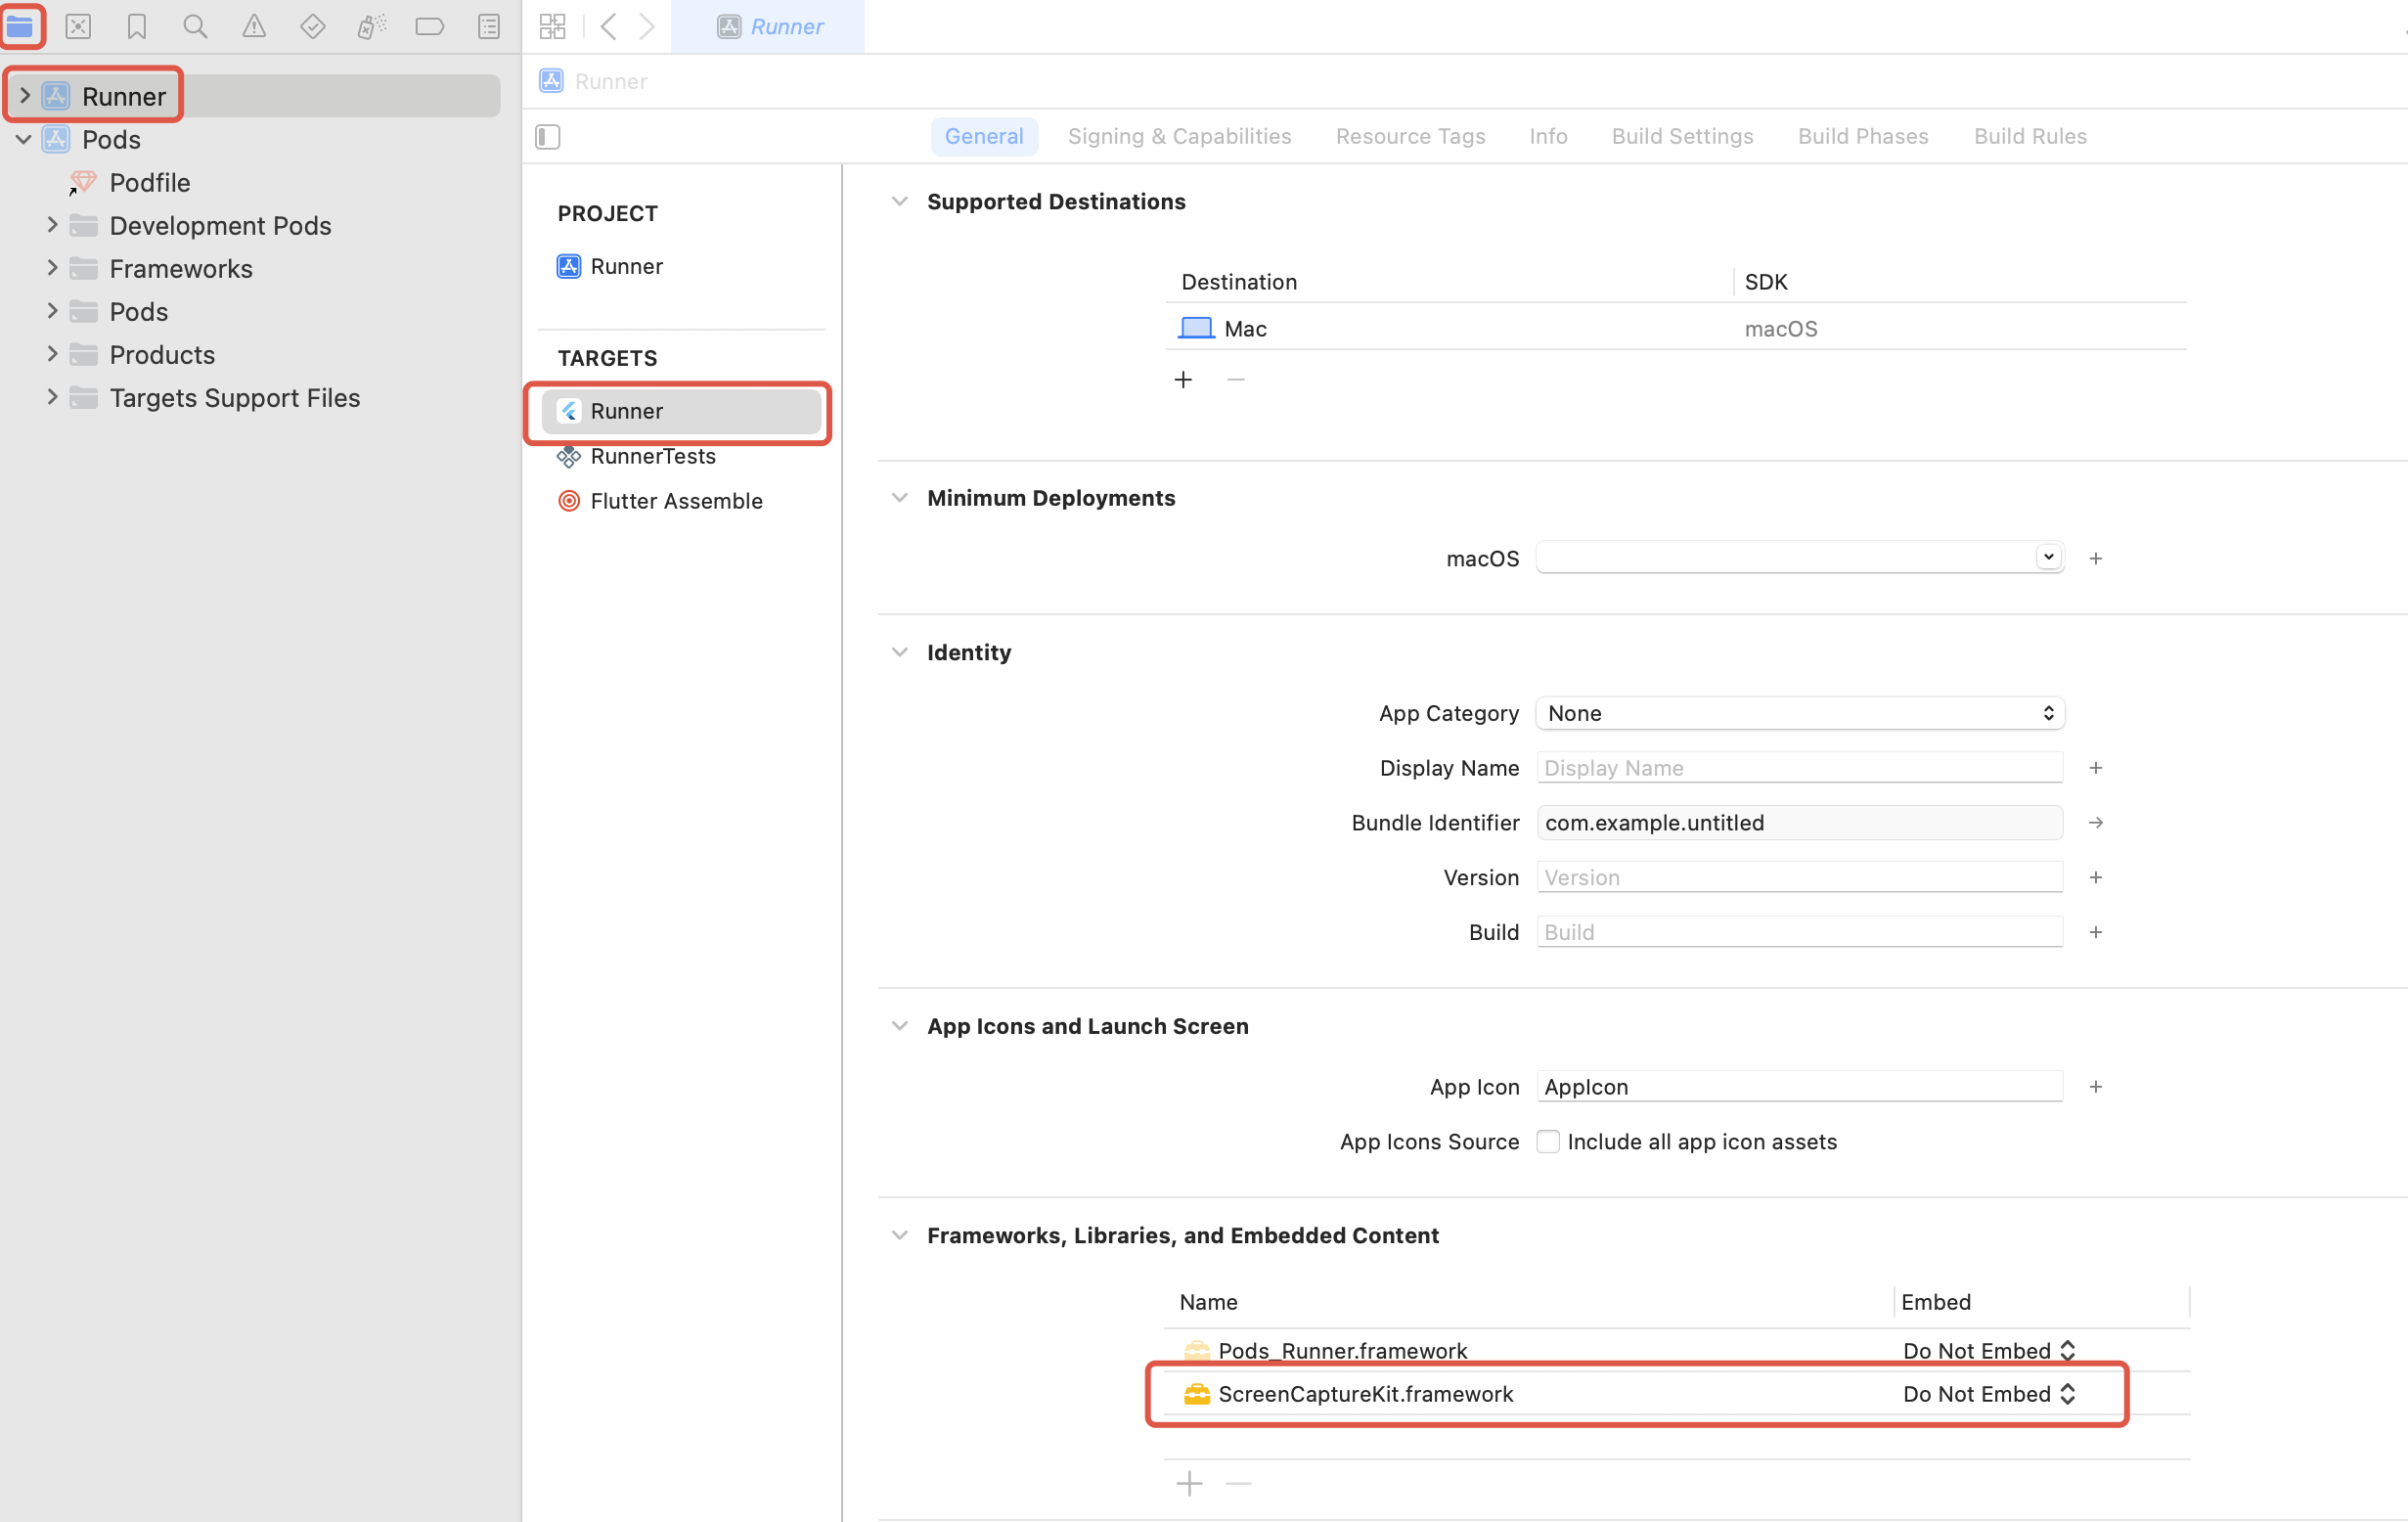
1. After opening the .xcworkspace project file, click on the left Project Navigator in the Xcode Navbar, select Runner, and ensure the correct TARGETS is selected in the editing area.
2. Add ScreenCaptureKit.framework in the Frameworks, Libraries, and Embedded Content section of the General tab.

Note:
If you encounter any problems during the access process, please refer to FAQs.

Step 3. Create a `TRTC` instance

1. Declare member variables
import 'package:tencent_rtc_sdk/trtc_cloud.dart';
import 'package:tencent_rtc_sdk/trtc_cloud_def.dart';
import 'package:tencent_rtc_sdk/trtc_cloud_listener.dart';
late TRTCCloud trtcCloud;
2. Call the initialization interface to create the TRTC instance and set the event callback.
// Create a TRTC instance
trtcCloud = (await TRTCCloud.sharedInstance())!;

// Create a TRTCCloudListener instance
TRTCCloudListener listener = TRTCCloudListener(
// Implement the corresponding callbacks as needed
onError: (errCode, errMsg) {
// TODO
}
);

// Register the listener and bind it to the trtcCloud instance
trtcCloud.registerListener(listener);

Step 4. Enter a room

1. If you run the program on an Android device, you need to request CAMERA and MICROPHONE permissions in advance.
if (!(await Permission.camera.request().isGranted) ||
!(await Permission.microphone.request().isGranted)) {
print('You need to obtain audio and video permission to enter');
return;
}
Note:
The permission request here uses the third-party library permission_handler.
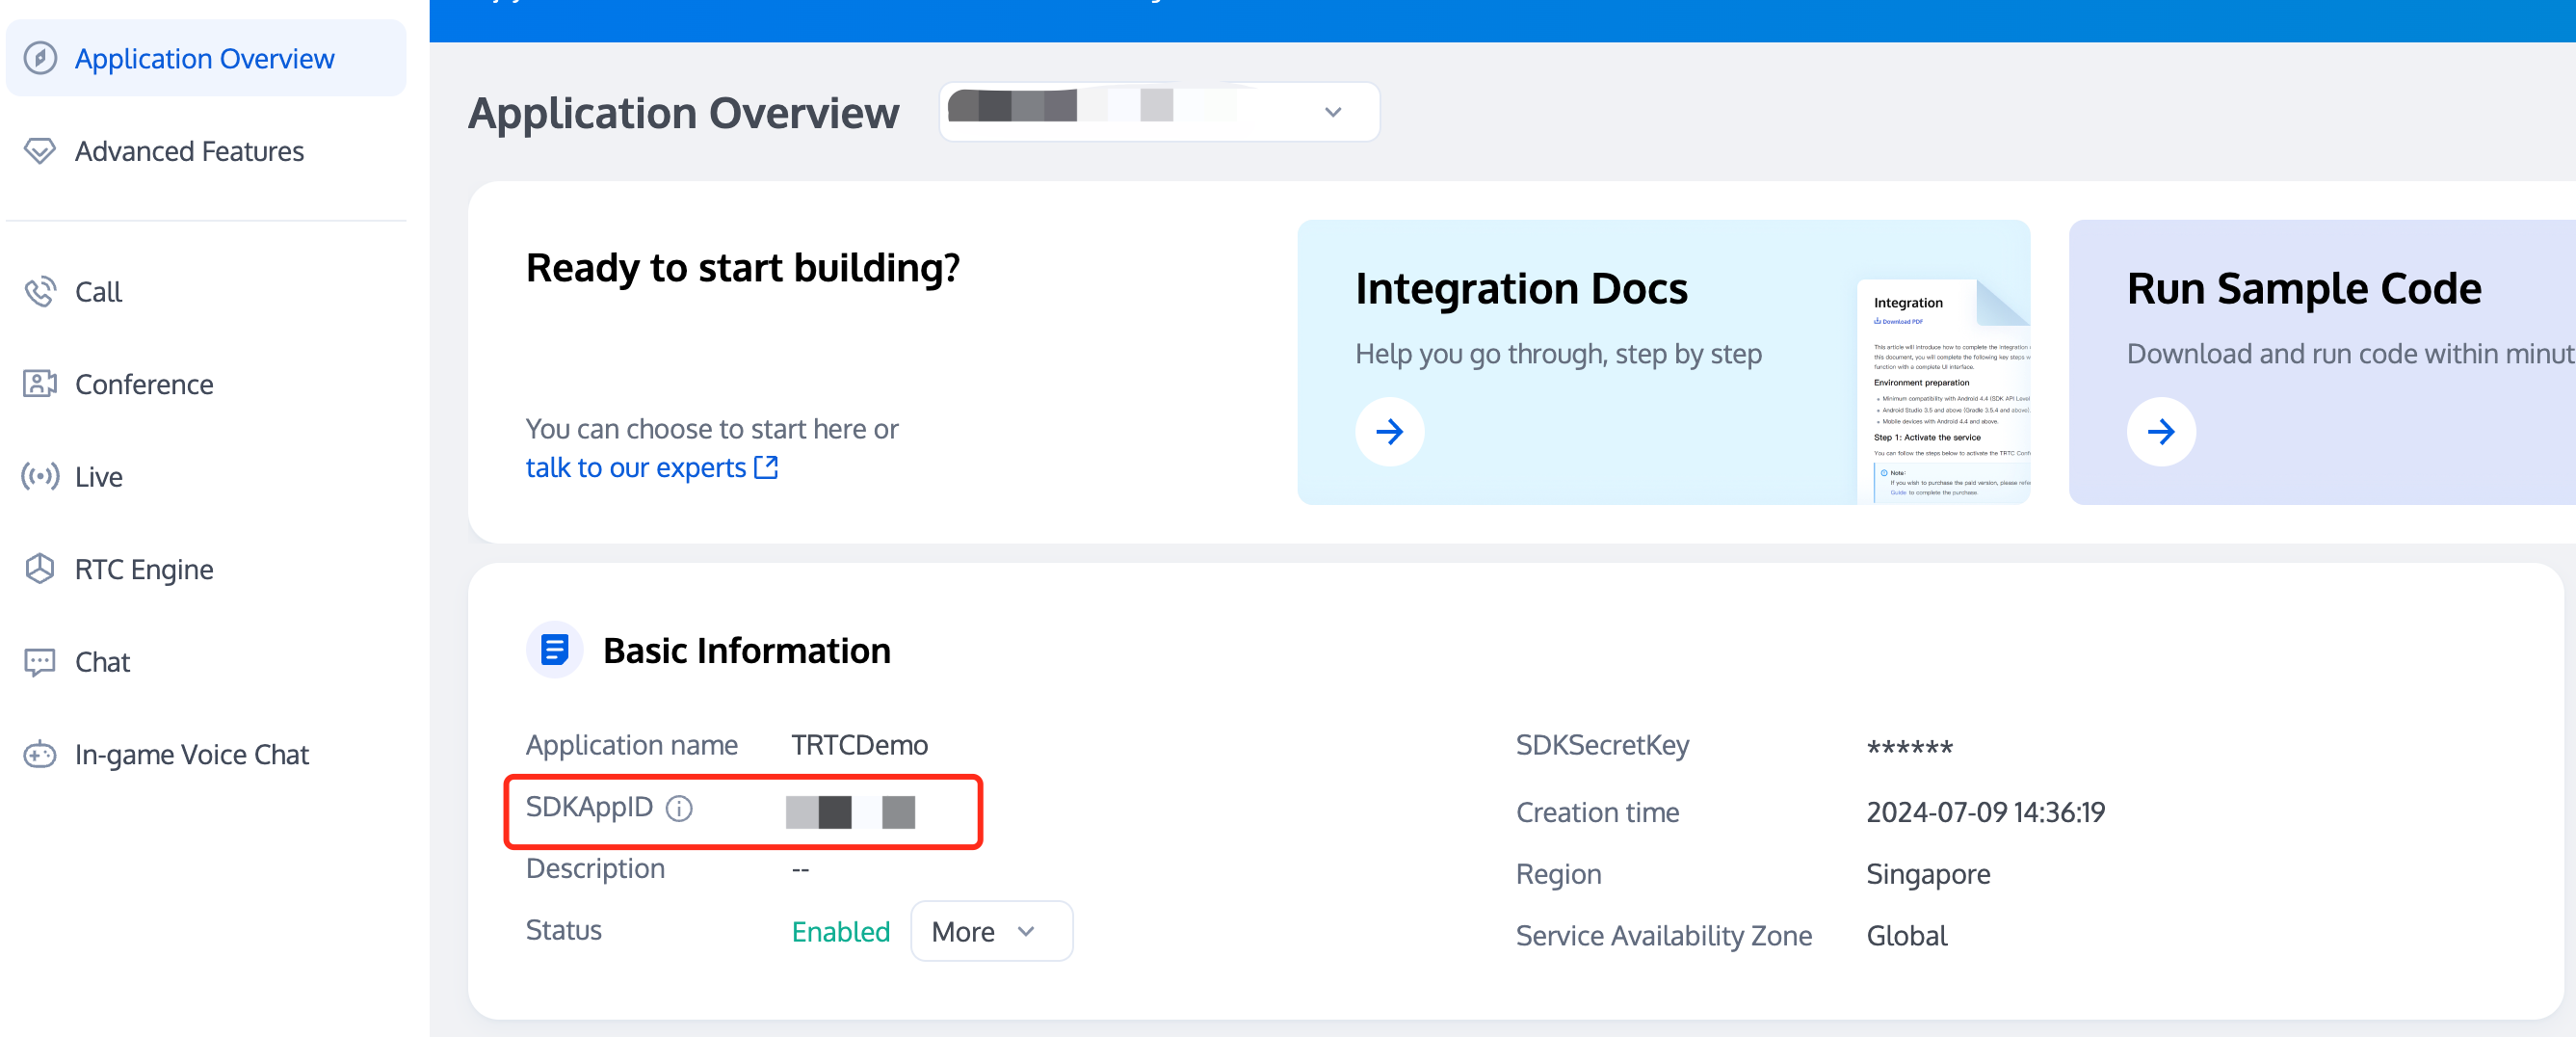
2. In the Tencent RTC Console, click Create Application to obtain the SDKAppID from Application Overview.


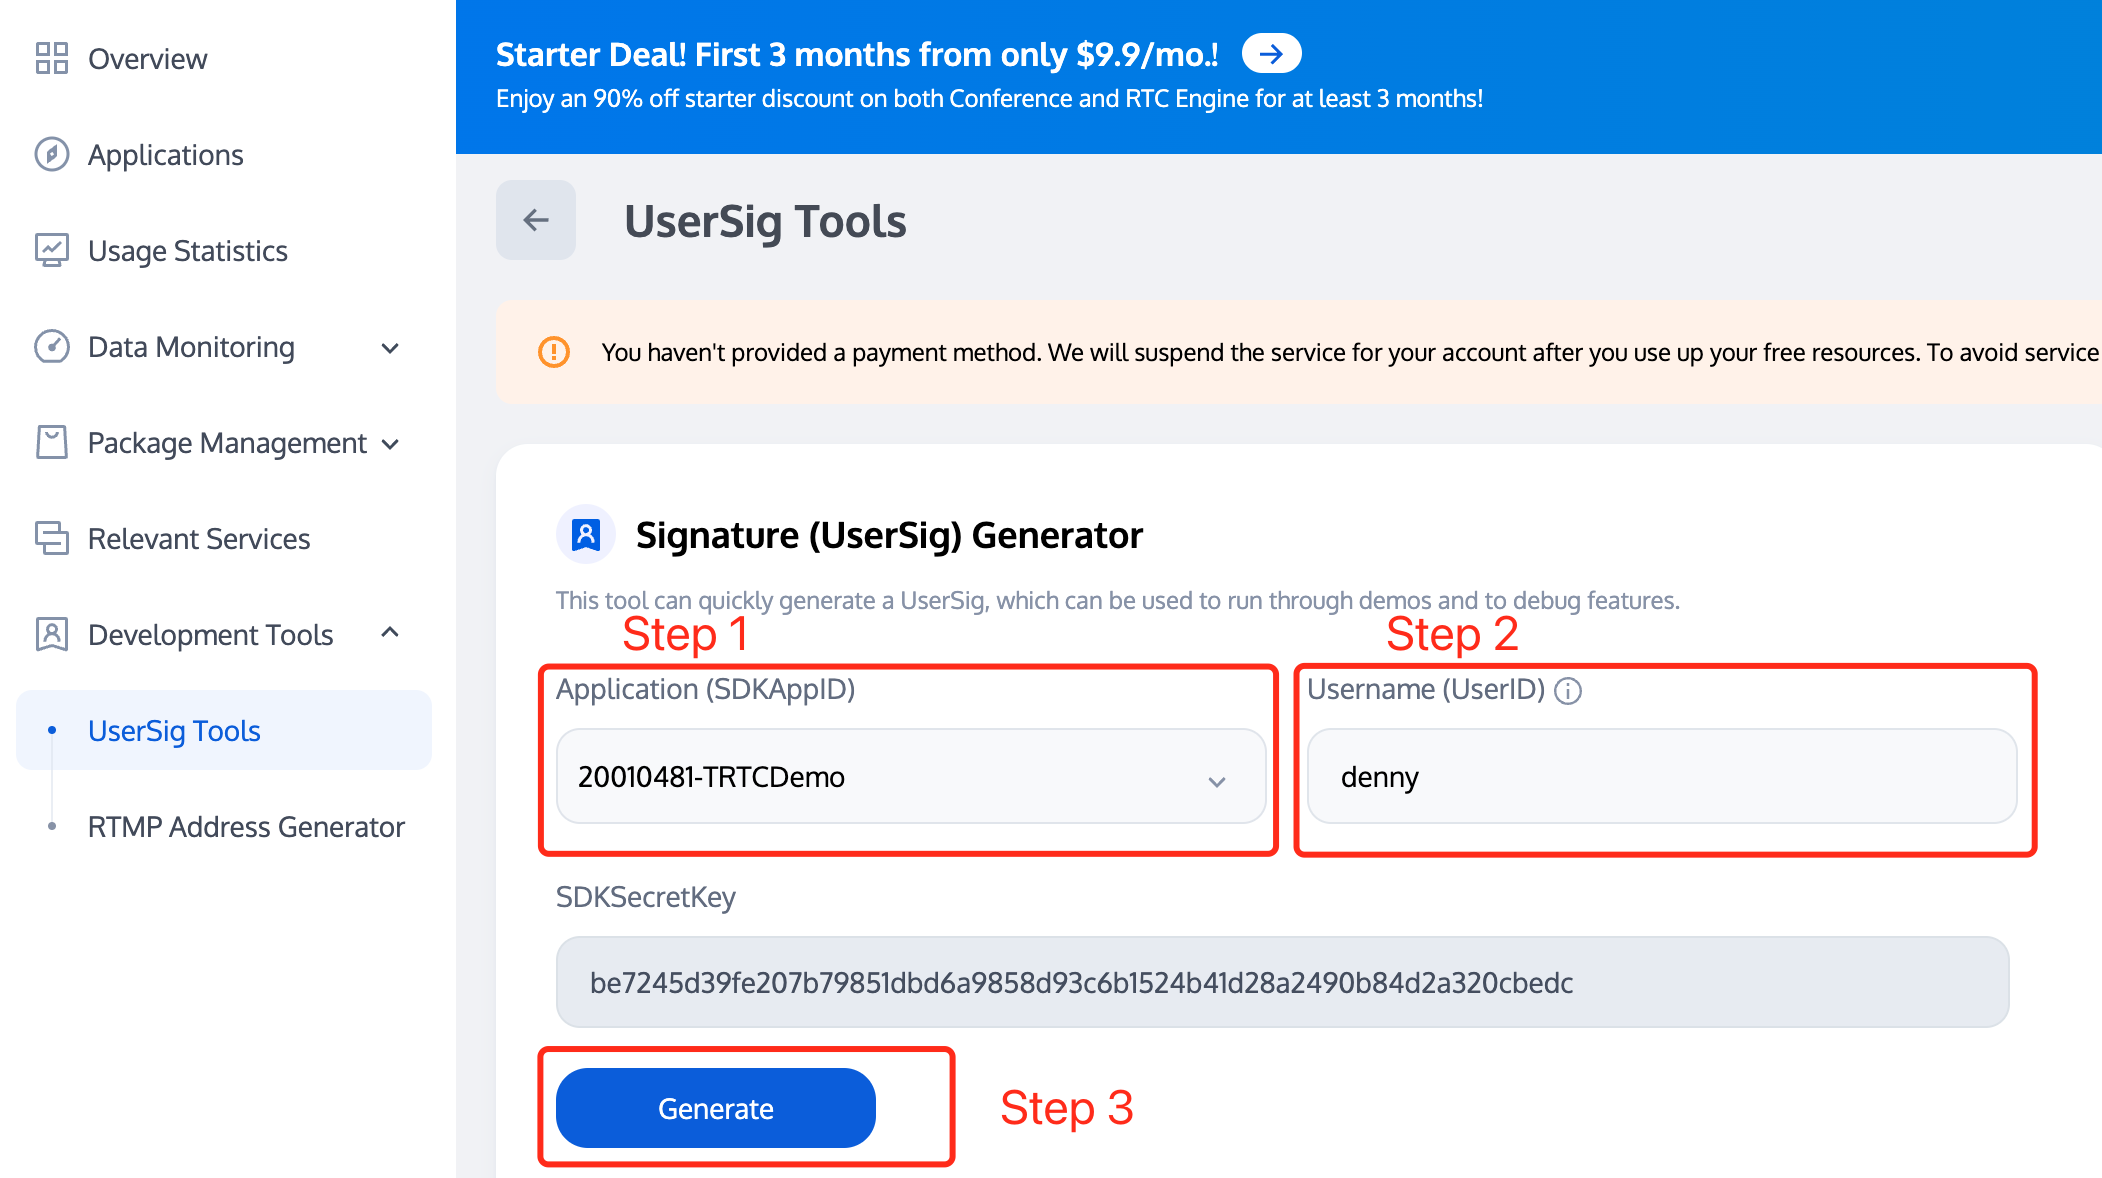
3. In UserSig Tools, select SDKAppID from the dropdown, enter your own username (UserID), and click Generate to get your own UserSig.


4. After setting the room parameters TRTCParams, call the enterRoom interface function to enter the room.
Anchor Role
trtcCloud.enterRoom(
TRTCParams(
sdkAppId: sdkAppId, // Replace with your SDKAppID
userId: "userId", // Replace with your userid
userSig: '', // Replace with your userSig
role: TRTCRoleType.anchor,
roomId: 123123, // Replace with your roomId
),
TRTCAppScene.live
);
Audience Role
trtcCloud.enterRoom(
TRTCParams(
sdkAppId: sdkAppId, // Replace with your SDKAppID
userId: "userId", // Replace with your userid
userSig: '', // Replace with your userSig
role: TRTCRoleType.audience,
roomId: 123123, // Replace with your roomId
),
TRTCAppScene.live
);
Note:
If you enter the room as an Audience Role, sdkAppId and roomId need to be the same as those at the anchor end, while userId and userSig need to be replaced with your own values.

Step 5. Enable the camera

1. Add TRTCCloudVideoView in the corresponding position of the build method on the page:
import 'package:tencent_rtc_sdk/trtc_cloud_video_view.dart';
TRTCCloudVideoView(
key: valueKey,
onViewCreated: (viewId) {
localViewId = viewId;
// TODO
},
),
Note:
viewId is the unique identifier of the video rendering control TRTCCloudVideoView. You can store this identifier in any way you like. Here, localViewId is used to store it for rendering local video streams later.
2. Before invoking the interface startLocalPreview to enable camera preview, you can set the local preview rendering parameters by calling the interface setLocalRenderParams.
// Set local preview rendering parameters
trtcCloud.setLocalRenderParams(
TRTCRenderParams(
fillMode: TRTCVideoFillMode.fill,
mirrorType: TRTCVideoMirrorType.auto,
rotation: TRTCVideoRotation.rotation0,
),
);

// Local preview of front camera content
trtcCloud.startLocalPreview(true, localViewId);

// Local preview of rear camera content
trtcCloud.startLocalPreview(false, localViewId);
Call stopLocalPreview to turn off the camera preview and stop pushing local video information.
trtcCloud.stopLocalPreview();
3. You can call the TXDeviceManager interface to complete the use of equipment extension features such as "Toggle front/back camera","Set Focus Mode","Flashlight".
import 'package:tencent_rtc_sdk/tx_device_manager.dart';
// Get the Device Manager Instance
TXDeviceManager manager = trtcCloud.getDeviceManager();

// Determine whether the camera is front-facing
if (manager.isFrontCamera()) {
// Switch to the rear-facing camera
manager.switchCamera(false);
} else {
// Switch to front camera
manager.switchCamera(true);
}
// Get the Device Manager Instance
TXDeviceManager manager = trtcCloud.getDeviceManager();

// Check if the device supports automatic face position detection
if (manager.isAutoFocusEnabled()) {
// Enable the auto-focus feature
manager.enableCameraAutoFocus(true);
} else {
// Turn off the auto-focus feature
manager.enableCameraAutoFocus(false);
}
// Get the Device Manager Instance
TXDeviceManager manager = trtcCloud.getDeviceManager();

// Turn on the flash when switching to the rear-facing camera
manager.enableCameraTorch(true);

// Turn the flash off
manager.enableCameraTorch(false);

Step 6. Enable the microphone

You can call startLocalAudio to enable microphone capture. This interface requires you to determine the capture mode through the quality parameter. It is recommended to select one of the following modes that suits your project.
// Enable mic capture and set the current scene to: Speech mode
// Strong noise suppression capability, adapts well to strong and weak network conditions
trtcCloud.startLocalAudio(TRTCAudioQuality.speech);
// Enable mic capture and set the current scene to: Music mode
// For high fidelity and minimum audio quality loss, it is recommended to use with a professional sound card
trtcCloud.startLocalAudio(TRTCAudioQuality.music);
Call stopLocalAudio to turn off the mic capture and stop pushing local audio information.
trtcCloud.stopLocalAudio();

Step 7. Play/Stop Video Streams

1. Listen to onUserVideoAvailable before entering the room. When you receive the onUserVideoAvailable(userId, true) notification, it means that the video frame from this stream has arrived and is ready for playback.
Note:
Here it is assumed that the user who can play the video is denny, and the video stream of the user denny is expected to be rendered to the TRTCCloudVideoView control with the unique identifier remoteViewId.
2. You can play the remote user's video by calling the startRemoteView interface.
// Play the primary video stream of the remote user denny
trtcCloud.startRemoteView("denny", TRTCVideoStreamType.big, remoteViewId);
Then, you can stop a remote user's video by calling the stopRemoteView interface, or stop all remote users' videos by calling the stopAllRemoteView interface.
// Stop playing the primary video stream of the remote user denny
trtcCloud.stopRemoteView("denny", TRTCVideoStreamType.big);
// Stop playing the videos of all remote users
trtcCloud.stopAllRemoteView();

Step 8. Play/Stop Audio Streams

By default, the SDK will automatically play remote audio, so you don't need to call any API to play it manually.
But if you don't prefer auto-playing audio, you can call muteRemoteAudio/muteAllRemoteAudio to choose to play or stop remote audio.
// Mute the remote user denny only
trtcCloud.muteRemoteAudio("denny", true);

// Mute all remote users
trtcCloud.muteAllRemoteAudio(true);
// Unmute the remote user denny
trtcCloud.muteRemoteAudio("denny", false);

// Unmute all remote users
trtcCloud.muteAllRemoteAudio(false);

Step 9. Exit the room

Call exitRoom to exit the current room:
trtcCloud.exitRoom();
TRTC SDK will notify you through the onExitRoom callback event after the room exit is completed.
TRTCCloudListener listener = TRTCCloudListener(
onExitRoom: (reason) {
// TODO
}
);

trtcCloud.registerListener(listener);

FAQs

You can see the full list of functions and their descriptions in the API Reference.
If you encounter any problems with access and use, please refer to FAQs.
Note:
If you encounter a symbol not found issue when running the release version on iOS, please refer to [symbol not found] during iOS release package runtime.

ヘルプとサポート

この記事はお役に立ちましたか?

フィードバック