Enabling Public Network Access
Download
포커스 모드
폰트 크기
This document describes how to manually enable or disable the public network address through the Tencent Cloud Distributed Cache console to achieve public network access to Tencent Cloud Distributed Cache instances. Users can access the cloud database via the public network using the system-assigned domain name and port. Enabling the public network facilitates daily testing and management, improving the convenience of development and usage for users.
Note:
Failures occurring in public network access will not be counted in the overall availability calculation of Tencent Cloud Distributed Cache service.
Public network access to Tencent Cloud Distributed Cache reduces the security of instances. It is only recommended for management, testing, or auxiliary management of databases and does not provide availability SLA guarantees. For business access, please use private network access.
The public network bandwidth is 20 Mb/s, with a connection limit of 10,000. Even though Distributed Cache supports 100,000 connections, the public network can only connect 10,000 clients.
Note:
The Memcached edition does not support enabling public network access.
Public Network Upgrade to New Architecture
1. Release Date of the New Architecture
To enhance the security and reliability of the database public network link, since May 2024, Beijing Time, Tencent Cloud Distributed Cache has released a new public network architecture that adopts CLB as the underlying public network architecture.
II. New vs. Old Architecture Comparison
Difference Item | legacy public network architecture | New Public Network Architecture (CLB) |
Architecture differences | The legacy public network architecture is a single-node deployment architecture. When a single point of failure occurs, restoration is slow and it lacks high availability capabilities. | The new public network architecture can expand the external service capabilities of application systems through traffic distribution and enhance the availability of application systems by eliminating single points of failure. |
Whether product linkage is involved. | Not involved | Involves, after public network is enabled, the system automatically creates a free basic CLB instance in the same region on the CLB console to provide public network capability.  |
III. Precautions
Currently, after the public network address is enabled, a Tencent Cloud Distributed Cache instance adopts the CLB architecture. The system automatically creates a basic CLB instance in the same region on the CLB console to provide public network access capability. The CLB architecture features granular resource restriction policies as shown in the table below.
Category | Concurrent Connections | New connections | Package | Inbound bandwidth | Outbound bandwidth |
CLB | 2000 | 200/s | No limit | 20Mbps | 20Mbps |

Note:
You can use the CLB instance automatically created by enabling a public network address for free.
When the public network address is disabled, the corresponding CLB instance on the CLB console is automatically deleted.
The "unlimited" in the above table means no separate speed limit policy is configured, and the number of packets is only limited by the physical link (including uplink switches, TGW cluster scales, and LD device attributes).
If higher performance is required, you can also directly purchase CLB to achieve this. For specific operations, see Enabling Public Network Services via CLB.
After public network access is enabled, the service will be controlled by the security group network access policy. Please configure the source information for database access in the security group inbound rules and allow the protocol ports. Starting from mid-May 2024, the CLB health probe source IP address uses the 100.64.0.0/10 CIDR block. After public network access is enabled, if the health status of your basic CLB instance shows as abnormal, you can allow the 100.64.0.0/10 CIDR block when configuring the security group for the Tencent Cloud Distributed Cache instance to resolve health check failures causing abnormal CLB instance status.
Be sure to allow both private and public network ports. The private network port defaults to 6379. For specific operations, see Configuring Security Groups.
Allow the CLB health probe source IP address segment 100.64.0.0/10 to perform real-time health checks on network links, ensuring network security and stability.

Use Limits
Note:
When accessing the cluster architecture using a public network address, the client must be configured in primary-secondary connection mode. If the client is configured in cluster mode, use the private network address instead.
Only VPC instances support enabling the public network address feature. If it is a basic network, please first switch the basic network to VPC, then enable public network access.
Currently, the public network address feature is only supported in the following regions: Chengdu, Beijing, Shanghai, and Guangzhou. For other regions requiring public network access, see the following two methods to access Tencent Cloud Distributed Cache instances.
through the method of iptable forwarding.
Enabling Public Network Service via CLB.
Prerequisites
Enable Public Network Address
1. Log in to the Distributed Cache console, click the instance ID in the instance list to go to the instance details page.
2. In the Network Information module on the right side of the instance details page, click Enable at Public Network Address.
Note:
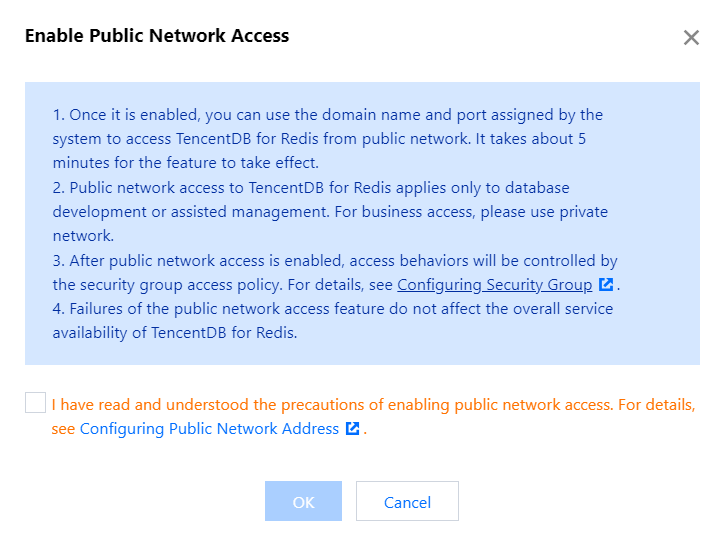
After public network access is enabled, it will be controlled by the security group network access policy. Please configure the source information for database access in the security group inbound rules and open the protocol ports (both private and public network ports must be opened; the default private network port is 6379). For specific operations, see Security Group Configuration.
3. In the pop-up dialog box, after confirming the information, select I have read and agree to the opening of public network access, and click OK.
4. Return to the instance details page. The instance status changes to Enabling public network, indicating that the instance is enabling the public network address. If the instance status does not change for a long time, please refresh the page.
Note:
Once enabled, you can use the system-assigned domain name and port to access Tencent Cloud Distributed Cache via the public network. It takes approximately 5 minutes to take effect.
5. When Public Network Address displays the public network address including the domain name and port, it indicates that the public network address has been successfully enabled. You can access the Distributed Cache database normally via the public network.
Disable Public Network Address
1. Log in to the Distributed Cache console, click the instance ID in the instance list to go to the instance details page.
2. In the Network Information module on the right side of the instance details page, click Disable at Public Network Address.
3. In the pop-up dialog box, after the information is confirmed, click OK.
4. Return to the instance details page. The instance status changes to Disabling public network access, and the Public Network Address no longer displays the public network address, indicating that the public network feature is disabled.
Subsequent Operations
After public network access is enabled, it is recommended to configure CLB monitoring alarm policies simultaneously.
1. Log in to the TCOP console.
2. Click Alarm Management > Alarm Configuration to enter the alarm policy configuration page.
3. Click New Policy to configure an alarm policy. The configuration instructions are as follows:
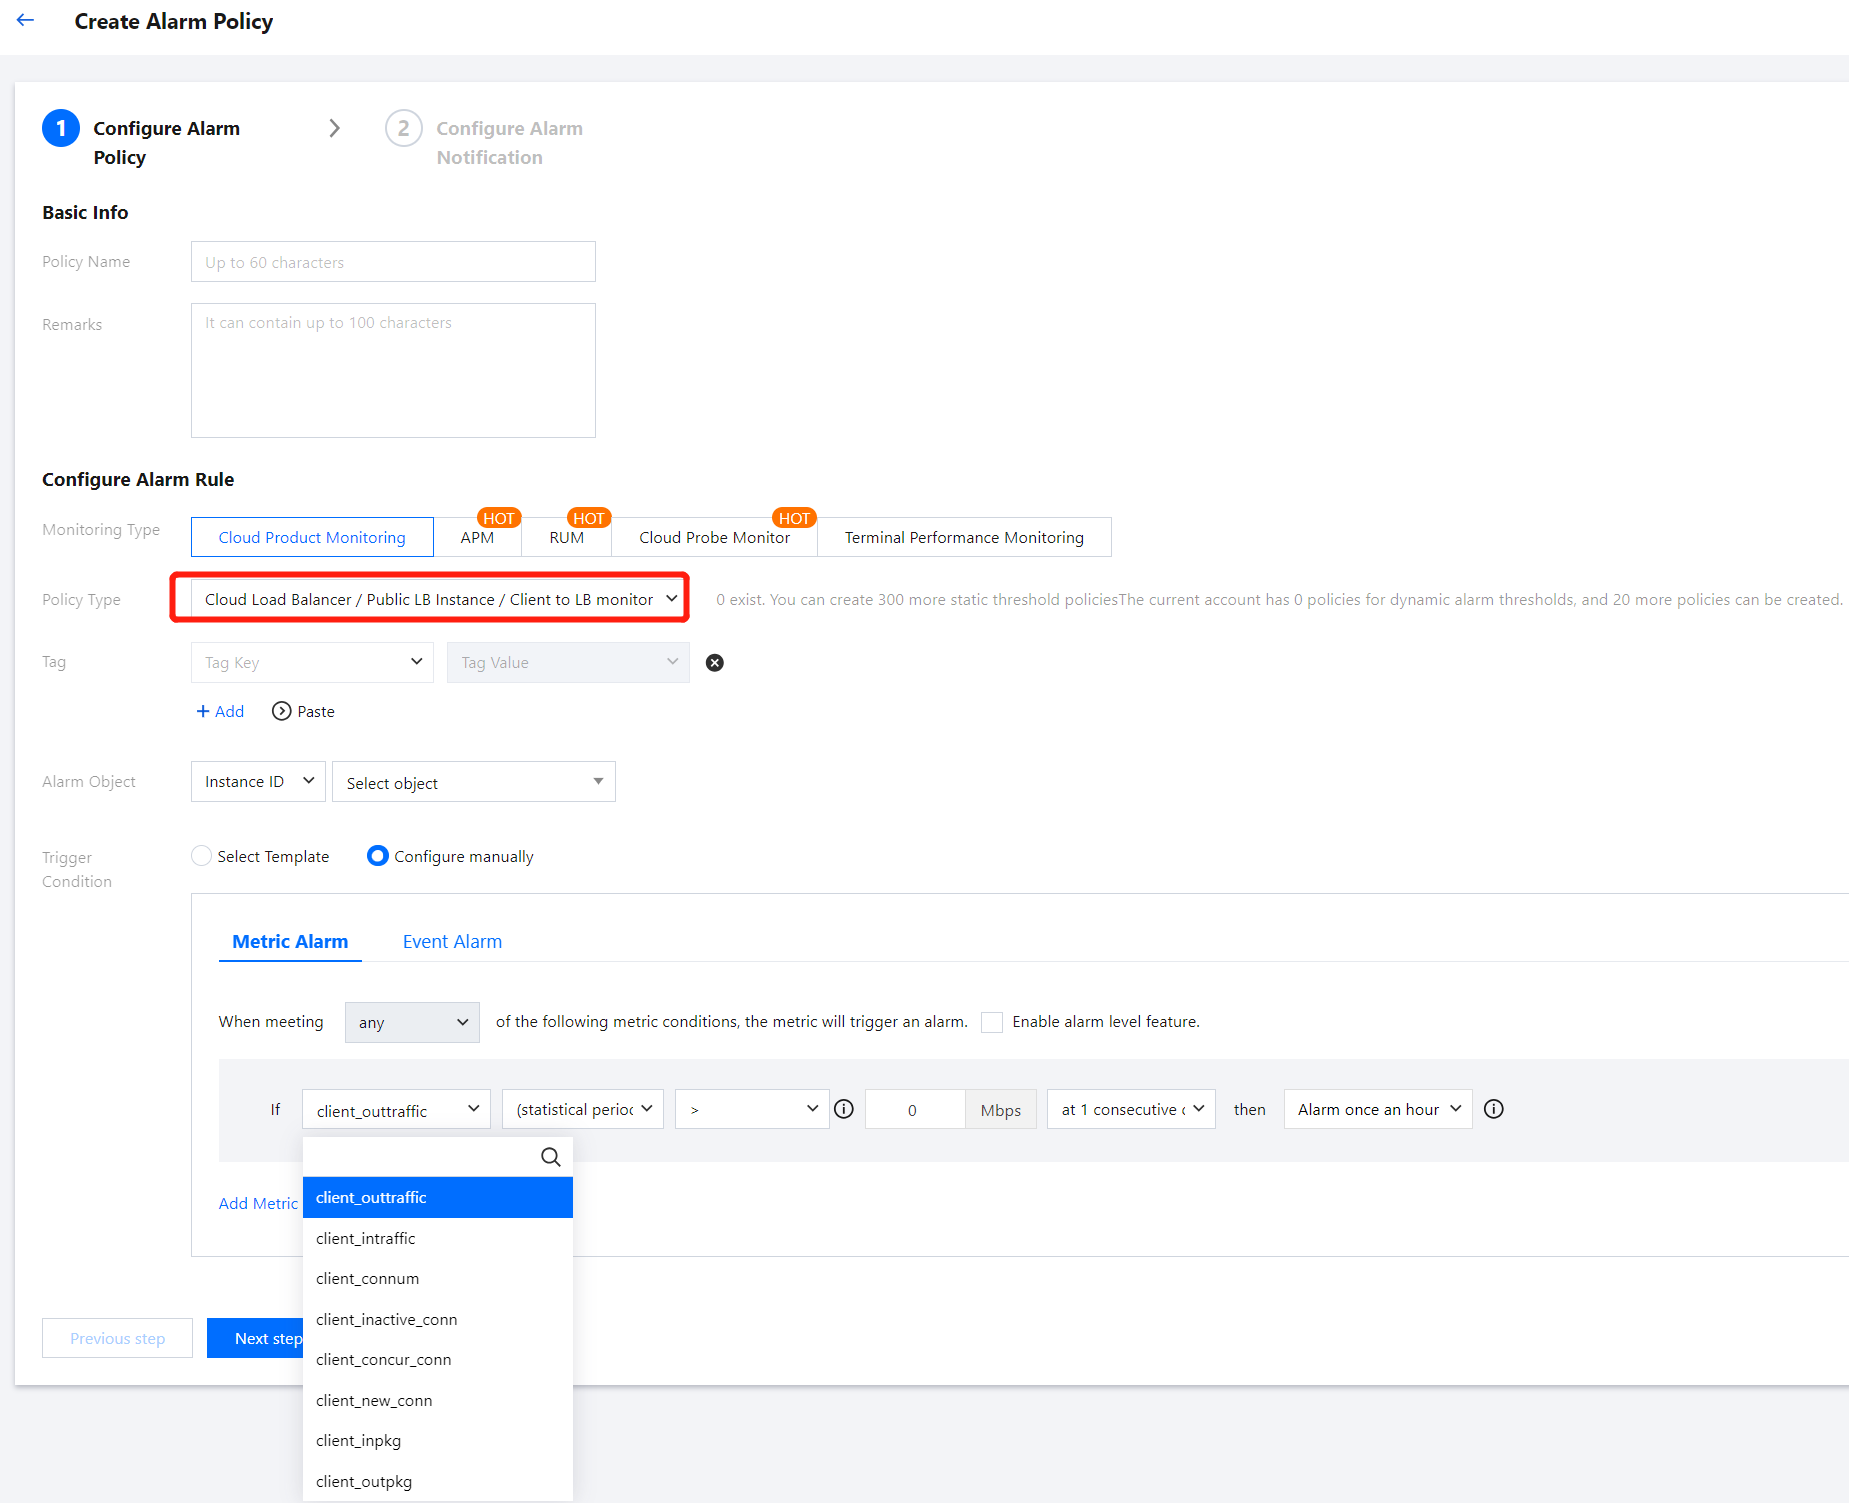
Configuration Type | Configuration Item | Description |
Basic Info | Policy Name | Custom policy name. |
| Remarks | Custom policy remarks. |
Configure Alarm Rule | Monitoring Type | Select Cloud Product Monitor. |
| Policy type | Choose CLB >> Public Network CLB Instance >> Monitoring from CLB to Backend. |
| Associated Project | Select Default Project. |
| Alarm object | If you select Instance ID, the alarm policy will be associated with the selected instance. If you select Instance Group, the alarm policy will be associated with the selected instance group. If you select all objects, the alarm policy will be associated with all instances under the current account. |
| Trigger Condition | An alarm trigger condition is a meaningful condition composed of a metric, a comparison operator, a threshold, a statistical granularity, and lasting for N consecutive monitoring data points. Select Template: Use an existing alarm trigger condition template. Preset templates trigger alarms. Click New Trigger Condition Template to create a template according to the console instructions. For more information, see Configure Trigger Condition Template. Manual Configuration: Customize the selection of monitoring metrics and event alarm trigger conditions. Configure alarm metrics, statistical granularity, alarm thresholds, alarm levels, and alarm frequencies based on business requirements. Note: Metric Alarm: The metrics that need to be configured include: Public Network New Connections, Public Network Connections, Public Network Outbound Bandwidth, and Public Network Inbound Bandwidth. For specific metric meanings, see CLB Monitoring Metrics. Event Alarm: You can select the events to be configured based on actual requirements. |
4. Click Next: Configure Alarm Notification to configure alarm notification rules. Supports selecting system preset notification templates and user-defined notification templates. Each alarm policy can be bound to a maximum of three notification templates. For details, see Notification Template.

5. After configuring the above information, click Complete to successfully create the alarm policy. For more information, see CLB Alarm Policy.
Related APIs
API | Feature Description |
Enable public network API. | |
Disable public network API. |
피드백