Both cross-region and cross-account communication of VPCs are advanced features of peering connections. This document describes how to implement cross-account communication by using an example.
Example
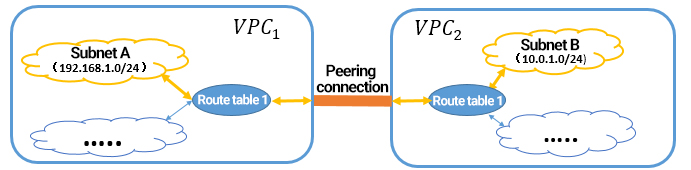
IP range 1: subnet A 192.168.1.0/24 of VPC1 in Guangzhou.
IP range 2: subnet B 10.0.1.0/24 of VPC2 in Beijing.
Perform the three steps below to create a peering connection across different accounts and implement communication between IP ranges 1 and 2:
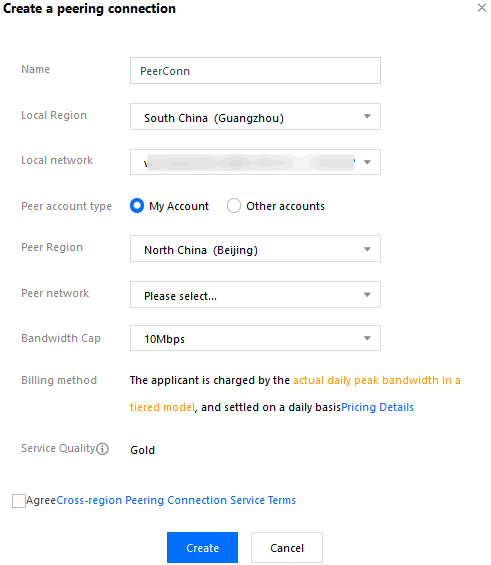
2. Select a region and a VPC (for example, Guangzhou and VPC1) above the list and then click +New to create a peering connection.
3. Enter a name (for example, PeerConn) and select the peer region (for example, Beijing), peer account type, and peer network (VPC2).
If the peer account type is My Account, select an account from the drop-down list.
If the peer account type is Other accounts, enter the account ID and VPC ID of the peer account.
4. Select the bandwidth cap.
For an intra-region peering connection, there is no bandwidth cap. Therefore, this field cannot be modified.
For a cross-region peering connection, select a bandwidth cap. The bandwidth cap supports 10Mbps, 20Mbps, 50Mbps, 100Mbps, 200Mbps, 500Mbps, and 1Gbps. If you need a higher cross-region bandwidth, please submit a ticket.
5. Click Create. A peering connection between two VPCs under the same account takes effect immediately after its creation.
Step 2: accept the peering connection
If VPC2 belongs to another user, you need to notify the user of accepting your peering connection request.
2. Select the target region (for example, Beijing) above the list, locate the peering connection (PeerConn) you want to accept, and click Accept.
Step 3: configure route tables on both sides
Note
You must configure routes on both sides to implement communication over a peering connection.
Please directly add routing policies to the original route table associated with the subnet at both ends. There is no need to create a new route table, because if you use a new route table to add routing policies, the original route table of the subnet will be replaced, and the original routing policies will become invalid. All instances under the subnet use the new routing table policy, which may affect services.
To enable communication between multiple IP ranges of the two VPCs, you simply need to add route table entries, instead of creating multiple peering connections.
2. In the left sidebar, click Subnet to go to the Subnet page.
3. Click a route table (route table A) associated with the local subnet (subnet A) of the peering connection to go to the Route table page. Click ID/Name of the route table A to access its details.
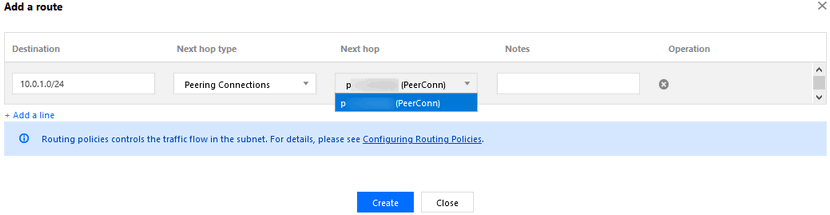
4. Click + New routing policies.
5. Enter the peer CIDR (10.0.1.0/24) for Destination, select Peering Connections for Next hop type, and select the peering connection created earlier (PeerConn) for Next hop.
6. Click Create. After the route table is configured, IP ranges of the two VPCs can communicate with each other.
Repeat the configuration on the peer route table.