Live Streaming Management System (React)
Download
포커스 모드
폰트 크기
Overview
Live provides comprehensive live streaming operations management capabilities including live monitoring, room management, gift configuration, and stream control console.
Features
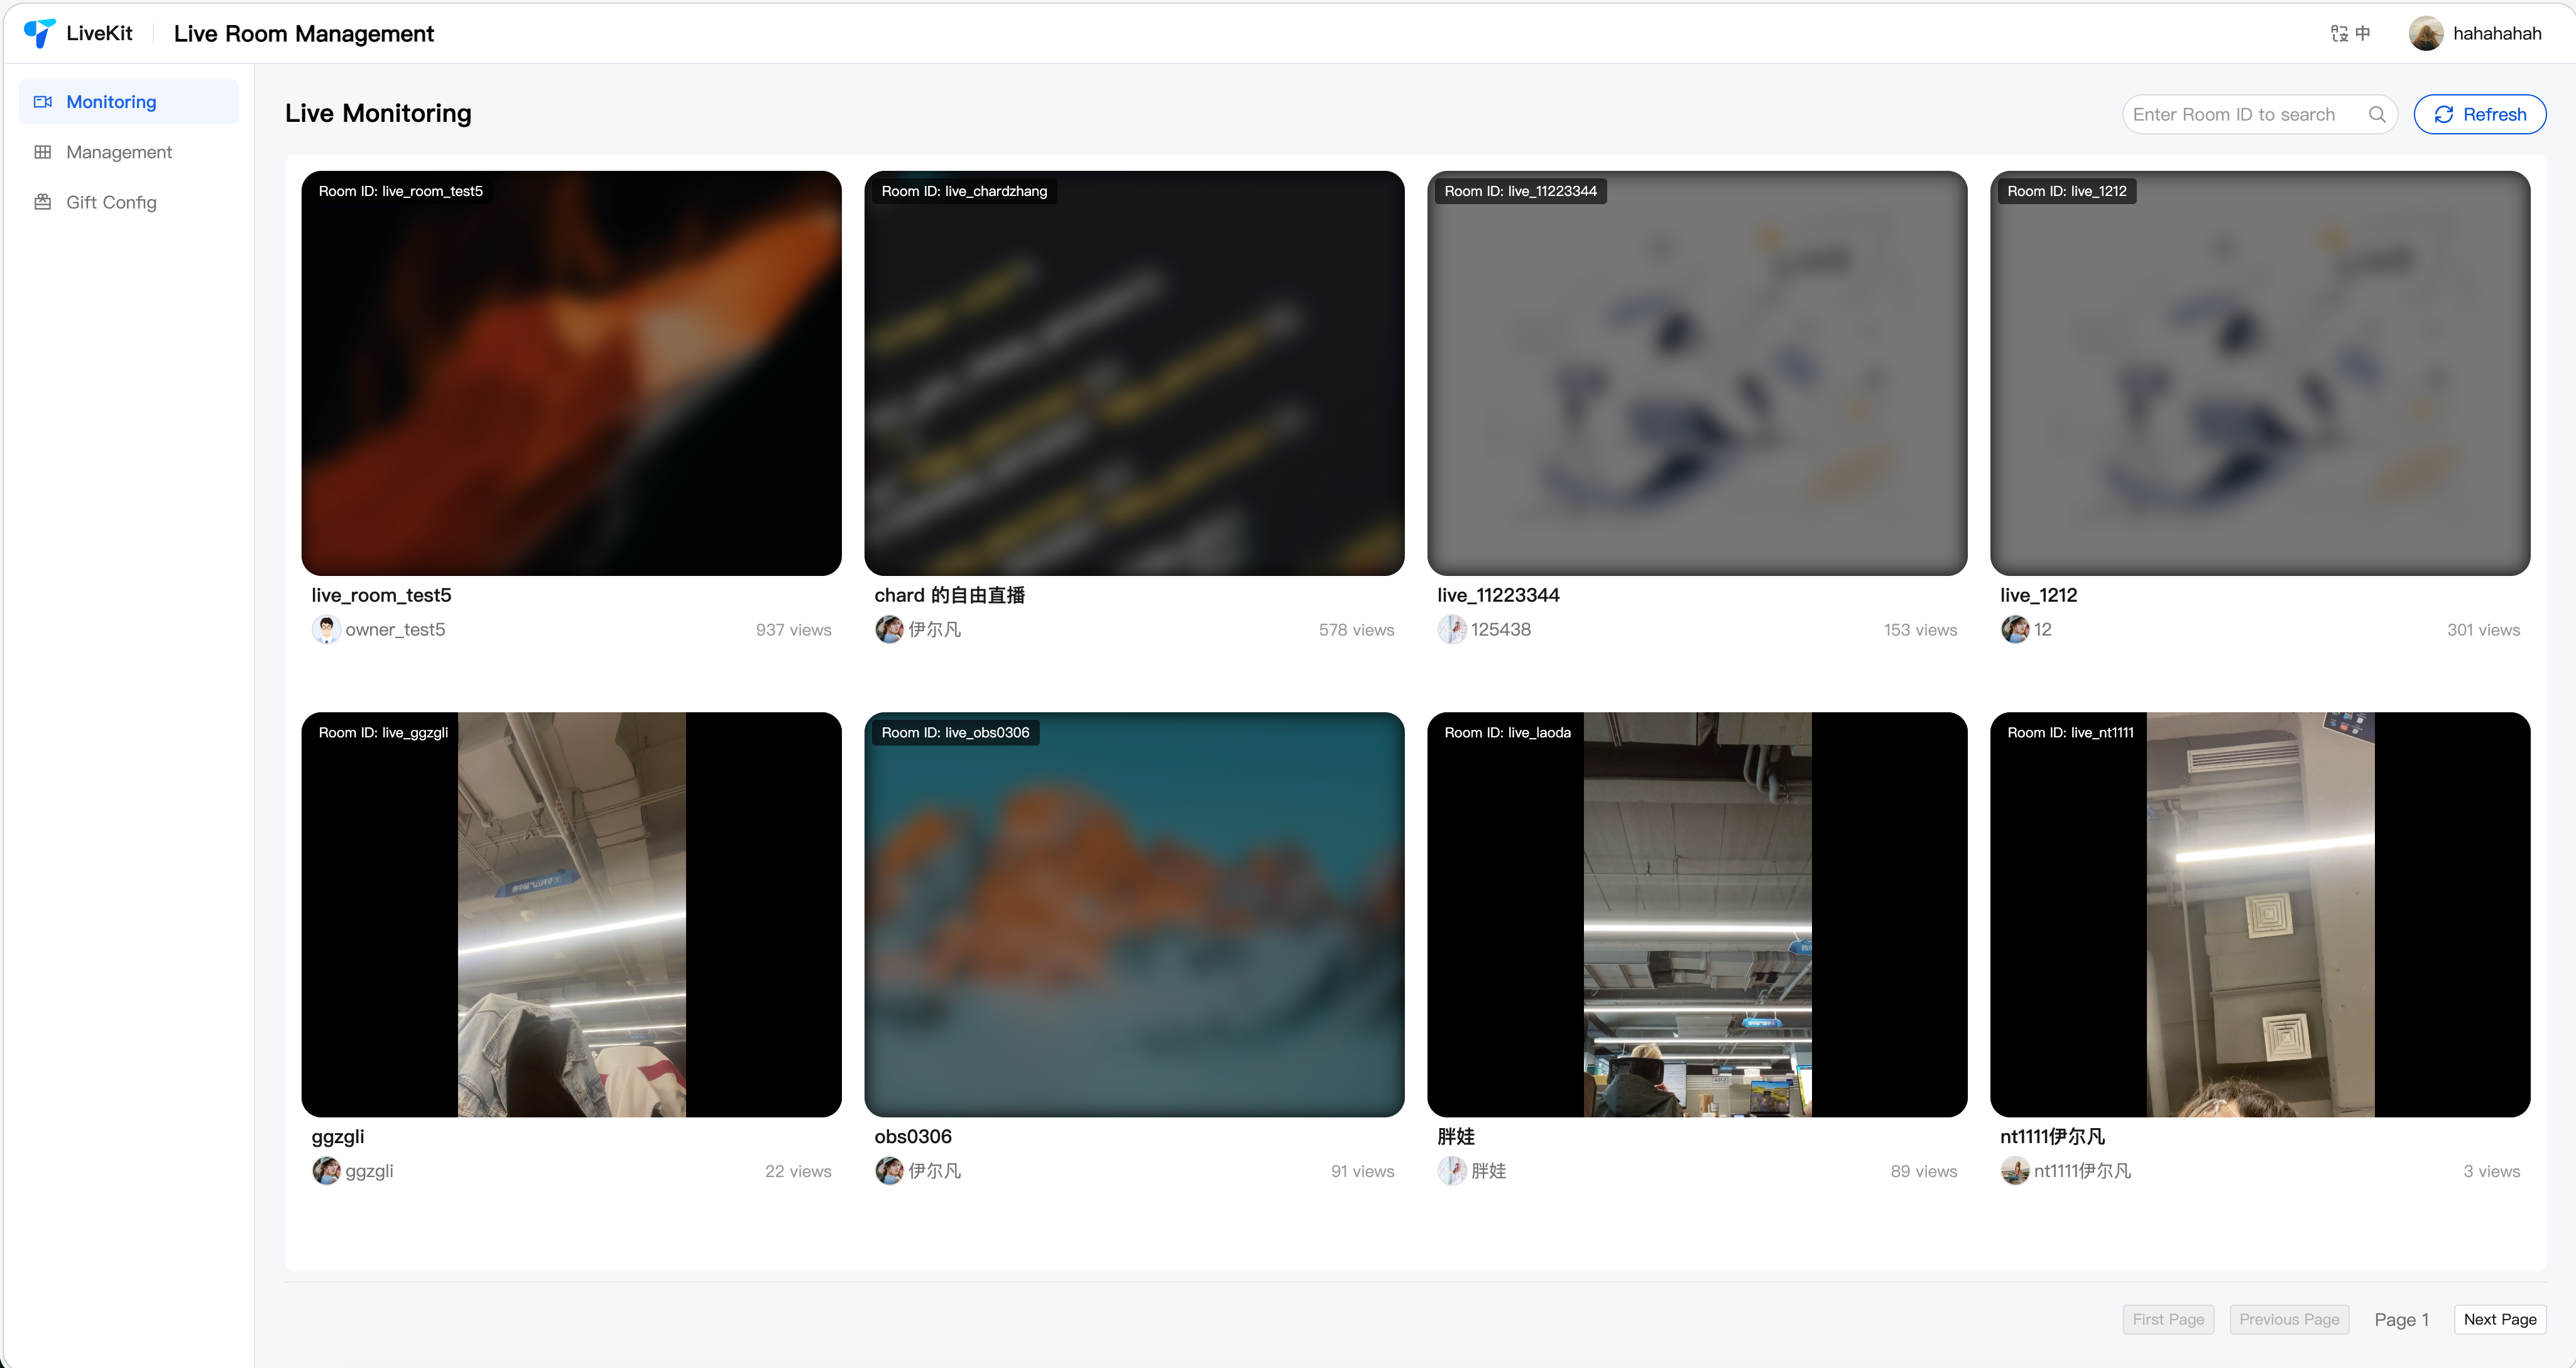
Live Monitoring: Multi-screen monitoring, low-latency playback, room search, forced stream termination.
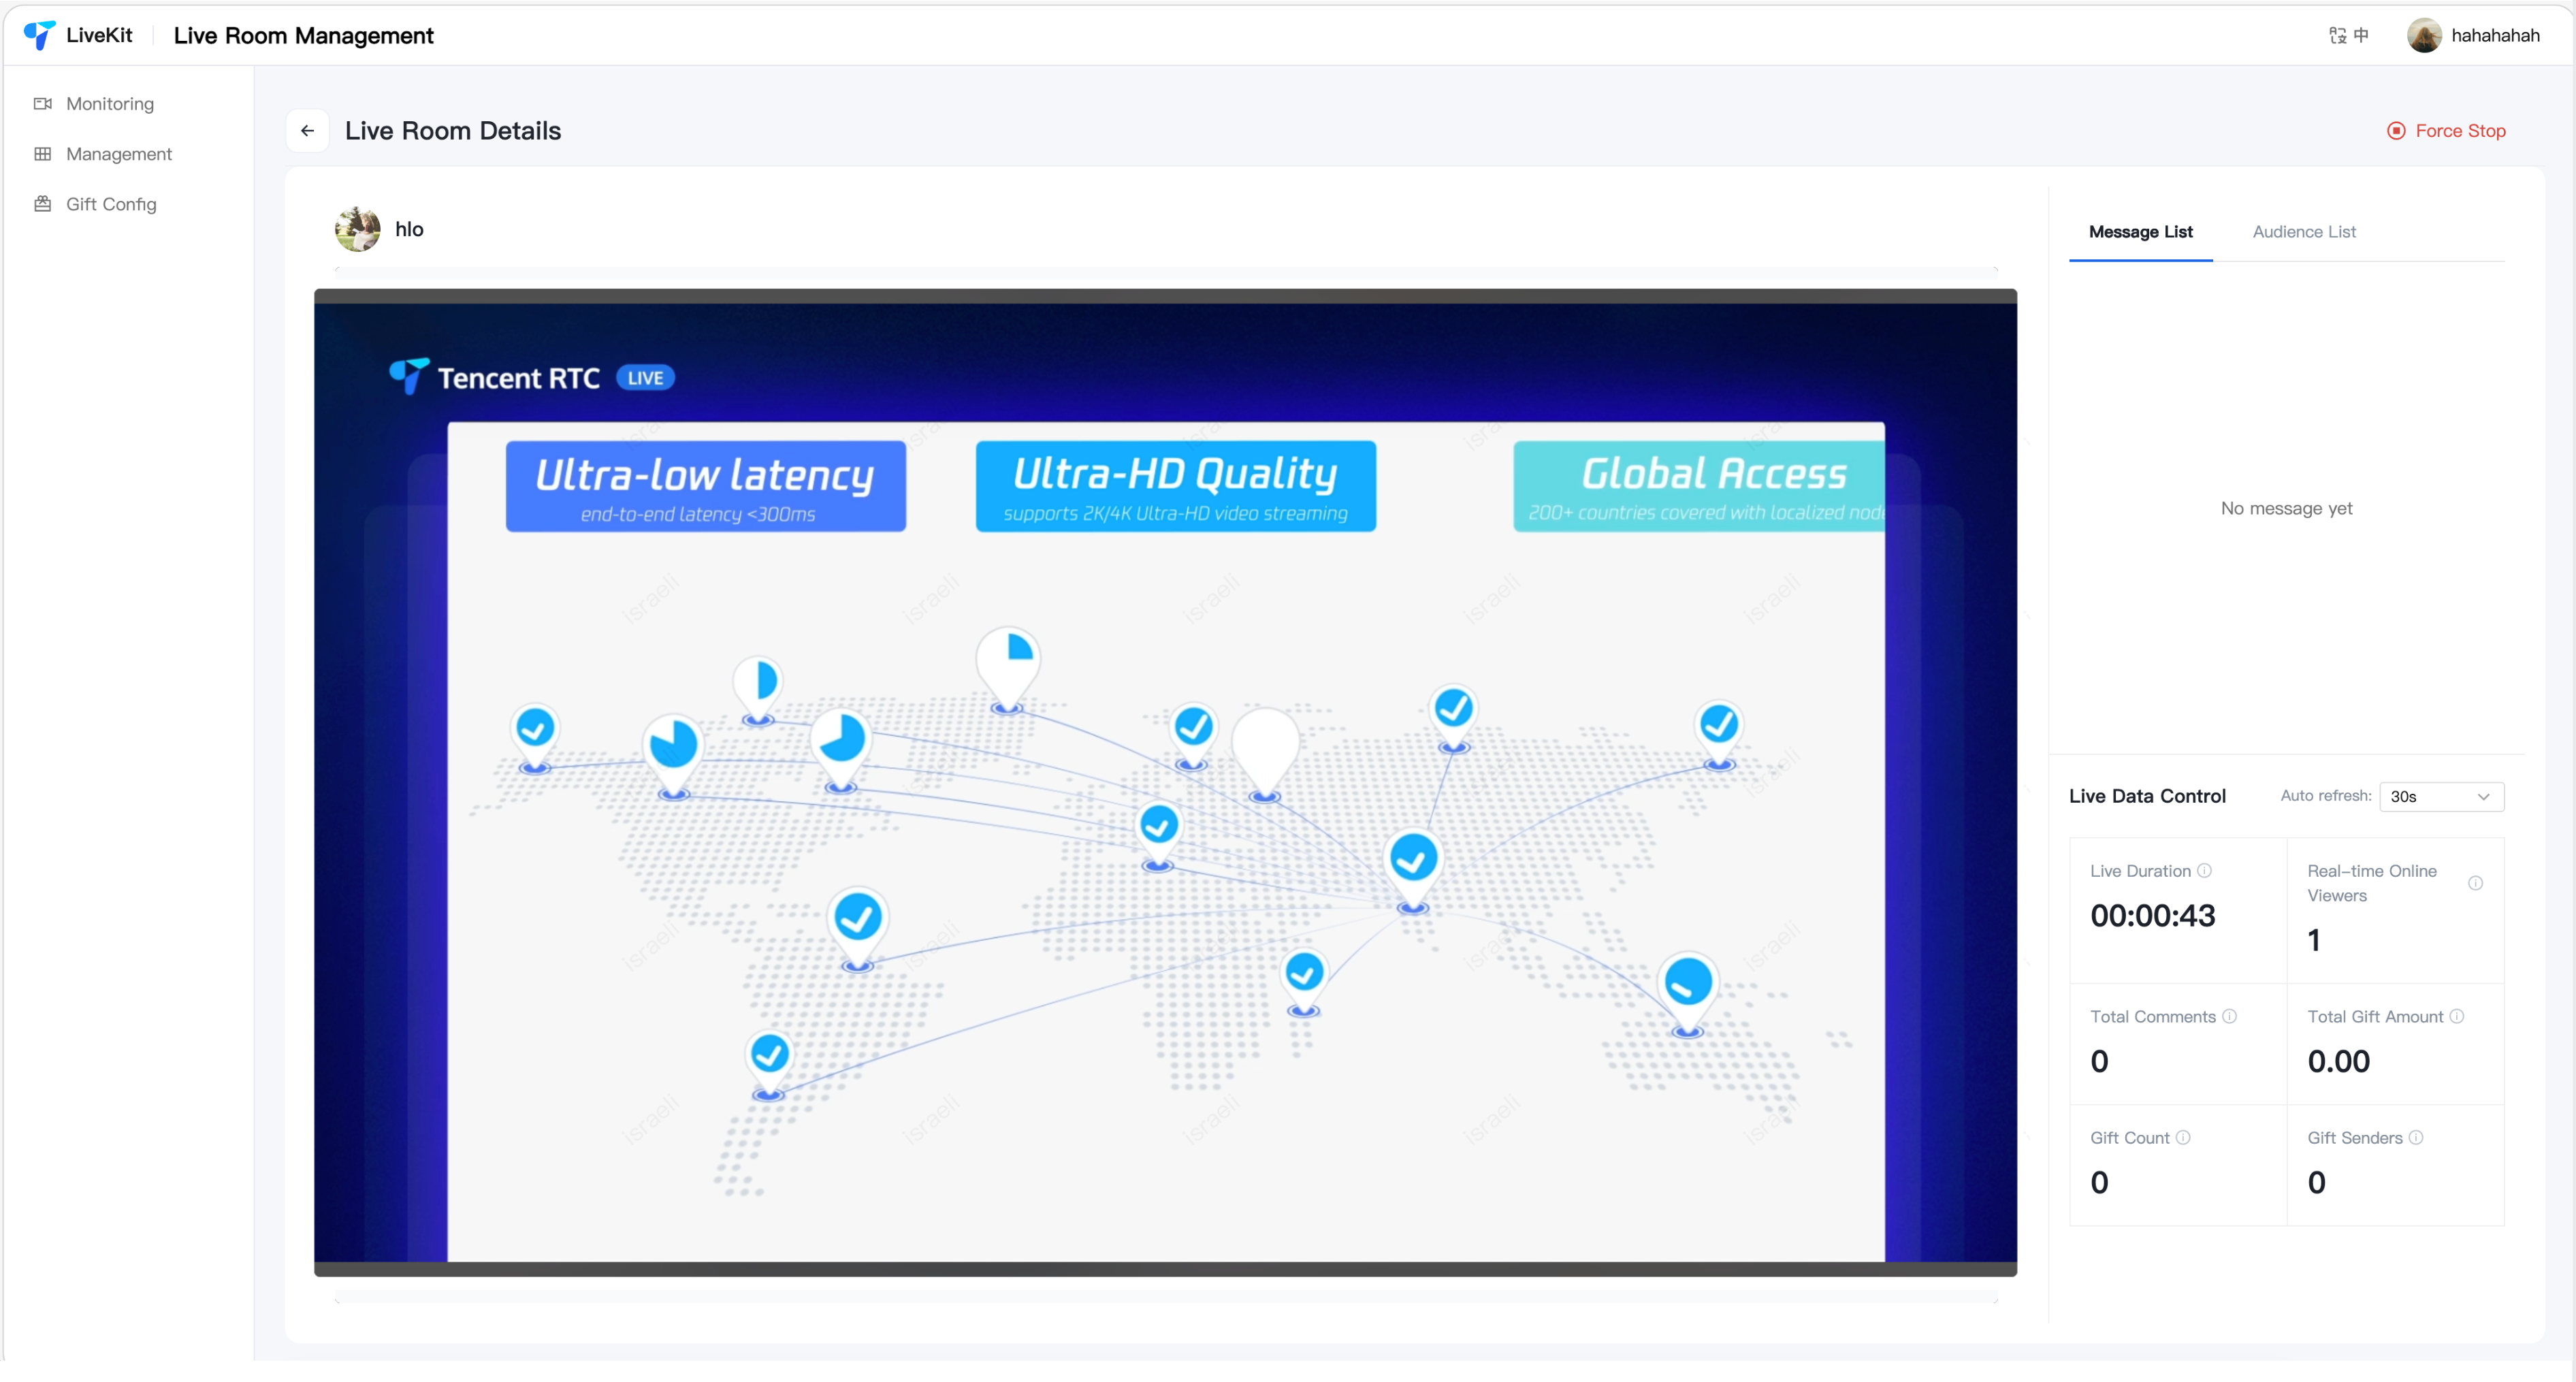
Room Details: Real-time playback, data statistics, user management (mute/ban).
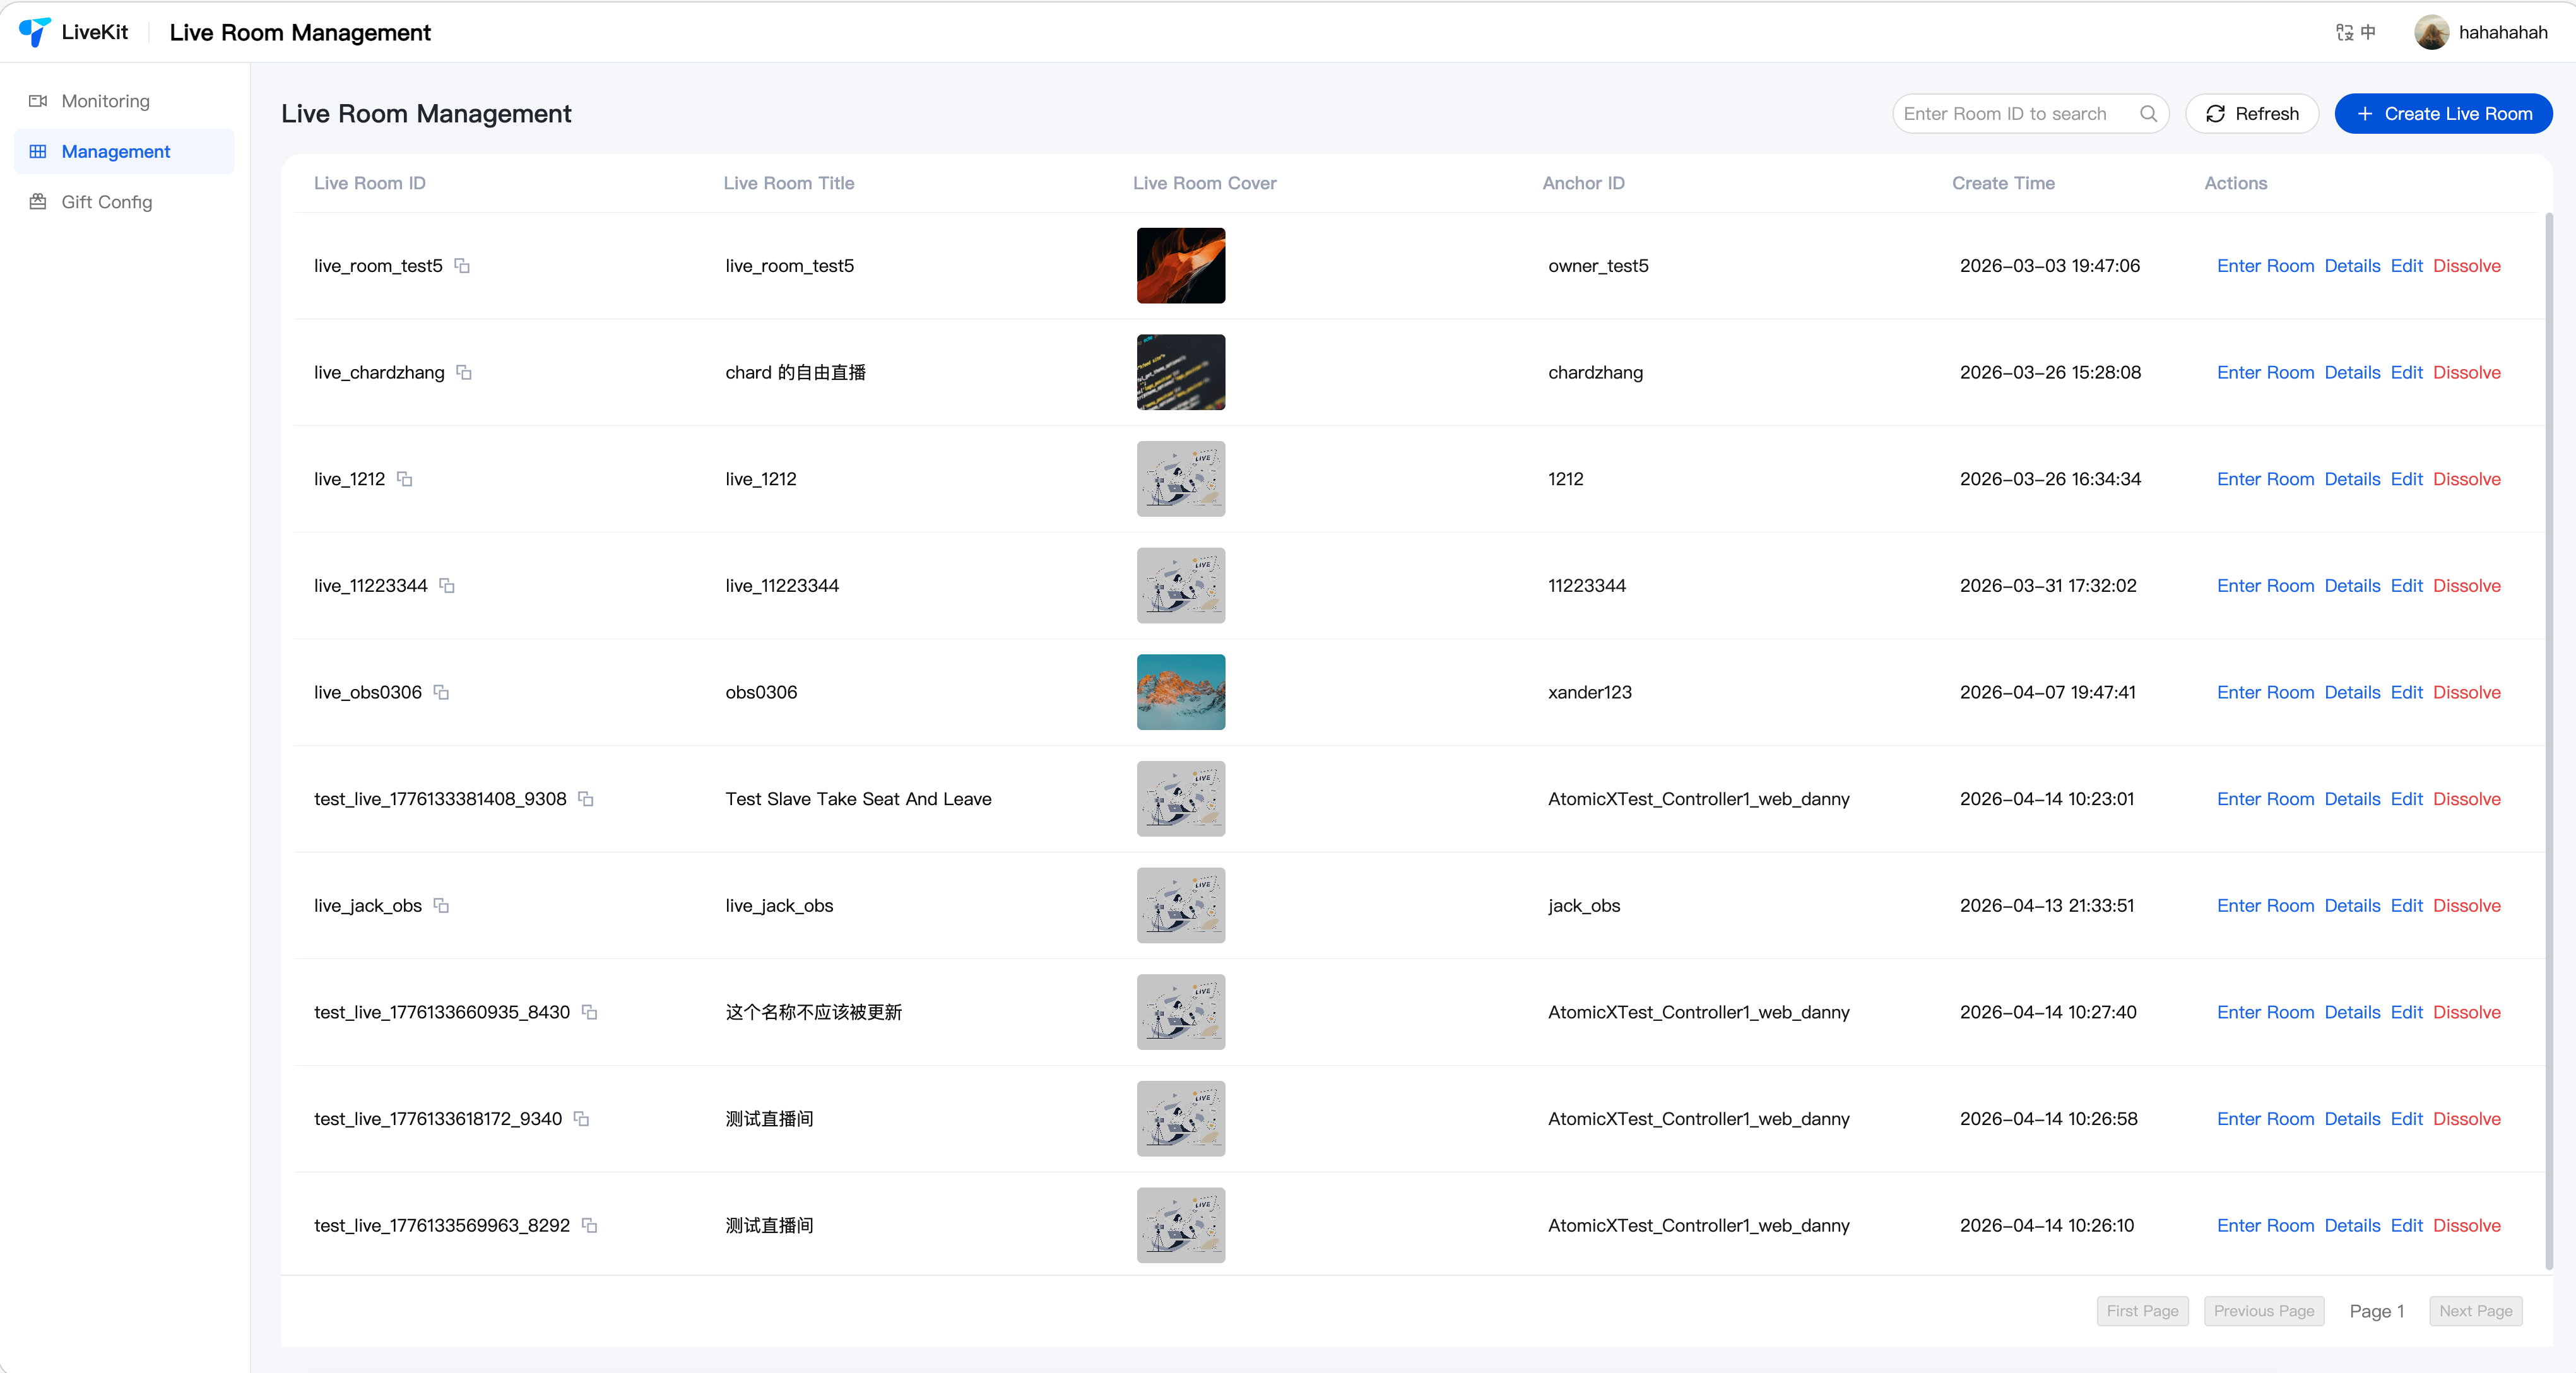
Room Management: Room list, create/edit/close rooms, OBS streaming configuration.
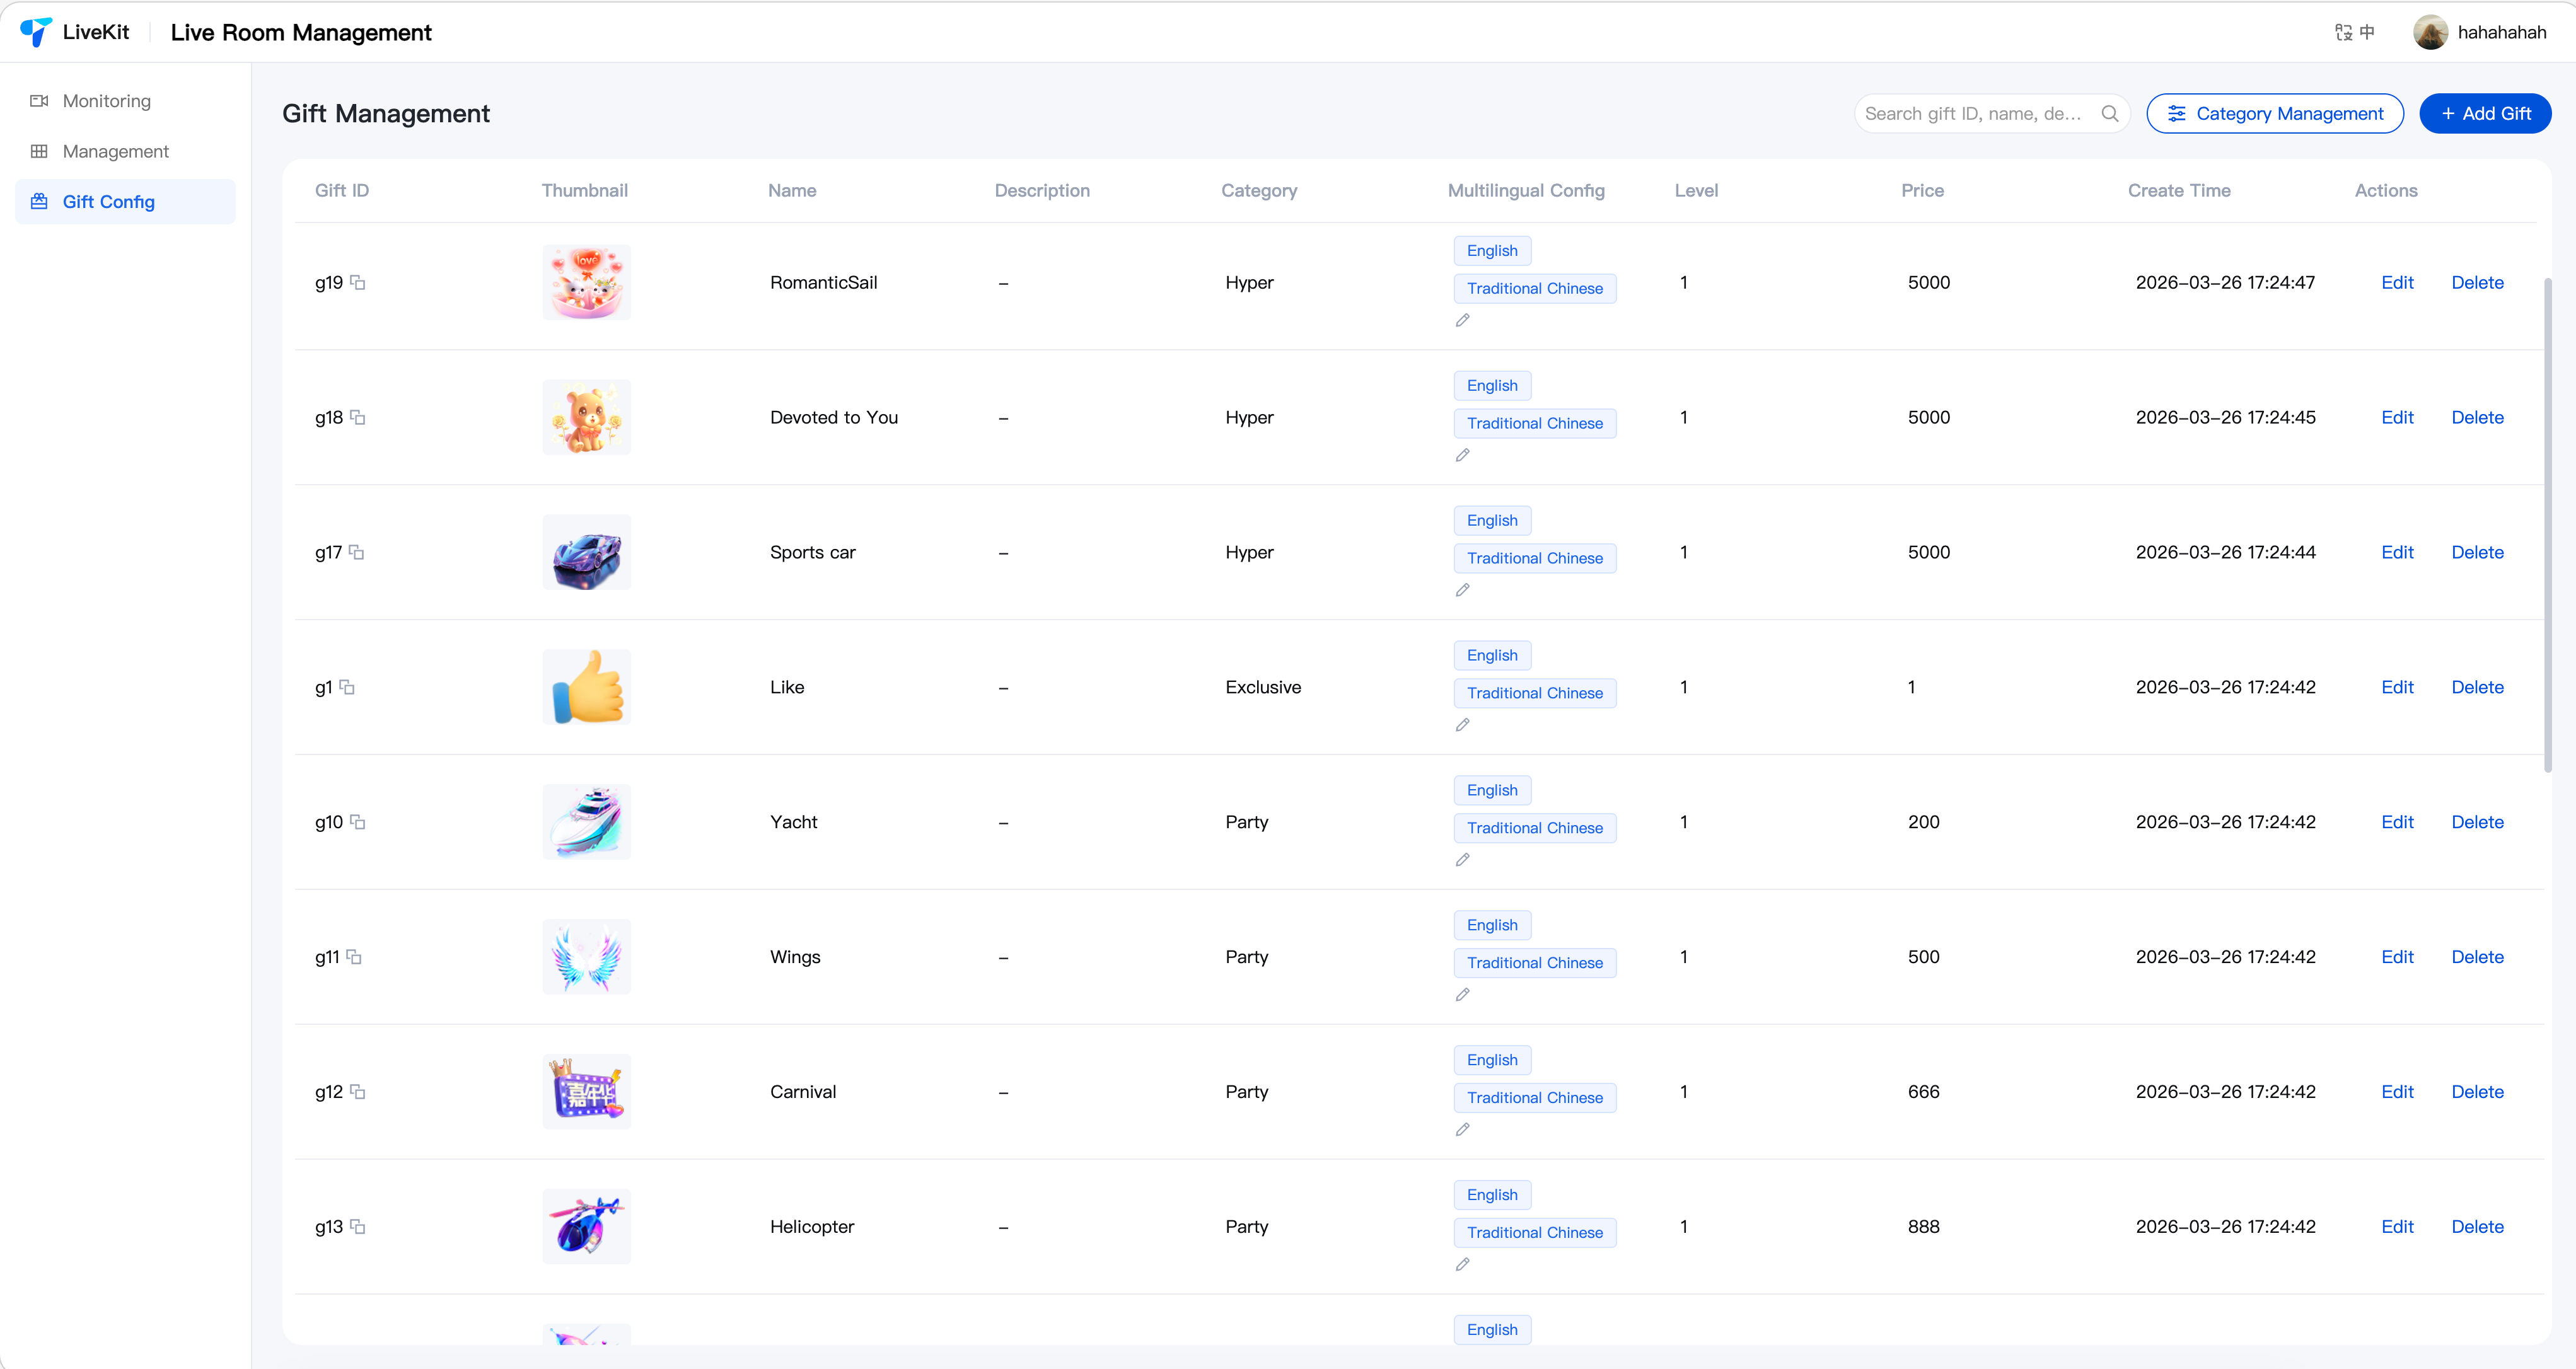
Gift Configuration: Gift CRUD, category management, multi-language support.
Feature Showcase
Live Monitoring
Room Management
Room Details
Gift Management
Quick Start
Step 1: Environment Setup
Before getting started, please refer to Preparation(Web React)for environment requirements and service activation.
Step 2: Download Project
git clone https://github.com/Tencent-RTC/TUILiveKit_Managercd TUILiveKit_Managernpm install
Step 3: Configure Server
Edit
packages/server/config/.env:SDK_APP_ID=1400000001 # Replace with your SDKAppIDSECRET_KEY=xxxxxxx # Replace with your SecretKeyUSER_ID=administrator # Replace with your admin userIDDOMAIN=console.tim.qq.com # Replace with your domain based on region
Note:
For how to get SDK_APP_ID and SECRET_KEY, see Activating the Service.
For how to get USER_ID, see Account Management.
Start the server:
npm run start:server
Note:
Default port is 9000. You can modify it by setting PORT in .env. Make sure the firewall allows access to this port.
Step 4: Configure Image Upload (Optional)
The system requires image upload for gift thumbnails, materials, and room covers. If not configured, the frontend will automatically degrade to manual URL input mode, which does not affect other features.
Add storage configuration to
packages/server/config/.env. The system supports two storage providers:Option 1: Tencent Cloud COS (Default)
Note:
STORAGE_PROVIDER=cosCOS_SECRET_ID=your_secret_id # Tencent Cloud API SecretIdCOS_SECRET_KEY=your_secret_key # Tencent Cloud API SecretKeyCOS_BUCKET=your-bucket-1250000000 # COS bucket nameCOS_REGION=ap-guangzhou # Bucket regionCOS_CDN_DOMAIN=web.sdk.qcloud.com # (Optional) CDN acceleration domainCOS_PATH_PREFIX=uploads # (Optional) Storage path prefix
Option 2: Custom HTTP Upload
Suitable for scenarios with existing upload services. The system forwards files to your endpoint via
multipart/form-data.STORAGE_PROVIDER=customCUSTOM_UPLOAD_URL=https://your-api.com/upload # Upload endpoint (required)CUSTOM_ACCESS_DOMAIN=https://cdn.your-api.com # (Optional) File access domain prefixCUSTOM_UPLOAD_FIELD=file # (Optional) Upload field name, default: fileCUSTOM_RESPONSE_URL_FIELD=data.url # (Optional) JSON path for URL in response, default: data.urlCUSTOM_AUTH_HEADER=Authorization: Bearer token # (Optional) Custom auth headerCUSTOM_PATH_PREFIX=uploads # (Optional) Storage path prefix
Note:
The custom upload endpoint should return JSON format, e.g.:
{ "code": 0, "data": { "url": "https://cdn.example.com/xxx.png" } }.Option 3: Extend Other Storage Services
To integrate AWS S3, Aliyun OSS, etc.:
1. Create
YourProvider.js in packages/server/src/services/storage/, extending StorageProvider.2. Register it in
PROVIDER_MAP in packages/server/src/services/storage/index.js.3. Set
STORAGE_PROVIDER=your_key in .env with corresponding config.Step 5: Configure Frontend
Edit
packages/react/.env:VITE_API_BASE_URL=http://localhost:9000/api
Note:
The port in VITE_API_BASE_URL must match the server port configured in Step 3.
Step 6: Start Frontend
npm run dev:react
Customization
You can modify page styles, layouts, and features based on the existing code. All page code is located in the
react and common directories. Refer to the source code structure for extensions.Production Deployment
Note:
If you have your own server, choose Option 1: Self-hosted deployment for more flexibility and integration with your existing system.
If you want quick trial or demo, choose Option 2: Cloud Functions + COS/EdgeOne Pages for faster setup without purchasing and configuring servers.
Option 1: Self-hosted Deployment
Server: Deploy to your server after configuration.
Frontend: After modifying
VITE_API_BASE_URL, run npm run build. Deploy the build output to a static server like Nginx, or place it in the server's public directory to share the port. In this case, set VITE_API_BASE_URL=/api to use relative paths.Option 2: Cloud Functions + COS / EdgeOne Pages
Server: Upload the server directory to Tencent Cloud Functions (Web Functions, Node.js 18.15).
Frontend: Create
.env.production with the cloud function URL, then run pnpm run build:react at the root. Upload the build output to COS or EdgeOne Pages.VITE_API_BASE_URL=https://your-scf-url.com/api
Note:
Replace your-scf-url.com with your actual domain and port.
Related Documentation
피드백