This document describes how to configure an Agent semi-managed migration task to migrate data from AWS S3 (International) to Tencent Cloud COS.
Note:
You need to log in to the AWS Management Console (International) for migration from AWS S3 (International).
Preparations
AWS S3
1. Log in to the AWS Console.
2. In the navigation pane, select Users and then Add User. Type in the username for the new user.
3. Select the access permission type that this group of users will have. Choose Programmatic access and AWS Management Console access.
4. Click Next: Permissions(Next: Permissions).On the Set permissions page, specify how to assign permissions to the new user, and grant the IAM account permission to read data (specific authorization operations include ListBuckets, HeadBucket, GetBucket, GetBucketLocation, ListObjects, HeadObject, GetObject).
5. Click Create user. To view the user's access keys, select show next to each password and access key you wish to view. To save the access keys, select download .csv, to obtain AccessKeyID and AccessKeySecret.
Note:
Create an AWS IAM account and grant relevant permissions. This is a simple guide and may change due to origin server updates. Refer to the AWS official documentation for details.
Tencent Cloud COS
1. Create a destination bucket to store the migrated data. For more details, see Creating Bucket.
2.2 Choose Users > User List in the left sidebar to enter the user list page.
2.3 Create a Sub-user, select programmatic access and Tencent Cloud console access.
2.4 Search for and check the QcloudMSPFullAccess and QcloudCOSAccessForMSPRole policies.
2.5 Complete the sub-user creation and save the userName, login password, SecretId, and SecretKey.
Note:
You can also log in to Cloud Migration with your root account. However, for security reasons, we recommend that you create a sub-account, use the sub-account's API key for migration, and delete the sub-account after migration.
2. Click Object Storage Migration in the left sidebar to enter the object storage migration page.
Creating Migration Task
1. On the object storage migration page, click Create task to enter the migration task configuration page and set the migration parameters.
2. Specify the migration task name.
Task name: 1 to 60 characters ([a-z], [A-Z], [0-9] and [_]). You can use this name to view the migration status and progress in the task list.
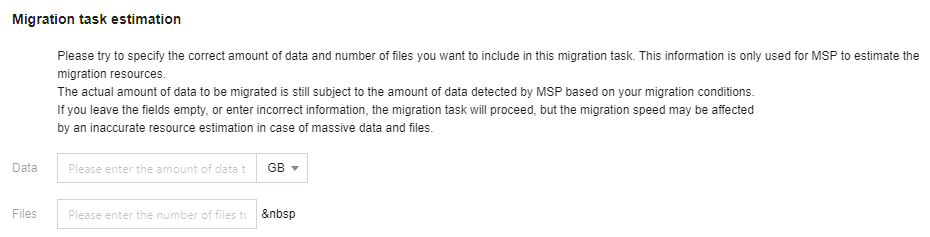
3. Task size estimation. Please accurately fill in the task size so that Tencent Cloud can better prepare resources. This field is optional.
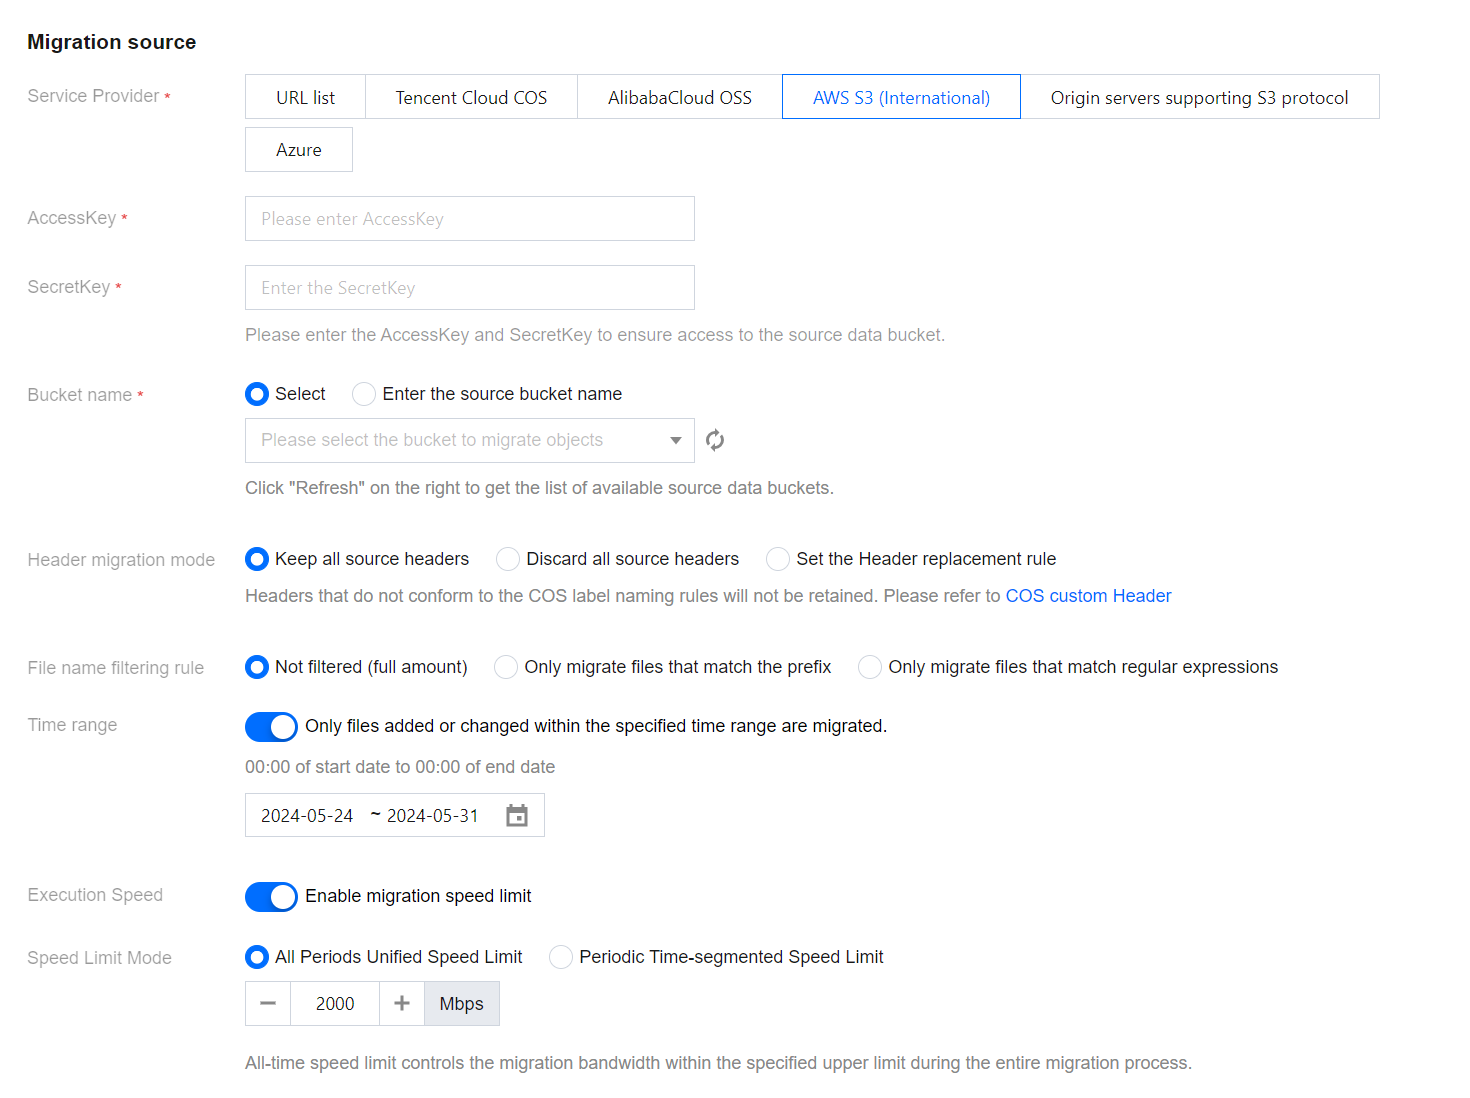
4. Set the file source for migration.
Service provider: Here the migration source service provider should select AWS S3 international website.
AccessKey, SecretKey: Enter the AccessKeyID and AccessKeySecret of the previously created AWS sub-account for migration in the text box.
Bucket Name: After filling in the key, click the refresh button on the right of the "Bucket Name" drop-down list to obtain the source COS bucket list. You can also choose to manually enter the source bucket name.
Header Migration Method: If files in the source bucket have set Header/Tag and need to be reserved after migration, select reserved or set replacement rules.
Filename filtering rules: Select to migrate all files in the specified bucket or only files with the specified prefix.
No filtering (full): Select to migrate all files in the specified bucket.
Migrate only files matching the prefix: Only migrate files with the specified prefix. For example, if there are files AA.jpg and AA/B.jpg in the root path of the bucket, then if you enter prefix AA, the migration will match files AA.jpg and AA/B.jpg.
Migrate only files matching the regular expression: Support input partial regular expression to match files. For example:
.*\\.jpg$ means match all files ending with .jpg.
^test.* means match all files starting with test in the root path. If files have the same prefix, such as doc/AA/, use ^doc/AA/test.* to match all files starting with test under the specified prefix.
.*/test/.* means match files with a subpath of test.
Time range: Set the time range to migrate only newly-added or changed files over a specified time period.
Execution speed, speed limit mode: Object storage of public cloud vendors has speed limits. To underwrite stable operation, please confirm with the source vendor and set the max available Mbps before migration.
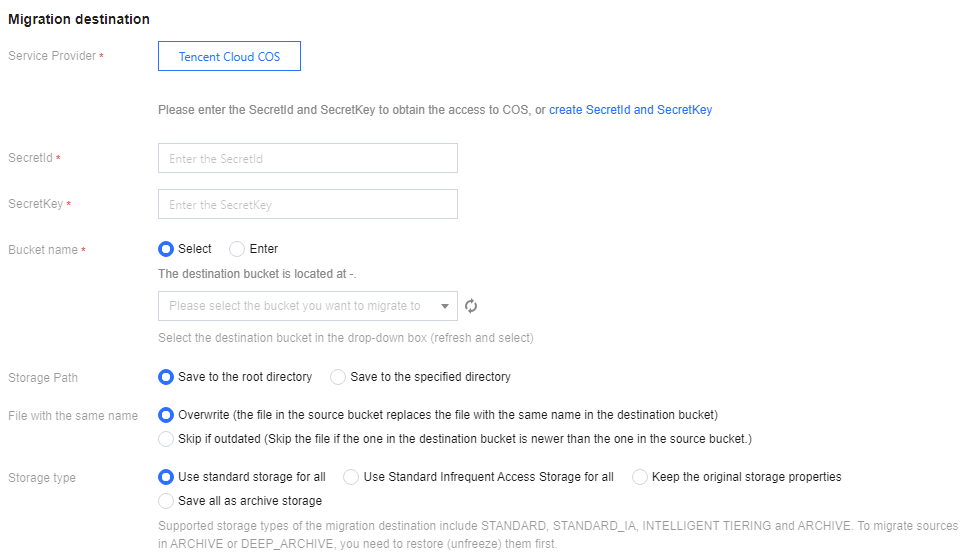
5. Select the target location to migrate to.
Service provider: Defaults to Tencent Cloud COS.
SecretId, SecretKey: Input the Tencent Cloud sub-user SecretId and SecretKey for migration.
Bucket Name: After filling in the key, click the refresh button on the right of the "Bucket Name" drop-down list to obtain the target COS bucket list.
Storage path: Specified directory for designated migration to the target bucket.
Save to root directory: Directly save files in the source bucket to the root directory of the target bucket with their original relative path. For example, if the original relative path of a file in the source bucket is /dir/a.txt, then the file will be saved to the target bucket path /dir/a.txt.
Save to specified directory: Save files in the source bucket to the specified directory with their original relative path. For example, if the original relative path of a file in the source bucket is /dir/a.txt and your specified directory is doc, then the file will be saved to the target bucket path /doc/dir/a.txt.
File with the same name: Specify the processing method for files with the same name.
Note:
If you select overwrite for existing files with the same name, the migration will directly overwrite them.
If you select skip for existing files with the same name, the judgment will be based on the last modification time LastModified, i.e.:
If the LastModified of the file in the source address is later than or equal to that in the destination address, then execute overwrite.
If the LastModified of the file in the source address is earlier than that in the destination address, then skip.
If the content of an object (file) changes during the migration process, it needs to perform secondary migration.
File storage method: Based on the need for migration, set the storage method of files after migration. You can choose: standard storage, infrequent storage, retain original storage attributes, archive storage.
6. Select migration pattern.
Mode selection:
Start fully managed migration immediately after creating a migration task: Select managed migration. After the user clicks Create and Start, the cloud migration service will access the source storage via public network to migrate.
Manually download Agent to initiate migration after creating a migration task: Select Agent Mode Migration. After the user clicks Create and Start, only the task configuration will be created. Users are advised to manually download Agent and deploy it on the migration source server before migration officially starts. For Agent Deployment, please refer to instructions for using semi-managed migration Agent.
Scheduled selection: Starting a scheduled task can repeat task execution and migrate incremental files from the source bucket. Except for the first task which is immediately executed, afterward it will trigger re-run based on the schedule type set at a fixed interval or according to the Cron setting. When running again, "file with the same name" will become "skip (retain existing files with the same name in the destination bucket)", meaning only synchronous increment files are synced.
Note:
For example, set the number of run attempts to 3, repeat once an hour, start the first task at 13:00, and execute the second task at 14:00 (if the first task is not completed at this time, have to wait until the first task is done, then rerun the second task, and so on, until all 3 tasks are completed).
7. Click Create and start to start the migration task.
Viewing Migration Status and Progress
In the COS migration interface, you can view all file migration task states and progress:
"Task completed" status: Green means the task is completed and all files are successfully migrated, yellow means the migration task is completed but some files have migration failure.
Click Retry Failed Task, and the failed files in the task will retry migration. Files that have already been successfully migrated will not be retransmitted.
Click Export can export the failed file list in the migration process.
Estimating File Migration Time
The migration speed is subject to the lowest speed at each stage of the migration process and is affected by the network transmission speed and maximum concurrency level. For more details, see Estimating File Migration Time.