2.2 Choose Users > User List in the left sidebar to enter the user list page.
2.3 Create a sub-user and select Programming access and Tencent Cloud console access.
2.4 Search for and check the QcloudMSPFullAccess and QcloudCOSAccessForMSPRole policies.
2.5 Complete creating the sub-user and save the sub-username, login password, SecretId, and SecretKey.
Note:
You can also log in to Cloud Migration with your root account. However, for security reasons, we recommend that you create a sub-account, use the sub-account's API key for migration, and delete the sub-account after migration.
2. Click COS Migration in the left sidebar to enter the COS Migration page.
Creating Migration Task
1. On the COS Migration page, click Create New Task to enter the COS migration task configuration page and set the migration parameters.
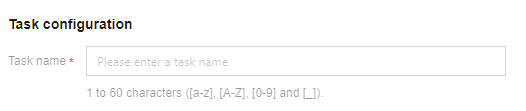
2. Set migration task name.
Task Name: The character length should be between 1 and 60 characters, and allowed characters include Chinese, English, 0-9, _, and -. The name set here will be used to check migration status and progress in the task list.
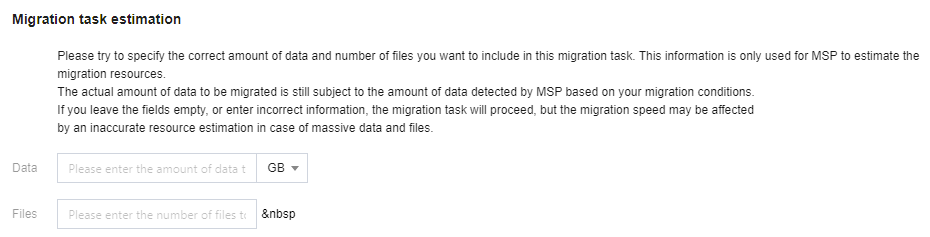
3. Estimate the task size. Please accurately fill in the task size to better prepare the related resources, though this is not mandatory.
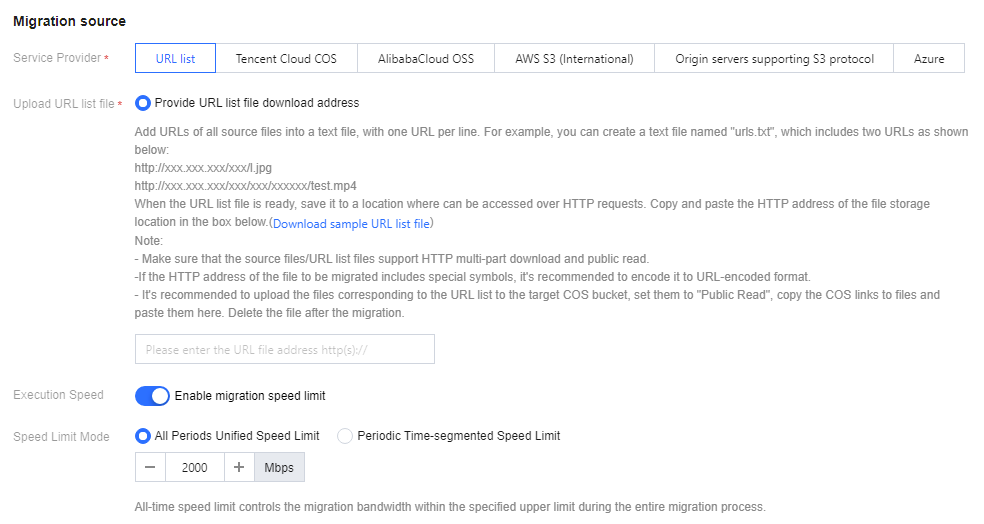
4. Set the file source for migration.
Service provider: Select URL listfor this field.
Upload URL list file: First, paste the URLs of the files to be migrated into a text file (e.g., 1.txt), then upload this text file to a location accessible via the HTTP protocol (such as a Tencent Cloud COS bucket). Next, set the text file to public read permission and obtain a public read access link. Finally, enter the link into the input box. Cloud Migration will batch upload the files listed in the text file to COS by reading the file. After the migration task is completed, delete the text file.
Note:
Each line of the text file should contain only one URL of the file to be migrated.
The storage service of both the files to be migrated and the text file should support HTTP partial downloads and public read.
If the HTTP URL of the file to be migrated contains special characters, it is recommended to perform URL encode encoding.
Execution Speed, Speed Limit Mode: All public cloud object storage services have speed limits. To ensure business stability, please confirm with the service provider and set the maximum available migration bandwidth in Mbps before migrating.
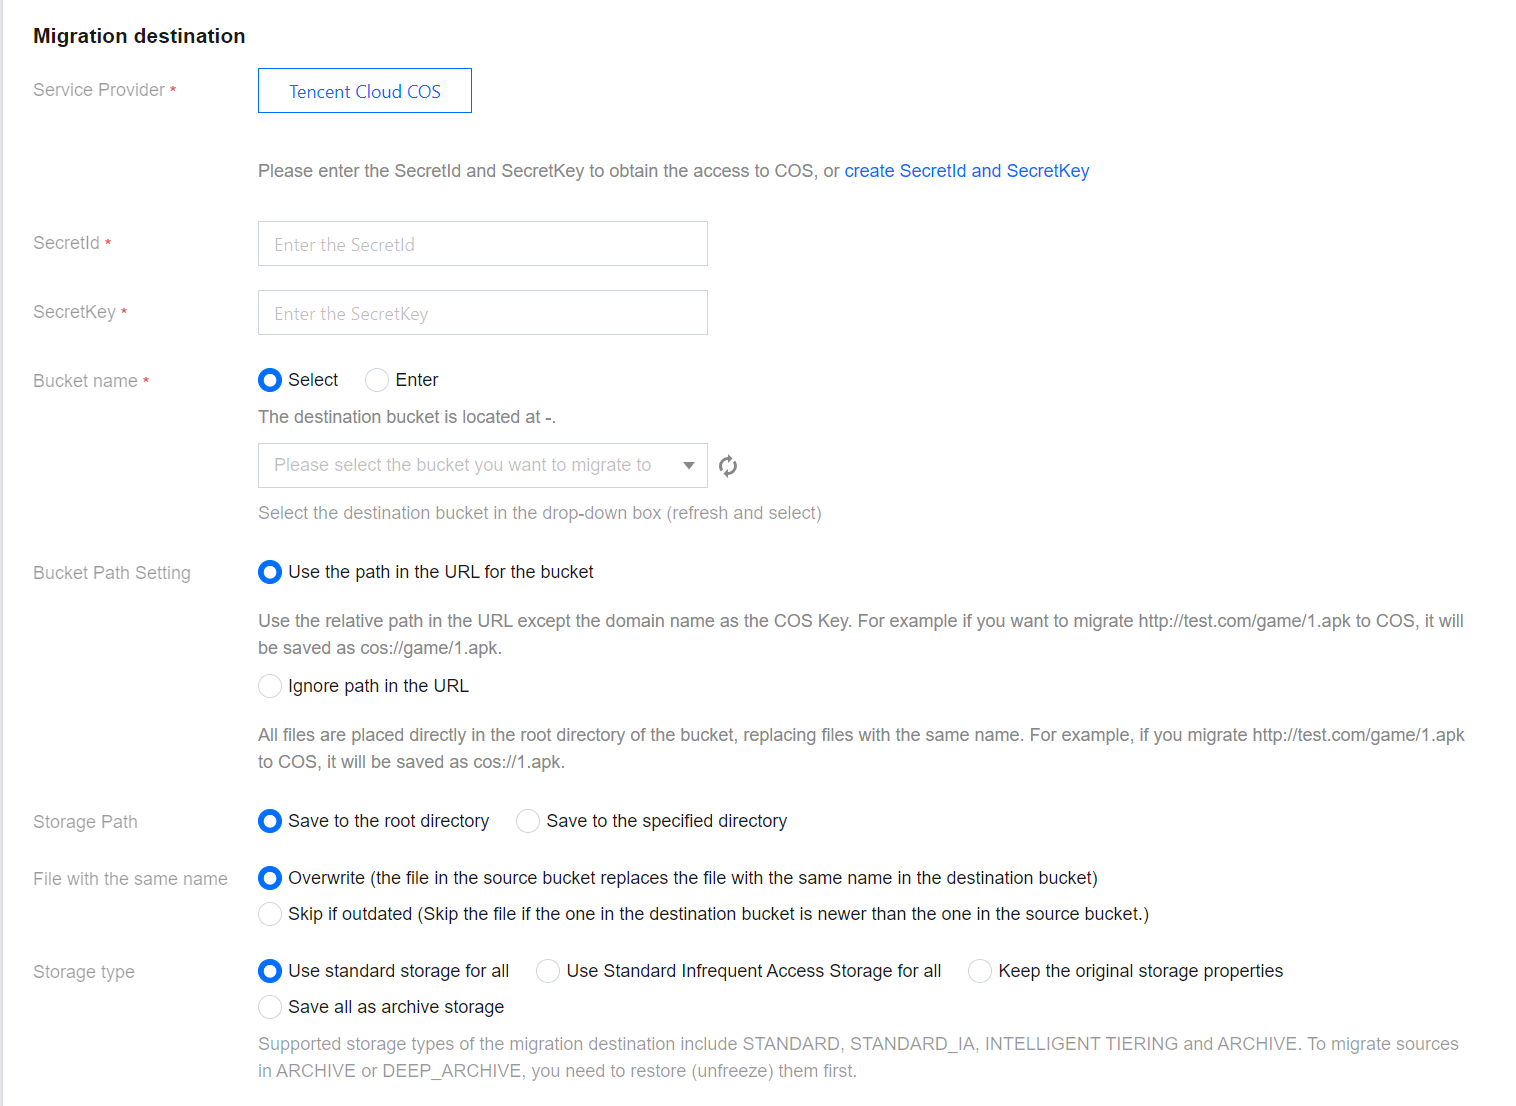
5. Select the destination for migration.
Service Provider: The default value is Tencent Cloud COS.
SecretId, SecretKey: Enter the SecretId and SecretKey of the sub-user for migration.
Bucket name: After you enter the Key, click Refresh on the right side of the "Bucket Name" drop-down box to view the list of destination COS buckets.
Bucket Path Setting:
Use the path in the URL for the bucket: The relative path in the URL, excluding the domain name, is used as the COS Key. For instance, migrating http://test.com/game/1.apk to COS will result in it being stored as cos://game/1.apk.
Ignore path in the URL: All files are placed directly in the root directory of the bucket. Files with identical names will be overwritten. For example, migrating http://test.com/game/1.apk to COS will result in it being saved as cos://1.apk.
Storage Path: Specify the directory in the destination bucket for migration.
Save to the root directory: Store the files in the source bucket to the root directory of the destination bucket according to the original relative paths.
Save to the specified directory: Store the files in the source bucket to the specified directory according to the original relative paths.
For example:
For files /a.txt and /dir/b.txt in the source bucket, if "dest" is filled in this field, the paths of the two files in the destination bucket will be /dest/a.txt and /dest/dir/b.txt after migration.
If dest/20180901 is filled in this field, the paths of the two files in the destination bucket will be /dest/20180901/a.txt and /dest/20180901/dir/b.txt after migration.
File with the same name: Specify the handling method for files with the same name.
Notes:
If the method is Overwrite, files in the destination bucket will be overwritten directly during migration.
If the method is Skip, judgment will be performed based on the last modification time (LastModified). Specifically:
If the last modification time of the file in the source bucket is later than or the same as that of the file in the destination bucket, then overwrite the file in the destination bucket.
If the last modification time of the file in the source bucket is earlier than that of the file in the destination bucket, skip the file in the source bucket.
Secondary migration is required if the object (file) content is changed during migration.
Storage type: Set the storage class for migrated files according to the migration requirements. Available options: Use standard storage for all, Use Standard Infrequent Access Storage for all, Keep the original storage properties, and Save all as archive storage.
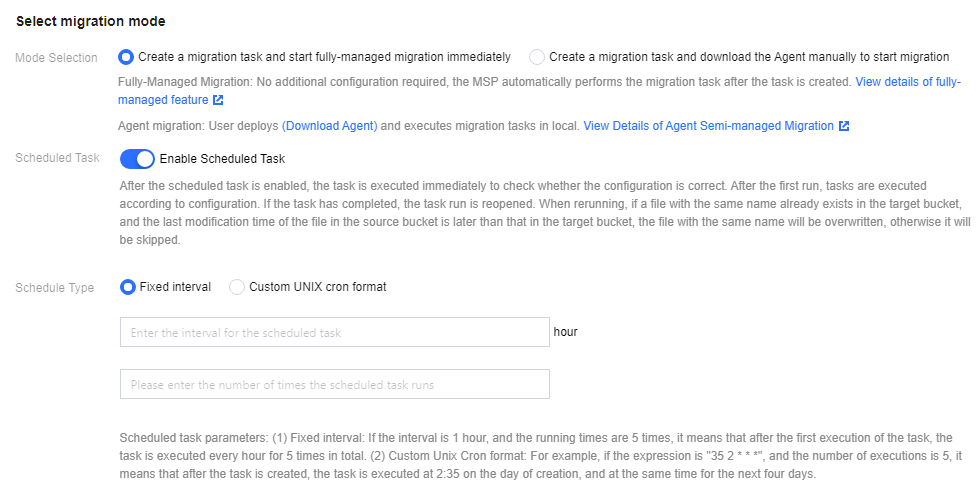
6. Select migration mode.
Mode Selection:
Create a migration task and start fully-managed migration immediately: When fully-managed migration is used, Cloud Migration will access the source bucket via the public network for migration after you click "Create and Start".
Create a migration task and download the Agent manually to start migration: When semi-managed migration is used, only task creation is completed after you click "Create and Start". You need to manually download the Agent and deploy it on the origin server before you can start the migration. For Agent deployment, see Using Semi-Managed Migration Agent.
Scheduled Task: Scheduled tasks can be executed repeatedly to synchronize incremental files in the source bucket. Such tasks are executed immediately for the first time and can be triggered later either after a specified interval or according to the scheduling rules set in Custom UNIX cron format. When a scheduled task is executed again, files with the same name as those in the destination bucket will be skipped. In other words, existing files with the same name in the destination bucket are retained, which means that only incremental files are synchronized.
7. Click Create and start to start the migration task.
Viewing Migration Status and Progress
You can view the status and progress of all file migration tasks on the Object Storage Migration page:
For completed tasks, the message in green indicates the task is completed with all files successfully migrated, while the message in yellow indicates the migration task is completed but some files failed to be migrated.
You can click Retry failed task to retry the migration of failed files involved in the task. Files that have been successfully migrated will not be retried.
You can click Export list of failed files to export the list of files that failed to be migrated.
Estimating File Migration Time
The migration speed is subject to the lowest speed at each stage of the migration process and is affected by the network transmission speed and maximum concurrency level. For more details, see Estimating File Migration Time.