Making Your First Call
Download
フォーカスモード
フォントサイズ
This guide shows you how to use the AtomicXCore SDK components—DeviceStore, CallStore, and CallCoreView—to quickly implement an audio/video call feature.
Core Features
To build multi-party audio/video call scenarios with AtomicXCore, you’ll need these three modules:
Module | Description |
Core UI component for calls. Automatically observes CallStore data and renders the interface, switching layouts between 1v1 and group calls as needed. | |
Manages the call lifecycle: make, answer, reject, hang up. Provides real-time status for participants’ audio/video, call duration, call history, and more. | |
Controls audio/video devices: microphone (toggle/volume), camera (toggle/switch/quality), screen sharing, and monitors device status in real time. |
Preparation
Step 1: Activate the Service
To obtain either a trial or paid version of the SDK, follow the instructions in Activate the Service.
Step 2: Integrate the SDK
Install the package: In your project root, run:
flutter pub add atomic_x_core
Step 3: Initialize and Log in
Android Configuration
1. The SDK uses Java reflection, so you must prevent certain SDK classes from being obfuscated.
In your project’s
android/app/ directory, update build.gradle.kts or build.gradle to enable Proguard rules:android {buildTypes {release {isMinifyEnabled = trueproguardFiles(getDefaultProguardFile("proguard-android.txt"),"proguard-rules.pro")}}}
android {buildTypes {release {minifyEnabled trueproguardFiles getDefaultProguardFile('proguard-android.txt'), 'proguard-rules.pro'}}}
Create a
proguard-rules.pro file in android/app and add:-keep class com.tencent.** { *; }
2. (Optional) To enable CallKit’s floating window outside the app, turn on system Picture-in-Picture for
MainActivity in AndroidManifest.xml:<manifest xmlns:android="http://schemas.android.com/apk/res/android"><application><activityandroid:name=".MainActivity"android:supportsPictureInPicture="true"</activity></application></manifest>
iOS Configuration
If you encounter a
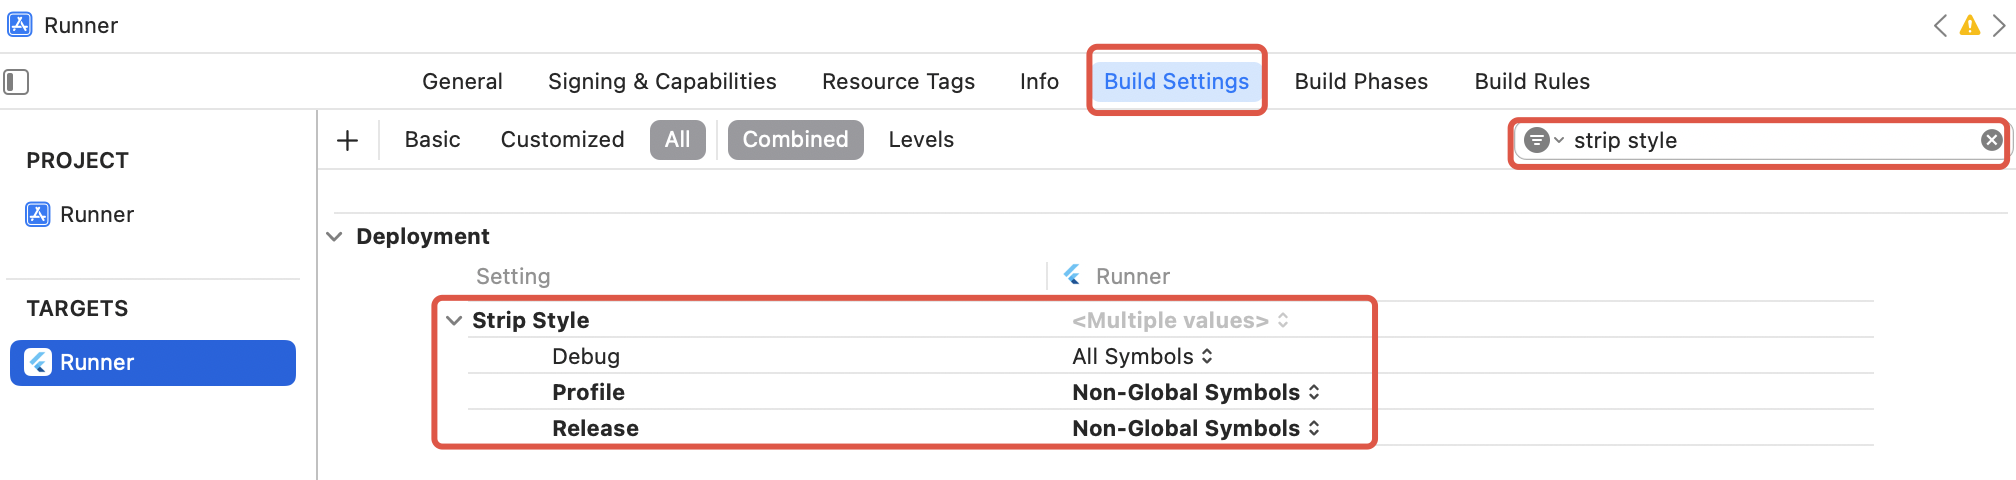
symbol not found error in Release on iOS (due to Flutter FFI symbol stripping), do the following:1. In Xcode Build Settings, set Deployment Postprocessing to Yes.
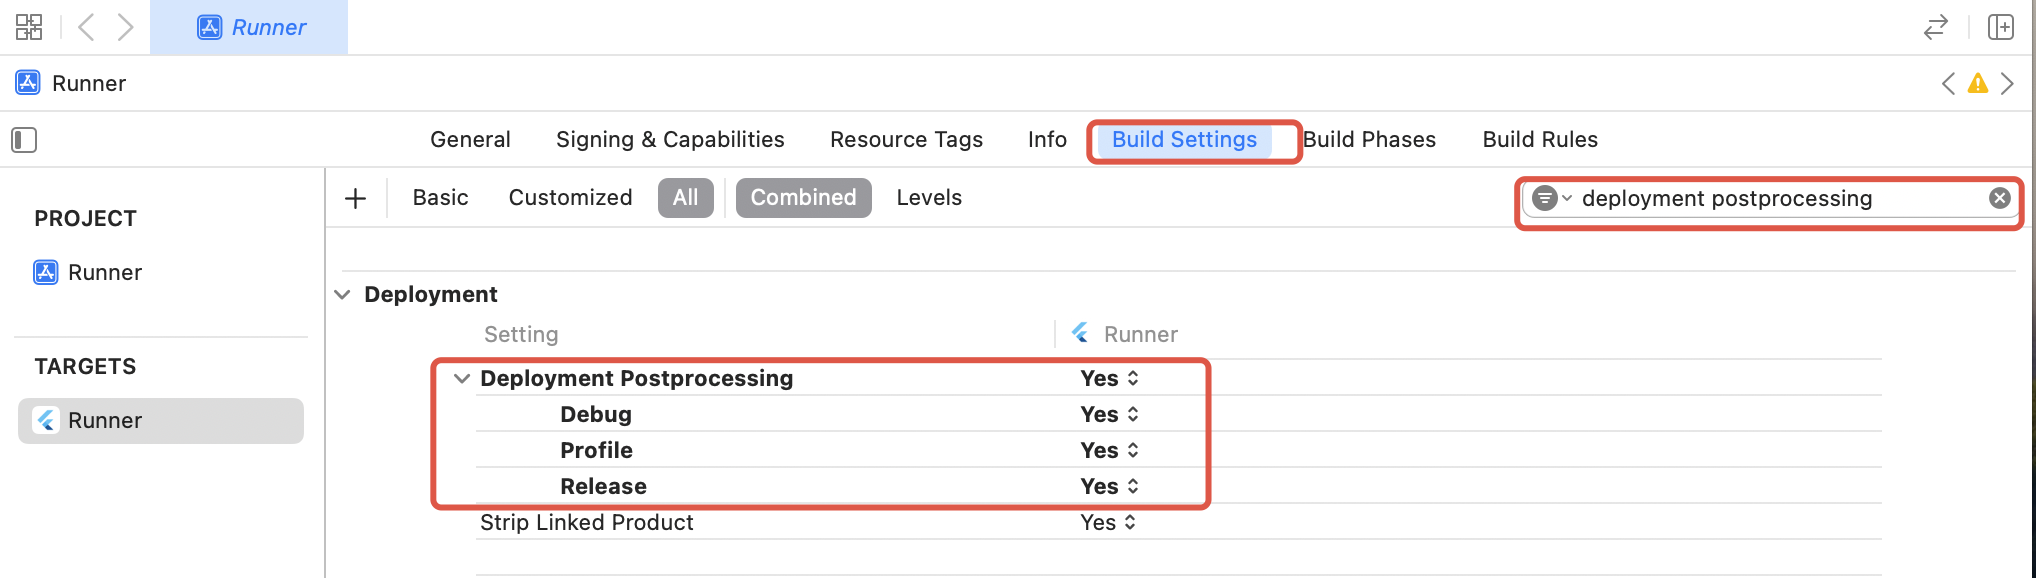
2. Set Strip Style for Release to Non-Global Symbols.
Flutter Initialization & Login Process
Initialize CallStore and log in the user before starting a call. CallStore will sync user info automatically and enter the ready state after a successful login. See flowchart and sample code:
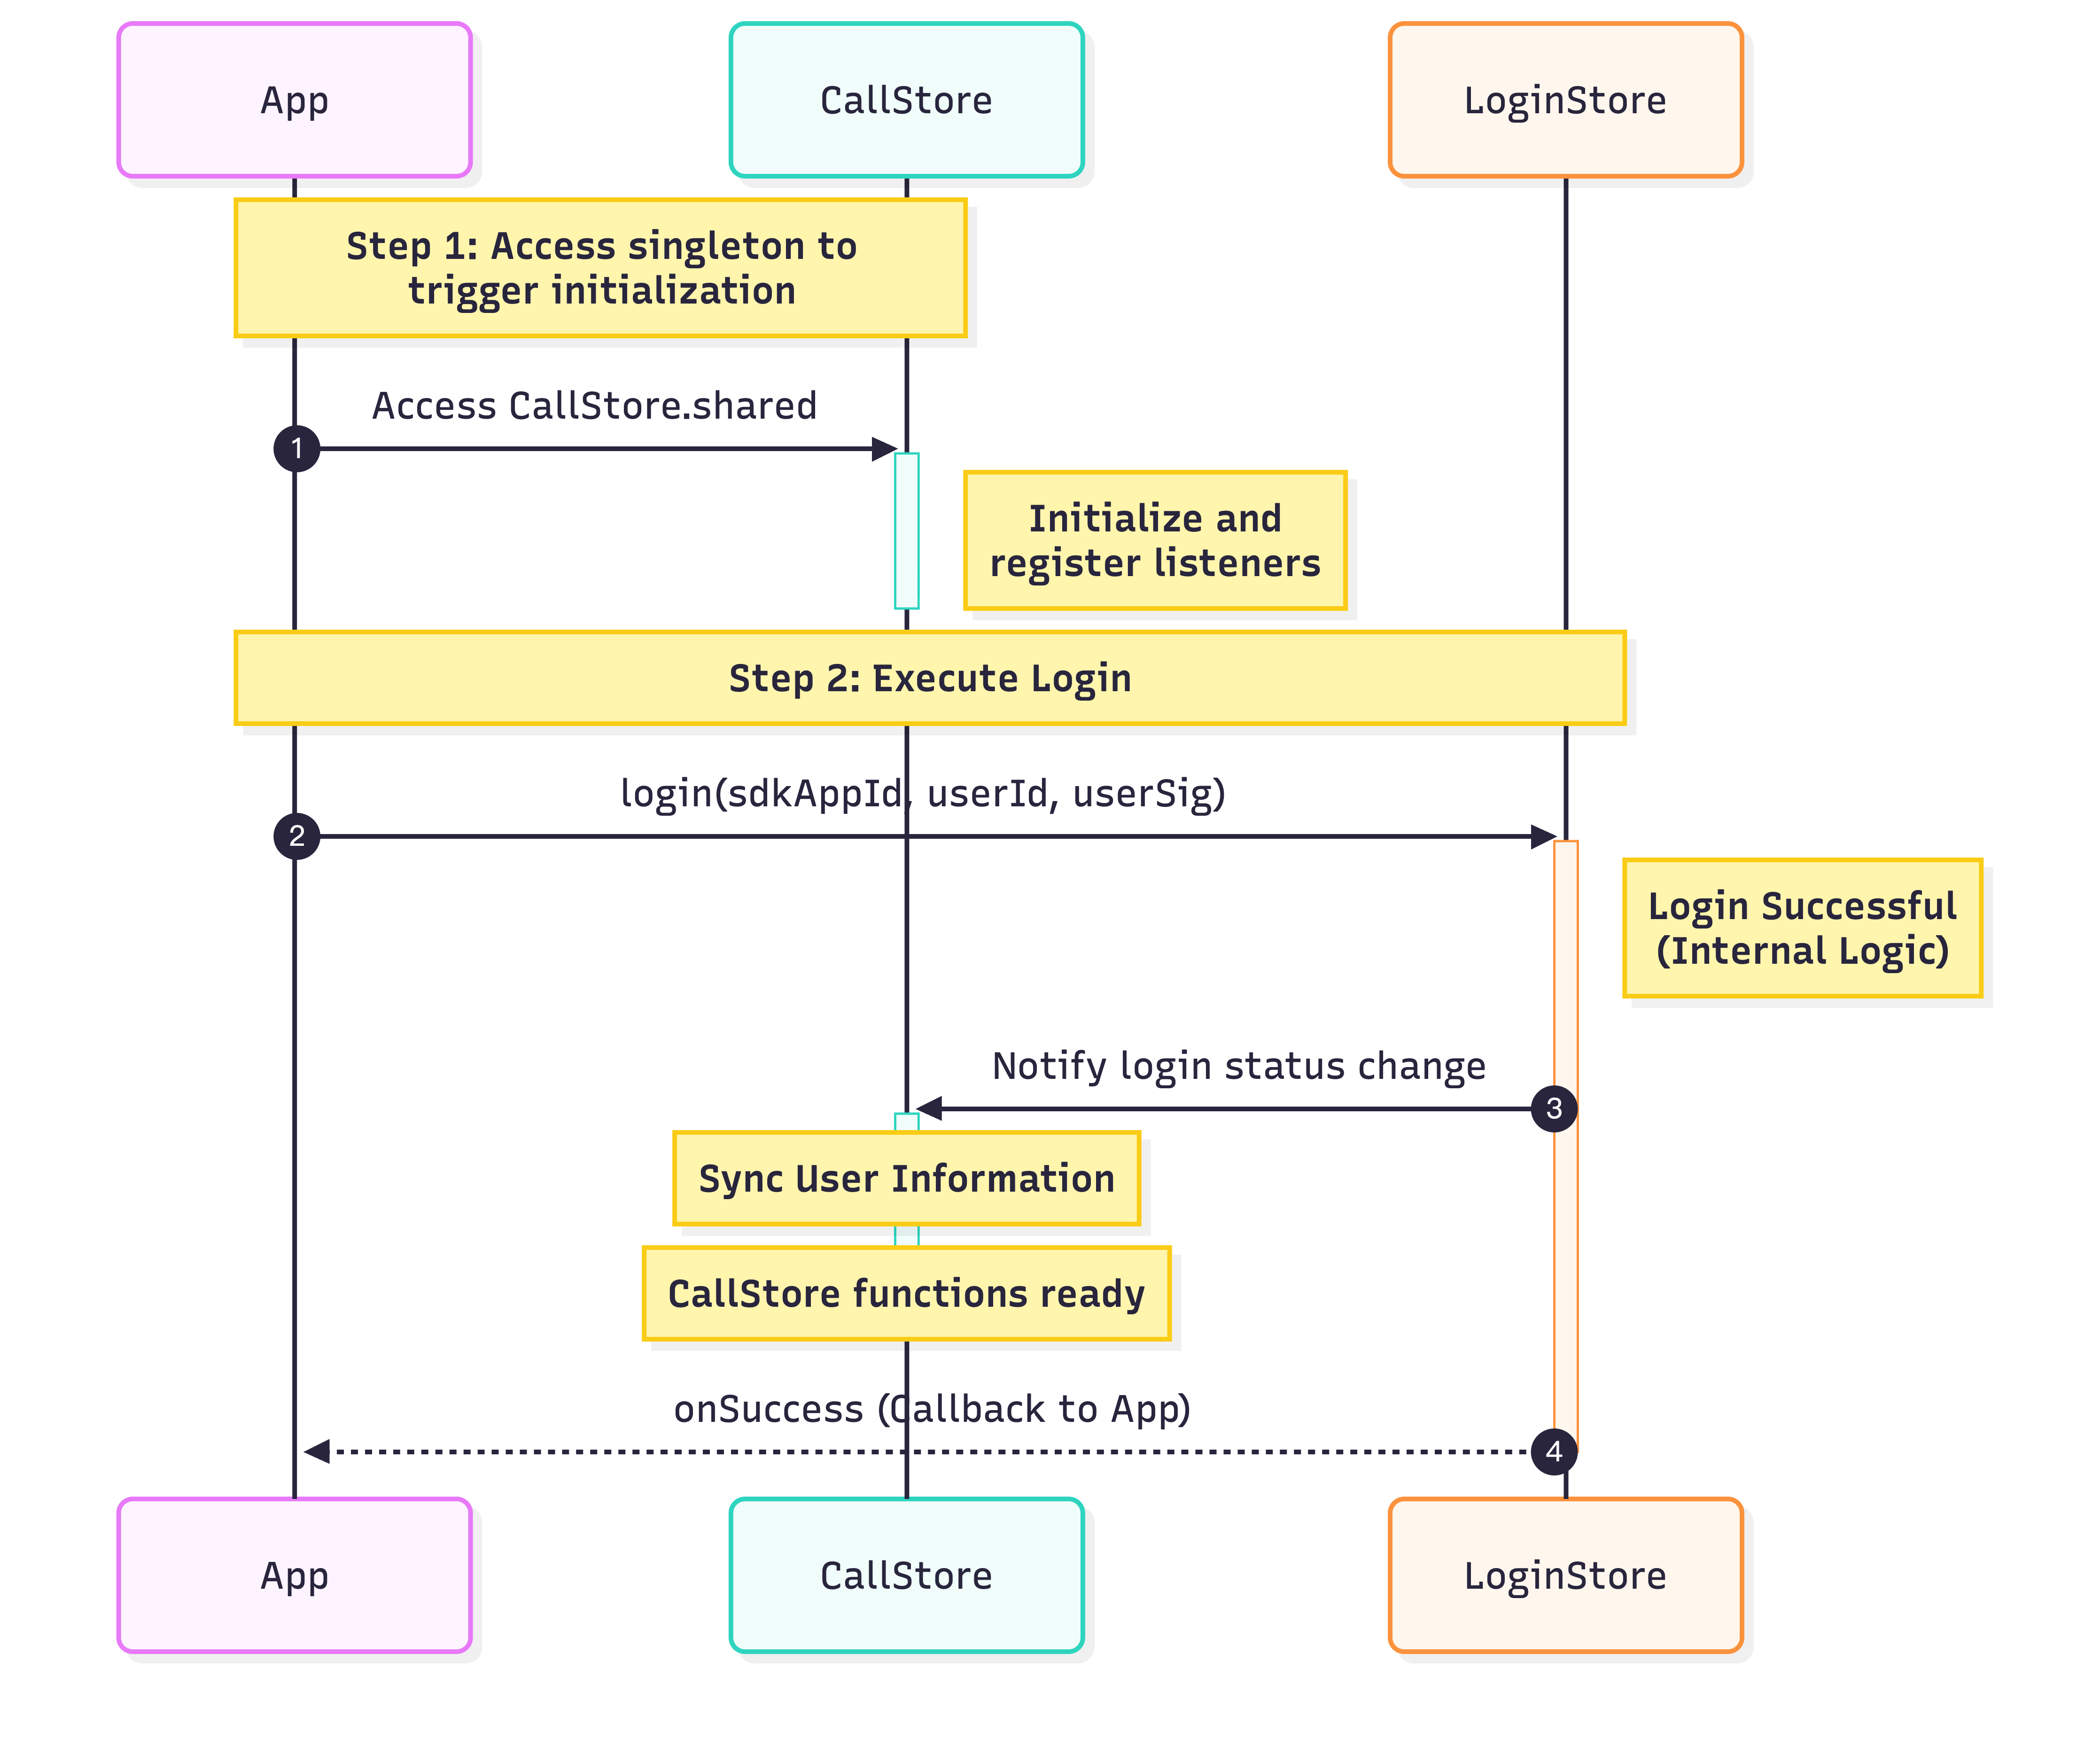
import 'package:atomic_x_core/atomicxcore.dart';import 'package:rtc_room_engine/api/call/tui_call_engine.dart';Future<void> _login() async {int sdkAppId = 1400000001; // Enter your SDKAppIDString userId = 'test_001'; // Enter your UserIDString userSig = 'xxxxxxxxxxx'; // Enter your UserSigCallStore.shared;final result = await LoginStore.shared.login(sdkAppId, userId, userSig);TUICallEngine.instance.init(sdkAppId, userId, userSig);if (result.isSuccess) {// Login successfuldebugPrint('login success');} else {// Login faileddebugPrint('login failed, code: ${result.code}, message: ${result.message}');}}
Parameter | Type | Description |
userId | String | Unique identifier for the current user; use only letters, numbers, hyphens, and underscores. Avoid simple IDs like 1 or 123 to prevent multi-device login conflicts. |
sdkAppId | int | |
userSig | String | Authentication token for TRTC. Development: Generate userSig locally using GenerateTestUserSig.genTestUserSig or with the UserSig Assistant Tool for temporary use. Production: Always generate userSig on your server to protect your secret key. See Server-side UserSig generation. |
Implementation Steps
Make sure you have logged in before initiating a call. Service is unavailable until login is complete. Follow these 5 steps to implement the "make a call" feature.
Step 1: Create the Call Interface
You need a dedicated call page to display when a call is active.
1. Create the call page: Implement a
StatefulWidget for your call host page, which will be used for navigation on incoming calls.2. Add CallCoreView to the call page: CallCoreView takes a
controller parameter, observes CallStore data, and automatically adjusts the layout for 1v1 or multi-party calls.import 'package:flutter/material.dart';import 'package:atomic_x_core/atomicxcore.dart';// 1. Create call page Widgetclass CallPage extends StatefulWidget {const CallPage({super.key});@overrideState<CallPage> createState() => _CallPageState();}class _CallPageState extends State<CallPage> {late CallCoreController controller;@overridevoid initState() {super.initState();controller = CallCoreController.create();}@overrideWidget build(BuildContext context) {// 2. Use CallCoreView Widget on the call pagereturn CallCoreView(controller: controller);}}
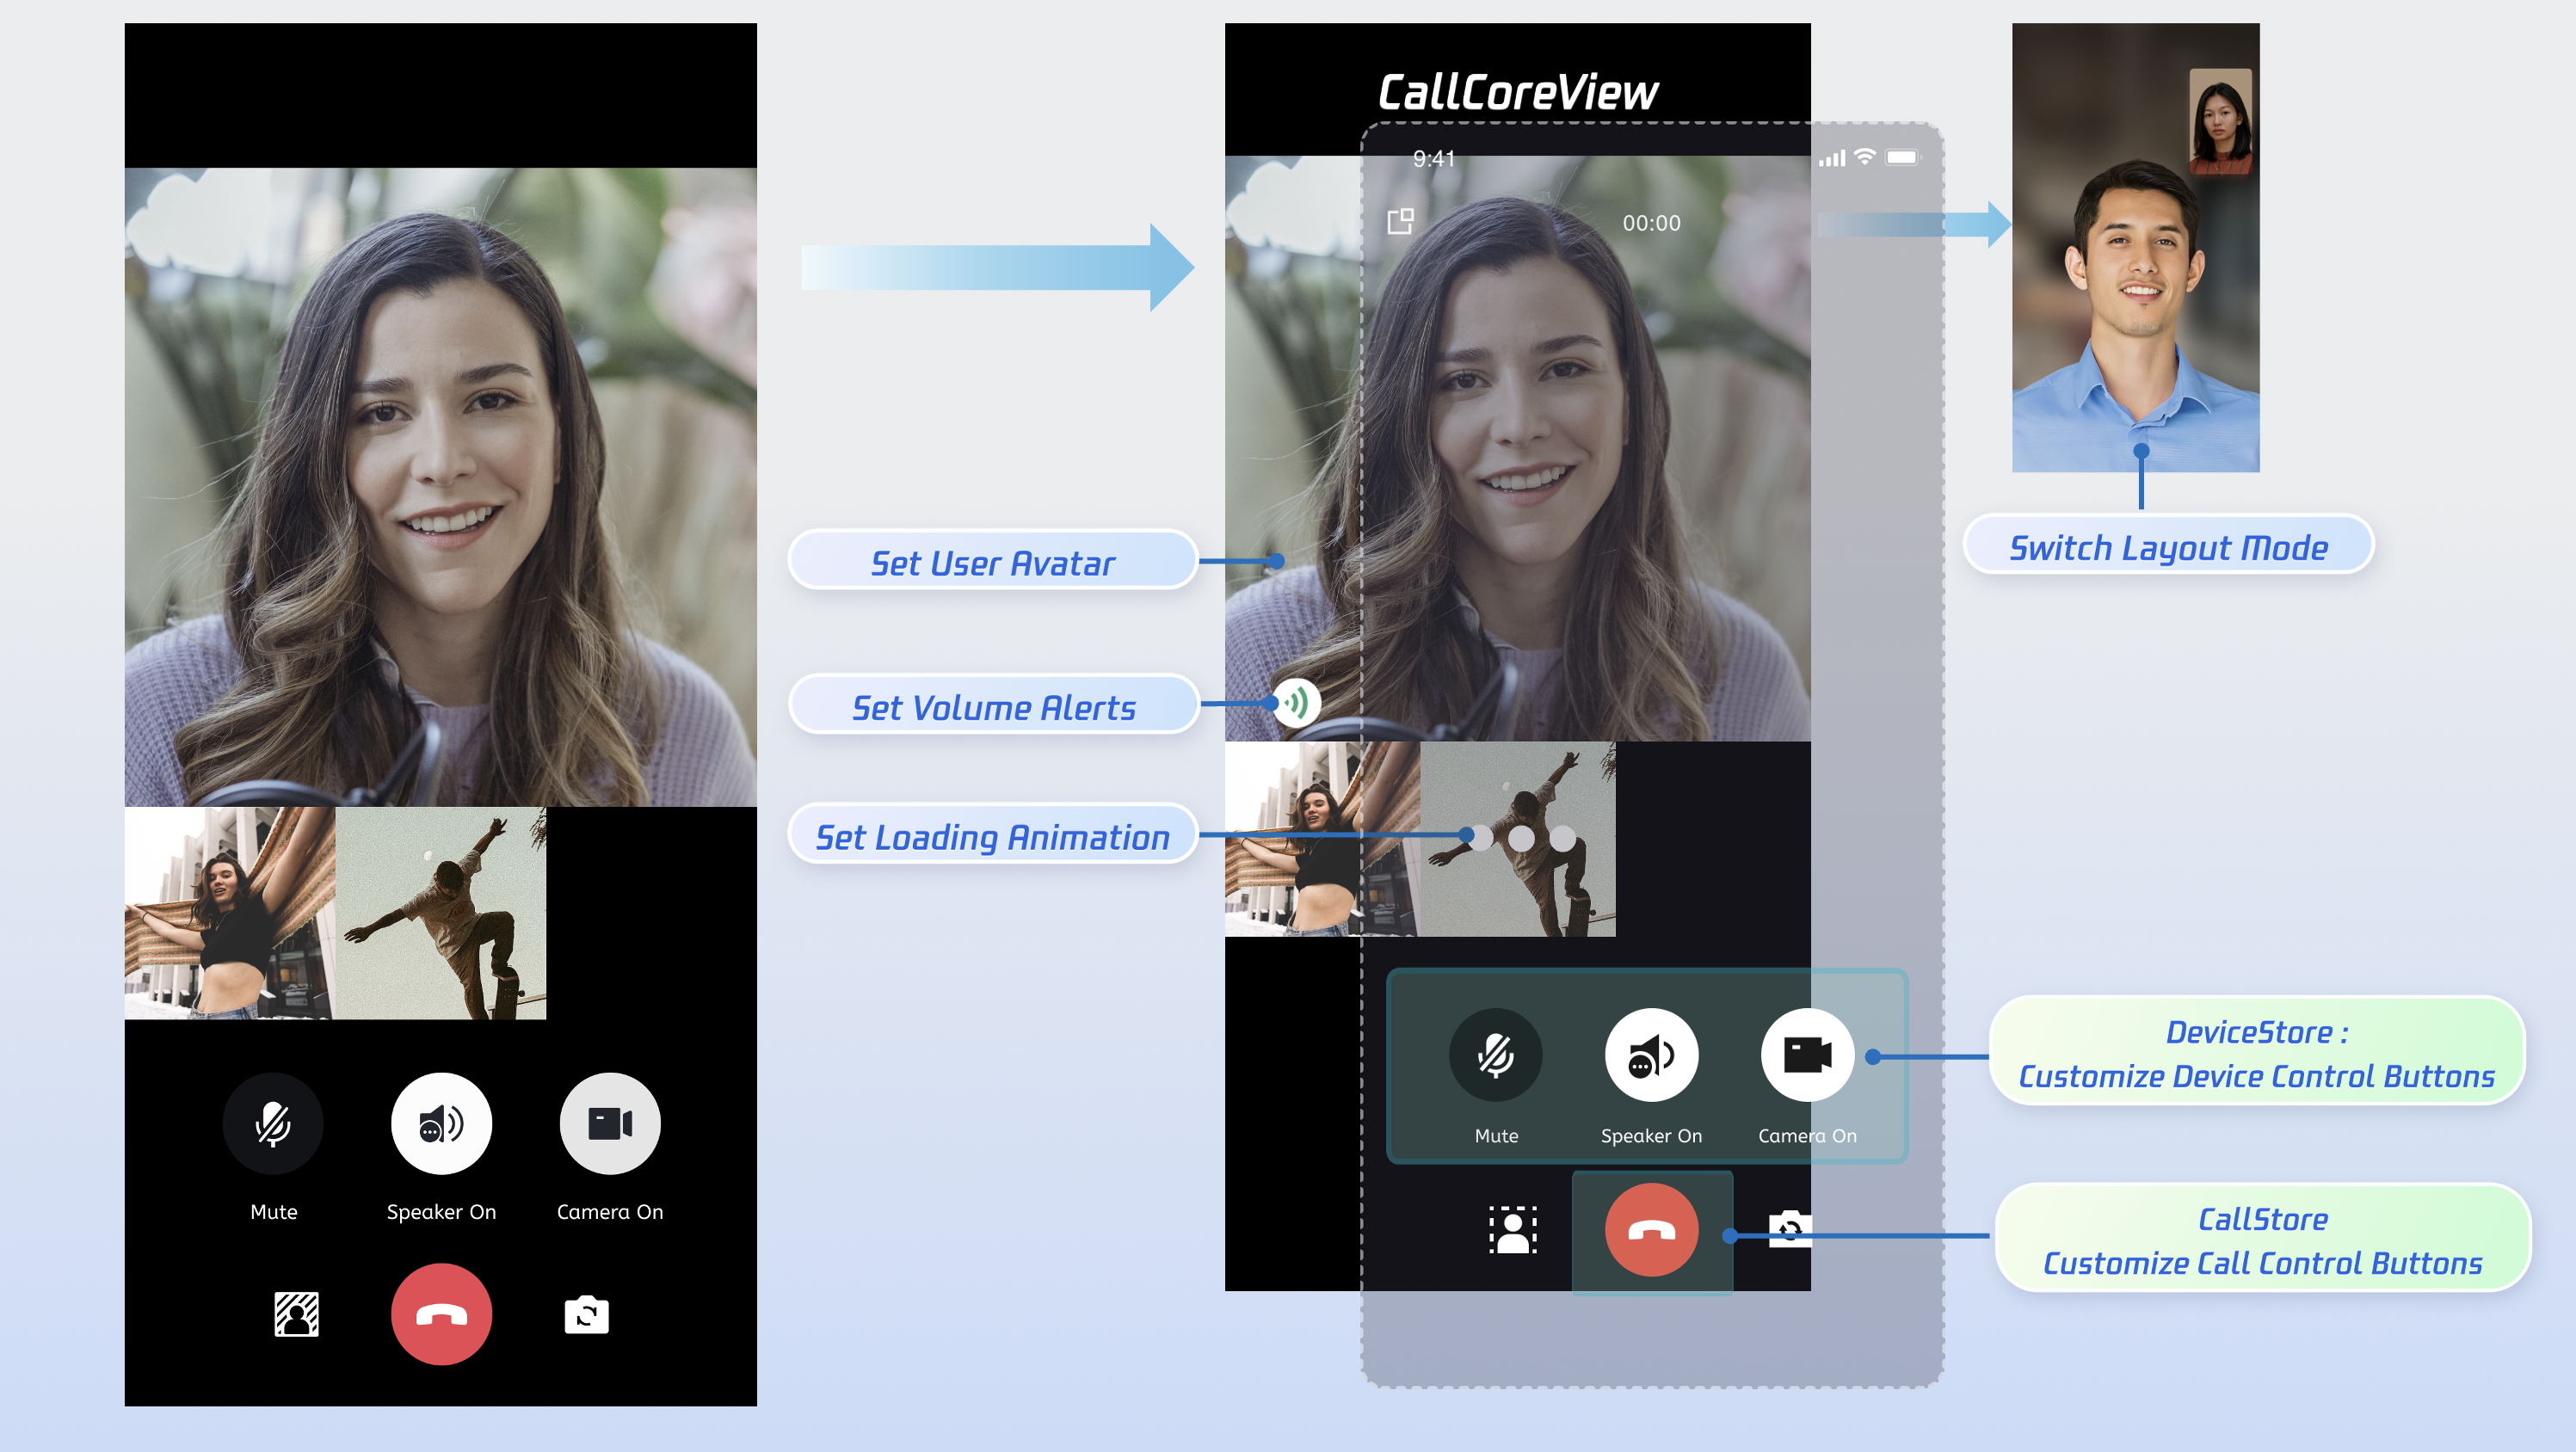
CallCoreView Widget Features:
Feature | Description | Reference |
Set layout mode | Supports dynamic layout mode switching. If not set, layout auto-adapts by participant count. | |
Set avatar | Allows custom avatars for users by passing resource paths. | |
Set volume indicator icon | Custom icons for different volume levels. | |
Set network indicator icon | Custom icons for real-time network quality. | |
Set waiting animation | Displays GIF animation for users in a waiting state during multi-party calls. |
Step 2: Add Call Control Buttons
DeviceStore: Controls microphone (toggle/volume), camera (toggle/switch/quality), screen sharing, and monitors device status. Bind button actions to these methods and listen for status changes to update UI in real time.
CallStore: Handles answering, hanging up, and rejecting calls. Bind these methods to button actions and listen for call status changes to sync UI accordingly.
Button icon resources: Download the TUICallKit button icons from GitHub. These are copyright-free.
Icons: |  |  |  |  |  |  |  |  |
Download links: |
Example: Adding hang up, microphone, and camera buttons
1. Create a container for control buttons: Place hang up, microphone, and camera buttons at the bottom of your call page.
import 'package:flutter/material.dart';import 'package:atomic_x_core/atomicxcore.dart';// Bottom control button container Widgetclass ControlsContainer extends StatelessWidget {const ControlsContainer({super.key});@overrideWidget build(BuildContext context) {return Row(mainAxisAlignment: MainAxisAlignment.spaceEvenly,children: [// Add control buttons here],);}}
2. Add hang up button: Call
hangup to end the call and close the page.import 'package:atomic_x_core/atomicxcore.dart';import 'package:flutter/material.dart';// Hang up button WidgetWidget buildHangupButton() {return GestureDetector(onTap: () {// Call hangup API to end the callCallStore.shared.hangup();},child: Container(width: 60,height: 60,decoration: const BoxDecoration(color: Colors.red,shape: BoxShape.circle,),child: const Icon(Icons.call_end,color: Colors.white,size: 30,),),);}
3. Add microphone toggle button: Use
openLocalMicrophone and closeLocalMicrophone to toggle the mic.import 'package:atomic_x_core/atomicxcore.dart';import 'package:flutter/material.dart';// Microphone toggle button Widget// Use ValueListenableBuilder to listen for microphone status changesWidget buildMicrophoneButton() {return ValueListenableBuilder(valueListenable: DeviceStore.shared.state.microphoneStatus,builder: (context, status, child) {final isOn = status == DeviceStatus.on;return GestureDetector(onTap: () {// Toggle microphone based on current statusif (isOn) {DeviceStore.shared.closeLocalMicrophone();} else {DeviceStore.shared.openLocalMicrophone();}},child: Container(width: 60,height: 60,decoration: BoxDecoration(color: Colors.white.withOpacity(0.2),shape: BoxShape.circle,),child: Icon(isOn ? Icons.mic : Icons.mic_off,color: Colors.white,size: 30,),),);},);}
4. Add camera toggle button: Use
openLocalCamera and closeLocalCamera to toggle the camera.import 'package:atomic_x_core/atomicxcore.dart';import 'package:flutter/material.dart';// Camera toggle button Widget// Use ValueListenableBuilder to listen for camera status changesWidget buildCameraButton() {return ValueListenableBuilder(valueListenable: DeviceStore.shared.state.cameraStatus,builder: (context, status, child) {final isOn = status == DeviceStatus.on;return GestureDetector(onTap: () {// Toggle camera based on current statusif (isOn) {DeviceStore.shared.closeLocalCamera();} else {final isFrontCamera = DeviceStore.shared.state.isFrontCamera.value;DeviceStore.shared.openLocalCamera(isFrontCamera);}},child: Container(width: 60,height: 60,decoration: BoxDecoration(color: Colors.white.withOpacity(0.2),shape: BoxShape.circle,),child: Icon(isOn ? Icons.videocam : Icons.videocam_off,color: Colors.white,size: 30,),),);},);}
5. Update device button status in real time: Use
ValueListenableBuilder to react to device status changes.import 'package:atomic_x_core/atomicxcore.dart';import 'package:flutter/material.dart';// In Flutter, use ValueListenableBuilder for reactive state updates// When DeviceStore state changes, UI rebuilds automaticallyWidget buildDeviceControlButtons() {return Row(mainAxisAlignment: MainAxisAlignment.spaceEvenly,children: [// Microphone button - reacts to microphoneStatus changesValueListenableBuilder(valueListenable: DeviceStore.shared.state.microphoneStatus,builder: (context, status, _) {final isOn = status == DeviceStatus.on;return Text(isOn ? 'Turn off microphone' : 'Turn on microphone');},),// Camera button - reacts to cameraStatus changesValueListenableBuilder(valueListenable: DeviceStore.shared.state.cameraStatus,builder: (context, status, _) {final isOn = status == DeviceStatus.on;return Text(isOn ? 'Turn off camera' : 'Turn on camera');},),],);}
Step 3: Request Microphone/Camera Permissions
Check for audio/video permissions before starting a call. If permissions are missing, prompt users to grant them.
1. Declare permissions for Android in
AndroidManifest.xml:<manifest xmlns:android="http://schemas.android.com/apk/res/android"><!-- Microphone permission --><uses-permission android:name="android.permission.RECORD_AUDIO" /><!-- Camera permission --><uses-permission android:name="android.permission.CAMERA" /></manifest>
2. Declare permissions for iOS in
Info.plist:<key>NSCameraUsageDescription</key><string>CallingApp needs access to your camera. Video recording requires camera permission.</string><key>NSMicrophoneUsageDescription</key><string>CallingApp needs access to your microphone. Video recording requires microphone permission.</string>
3. Request permissions dynamically: Use the
permission_handler plugin for runtime permission requests.flutter pub add permission_handler
import 'package:permission_handler/permission_handler.dart';// Request audio/video permissionsFuture<bool> requestCallPermissions() async {// Request microphone and camera permissionsMap<Permission, PermissionStatus> statuses = await [Permission.microphone,Permission.camera,].request();// Check permission statusbool micGranted = statuses[Permission.microphone]?.isGranted ?? false;bool cameraGranted = statuses[Permission.camera]?.isGranted ?? false;if (micGranted && cameraGranted) {// Permissions grantedreturn true;} else {// Some permissions denied, prompt user to enablereturn false;}}
Step 4: Initiate a Call
After calling calls, navigate to the call interface. Automatically enable microphone and/or camera based on the chosen media type.
1. Initiate the call: Call
calls to start.2. Enable media devices: After calling, enable the microphone; for video calls, enable the camera as well.
3. Navigate to the call page: On success, push the call page.
import 'package:atomic_x_core/atomicxcore.dart';import 'package:flutter/material.dart';// Initiate callFuture<void> startCall(List<String> userIdList, CallMediaType mediaType) async {final handler = await CallStore.shared.calls(userIdList, mediaType, null);if (handler.errorCode == 0) {// Navigate to call pageif (mounted) {Navigator.push(context,MaterialPageRoute(builder: (context) => const CallPage()),);}} else {debugPrint('Call failed: ${handler.errorCode}, ${handler.errorMessage}');}}
Parameter | Type | Required | Description |
userIdList | List | Yes | List of target users’ userId. |
mediaType | Yes | Specifies call type: audio or video. CallMediaType.video: Video callCallMediaType.audio: Audio call | |
params | No | Additional parameters: room ID, timeout, custom data, group ID, ephemeral flag. |
Step 5: End the Call
When you call hangup or the other party ends the call, the onCallEnded event fires. Listen for this event and close the call interface accordingly.
1. Listen for call end event: Subscribe to
onCallEnded.2. Destroy the call page: On event, close the call UI.
import 'package:atomic_x_core/atomicxcore.dart';import 'package:flutter/cupertino.dart';void addListener(BuildContext context) {CallEventListener listener = CallEventListener(onCallEnded: (callId, mediaType, reason, userId) {Navigator.of(context).pop();});CallStore.shared.addListener(listener);}
Parameter | Type | Description |
callId | String | Unique identifier for the call. |
mediaType | Specifies audio or video call. CallMediaType.video: VideoCallMediaType.audio: Audio | |
reason | Reason for call end: unknown: Unknownhangup: User hung upreject: Call rejectednoResponse: No answeroffline: Callee offlinelineBusy: Callee busycanceled: Caller canceledotherDeviceAccepted: Answered elsewhereotherDeviceReject: Rejected elsewhereendByServer: Ended by server | |
userId | String | User ID that triggered the end event |
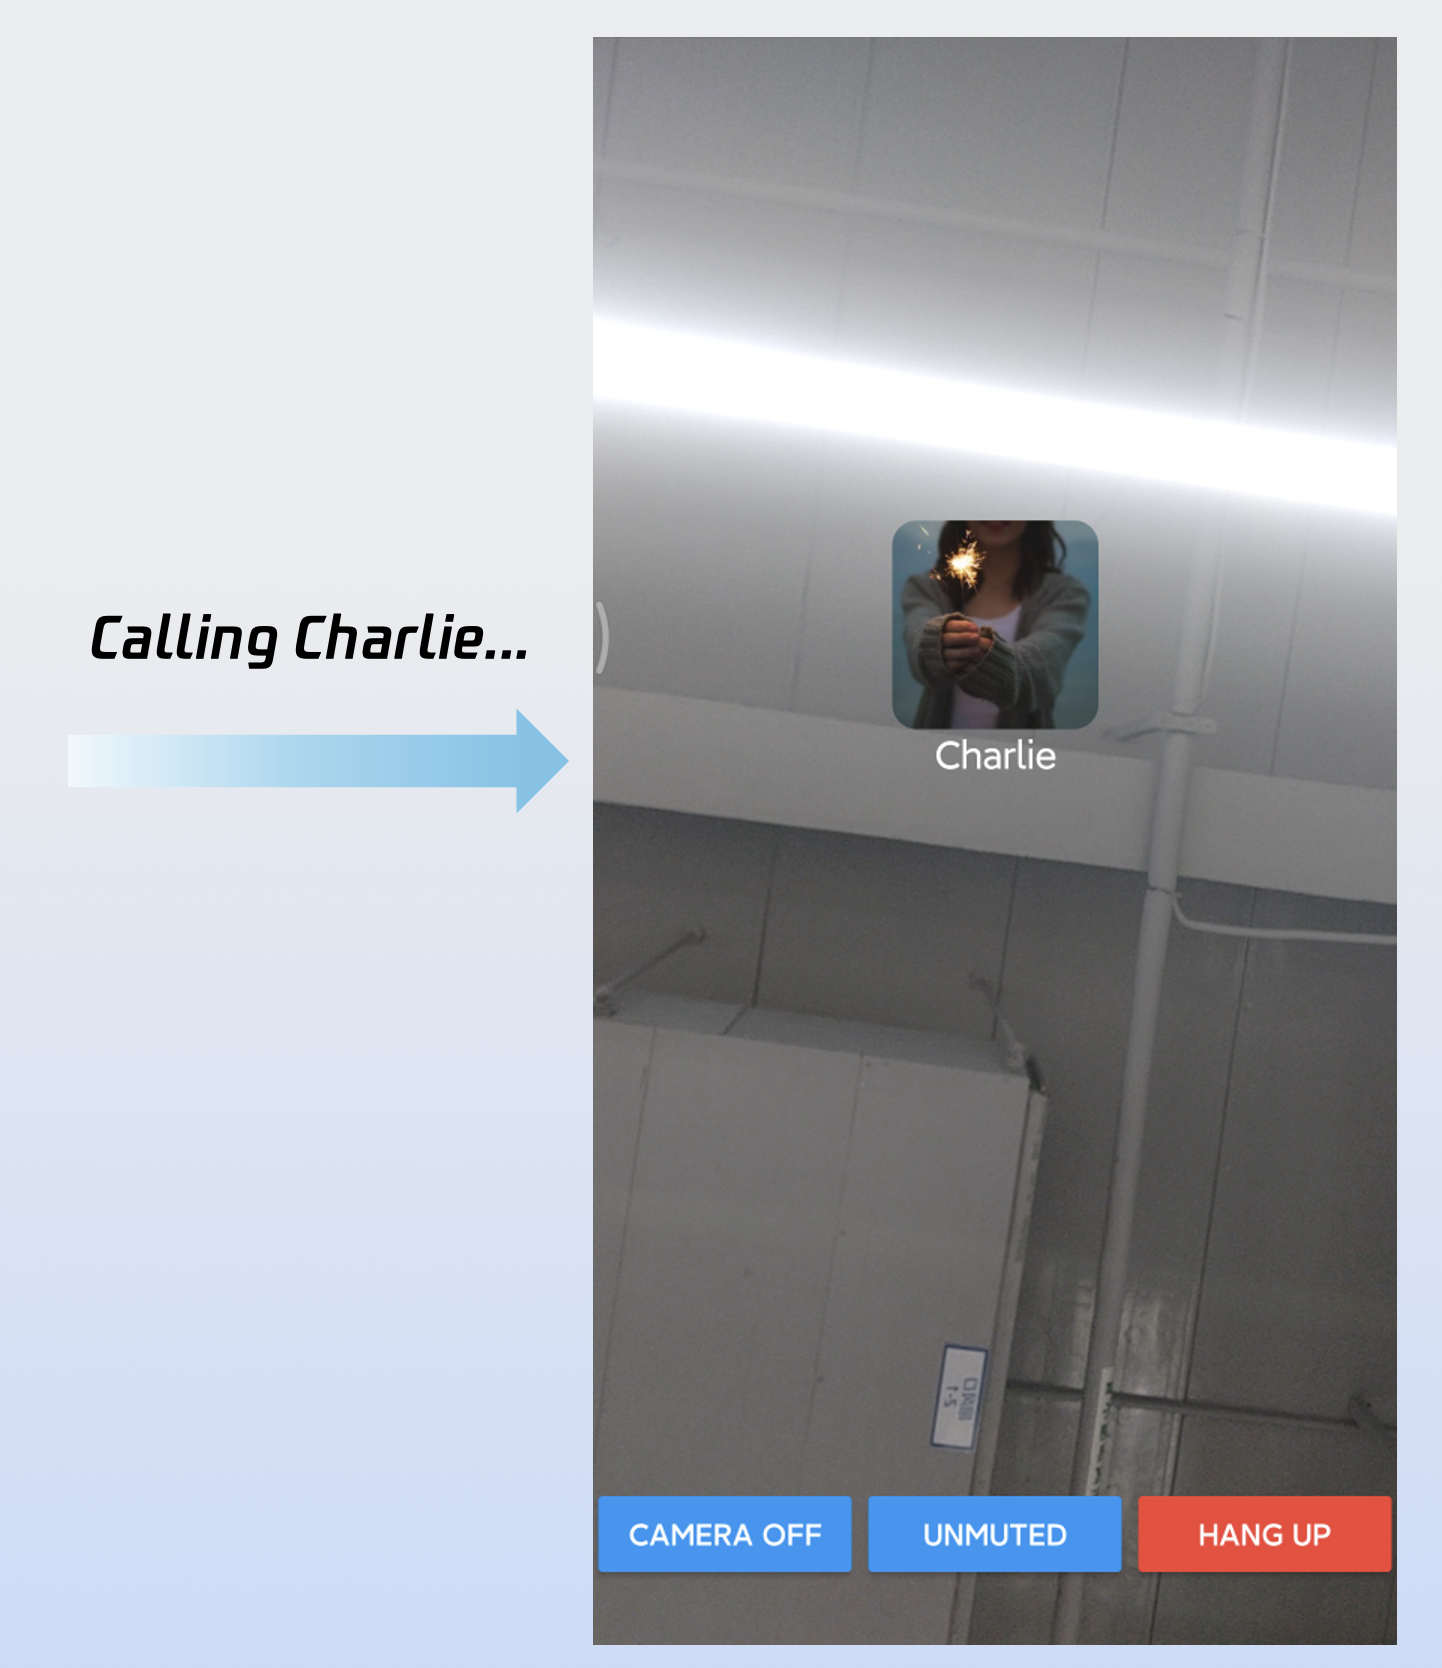
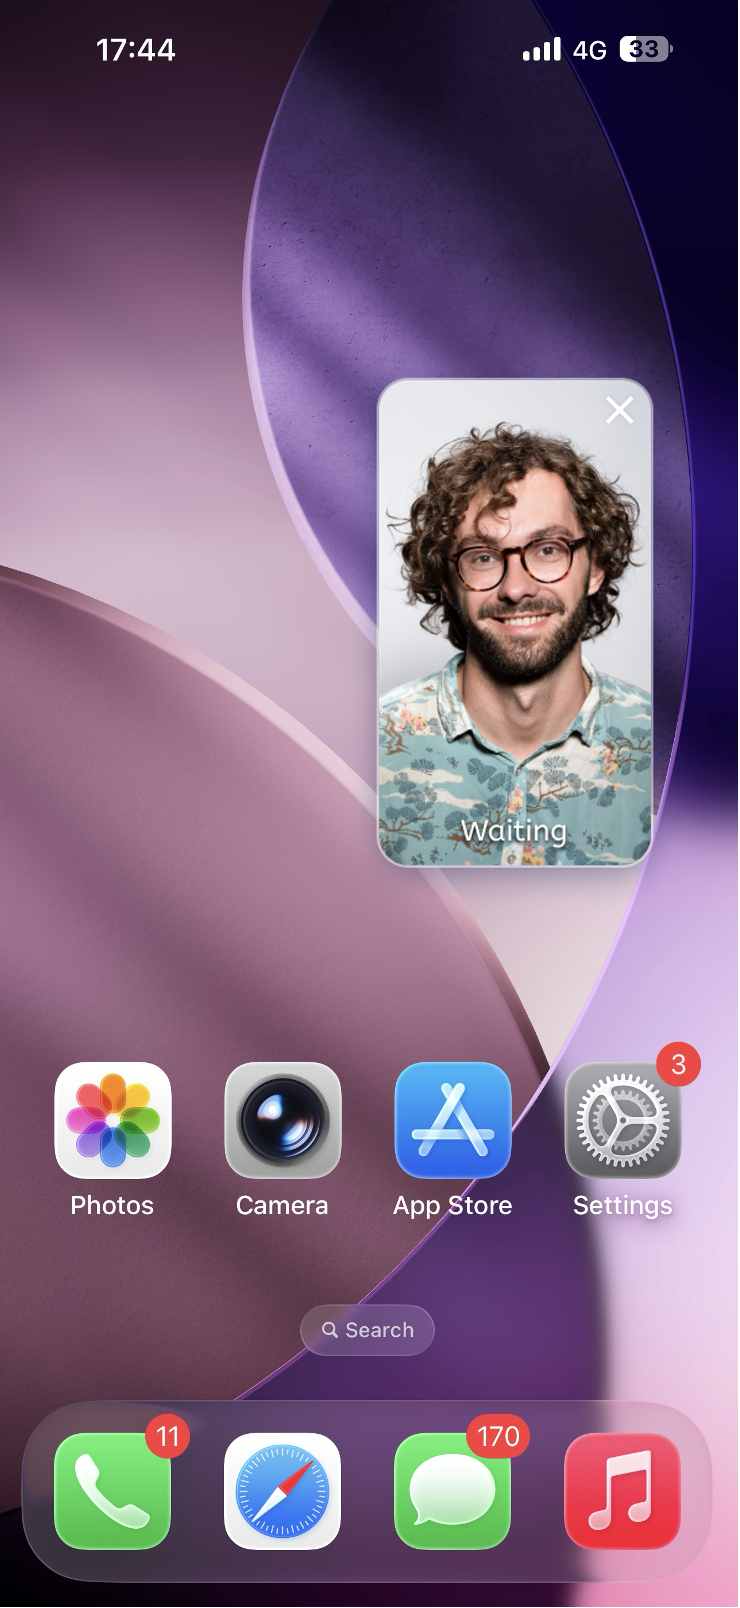
Result
After completing these 5 steps, your "make a call" feature will run as shown:
Customizing the Interface
CallCoreView supports extensive UI customization, including avatars and volume indicator icons. For fast integration, download TUICallKit icons from GitHub. All icons are copyright-free.
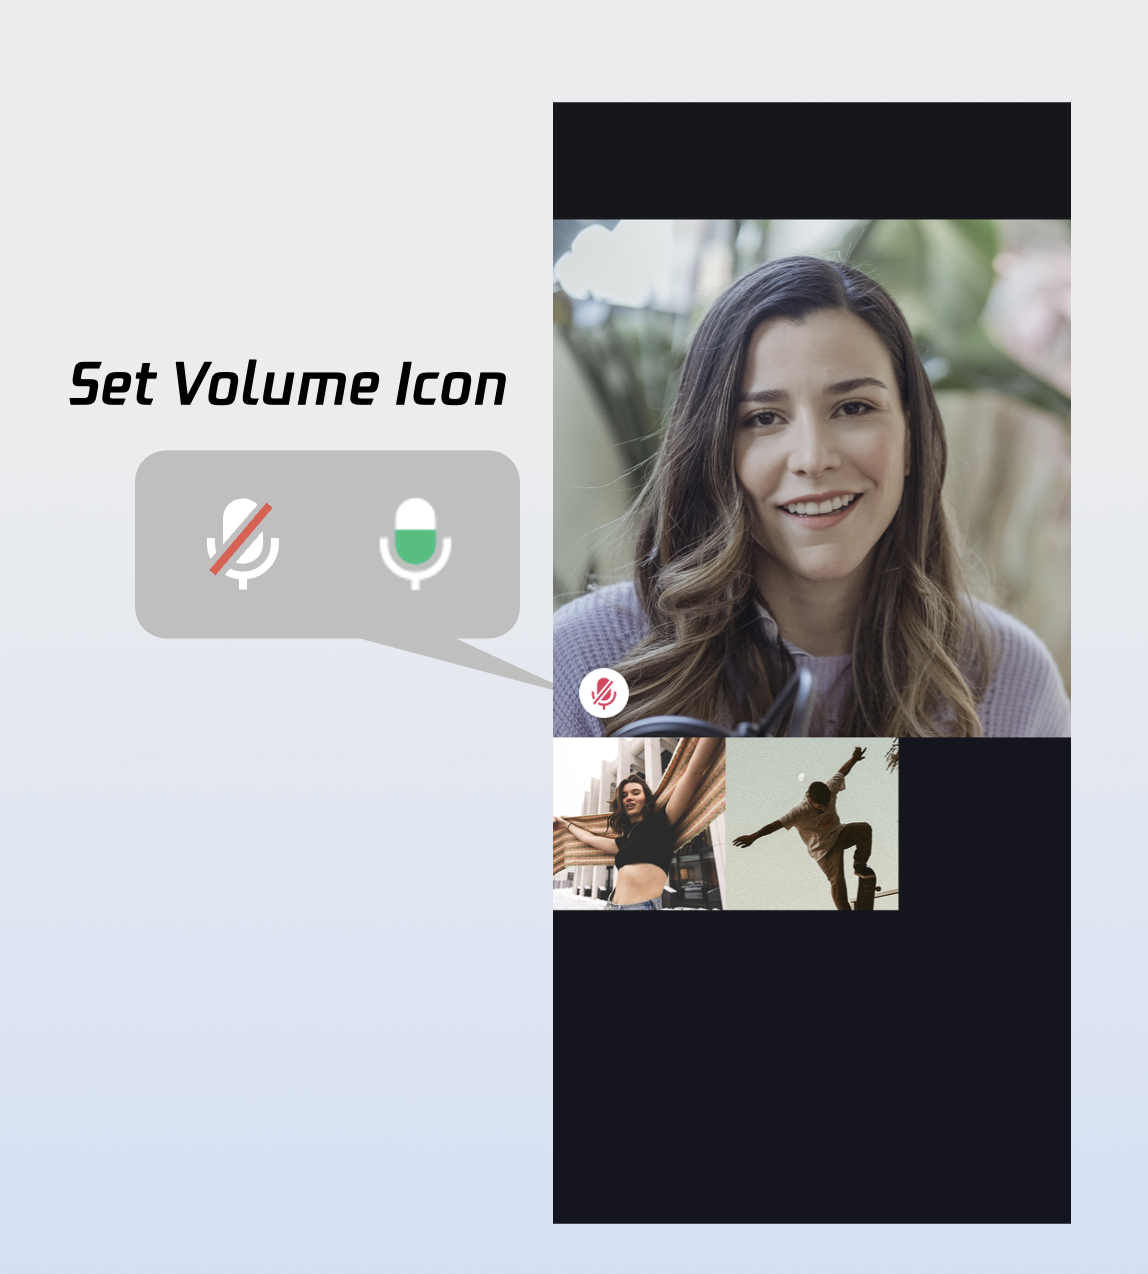
Custom Volume Indicator Icons
Sample usage:
Widget _buildCallCoreView() {Map<VolumeLevel, Image> volumeIcons = {VolumeLevel.mute : Image.asset(''), // Icon for mute};return CallCoreView(controller: CallCoreController.create(),volumeIcons: volumeIcons,);}
Parameter | Type | Required | Description |
volumeIcons | Map | No | Maps volume levels to icons. VolumeLevel.mute: MutedVolumeLevel.low: 0-25VolumeLevel.medium: 25-50VolumeLevel.high: 50-75VolumeLevel.peak: 75-100 |
Icon | Description | Download link |
 | Volume indicator icon; use for VolumeLevel.low or VolumeLevel.medium. | |
 | Mute icon; use for VolumeLevel.mute. |
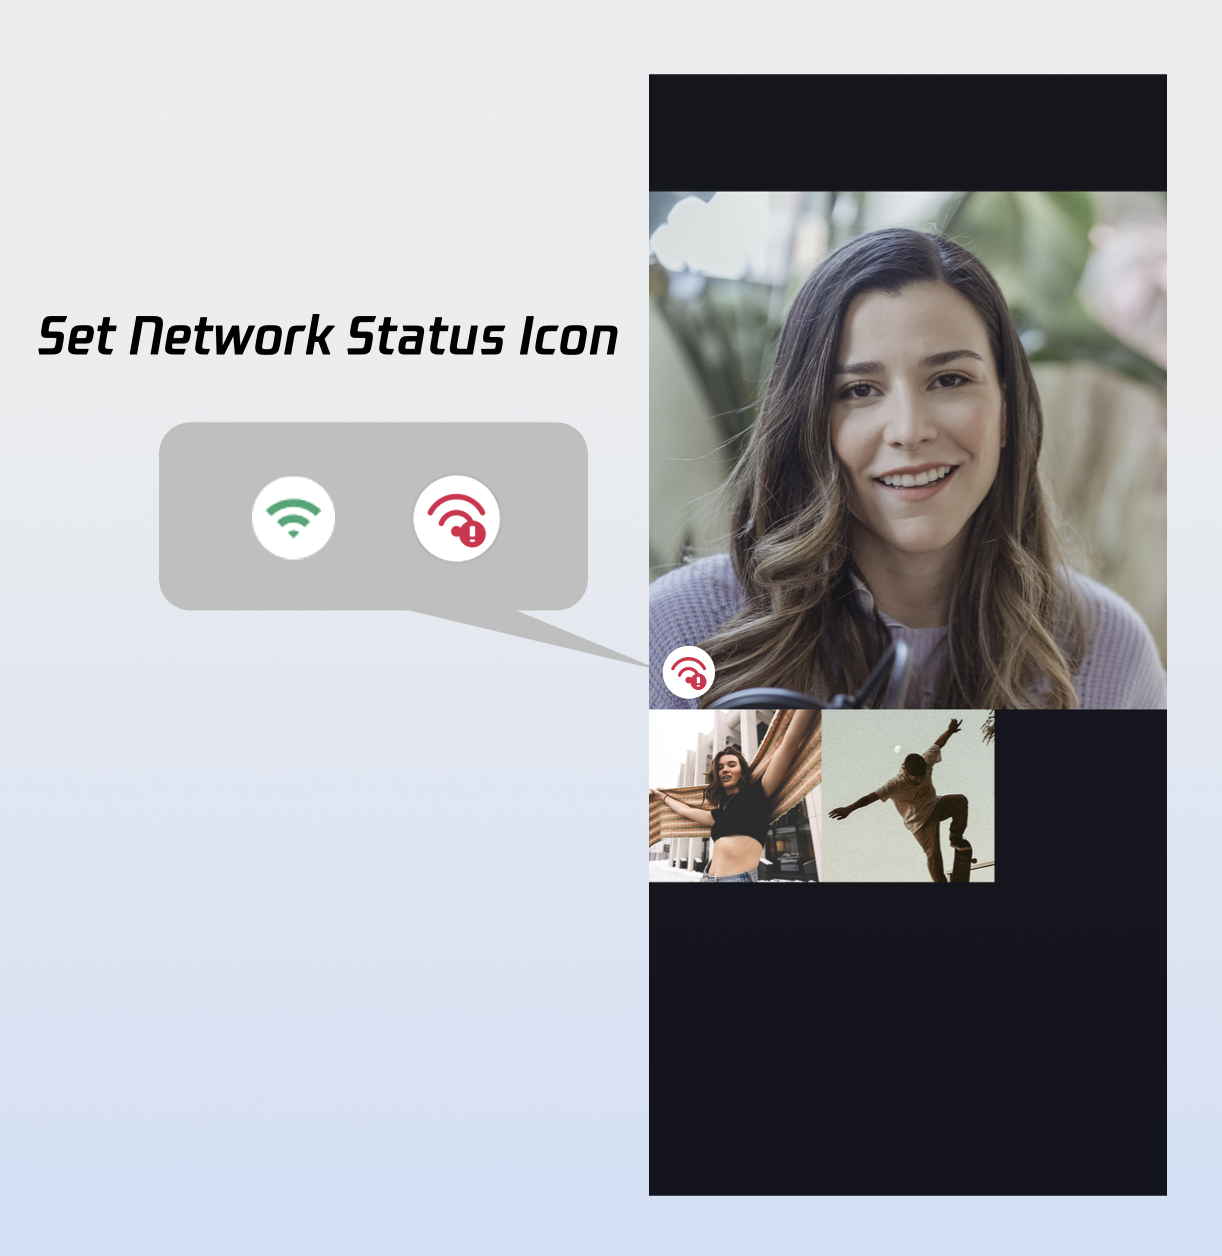
Custom Network Indicator Icons
Sample usage:
Widget _buildCallCoreView() {Map<NetworkQuality, Image> networkQualityIcons = {NetworkQuality.bad : Image.asset(''), // Icon for poor network};return CallCoreView(controller: CallCoreController.create(),networkQualityIcons: networkQualityIcons,);}
Parameter | Type | Required | Description |
networkQualityIcons | Map | No | Maps network quality to icons. Keys: NetworkQuality.unknownNetworkQuality.excellentNetworkQuality.goodNetworkQuality.poorNetworkQuality.badNetworkQuality.veryBadNetworkQuality.down |
Icon | Description | Download link |
 | Poor network indicator; use for NetworkQuality.bad, NetworkQuality.veryBad, or NetworkQuality.down. |
Custom Default Avatar
Use defaultAvatar in CallCoreView to specify a fallback user avatar. Monitor allParticipants for custom avatars; show the default avatar if none is set or loading fails.
Sample usage:
Widget _buildCallCoreView() {Image defaultAvatarImage = Image.asset(''); // Default avatar imagereturn CallCoreView(controller: CallCoreController.create(),defaultAvatar: defaultAvatarImage,);}
Parameter | Type | Required | Description |
defaultAvatar | Image | No | Default avatar image |
Icon | Description | Download link |
 | Default avatar; use as a placeholder when loading fails or no avatar is set. |
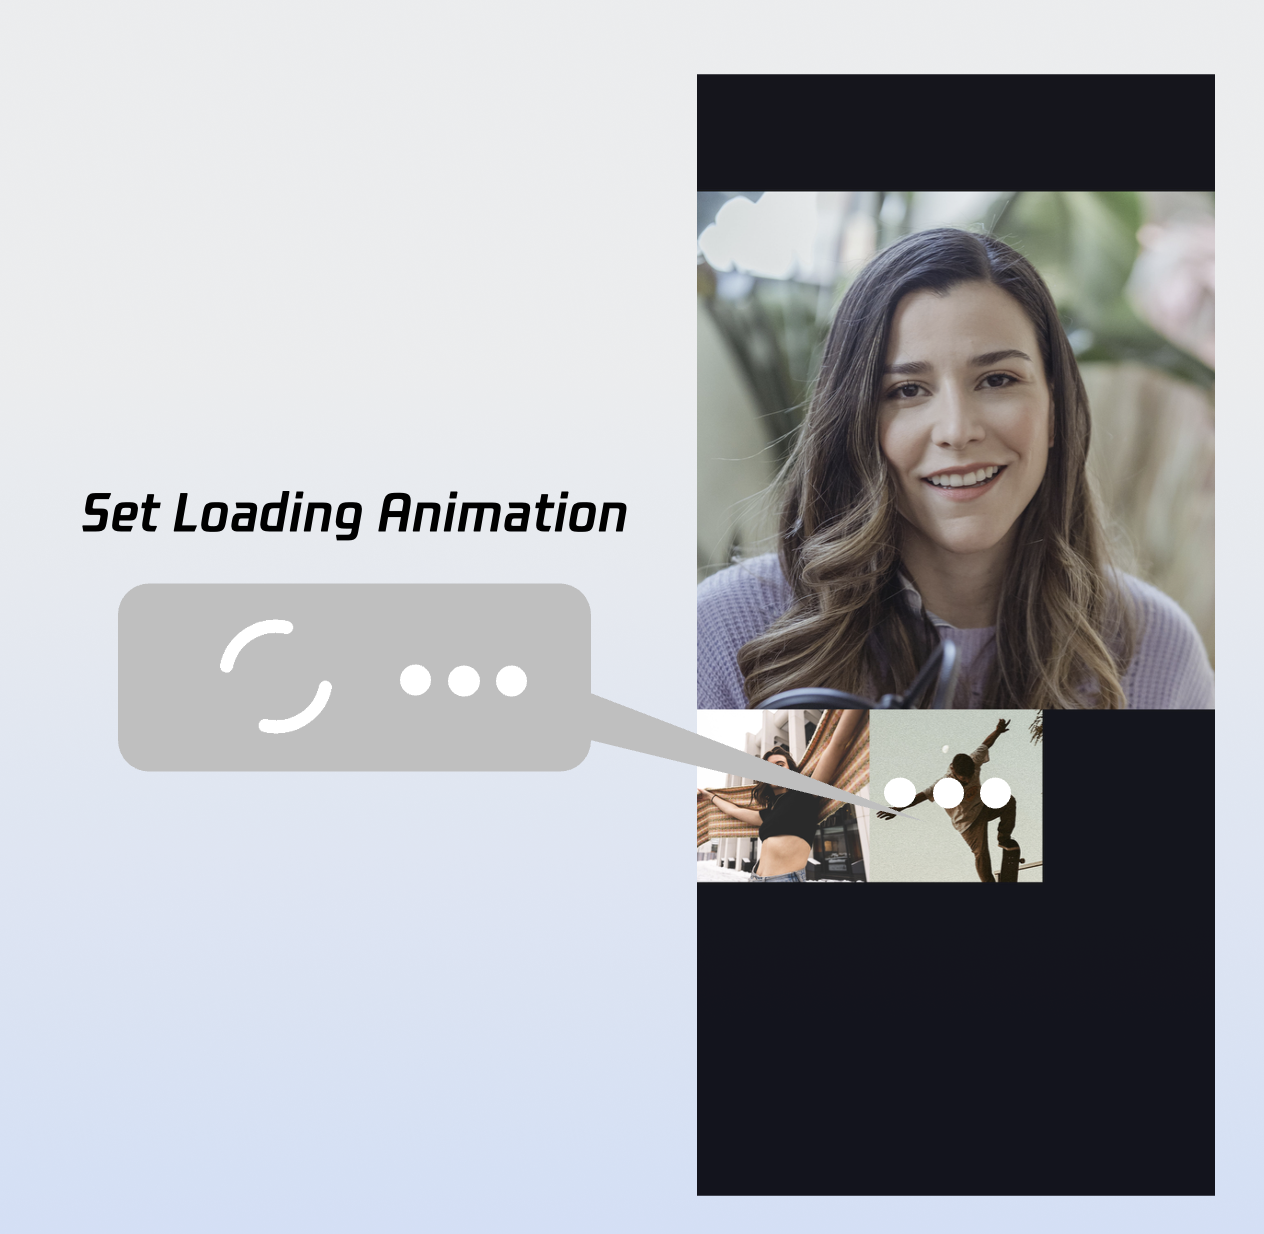
Custom Loading Animation
Sample usage:
Widget _buildCallCoreView() {Image loading = Image.asset(''); // Loading animation resourcereturn CallCoreView(controller: CallCoreController.create(),loadingAnimation: loading,);}
Parameter | Type | Required | Description |
loadingAnimation | Image | No | GIF animation resource for waiting state |
Icon | Description | Download link |
 | Waiting animation; use for group calls to indicate users in waiting state. |
Add Call Duration Indicator
1. Subscribe to call data: Listen to
CallStore.shared.state.activeCall for updates.2. Bind duration to UI: Use the
activeCall.duration field in your widget. This value updates reactively—no timer needed.import 'package:atomic_x_core/atomicxcore.dart';import 'package:flutter/material.dart';class TimerWidget extends StatelessWidget {final double? fontSize;final FontWeight? fontWeight;const TimerWidget({super.key,this.fontSize,this.fontWeight,});@overrideWidget build(BuildContext context) {return ValueListenableBuilder(valueListenable: CallStore.shared.state.selfInfo,builder: (context, info, child) {if (info.status == CallParticipantStatus.accept) {return ValueListenableBuilder(valueListenable: CallStore.shared.state.activeCall,builder: (context, activeCall, child) {return Text(formatDuration(activeCall.duration.toInt()),style: TextStyle(fontSize: fontSize,fontWeight: fontWeight,),);},);} else {return Container();}});}String formatDuration(int timeCount) {int hour = timeCount ~/ 3600;int minute = (timeCount % 3600) ~/ 60;String minuteShow = minute <= 9 ? "0$minute" : "$minute";int second = timeCount % 60;String secondShow = second <= 9 ? "0$second" : "$second";if (hour > 0) {String hourShow = hour <= 9 ? "0$hour" : "$hour";return '$hourShow:$minuteShow:$secondShow';} else {return '$minuteShow:$secondShow';}}}
Note :
More Features
Set Avatar and Nickname
UserProfile profile = UserProfile(userID: "", // Your UserIdavatarURL: "", // Avatar URLnickname: "", // Nickname to set);CompletionHandler result = await LoginStore.shared.setSelfInfo(userInfo: profile);if (result.errorCode == 0) {print("setSelfInfo success");} else {print("setSelfInfo failed");}
Parameter | Type | Required | Description |
userProfile | Yes | userID: User IDavatarURL: Avatar URLnickname: Nickname | |
completion | CompletionHandler | No | Callback returns result of set operation |
Switch Layout Modes
Switch layouts flexibly using setLayoutTemplate. If not set, CallCoreView adapts automatically: 1v1 defaults to
Float, group calls use Grid.Float Mode | Grid Mode | PIP Mode |
 |  |  |
Layout: Full screen self-view while waiting; after connecting, full screen remote view with self-view as a floating window. Interaction: Floating window supports drag and click-to-swap with the main view. | Layout: Grid layout for all participants, suitable for 2+ users. Supports click-to-enlarge. Interaction: Click any participant's view to enlarge. | Layout: 1v1 shows fixed remote view; multi-party uses active speaker strategy with full screen for the current speaker. Interaction: Waiting state shows self-view; after connecting, call duration is displayed. |
Sample usage:
CallCoreController controller = CallCoreController.create();CallLayoutTemplate template = CallLayoutTemplate.float;controller.setLayoutTemplate(template);
Parameter | Type | Required | Description |
template | Yes | Layout mode: float: Waiting is self full screen, answered is remote full screen/self floating window.grid: All participants tiled.pip: 1v1 always remote, group uses Active Speaker. |
Set Default Call Timeout
void startCall(List<String> userIdList, CallMediaType mediaType) {CallParams params = CallParams(timeout: 30, // Set call waiting timeout);CallStore.shared.calls(userIdList, mediaType, params);}
Parameter | Type | Required | Description |
userIdList | List | Yes | List of target userIds. |
mediaType | Yes | Specifies call type: audio or video. | |
params | No | Additional options: room ID, timeout, custom data, group ID, ephemeral flag. |
Implement In-App Floating Window
When the call interface is covered (e.g., by navigation), display an in-app floating window that shows key call status (such as duration and participant info) and provides one-tap return to the full call view.
_buildPipWindowWidget() {final pipWidth = MediaQuery.of(context).size.width;final pipHeight = MediaQuery.of(context).size.height;final scale = pipWidth / originWidth;CallCoreController controller = CallCoreController.create();controller.setLayoutTemplate(CallLayoutTemplate.pip);return Scaffold(body: SizedBox(width: pipWidth,height: pipHeight,child: Container(width: pipWidth,height: pipHeight,decoration: const BoxDecoration(color: Colors.transparent),child: MediaQuery(data: MediaQuery.of(context).copyWith(size: Size(originWidth ?? pipWidth, originHeight ?? pipHeight)),child: ClipRect(child: Transform.scale(scale: scale,alignment: Alignment.center,child: OverflowBox(maxWidth: originWidth,maxHeight: originHeight,alignment: Alignment.center,child: CallCoreView(controller: controller,),),),),),),),);}
Implement Android Picture-in-Picture Outside App
Picture-in-Picture requires Android 8.0 (API 26) or above.
1. MainActivity configuration: Listen for lifecycle changes and enter PiP when needed.
import android.app.PictureInPictureParamsimport android.content.pm.PackageManagerimport android.os.Buildimport android.util.Logimport android.util.Rationalimport io.flutter.embedding.android.FlutterActivityimport io.flutter.embedding.engine.FlutterEngineimport io.flutter.plugin.common.MethodChannelclass MainActivity : FlutterActivity() {companion object {private const val TAG = "MainActivity"private const val CHANNEL = "atomic_x/pip"}private var enablePictureInPicture = falseoverride fun configureFlutterEngine(flutterEngine: FlutterEngine) {super.configureFlutterEngine(flutterEngine)MethodChannel(flutterEngine.dartExecutor.binaryMessenger, CHANNEL).setMethodCallHandler { call, result ->when (call.method) {"enablePictureInPicture" -> {val enable = call.argument<Boolean>("enable") ?: falseval success = enablePIP(enable)result.success(success)}"enterPictureInPicture" -> {val success = enterPIP()result.success(success)}else -> result.notImplemented()}}}override fun onUserLeaveHint() {super.onUserLeaveHint()// Automatically enter PiP when user presses Homeif (enablePictureInPicture) {enterPIP()}}private fun enablePIP(enable: Boolean): Boolean {Log.i(TAG, "enablePictureInPicture: $enable")if (Build.VERSION.SDK_INT >= Build.VERSION_CODES.O &&packageManager.hasSystemFeature(PackageManager.FEATURE_PICTURE_IN_PICTURE)) {enablePictureInPicture = enablereturn true}return false}private fun enterPIP(): Boolean {if (!enablePictureInPicture) return falseif (Build.VERSION.SDK_INT >= Build.VERSION_CODES.O) {try {val aspectRatio = Rational(9, 16)val params = PictureInPictureParams.Builder().setAspectRatio(aspectRatio).build()return enterPictureInPictureMode(params)} catch (e: Exception) {Log.e(TAG, "enterPIP failed: ${e.message}")}}return false}}
2. AndroidManifest.xml configuration: Enable PiP for MainActivity.
<activityandroid:name=".MainActivity"android:exported="true"android:launchMode="singleTop"android:taskAffinity=""android:theme="@style/LaunchTheme"android:configChanges="orientation|keyboardHidden|keyboard|screenSize|smallestScreenSize|locale|layoutDirection|fontScale|screenLayout|density|uiMode"android:hardwareAccelerated="true"android:windowSoftInputMode="adjustResize"android:supportsPictureInPicture="true"><meta-dataandroid:name="io.flutter.embedding.android.NormalTheme"android:resource="@style/NormalTheme"/><intent-filter><action android:name="android.intent.action.MAIN"/><category android:name="android.intent.category.LAUNCHER"/></intent-filter></activity>
3. Dart layer configuration:
import 'package:flutter/services.dart';class PipManager {static const MethodChannel _channel = MethodChannel('atomic_x/pip');/// Enable/disable PiP featurestatic Future<bool> enablePictureInPicture(bool enable) async {try {final result = await _channel.invokeMethod<bool>('enablePictureInPicture', {'enable': enable});return result ?? false;} catch (e) {return false;}}/// Enter PiP mode immediatelystatic Future<bool> enterPictureInPicture() async {try {final result = await _channel.invokeMethod<bool>('enterPictureInPicture');return result ?? false;} catch (e) {return false;}}}
Enable PiP before the call starts, and disable it after the call ends.
Implement iOS Picture-in-Picture Outside App
iOS supports Picture-in-Picture outside the app using the underlying TRTC engine. When the app goes to background, the call interface floats over other apps as a system PiP window.
Note:
In Xcode, add
Background Modes under Signing & Capabilities and check Audio, AirPlay, and Picture in Picture. Requires iOS 15.0 or above.
1. Enable PiP:
import 'package:tencent_rtc_sdk/trtc_cloud.dart';TRTCCloud.sharedInstance().then((trtcCloud) {trtcCloud.callExperimentalAPI('''{"api": "configPictureInPicture","params": {"enable": true,"cameraBackgroundCapture": true,"canvas": {"width": 720,"height": 1280,"backgroundColor": "#111111"},"regions": [{"userId": "remoteUserId","userName": "","width": 1.0,"height": 1.0,"x": 0.0,"y": 0.0,"fillMode": 0,"streamType": "high","backgroundColor": "#111111","backgroundImage": "file:///path/to/avatar.png"},{"userId": "localUserId","userName": "","width": 0.333,"height": 0.333,"x": 0.65,"y": 0.05,"fillMode": 0,"streamType": "high","backgroundColor": "#111111"}]}}''');});
2. Disable PiP:
import 'package:tencent_rtc_sdk/trtc_cloud.dart';TRTCCloud.sharedInstance().then((trtcCloud) {trtcCloud.callExperimentalAPI('''{"api": "configPictureInPicture","params": {"enable": false}}''');});
Play Waiting Ringtone
Monitor call status, play ringtone while waiting for an answer, and stop it when the call is accepted or ends.
CallStore.shared.state.selfInfo.addListener(() {CallParticipantInfo info = CallStore.shared.state.selfInfo.value;if (info.status == CallParticipantStatus.accept || info.status == CallParticipantStatus.none) {// Stop ringtonereturn;}if (info.status == CallParticipantStatus.waiting) {// Play ringtone}});
Enable Background Audio/Video Capture
To ensure call audio/video capture continues when the app goes to background, configure Android and iOS as follows.
Android Configuration
1. Permissions and service in AndroidManifest.xml: Starting from Android 9.0 (API 28), foreground service permission is required. Android 14 (API 34) requires specifying service type.
<manifest xmlns:android="http://schemas.android.com/apk/res/android"><uses-permission android:name="android.permission.FOREGROUND_SERVICE" /><uses-permission android:name="android.permission.FOREGROUND_SERVICE_CAMERA" /><uses-permission android:name="android.permission.FOREGROUND_SERVICE_MICROPHONE" /><application><serviceandroid:name=".CallForegroundService"android:enabled="true"android:exported="false"android:foregroundServiceType="camera|microphone" /></application></manifest>
2. Create foreground service class (
CallForegroundService):import android.app.Notificationimport android.app.NotificationChannelimport android.app.NotificationManagerimport android.app.Serviceimport android.content.Contextimport android.content.Intentimport android.os.Buildimport android.os.IBinderimport androidx.core.app.NotificationCompatclass CallForegroundService : Service() {companion object {private const val NOTIFICATION_ID = 1001private const val CHANNEL_ID = "call_foreground_channel"fun start(context: Context) {val intent = Intent(context, CallForegroundService::class.java)if (Build.VERSION.SDK_INT >= Build.VERSION_CODES.O) {context.startForegroundService(intent)} else {context.startService(intent)}}fun stop(context: Context) {val intent = Intent(context, CallForegroundService::class.java)context.stopService(intent)}}override fun onCreate() {super.onCreate()createNotificationChannel()// Start foreground notification to ensure background capture permissionstartForeground(NOTIFICATION_ID, createNotification())}override fun onBind(intent: Intent?): IBinder? = nullprivate fun createNotification(): Notification {return NotificationCompat.Builder(this, CHANNEL_ID).setContentTitle("In Call").setContentText("App is running in background to keep the call alive").setSmallIcon(android.R.drawable.ic_menu_call) // Replace with your app icon.setPriority(NotificationCompat.PRIORITY_HIGH).build()}private fun createNotificationChannel() {if (Build.VERSION.SDK_INT >= Build.VERSION_CODES.O) {val channel = NotificationChannel(CHANNEL_ID,"Call Keep-Alive Service",NotificationManager.IMPORTANCE_HIGH)val manager = getSystemService(NotificationManager::class.java)manager.createNotificationChannel(channel)}}}
iOS Configuration
Open your project in Xcode and:
1. Select your project
Target > Signing & Capabilities.2. Click
+ Capability.3. Add
Background Modes.4. Check:
Audio, AirPlay, and Picture in PictureVoice over IPRemote notifications (optional for offline push)Your
Info.plist will include:<key>UIBackgroundModes</key><array><string>audio</string><string>voip</string><string>remote-notification</string></array>
Configure audio session (AVAudioSession):
Set up the audio session before the call starts. Recommended in the call interface’s
viewDidLoad or before initiating a call:import AVFoundation/*** Configure audio session for background audio capture** Recommended scenarios:* 1. In call interface's viewDidLoad* 2. Before initiating a call (calls)* 3. Before answering a call (accept)*/private func start() {let audioSession = AVAudioSession.sharedInstance()do {// Set session category to play and record// .allowBluetooth: Support Bluetooth headset// .allowBluetoothA2DP: Support high-quality Bluetooth audio (A2DP)try audioSession.setCategory(.playAndRecord, options: [.allowBluetooth, .allowBluetoothA2DP])// Activate audio sessiontry audioSession.setActive(true)} catch {// Audio session configuration failed}}
Note:
Call
start() via MethodChannel at the appropriate time to enable background keep-alive.Next Steps
You’ve now completed the "make a call" feature. To implement call answering, see the integration guide below:
Feature | Description | Integration Guide |
Answer the first call | Quick integration guide for handling incoming calls, including answer/reject controls and call interface invocation. |
FAQ
Why does my iOS Release build show [symbol not found] at runtime?
If you see
symbol not found errors in your iOS Release build, it’s likely because Xcode’s symbol stripping removed TRTC C symbols used by tencent_rtc_sdk (via Flutter FFI). To fix:1. In Build Settings, set Deployment Postprocessing to Yes.

2. In Build Settings, set Strip Style for Release to Non-Global Symbols.
If the callee goes offline and returns within the call invite timeout, will they still get the incoming call event?
For single calls: If the callee comes online within the timeout period, they will receive the incoming call invite.
For group calls: If the callee returns within the timeout, up to 20 unprocessed group messages will be pulled; if there is a call invite, the incoming call event will be triggered.
Contact Us
If you have any questions or suggestions during integration or use, join our Telegram technical group or Contact Us for support.
フィードバック