This document provides guidance on handling GPU instance issues to help you quickly diagnose and resolve related problems. The following troubleshooting tips and recommendations cover common GPU instance issues.
System Status Check
For GPU servers, users are recommended to keep the GPU driver version up to date, disable the nouveau module, enable GPU driver persistence mode, and configure it to start automatically at system boot.
For GPU servers, the following configurations are recommended:
Maintain an up-to-date and appropriate GPU driver version.
Disable the nouveau module.
Enable GPU Persistence Mode and configure it to start on boot.
In the event of a GPU failure, we recommend restarting the instance via the Console to see if the issue can be resolved.
For 64-bit Linux operating systems, it is recommended to directly select Linux 64-bit.
Select a driver that is recommended or certified by NVIDIA.
Disabling the Nouveau Module
Nouveau is an open-source driver for NVIDIA graphics cards. It can conflict with the official NVIDIA GPU driver, so the nouveau module must be disabled on the system.
If the following command returns no output, the nouveau module has been successfully disabled:
[root@localhost ~]# lsmod | grep -i nouveau
The following output indicates that the nouveau module has not been disabled:
[root@localhost ~]# lsmod | grep -i nouveau
nouveau              1662531  0
mxm_wmi                13021  1 nouveau
wmi                    19086  2 mxm_wmi,nouveau
i2c_algo_bit           13413  1 nouveau
video                  24538  1 nouveau
drm_kms_helper        176920  2 nouveau,vmwgfx
ttm                    99555  2 nouveau,vmwgfx
drm                   397988  6 ttm,drm_kms_helper,nouveau,vmwgfx
i2c_core               63151  5 drm,i2c_piix4,drm_kms_helper,i2c_algo_bit,nouveau
Methods to disable the nouveau module are as follows:
# CentOS 7
# Edit or create the blacklist-nouveau.conf file
[root@localhost ~]# vim /usr/lib/blacklist-nouveau.conf
blacklist nouveau
options nouveau modeset=0
# Run the following command and reboot the system to apply the kernel changes.
[root@localhost ~]# dracut -f
[root@localhost ~]# shutdown -ry 0
Configuring GPU Persistence Mode
Enabling GPU Persistence Mode can mitigate various issues, such as GPU loss, bandwidth degradation, and temperature monitoring failures. We recommend enabling GPU Persistence Mode and configuring it to start on boot.
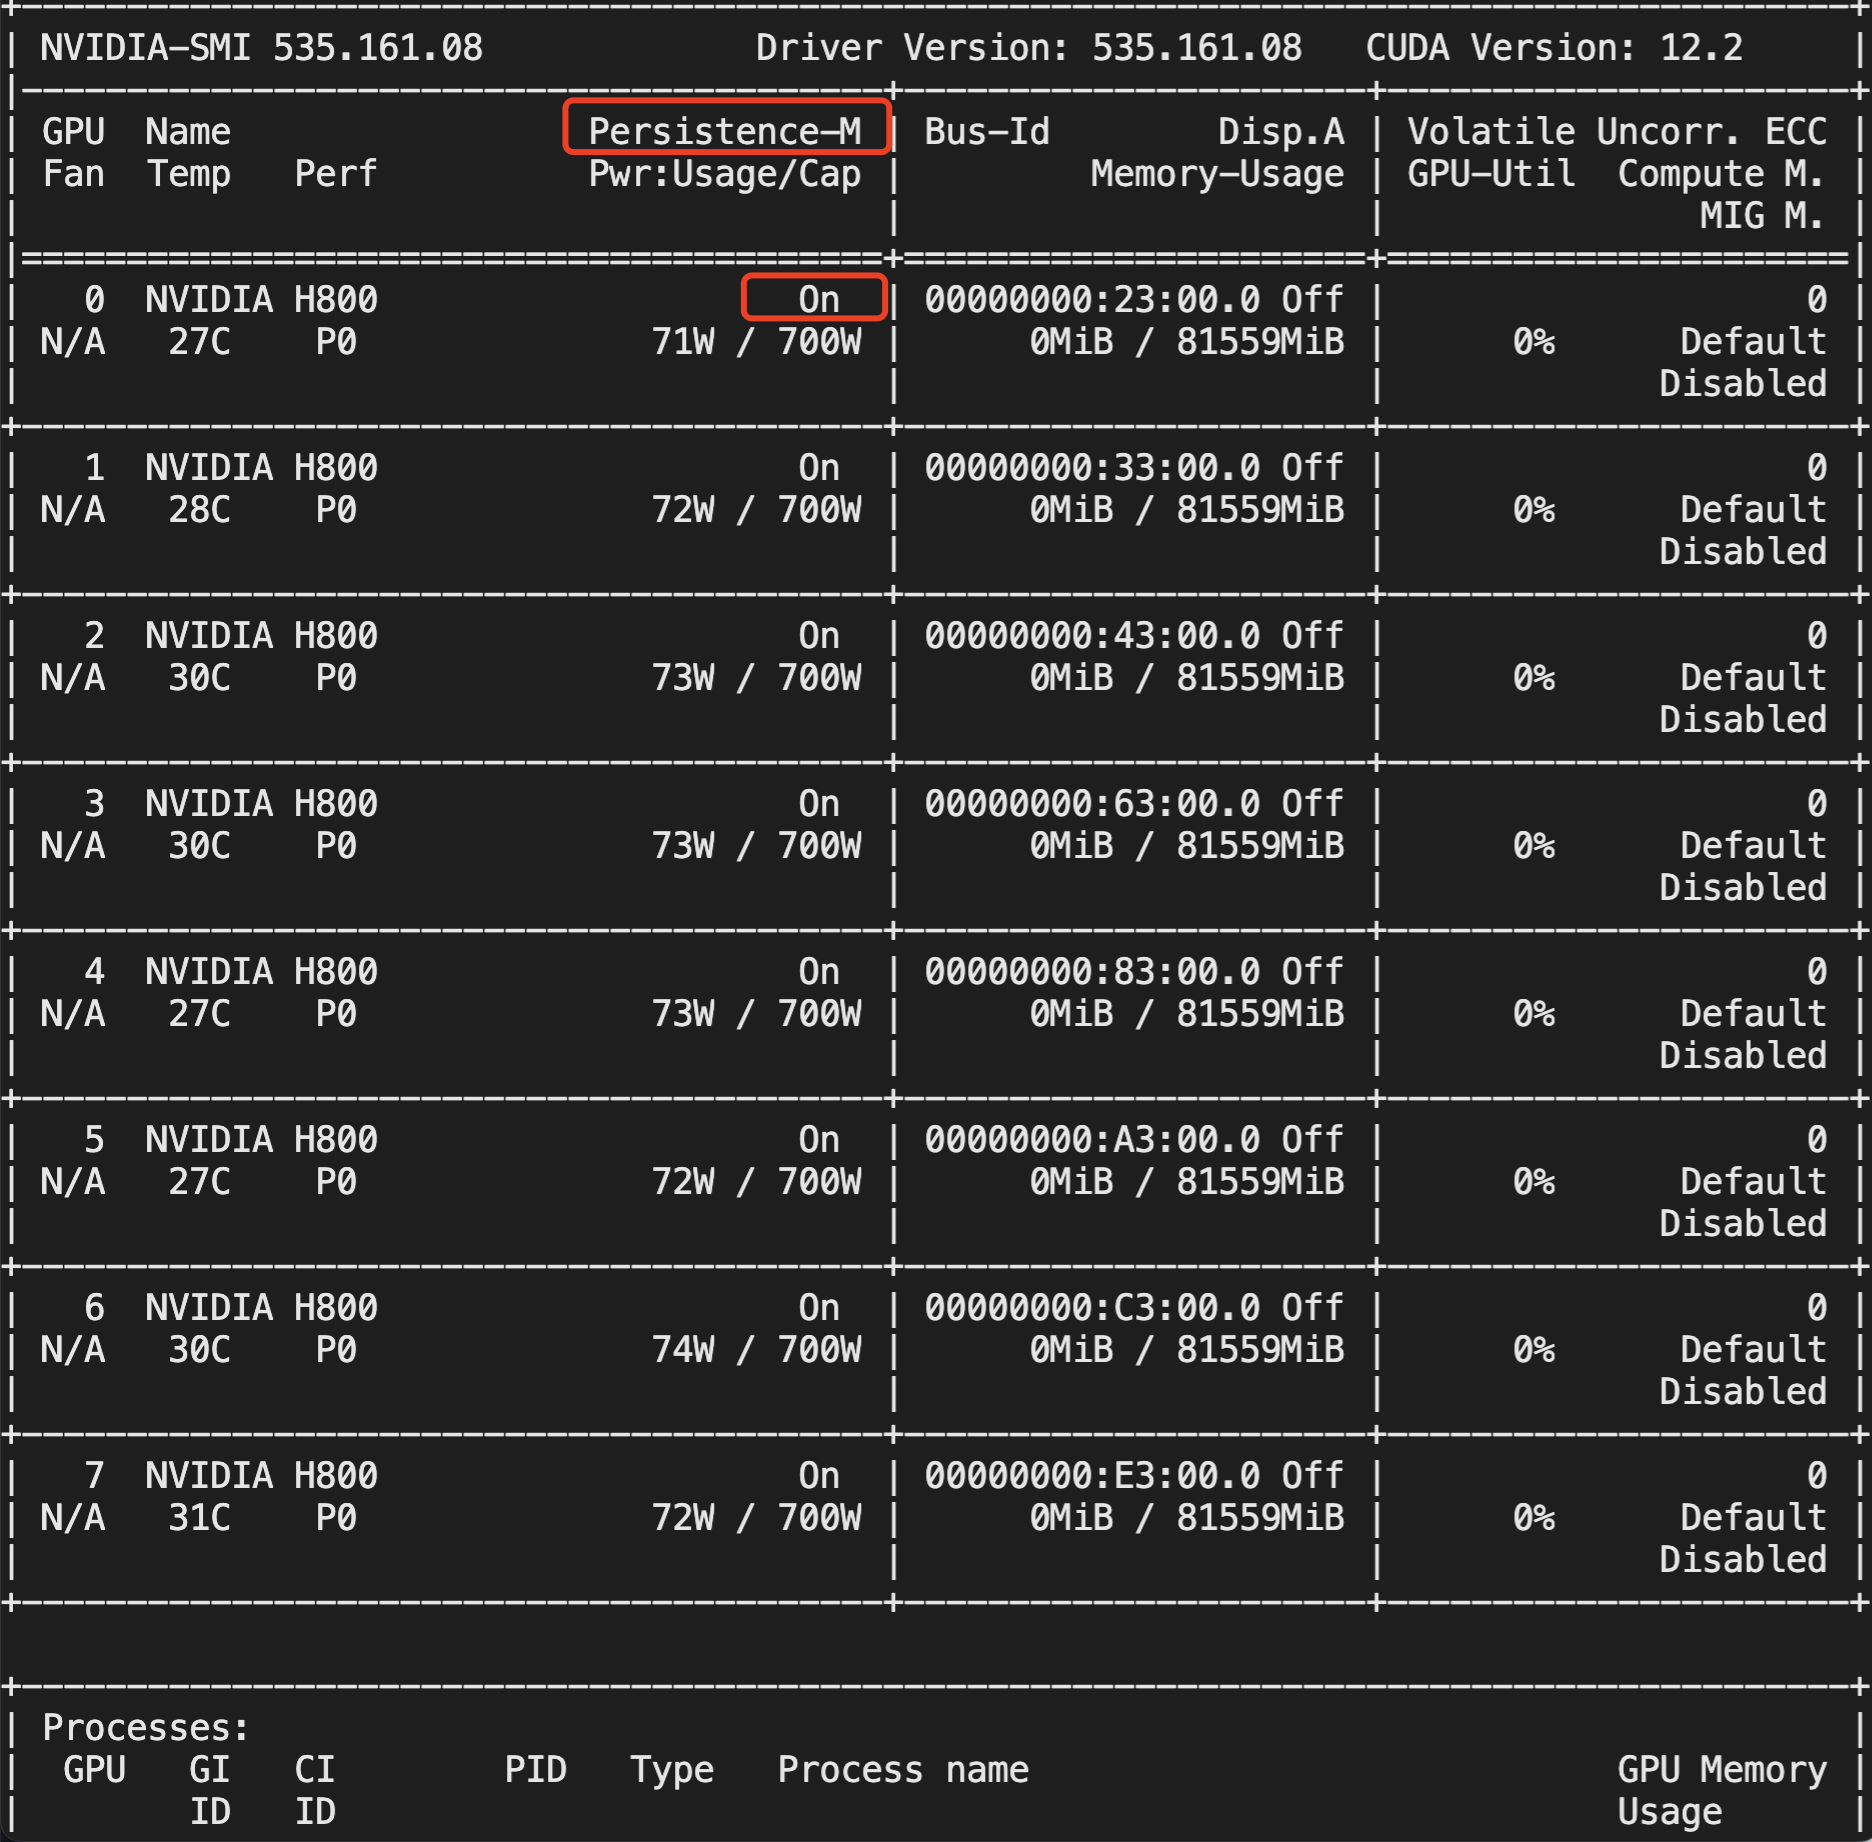
Common methods to check GPU Persistence Mode status:
In the output of nvidia-smi, the Persistence-M status is displayed as On
Example:
In the nvidia-bug-report.log, the Persistence Mode status is displayed as Enabled
Example:
GPU 00000000:08:00.0
Product Name : Tesla V100
Product Brand : Tesla
Display Mode : Enabled
Display Active : Disabled
Persistence Mode : Enabled
The method to enable GPU driver persistence mode is as follows:
Method 1
Method 2
[root@localhost ~]# nvidia-smi -pm 1
# The following command is valid for newer versions of GPU drivers
[root@localhost ~]# nvidia-persistenced --persistence-mode
Configure autostart on startup:
# vim /etc/rc.d/rc.local
# Add the following line to the file:
# nvidia-smi -pm 1
# Grant executable permissions to the /etc/rc.d/rc.local file
# chmod +x /etc/rc.d/rc.local
# Reboot the system for verification
Retrieving GPU Serial Numbers
To retrieve the serial numbers of all GPUs in an instance:
# nvidia-smi -q | grep -i serial
    Serial Number                   : 0324018045603
    Serial Number                   : 0324018044864
    Serial Number                   : 0324018027716
    Serial Number                   : 0323918059881
To retrieve the serial number of a specified GPU ID:
# nvidia-smi -q -i 0 | grep -i serial
    Serial Number                   : 0324018045603
Common GPU Issues
GPU Not Detected
To verify GPU detection status, first ensure that the lspci command detects all GPUs, and then ensure that the nvidia-smi command detects all GPUs.
Checking GPU Detection via lspci
Run the following command to ensure all GPUs are recognized correctly. Verify that each GPU entry ends with (rev a1). If the output ends with (rev ff), it indicates a GPU anomaly.
lspci | grep -i nvidia
Example:
# The following command output indicates that four GPUs are detected, with those ending in (rev a1) being in a normal status. However, GPU 41:00.0, which ends in (rev ff), indicates an exception.
~]# lspci | grep -i nvidia
3e:00.0 3D controller: NVIDIA Corporation Device 1db8 (rev a1)
3f:00.0 3D controller: NVIDIA Corporation Device 1db8 (rev a1)
40:00.0 3D controller: NVIDIA Corporation Device 1db8 (rev a1)
41:00.0 3D controller: NVIDIA Corporation Device 1db8 (rev ff)
Checking GPU Detection via nvidia-smi
Run the following command to verify GPU detection:
nvidia-smi
Example: The number of GPUs detected by the nvidia-smi command does not match the actual number of GPUs. As shown in the figure below, an instance with 8 GPUs displays only 7 GPUs when using the nvidia-smi command.
Note:
We recommend restarting the instance to attempt recovery. If the issue persists and the GPU status remains abnormal after the restart, please contact the platform for further troubleshooting assistance.
GPU Bandwidth Exception
Ensure that the current GPU bandwidth matches the rated bandwidth and is set to x16. You can check the GPU bandwidth using the lspci or nvidia-smi command.
It is typically caused by hardware issues. Please contact the platform for further troubleshooting assistance.
Checking GPU Retired Pages Count
NVIDIA GPU ECC RMA Standards
For details on the NVIDIA GPU ECC RMA standards, see the official NVIDIA documentation NVIDIA GPU ECC RMA Standards.
Note:
You can contact the platform for a GPU replacement if the nvidia fieldiag test fails or if the GPU Retired Pages count meets any of the following conditions:
In the Retired Pages parameter:
Double Bit ECC ≥ 5 within 30 days.
Double Bit ECC ≥ 10 within the warranty period.
Total Double Bit ECC + Single Bit ECC ≥ 60 within the warranty period.
Methods to Query Retired Pages
Method 1
Method 2
Method C
# Query the ECC count for a specific GPU by specifying the GPU ID:
[root@localhost ~]# nvidia-smi -i <target gpu> -q -d PAGE_RETIREMENT
...
Retired pages
Single Bit ECC : 2
Double Bit ECC : 0
Pending : No
# If the output shows Pending as No, it indicates that all ECC error address spaces have been masked. These error address spaces will no longer be called by software programs and will not affect program operation in the future.
# If Yes is displayed, it indicates that there are ECC error addresses that need to be masked. Restart the system or reset the GPU to change it to No.
# This method only allows you to check the retired pages count but does not indicate whether the retired pages have been masked.
# Query the ECC count for a specific GPU:
[root@localhost ~]# nvidia-smi -q -i 0 | grep -i 'bit ecc'
Single Bit ECC : 0
Double Bit ECC : 0
# View the retired pages count for all GPUs:
[root@inspur ~]# nvidia-smi -q | grep -i 'bit ecc'
Single Bit ECC : 0
Double Bit ECC : 0
Single Bit ECC : 1
Double Bit ECC : 0
# This method allows you to check the generation time of all retired pages, making it easier to determine whether the NVIDIA RMA standards are met.
# This method requires a relatively new GPU driver version; otherwise, the generation time of retired pages cannot be viewed.
If the GPU Retired Pages count meets NVIDIA RMA standards: Please contact the platform for hardware replacement.
If the GPU Retired Pages count does not meet NVIDIA RMA standards: Check if the address space of the current error is masked (i.e., Pending: No). If not, restart the system or reset the GPU to mask the error address, then retest the application. If the application is still affected by ECC errors after the address is masked, perform a fieldiag test. If the test fails, contact the platform for a GPU replacement.
For GPU ECC errors under the Volatile and Aggregate entries, you can clear them using the command nvidia-smi -p 0/1.
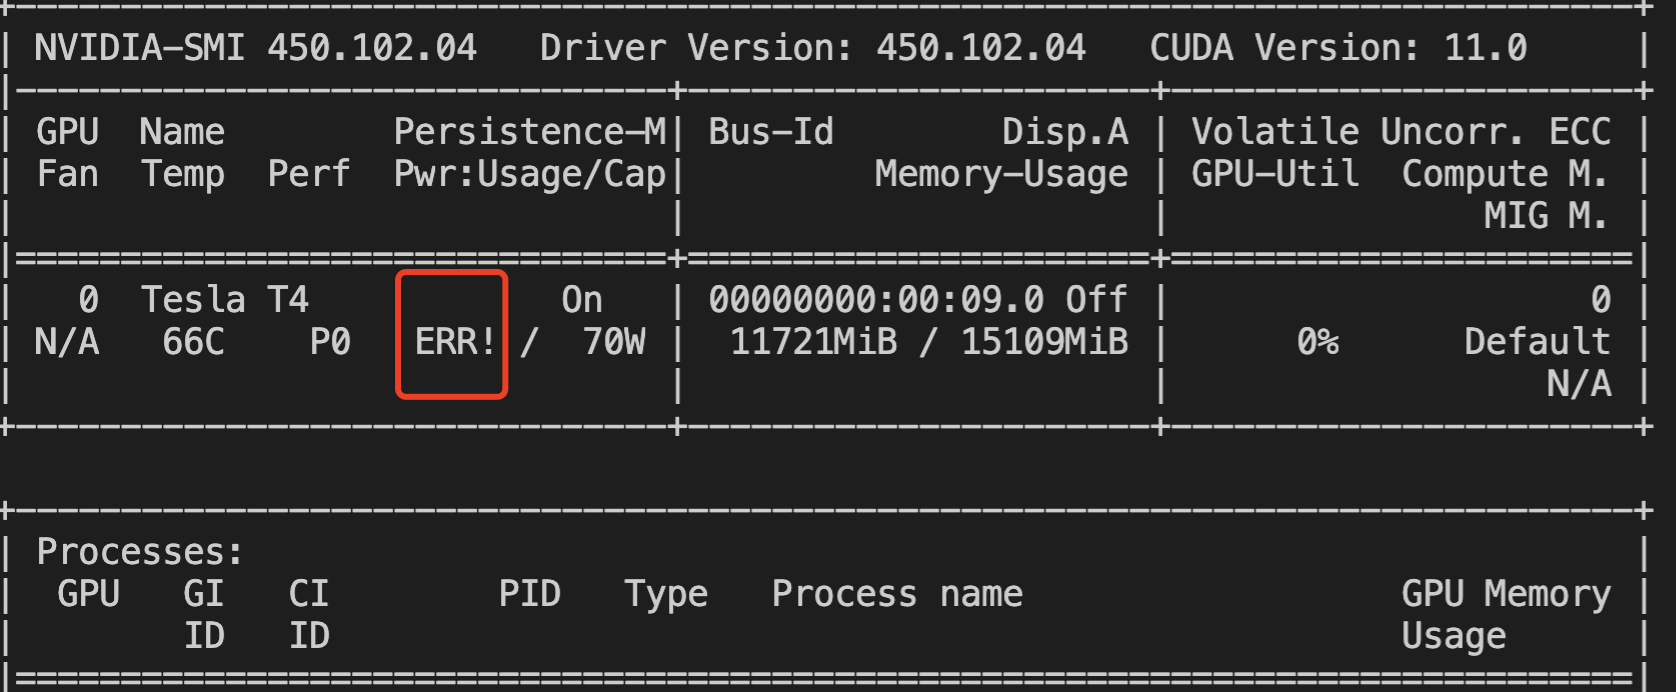
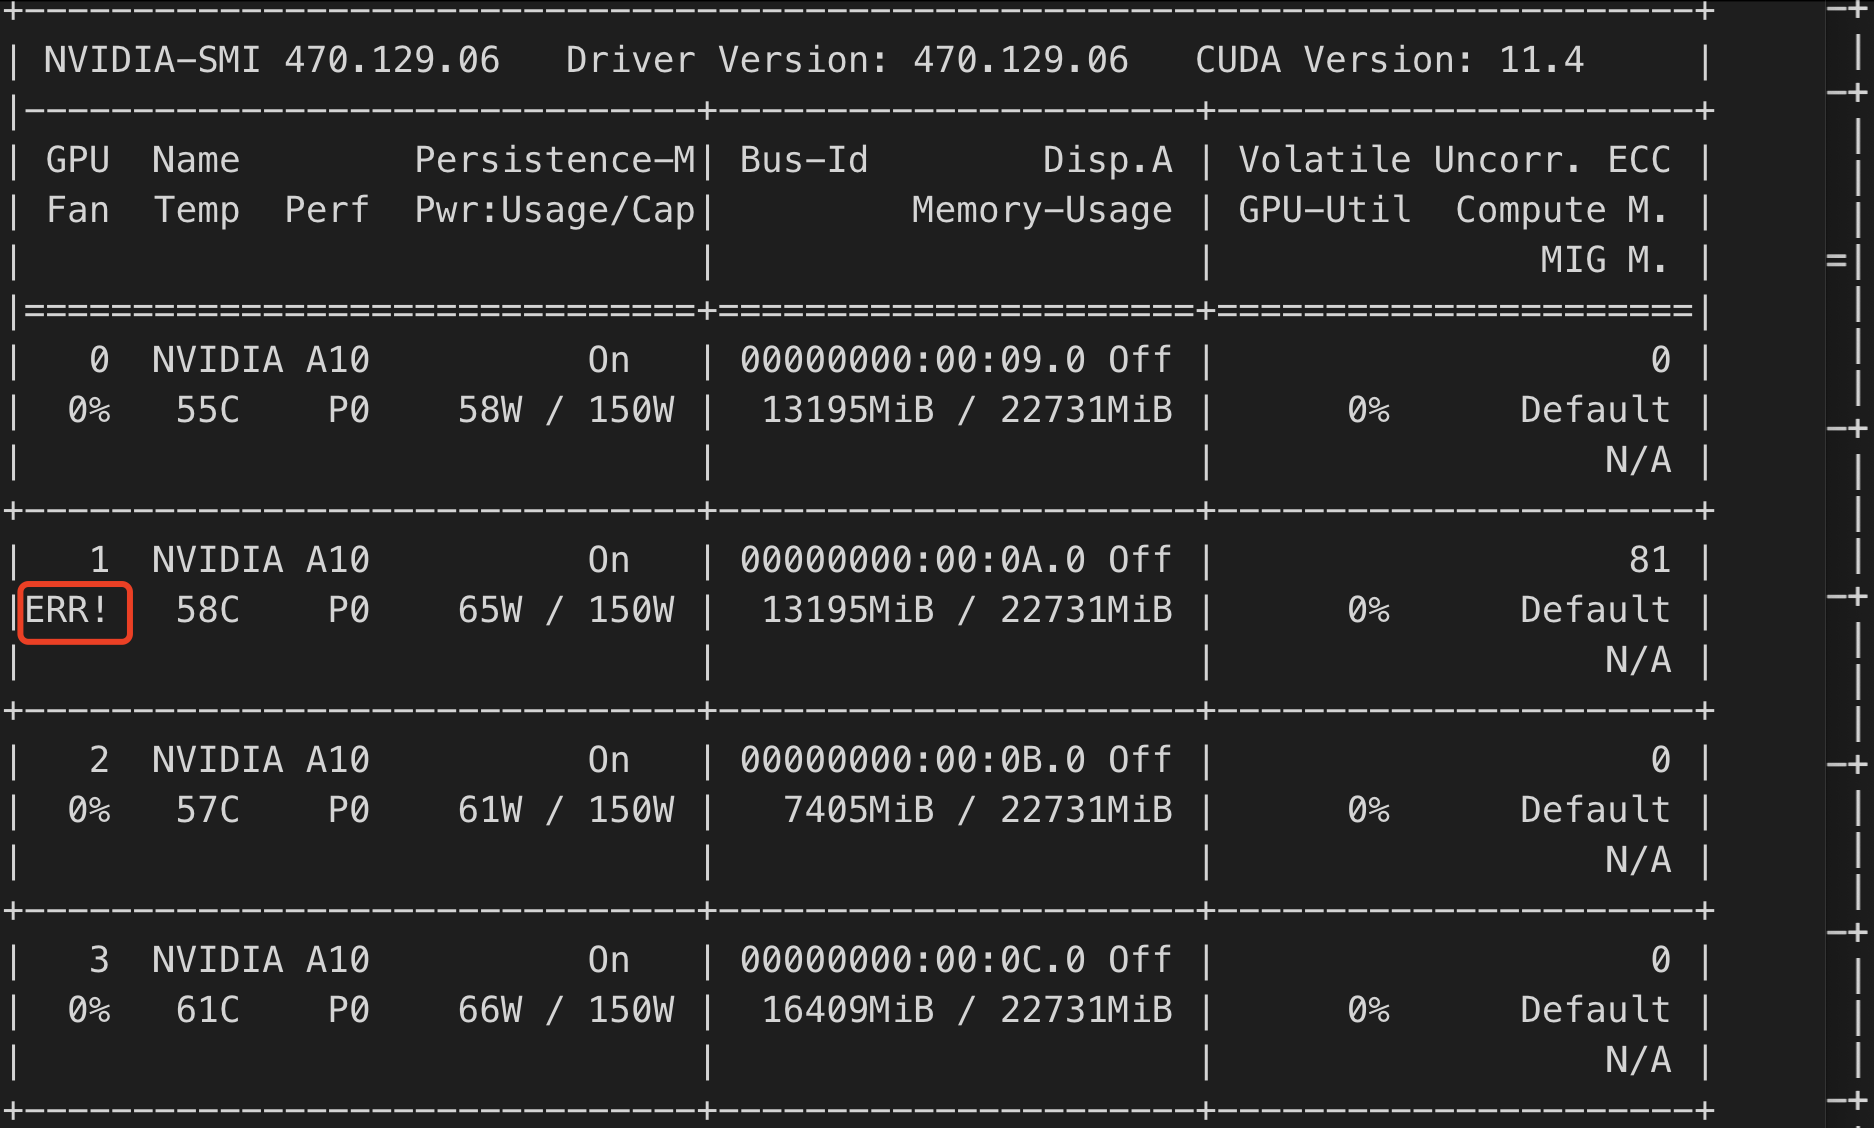
Checking for GPU ERR! Status
During GPU operation, ERR! errors related to fans, power, etc., may occur. You can identify these by checking if the nvidia-smi output contains ERR!.
Example of Power ERR! Error:
Example of Fan ERR! Error:
You can also identify this issue by checking if the "Fan Speed" or "Power Draw" fields in the nvidia-bug-report log show "Unknown Error".
Note:
Upgrade the GPU driver to a newer version and restart the system to observe the results. If the issue persists after restarting, contact the platform for further troubleshooting assistance.
Xid Errors
Xid messages are error reports printed by NVIDIA drivers to the operating system’s kernel logs or event logs. These messages indicate a GPU error, often caused by incorrect driver programming for the GPU or corrupted commands sent to the GPU. For common Xid events and recommended solutions, see Troubleshooting Common Xid Errors.
If the above status checks and common troubleshooting steps fail to resolve the issue, please contact the platform engineers for further troubleshooting assistance.