Widget is not only used for information display, but also supports user interactive behavior.
Action describes the specific behavior the system should execute when a user completes an interactive operation (such as click, select, fill in form) in a Widget. Through Action, the Widget can return user operation results and related data to the Intelligent Agent, triggering the subsequent process. In a Widget, onClckAction, onSubmitAction, and onChangeAction all belong to the Action type.
Whether a Widget supports interaction depends on whether it contains components that support Action configuration. You can declare the type and parameters of the corresponding Action through component property configuration. Action normally contains the following two core fields:
Field
Type
Description
type
"sys.chat" | "sys.go_to_url" | "sys.download"
For defining the specific behavior data type to execute after user interaction.
payload
object
Provide the required data content for the specified Action type.
Note:
Writing the specific implementation logic of Action directly in the Widget Template is not supported. You can declare the type and payload of Action. Currently only support official preset Action types. Customization is temporary not supported.
Official Preset Action
ADP officially provides three preset Action types, directly used for Widget interaction configuration.
sys.chat
Definition
type:"sys.chat"
Feature Overview
sys.chat is used to send a dialogue message to the Intelligent Agent. When a user triggers this Action in the Widget, the system will use the specified content as new user input to enter the context of the current dialogue, participating in subsequent reasoning, judgment, and process decision-making.
Scenarios
Suitable for interaction processes such as information collection and supplementary description that require Agent awareness and decision-making.
Examples
Template example:
The user clicks the reselectButton and sends the dialogue message "reselect solution" to the Agent.
<Button
label="Reselect"
onClickAction={{
type:"sys.chat",
payload:{ query:"Reselect solution"}}}/>
Code Explanation:
Set type to sys.chat, which means trigger dialogue input.
payload is used to provide text content that the Agent can understand, which is the direct send dialogue message.
Note:
The payload field name supports customization, and the field name and value can be selected based on specific scenarios.
In this example, query is a custom field that represents the user's operation or selection.
sys.go_to_url
Definition
type:"sys.go_to_url"
Feature Overview
sys.go_to_url supports triggering page redirects, which are directly executed by the frontend. This Action does not pass through model inference nor write to the dialogue context.
Scenarios
Suitable for operations such as redirecting to details page or opening external links, where the Intelligent Agent does not need to sense user intention or participate in decision-making.
Examples
After the user clicks the View Detail Button, the execution page navigates to the target URL.
Template example:
<Button
label="View detail"
onClickAction={{
type:"sys.go_to_url",
payload:{url:"https://adp.cloud.tencent.com/"}}}
/>
Code Explanation:
type is sys.go_to_url, which means execute a page redirect action.
payload is used for the specified target address and supports dynamic configuration through variables.
The redirect action is completed directly by the frontend and does not affect the current dialogue or Agent status.
Note:
sys.go_to_url payload must strictly be a URL. Other fields are not customizable.
If you need to transmit other parameters, consider using sys.chat to replace.
sys.download
Definition
type:"sys.download"
Feature Overview
sys.download is used to trigger file download. When the user triggers this Action in the Widget, the system will initiate file download based on the configured URL address. This Action does not pass through model inference or write to the dialogue context.
Scenarios
Suitable for scenarios where users need to download result files, such as images, audio, documents and other generated content.
Examples
Users click Download Image Button to download the file from the specified address.
type is sys.download, which means trigger a file download action.
payload is used to specify the resource address (url) of the file to download.
The download action is completed directly by the frontend and does not affect the current dialogue or Agent status.
Note:
sys.download payload requires the url field to specify the download resource address, otherwise file download cannot be carried out. The filename field is optional for custom download file name. If not configured, the system defaults to using the last level of the URL path as the file name.
Other types of Action are not yet supported. Customization support will be added subsequently.
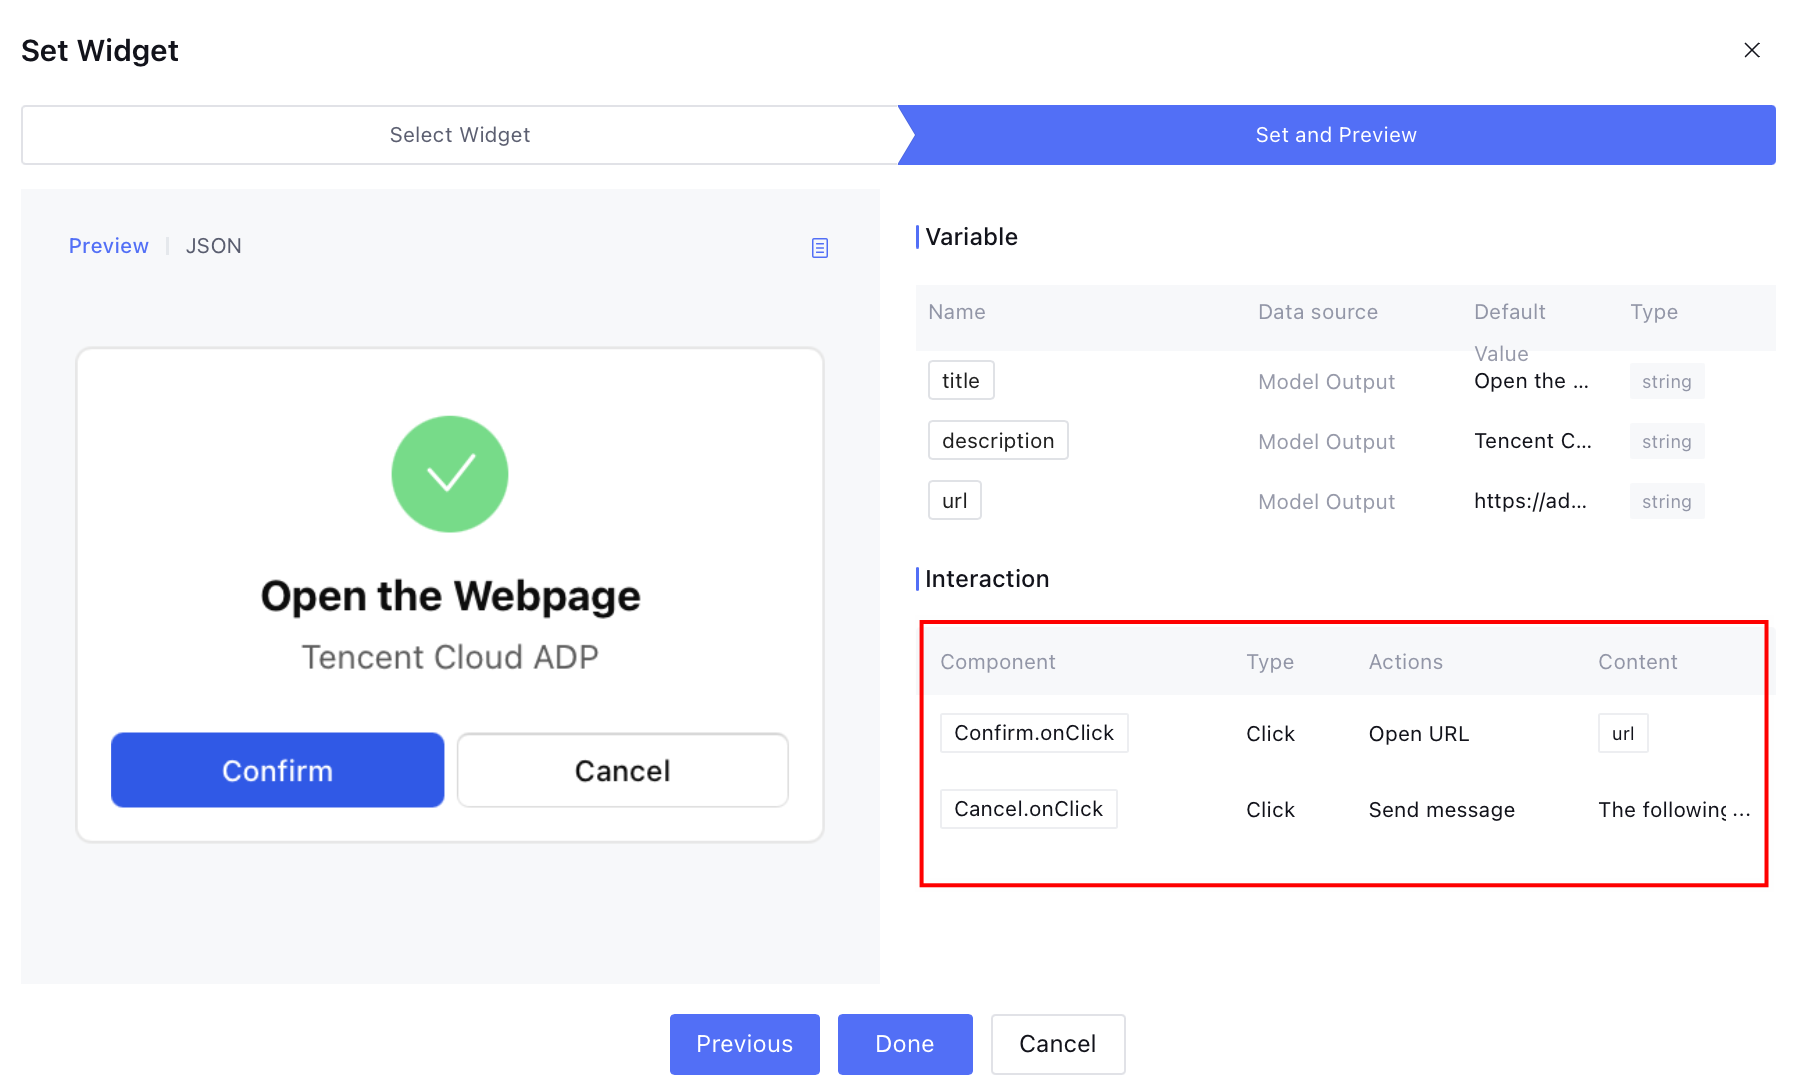
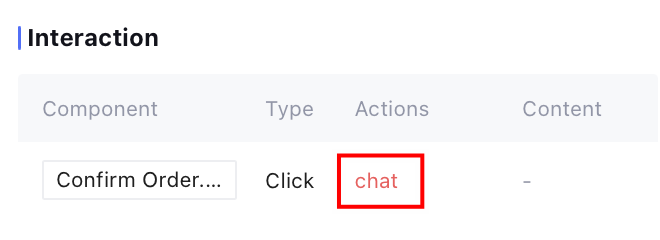
When referring to a Widget, if the Widget is configured with Action, in Multi-Agent Mode, the configuration details will automatically appear in the Widget settings and preview page. In the workflow canvas, the configuration details will automatically appear in the node detail page. For interactive operations that cannot be configured on the platform, the operation bar content will be highlighted in red.
The complete Action trigger process is as follows:
1. Users perform interactive operations in Widget, such as clicking buttons, submitting selections, or filling in forms.
2. Frontend triggers Action callback: The frontend sends the corresponding type and payload to the system for processing based on the Action configured in the component.
3. The system performs the corresponding action based on the Action type.
sys.go_to_url: The frontend directly executes a page redirect to the specified address.
sys.chat: Submit the content in the payload as new dialogue input to the Intelligent Agent to proceed with subsequent reasoning and process decision-making.
sys.download: Perform file download based on the configured resource address in the payload.
Components Supporting Action
The following components support declaring Action during configuration.
Component
Action Property
Description
Button
onClickAction
Click trigger
Form
onSubmitAction
form submission
DatePicker
onChangeAction
Date change
Select
Selection change
Checkbox
Selection change
RadioGroup
Single selection change
Note:
Hyperlinks can be directly used in <Markdown> without the need to define Action.
<Markdown value={"Click [here](https://example.com) to view more"} />
Submitting Form Widget Parameters
Information Collection Component
The following components can collect user input and specify output fields when the Action is triggered.
Input
Textarea
Select
Checkbox
RadioGroup
DatePicker
The above components need to configure the name field, used to identify the field name of the submit parameter.
Submitting Widget Parameters
After being triggered, the Widget sends a complete parameter set to the backend, including:
1. payload declared in Action.
2. User input values of ALL information collection components in the form.
Submission rule:
click/select action (onClickAction): Submit only the payload declared in the action without automatic collection of form fields.
form submission (onSubmitAction): automatically merge all information collection components in the form and submit the corresponding value with each component's name as the field name.
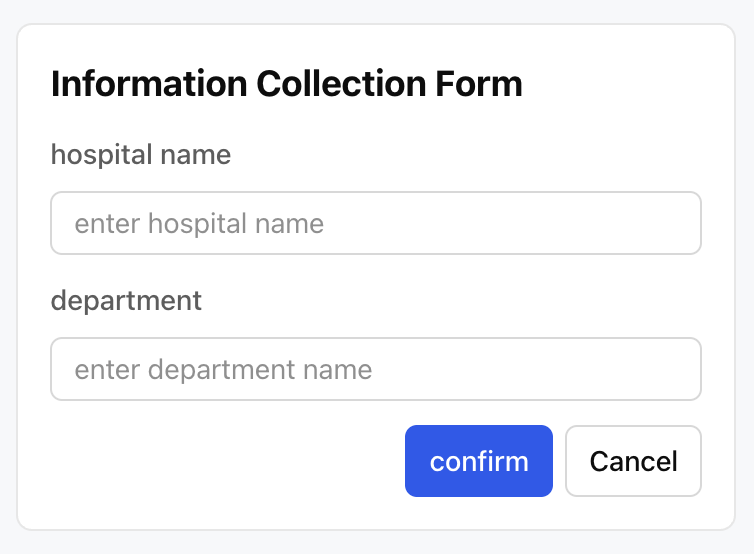
Widget Example
Template example:
<Card size="sm">
<Form
onSubmitAction={{
type: 'sys.chat',
payload:{ result: 'submit' },
}}
>
<Col gap={3}>
<Title value="Hospital and Department Information Collection Form" size="sm" />
<Input name="department" placeholder="enter department name" />
</Col>
</Col>
<Row>
<Spacer />
<Button submit label="confirm" style="primary" />
<Button
label="Cancel"
variant="outline"
onClickAction={{
type: 'sys.chat',
payload:{ query: 'Cancel fill in' },
}}
/>
</Row>
</Col>
</Form>
</Card>
Effect display as follows:
When the user fills in the input box:
Hospital name: Beijing 301 Hospital.
Department name: Cardiology.
After clicking Yes, the payload eventually sent to the Intelligent Agent is:
{
"result":"submit",
"hospital":"Beijing 301 Hospital",
"department":"Cardiology"
}
FAQs
Why Did I Perform an Interactive Operation in the Widget but the Intelligent Agent Not Get the Result?
You can usually troubleshoot from two aspects:
First, confirm whether the Action is actually triggered. Only when users complete explicit interactive operations (such as clicking buttons or submitting forms) on a component, and the component is configured with triggerable Actions (such as onClickAction or onSubmitAction), will the interaction result be sent to the Intelligent Agent. If the Widget is only used for content display or only contains input components without corresponding submission actions, the Intelligent Agent is unable to sense user operations.
Second, confirm whether the correct Action type is used. Among currently supported Actions, sys.go_to_url is only used for page redirects and does not transmit any data to the Intelligent Agent, while sys.chat will write the payload as new user input to the dialogue context for the Intelligent Agent to continue reasoning and decision-making. Therefore, as long as you hope the Intelligent Agent can "see" and process the user's operation result, you must use sys.chat.
The Input in the Form Is Filled, Why Still Can'T Get the Corresponding Value after Submission?
This situation is usually caused by two reasons:
First, the Input has no configuration for the name field. Input items without name will not participate in parameter submission. For example, in the following example, the lack of the name field means users cannot submit content to the Intelligent Agent even if they fill it in.
Incorrect example (lack of name field, will not submit):
<Form
onSubmitAction={{
type: 'sys.chat',
payload:{ type: 'submit_form' },
}}
>
<Input placeholder="hospital name" />
<Button submit label="submit" />
</Form>
Second, the input component is not submitted through the Form component. Information collection components like Input and Select do not proactively submit data. They must be wrapped in the Form component and trigger form submission through onSubmitAction to send the content filled in by users.
Therefore, a Form Widget must meet the following conditions: the input component has a name field, the component is wrapped in a Form component, and submission is triggered by onSubmitAction. An example that conforms to standards is as follows:
<Form
onSubmitAction={{
type: 'sys.chat',
payload:{ type: 'submit_form' },
}}
>
<Input
name="hospital_name"
placeholder="hospital name"
required
/>
<Button submit label="submit" style="primary" />
</Form>
Or use a container component with form semantics:
<Card
as="form"
onSubmitAction={{
type: 'sys.chat',
payload:{ type: 'submit_form' },
}}
>
<Input
name="hospital_name"
placeholder="hospital name"
required
/>
<Button submit label="submit" />
</Card>
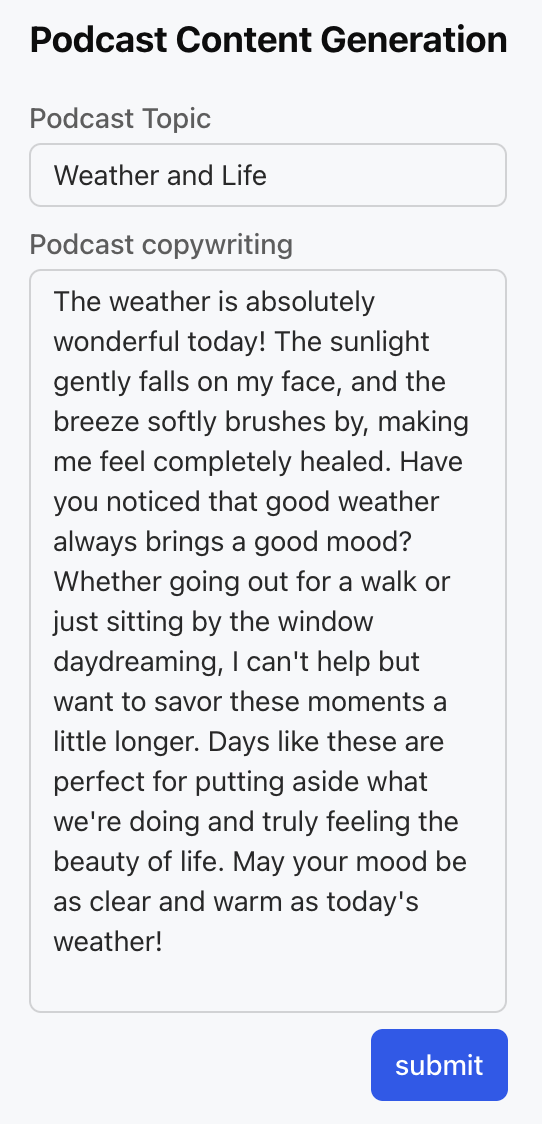
How to Implement Pre-Filled Content in Widget, Support Users to Modify Content and Return to Intelligent Agent?
In many interactive scenarios, the Agent first displays a form or prefilled information to the user. The user then modifies and submits it, hoping to return the modified content to the Agent for subsequent reasoning or decision-making. This type of interaction is common when users submit personal information, select a solution, or confirm content.
Widget supports this type of interaction: the initial result generated by the Intelligent Agent can be used as defaultValue and input into the input component. After user modification, the modified content is returned to the Intelligent Agent through Action. Among them, defaultValue is only used for initial content display as a starting point for user modification and will not be returned directly to the Intelligent Agent. The actual content involved in subsequent reasoning is the final value modified and submitted by the user in the input component.
Taking podcast content generation form as an example, the specific process is: the Intelligent Agent generates the initial default values of initialObject and initialScript as the first draft of the podcast theme and copywriting, and inputs them into the input box through defaultValue. After user modification, the form is submitted. The value finally received by the Intelligent Agent is the podcast theme and copywriting confirmed by the user, not the initial default values. In short, defaultValue is merely the first draft displayed to users. The Intelligent Agent always receives and handles the final result submitted by users.
The podcast theme and copywriting in this content generation form are already filled into the input box via defaultValue. Users can directly modify and submit them. The final content will be returned to the Intelligent Agent for subsequent processing.
How to Configure the Download Button to Allow Users to Repeat Clicking?
Set alwaysEnabled to true in onClickAction to allow multiple clicks on the Button. Otherwise, the button is clickable only once by default and will be automatically disabled. Details visible in Button.
Note:
This configuration is used for downloading (sys.download), redirection (sys.go_to_url) and other repeat operations. It is not recommended for sys.chat type Action to avoid triggering duplicate dialogue requests.