Vue (Fully compatible with both Vue2 & Vue3. While incorporating below, please select the Vue version guide that matches your needs)
TypeScript (Should your project be based on JavaScript, please proceed to JS project integrate to set up a progressive support for TypeScript)
Sass (sass-loader ≤ 10.1.1)
node(node.js ≥ 16.0.0)
npm (use a version that matches the Node version in use)
Integration of TUIKit (Web & H5)
Step 1. Create a project
TUIKit supports creating a project structure using webpack or vite, configured with Vue3 / Vue2 + TypeScript + sass. Below are a few examples of how to construct your project:
vue-cli
vite
Please Note:
Please make sure you have @vue/cli version 5.0.0 or above . The following sample code can be used to upgrade your @vue/cli version to v5.0.8.
Establish a project using Vue CLI, with configuration set to Vue2/Vue3 + TypeScript + Sass/SCSS.
If Vue CLI is not yet installed, or the version is below 5.0.0, you can use the following method for installation via Terminal or CMD:
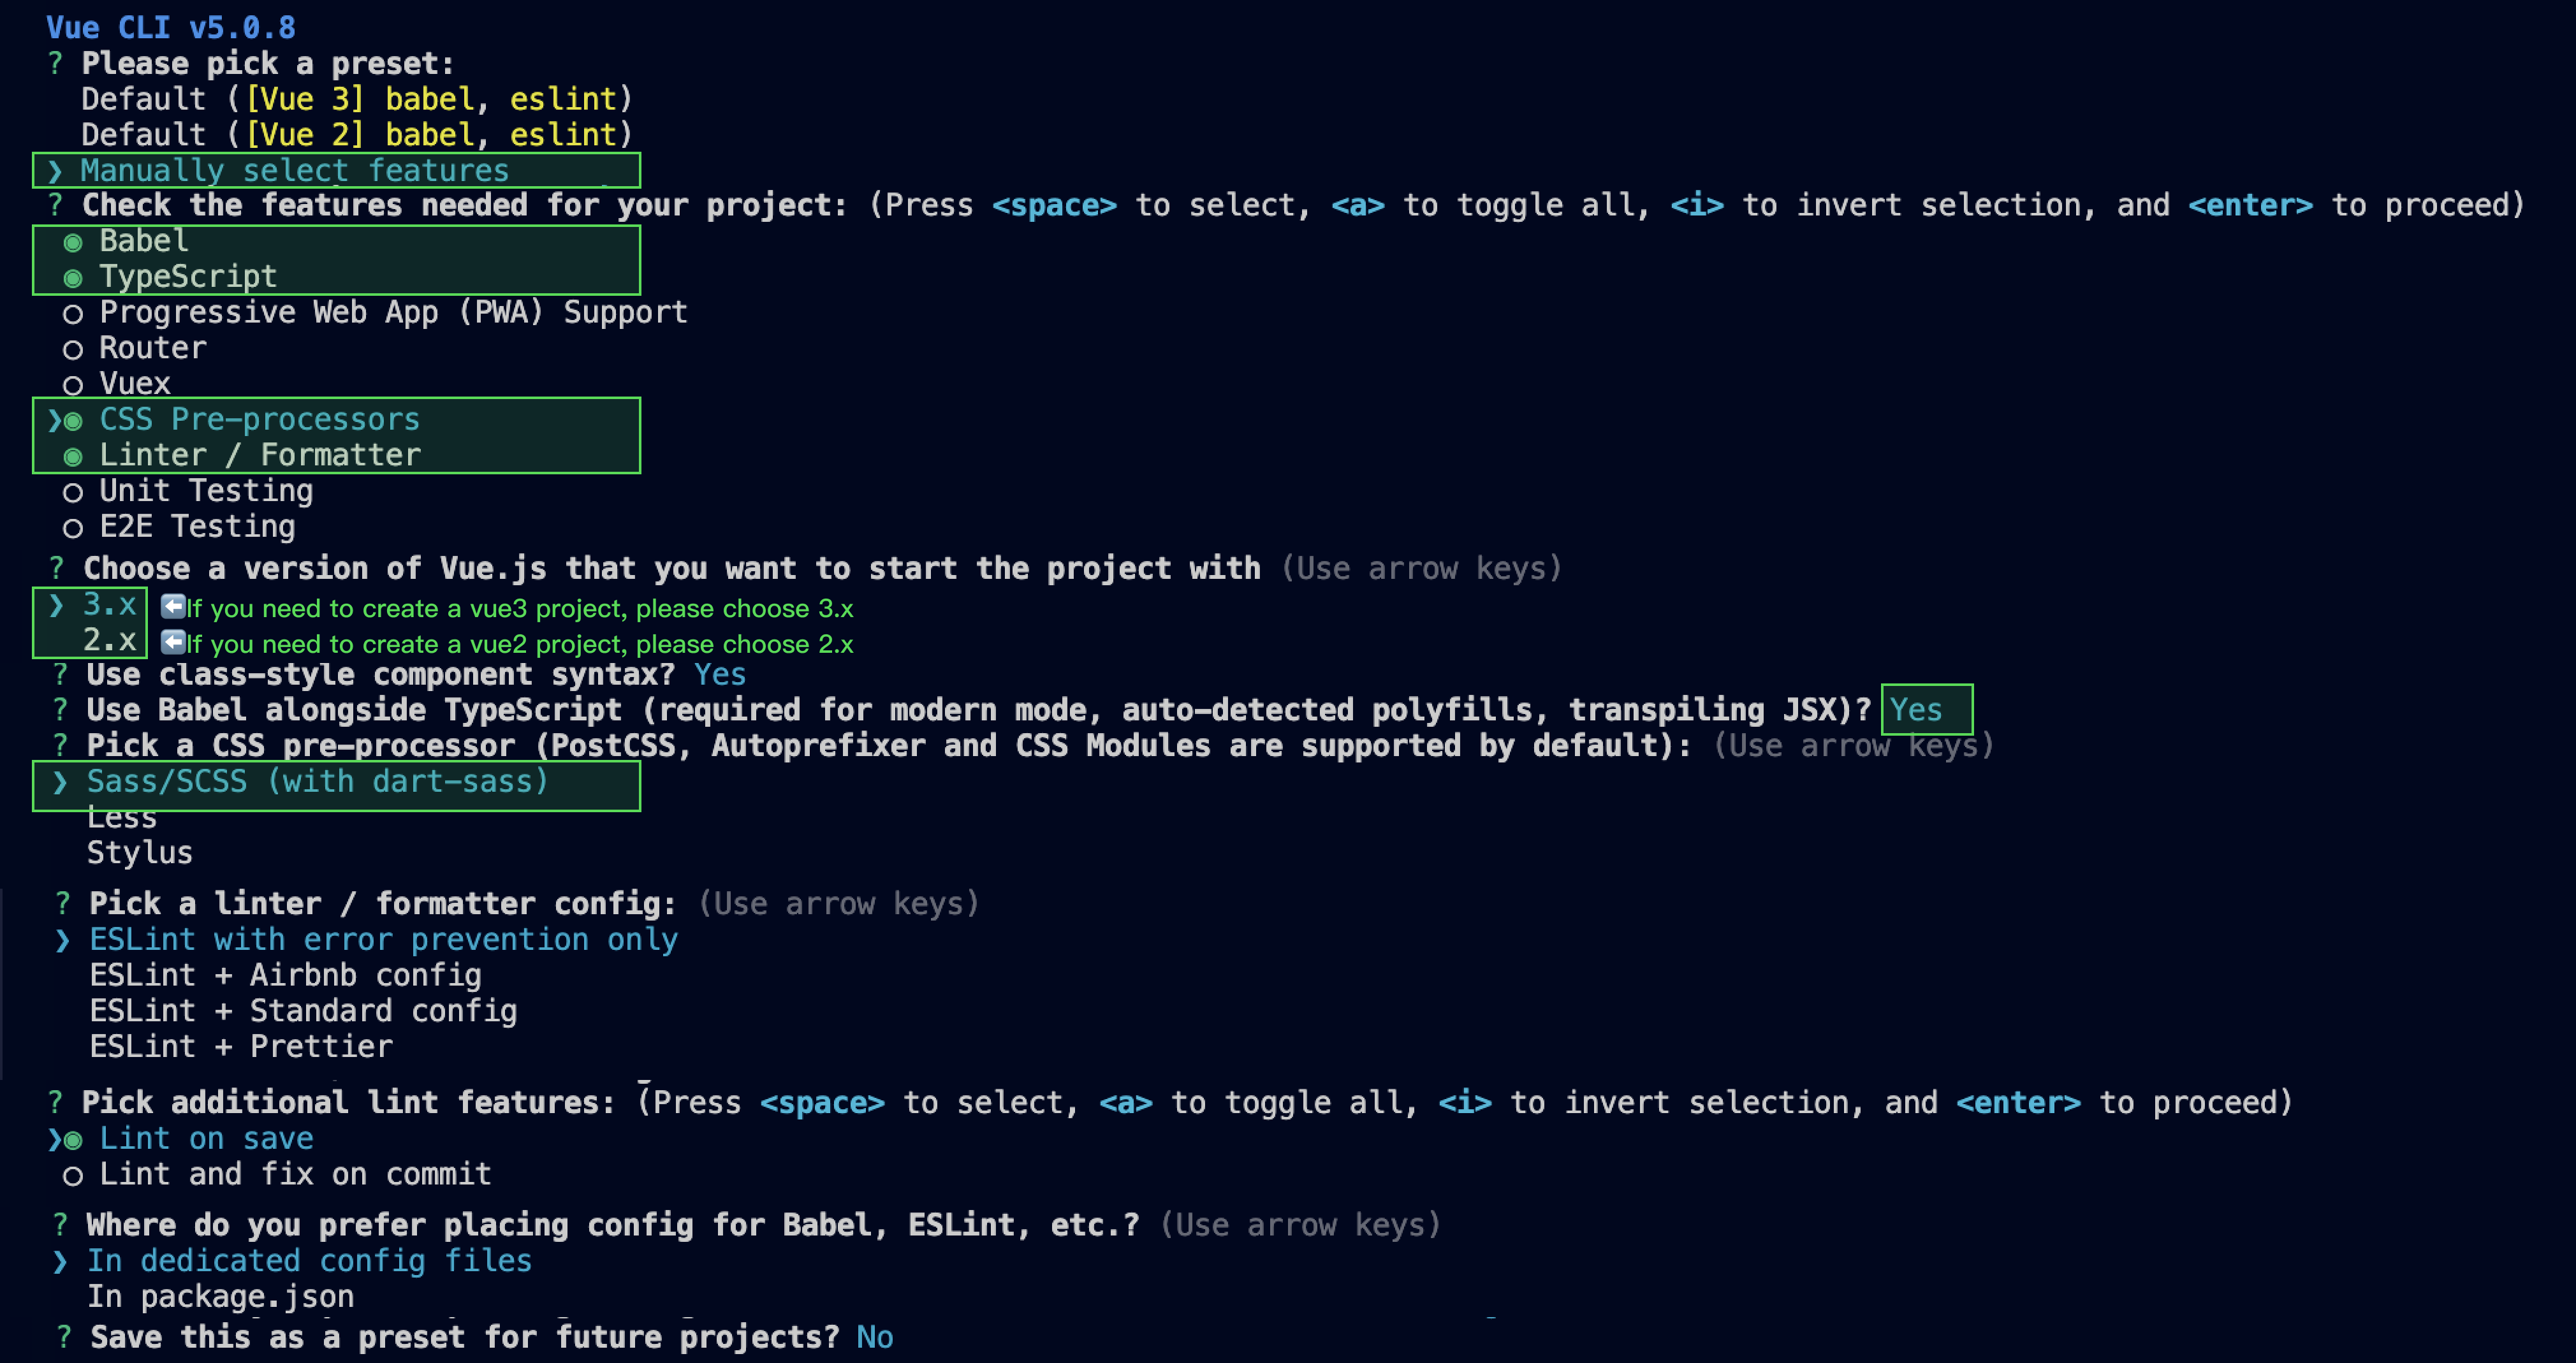
Create a project through Vue CLI and select the configuration items depicted below.
vue create chat-example
Please make sure to select according to the following configuration:
After creation, switch to the directory where the project is located:
cd chat-example
If you are a vue2 project, please make the following corresponding environment configurations based on the Vue version you are using.
IIf you are a vue2 project, please ignore.
vue2.7
Vue 2.6 and below
npm i vue@2.7.9 vue-template-compiler@2.7.9
npm i @vue/composition-api unplugin-vue2-script-setup vue@2.6.14 vue-template-compiler@2.6.14
Please Note:
Vite requires Node.js versions 18+, 20+. Pay attention to upgrade your Node version when your package manager issues a warning, for more details refer to Vite official website.
Create a project using Vite, configure Vue + TypeScript according to the options in the picture below.
npm create vite@latest
Then, switch to the project directory, and install the project dependencies.
cd chat-example
npminstall
Install the sass environment dependency required for TUIKit:
npm i -D sass sass-loader
Step 2. Download the TUIKit component
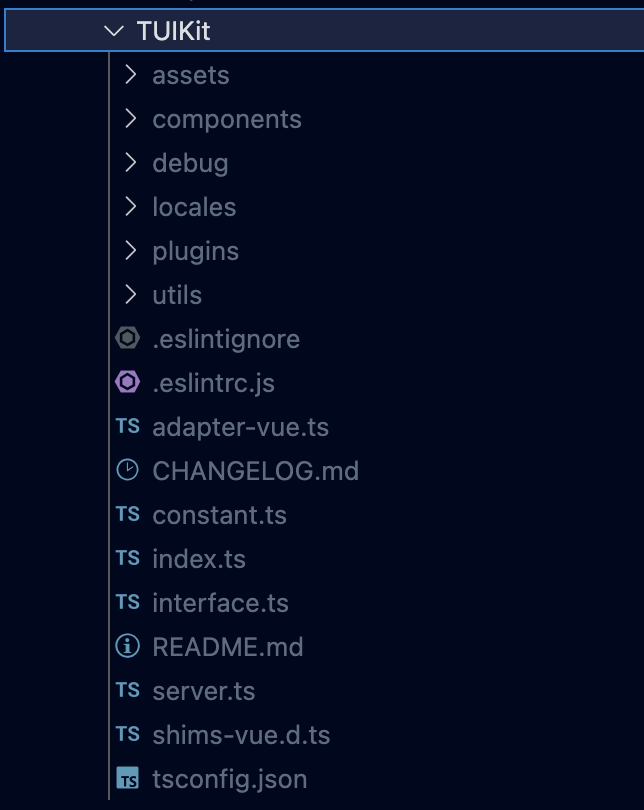
Download the TUIKit component through npm. To facilitate your subsequent expansion, it is recommended that you copy the TUIKit component to the src directory of your project:
// UserSig is a password used to log in to IM. It is the ciphertext obtained after data such as UserID is encrypted.
// this method is only suitable for locally running a demo project and feature debugging. https://www.tencentcloud.com/document/product/269/32688?from_cn_redirect=1
// UserSig is a password used to log in to IM. It is the ciphertext obtained after data such as UserID is encrypted.
// this method is only suitable for locally running a demo project and feature debugging. https://www.tencentcloud.com/document/product/269/32688?from_cn_redirect=1
userSig:genTestUserSig({
SDKAppID,
secretKey,
userID,
}).userSig,
useUploadPlugin:true,
// Local review can identify and handle unsafe and inappropriate content, safeguarding your product experience and business security
// This function is a value-added service, for reference please visit: https://www.tencentcloud.com/document/product/269/79139?from_cn_redirect=1
// If you have purchased the content review service, please set this feature to `true`
useProfanityFilterPlugin:false,
framework:"vue2",
});
Vue.config.productionTip =false;
newVue({
render:(h)=>h(App),
}).$mount("#app");
export{ SDKAppID, secretKey };
Step 4: Secure SDKAppID, secretKey, and userID
Set the relevant parameters SDKAppID, secretKey, and userID in the example code of the main.ts / main.js file:
Step 5: Please input userID / groupID to start a chat
Note:
conversationID: Session ID. The composition of the Session ID:
C2C${userID} (C2C chat)
GROUP${groupID} (Group chat)
About group chat:
The groupID can be obtained by calling the API createGroup
If it's a live chat group, you need to join the group by calling the API joinGroup before enter chat.
Enter the Chat
Invoke the API switchConversation and input a 'conversationID' to enter the chat interface.
Vue3 Version
Vue 2.7 Version
Vue2.6 or lower versions
For example: In the App.vue page, use TUIChat and TUICallKit to quickly build a chat interface (the following sample code supports both the Web side and the H5 side).
For example: In the App.vue page, use TUIChat and TUICallKit to quickly build a chat interface (the following sample code supports both the Web side and the H5 side).
parallel:false,// disable thread-loader, which is not compactible with this plugin
configureWebpack:{
plugins:[
ScriptSetup({
/* options */
}),
],
},
chainWebpack(config){
// disable type check and let `vue-tsc` handles it
config.plugins.delete("fork-ts-checker");
},
};
4. Replace the export source at the end of the src/TUIKit/adapter-vue.ts file:
// Initial notation
export*from"vue";
// Replace with
export*from"@vue/composition-api";
5. For example: In the App.vue page, use TUIChat and TUICallKit to quickly build a chat interface (the following sample code supports both the Web side and the H5 side).
A UserSig is a password with which you can log in to use IM service. It is the ciphertext generated by encrypting information such as userID.
The issuance of UserSig is achieved by integrating the calculation code for UserSig into your server-side, whilst providing an interface designed for your project. Whenever UserSig is required, your project could request the operational server for a dynamic UserSig. For further information, please refer to Generating UserSig on the server-side.
Caution
The method to obtain UserSig demonstrated in this document utilizes the configuration of a SECRETKEY within the client-side code. Within this procedure, the SECRETKEY is notably vulnerable to decompilation and reverse-engineering. Should your SECRETKEY be leaked, malefactors could potentially exploit your Tencent Cloud traffic. Therefore, this technique is only appropriate for local operation and functional debugging. For the correct method of issuing UserSig, please refer to the earlier text.
If the following errors occur during runtime after connecting as per the steps outlined above, it is imperative that you delete the node_modules directory under the TUIKit folder to ensure the uniqueness of TUIKit's dependencies, preventing issues caused by multiple copies of dependencies.
2. How does a JS project integrate the TUIKit component?
TUIKit exclusively supports the TS environment for operation. You can enable the coexistence of existing JS code in your project with the TS code in TUIKit through progressive configuration of TypeScript.
vue-cli
vite
Please execute the following in the root directory of your engineering project created by the Vue CLI scaffold:
vue add typescript
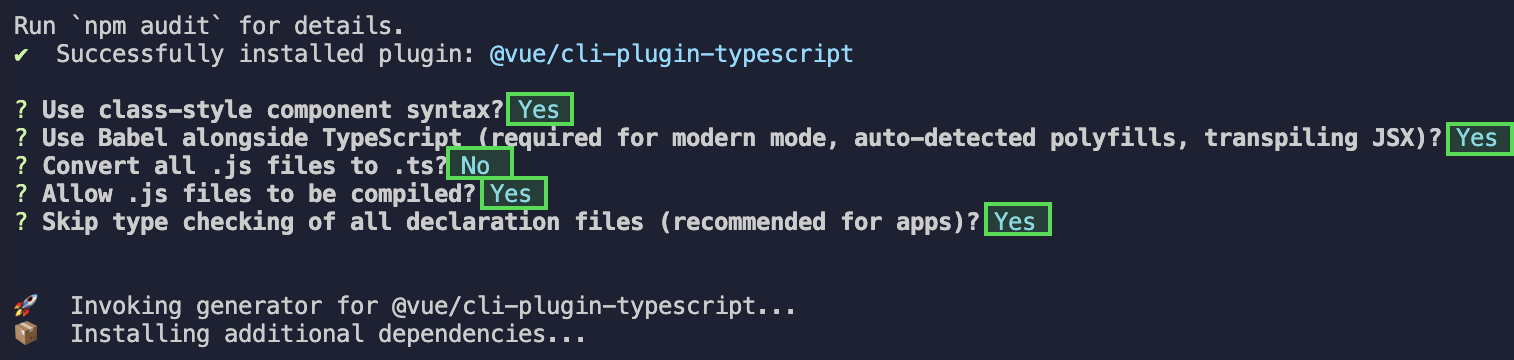
Subsequently, please make selections in accordance with the following configuration options. To assure that we can support both the existing js code and the ts code within TUIKit, it is imperative that you strictly adhere to the five options presented below.
Once these steps are completed, please rerun the project!
Please execute the following command in your project's root directory created with vite:
The above error message appears because your installed @vue/cli version is too low. You must ensure that your @vue/cli version is 5.0.0 or higher. The upgrade method is as follows:
npm install -g @vue/cli@5.0.8
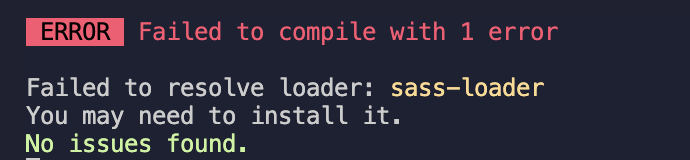
4. Runtime error: Failed to resolve loader: sass-loader
The above error message appears because the `sass` environment is not installed on your machine, please run the following command to install the `sass` environment:
npm i -D sass sass-loader@10.1.1
5. Other ESLint errors?
If copying chat-uikit-vue to the src directory results in error due to inconsistency with your local project code style, you may ignore this component directory. This can be achieved by adding .eslintignore file to the project root directory.
# .eslintignore
src/TUIKit
6. How to disable the full screen overlay error message prompt of webpack in dev mode in vue/cli?
You can disable it in the vue.config.js file at the root directory of your project:
webpack4
webpack3
module.exports =defineConfig({
...
devServer:{
client:{
overlay:false,
},
},
});
module.exports ={
...
devServer:{
overlay:false,
},
};
7. What to do when encountering 'Component name "XXXX" should always be multi-word'?
The version of ESLint utilized in IM TUIKit web is v6.7.2, which does not rigidly verify the camelCase format for module names.
Should you encounter this dilemma, you may configure as follows in the .eslintrc.js file:
module.exports ={
...
rules: {
...
'vue/multi-word-component-names':'warn',
},
};
8. What should I do if I encounter ERESOLVE unable to resolve dependency tree?
If ERESOLVE unable to resolve dependency tree appears when npm install is run, it indicates a conflict in dependency installation. The following method can be adopted for installation:
npminstall --legacy-peer-deps
9. How might one address the error message, 'vue packages version mismatch' occurring during execution?
// If you are using a vue2.7 project, please execute in your project root directory
npm i vue@2.7.9 vue-template-compiler@2.7.9
// If you have a Vue2.6 project, please execute in your project's root directory
npm i vue@2.6.14 vue-template-compiler@2.6.14
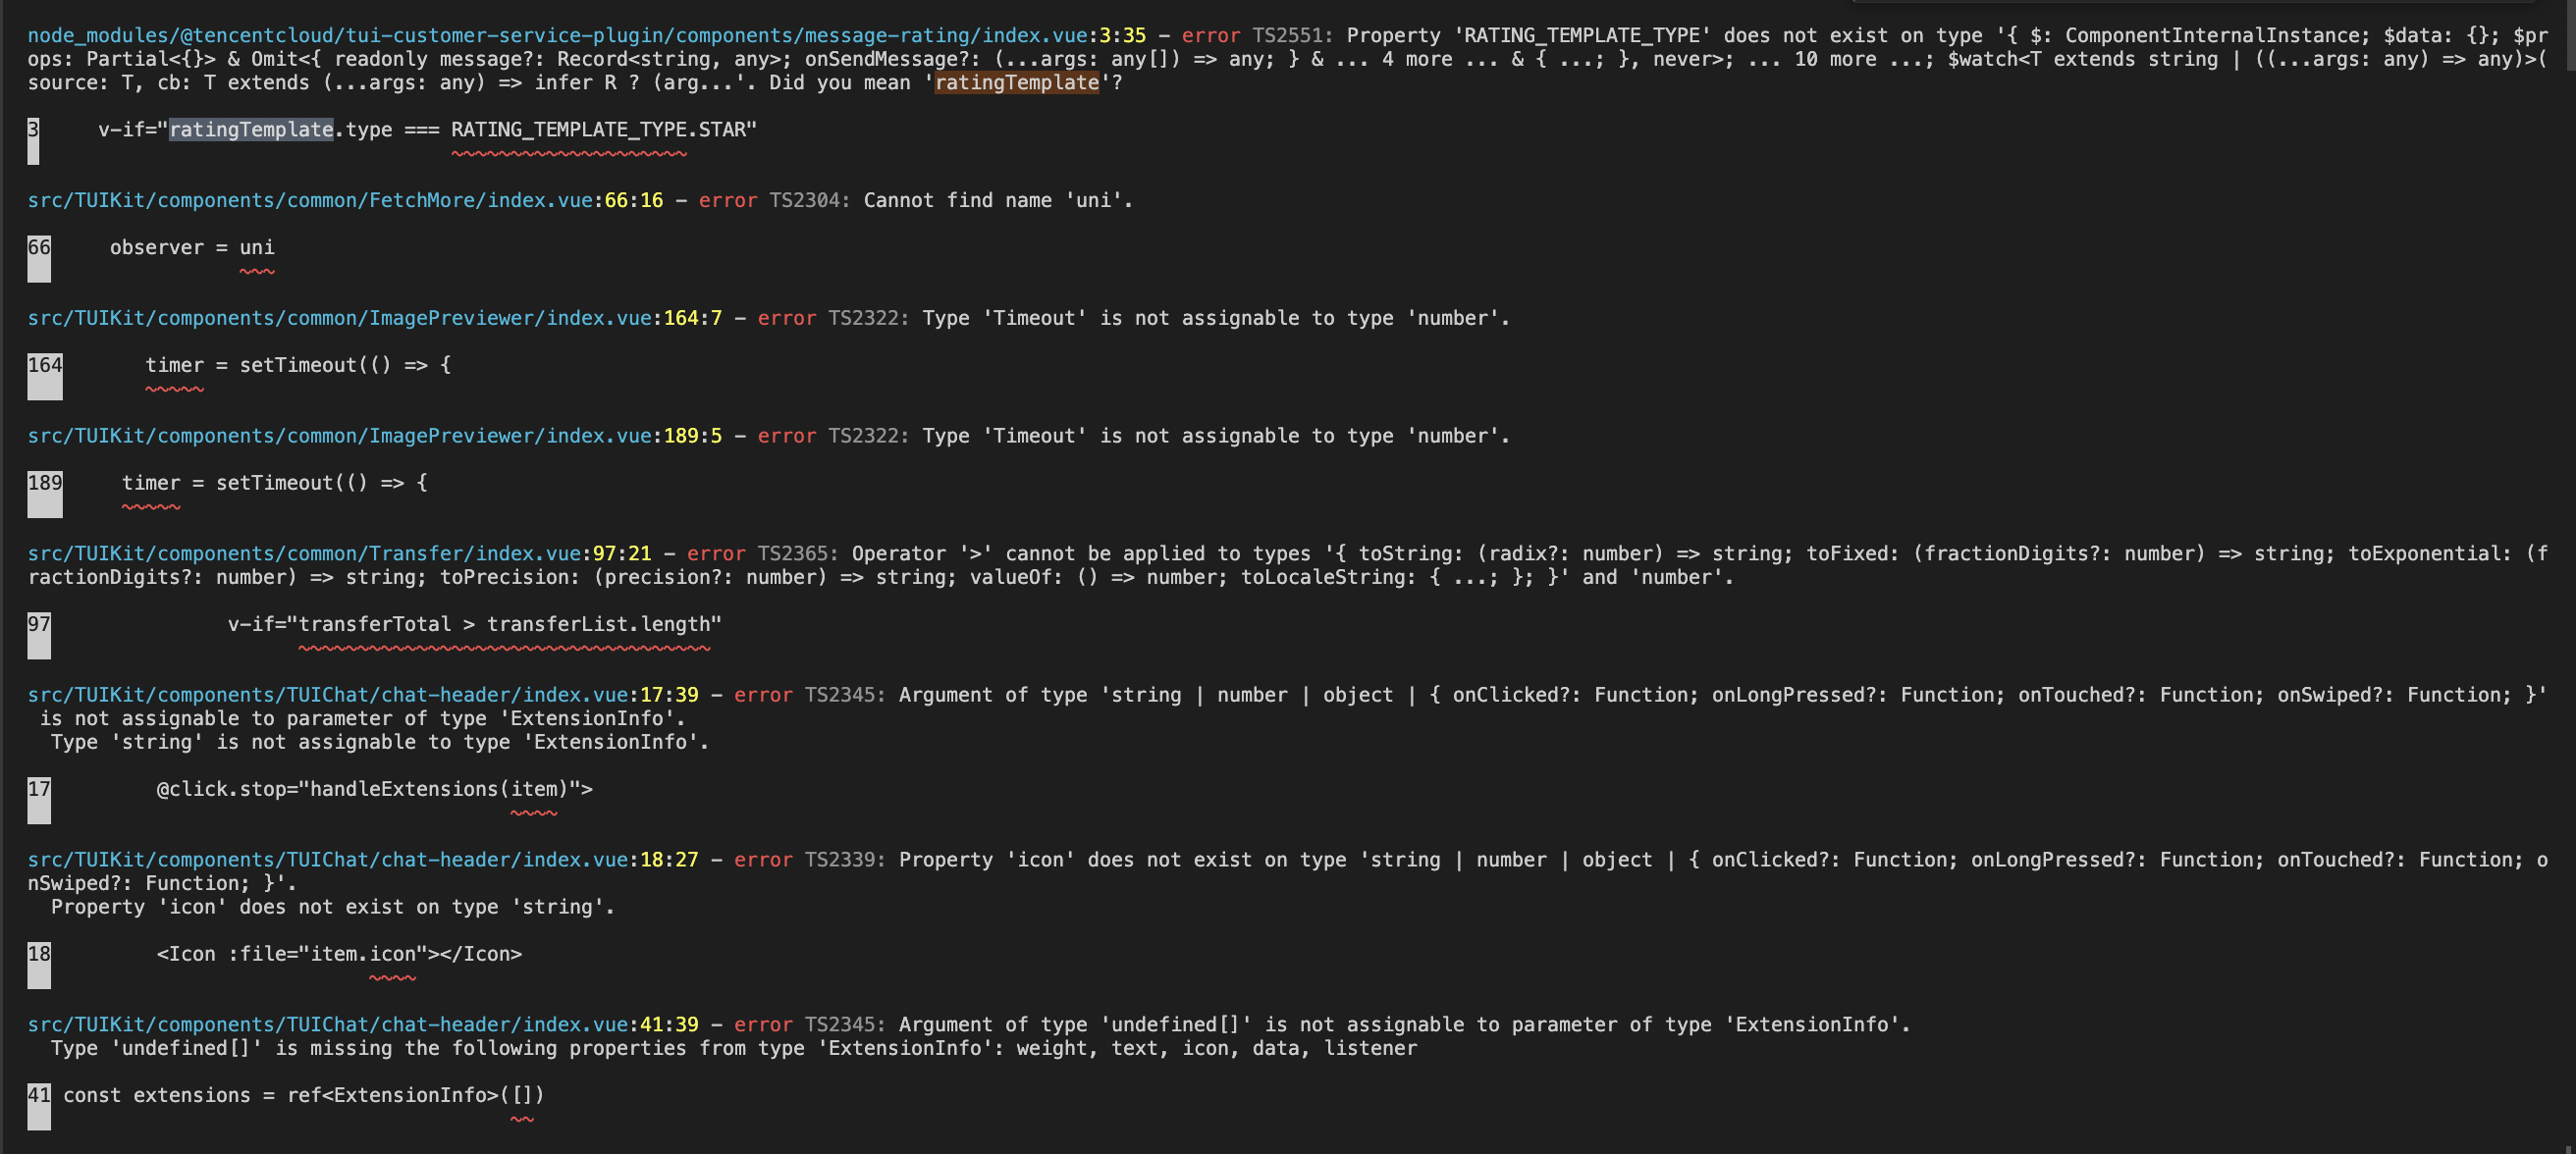
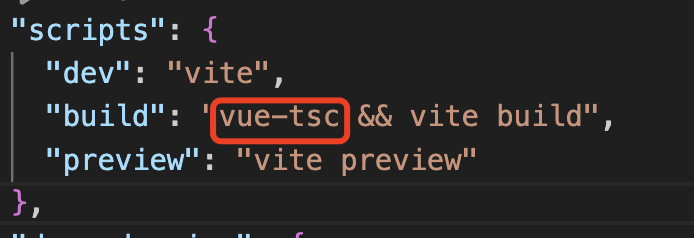
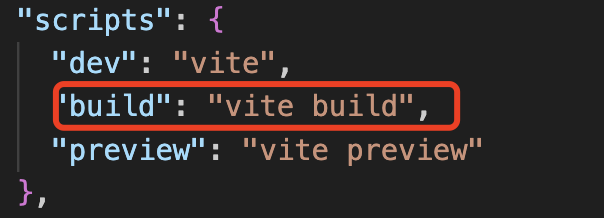
10. Why does TypeScript report an error after npm run build in a Vite project?
Reason: It's led by the vue-tsc command in "build": "vue-tsc && vite build" under package.json script.


 はい
はい
 いいえ
いいえ
この記事はお役に立ちましたか?