Uniapp platform, independent integration of Client-to-Client chat (1V1) or group chat(Group), like property agency consultation, e-commerce online customer service, and remote insurance loss assessment, etc.
Environment Requirements
HBuilderX (HBuilderX version >= 3.8.4.20230531) or upgrade to the latest version
Vue2 / Vue3
Sass (sass-loader version ≤ 10.1.1)
Node (12.13.0 ≤ node version ≤ 17.0.0. The official LTS version 16.17.0 of Node.js is recommended.)
npm (use a version that matches the Node version in use)
Integrating TUIChat
Proceed through the following steps to dispatch your inaugural message.
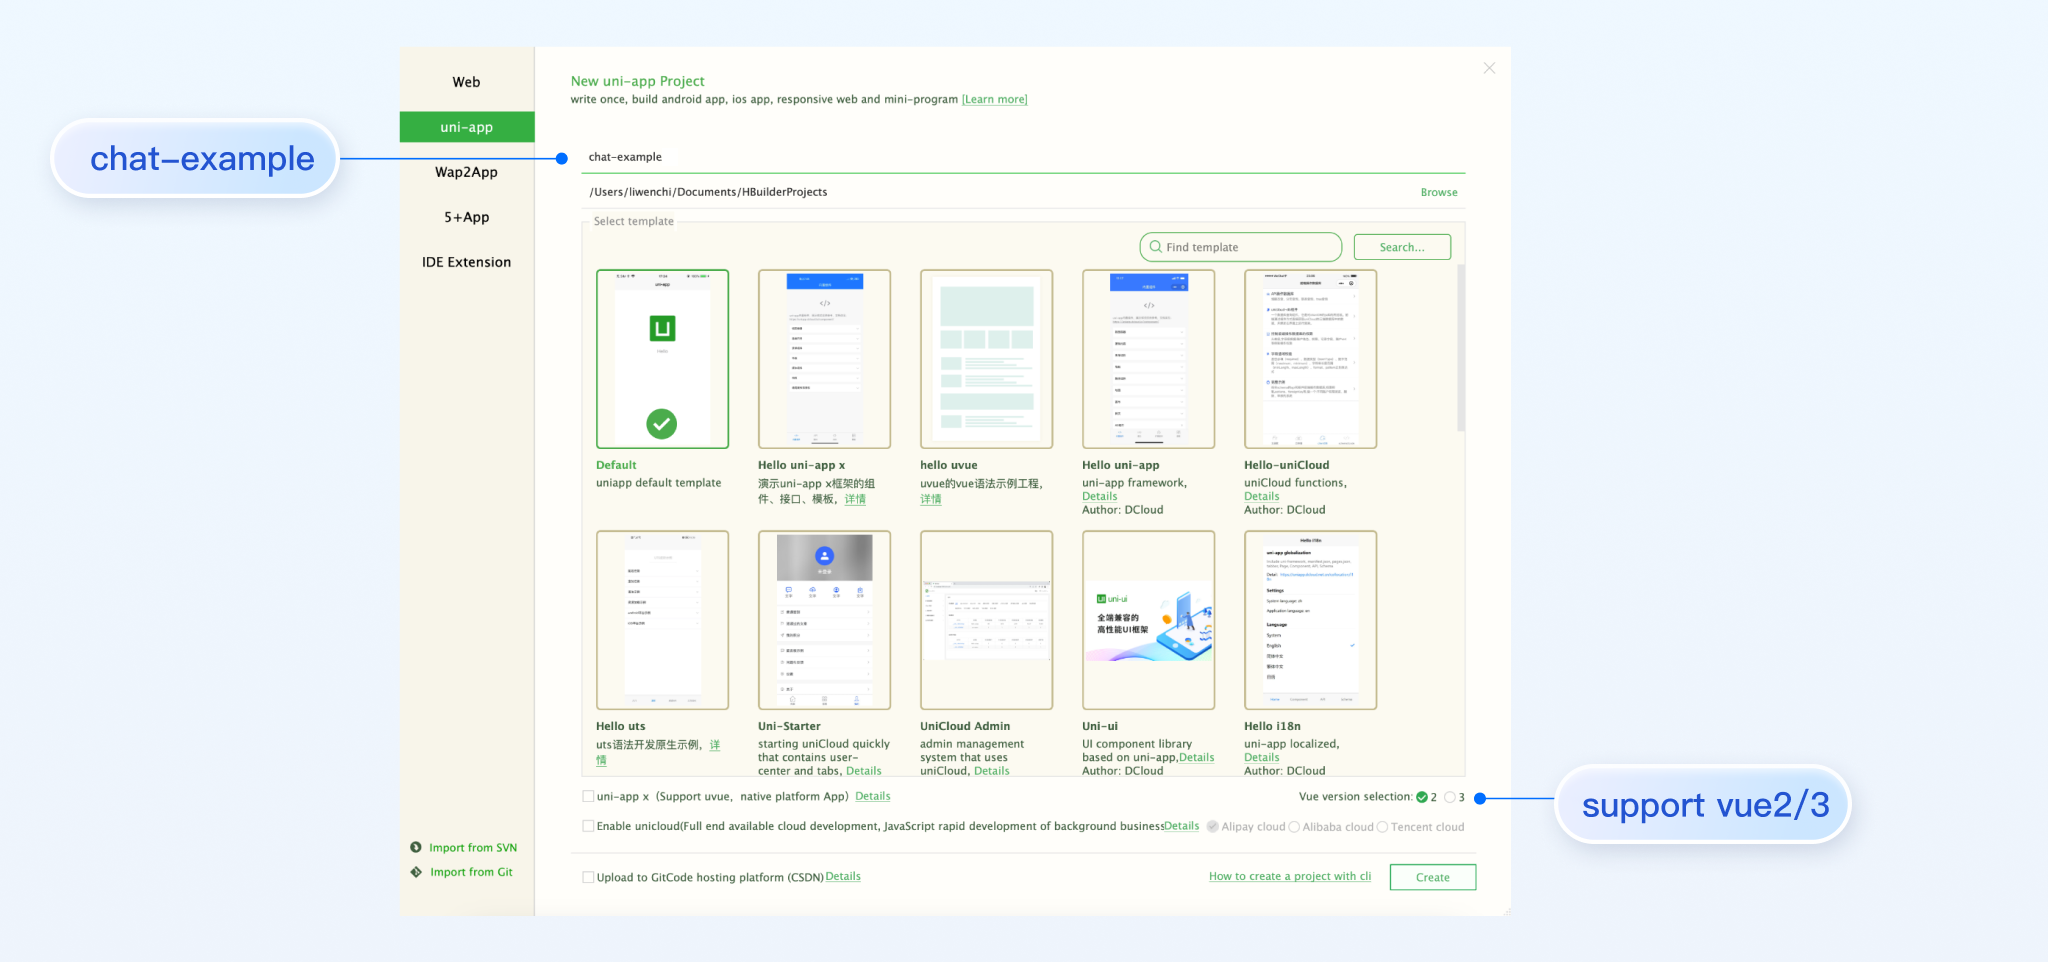
Step 1: create a project
Launch HbuilderX, navigate to "File-New-Project" in the menu bar, and create a uni-app project named chat-example.
Step 2: Introduce the TUIKit component
Since HBuilderX does not create package.json files by default, you need to proactively create one. Execute the following command in the root directory of the project:
npm i @tencentcloud/chat-uikit-uniapp unplugin-vue2-script-setup
To facilitate your subsequent expansion, it is recommended to copy the TUIKit component to the pages directory of your project. Please execute the following command at the root directory of your project:
npm i @tencentcloud/chat-uikit-uniapp unplugin-vue2-script-setup
To facilitate your subsequent expansion, it is recommended to copy the TUIKit component to the pages directory of your project. Please execute the following command at the root directory of your project:
// disable type check and let `vue-tsc` handles it
config.plugins.delete('fork-ts-checker');
},
};
Activate the split package configuration in the source code view of the manifest.json file
{
"mp-weixin":{
"appid":"",
"optimization":{
"subPackages":true
}
},
"h5":{
"optimization":{
"treeShaking":{
"enable":false
}
}
}
}
2. The Integration of TUIKit
Note:
Pursue the integration stringently in Four Steps. If you wish to package a Mini Program, please do not bypass the configuration of the "Home page of Mini Program Sub-package".
main.js file
pages.json file
App.vue file
Mini Program Sub-package Home Page
Pay heed, under Vue2 environment, make use of Vue.use(VueCompositionAPI) , to prevent inability to use environment variables such as isPC.
// UserSig is the cipher for users to sign in to Instant Messaging, essentially being the ciphertext obtained from encrypting information such as UserID.
// This method is only suitable for running the Demo locally and debugging functions. For more information, please refer to https://www.tencentcloud.com/document/product/269/32688?from_cn_redirect=1
userSig: uni.$chat_userSig,
// Should you require to send image, voice, video, file and other rich media messages, please set `Setting` to `true`
useUploadPlugin:true,
// Local review can successfully identify and handle inappropriate and unsafe content, thereby ensuring the safety and enhancing the user experience of your products
// This functionality is a value-added service, please refer to: https://www.tencentcloud.com/document/product/269/79139?from_cn_redirect=1
// If you have purchased the content review service, to activate this feature please set it to `true`
useProfanityFilterPlugin:false,
framework:`vue${vueVersion}`// Current development uses framework vue2 / vue3
});
// #endif
},
onShow:function(){
console.log('App Show')
},
onHide:function(){
console.log('App Hide')
}
};
</script>
<style>
/*Common CSS for each page*/
uni-page-body,
html,
body,
page {
width:100%!important;
height:100%!important;
overflow: hidden;
}
</style>
Example: Mini program sub-package TUIKit's first launch page is the TUIChat page (if you don't need to package the mini program, you can ignore this configuration page).
Please add the following content to the file path:TUIKit/components/TUIChat/index.vue:
Due to compatibility issues with conditional compilation, the following conditional compilation code must be written below the const variable.
// Initialization of TUIChatKit
// Attention: Due to the compatibility issues of conditional compilation, the following conditional compilation code must be written below the const variable
// #ifdef MP-WEIXIN
TUIChatKit.init();
uni.$chat_userSig =genTestUserSig({
userID: uni.$chat_userID,
SDKAppID: uni.$chat_SDKAppID,
secretKey: uni.$chat_secretKey
}).userSig;
onLoad((options)=>{
// login
TUILogin.login({
SDKAppID: uni.$chat_SDKAppID,
userID: uni.$chat_userID,
// UserSig is the cipher for users to sign in to Instant Messaging, essentially being the ciphertext obtained from encrypting information such as UserID.
// This method is only suitable for running Demo locally and debugging functions. For details, please refer to https://www.tencentcloud.com/document/product/269/32688?from_cn_redirect=1
userSig: uni.$chat_userSig,
// Should you require to send image, voice, video, file and other rich media messages, please set `Setting` to `true`
useUploadPlugin:true,
// Local review can successfully identify and handle inappropriate and unsafe content, thereby ensuring the safety and enhancing the user experience of your products
// This functionality is a value-added service, please refer to: https://www.tencentcloud.com/document/product/269/79139?from_cn_redirect=1
// If you have purchased the content review service, to activate this feature please set it to `true`
useProfanityFilterPlugin:false,
framework:`vue${vueVersion}`// Current development uses framework vue2 / vue3
Step 4: Get access to SDKAppID, secretKey, and userID
Within the App.vue file under the root directory of configuration, access the config object's SDKAppID, secretKey, and userID. The SDKAppID and secretKey can be accessed through the Instant Messaging console, while the userID can be obtained during account creation in the Instant Messaging console.
// Mandatory information
const config ={
userID:"test-user1",// Login User ID
SDKAppID:0,// Your SDKAppID
secretKey:"",// Your secretKey
};
access SDKAppID, secretKey
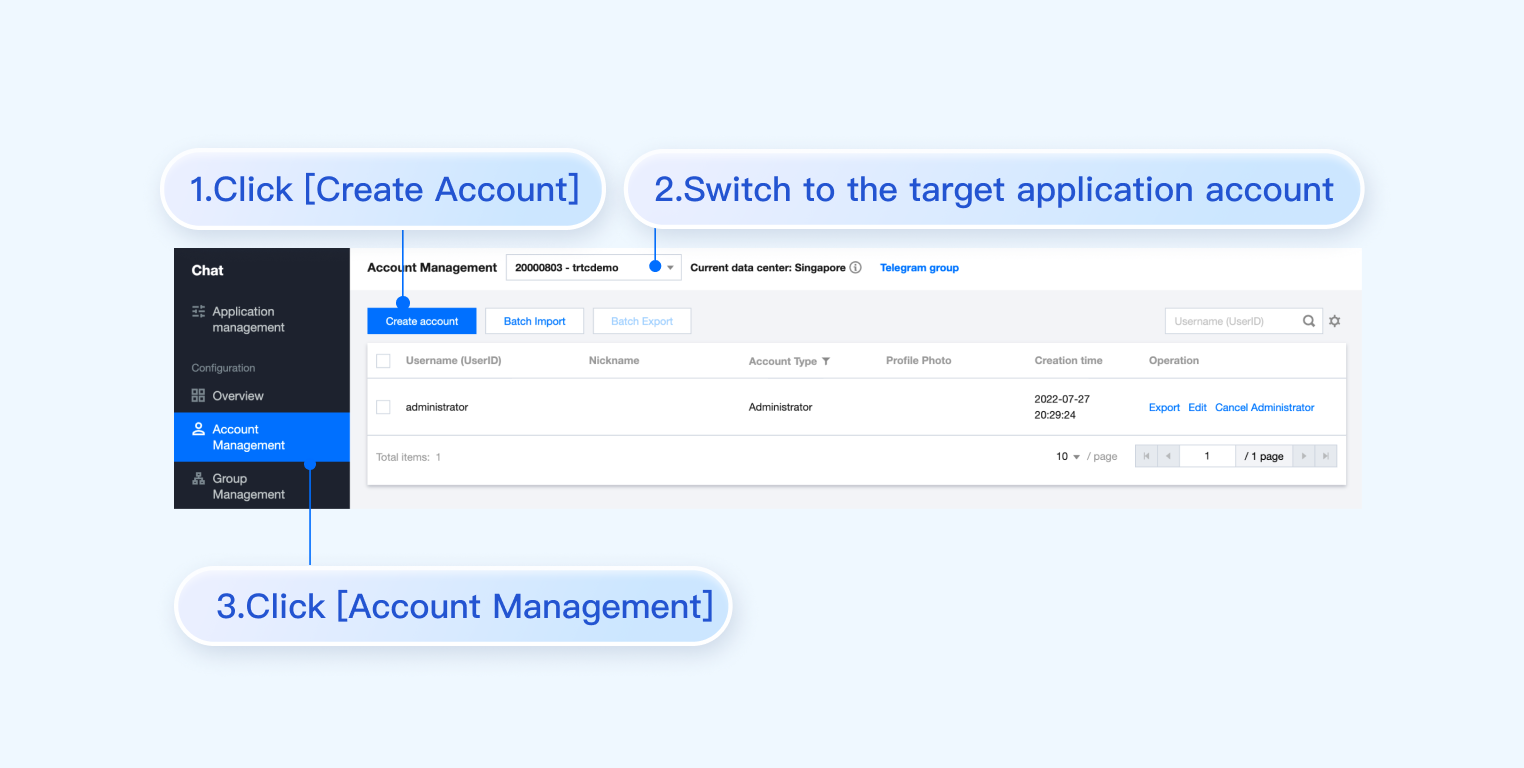
In the Instant Messaging console, under the application management page, you can see the application you have created. The second column is the SDKAppID. Then click on 'peekKey' under operations. A dialog box for 'peekKey' will pop up on the web sites. Then, by clicking on 'Show Key', you can retrieve the 'peekKey'.
Create an account with `userID` as `test-user1`
Note:
The step of creating an account can be circumvented as TUIKit will auto-generate an account during the sign in process if the configuration's userID does not exist. This only demonstrates how to access the userID.
Click on Account Management on the left side of the console. If you have multiple applications, please make sure to switch to the current application. Then click on Create New Account under the current application to create an account with userID test-user1.
Step 5: Configuration of 1v1 chat and group chat entrances on the main package homepage of the project
Create an index.vue file under the pages/index folder, and enter the userID/groupID:
Note:
conversationID: Session ID. The composition method of the Session ID:
C2C${userID} (Private chat)
GROUP${groupID} (Group chat)
Regarding group chat:
Obtaining the corresponding groupID after creating a group through invoking createGroup
If it is a live broadcast group, you need to join the group by calling the API joinGroup before you can chat.
userID:"test-user2",// Please input the opposite-end userID. Refer to Step 6
groupID:"",// Accessible groupID by invoking API createGroup, for more details, refer to: https://web.sdk.qcloud.com/im/doc/chat-engine/ITUIGroupService.html#createGroup
From the left sidebar of the console, navigate to the Account Management page, click Create New Account and create a regular account, userID: test-user2.
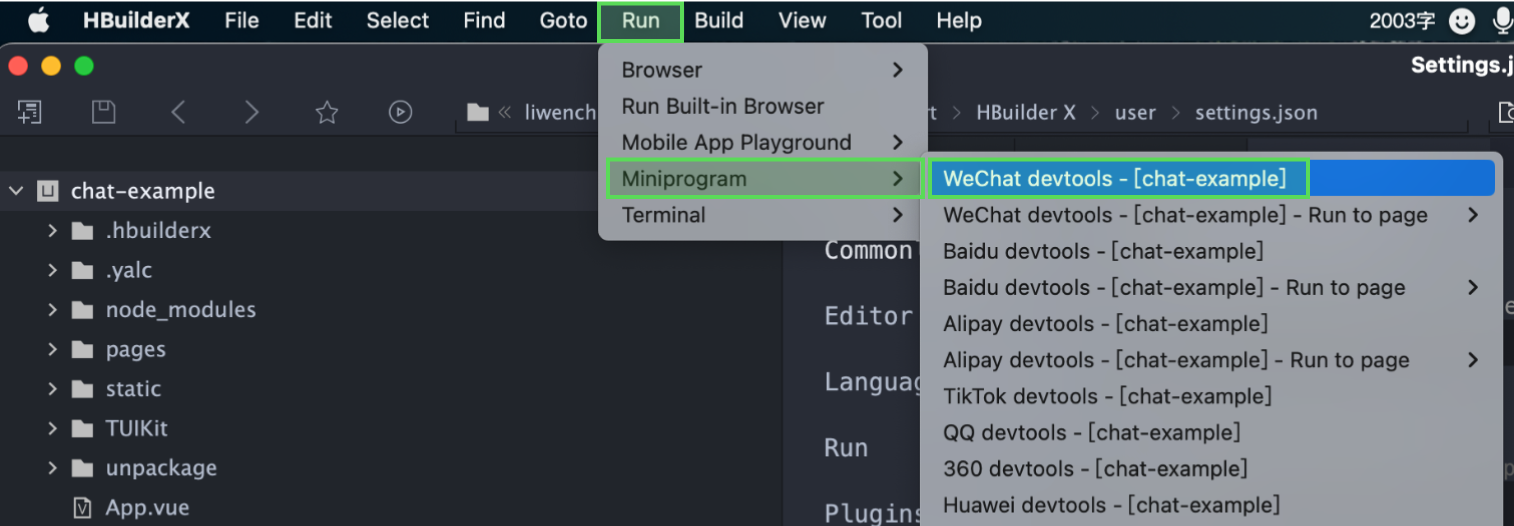
2. Launch the project using HBuilderX, clickRun > Run to Mini Program Simulator > WeChat Developer Tools.
3. Should HBuilderX fail to automatically activate the WeChat Developer Toolkit, kindly use the toolkit to manually open the compiled project.
Open the unpackage/dist/dev/mp-weixin under the project root directory using the WeChat Developer Tool.
4. Upon opening the project, check Do not verify legitimate domain name, web-view (business domain name), TLS version, and HTTPS certificate in the Details > Local Setting of the WeChat Developer Tool.
5. Initiate a Conversation
Click open 1v1 chat, and convey your inaugural message.
Additional Advanced Features
Audio-Visual Communication TUICallKit Plugin
Note:
The TUICallKit audio/video component is not integrated by default in TUIKit,TUICallKit primarily handles voice and video calls.
Should you need to integrate call functionalities, kindly refer to the following documents for guidelines.
For packaging into APP, refer to: Audio/Video Calling (Client)
For packaging to Miniprogram, please refer to: Video Calls(Miniprogram)
For packaging into HTML5, please refer to the official documentation: Audio and Video Calls (HTML5)
Please look forward to it.
TIMPush Offline Push Plugin
Indication
The TUIKit does not incorporate TIMPush, the offline push plugin, by default. TIMPush is the Tencent Cloud's Instant Messaging Push plugin. Presently, offline push technology is supported on Android and iOS platforms, catering to devices from Huawei, Xiaomi, OPPO, vivo, Meizu and Apple.
If you need to integrate offline push capabilities into your app, please refer to the uni-app offline push implementation.
Please look forward to it.
FAQs
1. In the scenario of independent integration, how can the unread conversation count be cleared?
In response: during the execution of "Step 2 -> Integration TUIKit Components -> Sub-Program Home Page", TUIChat invokes the TUIConversationService.switchConversation() method in the onLoad event. This method proactively clears the current conversation's unread count, thus there is no need for manually deleting the unread count.
For additional inquiries, please refer to Uniapp FAQ.


 はい
はい
 いいえ
いいえ
この記事はお役に立ちましたか?