- Release Notes
- Product Introduction
- Purchase Guide
- Getting Started
- Operation Guide
- Troubleshooting
- API Documentation
- History
- Introduction
- API Category
- Making API Requests
- Cluster Security APIs
- SetCheckMode
- DescribeUserCluster
- DescribeUnfinishRefreshTask
- DescribeTaskResultSummary
- DescribeRiskList
- DescribeRefreshTask
- DescribeClusterSummary
- DescribeClusterDetail
- DescribeCheckItemList
- DescribeAffectedWorkloadList
- DescribeAffectedNodeList
- DescribeAffectedClusterCount
- CreateRefreshTask
- CreateClusterCheckTask
- CreateCheckComponent
- Network Security APIs
- UpdateNetworkFirewallPolicyYamlDetail
- UpdateNetworkFirewallPolicyDetail
- UpdateAndPublishNetworkFirewallPolicyYamlDetail
- UpdateAndPublishNetworkFirewallPolicyDetail
- DescribeNetworkFirewallPolicyYamlDetail
- DescribeNetworkFirewallPolicyStatus
- DescribeNetworkFirewallPolicyList
- DescribeNetworkFirewallPolicyDiscover
- DescribeNetworkFirewallPolicyDetail
- DescribeNetworkFirewallPodLabelsList
- DescribeNetworkFirewallNamespaceLabelList
- DescribeNetworkFirewallClusterRefreshStatus
- DescribeNetworkFirewallClusterList
- DescribeNetworkFirewallAuditRecord
- DeleteNetworkFirewallPolicyDetail
- CreateNetworkFirewallUndoPublish
- CreateNetworkFirewallPublish
- CreateNetworkFirewallPolicyDiscover
- CreateNetworkFirewallClusterRefresh
- ConfirmNetworkFirewallPolicy
- CheckNetworkFirewallPolicyYaml
- AddNetworkFirewallPolicyYamlDetail
- AddNetworkFirewallPolicyDetail
- AddAndPublishNetworkFirewallPolicyYamlDetail
- AddAndPublishNetworkFirewallPolicyDetail
- Security Compliance APIs
- ScanComplianceScanFailedAssets
- ScanCompliancePolicyItems
- ScanComplianceAssetsByPolicyItem
- ScanComplianceAssets
- ModifyCompliancePeriodTask
- InitializeUserComplianceEnvironment
- DescribeComplianceWhitelistItemList
- DescribeComplianceTaskPolicyItemSummaryList
- DescribeComplianceTaskAssetSummary
- DescribeComplianceScanFailedAssetList
- DescribeCompliancePolicyItemAffectedSummary
- DescribeCompliancePolicyItemAffectedAssetList
- DescribeCompliancePeriodTaskList
- DescribeComplianceAssetPolicyItemList
- DescribeComplianceAssetList
- DescribeComplianceAssetDetailInfo
- DeleteCompliancePolicyItemFromWhitelist
- DeleteCompliancePolicyAssetSetFromWhitelist
- DeleteComplianceAssetPolicySetFromWhitelist
- CreateExportComplianceStatusListJob
- CreateComplianceTask
- AddCompliancePolicyItemToWhitelist
- AddCompliancePolicyAssetSetToWhitelist
- AddComplianceAssetPolicySetToWhitelist
- Runtime security - High-risk syscalls
- Runtime Security - Reverse Shell APIs
- Runtime Security - Container Escape APIs
- ModifyEscapeWhiteList
- ModifyEscapeRule
- ModifyEscapeEventStatus
- DescribeEscapeWhiteList
- DescribeEscapeSafeState
- DescribeEscapeRuleInfo
- DescribeEscapeEventsExport
- DescribeEscapeEventTypeSummary
- DescribeEscapeEventTendency
- DescribeEscapeEventInfo
- DescribeEscapeEventDetail
- DeleteEscapeWhiteList
- CreateEscapeWhiteListExportJob
- CreateEscapeEventsExportJob
- AddEscapeWhiteList
- Runtime Security APIs
- StopVulScanTask
- OpenTcssTrial
- ModifyAccessControlStatus
- ModifyAccessControlRuleStatus
- ModifyAbnormalProcessStatus
- ModifyAbnormalProcessRuleStatus
- DescribeWebVulList
- DescribeVulScanLocalImageList
- DescribeVulScanInfo
- DescribeVulImageList
- DescribeVulDetail
- DescribeVulContainerList
- DescribeSupportDefenceVul
- DescribeRiskSyscallDetail
- DescribeEmergencyVulList
- DescribeAssetImageBindRuleInfo
- DescribeAccessControlRulesExport
- DescribeAccessControlRules
- DescribeAccessControlRuleDetail
- DescribeAccessControlEventsExport
- DescribeAccessControlEvents
- DescribeAccessControlDetail
- DescribeAbnormalProcessRulesExport
- DescribeAbnormalProcessRules
- DescribeAbnormalProcessRuleDetail
- DescribeAbnormalProcessLevelSummary
- DescribeAbnormalProcessEventsExport
- DescribeAbnormalProcessEvents
- DescribeAbnormalProcessEventTendency
- DescribeAbnormalProcessDetail
- DeleteAccessControlRules
- DeleteAbnormalProcessRules
- CreateWebVulExportJob
- CreateVulScanTask
- CreateVulImageExportJob
- CreateVulContainerExportJob
- CreateSystemVulExportJob
- CreateRiskDnsEventExportJob
- CreateProcessEventsExportJob
- CreateEmergencyVulExportJob
- CreateDefenceVulExportJob
- AddEditRiskSyscallWhiteList
- AddEditAccessControlRule
- AddEditAbnormalProcessRule
- Image Security APIs
- DescribeVulRegistryImageList
- UpdateImageRegistryTimingScanTask
- UpdateAssetImageRegistryRegistryDetail
- SyncAssetImageRegistryAsset
- SwitchImageAutoAuthorizedRule
- RenewImageAuthorizeState
- RemoveAssetImageRegistryRegistryDetail
- ModifyVulDefenceSetting
- ModifyVulDefenceEventStatus
- ModifyImageAuthorized
- ModifyAssetImageScanStop
- ModifyAssetImageRegistryScanStopOneKey
- ModifyAssetImageRegistryScanStop
- ModifyAsset
- DescribeVulTopRanking
- DescribeVulTendency
- DescribeVulSummary
- DescribeVulScanAuthorizedImageSummary
- DescribeVulLevelSummary
- DescribeVulLevelImageSummary
- DescribeVulImageSummary
- DescribeVulIgnoreRegistryImageList
- DescribeVulIgnoreLocalImageList
- DescribeVulDefenceSetting
- DescribeVulDefencePlugin
- DescribeVulDefenceHost
- DescribeVulDefenceEventTendency
- DescribeVulDefenceEventDetail
- DescribeVulDefenceEvent
- DescribeValueAddedSrvInfo
- DescribeSystemVulList
- DescribeSecEventsTendency
- DescribeScanIgnoreVulList
- DescribePostPayDetail
- DescribeNewestVul
- DescribeImageSimpleList
- DescribeImageRiskTendency
- DescribeImageRiskSummary
- DescribeImageRegistryTimingScanTask
- DescribeImageRegistryNamespaceList
- DescribeImageComponentList
- DescribeImageAutoAuthorizedTaskList
- DescribeImageAutoAuthorizedRule
- DescribeImageAutoAuthorizedLogList
- DescribeContainerSecEventSummary
- DescribeContainerAssetSummary
- DescribeAutoAuthorizedRuleHost
- DescribeAssetWebServiceList
- DescribeAssetSummary
- DescribeAssetProcessList
- DescribeAssetPortList
- DescribeAssetImageVulListExport
- DescribeAssetImageVulList
- DescribeAssetImageVirusListExport
- DescribeAssetImageVirusList
- DescribeAssetImageSimpleList
- DescribeAssetImageScanTask
- DescribeAssetImageScanStatus
- DescribeAssetImageScanSetting
- DescribeAssetImageRiskListExport
- DescribeAssetImageRiskList
- DescribeAssetImageRegistryVulListExport
- DescribeAssetImageRegistryVulList
- DescribeAssetImageRegistryVirusListExport
- DescribeAssetImageRegistryVirusList
- DescribeAssetImageRegistrySummary
- DescribeAssetImageRegistryScanStatusOneKey
- DescribeAssetImageRegistryRiskListExport
- DescribeAssetImageRegistryRiskInfoList
- DescribeAssetImageRegistryRegistryList
- DescribeAssetImageRegistryRegistryDetail
- DescribeAssetImageRegistryListExport
- DescribeAssetImageRegistryList
- DescribeAssetImageRegistryDetail
- DescribeAssetImageRegistryAssetStatus
- DescribeAssetImageListExport
- DescribeAssetImageList
- DescribeAssetImageHostList
- DescribeAssetImageDetail
- DescribeAssetHostList
- DescribeAssetHostDetail
- DescribeAssetDBServiceList
- DescribeAssetContainerList
- DescribeAssetContainerDetail
- DescribeAssetComponentList
- DescribeAssetAppServiceList
- DeleteIgnoreVul
- CreateVulExportJob
- CreateVulDefenceHostExportJob
- CreateVulDefenceEventExportJob
- CreateOrModifyPostPayCores
- CreateImageExportJob
- CreateComponentExportJob
- CreateAssetImageScanTask
- CreateAssetImageRegistryScanTaskOneKey
- CreateAssetImageRegistryScanTask
- CheckRepeatAssetImageRegistry
- AddIgnoreVul
- AddEditImageAutoAuthorizedRule
- AddAssetImageRegistryRegistryDetail
- Runtime Security - Trojan Call APIs
- DescribeExportJobResult
- StopVirusScanTask
- ModifyVirusScanTimeoutSetting
- ModifyVirusScanSetting
- ModifyVirusMonitorSetting
- ModifyVirusFileStatus
- ModifyVirusAutoIsolateSetting
- ModifyVirusAutoIsolateExampleSwitch
- ExportVirusList
- DescribeVirusTaskList
- DescribeVirusSummary
- DescribeVirusScanTimeoutSetting
- DescribeVirusScanTaskStatus
- DescribeVirusScanSetting
- DescribeVirusSampleDownloadUrl
- DescribeVirusMonitorSetting
- DescribeVirusManualScanEstimateTimeout
- DescribeVirusList
- DescribeVirusEventTendency
- DescribeVirusDetail
- DescribeVirusAutoIsolateSetting
- DescribeVirusAutoIsolateSampleList
- DescribeVirusAutoIsolateSampleDownloadURL
- DescribeVirusAutoIsolateSampleDetail
- CreateVirusScanTask
- CreateVirusScanAgain
- Asset Management APIs
- ModifyContainerNetStatus
- DescribeUnauthorizedCoresTendency
- DescribeTcssSummary
- DescribePromotionActivity
- DescribeInspectionReport
- DescribeExportJobManageList
- DescribeExportJobDownloadURL
- DescribeAssetSyncLastTime
- DescribeAgentInstallCommand
- DescribeAgentDaemonSetCmd
- DescribeABTestConfig
- DeleteMachine
- CreateHostExportJob
- CreateAssetImageVirusExportJob
- CreateAssetImageScanSetting
- Security Operations - Log Analysis APIs
- ResetSecLogTopicConfig
- ModifySecLogKafkaUIN
- ModifySecLogJoinState
- ModifySecLogJoinObjects
- ModifySecLogDeliveryKafkaSetting
- ModifySecLogDeliveryClsSetting
- ModifySecLogCleanSettingInfo
- DescribeSecLogKafkaUIN
- DescribeSecLogJoinTypeList
- DescribeSecLogJoinObjectList
- DescribeSecLogDeliveryKafkaSetting
- DescribeSecLogDeliveryKafkaOptions
- DescribeSecLogDeliveryClsSetting
- DescribeSecLogDeliveryClsOptions
- DescribeSecLogCleanSettingInfo
- DescribeSecLogAlertMsg
- DescribeSearchTemplates
- DescribeSearchLogs
- DescribeSearchExportList
- DescribePublicKey
- DescribeLogStorageStatistic
- DescribeIndexList
- DescribeESHits
- DescribeESAggregations
- DeleteSearchTemplate
- CreateSearchTemplate
- Alert Settings APIs
- Advanced prevention - K8s API abnormal requests
- ModifyK8sApiAbnormalRuleStatus
- ModifyK8sApiAbnormalRuleInfo
- ModifyK8sApiAbnormalEventStatus
- DescribeK8sApiAbnormalTendency
- DescribeK8sApiAbnormalSummary
- DescribeK8sApiAbnormalRuleScopeList
- DescribeK8sApiAbnormalRuleList
- DescribeK8sApiAbnormalRuleInfo
- DescribeK8sApiAbnormalEventList
- DescribeK8sApiAbnormalEventInfo
- DescribeAssetClusterList
- DeleteK8sApiAbnormalRule
- CreateK8sApiAbnormalRuleInfo
- CreateK8sApiAbnormalRuleExportJob
- CreateK8sApiAbnormalEventExportJob
- CreateAccessControlsRuleExportJob
- Billing APIs
- Data Types
- Error Codes
- FAQs
- TCSS Policy
- Contact Us
- Glossary
This document describes the local image feature and how to enable data scan and view the local image list.

Enabling Data Scan
The data scan module displays the number of images at risk, total number of images, and the numbers of vulnerabilities, viruses, trojans, and sensitive data pieces in the images after the last scan.
Enabling quick scan
1. Log in to the TCSS console and click Image Risk Control > Local Images on the left sidebar.
2. On the Local Images page, click Scan now on the right to scan again and get the latest image data or risk information.

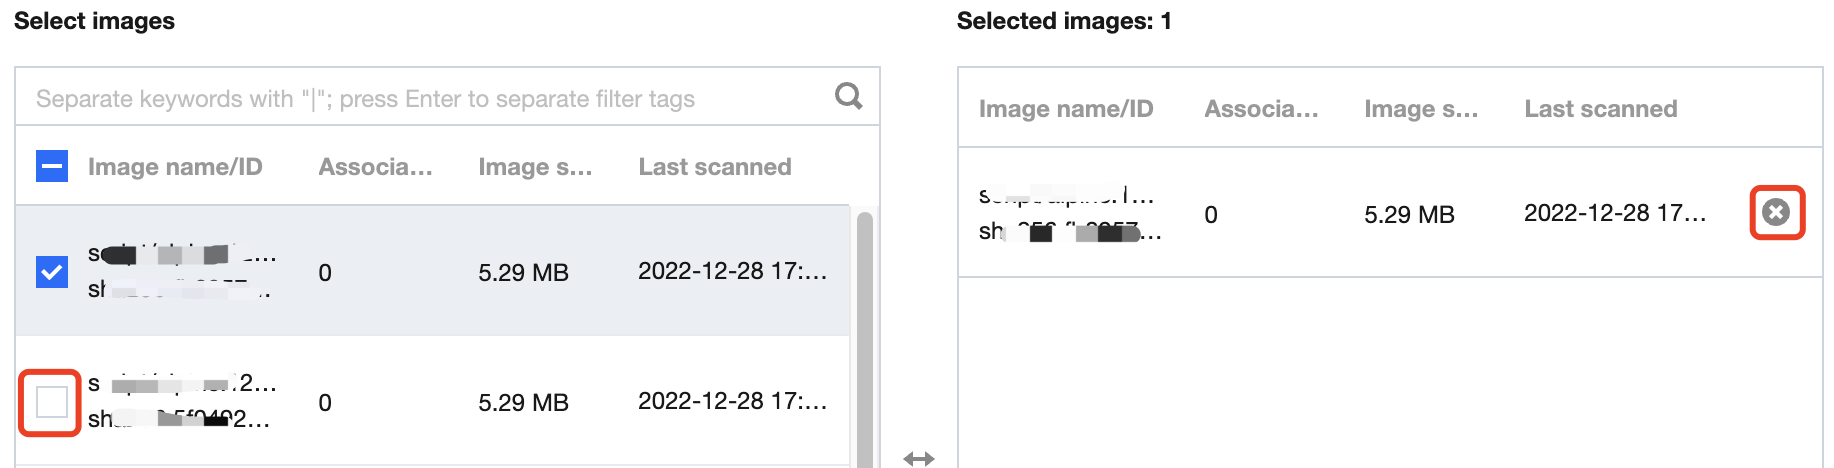
3. On the Scanning settings page, select the Risk category and Images as needed.
Risk category: Vulnerabilities or Sensitive data.
Images: All images or Specified images. Click 

Note:
You can press Shift to select multiple ones.

4. After selecting the target content, click Scan now.
Note:
After the scan starts, all images with the same ID as the selected image will be scanned at the same time.
Enabling scheduled scan
1. On the Local Images page, click Scheduled scan settings on the right to specify whether to enable the scheduled scan feature.

2. On the Scheduled scan settings page, toggle on the On/Off switch and set the Frequency, Risk category, and Images as needed.
Frequency: It can be every day, every 7 days, every 15 days, every 30 days, or a specified time range.
Risk category: Click 
Images: All images or Specified images. Click 

Note:
You can press Shift to select multiple ones.
3. After selecting the target content, click Set or Cancel.
Enabling data update
On the Local Images page, click Data update > OK on the right to immediately update the security information of all images.
Note:
It takes up to one to three minutes.

Viewing the List of Local Images
Image licensing event
1. On the Local Images page, click License.

2. In the pop-up window, click OK.
Note:
A license will be assigned to this image.
Filtering images
On the Local Images page, filter images as follows:
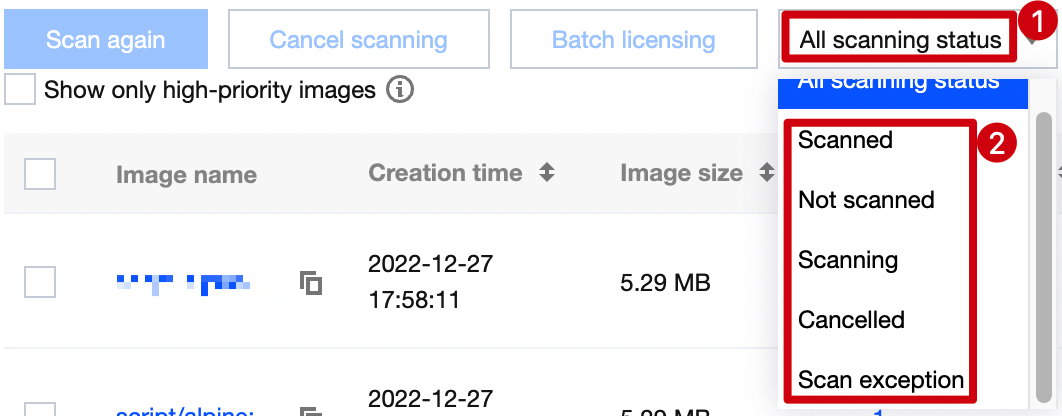
Click the scanning status drop-down list to filter images by scanning status.
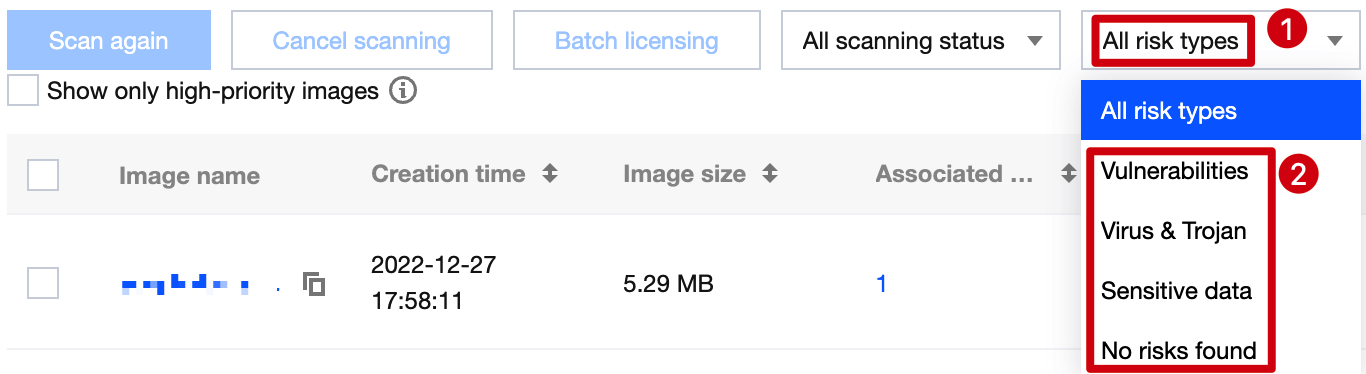
Click the security status drop-down list to filter images by security status.
Click 

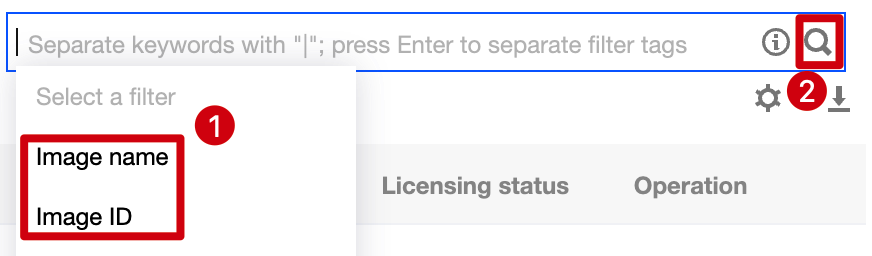
Click the search box and search for images by keyword such as image name or image ID.
Exporting an image
On the Local Images page, click 

Viewing the list details
1. On the Local Images page, click Image name to pop up the drawer on the right, which displays the image details.
Note:
Image risk: It indicates whether the image scan is successful and the numbers of vulnerabilities, viruses, trojans, and sensitive data pieces.
Image details: It includes the image name, image ID, image size, and operating system type.
Vulnerability list: You can filter image security vulnerability events by vulnerability severity or search for them by vulnerability name. Click View details to view the vulnerability details and fix suggestion.
Virus and trojan list: You can filter image security events by virus or trojan severity or search for them by filename. Click View details to view the virus or trojan details and suggestion.
Sensitive data list: You can filter security events by sensitive data severity, name, or type.
Image build history: It logs the image build history.

2. On the Local Images page, click Associated servers to pop up the details window, which displays the server name, server IP, and Docker version.
Note:
If multiple servers are associated, you can filter them as follows:
Click the server status drop-down list to filter servers by status.
Click the search box and search for servers by keyword such as server name, project, or Docker version.

3. On the Local Images page, click Associated containers to pop up the details window, which displays the container name, container ID, container running status, CMD, and last update time.
Note:
If multiple containers are associated, you can filter them as follows:
Click the status drop-down list to filter containers by status.
Enter the server name and click 

4. On the Local Images page, click Details to display the drawer on the right, which displays the image name.

Image scanning
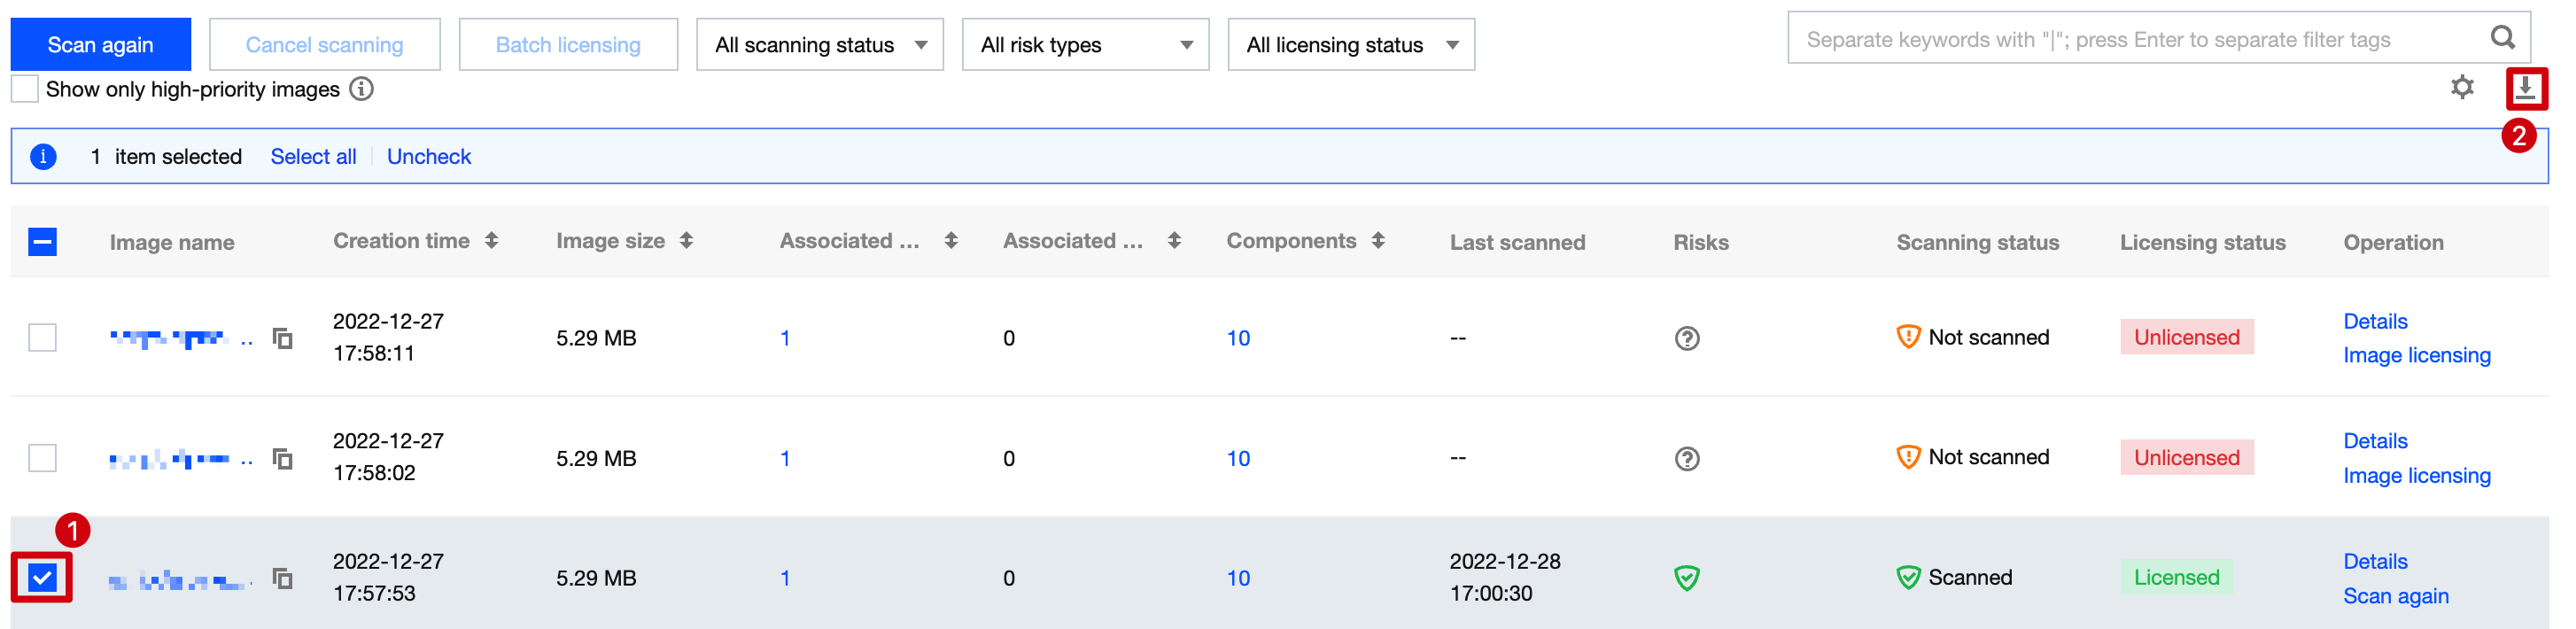
1. On the Local Images page, click Scan now > OK to scan an image in "Not scanned" status.

2. On the Local Images page, click Scan again after the previous scan task ends to scan the image again.
Note:
Click 
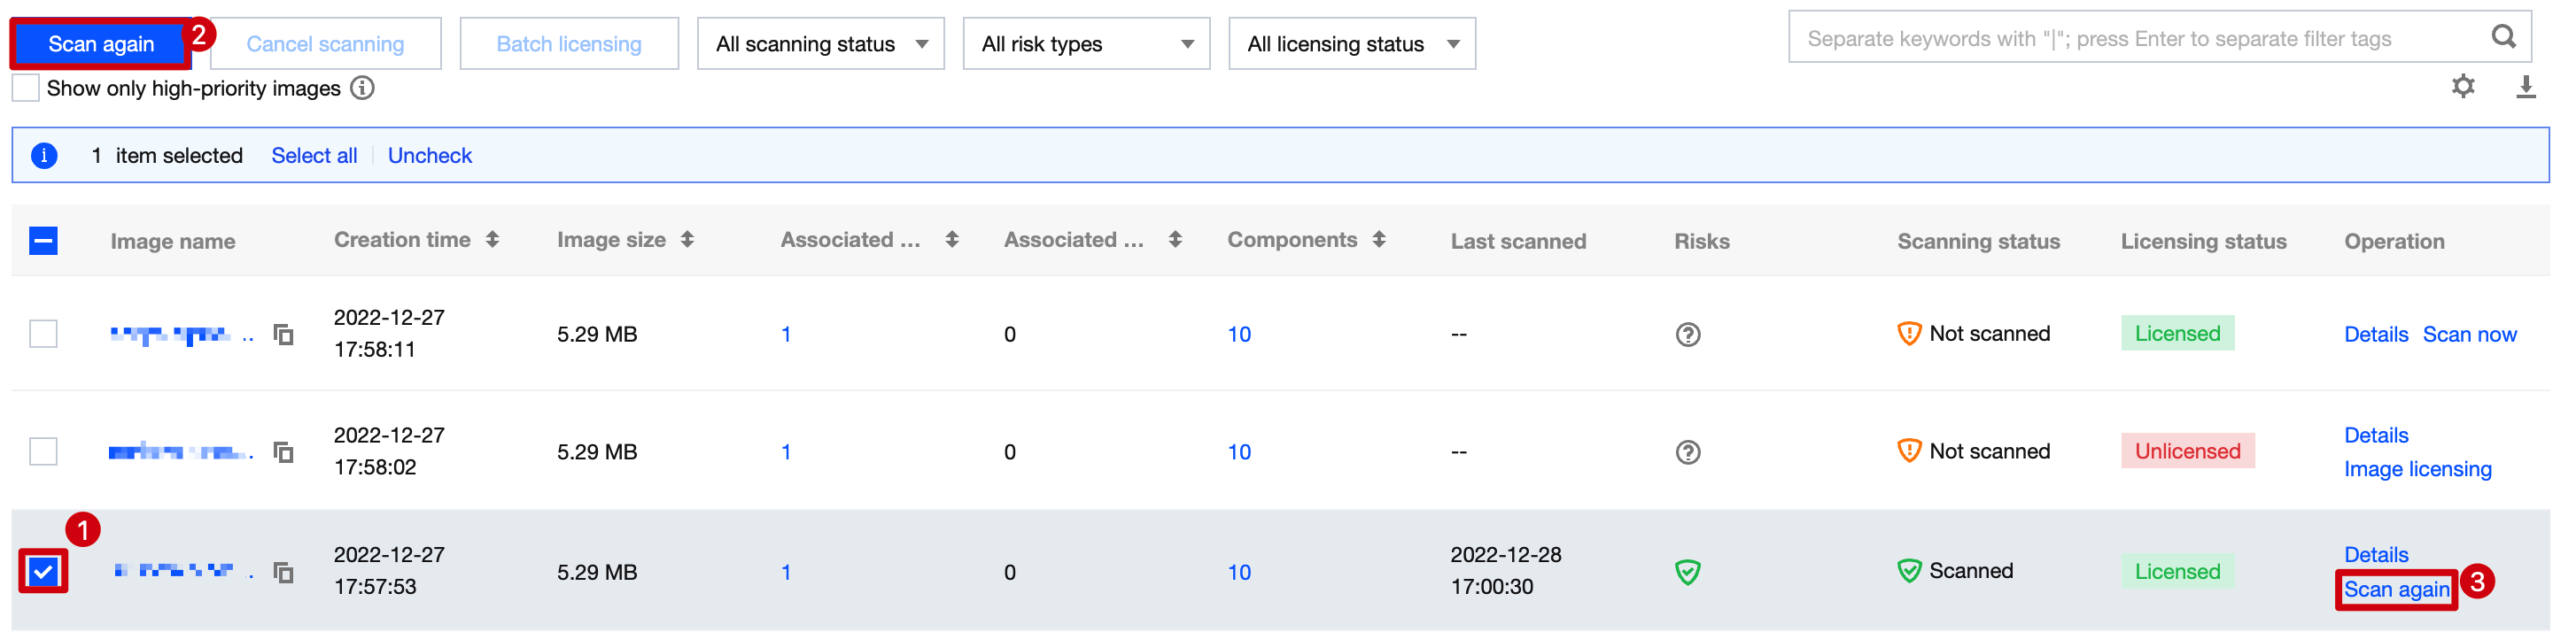
3. On the Local Images page, click Cancel scanning to cancel scanning an image in "Scanning" status.
Note:
Click 

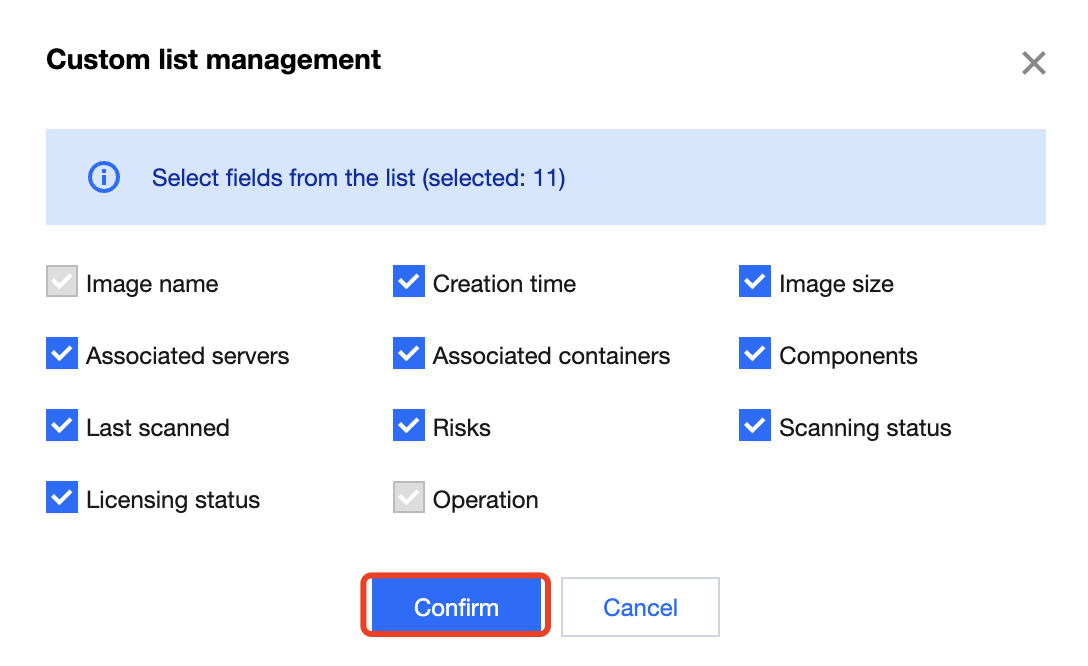
Custom list management
1. On the Local Images page, click 
2. In the pop-up window, select the target type and click OK.
Key fields in the list
1. Creation time: The time when the image is created.
2. Last scanned: The time of the last scan.
3. Risks: Type of the risks to the container.
4. Status: Container scanning status, which can be Scanned, Not scanned, Scanning, Cancelled, or Scan exception.
Note:
We recommend you scan again in case of an exception.

 Yes
Yes
 No
No
Was this page helpful?