This document describes how to implement network isolation between containers in common scenarios based on container network policies.
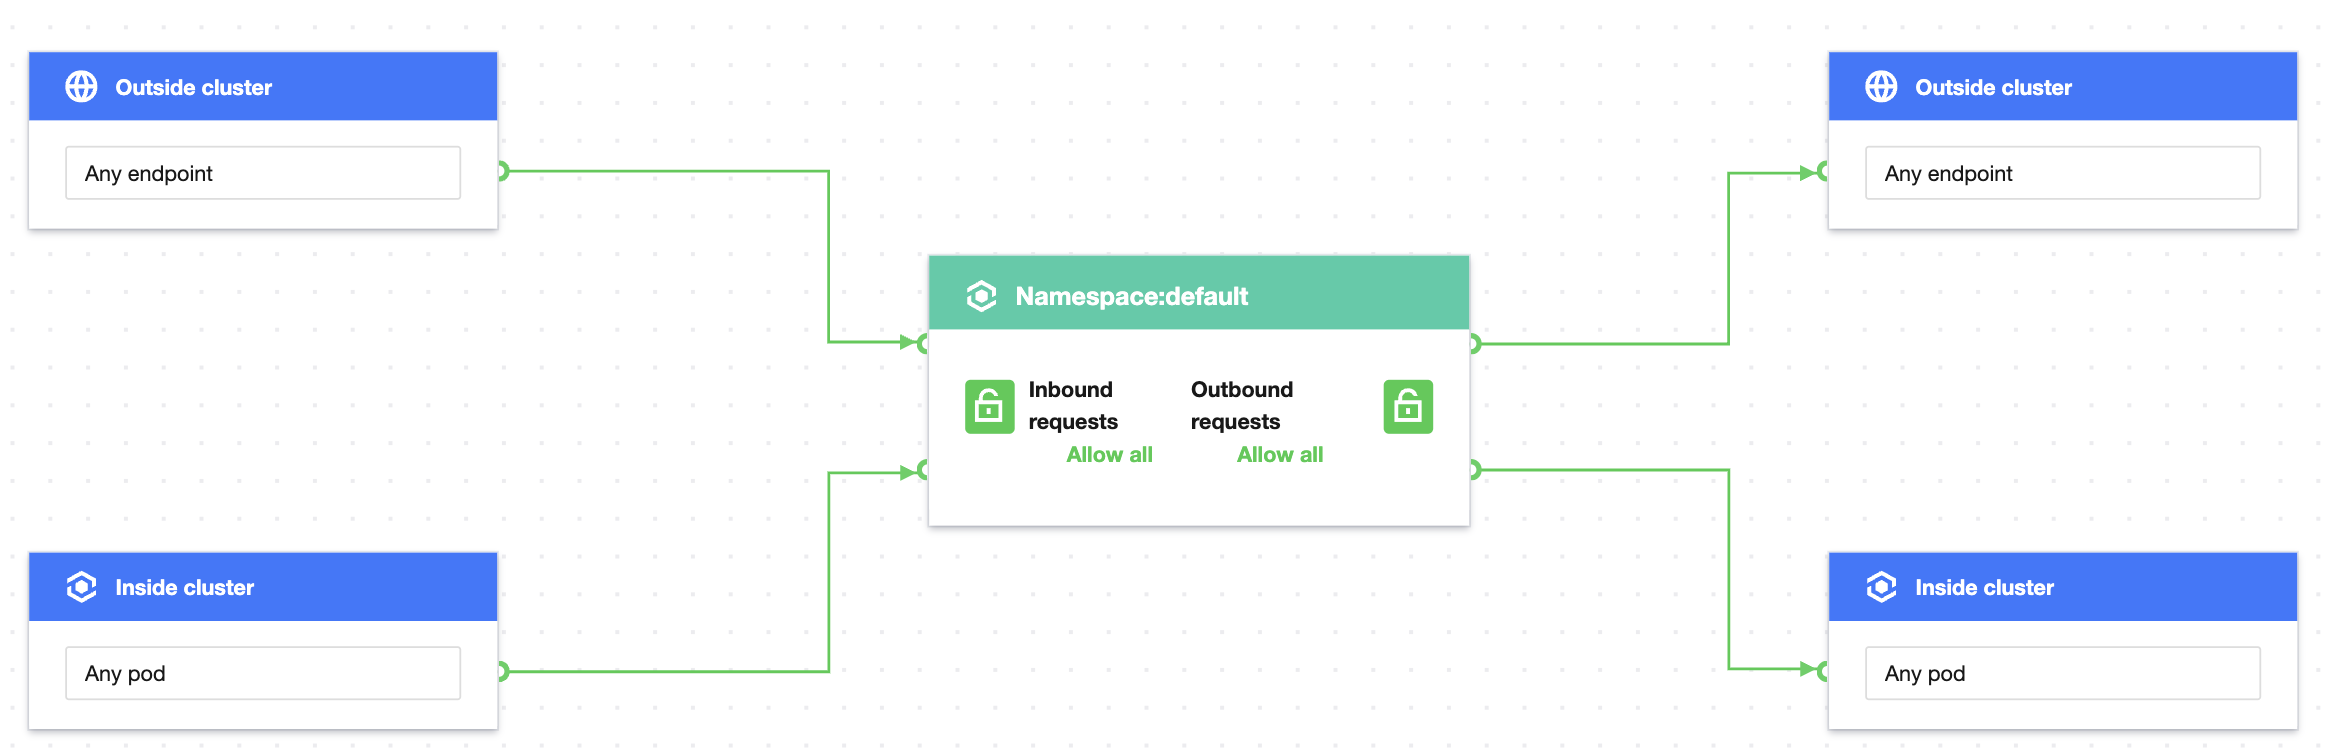
Scenario 1. Set to allow requests only between specified Pods
Policy description
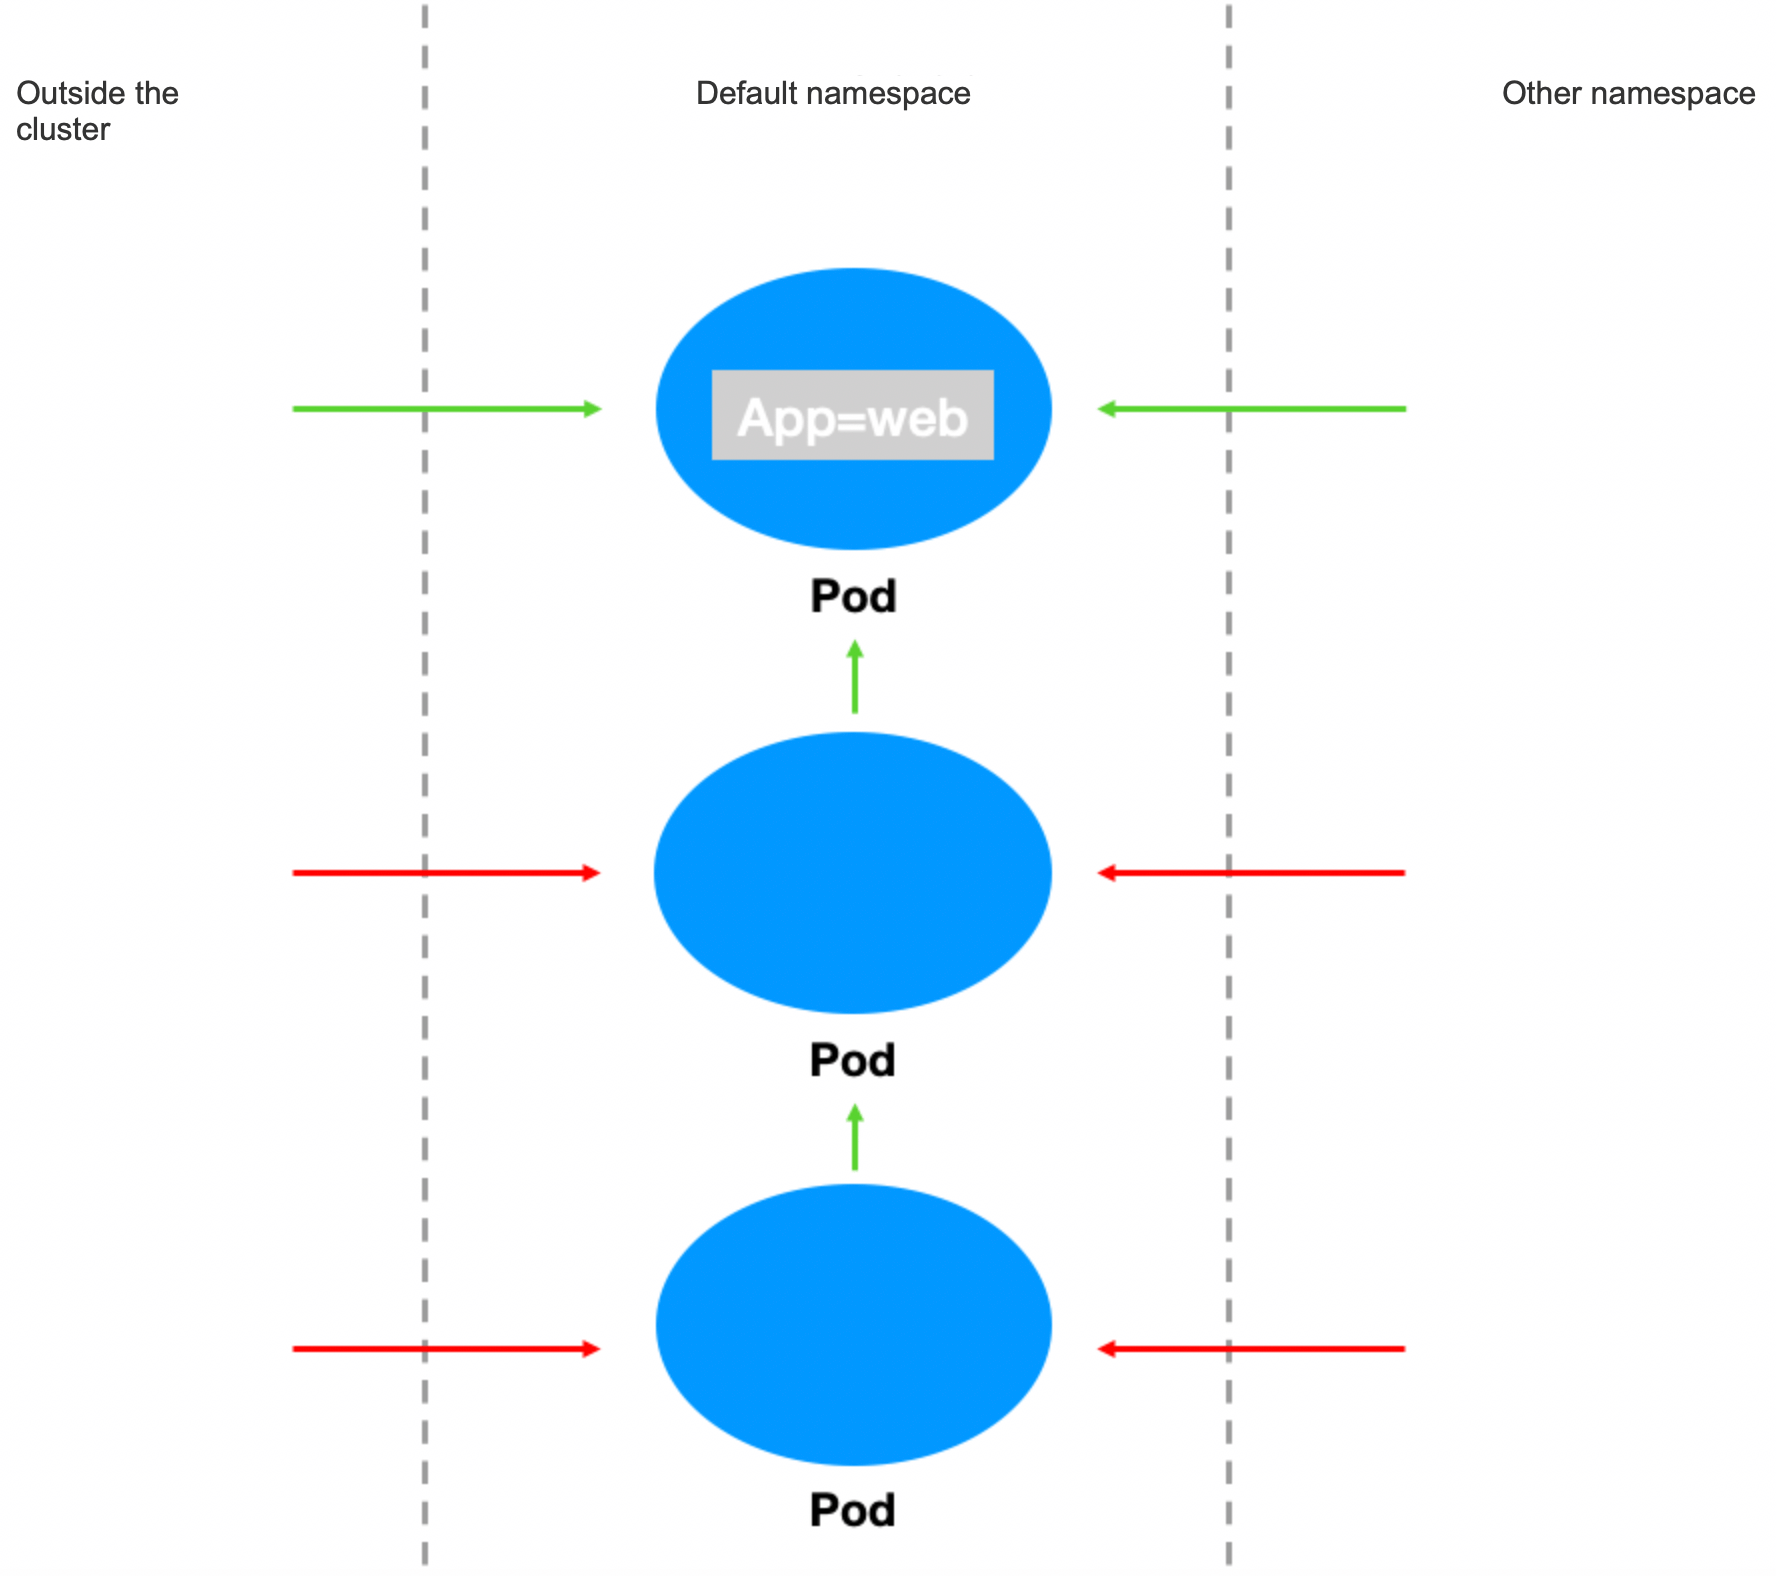
Set to allow requests only between Pod applications with the app=web label and reject requests from other Pods. This is commonly used to control the access between resources in a project.
Verification steps
1. Create a Pod application with the app=web label and start the service.
kubectl run --generator=run-pod/v1 apiserver --image=nginx --labels app=web --expose --port 80
Check whether the Pod is created successfully.
[root@VM-0-11-centos ~]# kubectl get pods web
NAME READY STATUS RESTARTS AGE
web 1/1 Running 0 4s
Check whether the svc is created successfully.
[root@VM-0-11-centos ~]# kubectl get svc web
NAME TYPE CLUSTER-IP EXTERNAL-IP PORT(S) AGE
web ClusterIP 172.18.255.217 <none> 80/TCP 16s
2. Verify that the web service can be accessed from any source by default.
[root@VM-0-11-centos ~]# kubectl run --rm -it --image=alpine testweb
If you don't see a command prompt, try pressing enter.
/ # wget -qO- http://172.18.255.217
<!DOCTYPE html>
<html>
<head>
<title>Welcome to nginx!</title>
...
3. Create and enable the container network policy.
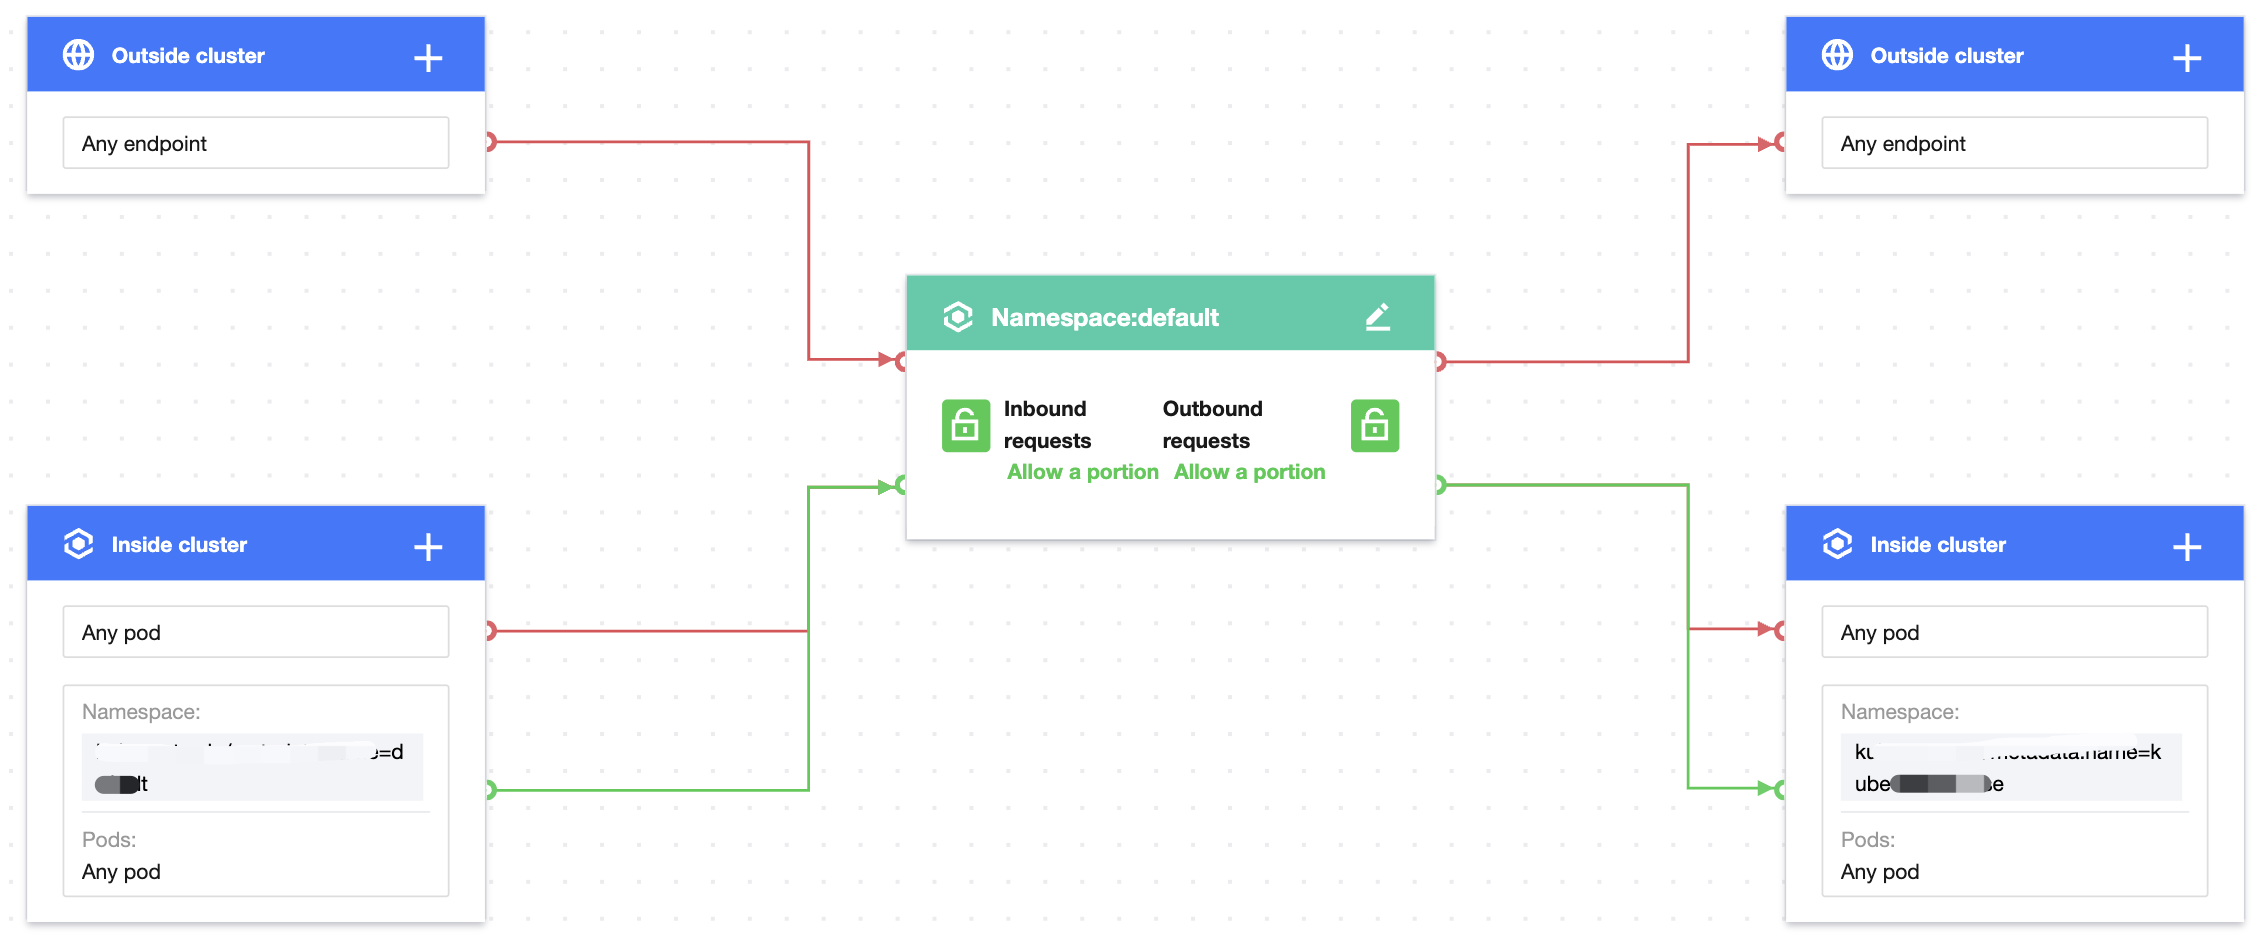
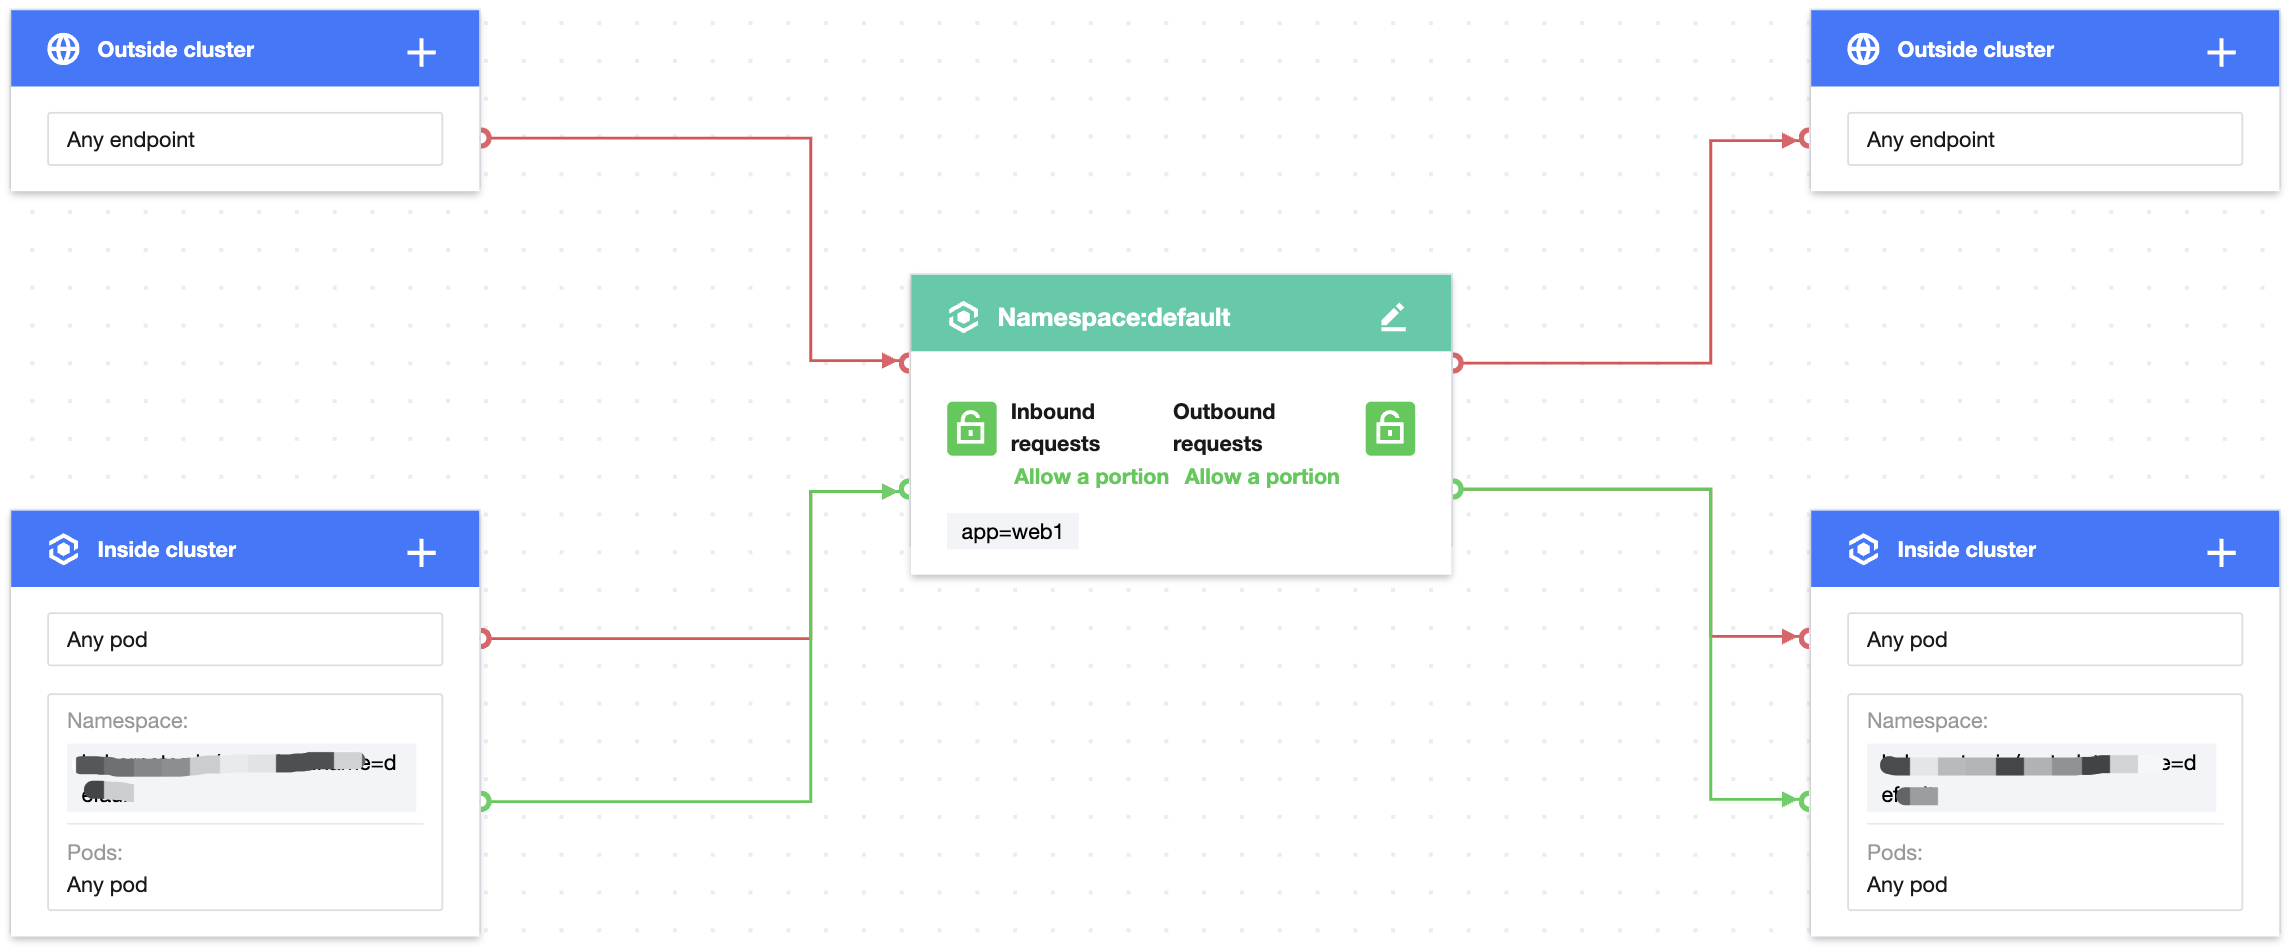
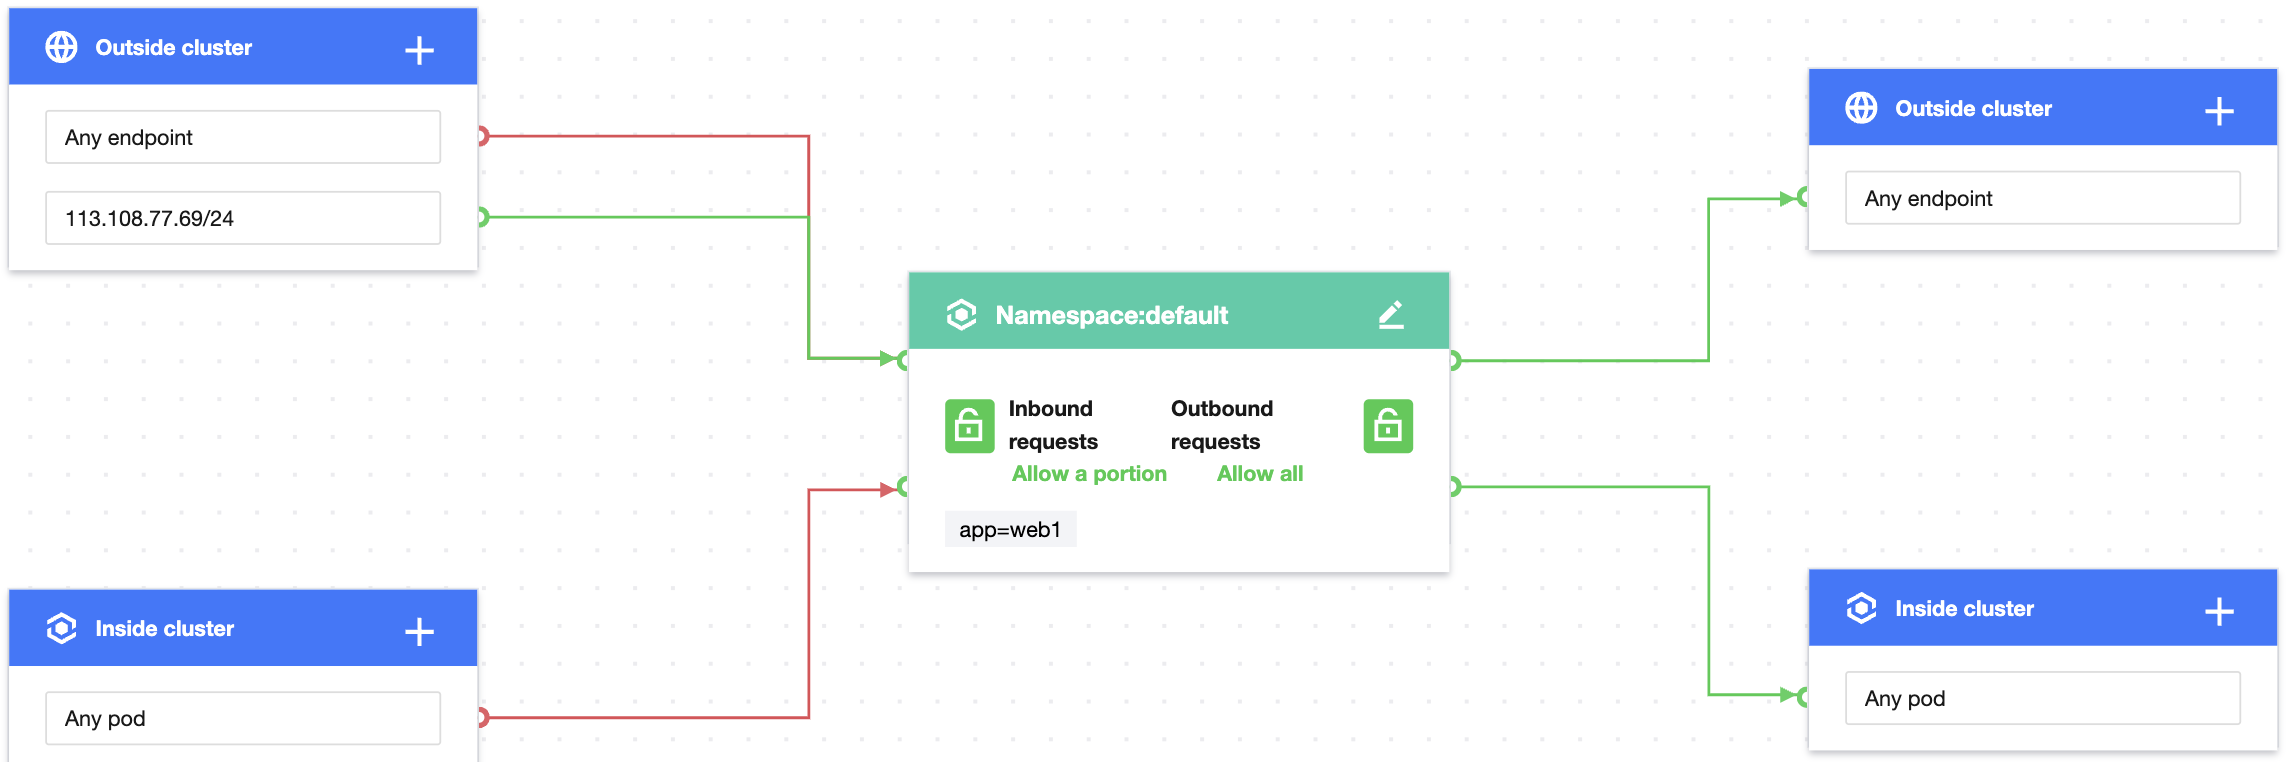
Set the label of the protected Pod as app=web, use custom inbound rules, configure the source type as the Pod, and specify the Pod with the app=web label as the allowed inbound source. The configuration is the same for outbound rules as shown below:
Note:
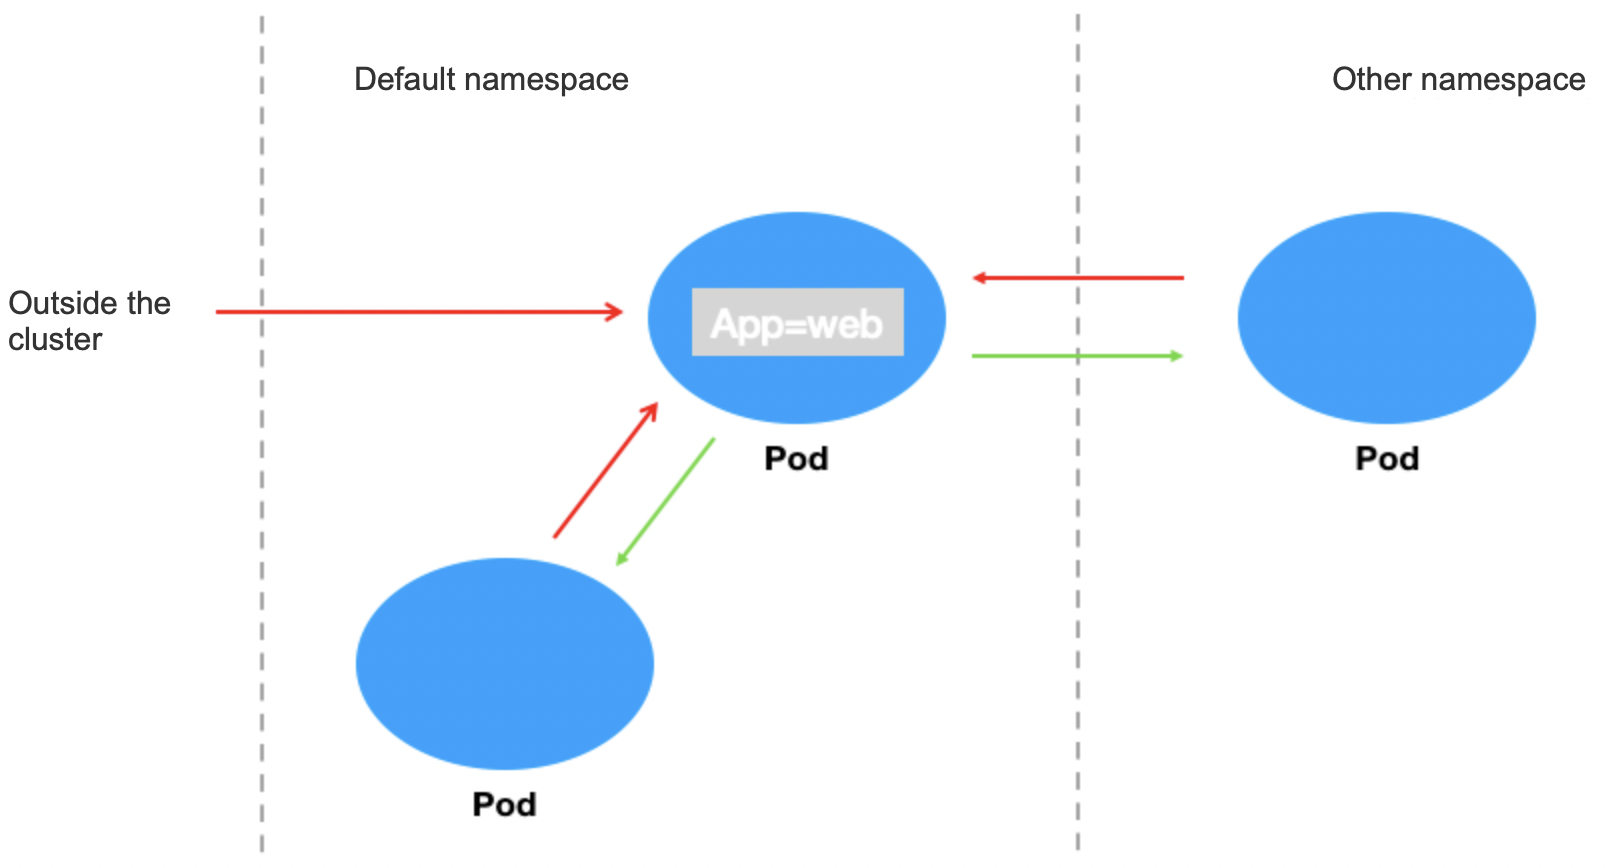
If no namespace is specified, the policy takes effect for the current namespace (default). In this case, requests from Pods in other namespaces will be rejected, even if their label is app=web.
4. Verify the effect of the network policy, i.e., only the Pod with the app=web label can access the web service.
The application with the app=web label in the current namespace can send requests to the web service.
[root@VM-0-11-centos ~]# kubectl run --rm -it --image=alpine testweb --labels app=web -- sh
If you don't see a command prompt, try pressing enter.
/ # wget -qO- http://172.18.255.217
<!DOCTYPE html>
<html>
<head>
<title>Welcome to nginx!</title>
...
Applications without the app=web label in the current namespace cannot send requests to the web service.
[root@VM-0-11-centos ~]# kubectl run --rm -it --image=alpine testweb --labels app2=web2 -- sh
If you don't see a command prompt, try pressing enter.
/ # wget -qO- http://172.18.255.217
wget: can't connect to remote host (172.18.255.217): Connection refused
Applications with the app=web label in other namespaces can send requests to the web service.
[root@VM-0-11-centos ~]# kubectl run --rm -it --image=alpine testweb --labels app=web -n secondary -- sh
If you don't see a command prompt, try pressing enter.
/ # wget -qO- http://172.18.255.217
<!DOCTYPE html>
<html>
<head>
<title>Welcome to nginx!</title>
...
5. Clear the environment.
kubectl delete pod web
kubectl delete service web
Disable the network policy in the console// (This can also be done by running `kubectl delete networkpolicy case1`.)
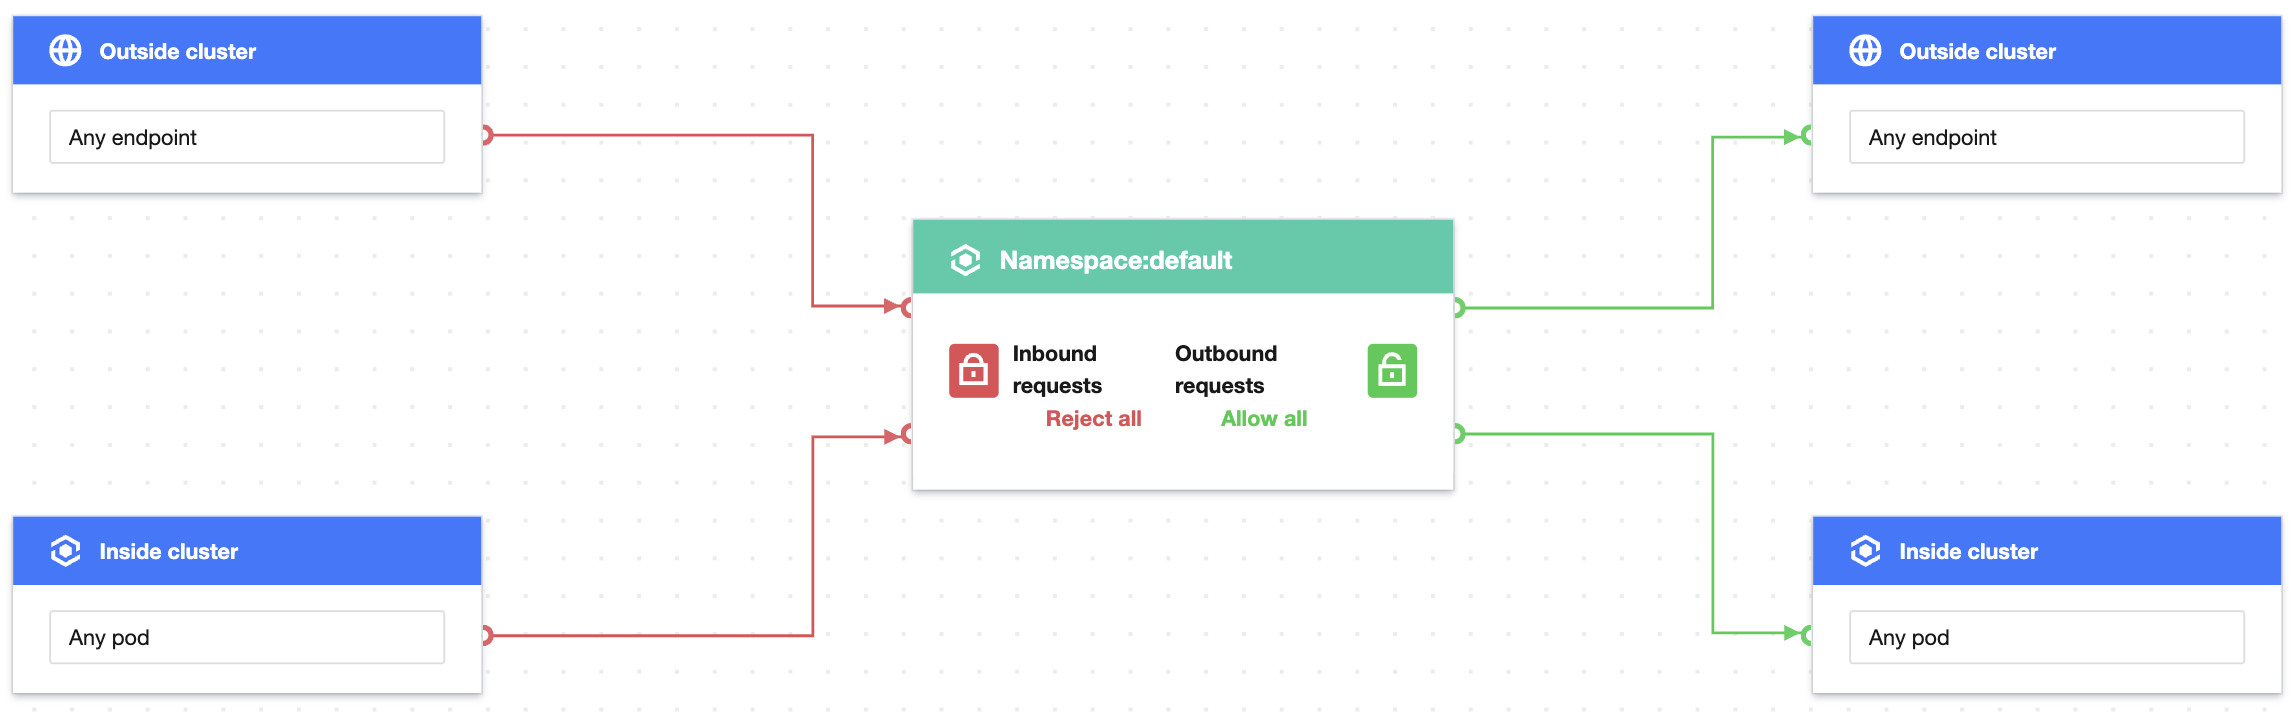
Scenario 2. Set to reject inbound requests to a Pod application
Policy description
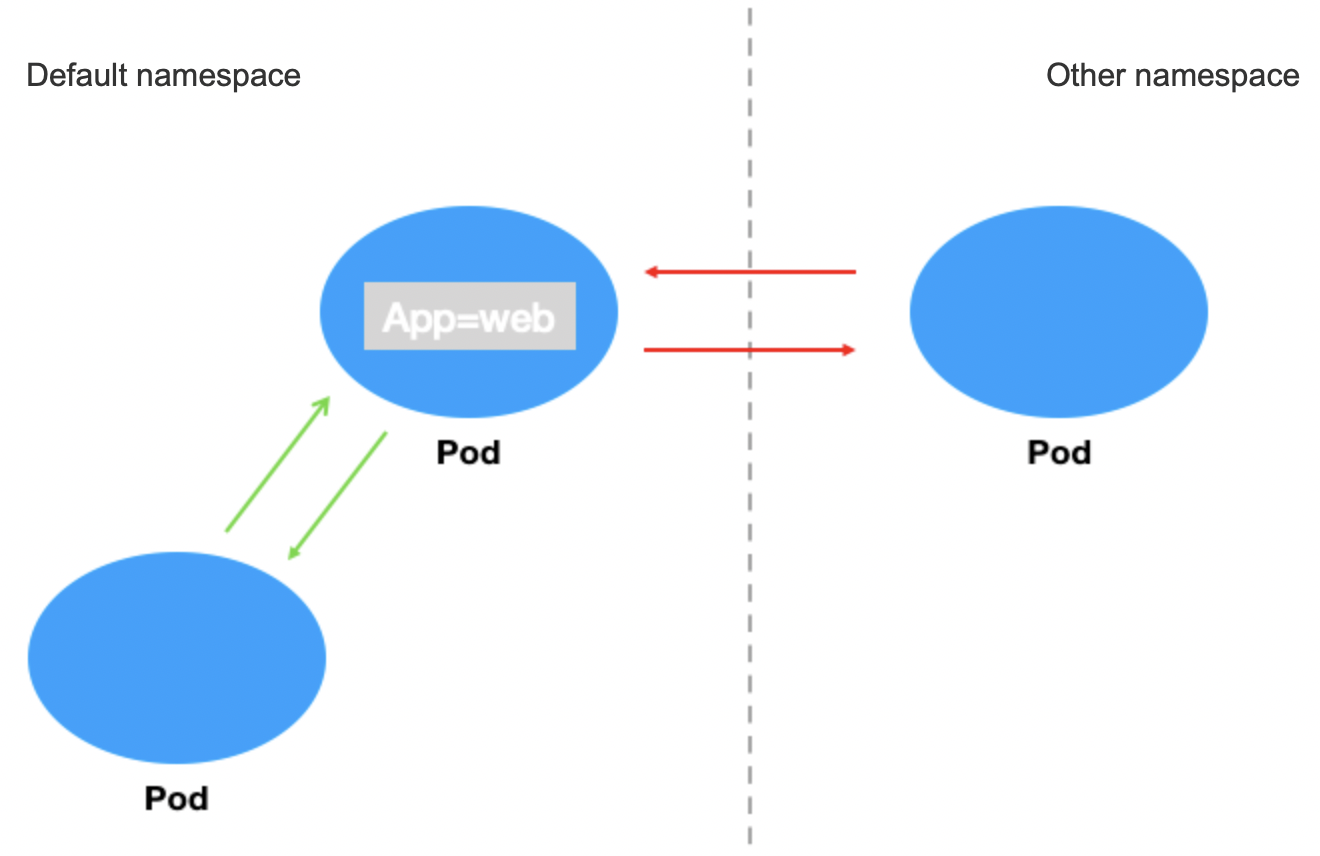
Set to reject inbound requests to the Pod with the app=web label. This doesn't affect outbound requests.
Verification steps
1. Create a Pod application with the app=web label and start the service.
[root@VM-0-11-centos ~]# kubectl run web --image=nginx --labels app=web --expose --port 80
service/web created
pod/web created
[root@VM-0-11-centos ~]# kubectl get pods web
NAME READY STATUS RESTARTS AGE
web 1/1 Running 0 4s
[root@VM-0-11-centos ~]# kubectl get svc web
NAME TYPE CLUSTER-IP EXTERNAL-IP PORT(S) AGE
web ClusterIP 172.18.255.217 <none> 80/TCP 16s
2. Verify that the web service can be accessed from any sources by default.
[root@VM-0-11-centos ~]# kubectl run --rm -it --image=alpine testweb
If you don't see a command prompt, try pressing enter.
/ # wget -qO- http://172.18.255.217
<!DOCTYPE html>
<html>
<head>
<title>Welcome to nginx!</title>
...
3. Create and enable the container network policy.
Set the label of the protected Pod as app=web and set to reject all inbound requests as shown below:
4. Verify the effect of the network policy, i.e., the application with the app=web label cannot be accessed from any external sources.
kubectl run --rm -i -t --image=alpine testweb -- sh
If you don't see a command prompt, try pressing enter.
/ # wget -qO- --timeout=2 http://web
wget: can't connect to remote host (172.18.255.217): Connection refused
5. Clear the environment.
kubectl delete pod web
kubectl delete service web
Disable the network policy in the console// (This can also be done by running `kubectl delete networkpolicy case2`.)
Scenario 3. Set to reject requests from other namespaces
Policy description
Set to reject requests from other namespaces to the applications with the app=web label and allow requests only from the current namespace as shown below:
Verification steps
1. Create a Pod application with the app=web label and start the service.
[root@VM-0-11-centos ~]# kubectl run web --image=nginx --labels app=web --expose --port 80
service/web created
pod/web created
[root@VM-0-11-centos ~]# kubectl get pods web
NAME READY STATUS RESTARTS AGE
web 1/1 Running 0 5s
[root@VM-0-11-centos ~]# kubectl get svc web
NAME TYPE CLUSTER-IP EXTERNAL-IP PORT(S) AGE
web ClusterIP 172.18.255.217 <none> 80/TCP 13s
2. Verify that requests can be sent from other namespaces to the application with the app=web label by default.
[root@VM-0-11-centos ~]# kubectl run --rm -it --image=alpine testweb --labels app=web -n secondary -- sh
If you don't see a command prompt, try pressing enter.
/ # wget -qO- http://172.18.255.217
<!DOCTYPE html>
<html>
<head>
<title>Welcome to nginx!</title>
...
3. Create and enable the container network policy.
Set the label of the protected Pod as app=web, use custom inbound rules, configure the source type as the Pod, leave the namespace empty, and specify any Pod as the allowed inbound source. The configuration is the same for outbound rules as shown below:
4. Verify the effect of the network policy.
The Pod with the app=web label can be accessed from the current namespace.
[root@VM-0-11-centos ~]# kubectl run testweb --namespace=default --rm -it --image=alpine -- sh
If you don't see a command prompt, try pressing enter.
/ # wget -qO- --timeout=2 http://web.default
<!DOCTYPE html>
<html>
<head>
<title>Welcome to nginx!</title>
...
The Pod with the app=web label cannot be accessed from other namespaces.
[root@VM-0-11-centos ~]# kubectl run --rm -it --image=alpine testweb --labels app=web -n secondary -- sh
If you don't see a command prompt, try pressing enter.
/ # wget -qO- --timeout=2 http://web.default
wget: can't connect to remote host (172.18.255.217): Connection refused
5. Clear the environment.
kubectl delete pod web
kubectl delete service web
Disable the network policy in the console// (This can also be done by running `kubectl delete networkpolicy case3`.)
Scenario 4. Set to allow access only to specified Pods in the namespace
Policy description
Set to allow external requests only to the Pod with the app=web label in the namespace.
Verification steps
1. Create a Pod application with the app=web label and another with the app=web1 label and start the services.
1.1 Create the application with the app=web label.
[root@VM-0-11-centos ~]# kubectl run web --image=nginx --namespace default --labels=app=web --expose --port 80
service/web created
pod/web created
[root@VM-0-11-centos ~]# kubectl get svc web
NAME TYPE CLUSTER-IP EXTERNAL-IP PORT(S) AGE
web ClusterIP 172.18.255.217 <none> 80/TCP 5s
1.2 Create the application with the app=web1 label.
2. Verify that the Pods with the app=web and app=web1 labels can be accessed by default.
2.1 The Pod with the app=web label can be accessed.
[root@VM-0-11-centos ~]# kubectl run --rm -it --image=alpine testweb -- sh
If you don't see a command prompt, try pressing enter.
/ # wget -qO- http://172.18.255.217
<!DOCTYPE html>
<html>
<head>
<title>Welcome to nginx!</title>
...
2.2 The Pod with the app=web1 label can be accessed.
[root@VM-0-11-centos ~]# kubectl run --rm -it --image=alpine testweb -- sh
If you don't see a command prompt, try pressing enter.
/ # wget -qO- http://172.18.255.39
<!DOCTYPE html>
<html>
<head>
<title>Welcome to nginx!</title>
...
3. Create and enable the container network policy.
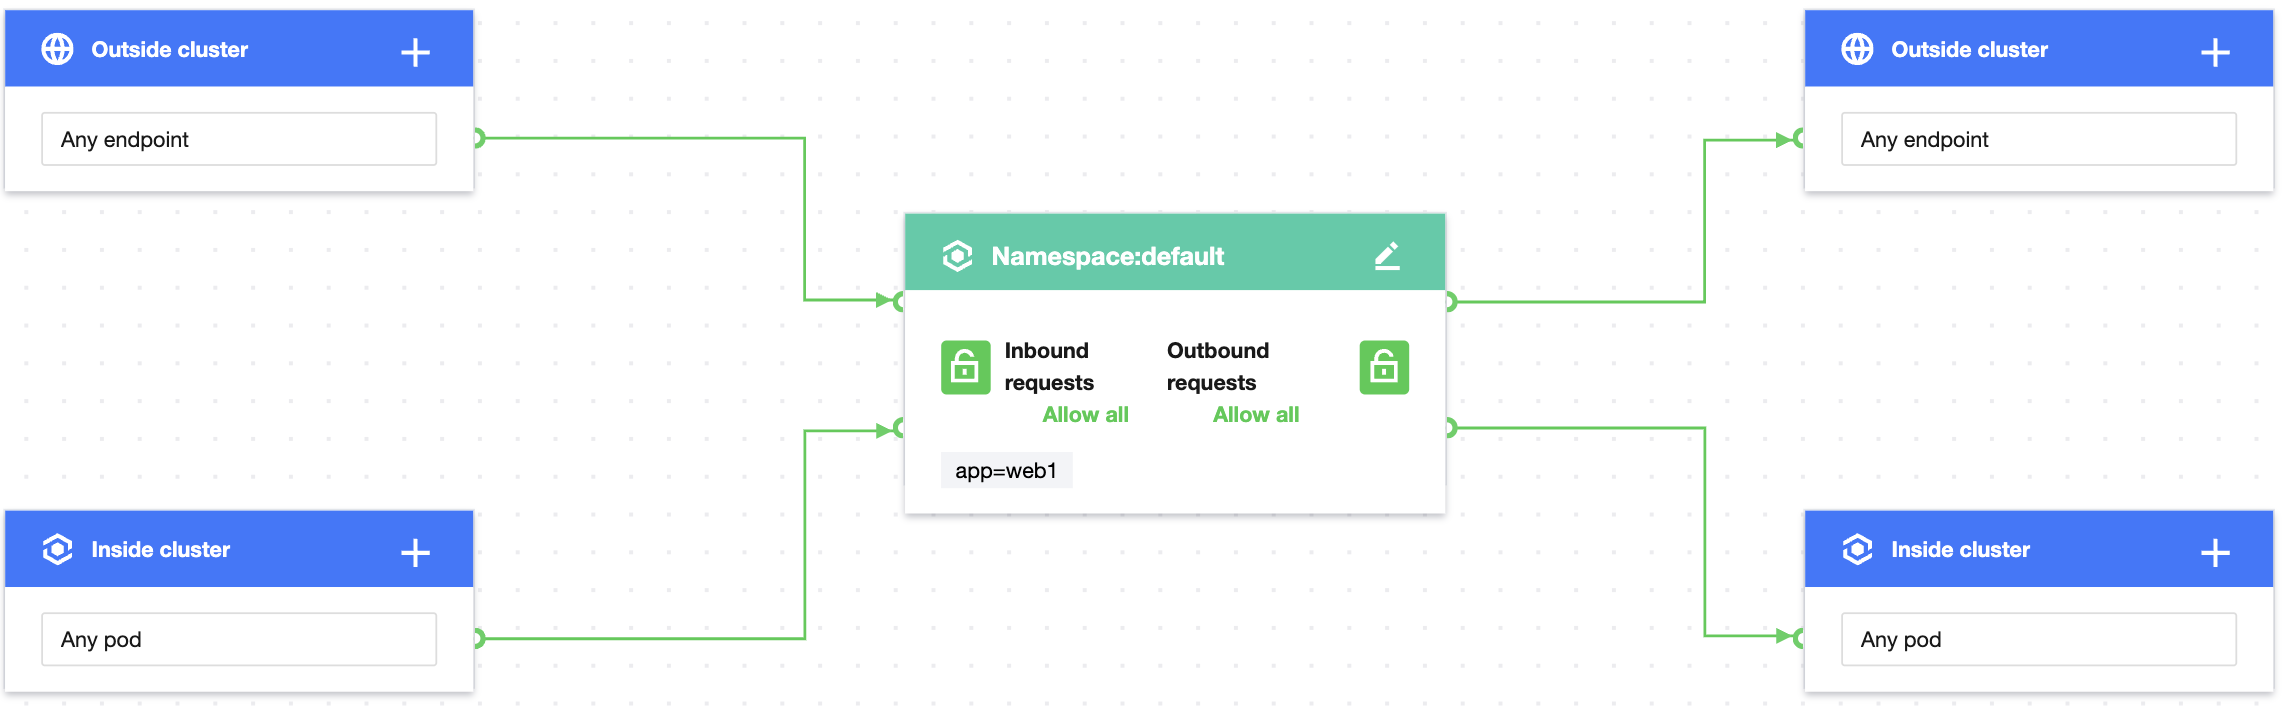
3.1 Create policy A to allow all inbound requests to the Pod with the app=web label, specifically, by specifying the current namespace (default) and the app=web label.
3.2 Create policy B to allow requests to all Pods only from the current namespace (default) and reject requests from other namespaces.
4. Verify the effect of the network policy. In the default namespace, only the Pod with the app=web label can be accessed from other namespaces, and other Pods (such as that with the app=web1 label) cannot.
The Pod with the app=web label can be accessed from other namespaces.
By default, the web application can be accessed from the dev namespace.
kubectl run testweb --namespace=dev --rm -i -t --image=alpine -- sh
If you don't see a command prompt, try pressing enter.
/ # wget -qO- --timeout=2 http://web.default
<!DOCTYPE html>
<html>
<head>
<title>Welcome to nginx!</title>
...
By default, the web application can be accessed from the production namespace.
kubectl run testweb --namespace=production --rm -i -t --image=alpine -- sh
If you don't see a command prompt, try pressing enter.
/ # wget -qO- --timeout=2 http://web.default
<!DOCTYPE html>
<html>
<head>
<title>Welcome to nginx!</title>
...
3. Create and enable the container network policy.
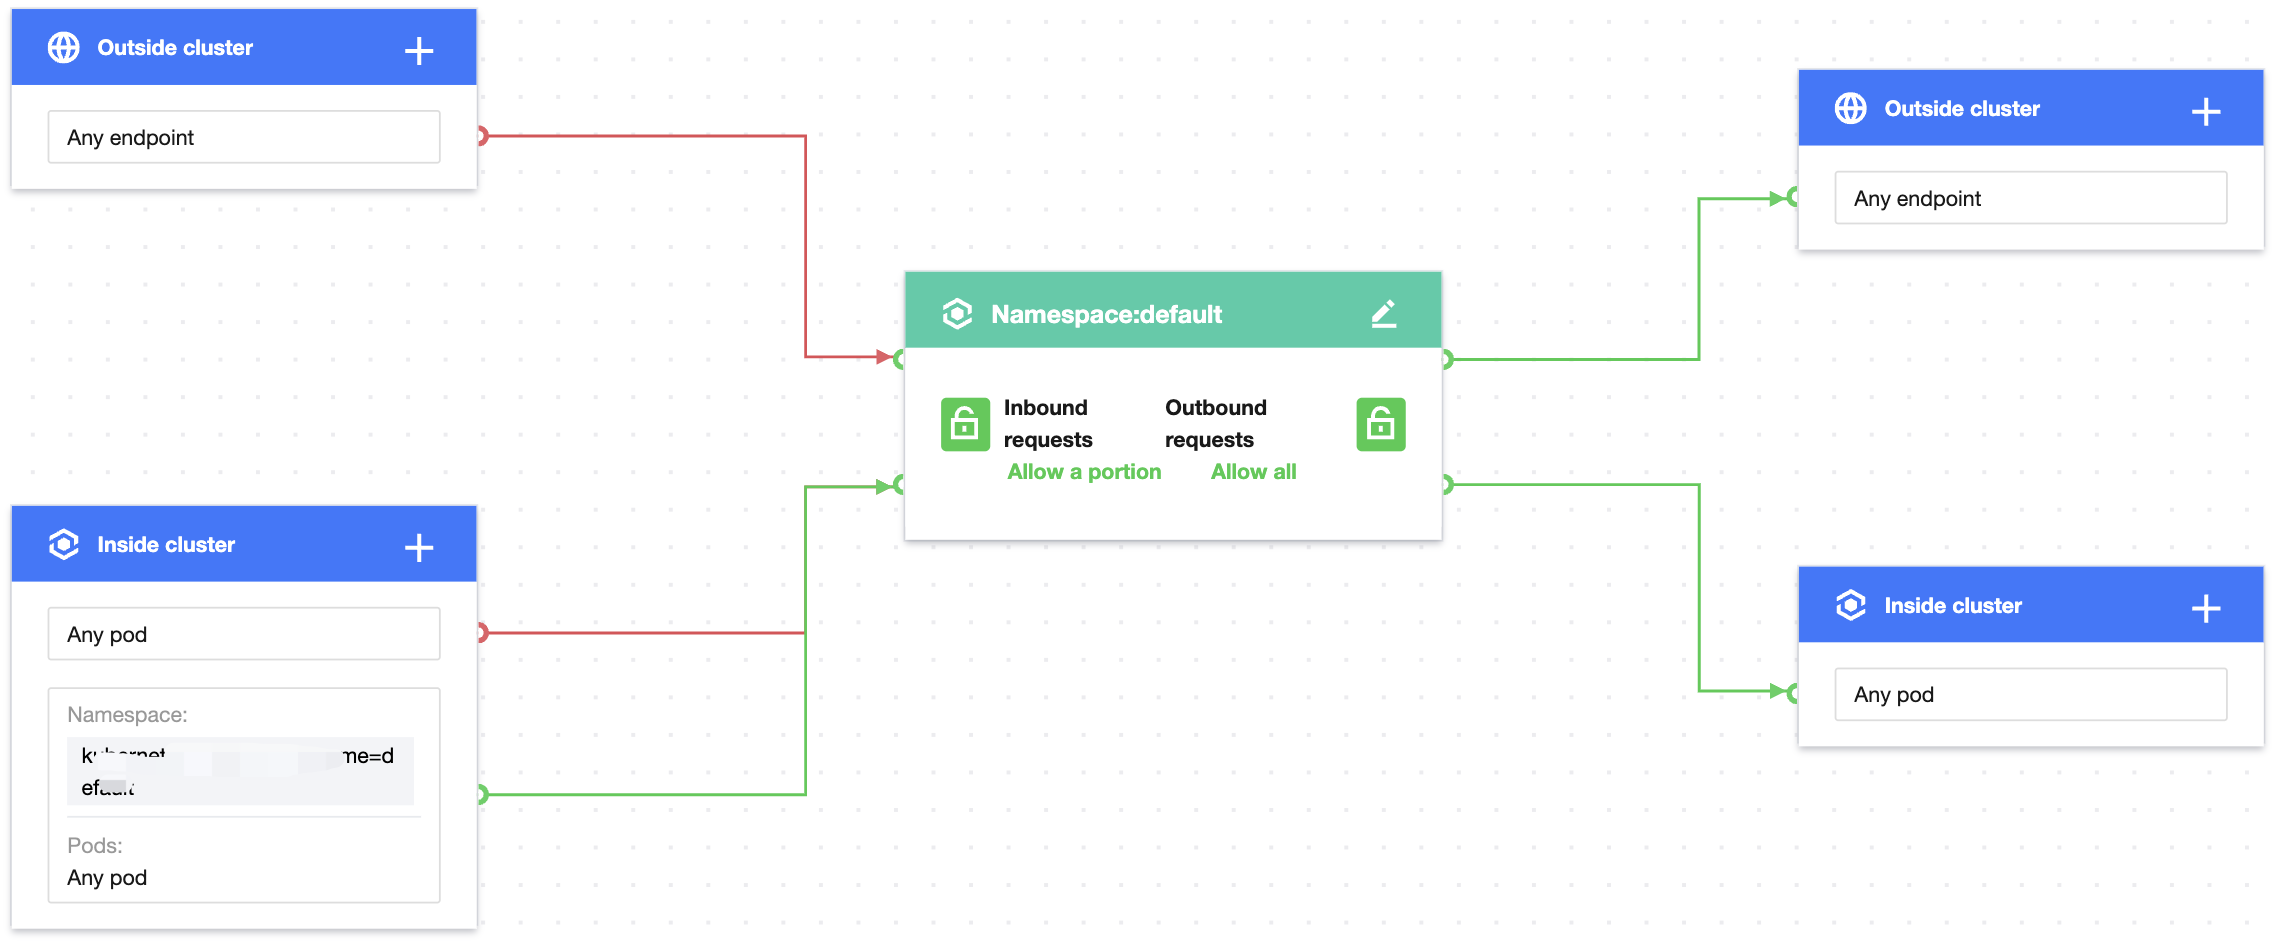
Set the label of the protected Pod as app=web, configure the source type as the namespace, and set to allow requests only from the namespace with the env=production label. The configuration is the same for outbound rules as shown below:
4. Verify the effect of the network policy.
The web service cannot be accessed from the dev namespace.
kubectl run testweb --namespace=dev --rm -i -t --image=alpine -- sh
If you don't see a command prompt, try pressing enter.
/ # wget -qO- --timeout=2 http://web.default
wget: can't connect to remote host (172.18.255.217): Connection refused
The web service can be accessed from the production namespace.
kubectl run testweb --namespace=production --rm -i -t --image=alpine -- sh
If you don't see a command prompt, try pressing enter.
/ # wget -qO- --timeout=2 http://web.default
<!DOCTYPE html>
<html>
<head>
<title>Welcome to nginx!</title>
...
5. Clear the environment.
kubectl delete pod web
kubectl delete service web
kubectl delete namespace {prod,dev}
Disable the network policy in the console// (This can also be done by running `kubectl delete networkpolicy case5`.)
Scenario 6. Set to allow requests to a Pod only from the cluster
Policy description
Set to allow requests to the application with the app=web label only from the cluster and reject those from outside the cluster.
Verification steps
1. Create a Pod application with the app=web label and another with the app=web1 label and start the services. web1 simulates a service in the cluster.
[root@VM-0-11-centos ~]# kubectl run web --image=nginx --labels=app=web --expose --port 80
service/web created
pod/web created
[root@VM-0-11-centos ~]# kubectl run web1 --image=nginx --labels=app=web1 --expose --port 80
service/web created
pod/web created
[root@VM-0-11-centos ~]# kubectl get svc web
NAME TYPE CLUSTER-IP EXTERNAL-IP PORT(S) AGE
web ClusterIP 172.18.255.217 <none> 80/TCP 5s
[root@VM-0-11-centos ~]# kubectl get svc web1
NAME TYPE CLUSTER-IP EXTERNAL-IP PORT(S) AGE
web1 ClusterIP 172.18.255.39 <none> 80/TCP 7s
2. Verify that the web service can access the service in the cluster and external IPs by default.
The web application can access the web1 service in the cluster.
[root@VM-0-11-centos ~]# kubectl exec -it web -- sh
# curl 172.18.255.39:80
<!DOCTYPE html>
<html>
<head>
<title>Welcome to nginx!</title>
...
The web application can access external IPs.
[root@VM-0-11-centos ~]# kubectl exec -it web -- sh
3. Create and enable the network policy.
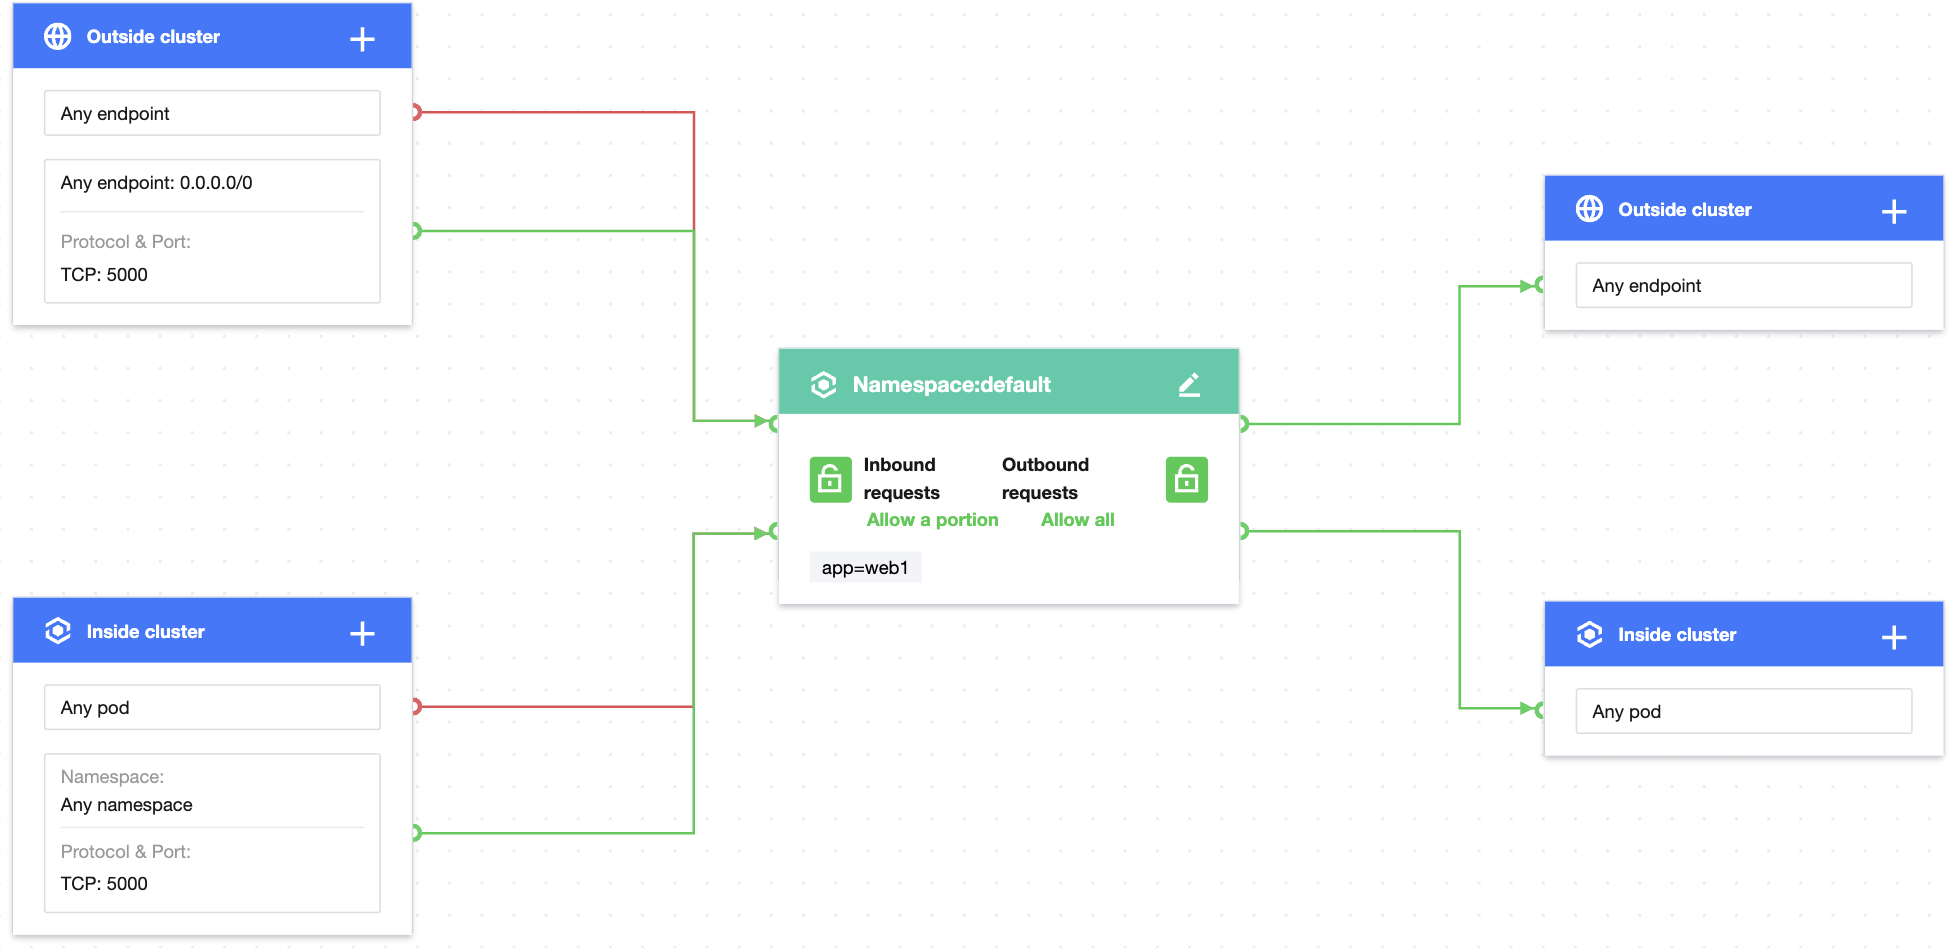
Set the label of the protected Pod as app=web and allow requests from any namespace in the cluster. The configuration is the same for outbound rules as shown below:
4. Verify the effect of the network policy.
The web application can access the web1 service in the cluster.
[root@VM-0-11-centos ~]# kubectl exec -it web -- sh
# curl 172.18.255.39:80
<!DOCTYPE html>
<html>
<head>
<title>Welcome to nginx!</title>
...
The web application cannot access external IPs.
[root@VM-0-11-centos ~]# kubectl exec -it web -- sh
# curl 220.181.38.148:80
curl: (: not foundo connect to 220.181.38.148 port 80: Connection refused
5. Clear the environment.
kubectl delete pod web
kubectl delete service web
kubectl delete pod web1
kubectl delete service web1
Disable the network policy in the console// (This can also be done by running `kubectl delete networkpolicy case6`.)
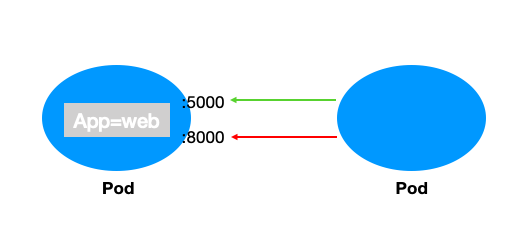
Scenario 7. Set to allow access to a Pod only through the specified port
Policy description
Set to allow access to the application with the app=web label only from TCP port 5000 and reject requests from other ports (this doesn't affect UDP access).
Verification steps
1. Create a Pod application with the app=web label and open ports 5000 and 8000.
kubectl run web --image=ahmet/app-on-two-ports --labels app=web
pod/web created
[root@VM-0-11-centos ~]# kubectl get pod web -o wide
NAME READY STATUS RESTARTS AGE IP NODE NOMINATED NODE READINESS GATES
web 1/1 Running 0 117s 172.18.0.42 172.16.0.11 <none> <none>
2. Verify that ports 5000 and 8000 of the web application can be accessed by default.
[root@VM-0-11-centos ~]# kubectl run testweb --namespace=dev --rm -i -t --image=alpine -- sh
If you don't see a command prompt, try pressing enter.
/ # wget -qO- http://172.18.0.42:5000/metrics
http.requests=2
go.goroutines=5
go.cpus=4
/ # wget -qO- http://172.18.0.42:8000
Hello from HTTP server.
3. Create and enable the network policy.
Set the label of the protected Pod as app=web, allow requests only from TCP port 5000 in any namespace in the cluster, and allow requests only from TCP port 5000 at any endpoint outside the cluster as shown below:
Note:
To set access only through the specified UDP port, you need to add UDP port rules.
4. Verify the effect of the network policy.
Port 5000 of the web application can be accessed, but port 8000 of the web application cannot.
[root@VM-0-11-centos ~]# kubectl run testweb --namespace=dev --rm -i -t --image=alpine -- sh
If you don't see a command prompt, try pressing enter.
/ # wget -qO- http://172.18.0.42:5000/metrics
http.requests=2
go.goroutines=5
go.cpus=4
/ # wget -qO- http://172.18.0.42:8000
wget: can't connect to remote host (172.18.0.42): Connection refused
5. Clear the environment.
kubectl delete pod web
kubectl delete service web
Disable the network policy in the console// (This can also be done by running `kubectl delete networkpolicy case7`.)
Scenario 8. Set to allow access to a Pod only from the specified IP
Policy description
Set to allow access to the Pod with the app=web label only from the specified IP.
Verification steps
1. Create a Pod application with the app=web label and start the service.
[root@VM-0-11-centos ~]# kubectl run web --namespace default --image=nginx --labels=app=web
pod/web created
[root@VM-0-11-centos ~]# kubectl get svc web
NAME TYPE CLUSTER-IP EXTERNAL-IP PORT(S) AGE
web ClusterIP 172.18.255.217 <none> 80/TCP 6s
2. Bind the public network IP to the web service.
2.1 On the Cluster page, create the public network LB service and bind the web service. For more information, see Basic Features.
2.2 The public network LB is created successfully, and the access address is 106.xx.xx.61.
3. Verify that the web application can be accessed from any IP by default.
Any Pod can access the web application.
[root@VM-0-11-centos ~]# kubectl run --rm -it --image=alpine testweb -- sh
If you don't see a command prompt, try pressing enter.
/ # wget -qO- http://web.default
<!DOCTYPE html>
<html>
<head>
<title>Welcome to nginx!</title>
...
The web application can be accessed from any IP.
~/workspace/networkpolicy_test curl cip.cc
IP: 113.xx.xx.70
Address: Shenzhen, Guangdong Province, China
ISP: China Telecom
Data 2: Shenzhen, Guangdong Province | Tencent Cloud
Data 3: Shenzhen, Guangdong Province, China | China Telecom
4. Create and enable the network policy.
Set the label of the protected Pod as app=web and allow requests only from the specified IP outside the cluster as shown below:
5. Verify the effect of the network policy.
The web application can be accessed only from the specified IP.
3. Create and enable the network policy.
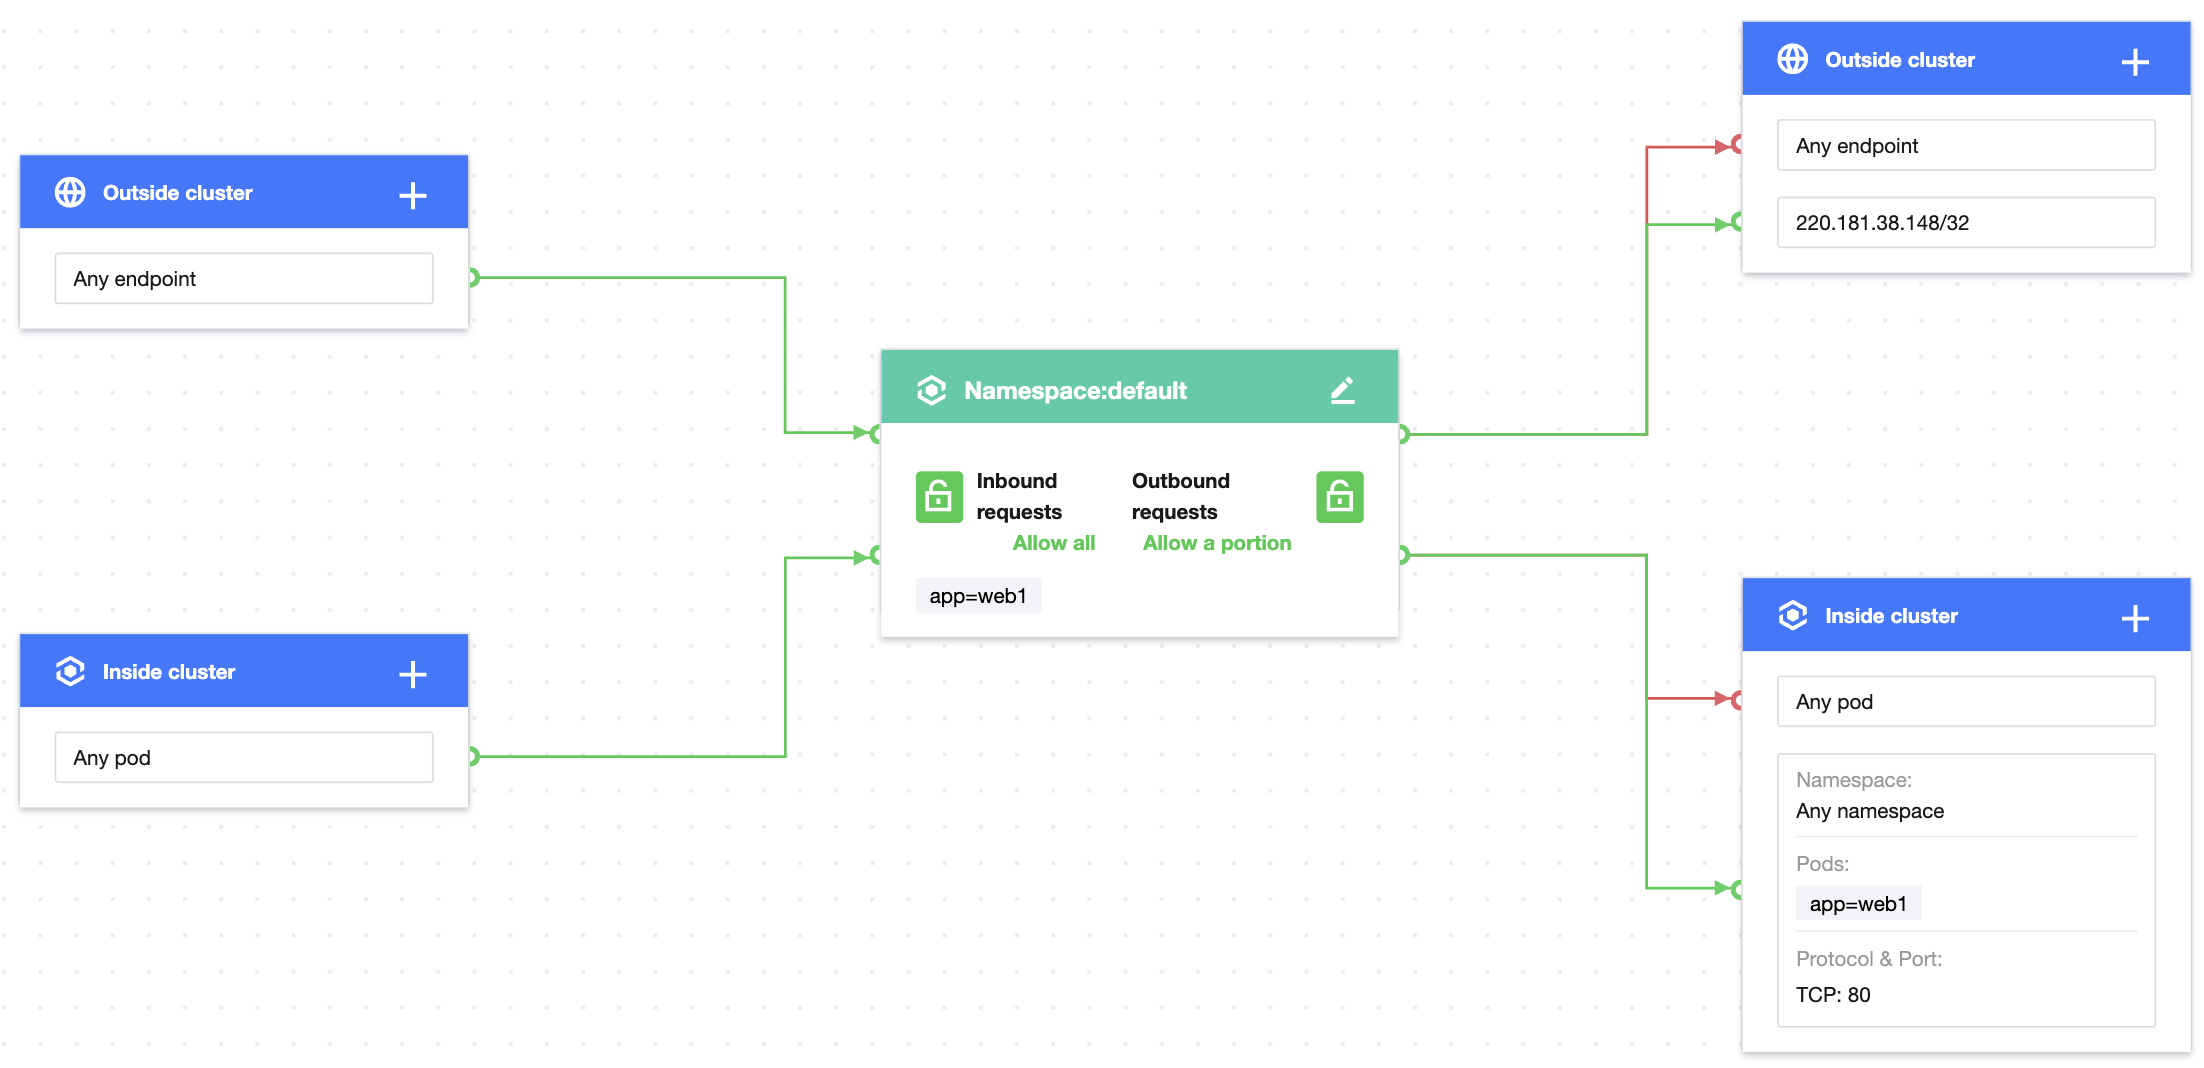
Set the label of the protected Pod as app=web, allow outbound requests only from the specified IP outside the cluster, and allow TCP requests only through port 80 of the Pod with the app=db label in any namespace as shown below:
Note:
This policy doesn't take effect for UDP, as it is not configured.
4. Verify the effect of the network policy.
The web service can access port 80 of the service with the app=db label.
[root@VM-0-11-centos ~]# kubectl exec -it web -- sh
# curl 172.18.254.45:80
<!DOCTYPE html>
<html>
<head>
<title>Welcome to nginx!</title>
...
The web service cannot access other ports of the service with the app=db label.
[root@VM-0-11-centos ~]# kubectl exec -it web -- sh
# curl 172.18.254.45:81
curl:(7)Failed to connect to 172.18.254.45 port 81: Connection refused
The web service cannot access other Pod services.
[root@VM-0-11-centos ~]# kubectl get svc web1
NAME TYPE CLUSTER-IP EXTERNAL-IP PORT(S) AGE
web1 ClusterIP 172.18.255.39 <none> 80/TCP 55m
[root@VM-0-11-centos ~]# kubectl exec -it web -- sh
# curl 172.18.255.39:80
curl:(7)Failed to connect to 172.18.255.39 port 80: Connection refused
The web service can access the specified IP.
[root@VM-0-11-centos ~]# kubectl exec -it web -- sh


 Yes
Yes
 No
No
Was this page helpful?