- Release Notes
- Product Introduction
- Purchase Guide
- Getting Started
- Operation Guide
- Troubleshooting
- API Documentation
- History
- Introduction
- API Category
- Making API Requests
- Cluster Security APIs
- SetCheckMode
- DescribeUserCluster
- DescribeUnfinishRefreshTask
- DescribeTaskResultSummary
- DescribeRiskList
- DescribeRefreshTask
- DescribeClusterSummary
- DescribeClusterDetail
- DescribeCheckItemList
- DescribeAffectedWorkloadList
- DescribeAffectedNodeList
- DescribeAffectedClusterCount
- CreateRefreshTask
- CreateClusterCheckTask
- CreateCheckComponent
- Network Security APIs
- UpdateNetworkFirewallPolicyYamlDetail
- UpdateNetworkFirewallPolicyDetail
- UpdateAndPublishNetworkFirewallPolicyYamlDetail
- UpdateAndPublishNetworkFirewallPolicyDetail
- DescribeNetworkFirewallPolicyYamlDetail
- DescribeNetworkFirewallPolicyStatus
- DescribeNetworkFirewallPolicyList
- DescribeNetworkFirewallPolicyDiscover
- DescribeNetworkFirewallPolicyDetail
- DescribeNetworkFirewallPodLabelsList
- DescribeNetworkFirewallNamespaceLabelList
- DescribeNetworkFirewallClusterRefreshStatus
- DescribeNetworkFirewallClusterList
- DescribeNetworkFirewallAuditRecord
- DeleteNetworkFirewallPolicyDetail
- CreateNetworkFirewallUndoPublish
- CreateNetworkFirewallPublish
- CreateNetworkFirewallPolicyDiscover
- CreateNetworkFirewallClusterRefresh
- ConfirmNetworkFirewallPolicy
- CheckNetworkFirewallPolicyYaml
- AddNetworkFirewallPolicyYamlDetail
- AddNetworkFirewallPolicyDetail
- AddAndPublishNetworkFirewallPolicyYamlDetail
- AddAndPublishNetworkFirewallPolicyDetail
- Security Compliance APIs
- ScanComplianceScanFailedAssets
- ScanCompliancePolicyItems
- ScanComplianceAssetsByPolicyItem
- ScanComplianceAssets
- ModifyCompliancePeriodTask
- InitializeUserComplianceEnvironment
- DescribeComplianceWhitelistItemList
- DescribeComplianceTaskPolicyItemSummaryList
- DescribeComplianceTaskAssetSummary
- DescribeComplianceScanFailedAssetList
- DescribeCompliancePolicyItemAffectedSummary
- DescribeCompliancePolicyItemAffectedAssetList
- DescribeCompliancePeriodTaskList
- DescribeComplianceAssetPolicyItemList
- DescribeComplianceAssetList
- DescribeComplianceAssetDetailInfo
- DeleteCompliancePolicyItemFromWhitelist
- DeleteCompliancePolicyAssetSetFromWhitelist
- DeleteComplianceAssetPolicySetFromWhitelist
- CreateExportComplianceStatusListJob
- CreateComplianceTask
- AddCompliancePolicyItemToWhitelist
- AddCompliancePolicyAssetSetToWhitelist
- AddComplianceAssetPolicySetToWhitelist
- Runtime security - High-risk syscalls
- Runtime Security - Reverse Shell APIs
- Runtime Security - Container Escape APIs
- ModifyEscapeWhiteList
- ModifyEscapeRule
- ModifyEscapeEventStatus
- DescribeEscapeWhiteList
- DescribeEscapeSafeState
- DescribeEscapeRuleInfo
- DescribeEscapeEventsExport
- DescribeEscapeEventTypeSummary
- DescribeEscapeEventTendency
- DescribeEscapeEventInfo
- DescribeEscapeEventDetail
- DeleteEscapeWhiteList
- CreateEscapeWhiteListExportJob
- CreateEscapeEventsExportJob
- AddEscapeWhiteList
- Runtime Security APIs
- StopVulScanTask
- OpenTcssTrial
- ModifyAccessControlStatus
- ModifyAccessControlRuleStatus
- ModifyAbnormalProcessStatus
- ModifyAbnormalProcessRuleStatus
- DescribeWebVulList
- DescribeVulScanLocalImageList
- DescribeVulScanInfo
- DescribeVulImageList
- DescribeVulDetail
- DescribeVulContainerList
- DescribeSupportDefenceVul
- DescribeRiskSyscallDetail
- DescribeEmergencyVulList
- DescribeAssetImageBindRuleInfo
- DescribeAccessControlRulesExport
- DescribeAccessControlRules
- DescribeAccessControlRuleDetail
- DescribeAccessControlEventsExport
- DescribeAccessControlEvents
- DescribeAccessControlDetail
- DescribeAbnormalProcessRulesExport
- DescribeAbnormalProcessRules
- DescribeAbnormalProcessRuleDetail
- DescribeAbnormalProcessLevelSummary
- DescribeAbnormalProcessEventsExport
- DescribeAbnormalProcessEvents
- DescribeAbnormalProcessEventTendency
- DescribeAbnormalProcessDetail
- DeleteAccessControlRules
- DeleteAbnormalProcessRules
- CreateWebVulExportJob
- CreateVulScanTask
- CreateVulImageExportJob
- CreateVulContainerExportJob
- CreateSystemVulExportJob
- CreateRiskDnsEventExportJob
- CreateProcessEventsExportJob
- CreateEmergencyVulExportJob
- CreateDefenceVulExportJob
- AddEditRiskSyscallWhiteList
- AddEditAccessControlRule
- AddEditAbnormalProcessRule
- Image Security APIs
- DescribeVulRegistryImageList
- UpdateImageRegistryTimingScanTask
- UpdateAssetImageRegistryRegistryDetail
- SyncAssetImageRegistryAsset
- SwitchImageAutoAuthorizedRule
- RenewImageAuthorizeState
- RemoveAssetImageRegistryRegistryDetail
- ModifyVulDefenceSetting
- ModifyVulDefenceEventStatus
- ModifyImageAuthorized
- ModifyAssetImageScanStop
- ModifyAssetImageRegistryScanStopOneKey
- ModifyAssetImageRegistryScanStop
- ModifyAsset
- DescribeVulTopRanking
- DescribeVulTendency
- DescribeVulSummary
- DescribeVulScanAuthorizedImageSummary
- DescribeVulLevelSummary
- DescribeVulLevelImageSummary
- DescribeVulImageSummary
- DescribeVulIgnoreRegistryImageList
- DescribeVulIgnoreLocalImageList
- DescribeVulDefenceSetting
- DescribeVulDefencePlugin
- DescribeVulDefenceHost
- DescribeVulDefenceEventTendency
- DescribeVulDefenceEventDetail
- DescribeVulDefenceEvent
- DescribeValueAddedSrvInfo
- DescribeSystemVulList
- DescribeSecEventsTendency
- DescribeScanIgnoreVulList
- DescribePostPayDetail
- DescribeNewestVul
- DescribeImageSimpleList
- DescribeImageRiskTendency
- DescribeImageRiskSummary
- DescribeImageRegistryTimingScanTask
- DescribeImageRegistryNamespaceList
- DescribeImageComponentList
- DescribeImageAutoAuthorizedTaskList
- DescribeImageAutoAuthorizedRule
- DescribeImageAutoAuthorizedLogList
- DescribeContainerSecEventSummary
- DescribeContainerAssetSummary
- DescribeAutoAuthorizedRuleHost
- DescribeAssetWebServiceList
- DescribeAssetSummary
- DescribeAssetProcessList
- DescribeAssetPortList
- DescribeAssetImageVulListExport
- DescribeAssetImageVulList
- DescribeAssetImageVirusListExport
- DescribeAssetImageVirusList
- DescribeAssetImageSimpleList
- DescribeAssetImageScanTask
- DescribeAssetImageScanStatus
- DescribeAssetImageScanSetting
- DescribeAssetImageRiskListExport
- DescribeAssetImageRiskList
- DescribeAssetImageRegistryVulListExport
- DescribeAssetImageRegistryVulList
- DescribeAssetImageRegistryVirusListExport
- DescribeAssetImageRegistryVirusList
- DescribeAssetImageRegistrySummary
- DescribeAssetImageRegistryScanStatusOneKey
- DescribeAssetImageRegistryRiskListExport
- DescribeAssetImageRegistryRiskInfoList
- DescribeAssetImageRegistryRegistryList
- DescribeAssetImageRegistryRegistryDetail
- DescribeAssetImageRegistryListExport
- DescribeAssetImageRegistryList
- DescribeAssetImageRegistryDetail
- DescribeAssetImageRegistryAssetStatus
- DescribeAssetImageListExport
- DescribeAssetImageList
- DescribeAssetImageHostList
- DescribeAssetImageDetail
- DescribeAssetHostList
- DescribeAssetHostDetail
- DescribeAssetDBServiceList
- DescribeAssetContainerList
- DescribeAssetContainerDetail
- DescribeAssetComponentList
- DescribeAssetAppServiceList
- DeleteIgnoreVul
- CreateVulExportJob
- CreateVulDefenceHostExportJob
- CreateVulDefenceEventExportJob
- CreateOrModifyPostPayCores
- CreateImageExportJob
- CreateComponentExportJob
- CreateAssetImageScanTask
- CreateAssetImageRegistryScanTaskOneKey
- CreateAssetImageRegistryScanTask
- CheckRepeatAssetImageRegistry
- AddIgnoreVul
- AddEditImageAutoAuthorizedRule
- AddAssetImageRegistryRegistryDetail
- Runtime Security - Trojan Call APIs
- DescribeExportJobResult
- StopVirusScanTask
- ModifyVirusScanTimeoutSetting
- ModifyVirusScanSetting
- ModifyVirusMonitorSetting
- ModifyVirusFileStatus
- ModifyVirusAutoIsolateSetting
- ModifyVirusAutoIsolateExampleSwitch
- ExportVirusList
- DescribeVirusTaskList
- DescribeVirusSummary
- DescribeVirusScanTimeoutSetting
- DescribeVirusScanTaskStatus
- DescribeVirusScanSetting
- DescribeVirusSampleDownloadUrl
- DescribeVirusMonitorSetting
- DescribeVirusManualScanEstimateTimeout
- DescribeVirusList
- DescribeVirusEventTendency
- DescribeVirusDetail
- DescribeVirusAutoIsolateSetting
- DescribeVirusAutoIsolateSampleList
- DescribeVirusAutoIsolateSampleDownloadURL
- DescribeVirusAutoIsolateSampleDetail
- CreateVirusScanTask
- CreateVirusScanAgain
- Asset Management APIs
- ModifyContainerNetStatus
- DescribeUnauthorizedCoresTendency
- DescribeTcssSummary
- DescribePromotionActivity
- DescribeInspectionReport
- DescribeExportJobManageList
- DescribeExportJobDownloadURL
- DescribeAssetSyncLastTime
- DescribeAgentInstallCommand
- DescribeAgentDaemonSetCmd
- DescribeABTestConfig
- DeleteMachine
- CreateHostExportJob
- CreateAssetImageVirusExportJob
- CreateAssetImageScanSetting
- Security Operations - Log Analysis APIs
- ResetSecLogTopicConfig
- ModifySecLogKafkaUIN
- ModifySecLogJoinState
- ModifySecLogJoinObjects
- ModifySecLogDeliveryKafkaSetting
- ModifySecLogDeliveryClsSetting
- ModifySecLogCleanSettingInfo
- DescribeSecLogKafkaUIN
- DescribeSecLogJoinTypeList
- DescribeSecLogJoinObjectList
- DescribeSecLogDeliveryKafkaSetting
- DescribeSecLogDeliveryKafkaOptions
- DescribeSecLogDeliveryClsSetting
- DescribeSecLogDeliveryClsOptions
- DescribeSecLogCleanSettingInfo
- DescribeSecLogAlertMsg
- DescribeSearchTemplates
- DescribeSearchLogs
- DescribeSearchExportList
- DescribePublicKey
- DescribeLogStorageStatistic
- DescribeIndexList
- DescribeESHits
- DescribeESAggregations
- DeleteSearchTemplate
- CreateSearchTemplate
- Alert Settings APIs
- Advanced prevention - K8s API abnormal requests
- ModifyK8sApiAbnormalRuleStatus
- ModifyK8sApiAbnormalRuleInfo
- ModifyK8sApiAbnormalEventStatus
- DescribeK8sApiAbnormalTendency
- DescribeK8sApiAbnormalSummary
- DescribeK8sApiAbnormalRuleScopeList
- DescribeK8sApiAbnormalRuleList
- DescribeK8sApiAbnormalRuleInfo
- DescribeK8sApiAbnormalEventList
- DescribeK8sApiAbnormalEventInfo
- DescribeAssetClusterList
- DeleteK8sApiAbnormalRule
- CreateK8sApiAbnormalRuleInfo
- CreateK8sApiAbnormalRuleExportJob
- CreateK8sApiAbnormalEventExportJob
- CreateAccessControlsRuleExportJob
- Billing APIs
- Data Types
- Error Codes
- FAQs
- TCSS Policy
- Contact Us
- Glossary
The security check feature provides the security checklist, cluster risk statistics, security check details, and check item management. It allows installing the scanner for specified clusters, performing risk checks, and viewing cluster risk details.
Installing the Scanner
1. Log in to the TCSS console and click Cluster Risk Management > Security Check on the left sidebar.
2. The Security Check page presets a scheduled cluster sync every hour. Click Sync assets to manually sync clusters.
Note:
Currently, the security checklist applies to the sync of TKE managed and self-deployed clusters.
During your first use of cluster security, you need to manually "sync the assets" once, and the system will then automatically sync them.

Single: Select the target Cluster ID and click Install scanner or Install component.

Multiple: Select the target Cluster IDs and click Install component.

3. In the pop-up window, click OK.
4. After the confirmation, the system will deploy the DaemonSet component on all nodes in the cluster. The scanner will be in the Running status after the installation.
Note:
When the scanner is installed, the
cluster-security-defender DaemonSet workload will be installed in the kube-system namespace of the cluster. To execute a cluster security check, make sure that the DaemonSet workload runs normally.DaemonSet doesn't affect cluster running or performance. It is subject to the following resource limits:
CPU: 100–250 MB
MEM: 100–250 MiB
To delete the scanner, log in to the TKE console, click Workload on the Cluster details page, select DaemonSet, select cluster-security-defender in the
kube-system namespace, and click More > Delete in the Operation column.Performing a Security Check
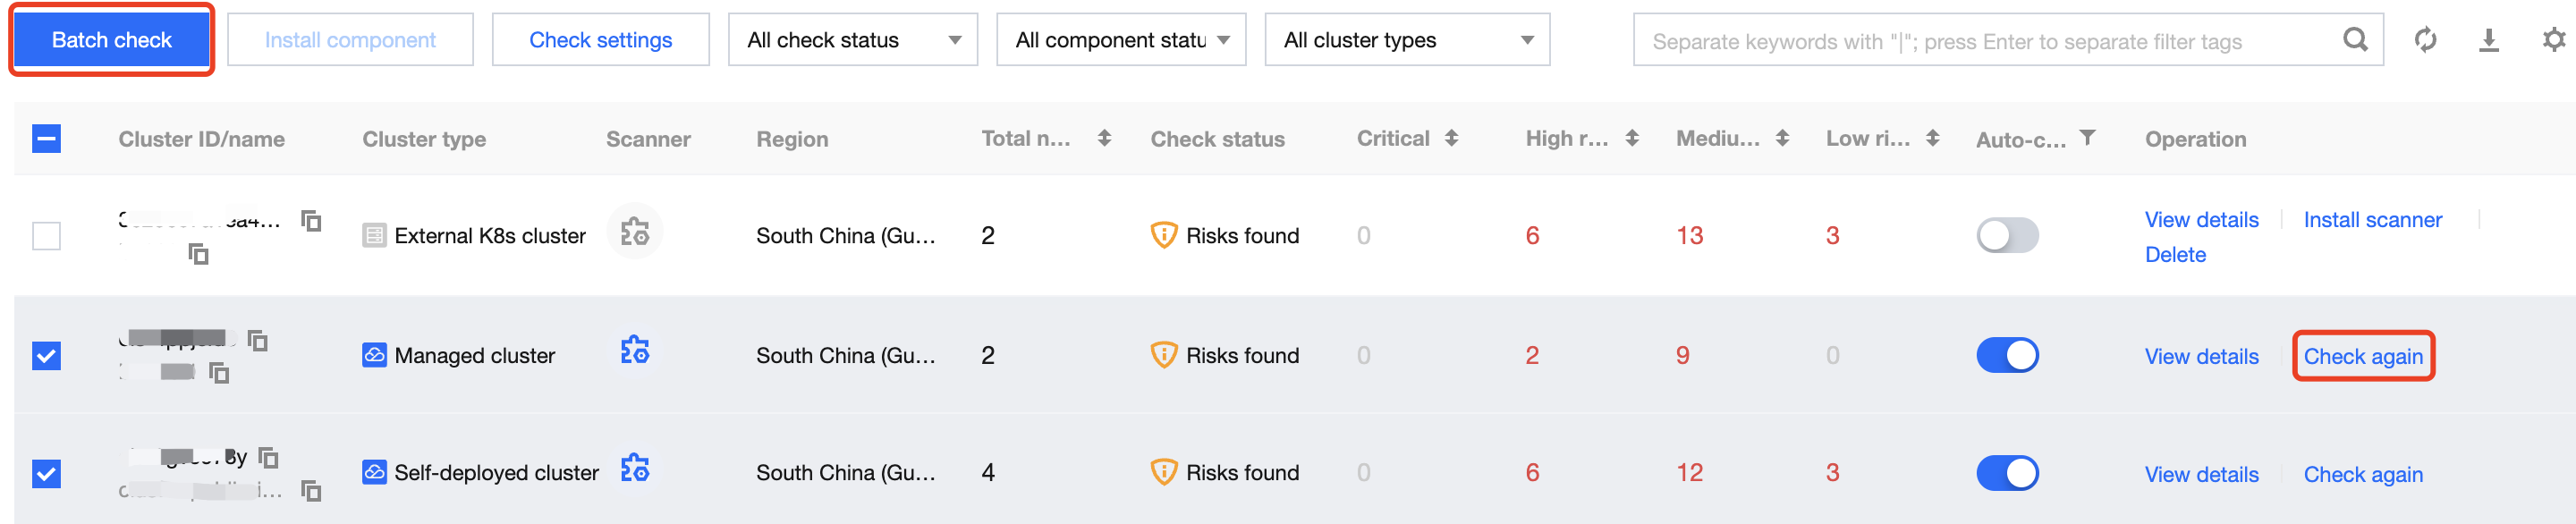
On the Security Check page, the system will automatically perform a check after the scanner is installed successfully. You can specify a cluster and click Check again, or specify multiple clusters and click Batch check.
Note:
The scanner is not installed by default and needs to be installed before a scan is performed.
Viewing the Security Check Result
1. On the Security Check page, the Statistics card displays the total number of clusters and the numbers of clusters involving no risks and those not checked.

2. The Cluster risks card displays the numbers of risky clusters and clusters involving critical risks, high risks, medium risks, and low risks.

3. On the Security Check page, click View details in the Operation column of the cluster list to enter the Cluster risk details page.

4. The Cluster risk details page displays all identified cluster risks, cluster details, and risk details of the current cluster.
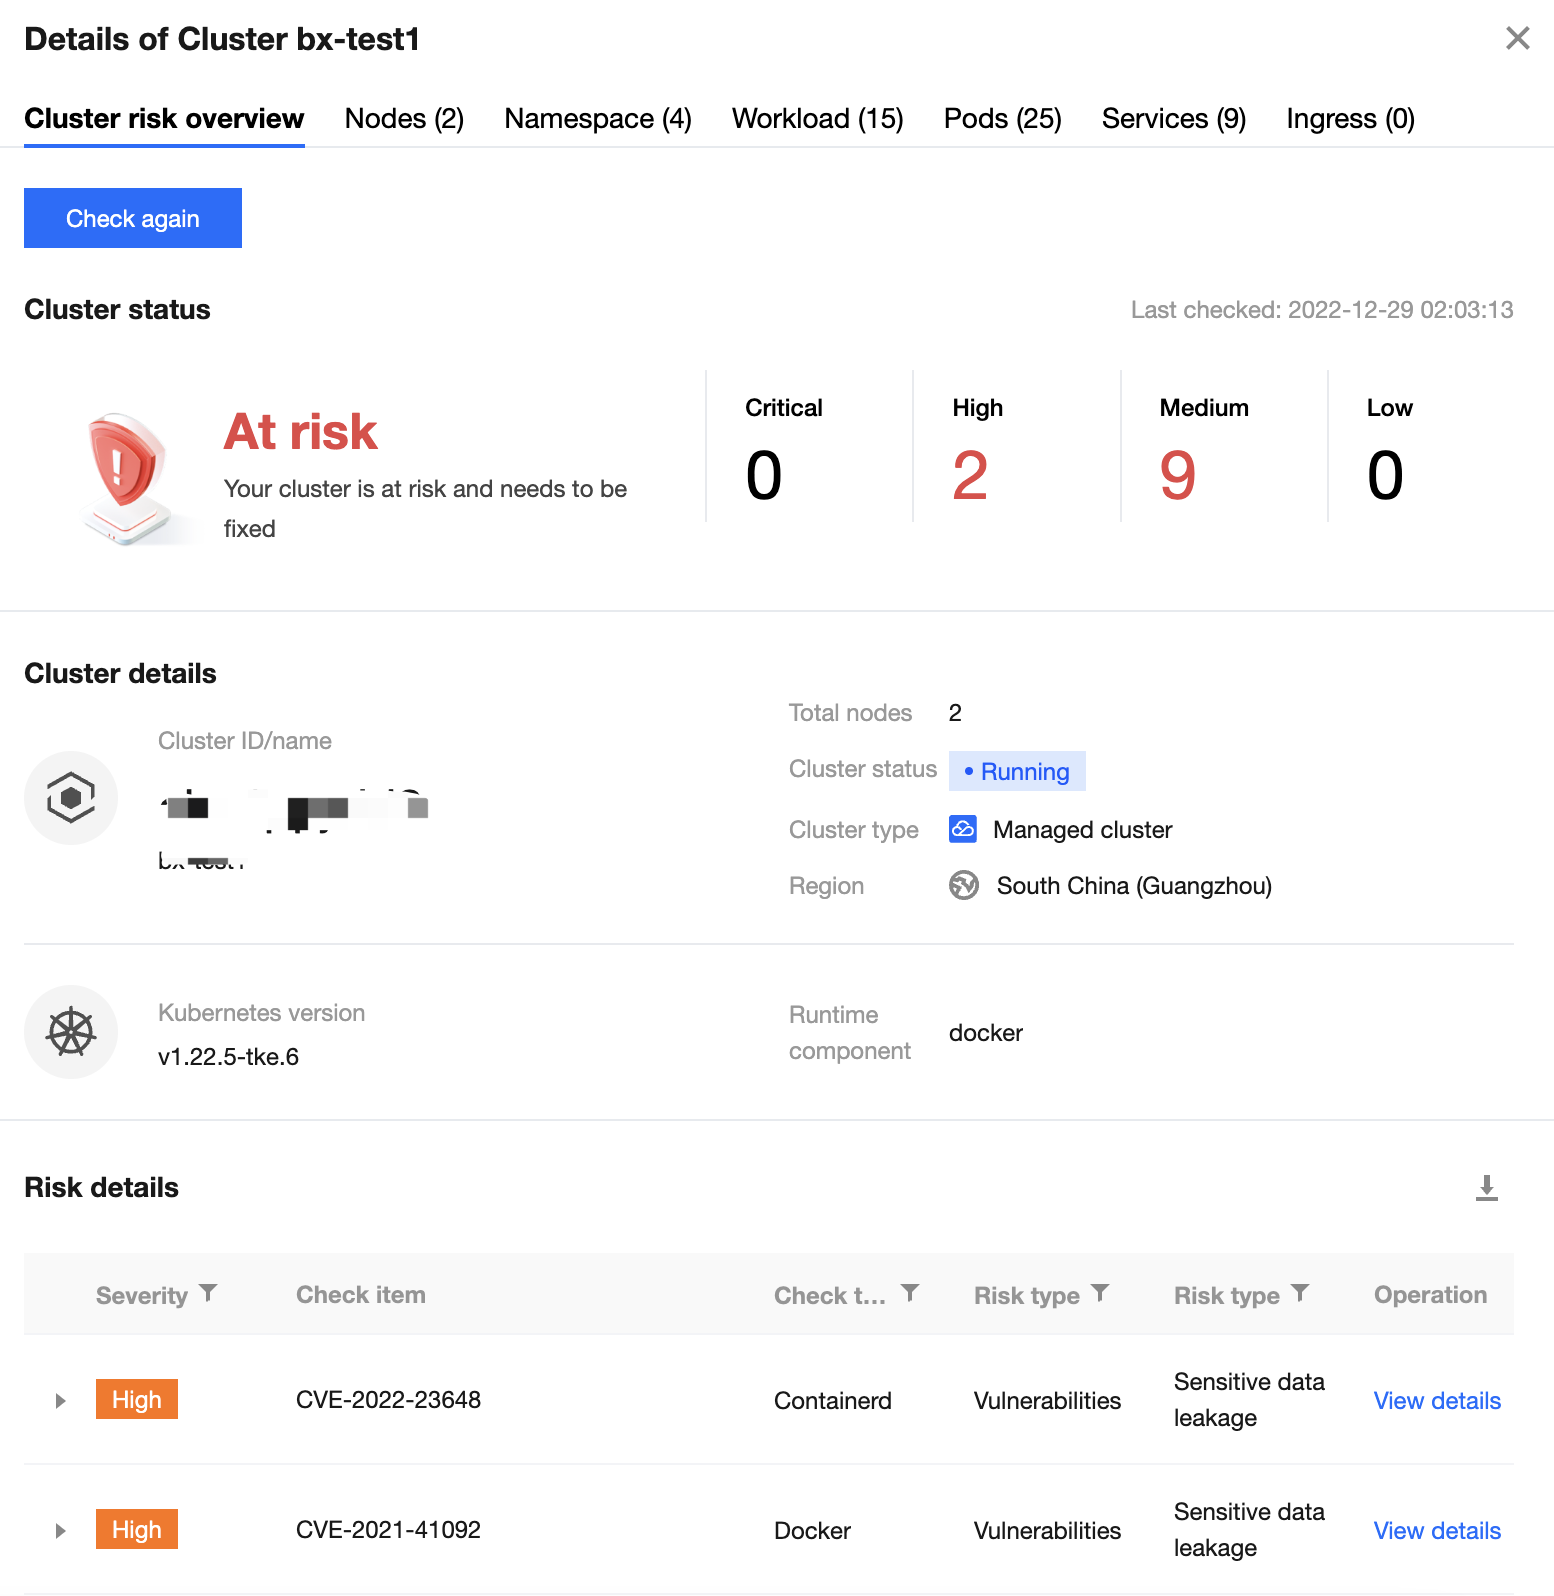
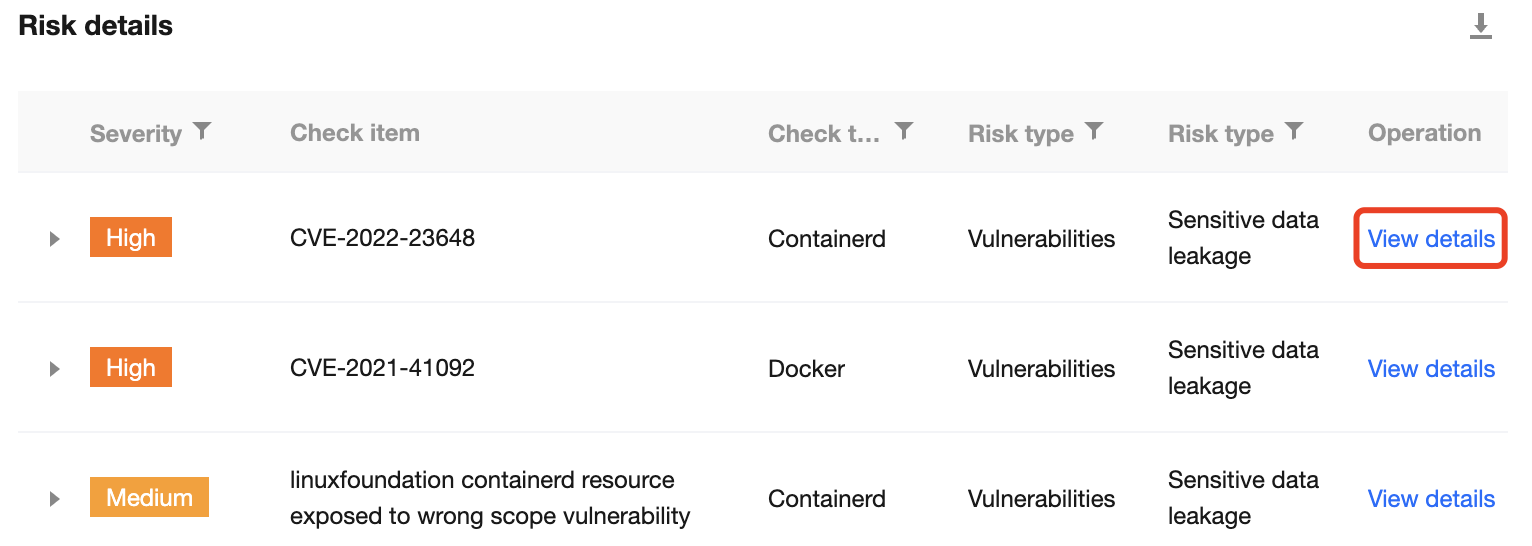
5. On the risk details list, select the target check item and click View details to enter the Risk check item details page.
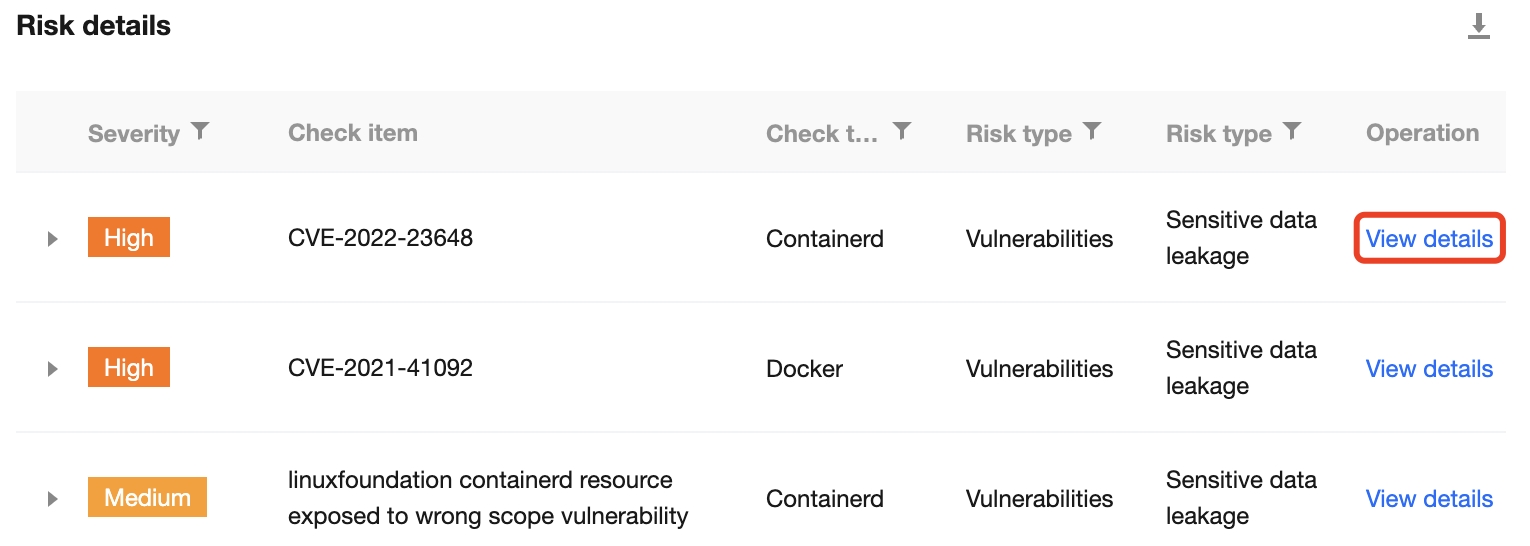
6. The Risk check item details page displays the risk details, description, solution, and affected assets in the current cluster.
Enabling Automatic Check
Enabling automatic check for a single cluster
1. On the Security Check page, select the target cluster and toggle on 

2. In the pop-up window, click OK.
Note:
After the confirmation, automatic check will be enabled and performed as follows:
Nodes newly added to the cluster will be automatically checked.
The cluster will be checked across every midnight.
Enabling automatic check for multiple clusters
Note:
Automatic security check is disabled by default and can be enabled for the following check items:
Nodes newly added to the cluster will be automatically checked.
The cluster will be checked across every midnight.
Managing Security Check Items
1. On the Security Check page, click Check item management in the top-right corner.
2. On the check item settings page, the list of check items displays all check items of a security check performed by the system. Click View details to view the check item details.

 Yes
Yes
 No
No
Was this page helpful?