Customer Service Desk Web UIKit. Using this UIKit, you can integrate the capabilities of Customer Service into your Web or Hybrid projects within one day. Minimize the integration, and use AI to increase revenue and improve efficiency for your products.
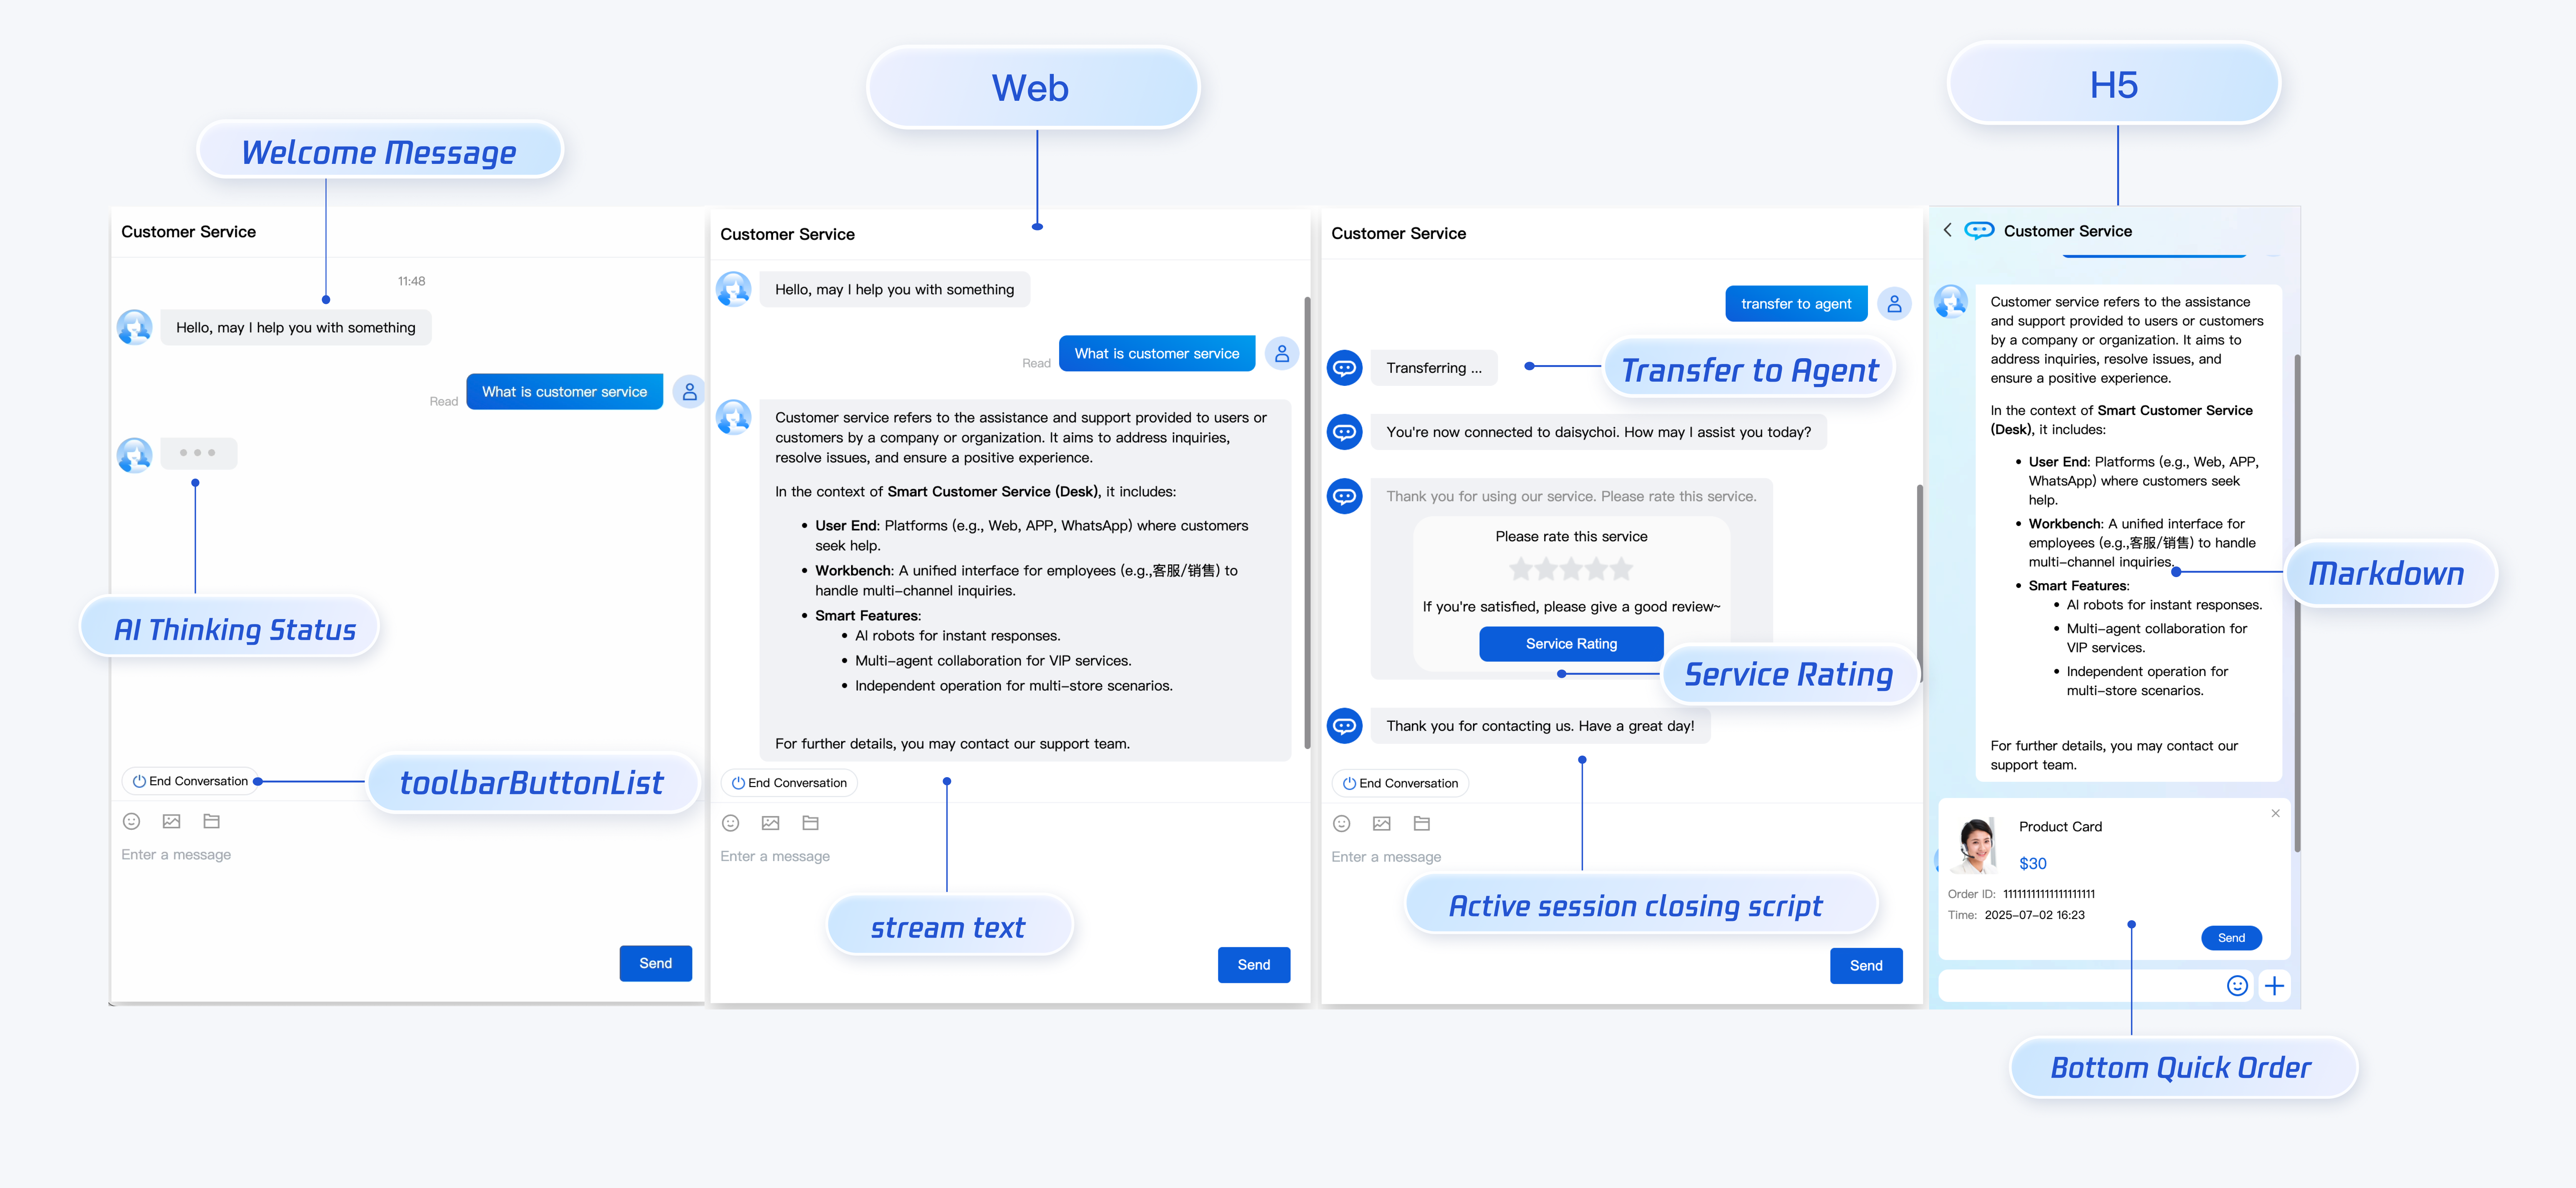
Preview
Developer Environment Requirements
Vue (fully support Vue2 & Vue3, please choose your matched Vue version access guide when accessing below)
Supports the use of webpack or vite to create a project, configured with Vue3/Vue2 + TypeScript + sass. The following is several project setup examples:
vue-cli
vite
Note:
1. Ensure your @vue/cli version is above 5.0.0. You can use the following example code to upgrade @vue/cli to v5.0.8.
2. If your project was created with a @vue/cli lower version, and there is an error after seamless integration with UIKit, see common issues for problem-solving.
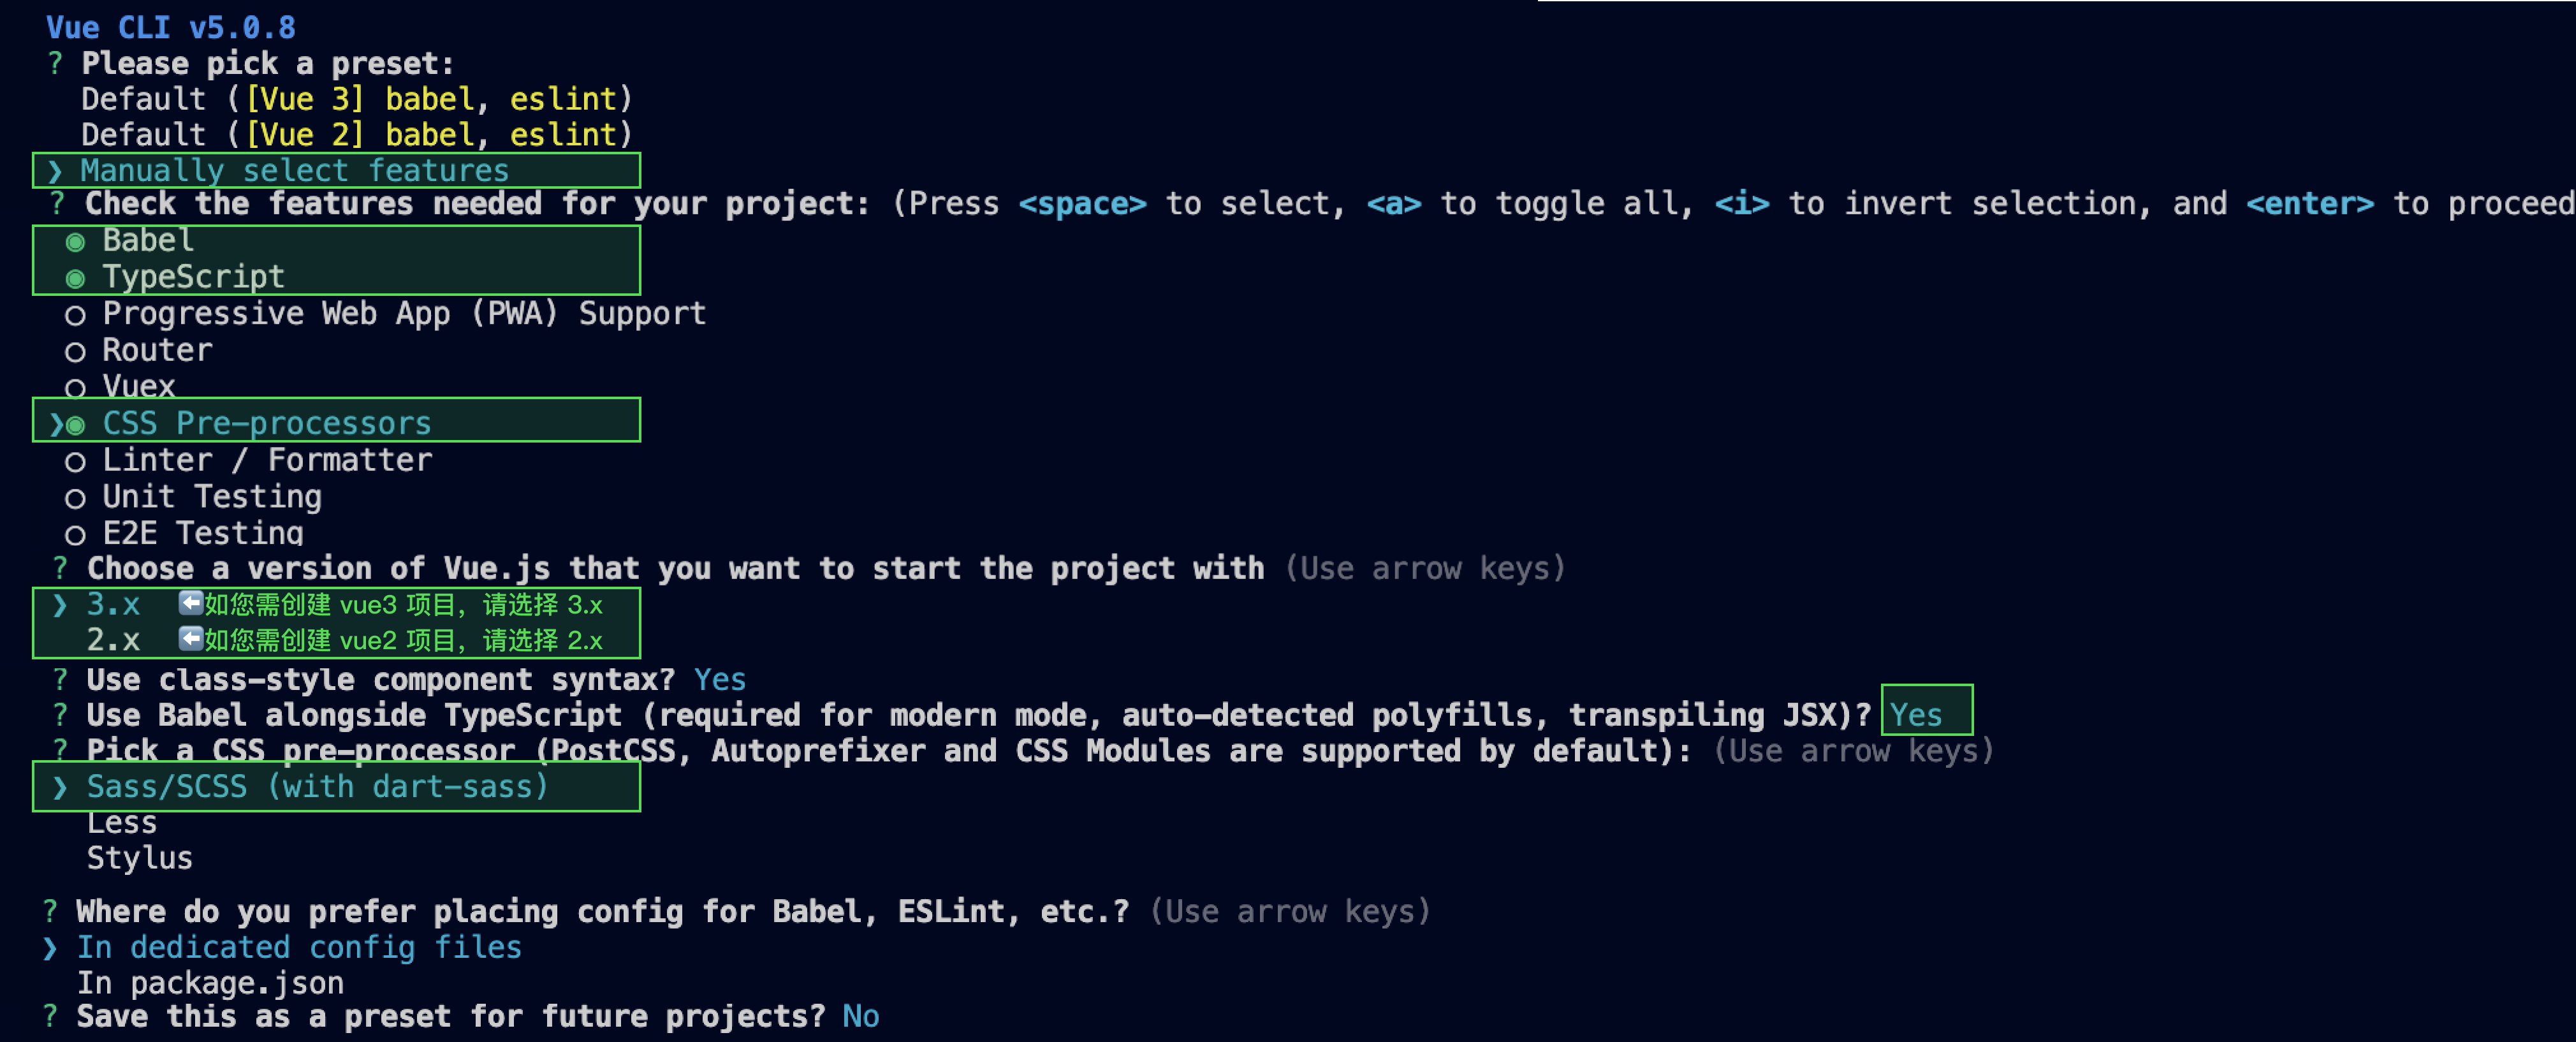
Create a project using vue-cli, configured with Vue2/Vue3 + TypeScript + sass.
If you have not installed vue-cli or the vue-cli version is lower than 5.0.0, you can install it in terminal or cmd in the following ways:
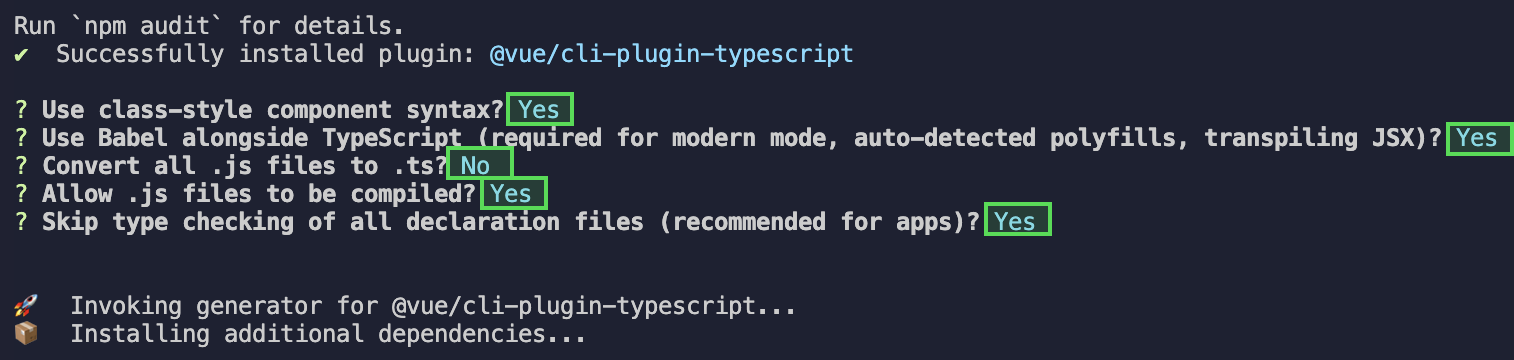
Create a project using vue-cli and choose the selected configuration in the figure below.
vue create ai-desk-example
Ensure to select the following configuration:
After creation, switch to the project directory.
cd ai-desk-example
If you are a vue 2 project, configure the environment based on the vue version used by you. Ignore it for vue 3 projects.
vue2.7
Vue 2.6 and Below
npm i vue@2.7.9 vue-template-compiler@2.7.9
npm i @vue/composition-api unplugin-vue2-script-setup vue@2.6.14 vue-template-compiler@2.6.14
Note:
Warning: Vite requires Node.js version 18+ or 20+. When your package manager issues a warning, please upgrade your Node Version. For details, refer to Vite Official Website.
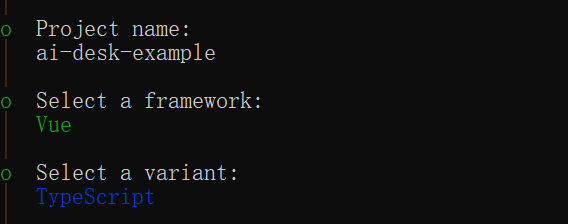
Create a project using vite, configured with Vue + TypeScript as the figure below.
npm create vite@latest
Switch to the project directory afterward and install the project dependencies.
Introduce the UI Component on the Page to Be Displayed and It Can Be Used
For Example: Implement the Following Code on the App.Vue Page to Quickly Deploy the Customer Service Inquiry Interface (The Following Example Code Simultaneously Supports the Web and H5)
Note:
The following example code uses setup syntax. If your project does not use setup syntax, please register the component according to the standard method of Vue3/Vue2.
const SDKAppID =0;// Your SDKAppID, the application ID with customer service Desk enabled
const userID ='';// Your userID, reusable account system of your app or randomly generated
const userSig ='';// Your userSig, can be generated by the console during the integration stage, and must be generated by the server during the production stage
parallel:false,// disable thread-loader, which is not compactible with this plugin
configureWebpack:{
plugins:[
ScriptSetup({
/* options */
}),
],
},
chainWebpack(config){
// disable type check and let `vue-tsc` handles it
config.plugins.delete("fork-ts-checker");
},
};
3. At the end of the src/ai-desk-customer-vue/adapter-vue-web.ts file, replace export source:
// Initial writing
export*from"vue";
// replace with
export*from"@vue/composition-api";
Step 4: Obtain SDKAppID, UserID, UserSig
Set the SDKAppID, userID, and userSig in App.vue.
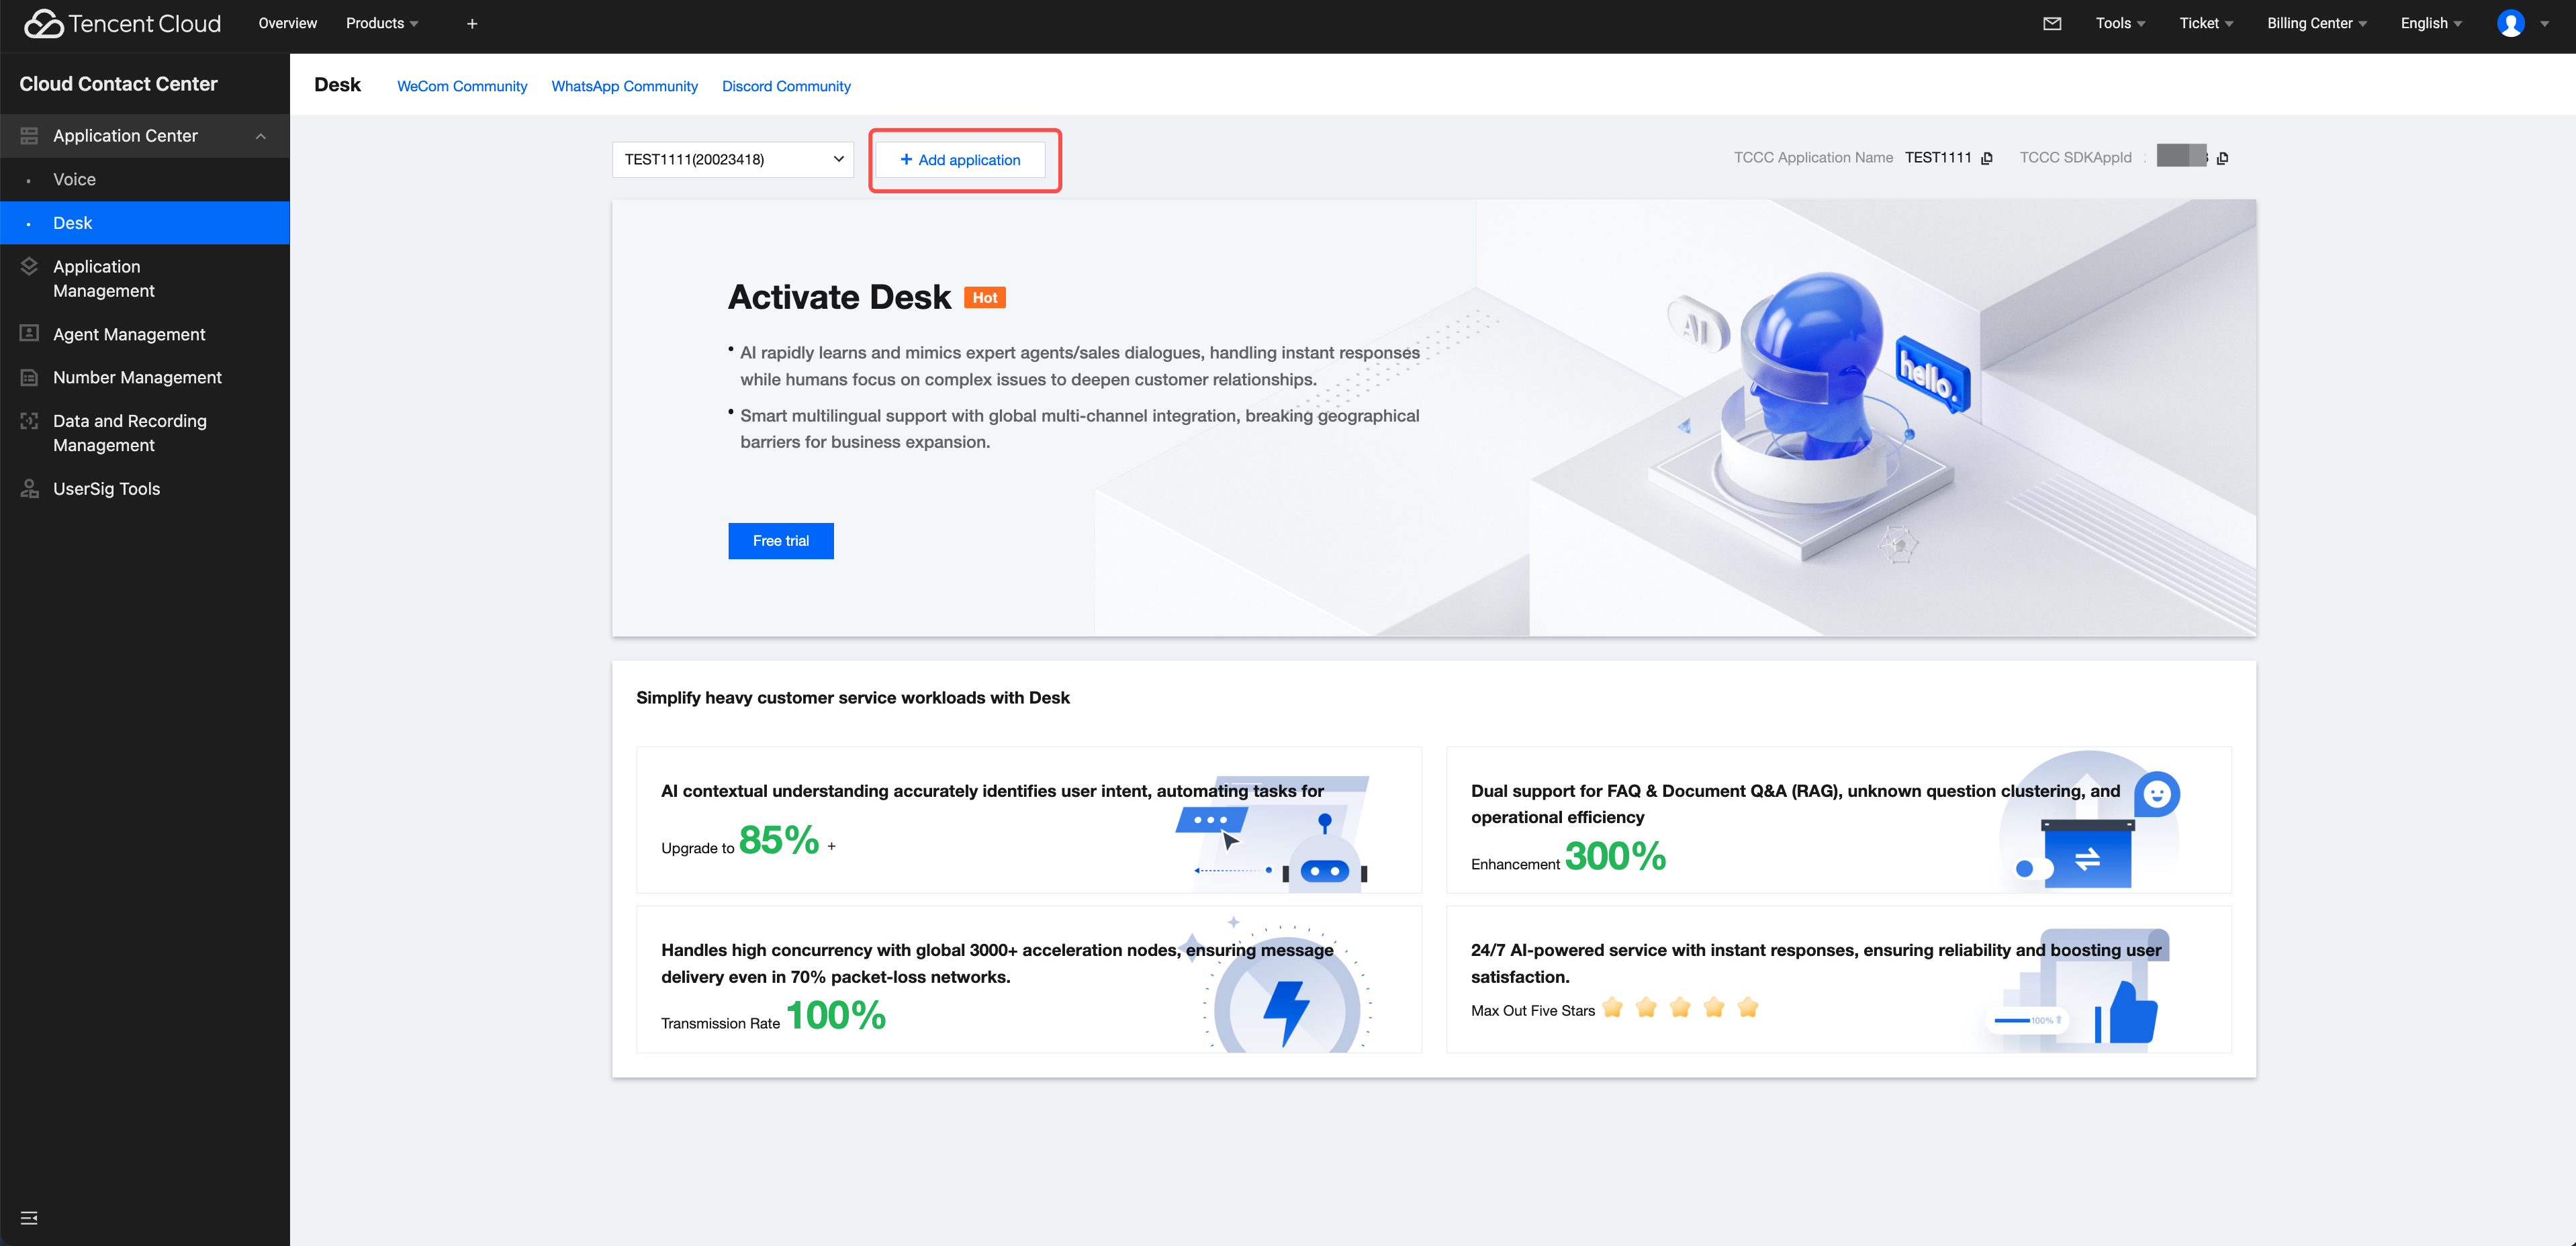
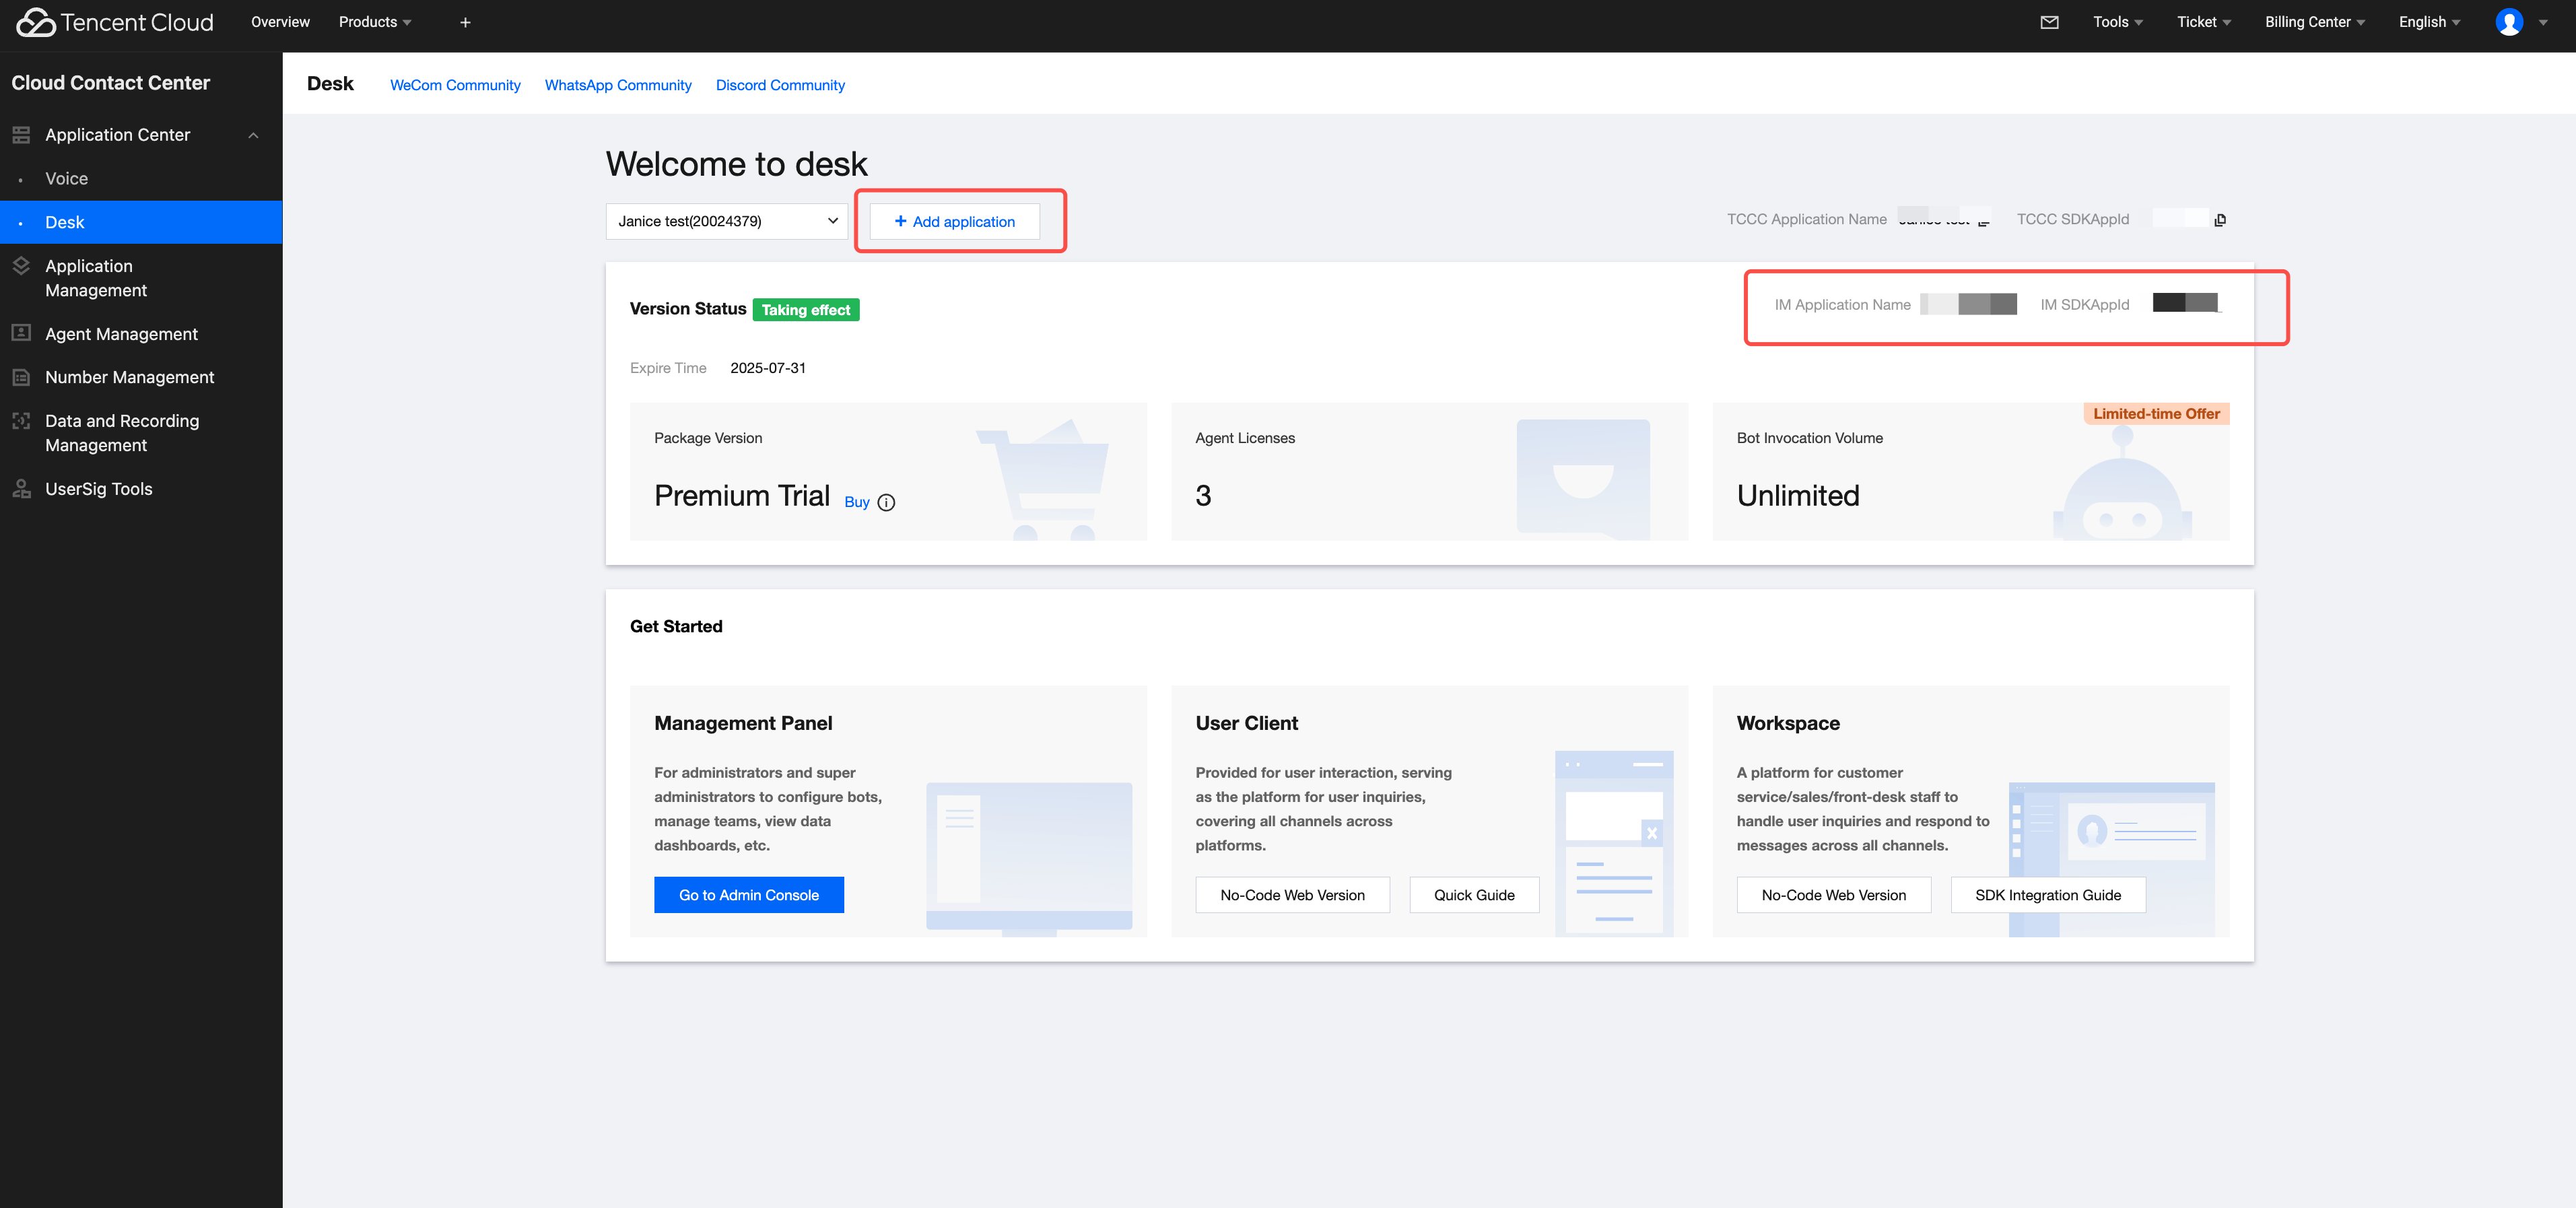
SDKAppID information can be obtained by clicking Application Management > Add application in the Cloud Contact Center console and choosing Customer Service Desk > Add application, and then enabling Customer Service.
userID information. A random string can be locally generated, such as test-1234.
Note:
userID can only contain printable ASCII characters
userID cannot contain the string administrator.
userID cannot contain the ID of a customer service agent.
userID length cannot exceed 45 bytes.
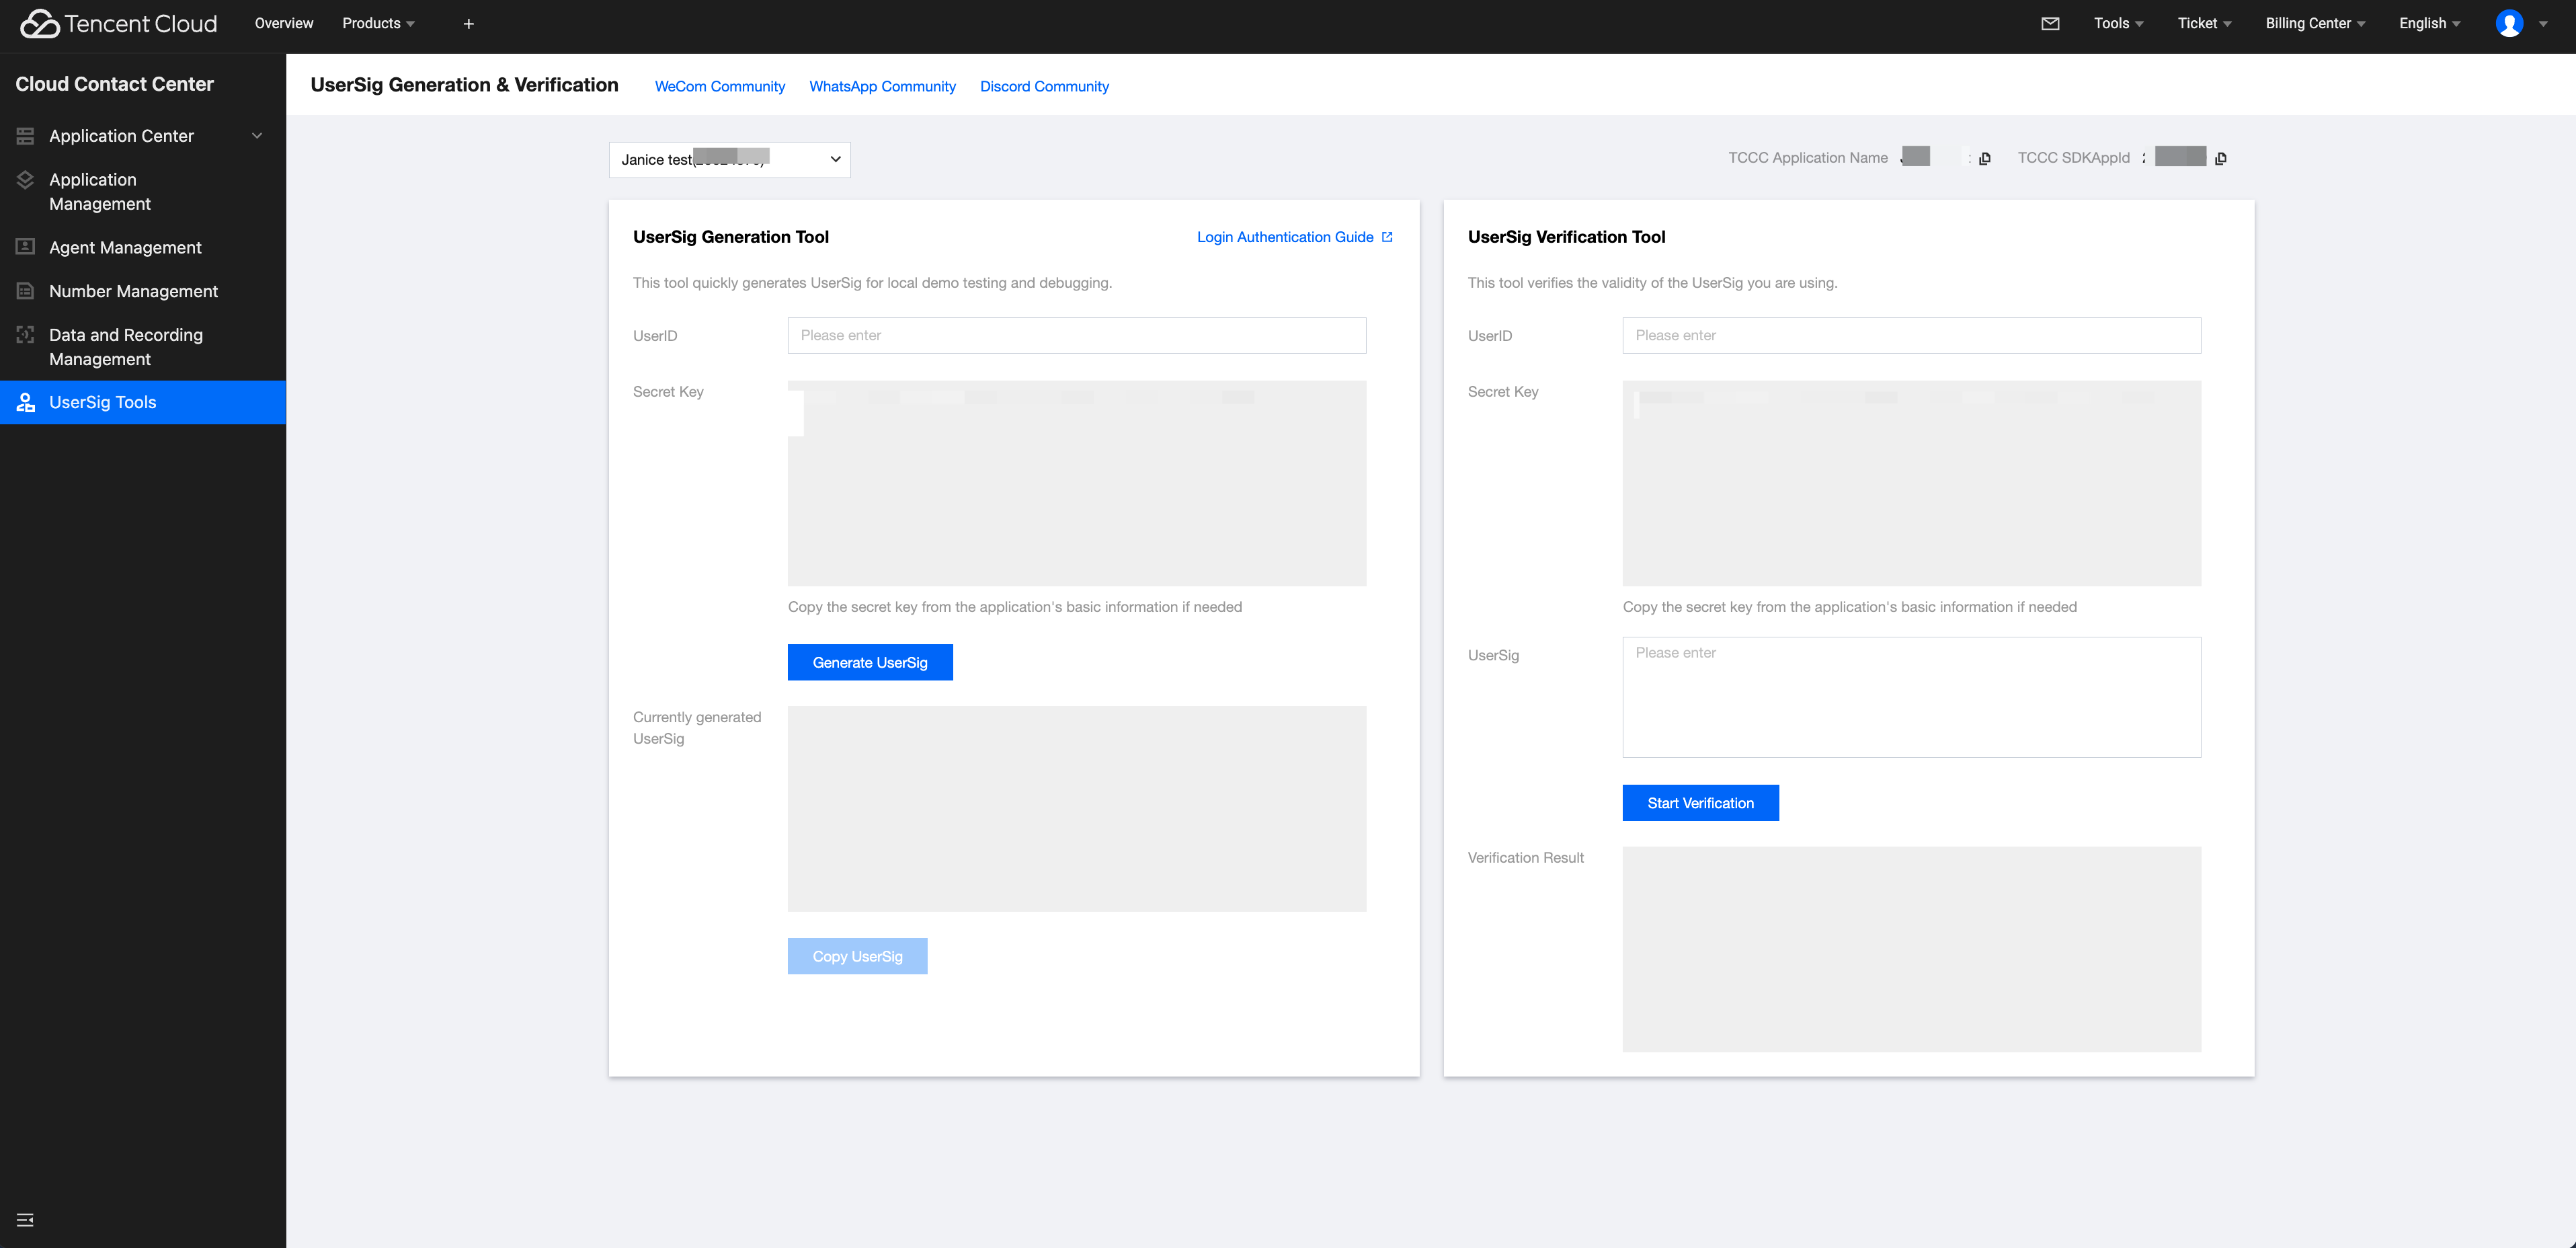
userSig info, click UserSig Tools, fill in the created userID to generate userSig.
Step 5: Start a Project, initiate your first customer service inquiry
Execute the following command to start the project.
vue-cli
vite
Note:
Since vue-cli enables webpack global overlay error message prompts by default, for a better experience, it is recommended to disable global overlay error prompts.
Add the following code to vue.config.js
Webpack4 and Above
webpack3
module.exports =defineConfig({
devServer:{
client:{
overlay:false,
},
},
});
module.exports ={
devServer:{
overlay:false,
},
};
Disable TypeScript detection for ai-desk-customer-vue in tsconfig.json.
{
"exclude":[
"node_modules",
"src/ai-desk-customer-vue",
]
}
npm run serve
npm run dev
Advanced Feature
Internationalized Interface
UIKit components support the following languages:
Language Code (UserLang)
Language
zh_cn
Simplified Chinese
en
English
zh_tw
Traditional Chinese
ja
Japanese
id
Indonesian
ms
Malaysian
vi
Vietnamese
th
Thai
fil
Filipino
ru
Russian
If your business needs to go global and the user language is mainly English, you can set userLang="en" when using customer service. If you do not specify userLang, UIKit will use the language in browser settings.
If you need to support dynamic user language switching, use the TUICustomerServer.changeLanguage API and trigger a re-render by modifying the page/component key. This ensures language updates are applied immediately.
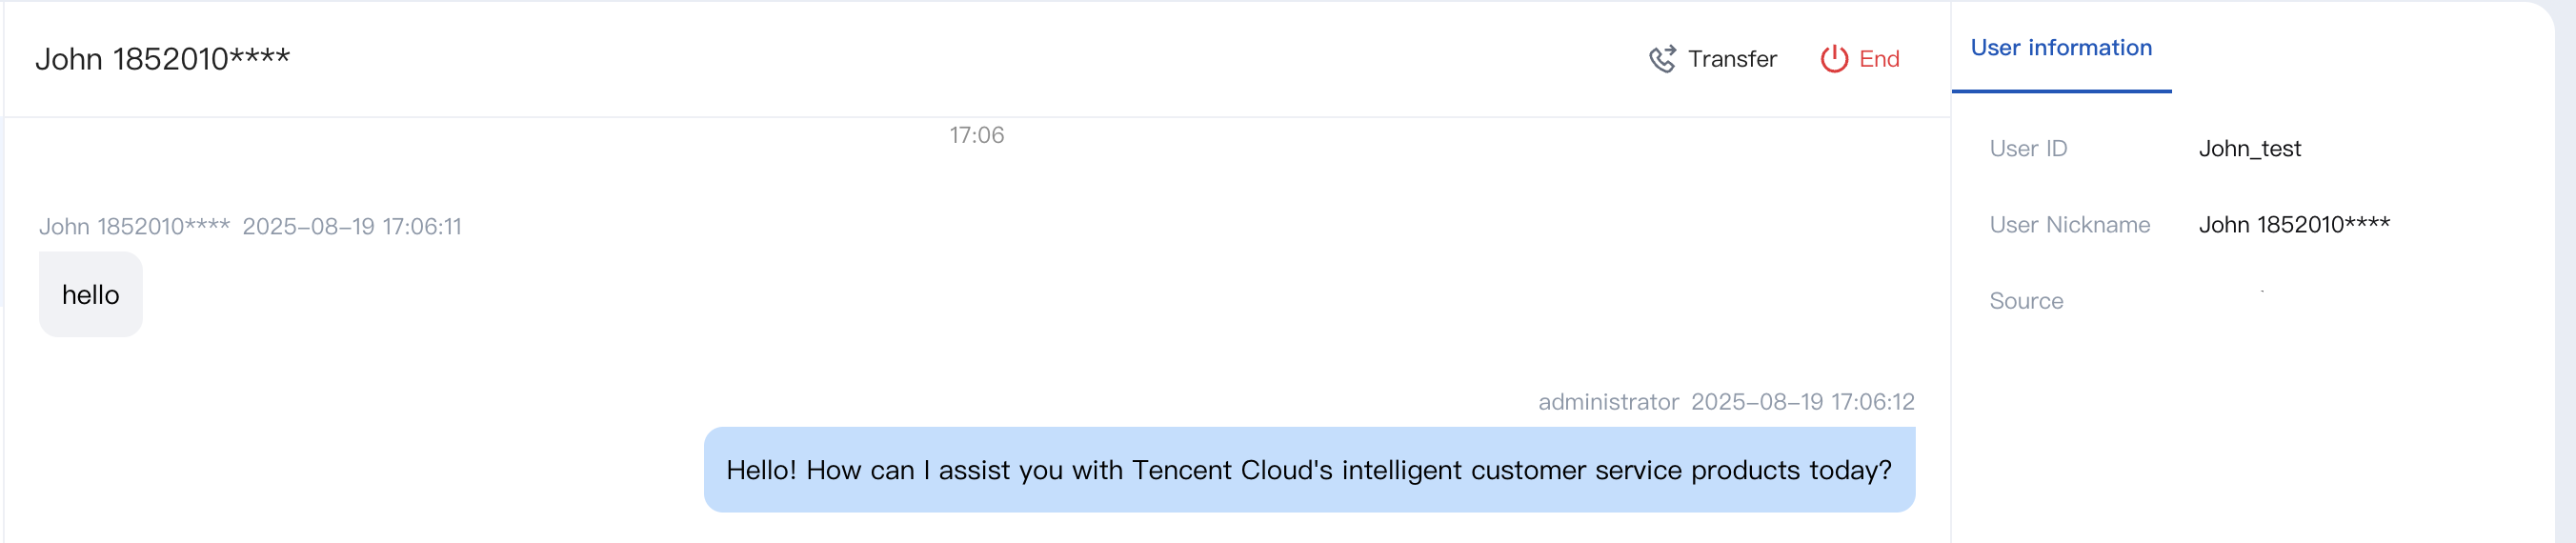
If the agent wants to see the user's nickname, avatar, and other information during reception on the workstation to enhance communication efficiency, the effect is as shown below:
Please use the initWithProfile API to initialize, input Nickname and avatar just.
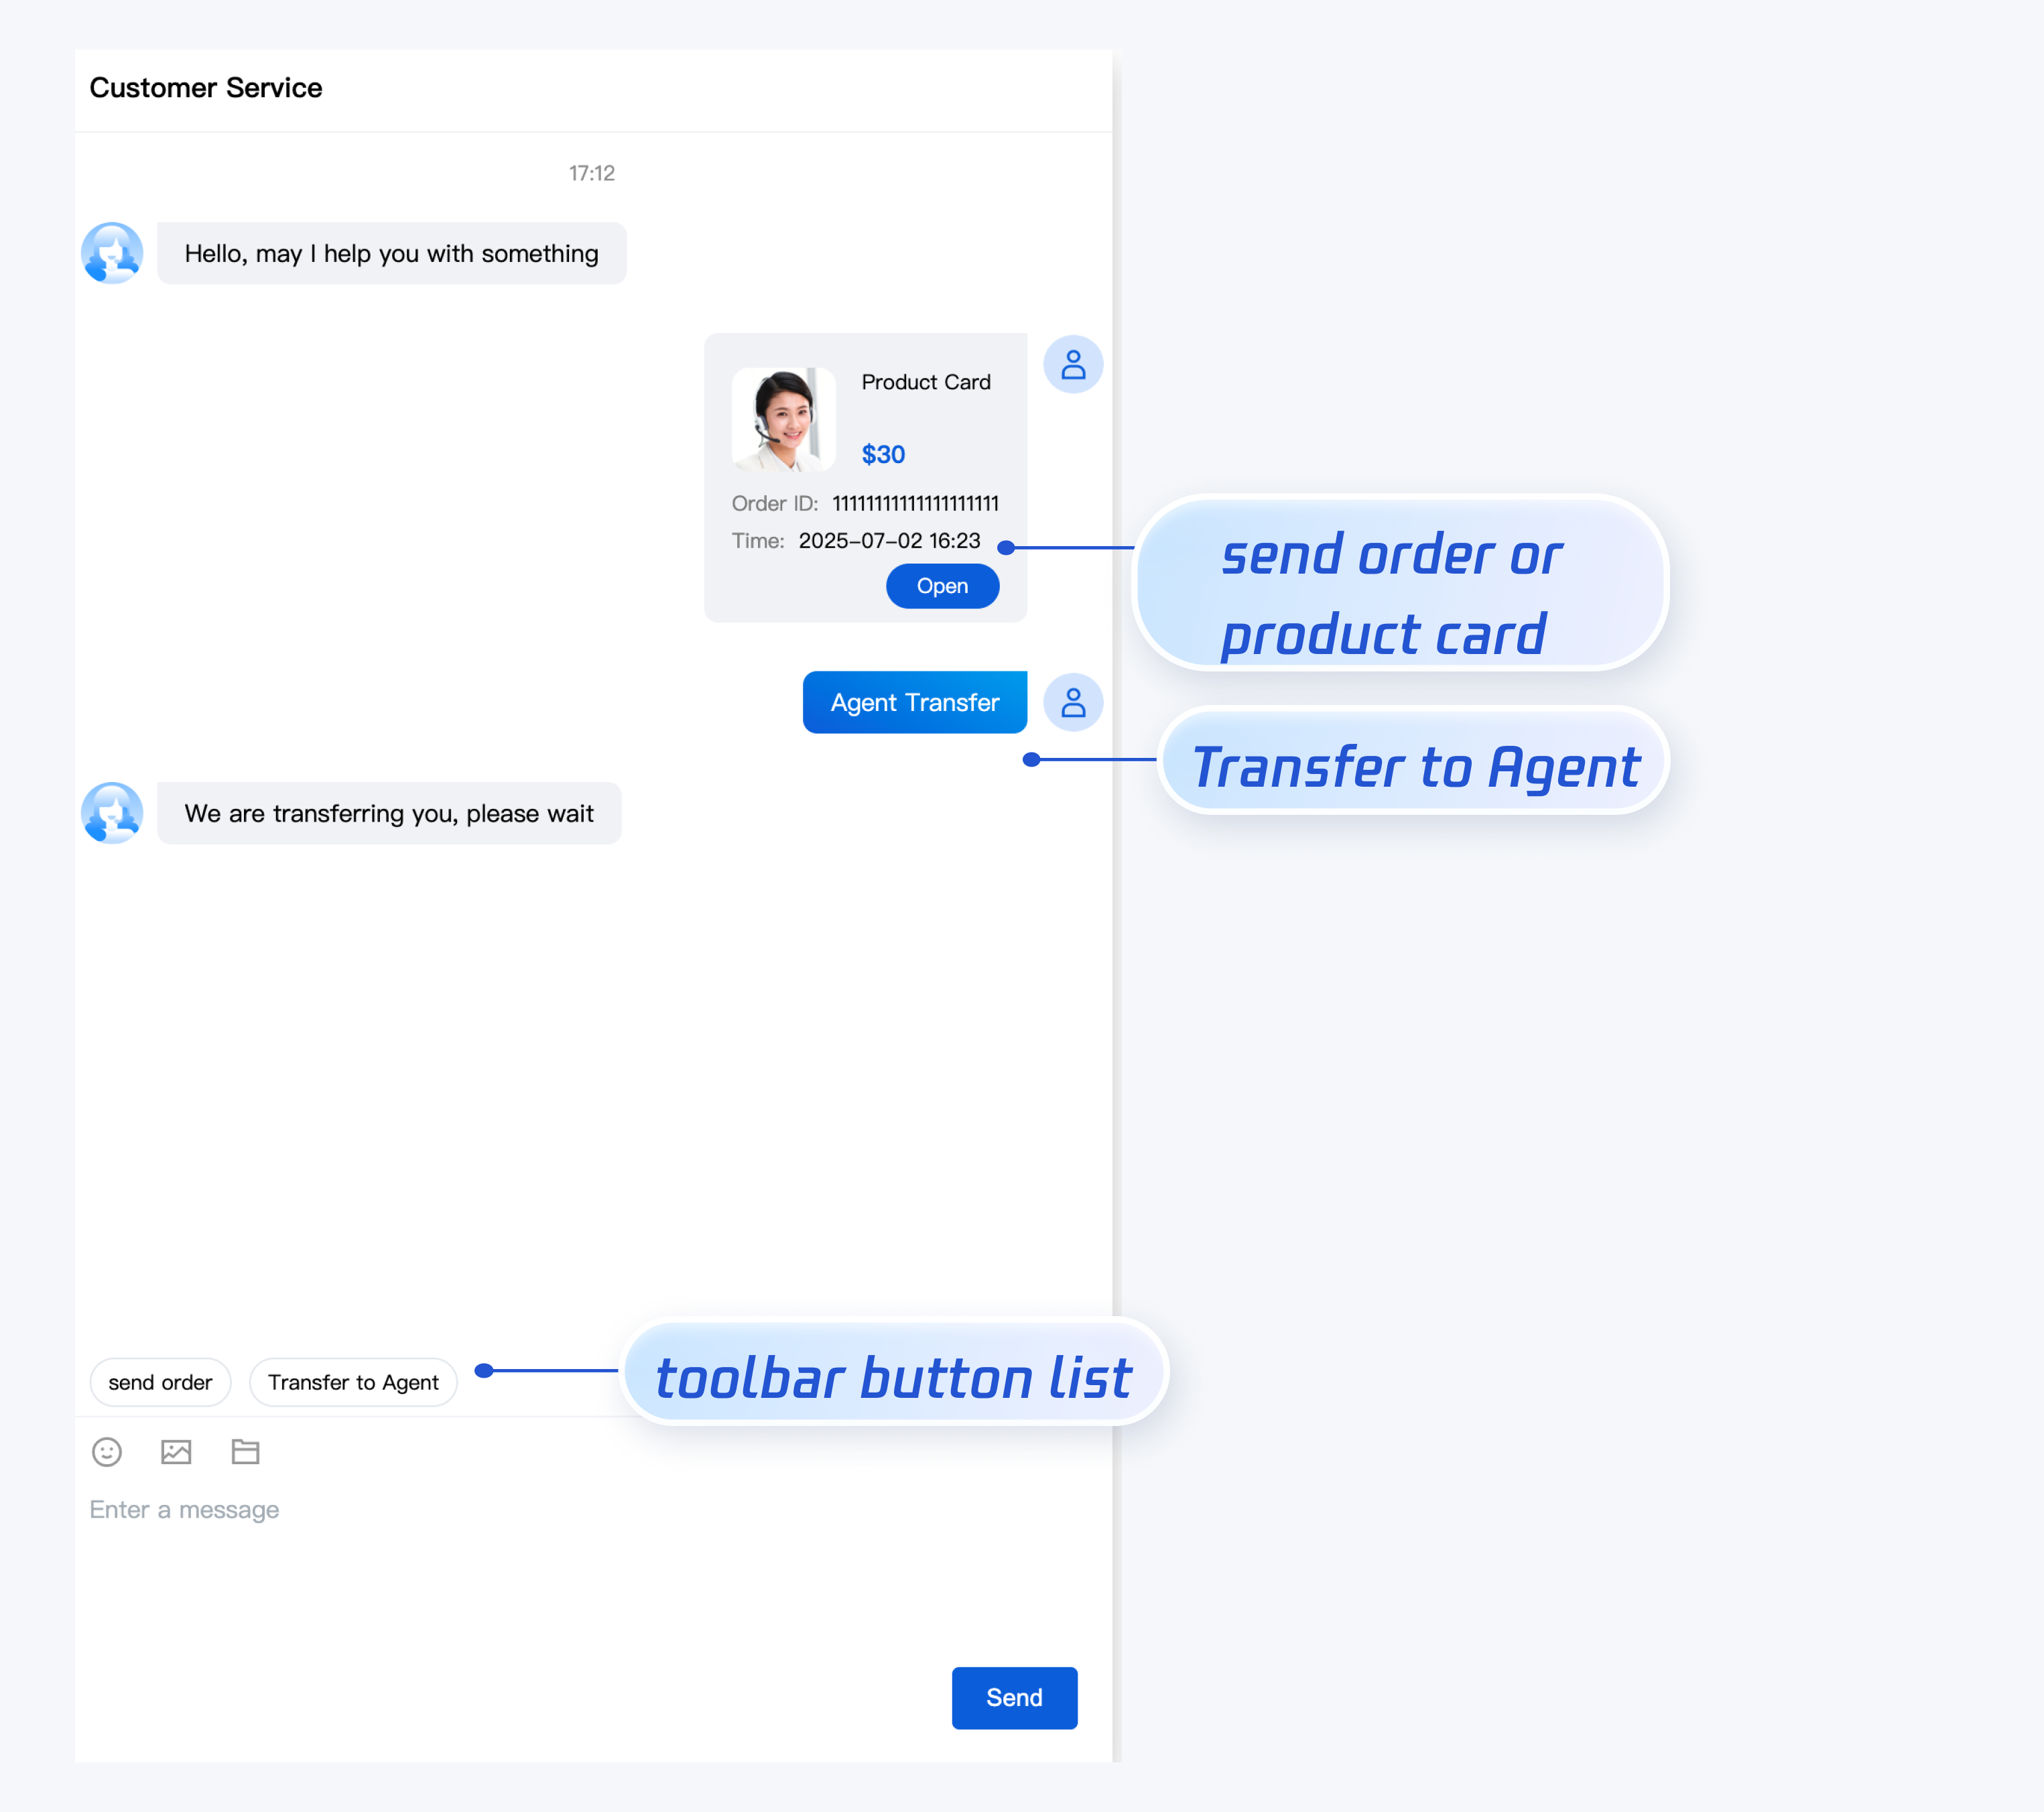
If you want to add shortcut buttons above the input box to facilitate users' use, such as adding "transfer to agent" and "Order message", you can set toolbarButtonList when deploying Desk UIKit. The effect is as shown below:
toolbarButtonList is an array containing one or more items. The description is as follows:
Parameter
Type
Required or Not
Description
title
String
Yes
button Title
icon
String
No
Button Icon URL
isPreset
Number
Yes
1: Built-in feature of the customer service component.
0: Non-built-in feature.
presetId
String
No
When isPreset is 1, valid values include:
humanService: manual service.
serviceRating: service evaluation
endHumanService: End the session.
isEnabled
Number
Yes
1: Render.
0: No render.
content
String
No
When isPreset is 0, please fill in text content or url.
type
Number
Yes
1: the component sends the corresponding text of the content.
2: the component opens the corresponding url.
3 - trigger the specified task flow.
4 -transfer to the specified agents or specified agent group.
// Trigger the specified task flow, taskFlowID is the task flow id, if description is empty it will not be displayed in the message list
{"title":"Trigger the specified task flow","type":3,"content":{"taskFlowID":3226,"description":"your description"},"isPreset":0,"isEnabled":1},
// Transfer to specified agents, specificMemberList is the agent account list
{"title":"Transfer to specified agent","type":4,"content":{"specificMemberList":["agent_01@email.com"],"description":"your description"},"isPreset":0,"isEnabled":1},
// Transfer to specified agent group, groupID is the customer service agent group ID
{"title":"Transfer to specified agent group","type":4,"content":{"groupID":111,"description":"your description"},"isPreset":0,"isEnabled":1}
];
onMounted(()=>{
const SDKAppID =0;// Your SDKAppID, the application ID with customer service Desk enabled
const userID ='';// Your userID, reusable account system of your app or randomly generated
const userSig ='';// Your userSig, can be generated by the console during the integration stage, and must be generated by the server during the production stage
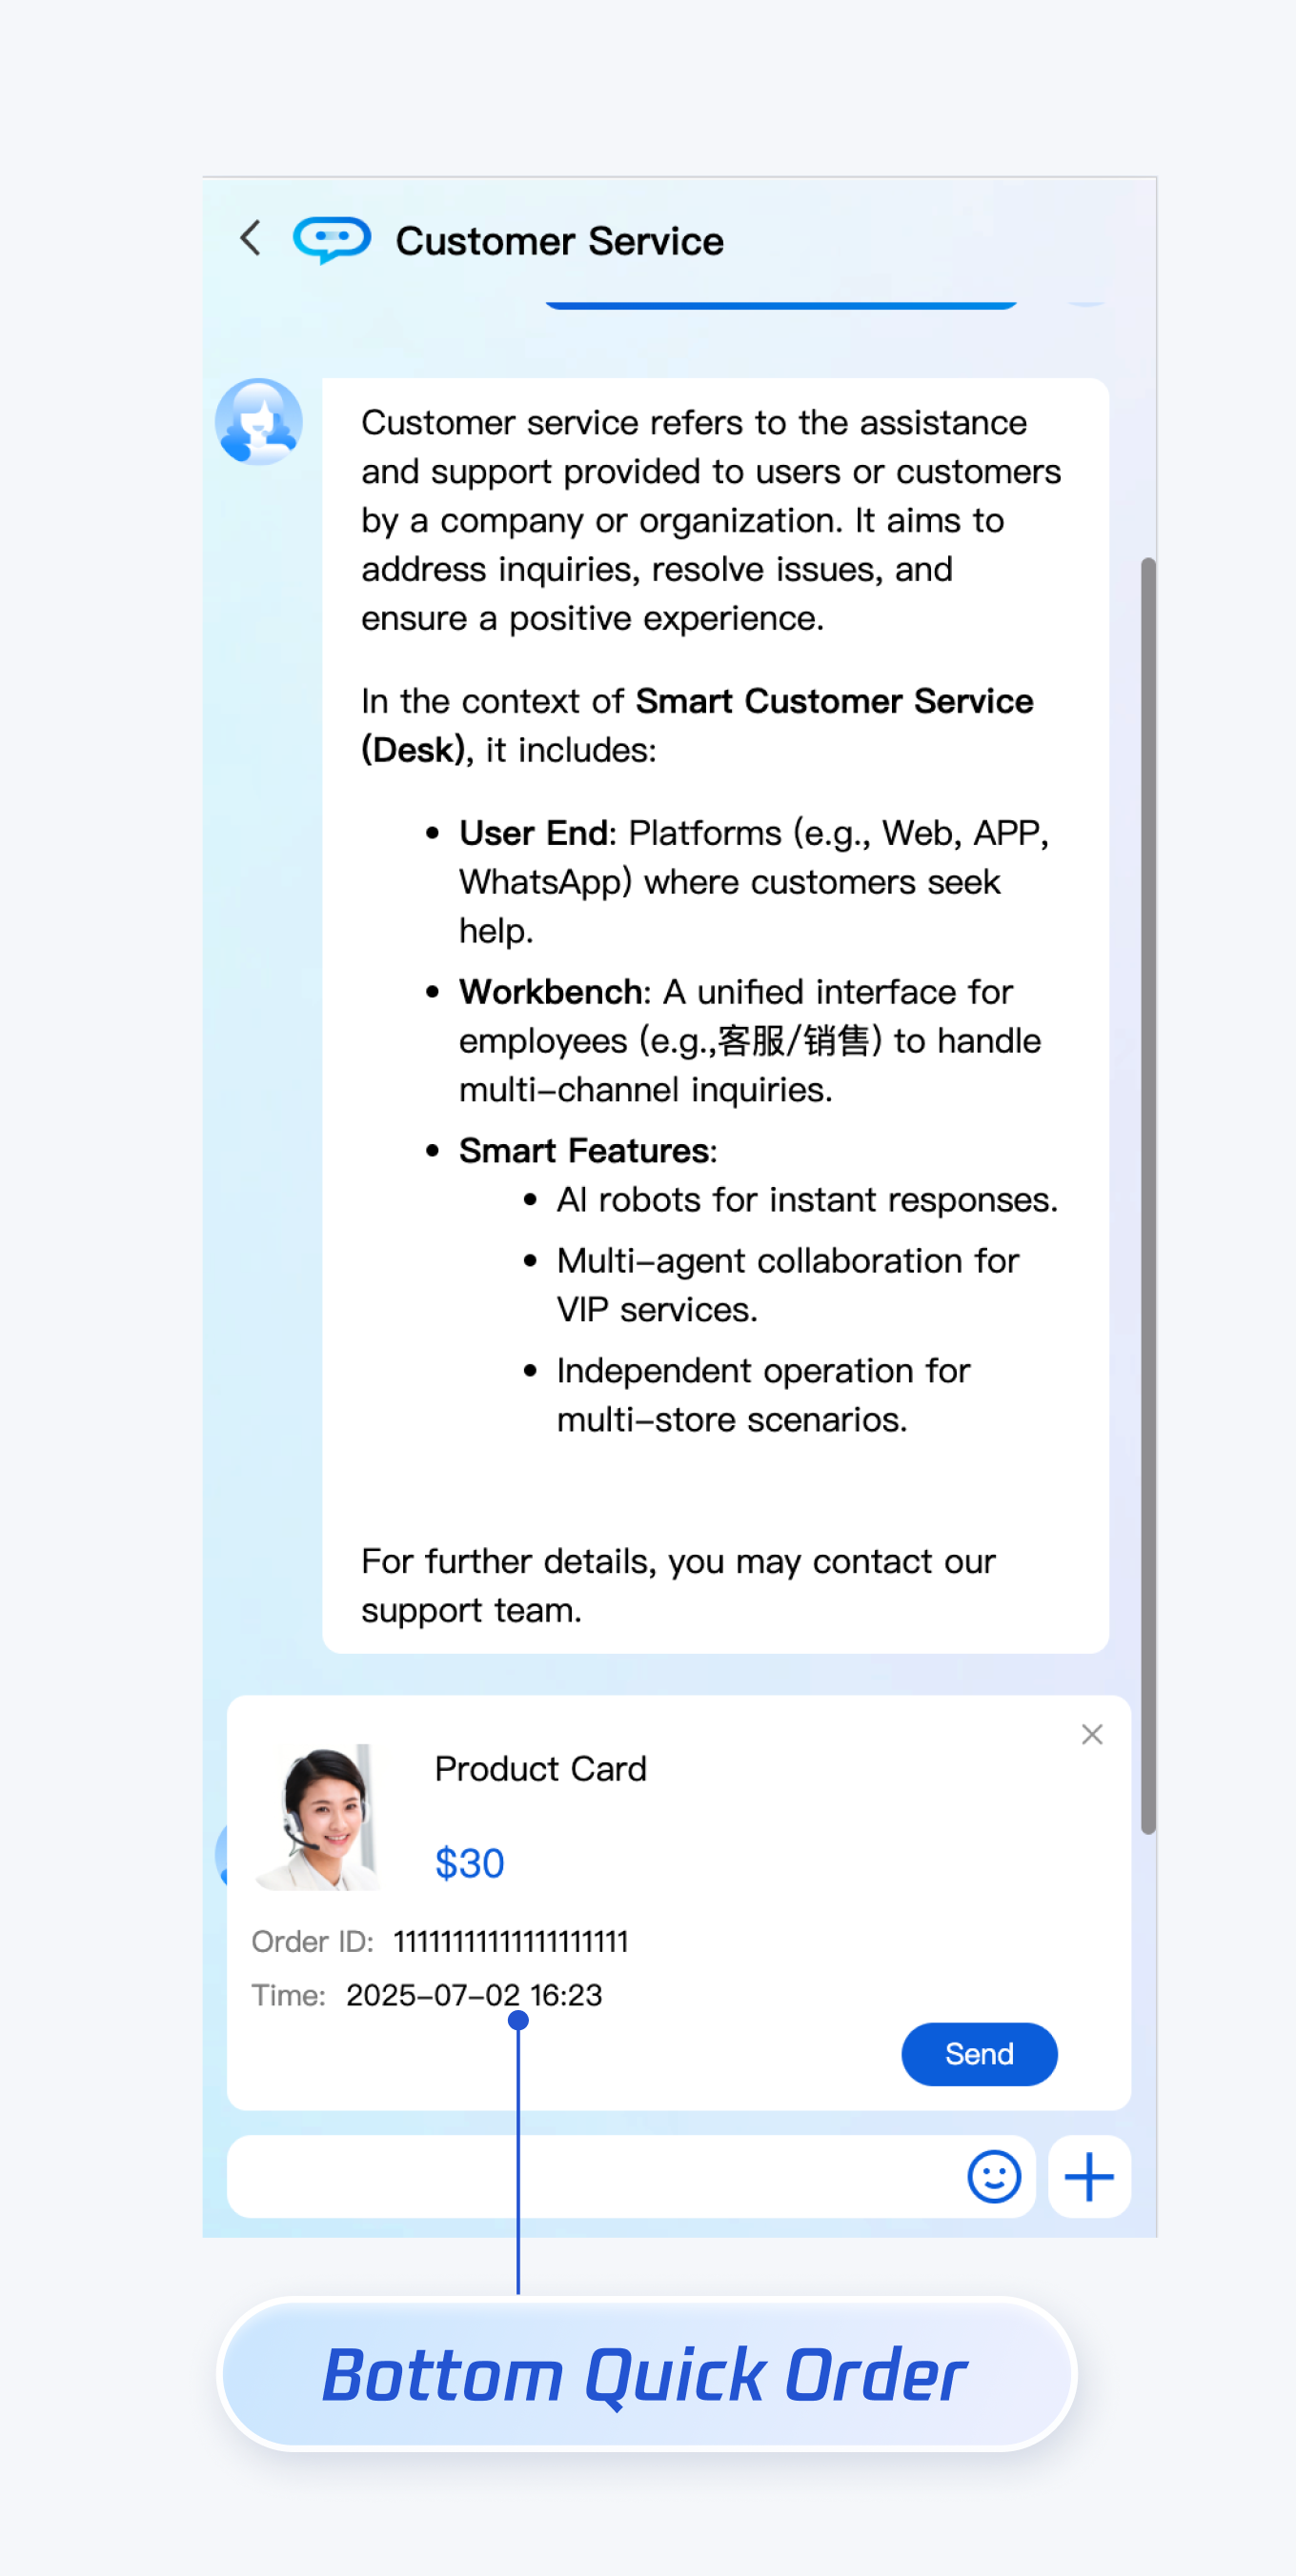
If you want to show a quick order at the bottom of the chat area when opening a customer service conversation, you can configure bottomQuickOrder. The effect is as shown below:
Parameter description of bottomQuickOrder is as follows:
Parameter
Type
Required or Not
Description
header
String
Yes
Order title, corresponding to "Product Card" in the image above.
desc
String
Yes
Order description, corresponding to "$30" in the image above.
pic
String
No
Order image url.
url
String
Yes
When the customer service agent receives the order message, click to open the webpage corresponding to this url.
customField
Array
No
Custom configuration, such as "order ID", "order time", etc.
If your application requires multiple customer service accounts to provide users with exclusive customer service features for improved service quality and fast response speed, you can implement the Multiple Customer Service Accounts feature provided by UIKit.
// 1. Pass the custom customer service account ID from the business side to UIKit before initialization
// 2. During initialization, include the customer service account ID to start conversation, such as 'customerServiceID_002'
// If no customer service account ID is specified to start conversation, UIKit uses the first element in the multiple customer service accounts list by default
Note: The client-side can proactively end the session by sending a custom message, applicable to the following 3 cases:
1. User requests to transfer to agent and enters the queue. Sending this message can end the queue.
2. The customer service mode is manual service. After the user requests agent service and the customer service is successfully allocated, the user waits for the customer service to confirm the reception. Sending this message can end the wait.
3. Transfer to an agent and successfully connect to customer service. Send this message to end the session.
TUICustomerServer.sendCustomMessage({
to:'@customer_service_account',
conversationType:'C2C',
payload:{
data:JSON.stringify({
src:'27',
customerServicePlugin:0,
}),
},
},{onlineUserOnly:true});
FAQs
What Is UserSig? How do I Generate a UserSig?
UserSig is the password for user login to IM. It is essentially an encrypted ciphertext of UserID and other information.
The UserSig issuance method involves integrating the UserSig calculation code into your server and providing a project-oriented API. When UserSig is required, your project initiates a request to the business server to obtain a dynamic UserSig. For more details, see UserSig generation by the server.
How to Integrate the UIKit Component Into a JS Project
UIKit only supports running in the ts environment. You can progressively configure typescript to allow existing js code in your project to coexist with ts code in UIKit.
vue-cli
Vite
Please execute in the project root directory created by your vue-cli scaffold:
vue add typescript
Then configure the options as follows (to ensure simultaneous support for existing js code and ts code in UIKit, be sure to strictly follow the five options below)
After completing the above steps, rerun the project.
Please execute in the project root directory created by your vite.
npminstall -D typescript
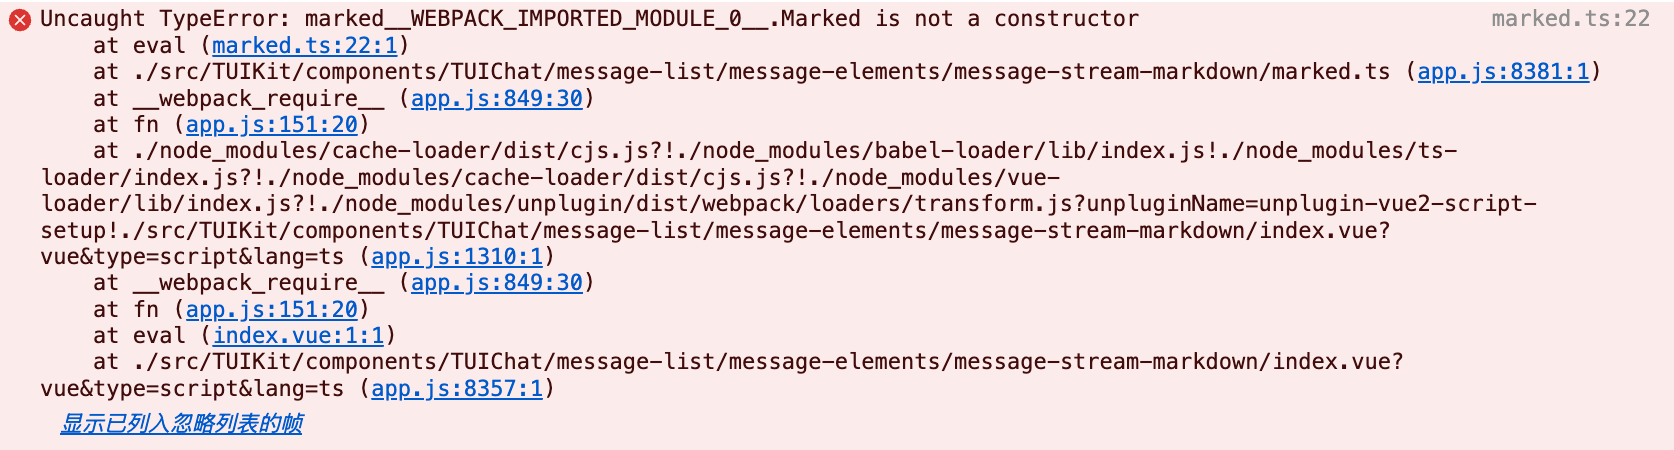
Runtime Error: Uncaught TypeError: Marked__WEBPACK_IMPORTED_MODULE_0_ Marked Is Not a Constructor
If the following error occurs during operation, it means your current Vue CLI project environment version is low, and you must downgrade the marked version used in UIKit to 5.1.2.
Please use the following script in your project root directory to downgrade the marked version:
npm i marked@5.1.2 --legacy-peer-deps
Compilation Error: node_modules/marked/lib/marked.esm.js: Class private methods are not enabled.
If the following error occurs during operation, it means your current marked version is outdated. Please upgrade the marked version to 6.0.0.
Please use the following script in your project root directory to upgrade the marked version: