Cloud resources represent a significant cost. Beyond querying and analyzing cloud resource costs based on standard dimensions like cloud products and resources, users also expect to analyze and control cloud costs according to enterprise (or individual) cost budgeting management dimensions, such as by department or project. To meet this demand, Tencent Cloud offers a comprehensive cost allocation management solution and product capabilities based on such scenarios. This enables automatic ollection and allocation of cloud resource expenses according to the user's own cost allocation structure, ultimately achieving lean analysis and control of cloud resource costs.
Tencent Cloud currently offers two cost allocation tools, Cost Allocation Tags and Cost Allocation Unit, which help you customize management statistical analysis dimensions to better accommodate your diverse needs for billing and cost analysis.
Feature Overview
A Cost Allocation Unit is a customizable organizational structure. You can define its name and rules based on your own cost analysis dimension requirements, and aggregate resource costs to achieve cost allocation. A hierarchical structure is established in the form of a directory tree, and cloud costs are filtered and aggregated according to your custom structure to meet users' multi-dimensional management and analysis needs for bills. Compared to Cost Allocation Tags, the Cost Allocation Unit is a more advanced cost allocation tool with more powerful and flexible features, suitable for scenarios requiring allocation across multiple dimensions.
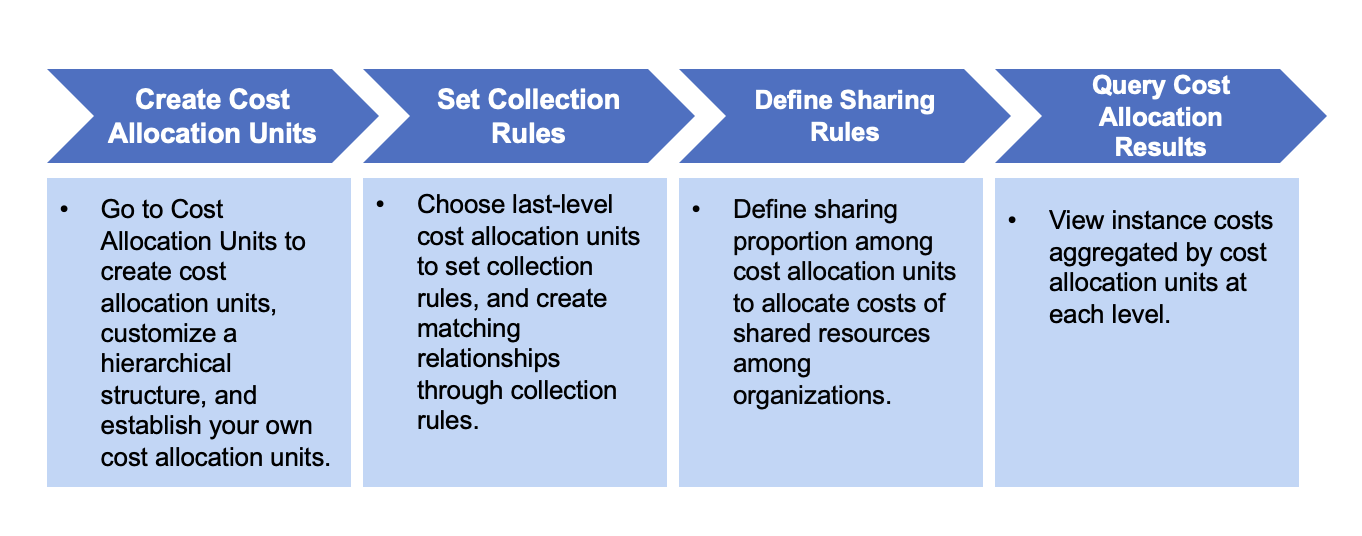
Before using the Cost Allocation Units, you need to set up the unit and define collection rules or cost sharing rules. This enables you to view the aggregated costs across different hierarchical levels of the Cost Allocation Units. The specific workflow is as follows:
Cost Allocation Units Setup
Scenario Description: If you are a large enterprise and wish to automatically aggregate and allocate cloud resource costs according to your enterprise's organizational cost budgeting management dimensions, such as by department or product line, you can utilize Tencent Cloud's Cost Allocation Units to achieve lean analysis and control of cloud resource costs. The specific steps are as follows:
Step 1: Creating a Cost Allocation Units
You can go to Billing Center > Cost Allocation Units to establish your own cost allocation unit directory tree based on the enterprise's departments and business lines. The custom hierarchical structure supports up to 6 levels. The steps are as follows:
2. In the left sidebar, choose Cost Allocation Management > Cost Allocation Units.
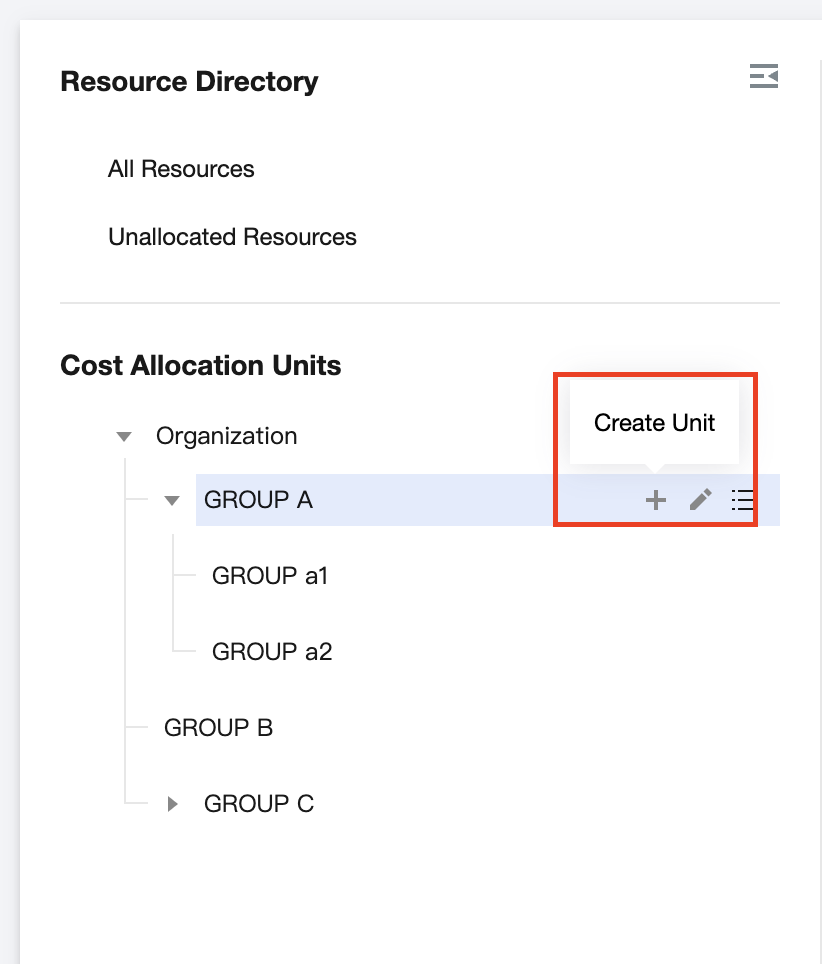
3. Create Unit:
On the Cost Allocation Unit Management tab, establish a hierarchical structure based on your custom requirements. Click New Unit or New Sub-unit (up to 6 levels are supported), specify the Cost Allocation Unit Name as needed, and then click OK to complete the creation. You can also drag a cost allocation unit under another unit to adjust the organizational hierarchy of the directory tree.
Step 2: Configure Collection Rules
Note:
Intermediate-level cost allocation units serve solely for hierarchical classification. The last-level cost allocation units can be selected to configure Collection rules (supporting up to three levels of condition groups).
Once you have created cost allocation units based on your organization's departments and business lines, you can configure collection rules. The system will allocate resource instances to designated cost allocation units according to these rules. To create a new collection rule, follow these steps:
2. In the left sidebar, choose Cost Allocation Management > Cost Allocation Units.
3. Click the last-level cost allocation unit to configure collection rules:
3.1 Click Set Now.
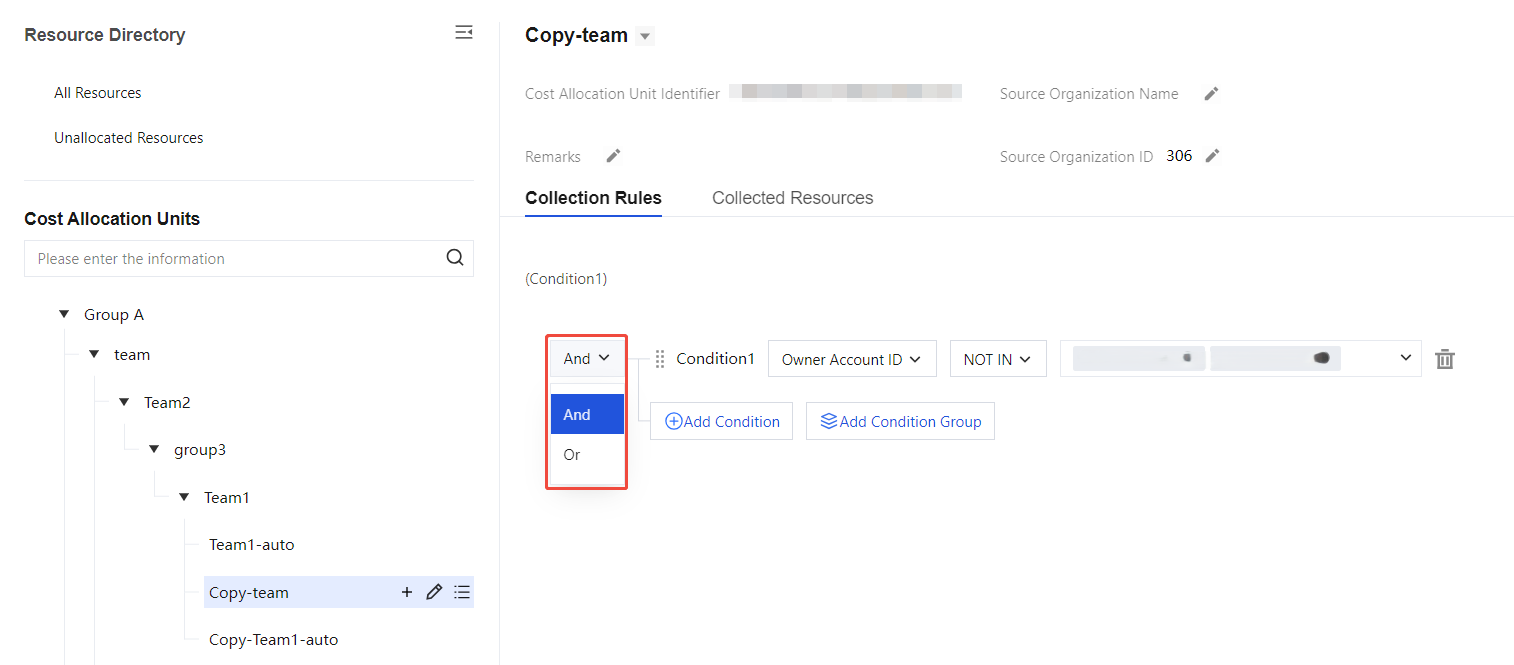
3.2 On the collection Rule Settings page, you can configure rules as needed.
Configure collection rules, where between conditions and between condition groups can be an AND relationship or an OR relationship (supporting up to three levels of condition groups).
For the same condition, collection can be enabled or disabled.
3.3 Click Apply Rule, and the setting will be completed successfully.
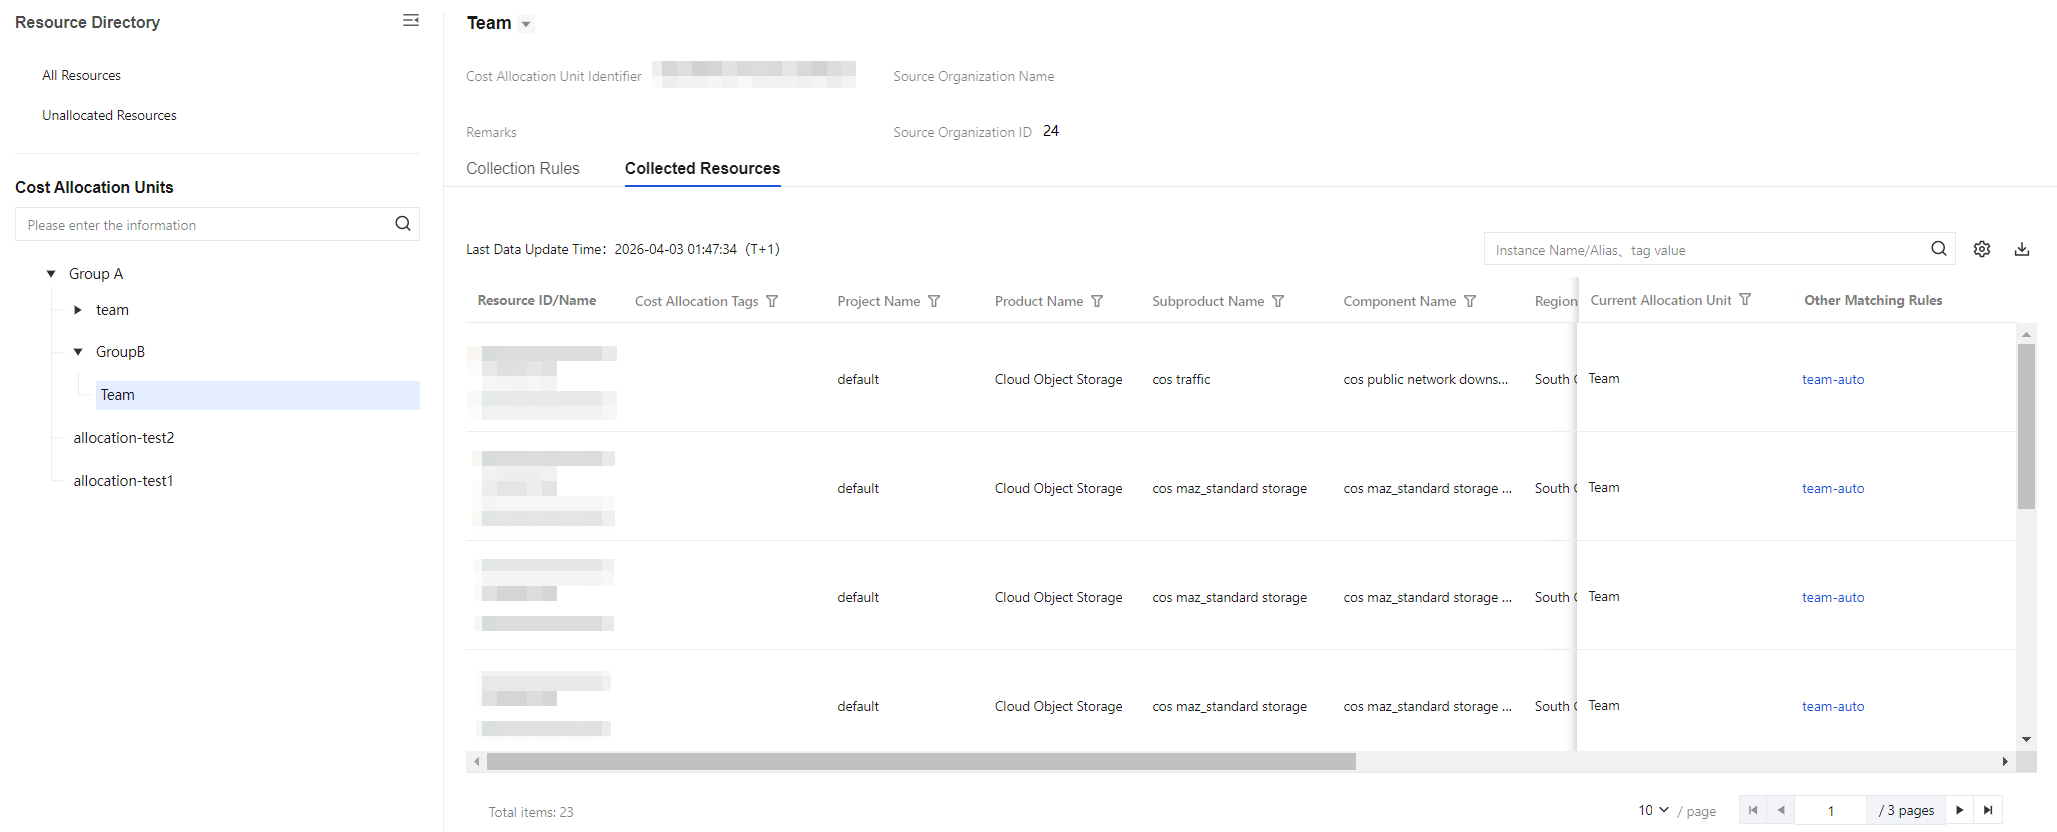
4. To view Collected resources and their cost details, go to the Collected Resources page. On this page, you can query the cost details of resources that have collection rules configured. It also supports operations such as setting custom fields, filtering, and downloading data.
Note:
Cost allocation unit rules modified on the same day will take effect the next day, at which time the resource ownership relationships and the cost allocation bill data for the current month will be refreshed.
Cost allocation units and collection rules are saved in monthly versions. Modifications to the current month's cost allocation units and collection rules must be completed by the 3rd of the following month and cannot be modified thereafter.
Cost allocation rules can only be created under the last-level cost allocation unit. If collection rules from multiple cost allocation units match the same resource, that resource is preferentially allocated to the most recently activated collection rule.
After resources are tagged and set as cost allocation tags on the same day (system bill tag information will take effect the next day), if the cost allocation unit also sets this tag as an collection rule, then this rule in the cost allocation unit will take effect on T+2 day.
Step 3: Define Cost Sharing Rules
Note:
To achieve fair allocation of shared cloud resource costs (such as network and resource packs) across multiple organizations, shared cost allocation rules can be created.
According to the configured shared cost allocation rules, the system will allocate shared costs to other cost allocation units.
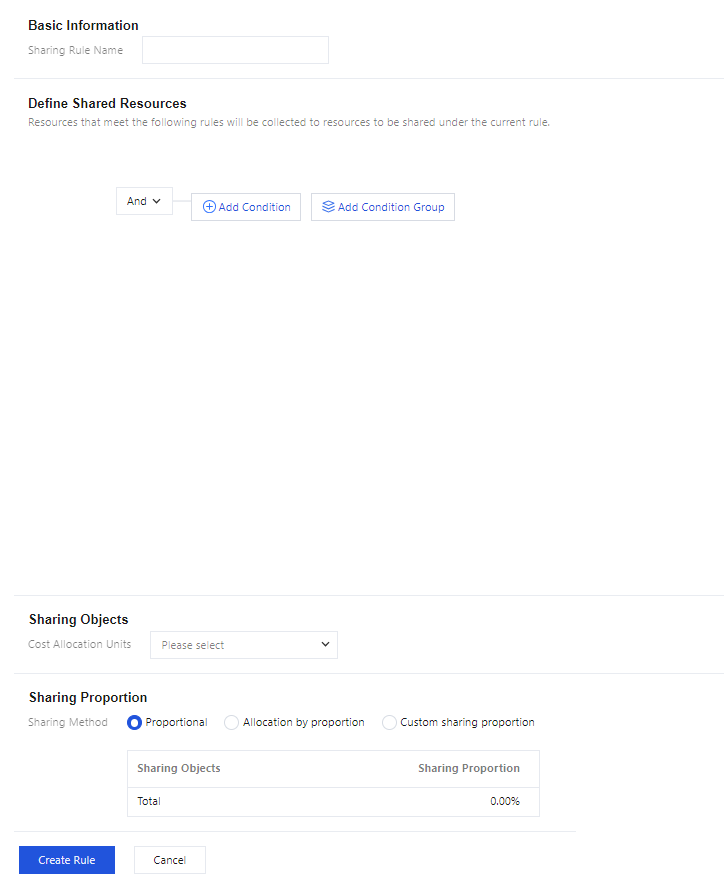
To allocate shared cloud resource costs across different business departments within a company based on their resource usage, you can create shared cost allocation rules. The steps to create a new shared cost allocation rule are as follows:
4.4 Set sharing proportion: Proportional, Allocation by proportion or custom sharing proportion.
Proportional: Each cost allocation object is allocated equally.
Allocation by proportion: Allocate costs based on the proportion of aggregated costs in each cost allocation unit.
For example: The BWP bill amount in the cost statement is USD 500. This cost needs to be allocated proportionally to three cost allocation units: A, B, and C. It is known that USD 500 has been aggregated to unit A, USD 250 to unit B, and USD 250 to unit C. The proportional allocation calculation formula is as follows:
The shared cost amount for A is: 500 / (500 + 250 + 250) * 500 = USD 250.
The shared cost amount for B is: 250 / (500 + 250 + 250) * 500 = USD 125.
The shared cost amount for C is: 250 / (500 + 250 + 250) * 500 = USD 125.
Custom sharing proportion: Manually set the allocation proportion for each sharing target.
5. After configuration, click New Rule to complete the creation of shared cost rules.
Step 4: Check cost allocation results
Note:
View the resource directory to obtain a list of information for all Tencent Cloud resource instances currently in use, as well as the assigned units and matching rules.
Go to Cost Allocation Bill to view the resource instance costs aggregated by cost allocation unit at each level.
2. In the left sidebar, choose Cost Allocation Management > Cost Allocation Units.
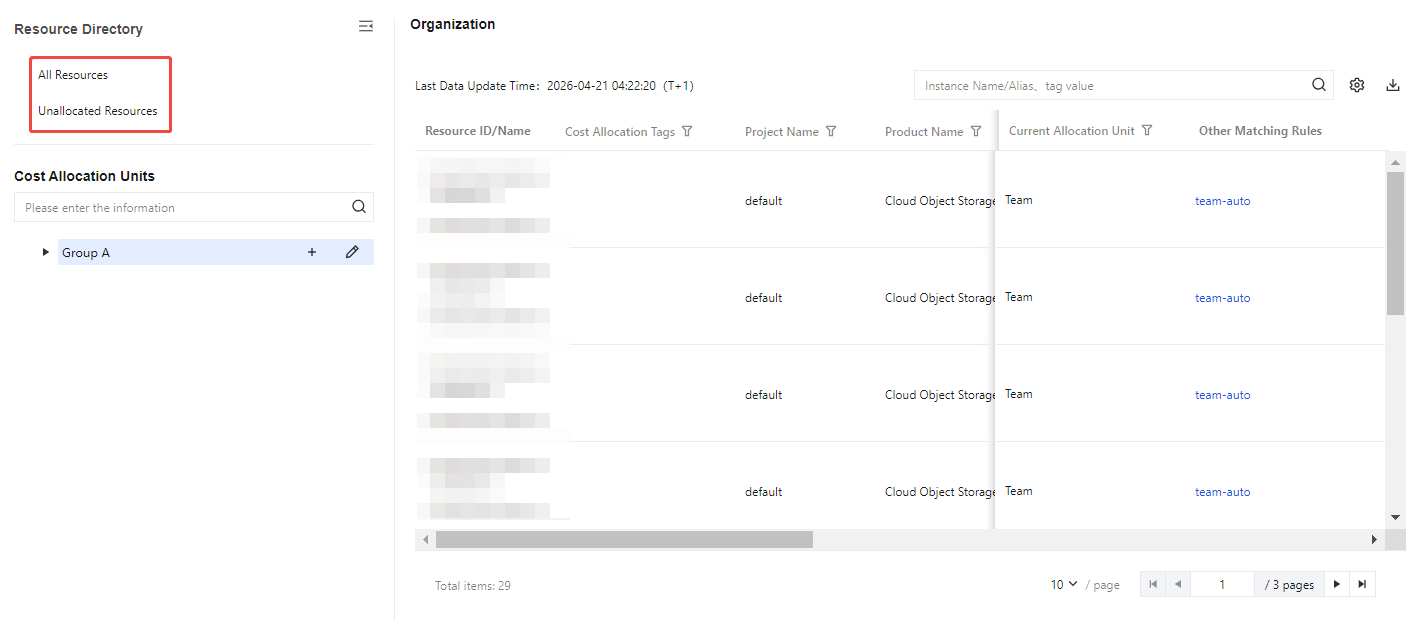
3. Browse Resource Directory:
All Resources: Click All Resources, and the right side displays a list of information for all Tencent Cloud resource instances currently in use, as well as the assigned units and matching rules.
Unallocated Resources: Click Unallocated Resources, and the right side displays a list of resource instances currently in use that have not been assigned to a cost allocation unit.
4. The cost allocation results support custom fields, download, and filtering.
Custom Field Settings: Click the Custom Field Settings button to select the fields to be displayed.
Download: Click the Download button to download the current list.
Filter: Supports top search bar and column header filtering.
Note:
To query and download the cost collection or allocation results of the cost allocation unit, see cost allocation bill.
Cost Allocation Units Management
If you have created a cost allocation unit and need to query or adjust it, the procedure is as follows:
2. In the left sidebar, choose Cost Allocation Management > Cost Allocation Units.
Query Unit:
On the Cost Allocation Unit Management tab, you can view configured cost allocation units. The cost allocation unit directory tree supports expanding and collapsing.
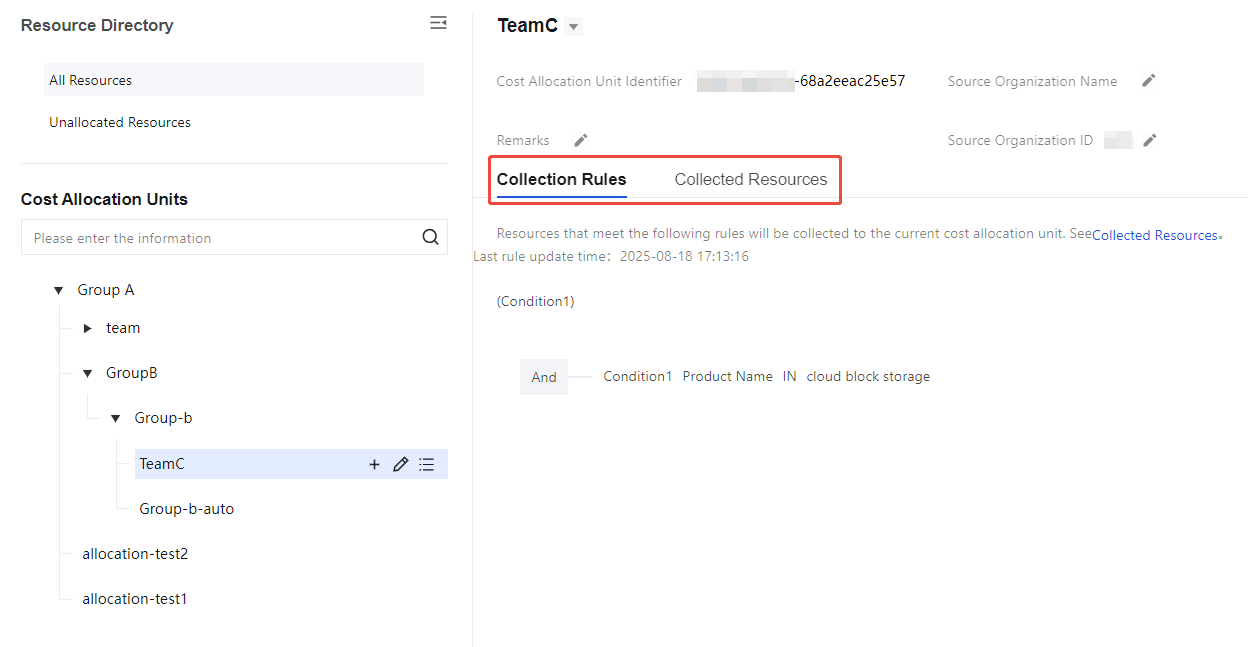
Click a cost allocation unit. Its details are displayed on the right, where you can edit the unit's information. However, configuring Collection Rules and viewing Collected Resources are supported only for leaf-level cost allocation units.
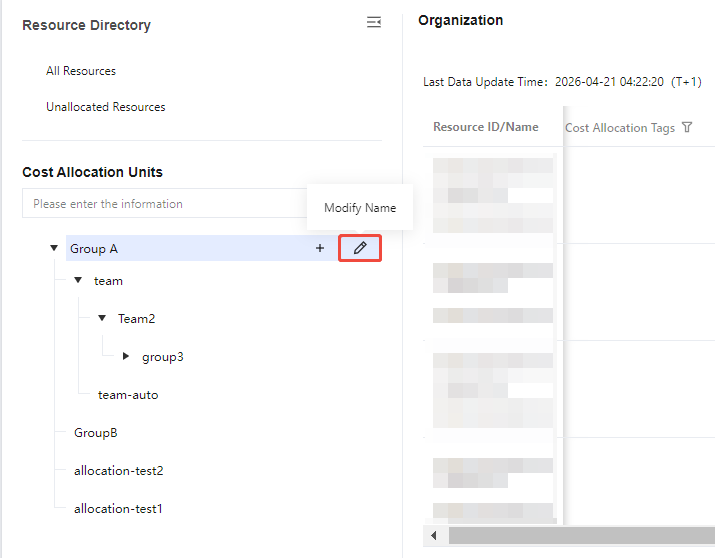
Edit Unit: Click the
button for the cost allocation unit to modify its name.
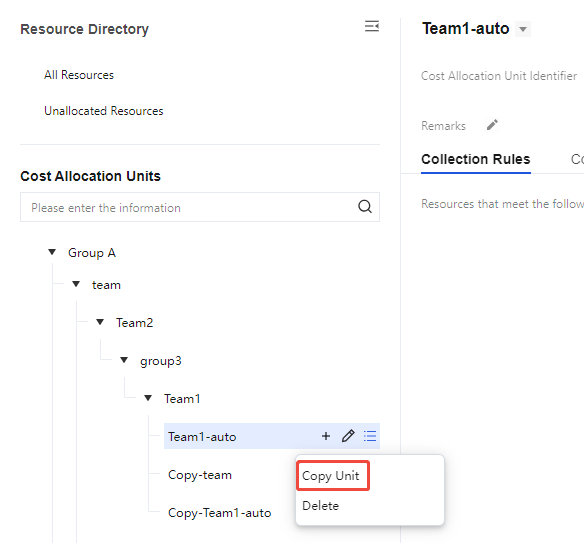
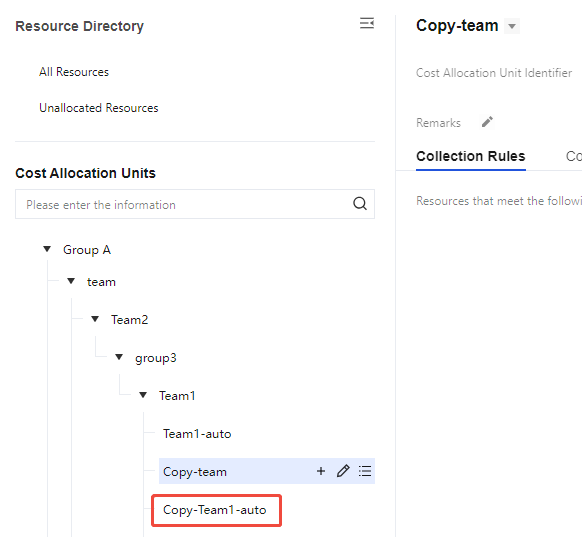
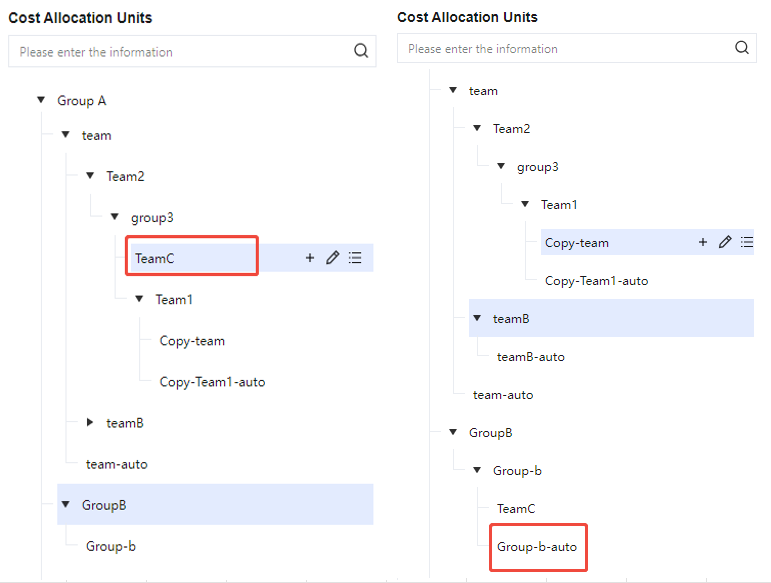
Copy Unit: Click the Copy Unit button to generate a replica cost allocation unit. The operation copies the unit's hierarchy but does not copy configured collection rules.
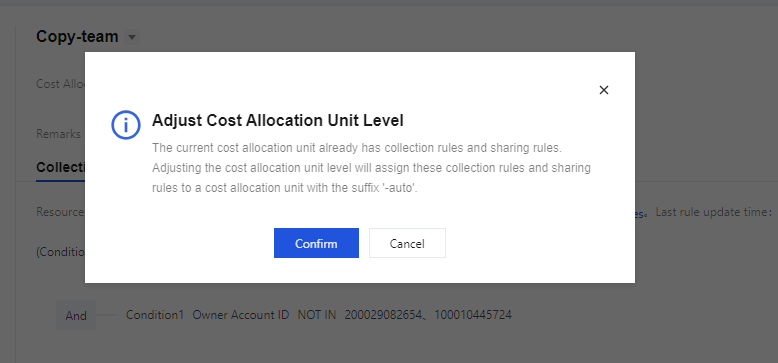
Adjust Unit: Supports dragging to adjust the organizational hierarchy of the directory tree.
For example, if you drag the TeamC under the Group-b and the Group-b already has collection rules, adjusting the cost allocation unit hierarchy will allocate these rules to a cost allocation unit named with the suffix -auto, generating Grou-b-auto.
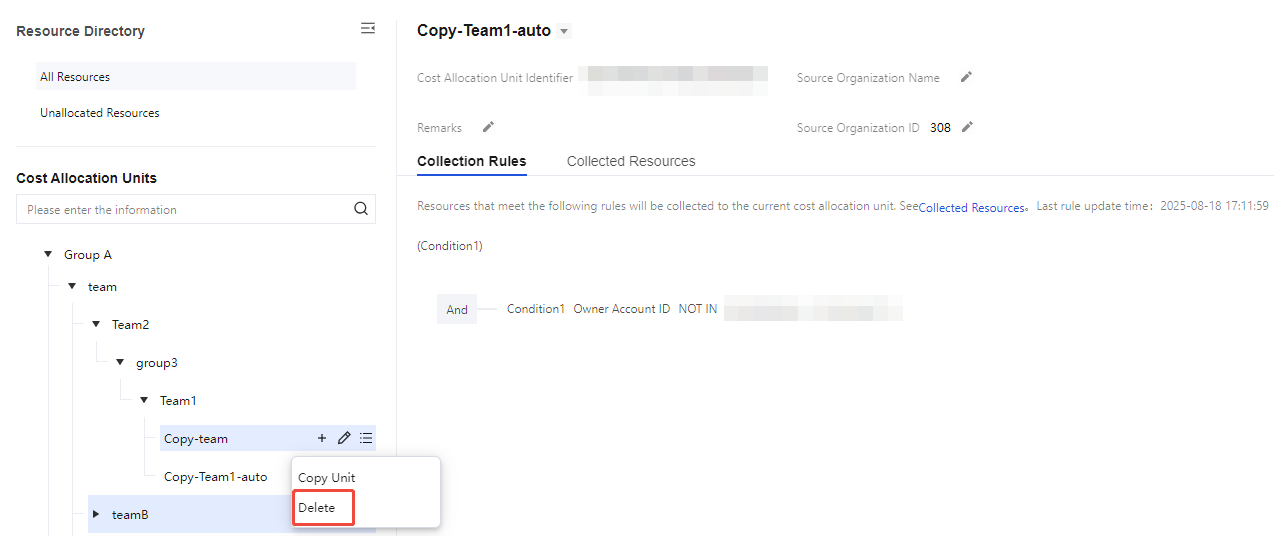
Delete Unit: Click Delete for the cost allocation unit. After deletion, the collection rules under this cost allocation unit will be cleared and cannot be recovered.
If a prompt appears indicating that the cost allocation unit cannot be deleted, it indicates that the unit or its sub-units have active sharing rules. Deleting the unit will affect allocation execution. Adjust the sharing rules before deletion.
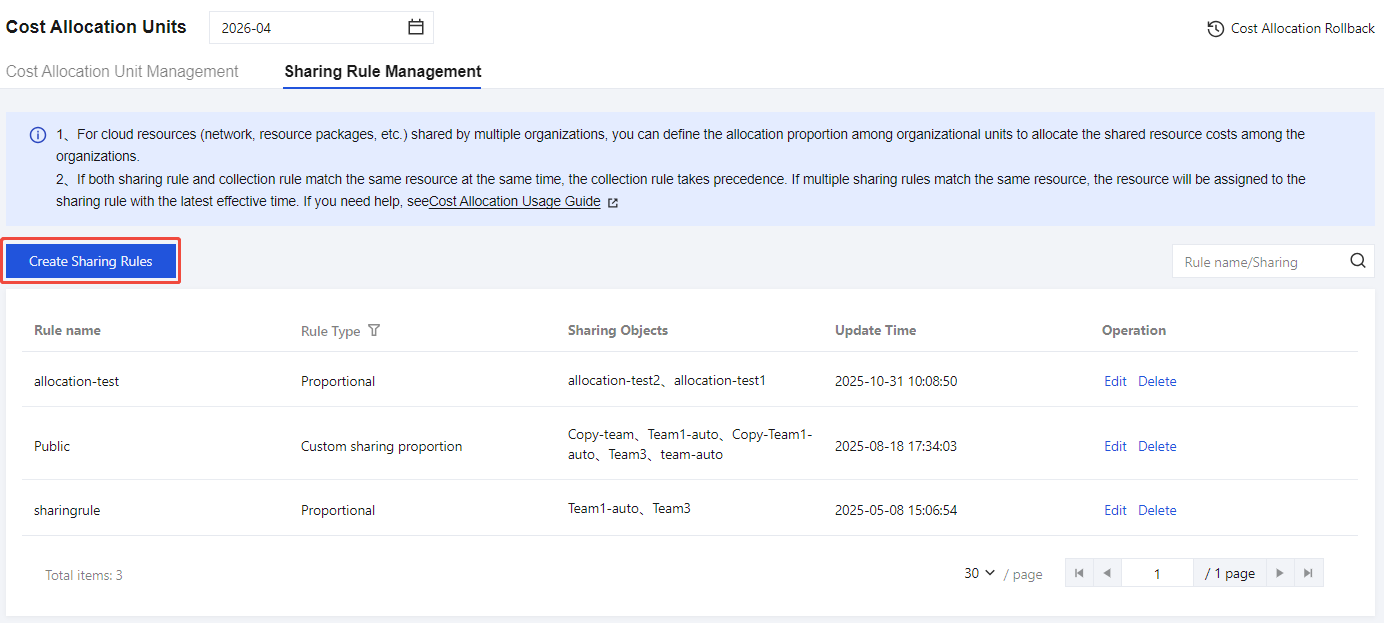
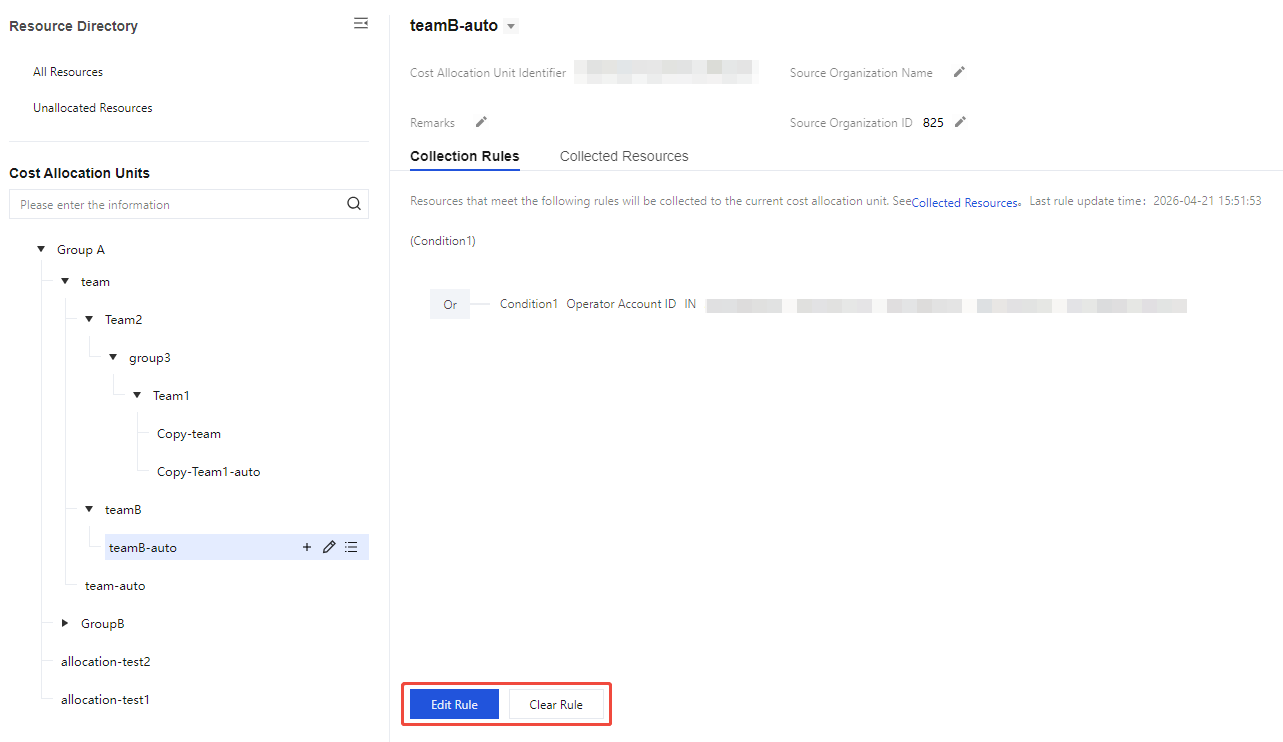
Collection Rules Management
If you need to modify collection rules, the procedure is as follows:
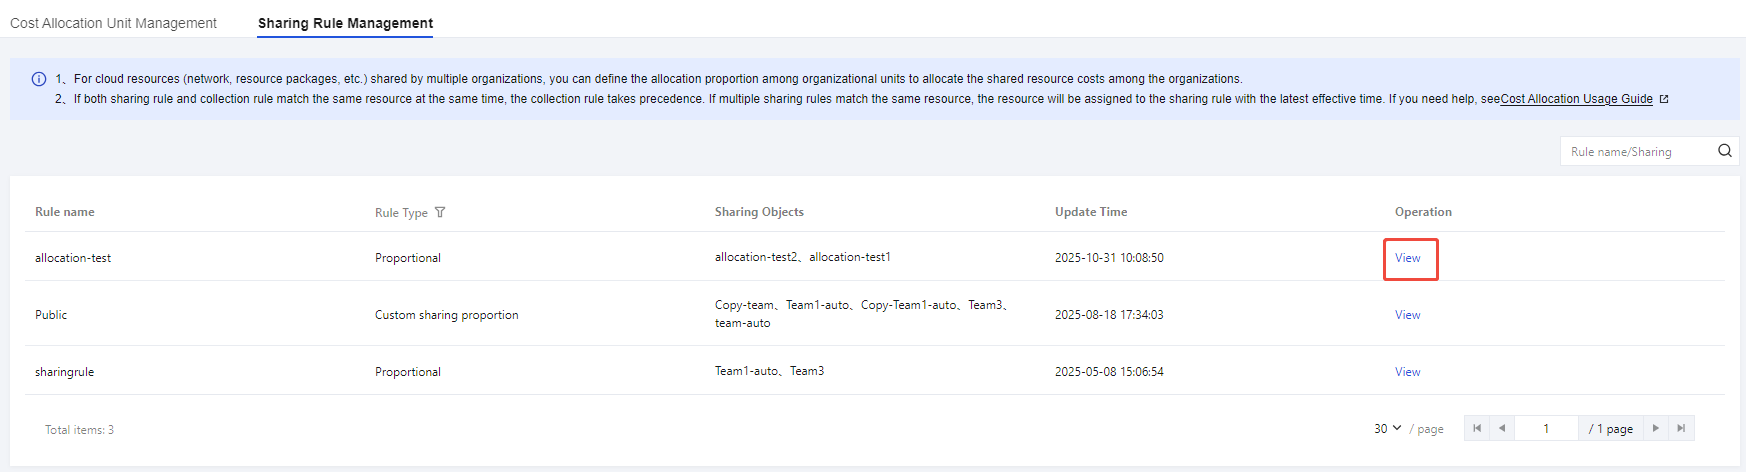
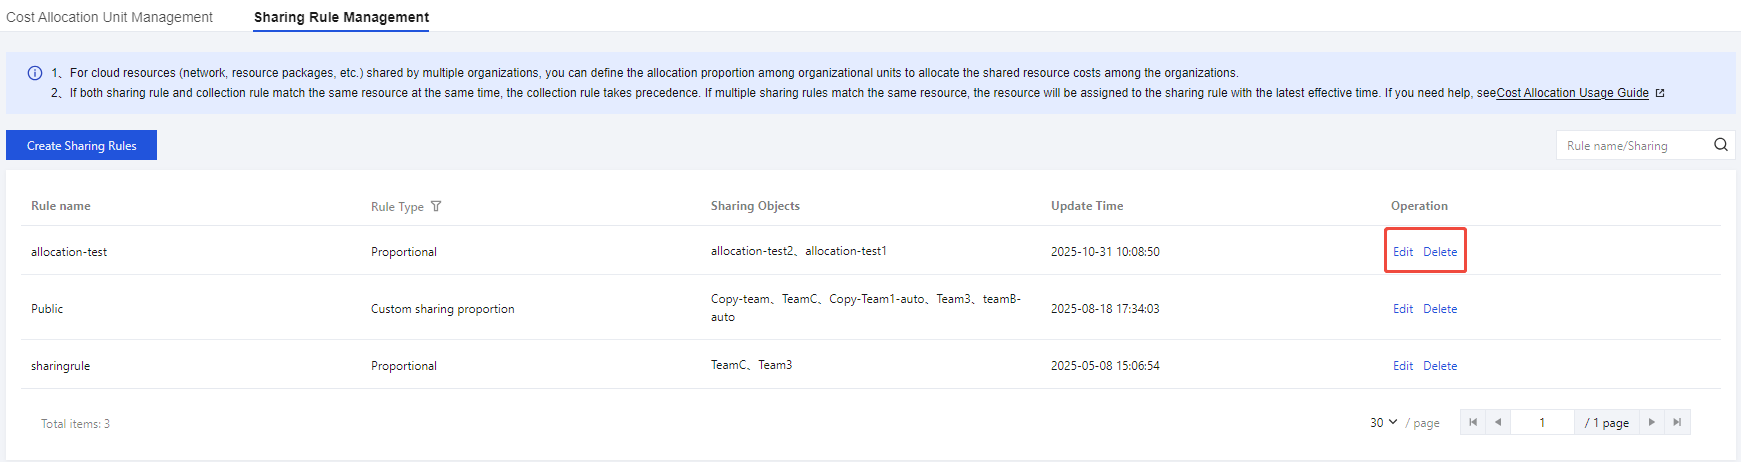
2. In the left sidebar, choose Cost Allocation Management > Cost Allocation Units > Sharing Rule Management.
View: Select a historical billing period, click the View button for shared allocation rules to view the configured shared allocation rules. Click Back to return to the rules list.
Edit: Select the current billing period, click the Edit button for shared allocation rules to modify the rule content. Click Save Rules to save successfully.
Delete: Select the current billing period, click the Delete button for shared allocation rules to delete this shared allocation rule.
Note:
Shared allocation rules are effective T+1. Rules modified on the same day will refresh resource ownership relationships and the current month's cost allocation bill data the next day.
Shared allocation rules are versioned monthly. Rules for the current month must be modified by the 3rd of the next month. After that date, they cannot be modified further and can only be viewed.
If both shared allocation rules and collection rules apply to the same resource, the collection rules take precedence.
If multiple shared allocation rules apply to the same resource, the resource will be prioritized under the most recently effective shared allocation rule.
Cost Allocation Rollback
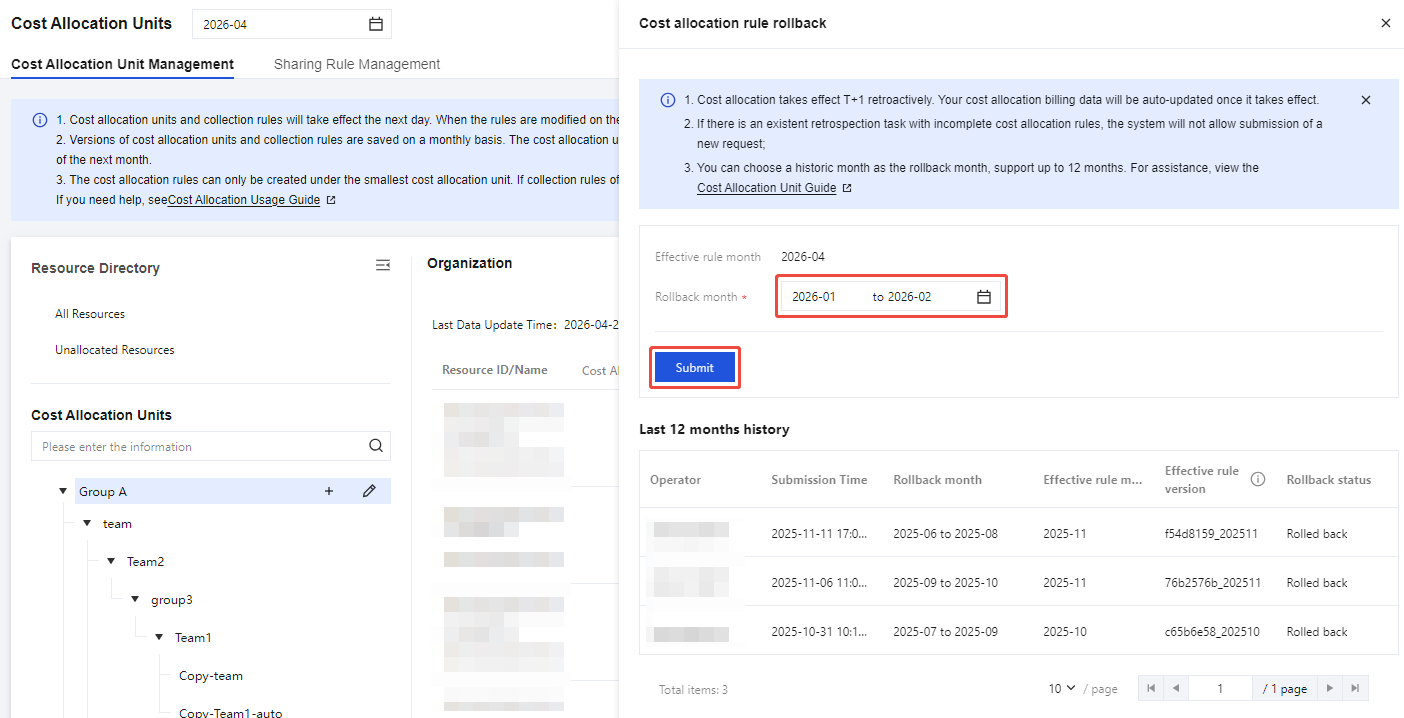
1. Log in to the Billing Center console, and choose Cost Allocation Management > Cost Allocation Units > Cost Allocation Rollback.
2. Select the historical Rollback month as needed (supports single month or multiple months), then click Submit.
3. In the Confirm Submssion Rollback Operation window, click OK, then the system begins the retrospection.
4. After submitting the retrospection, you can check the retrospection status via the retrospection records at the bottom of the page. Wait for the retrospection to complete, then access the cost allocation bill to view the updated bill.
Note:
The retrospection supports a maximum of 12 months and can only be retrospected back to the month when the cost allocation unit was activated.
Cost allocation retrospection takes effect T+1. After retrospection takes effect, your cost allocation bill data will be automatically updated.
Rollback Records Description
Operator: The UIN that submitted the retrospection operation, that is, the currently logged-in account, such as 100002345.
Submission Time: The time when the retrospection was submitted, such as 2025-11-16 14:09:54.
Rollback Month: Select the month (time period) for retrospection, such as 2024 - 08 - 2024 - 12.
Effective Rule Month: Retrospection based on the current month's rules. By default, the current month is displayed (but displays the previous month before the 3rd, with retrospections before the 3rd following last month's rules).
Effective Rule Version: The system-generated effective rule version number is used to uniquely identify each version.
Rollback Status:
In Progress: The retrospection task has been submitted but is not yet completed, and downstream data has not been refreshed.
Completed: The retrospection task has been submitted and completed. Downstream data is now effective based on the latest retrospection version.