tencent cloud

Game Multimedia Engine

릴리스 노트
제품 소개
제품 개요
장점 및 특징
제품 기능
응용 시나리오
보안 및 컴플라이언스 인증
사용자 튜토리얼
SDK 다운로드 가이드
제품 기능 데모
기본 기능 데모
시나리오 기반 Demo
콘솔 가이드
사용량 조회
서비스 활성화
시작하기
Quick Integration of SDK
Quick Integration of Sample Project
기본 기능 개발 가이드
인증 키
실시간 음성 채팅 역할 설정
음질 선택
고급 기능 개발 가이드
서버 녹음
레인지 보이스
3D 음향 효과
음향 효과 및 반주
네트워크 오디오 스트림 포워딩 라우팅
사용자 지정 메시지 채널
회사 방화벽 제한을 해결하는 방법
Language Parameter Reference List
GME 채팅방 관리 통합
클라이언트 API
Unity SDK
SDK for Unreal Engine
Cocos2D SDK
SDK for Windows
SDK for iOS
SDK for Android
SDK for macOS
H5 SDK
Electron SDK
SDK for Flutter
SDK Version Upgrade Guide
에러 코드
Toolchain
Server APIs
History
Introduction
API Category
Usage APIs
Recording APIs
Making API Requests
Voice Chat APIs
Application APIs
Data Types
Error Codes
FAQ
제품 기능
문제 해결 가이드
과금
Sample Project 사용 문제
일반 문제
인증
방 입장 실패
사운드 및 오디오
네트워크
음성을 텍스트로 변환
프로그램 내보내기
Service Agreement
Service Level Agreement
문의하기
용어집
GME 정책
데이터 처리 및 보안 계약
개인 정보 보호 정책

Project Configuration

PDF
포커스 모드
폰트 크기
마지막 업데이트 시간: 2024-01-18 15:11:45
This document describes how to configure a Cocos2d project for the GME APIs for Cocos2d.

SDK Preparation

1. Download the applicable demo and SDK. For more information, see SDK Download Guide.
2. Decompress the obtained SDK resources.
3. The folder contains:
GMESDK: GME SDK framework file.
GMECocosDemo: GME SDK demo project.
Note:
The SDK supports compilation on macOS.

iOS Xcode Configuration

1. Add the framework to the Xcode project and set the header file import location (the framework file in the GMESDK folder must be added to the project).
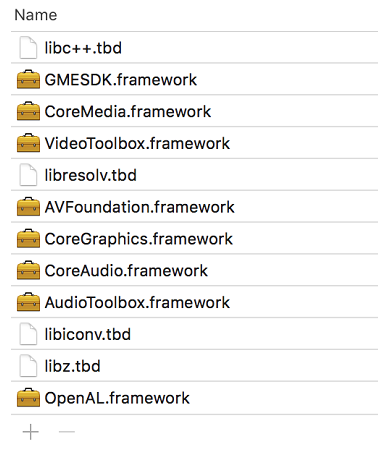
2. Add dependent libraries as shown below:


Android Configuration

1. Add gmesdk.jar to the libs library.
2. Import the so file into Activity as shown below:
public class AppActivity extends Cocos2dxActivity {
static final String TAG = "AppActivity";
static OpensdkGameWrapper gameWrapper ;
static {
OpensdkGameWrapper.loadSdkLibrary();
}
}
3. Initialize in the oncreate function exactly in the following sequence:
protected void onCreate(Bundle savedInstanceState) {
super.setEnableVirtualButton(false);
super.onCreate(savedInstanceState);
// Initialize exactly in the following sequence
gameWrapper = new OpensdkGameWrapper(this);
runOnGLThread(new Runnable() {
@Override
public void run() {
gameWrapper.initOpensdk();
}
});
}
4. Configure your project for compilation options by referring to the Android.mk in the GME Demo for Cocos.
Path: GMECocos/GMECocosDemo/proj.android-studio/app/jni/Android.mk
Path to the preBuild.mk file: /Users/username/Downloads/GMECocos/GMESDK/android/bin/preBuild.mk

Exporting to Different Platforms

Project configuration is required before you can export executables from the Cocos2d engine for different platforms:

Android

Configuring required permissions

Add the following permissions in the AndroidManifest.xml file of the project:
<uses-permission android:name="android.permission.RECORD_AUDIO" />
<uses-permission android:name="android.permission.ACCESS_NETWORK_STATE" />
<uses-permission android:name="android.permission.ACCESS_WIFI_STATE" />
<uses-permission android:name="android.permission.INTERNET" />
<uses-permission android:name="android.permission.MODIFY_AUDIO_SETTINGS" />
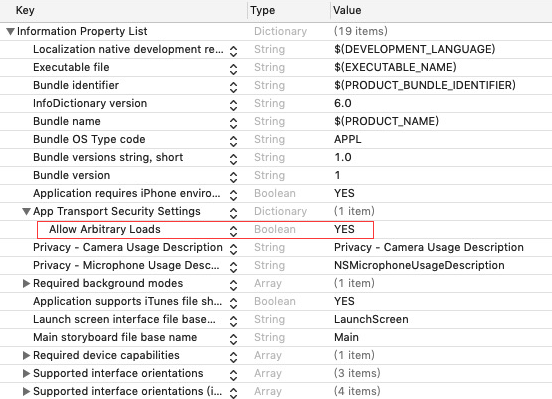
To use the voice messaging and speech-to-text feature, add the following under the application node in the manifest file:
<application android:usesCleartextTraffic="true" >

Adding permissions as needed

Add the following permissions in the AndroidManifest.xml file of the project as needed:
Read/Write permission
Bluetooth permission
The read/write permission is not required. Determine whether to add it according to the following rules:
If you use the default log path (/SDCARD/Android/Data/files), it means that you do not call SetLogPath, and do not need Write_External_Storage permission.
If you call the setLogPath API to set the log path to an external storage device, and the storage path of the voice message recording is an external storage device, you need to apply for the Write_External_Storage permission to the user and get the user's approval.
<uses-permission android:name="android.permission.WRITE_EXTERNAL_STORAGE"/>
Add the Bluetooth permission according to the following rules:
If targetSDKVersion in the project is v30 or earlier:
<uses-permission android:name="android.permission.BLUETOOTH"/>
If targetSDKVersion in the project is v31 or later:
<uses-permission android:name="android.permission.BLUETOOTH" android:maxSdkVersion="30" />
<uses-permission android:name="android.permission.BLUETOOTH_CONNECT" />

iOS

Add permissions:
Microphone Usage Description: Allows access to microphone.
Grant the Allow Arbitrary Loads permission as shown below:


Windows

You need to download the SDK for Windows as instructed in SDK Download Guide and import it into the project.

도움말 및 지원

문제 해결에 도움이 되었나요?

피드백