iOS
Download
聚焦模式
字号
本文将介绍如何快速完成 Objective-C 版本的 iOS RTC Engine 的接入,实现一个基本的音视频通话。
环境准备
Xcode 13.0+。
iOS 9.0 以上的 iPhone 或者 iPad 真机。
项目已配置有效的开发者签名。
接入指引
步骤1. 导入 SDK
1. 在终端窗口执行以下命令安装 CocoaPods ,如果您已经完成 CocoaPods 的安装,可以跳过该步。
sudo gem install cocoapods
2. 在终端窗口中进入项目根目录,执行以下命令为项目创建 Podfile 文件。
pod init
3. 编辑并保存 Podfile 内容如下。
platform :ios, '8.0'# 将 App 修改为您项目的名称target 'App' dopod 'TXLiteAVSDK_TRTC', :podspec => 'https://liteav.sdk.qcloud.com/pod/liteavsdkspec/TXLiteAVSDK_TRTC.podspec'end
4. 在终端窗口中执行以下命令更新本地库文件,完成对 TRTC SDK 的下载。
pod install
说明:
pod install 执行完成,会生成新的 .xcworkspace 工程文件,双击打开.xcworkspace 文件进行后续工作。1. 以 Xcode 26.4.1 为例,进入
File > Add Package Dependencies...,在搜索中粘贴如下 URL,等待结果出来后点击 Add Package。// 13.3 及之后的版本git@github.com:Tencent-RTC/TRTC_SwiftPM.git
2. 在 Choose Package Options 中指定你想集成的 SDK 版本。你也可以参考 Apple 官方文档 进行设置。
注意:
Swift Package Manager 集成方式从 13.3 版本开始支持,若要使用之前的版本,可以使用 CocoaPods 方式集成。
步骤2. 配置项目
1. 打开
.xcworkspace 工程文件后,在 Xcode 的导航栏中点击左侧的 Project Navigator,点击您的项目名称并确保在编辑区域选择正确的 TARGETS。2. 在
Build Settings 选项卡中搜索 User Script Sandboxing,将其值置为 No,以允许用户脚本访问更广泛的系统资源和文件。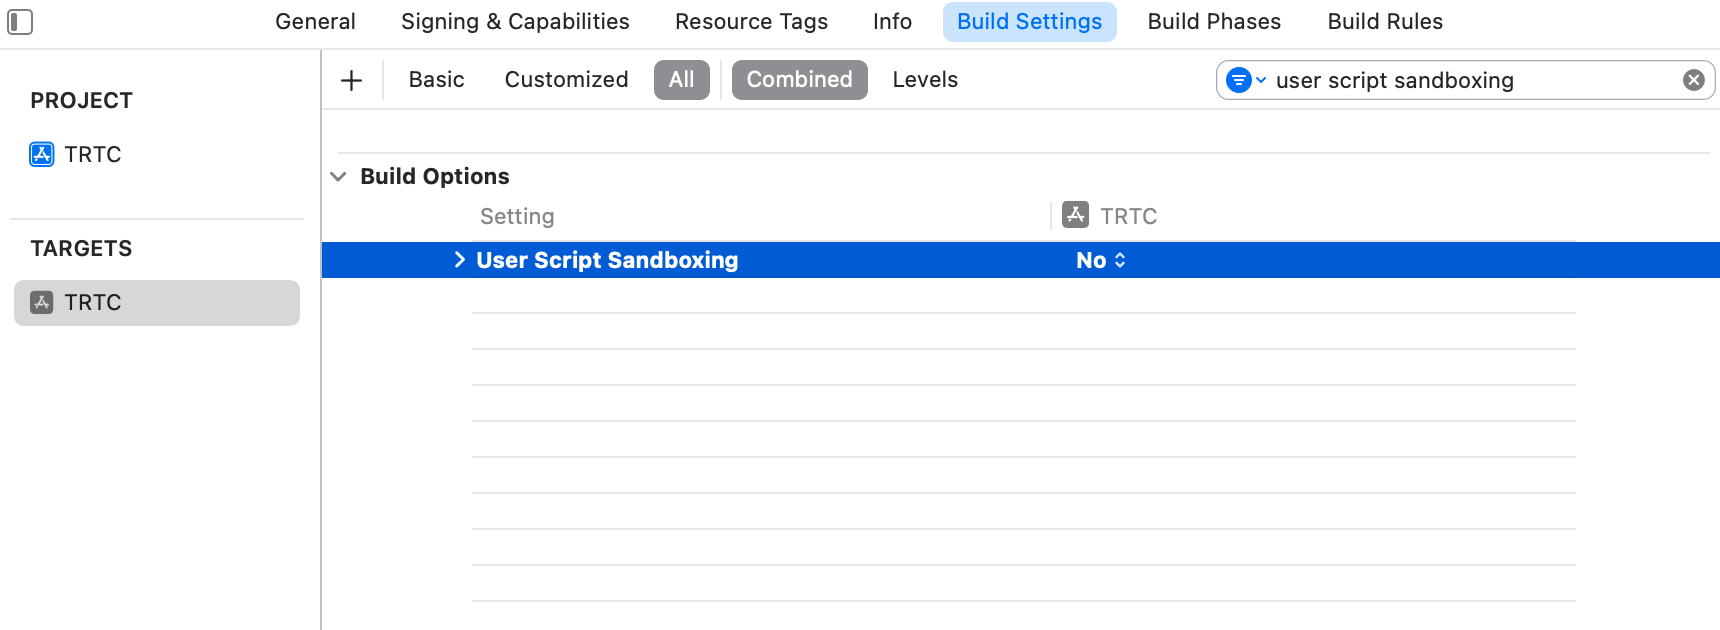
3. 在
Info.plist 选项卡中添加 Privacy-Microphone Usage Description 和 Privacy-Microphone Usage Description ,并填入 Microphone/Camera 使用的目标提示语,获取麦克风和摄像头的使用权限。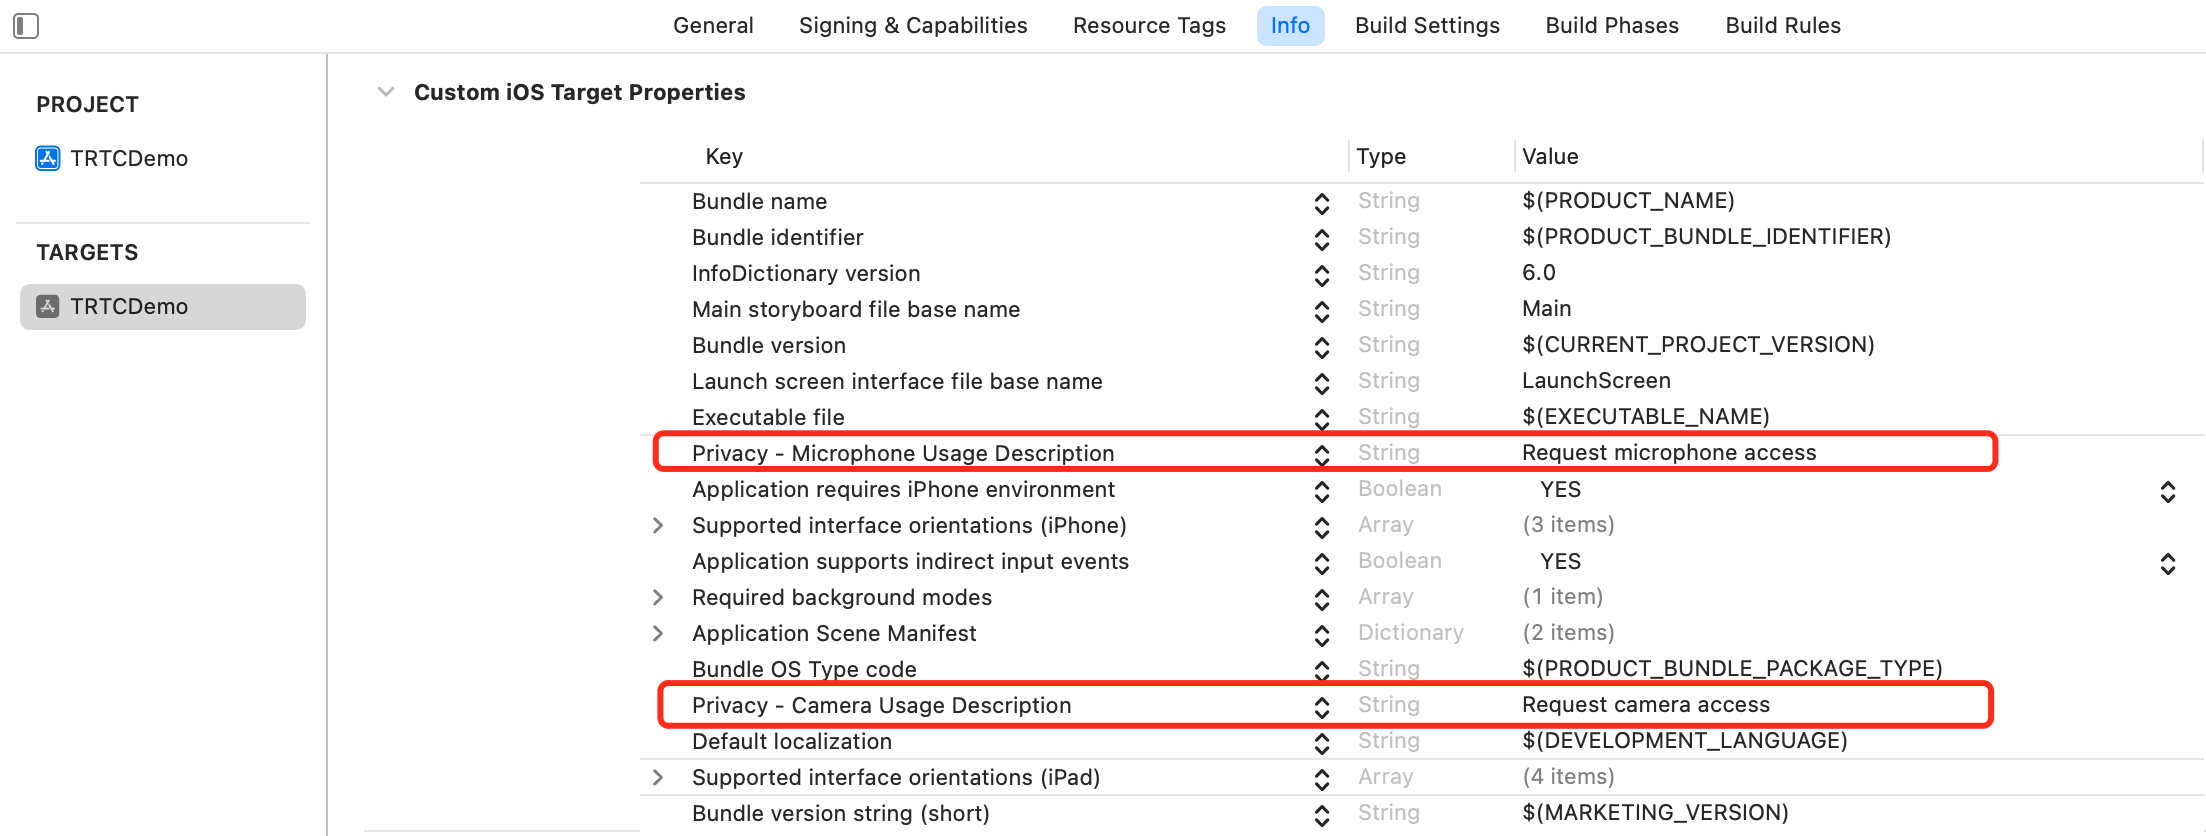
4. 在
Signing & Capabilities 选项卡中添加 Background Modes,并勾选 Audio,AirPlay and Picture in Picture,以允许应用在后台运行音频、AirPlay 和画中画功能。
步骤3. 创建 TRTC 实例
1. 在
AppDelegate.h 文件中引入 TRTC SDK。@import TXLiteAVSDK_TRTC; // 引入 TRTC SDK 模块
2. 在
AppDelegate.h 文件中声明 TRTCCloud 属性和 TRTCCloudDelegate 接口。@interface AppDelegate : UIResponder <UIApplicationDelegate, TRTCCloudDelegate> // 添加 TRTCCloudDelegate 接口声明@property (nonatomic, strong) TRTCCloud *trtcCloud; // 添加 TRTCCloud 属性
3. 进入
AppDelegate.m 文件后,在 didFinishLaunchingWithOptions 方法中调用 sharedInstance 创建 TRTC 实例,并设置事件监听。- (BOOL)application:(UIApplication *)application didFinishLaunchingWithOptions:(NSDictionary *)launchOptions {// 创建 TRTC 实例并设置监听_trtcCloud = [TRTCCloud sharedInstance];_trtcCloud.delegate = self;return YES;}// 监听并处理 `onError` 事件- (void)onError:(TXLiteAVError)errCodeerrMsg:(nullable NSString *)errMsgextInfo:(nullable NSDictionary *)extInfo{// 处理 `Error` 事件,建议对 OnError 的信息通过 'toastTip:' 进行提示NSString *errCodeStr = [NSString stringWithFormat:@"%ld", (long)errCode];NSString *extInfoStr = extInfo ? [extInfo description] : @"";NSString *notification = [NSString stringWithFormat:@"%@, %@, %@", errCodeStr, errMsg, extInfoStr];[self toastTip:notification];}// 实现 'toastTip:'- (void)toastTip:(NSString *)tip {UIAlertController *alert = [UIAlertController alertControllerWithTitle:@"Tip"message:tippreferredStyle:UIAlertControllerStyleAlert];UIAlertAction *okAction = [UIAlertAction actionWithTitle:@"Confirm"style:UIAlertActionStyleDefaulthandler:nil];[alert addAction:okAction];[self.window.rootViewController presentViewController:alert animated:YES completion:nil];dispatch_after(dispatch_time(DISPATCH_TIME_NOW, (int64_t)(2.0 * NSEC_PER_SEC)), dispatch_get_main_queue(), ^{[alert dismissViewControllerAnimated:YES completion:nil];});}
步骤4. 进入房间
设置进房参数
TRTCParams 并调用 enterRoom 即可成功进入房间,该方法通常在点击开始通话按钮后调用。#import "AppDelegate.h" // 导入 "AppDelegate.h" 文件- (void)enterRoom {// 将以下 trtcParams 参数修改为自己的参数TRTCParams *trtcParams = [[TRTCParams alloc] init];trtcParams.sdkAppId = 1400000123;trtcParams.userId = @"denny";trtcParams.userSig = @"";trtcParams.roomId = 123321;// 对于多人视频通话场景,推荐使用 TRTC_APP_SCENE_LIVEAppDelegate *appDelegate = (AppDelegate *)[[UIApplication sharedApplication] delegate];[appDelegate.trtcCloud enterRoom:trtcParams appScene:TRTCAppSceneLIVE];}// 监听 `onEnterRoom` 事件- (void)onEnterRoom:(NSInteger)result {// 处理 onEnterRoom 事件}
步骤5. 打开/关闭摄像头
1. 在
ViewController.h 文件中声明 UIWindow 和 UIView 属性。@property (strong, nonatomic) UIWindow *window; // 添加 UIWindow 属性@property (nonatomic, strong) UIView *localCameraVideoView; // 添加 UIView 属性
2. 设置本地预览的渲染参数
setLocalRenderParams ,并调用 startLocalPreview 进行本地预览,成功调用 enterRoom 后开始推流。- (void)startLocalPreview {// 设置本地预览渲染参数TRTCRenderParams *trtcRenderParams = [[TRTCRenderParams alloc] init];trtcRenderParams.fillMode = TRTCVideoFillMode_Fill;trtcRenderParams.mirrorType = TRTCVideoMirrorTypeAuto;AppDelegate *appDelegate = (AppDelegate *)[[UIApplication sharedApplication] delegate];[appDelegate.trtcCloud setLocalRenderParams:trtcRenderParams];// 对采集内容进行本地预览[appDelegate.trtcCloud startLocalPreview:YES view:self.localCameraVideoView];}
调用
stopLocalPreview 关闭摄像头预览并停止推送本地视频信息。AppDelegate *appDelegate = (AppDelegate *)[[UIApplication sharedApplication] delegate];[appDelegate.trtcCloud stopLocalPreview];
3. 添加“切换前后摄像头”、“设置对焦模式”、“闪光灯”等设备扩展功能的使用。
// 默认开启前置摄像头,切换为后置摄像头AppDelegate *appDelegate = (AppDelegate *)[[UIApplication sharedApplication] delegate];TXDeviceManager * deviceManager = [appDelegate.trtcCloud getDeviceManager];if([deviceManager isFrontCamera]) {[deviceManager switchCamera:false];}// 切换为前置摄像头AppDelegate *appDelegate = (AppDelegate *)[[UIApplication sharedApplication] delegate];TXDeviceManager * deviceManager = [appDelegate.trtcCloud getDeviceManager];[deviceManager switchCamera:true];
// 若设备支持自动识别人脸位置,开启自动对焦功能AppDelegate *appDelegate = (AppDelegate *)[[UIApplication sharedApplication] delegate];TXDeviceManager * deviceManager = [appDelegate.trtcCloud getDeviceManager];if([deviceManager isAutoFocusEnabled]) {[deviceManager enableCameraAutoFocus:true];}// 关闭自动对焦功能AppDelegate *appDelegate = (AppDelegate *)[[UIApplication sharedApplication] delegate];TXDeviceManager * deviceManager = [appDelegate.trtcCloud getDeviceManager];[deviceManager enableCameraAutoFocus:false];
// 切换后置摄像头时可开启闪光灯AppDelegate *appDelegate = (AppDelegate *)[[UIApplication sharedApplication] delegate];TXDeviceManager * deviceManager = [appDelegate.trtcCloud getDeviceManager];if(![deviceManager isFrontCamera]) {[deviceManager enableCameraTorch:true];}// 关闭闪光灯AppDelegate *appDelegate = (AppDelegate *)[[UIApplication sharedApplication] delegate];TXDeviceManager * deviceManager = [appDelegate.trtcCloud getDeviceManager];[deviceManager enableCameraTorch:false];
4. 在
ViewController.m 中初始化 localCameraVideoView ,并将其添加到当前视图的视图层次结构中。#import "AppDelegate.h" // 引入 "AppDelegate.h" 文件@interface ViewController ()@end@implementation ViewController- (void)viewDidLoad {[super viewDidLoad];// Do any additional setup after loading the view.// 初始化 localCameraVideoViewself.localCameraVideoView = [[UIView alloc] initWithFrame:self.view.bounds];self.localCameraVideoView.backgroundColor = [UIColor blackColor];[self viewDidAppear];}- (void)viewDidAppear {AppDelegate *appDelegate = (AppDelegate *)[[UIApplication sharedApplication] delegate];// 将 localCameraVideoView 添加到当前视图的视图层次结构中[self.view addSubview:self.localCameraVideoView];// 开启本地预览[appDelegate.trtcCloud startLocalPreview:YES view:self.localCameraVideoView];}@end
步骤6. 打开/关闭麦克风
调用
startLocalAudio 开启麦克风采集,请根据您的需求选择以下其中一个声音质量参数 Quality。// 开启麦克风采集,设置当前场景为:语音模式// 具有高的噪声抑制能力,有强有弱的网络阻力AppDelegate *appDelegate = (AppDelegate *)[[UIApplication sharedApplication] delegate];[appDelegate.trtcCloud startLocalAudio:TRTCAudioQualitySpeech];
// 开启麦克风采集,设置当前场景为:音乐模式// 为获得高保真度,低音质损失,建议配合专业声卡使用AppDelegate *appDelegate = (AppDelegate *)[[UIApplication sharedApplication] delegate];[appDelegate.trtcCloud startLocalAudio:TRTCAudioQualityMusic];
调用
stopLocalAudio 关闭麦克风采集并停止推送本地音频信息。AppDelegate *appDelegate = (AppDelegate *)[[UIApplication sharedApplication] delegate];[appDelegate.trtcCloud stopLocalAudio];
步骤7. 播放/停止视频流
1. 在进入房间之前对 onUserVideoAvailable 进行监听,当您收到
onUserVideoAvailable(userId, YES) 通知时,表示该路画面已经有可播放的视频帧到达。2. 调用
startRemoteView 进行本地预览,成功调用 enterRoom 后开始推流。- (void)startRemoteView{// 播放远端画面AppDelegate *appDelegate = (AppDelegate *)[[UIApplication sharedApplication] delegate];[appDelegate.trtcCloud startRemoteView:@"denny" streamType:TRTCVideoStreamTypeBig view:self.localCameraVideoView];}
调用
stopRemoteView 停止播放远端画面。// 停止播放AppDelegate *appDelegate = (AppDelegate *)[[UIApplication sharedApplication] delegate];[appDelegate.trtcCloud stopRemoteView:@"denny"]; // 仅停止播放 denny 画面[appDelegate.trtcCloud stopAllRemoteView]; // 停止播放所有视频
步骤8. 播放/停止音频流
调用
muteRemoteAudio 选择播放或停止远端声音。// 静音AppDelegate *appDelegate = (AppDelegate *)[[UIApplication sharedApplication] delegate];[appDelegate.trtcCloud muteRemoteAudio:@"denny" mute:YES]; // 仅静音 denny[appDelegate.trtcCloud muteAllRemoteAudio:YES]; // 静音所有远端用户
// 取消静音AppDelegate *appDelegate = (AppDelegate *)[[UIApplication sharedApplication] delegate];[appDelegate.trtcCloud muteRemoteAudio:@"denny" mute:NO]; // 仅取消静音 denny[appDelegate.trtcCloud muteAllRemoteAudio:NO]; // 取消静音所有远端用户
步骤9. 退出房间
调用
exitRoom 退出当前的房间,TRTC SDK 会在退房结束后通过 onExitRoom 回调事件通知您。// 退出当前房间AppDelegate *appDelegate = (AppDelegate *)[[UIApplication sharedApplication] delegate];[appDelegate.trtcCloud exitRoom];// 监听 `onExitRoom` 回调- (void)onExitRoom:(NSInteger)reason {if (reason == 0) {NSLog(@"Exit current room by calling the 'exitRoom' api of sdk ...");} else if (reason == 1) {NSLog(@"Kicked out of the current room by server through the restful api...");} else if (reason == 2) {NSLog(@"Current room is dissolved by server through the restful api...");}}
常见问题
您可以在 API 参考 查看所有函数列表及其描述。
如果您的接入和使用中遇到问题,请参见 常见问题。
联系我们
如果有任何需要或者反馈,您可以联系:info_rtc@tencent.com。
文档反馈