Spring Boot Starter Integration
Last updated:2025-12-24 15:07:56
Scenarios
This document describes how to use Spring Boot Starter to send and receive messages, so as to help you better understand the complete process of sending and receiving messages.
Prerequisites
You have obtained the client connection parameters as instructed in SDK Overview.
Operation Steps
Step 1: Adding Dependencies
Import Pulsar Starter dependencies to the project.
<dependency><groupId>io.github.majusko</groupId><artifactId>pulsar-java-spring-boot-starter</artifactId><version>1.0.7</version></dependency><!-- https://mvnrepository.com/artifact/io.projectreactor/reactor-core --><dependency><groupId>io.projectreactor</groupId><artifactId>reactor-core</artifactId><version>3.4.11</version></dependency>
Step 2: Preparing Configurations
Add the Pulsar configuration information to the application.yml configuration file.
server:port: 8081pulsar:# The namespace name.namespace: namespace_java# The address used to access the service.service-url: http://pulsar-w7eognxxx.tdmq.ap-gz.public.tencenttdmq.com:8080# The authorized role token.token-auth-value: eyJrZXlJZC......# The cluster ID.tenant: pulsar-w7eognxxx
Parameter | Description |
namespace | |
service-url | Address used to access the cluster. You can view and copy the address from the Cluster page in the console. |
token-auth-value | |
tenant |
Step 3: Producing Messages
Configure the producer in ProducerConfiguration.java.
package com.tencent.cloud.tdmq.pulsar.config;import io.github.majusko.pulsar.producer.ProducerFactory;import org.springframework.context.annotation.Bean;import org.springframework.context.annotation.Configuration;/*** Producer-related configurations* 1. The topic should be created in the console in advance.* 2. The message type should implement the Serializable API.* 3. A topic cannot be bound to different data types.*/@Configurationpublic class ProducerConfiguration {@Beanpublic ProducerFactory producerFactory() {return new ProducerFactory()// Producer for topic1.addProducer("topic1")// Producer for topic2.addProducer("topic2");
Note:
You need to provide the full path of the topic in the format of persistent://clusterid/namespace/topic. You can copy the clusterid/namespace/topic part from the Topic page in the console.
Compile and run the message production program MyProducer.java.
package com.tencent.cloud.tdmq.pulsar.service;import io.github.majusko.pulsar.producer.PulsarTemplate;import org.apache.pulsar.client.api.MessageId;import org.apache.pulsar.client.api.PulsarClientException;import org.springframework.beans.factory.annotation.Autowired;import org.springframework.stereotype.Service;import java.nio.charset.StandardCharsets;import java.util.concurrent.CompletableFuture;@Servicepublic class MyProducer {/*** 1. The topic for sending messages should be a topic that has already been declared in the producer configuration.* 2. The PulsarTemplate type should match the type of the messages being sent.* 3. When you send messages to a specific topic, the message type should correspond to the type bound to the topic in the producer factory configuration.*/@Autowiredprivate PulsarTemplate<byte[]> defaultProducer;public void syncSendMessage() throws PulsarClientException {defaultProducer.send("topic1", "Hello pulsar client.".getBytes(StandardCharsets.UTF_8));}public void asyncSendMessage() {String msg = "Hello pulsar client.";CompletableFuture<MessageId> completableFuture = defaultProducer.sendAsync("topic1", msg.getBytes(StandardCharsets.UTF_8));// Use asynchronous callbacks to determine whether the message was sent successfully.completableFuture.whenComplete(((messageId, throwable) -> {if( null != throwable ) {System.out.println("delivery failed, value: " + msg );// Add the logic for delayed retries here.} else {System.out.println("delivered msg " + messageId + ", value:" + msg);}}));}/*** Sequential messages should be implemented using sequential-type topics, which support both global and partial ordering. Select the appropriate type based on your requirements.*/public void sendOrderMessage() throws PulsarClientException {for (int i = 0; i < 5; i++) {defaultProducer.send("topic2", ("Hello pulsar client, this is a order message" + i + ".").getBytes(StandardCharsets.UTF_8));}}}
Note:
The topic for sending messages should be a topic that has already been declared in the producer configuration.
The PulsarTemplate type should match the type of the messages being sent.
When you send messages to a specific topic, the message type should correspond to the type bound to the topic in the producer factory configuration.
Step 4: Consuming Messages
Compile and run the message consumption program MyConsumer.java.
package com.tencent.cloud.tdmq.pulsar.service;import io.github.majusko.pulsar.annotation.PulsarConsumer;import io.github.majusko.pulsar.constant.Serialization;import org.apache.pulsar.client.api.SubscriptionType;import org.springframework.stereotype.Service;/*** Consumer configuration*/@Servicepublic class MyConsumer {@PulsarConsumer(topic = "topic1", // The name of the subscribed topic.subscriptionName = "sub_topic1", // The subscription name.serialization = Serialization.JSON, // The serialization method.subscriptionType = SubscriptionType.Shared, // The subscription mode. The default mode is Exclusive.consumerName = "firstTopicConsumer", // The consumer name.maxRedeliverCount = 3, // The maximum number of retries.deadLetterTopic = "sub_topic1-DLQ" // The name of the dead letter topic.)public void firstTopicConsume(byte[] msg) {// TODO process your messageSystem.out.println("Received a new message. content: [" + new String(msg) + "]");// If the consumption fails, throw an exception so that the message will enter the retry queue. It can then be consumed again until the maximum number of retries is reached, after which it will enter the dead letter queue. The prerequisite is to create the retry and dead letter topics.}/*** Sequential messages can be handled using sequential-type topics, which support both global and partial ordering.*/@PulsarConsumer(topic = "topic2", subscriptionName = "sub_topic2")public void orderTopicConsumer(byte[] msg) {// TODO process your messageSystem.out.println("Received a order message. content: [" + new String(msg) + "]");}/*** Listen to the dead letter topic and process dead letter messages.*/@PulsarConsumer(topic = "sub_topic1-DLQ", subscriptionName = "dead_sub")public void deadTopicConsumer(byte[] msg) {// TODO process your messageSystem.out.println("Received a dead message. content: [" + new String(msg) + "]");}}
Parameter | Description |
topic | You need to provide the full path of the topic in the format of persistent://clusterid/namespace/topic. You can copy the clusterid/namespace/topic part from the Topic page in the console. |
subscriptionName | You need to enter the subscription name. You can copy the subscription name from the Consumer tab of the topic. |
deadLetterTopic | If you enable Auto-Create Retry & Dead Letter Queue when you create a subscription, the system will automatically generate a retry queue and a dead letter queue. You can specify the name of the dead letter topic for this parameter. You need to specify the full path in the format of persistent://clusterid/namespace/topic. You can copy the clusterid/namespace/topic part from the Topic page in the console. |
Note:
The above is a simple configuration for using Pulsar through Spring Boot Starter. For more information, see Demo, Starter GitHub, and Starter Gitee.
Step 5: Querying Messages
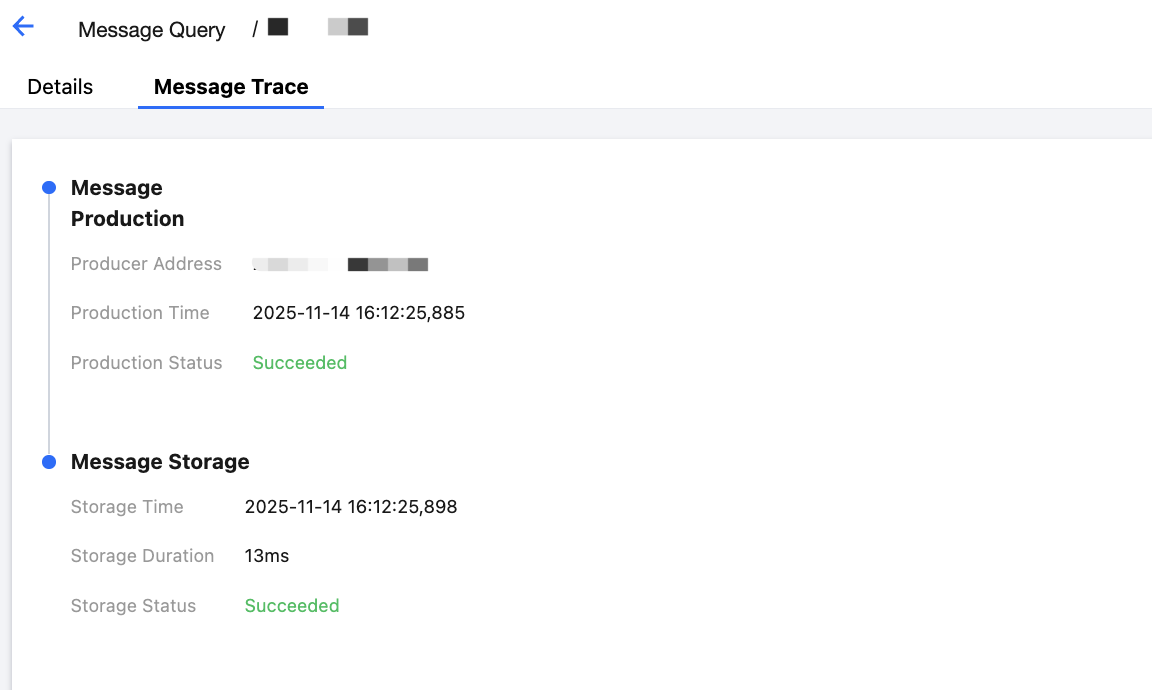
Log in to the console and go to the Message Query page to view the message trace after running the demo.

The following figure shows the message trace.

Note:
The above is a simple configuration for using Pulsar through Spring Boot Starter. For more information, see Demo or the Starter documentation.
Was this page helpful?
You can also Contact Sales or Submit a Ticket for help.
Yes
No
Feedback

