./sgx_linux_x64_sdk를 실행할 때 설치 디렉터리를 선택해야 하며, 현재 디렉터리에 설치하지 않고 /opt/intel/에 설치하는 것이 좋습니다. 이때 Intel SGXSDK의 기본 설치 디렉터리는 /opt/intel/sgxsdk입니다. Intel SGXSDK 사용자 매뉴얼을 참조하여 SGX 프로그램을 개발할 수 있습니다.
4. SGX runtime 및 Intel SGXSDK 설치가 완료되면 인스턴스를 재시작하십시오. 자세한 내용은 인스턴스 재시작을 참조하십시오.
주의:
재시작 중에는 인스턴스가 정상적으로 서비스를 제공할 수 없습니다. 따라서 재시작하기 전에 CVM이 비즈니스 요청을 일시 중지했는지 확인하시기 바랍니다.
Tencent Cloud SGX 원격 증명 서비스 구성
Tencent Cloud SGX 원격 증명 서비스는 지역화 배포를 채택하고 있습니다. 최적의 경험을 위해 SGX CVM 인스턴스가 위치한 리전의 원격 증명 서비스에 액세스하는 것을 권장합니다.
주의 사항
Tencent Cloud SGX 원격 증명 서비스는 베이징, 상하이, 광저우, 난징, 싱가포르 리전에 배포되어 있습니다.
귀하의 SGX CVM 인스턴스가 상기 리전에 위치하지 않더라도 SGX 원격 증명 서비스를 정상적으로 사용할 수 있습니다. 가까운 배포 리전의 서비스를 선택하여 방문하면 되며, 모든 리전 간 요청은 상호 연결되어 기능 사용성에 영향을 미치지 않습니다.
리전
[Region-ID]
베이징
bj
상하이
sh
광저우
gz
난징
nj
싱가포르
sg
Intel Ice Lake는 Intel EPID 원격 증명 방식이 아닌 Intel SGX DCAP 기반 원격 증명 방식만 지원합니다.
Tencent Cloud SGX 원격 증명 서비스 업그레이드
Intel 관련 공지에 따르면, Intel은 베이징 시간 2026년 4월 30일 23:00에 Intel® SGX PCS API 버전 2 및 버전 3 서비스를 완전히 중단합니다. 현재 SGX 원격 증명 서비스를 사용 중인 경우, 반드시 이 시간 전에 Intel® SGX PCS API 버전 4로 업그레이드하셔야 합니다.
Intel® SGX PCS API 버전 4로 업그레이드하려면 /etc/sgx_default_qcnl.conf 구성 파일의 원격 증명 서비스 URL에서 v3를 v4로 교체하고 저장한 후 SGX 원격 증명 기능을 재검증하면 됩니다. 구체적인 구성 수정은 작업 단계를 참조하십시오.
작업 단계
다음 단계에 따라 /etc/sgx_default_qcnl.conf 파일을 수동으로 수정하십시오.
설명:
Intel SGXSDK 설치 후 원격 증명 서비스의 기본 구성 파일 /etc/sgx_default_qcnl.conf이 자동 생성됩니다.
/etc/sgx_default_qcnl.conf은 rpm 패키지 libsgx-dcap-default-qpl에 속합니다. 그 형식은 toml 및 JSON 파일 두 가지 형식을 동시에 지원합니다. 아래에서는 두 가지 경우에 대한 구성 방법을 소개합니다.
JSON 구성으로 /etc/sgx_default_qcnl.conf를 사용하는 경우: VIM 에디터로 /etc/sgx_default_qcnl.conf을 열고 pccs_url을 찾아 해당 줄을 다음과 같이 수정합니다:
# To accept insecure HTTPS cert, set this option to FALSE
USE_SECURE_CERT=TRUE
SGX 기능 인증 예시
예시1: Enclave 실행
Intel SGXSDK는 SGX 기능을 인증하기 위한 SGX 샘플 코드를 제공합니다. 기본 디렉터리는 /opt/intel/sgxsdk/SampleCode입니다. 이 예시에서 코드(SampleEnclave)의 효과는 설치된 SGXSDK의 정상 사용 여부와 SGX CVM 인스턴스의 보안 메모리 리소스 사용 가능 여부를 확인하기 위해 Enclave를 실행하는 것입니다.
1. 다음 명령어를 실행하여 Intel SGXSDK 관련 환경 변수를 설정하십시오.
source /opt/intel/sgxsdk/environment
2. 다음 명령어를 실행하여 샘플 코드 SampleEnclave를 컴파일합니다.
cd /opt/intel/sgxsdk/SampleCode/SampleEnclave &&make
3. 다음 명령어를 실행하여 컴파일된 실행 파일을 실행합니다.
./app
다음 그림과 같은 결과가 반환되면 성공적으로 시작되었음을 의미합니다.
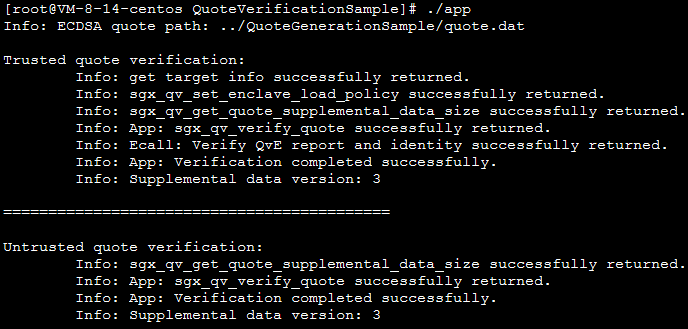
예시2: SGX 원격 증명
Intel SGX 코드 트리는 SGX 원격 증명 기능(DCAP)을 인증하기 위한 샘플 코드를 제공합니다. 이 예제는 Quote 생성(QuoteGenerationSample) 및 검증(QuoteVerificationSample)을 다루며, Quote 생성기와 검증기 샘플을 포함합니다.
1. 다음 명령어를 실행하여 Intel SGXSDK 관련 환경 변수를 설정하십시오.
source /opt/intel/sgxsdk/environment
2. 다음 명령어를 순서대로 실행하여 git을 설치하고 intel sgx DCAP code tree를 다운로드합니다.