You can bind multiple domain names to the same custom CNAME for easy management.
Note:
This feature is now only available to beta users.
You need to modify the CNAME resolution of your domain after the operation.
Configuration directions
Checking shared CNAMEs
Log in to the CDN console, click Domain Name Management from the left sidebar. In the page that appears, click Shared CNAME.
Adding a configuration
Click Add configuration and complete the configuration.
See below for details:
1. Select domain name: Select the target domain name.
Note:
It’s recommended to add domain names with the same acceleration region and service type to the same CNAME.
If you have enabled both CDN and ECDN services, you cannot select domain names that use different services.
The domain name to add cannot be closed, blocked, locked or bound with another CNAME.
2. The backend automatically groups the selected domain names by their platforms, and assigns a custom CNAME record to each group. This way, domain names in the same group are bound to the same CNAME record.
Note:
A string in the format of XXX-APPID.shared.cdn.dnsv1.com is appended to a custom CNAME record.
3. Check the assigned CNAME records. The initial CNAME record of a selected domain name will be overwritten by the corresponding shared CNAME record. Therefore, you must manually check the configuration.
Then, click Confirm to return to the Shared CNAME page and view the configuration.
Editing the configuration
After you configure a shared CNAME record, you can bind more domain names to the record, unbind domain names from the record, and delete the record.
Binding domain names
You can bind more domain names to a shared CNAME record.
Note:
A shared CNAME record is strongly related to the platform of a domain name. You can select only domain names whose platform matches the current shared CNAME record. Unmatched domain names are grayed out and cannot be selected.
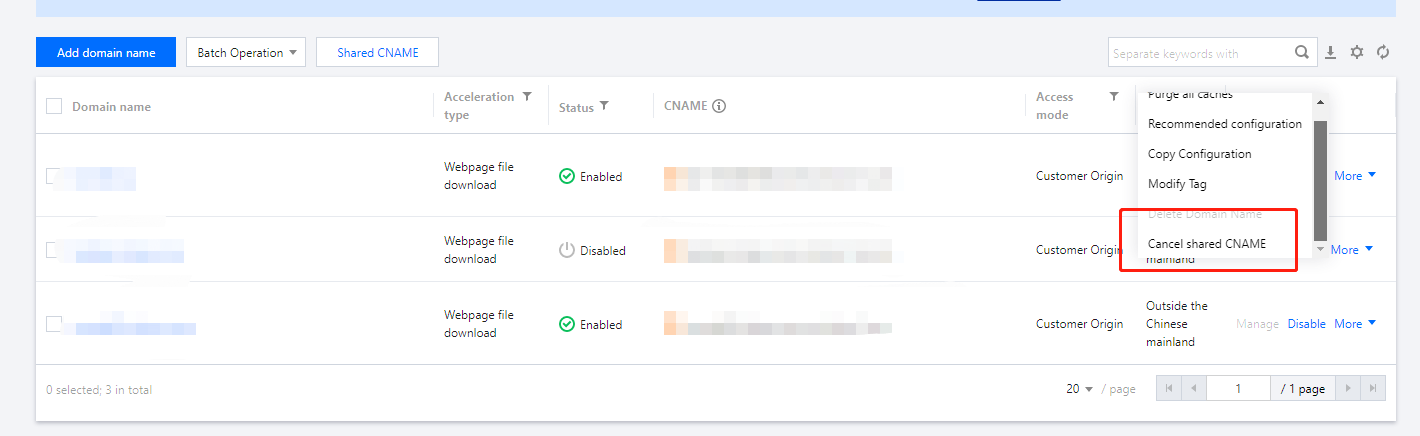
Unbinding a domain name
You can unbind a domain name from a shared CNAME record.
Note:
The CNAME configuration of the unbound domain name will be restored to its initial CNAME record. We recommend that you check the CNAME configuration of the domain name after the operation.
A shared CNAME record must be bound to at least one domain name. If all previously bound domain names are unbound from a shared CNAME record, the shared CNAME record is deleted.
You can also go to the Domain Management page, find the target domain name, and choose More > Cancel shared CNAME in the Operation column to unbind the domain name from its shared CNAME record.
Deleting a shared CNAME record
After you delete a shared CNAME record, all domain names previously bound to it are unbound, and the CNAME configurations of the domain names are restored to the respective initial CNAME records. We recommend that you check the CNAME configurations of the domain names after the operation.