tencent cloud

Feedback

Share Custom Images

Last updated: 2023-07-19 17:08:04

    Overview

    Tencent Cloud allows you to share custom images between Lighthouse and CVM. You can customize image sharing as needed to implement offline migration between them. You can also use a shared image to quickly create instances and then get the needed components from them or add custom content to them.
    Note:
    Shared images do not take up the quota of custom Lighthouse instance images.
    A shared custom Lighthouse instance can be deleted only after sharing is canceled.

    Usage Limits

    Custom images can be shared only between Lighthouse and CVM instances in the same region under the same account.
    You cannot share the following custom images from CVM to Lighthouse:
    Imported custom CVM instance images.
    Custom images already shared from CVM to Lighthouse.
    Custom images of entire CVM instances.
    Custom images whose underlying operating system and version are not listed in Supported Operating Systems.
    Custom images without Cloud-init installed.

    Supported Operating Systems

    Images on the following underlying operating systems and versions can be shared:
    CentOS 6.8 or later
    Ubuntu 16.04 or later
    Debian 8.2 or later
    Windows Server 2012 or later
    TencentOS Server 2.4 or later

    Directions

    Sharing image to CVM

    1. Log in to the Lighthouse console and select Images on the left sidebar.
    2. Select the region at the top of the Image page and click the Custom image tab.
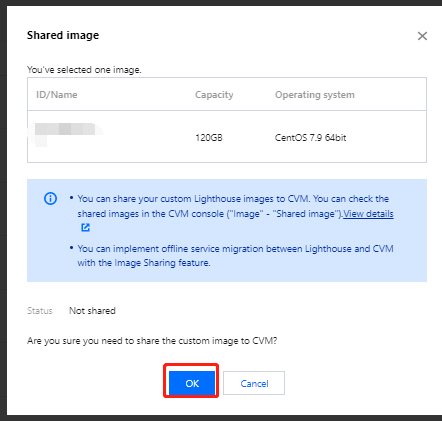
    3. On the right of the row of the target image, select More > Share/Unshare.
    4. In the Share Image pop-up window, click OK as shown below:
    
    After sharing the image, you can view it on the shared image list page in the CVM console.

    Unsharing image to CVM

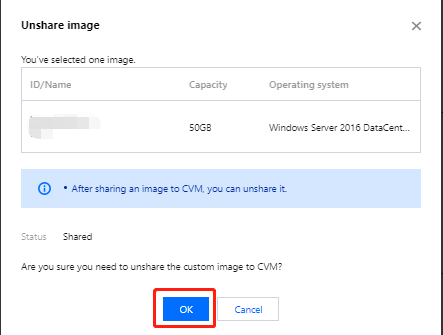
    1. On the Custom image tab, select More > Share/Unshare on the right of the row of the target image.
    2. In the Unshare Image pop-up window, click OK as shown below:


    Sharing image to Lighthouse

    You can share a custom CVM instance image to Lighthouse in the following consoles:
    Lighthouse console
    CVM console
    1. Log in to the Lighthouse console and select Images on the left sidebar.
    2. Select the region at the top of the Image page and click the Shared image tab.
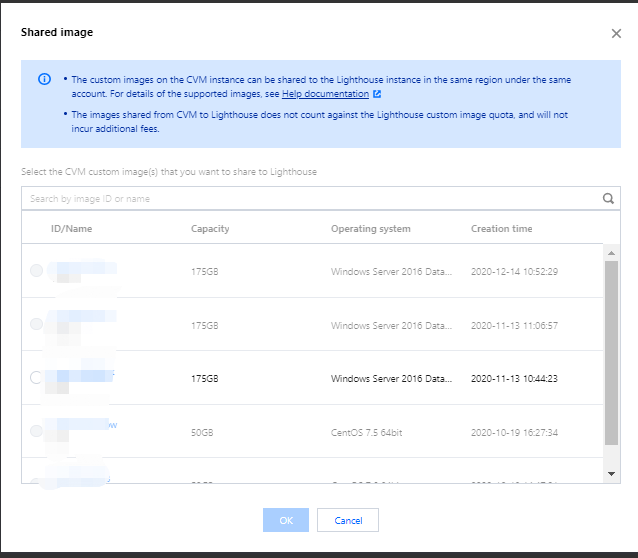
    3. Click Share CVM image. In the Share Image pop-up window, select the target image as shown below:
    
    
    4. Click OK.
    1. Log in to the CVM console and click Images on the left sidebar.
    2. Select the region at the top of the Image page and click the Custom image tab.
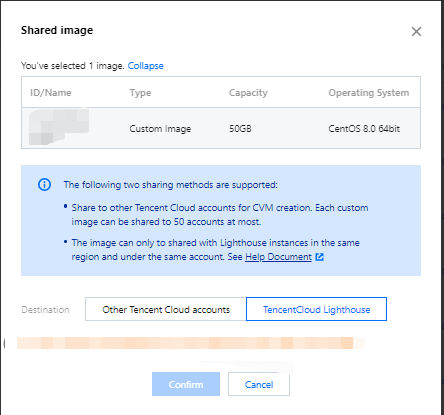
    3. On the right of the row of the target image, select Share.
    4. In the Share Image pop-up window, select Lighthouse as the destination as shown below:
    
    
    5. Click OK.

    Unsharing image to Lighthouse

    You can unshare a custom CVM instance image to Lighthouse in the following consoles:
    Lighthouse console
    CVM console
    1. Log in to the Lighthouse console and select Images on the left sidebar.
    2. Select the region at the top of the Image page and click the Shared image tab.
    3. On the right of the row of the target image, click Unshare as shown below:
    
    
    4. In the Unshare Image pop-up window, click OK.
    1. Log in to the CVM console and click Images on the left sidebar.
    2. Select the region at the top of the Image page and click the Custom image tab.
    3. On the right of the row of the target image, select More > Unshare.
    4. On the Shared image tab on the image details page, select Unshare on the right of the row of the target image sharing record as shown below:
    
    
    5. In the Unshare pop-up window, click OK.

    Viewing image sharing status

    You can view image information and sharing status on the custom image details page in the Lighthouse console:
    1. Log in to the Lighthouse console and select Images on the left sidebar.
    2. Select the region at the top of the Image page and click the Custom image tab.
    3. Click the ID of the target image to enter its details page to view its information and sharing status.

    Using shared image to create instance

    You can use an image shared to Lighthouse to create an instance quickly.
    1. Log in to the Lighthouse console and select Images on the left sidebar.
    2. Select the region at the top of the Image page and click the Shared image tab.
    3. On the right of the row of the target image, click Create instance as shown below:
    
    
    4. On the Lighthouse instance purchase page, select the configuration as need and create the instance. Here, the shared instance is selected for Image, and you need to set other configuration items as instructed in Purchase Methods.
    Contact Us

    Contact our sales team or business advisors to help your business.

    Technical Support

    Open a ticket if you're looking for further assistance. Our Ticket is 7x24 avaliable.

    7x24 Phone Support