Android
Download
聚焦模式
字号
TUIRoomKit 是 TRTC 提供的一站式多人音视频房间解决方案,集成了完整的 UI 组件和核心功能。通过本文档,开发者可以快速了解如何将 TUIRoomKit 集成到项目中,实现多人音视频房间功能。本文还将详细介绍如何快速替换图片资源、本地化文案等个性化配置,帮助开发者打造符合品牌特色的音视频应用。
房间准备页 | 房间主页 | 成员管理 |
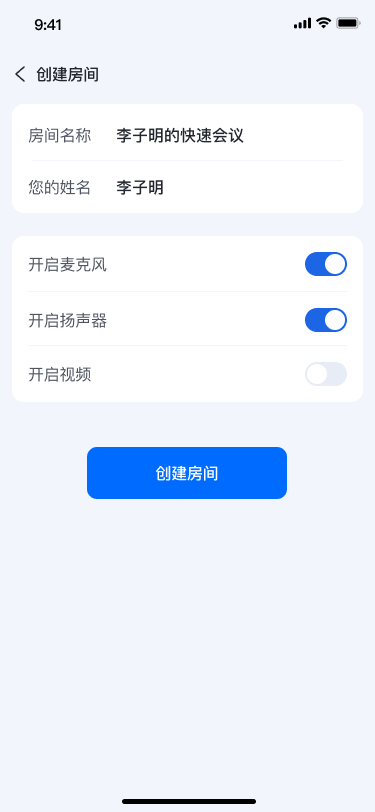 | 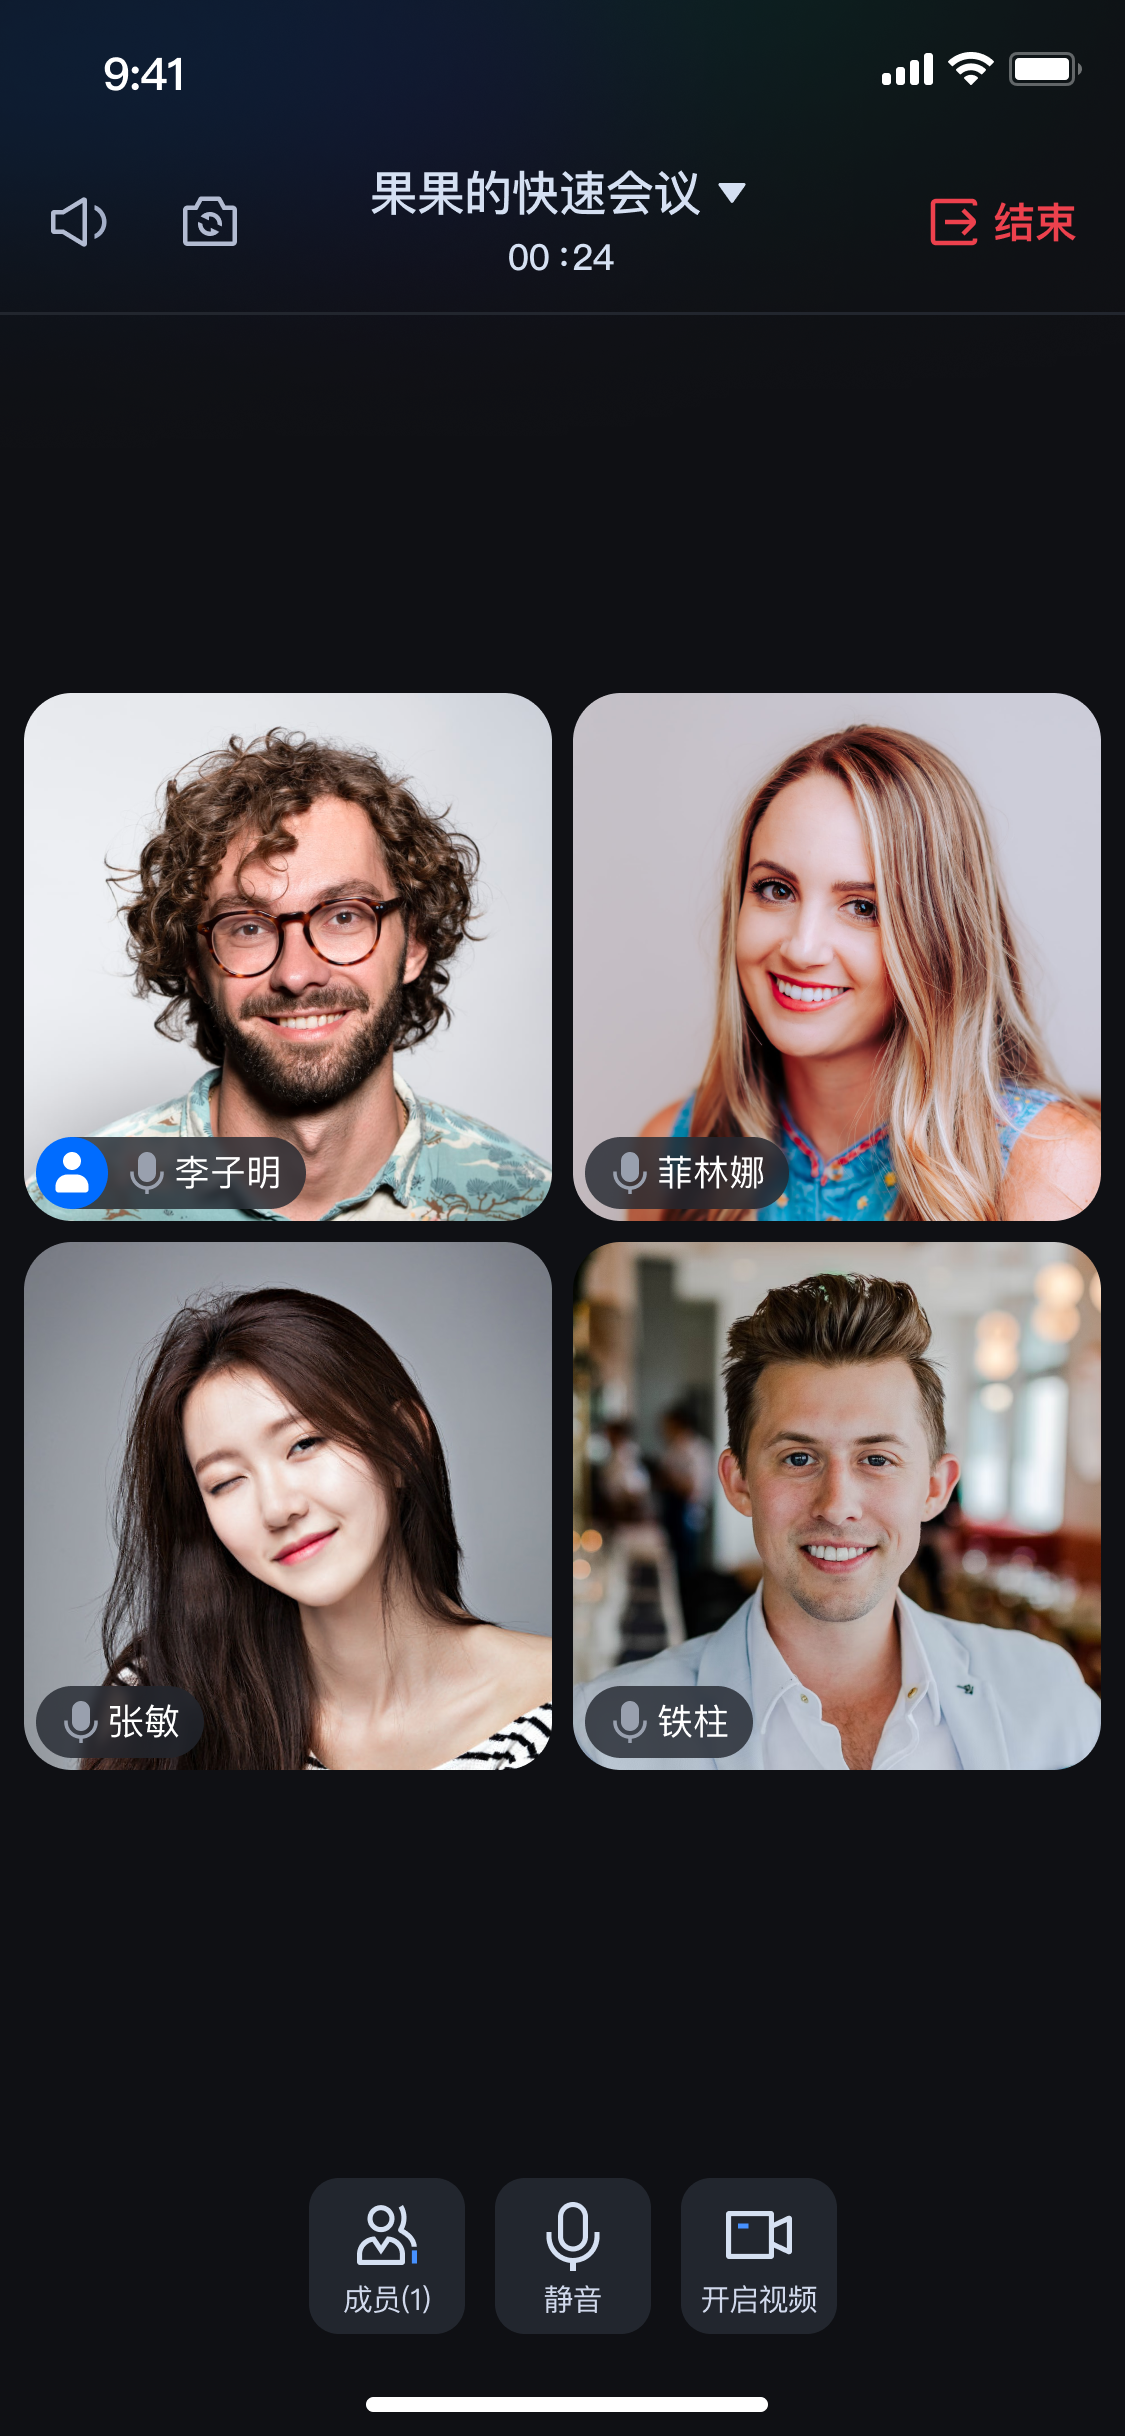 |  |
前提条件
开通服务
SDKAppID:应用标识(必填),腾讯云基于 SDKAppID 完成计费统计。
SDKSecretKey:应用密钥,用于初始化配置文件的密钥信息。
环境准备
Android 5.0 (SDK API level 21)及以上。Gradle 8.0 及以上。Android 5.0 以上的设备。需使用
JDK 17、18 或 19 版本。快速接入
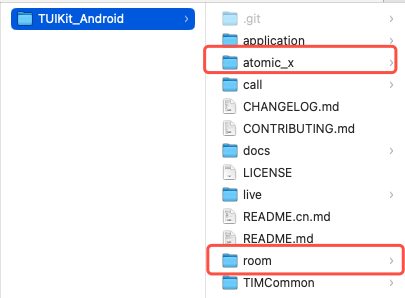
步骤1:下载 TUIRoomKit 组件
步骤2:工程配置
1. 导入 TUIRoomKit 组件
在工程根目录下的
settings.gradle.kts 或 settings.gradle 文件中,增加以下代码以导入 tuiroomkit 组件。include(":tuiroomkit")project(":tuiroomkit").projectDir = File(settingsDir, "room/tuiroomkit")include(":atomic_x")project(":atomic_x").projectDir = File(settingsDir, "atomic_x")
include ':tuiroomkit'project(':tuiroomkit').projectDir = new File(settingsDir, "room/tuiroomkit")include(":atomic_x")project(':atomic_x').projectDir = new File(settingsDir, "atomic_x")
2. 添加组件依赖
在
app 目录下找到 build.gradle.kts(或 build.gradle)文件,并在文件中增加以下代码,该步骤的作用是声明当前 App 对新加入的 tuiroomkit 组件的依赖。dependencies {// 添加 tuiroomkit 依赖api(project(":tuiroomkit"))}
dependencies {// 添加 tuiroomkit 依赖api project(':tuiroomkit')}
说明:
TUIRoomKit 内部已默认依赖 TRTC SDK、IM SDK 等公共库,您无需单独配置。
3. 配置混淆规则
由于 SDK 内部使用了 Java 反射,请在
proguard-rules.pro 文件中添加以下代码,将相关类加入不混淆名单,以确保功能正常运行。-keep class com.tencent.** { *; }-keep class com.tencent.beacon.** { *; }-keep class com.tencent.cloud.iai.lib.** { *; }-keep class com.tencent.qimei.** { *; }-keep class com.tencent.xmagic.** { *; }-keep class com.tcmediax.** { *; }# Google 序列化/反序列化框架 Gson 库相关混淆-keep class com.google.gson.** { *; }
4. 修改 AndroidManifest.xml
为了防止编译时
AndroidManifest 合并过程中产生属性冲突,您需要在 app/src/main/AndroidManifest.xml 文件的 <application> 节点中,添加 tools:replace="android:allowBackup" 和 android:allowBackup="false",用以覆盖组件内的设置。<manifest xmlns:android="http://schemas.android.com/apk/res/android"xmlns:tools="http://schemas.android.com/tools"><!-- 添加如下配置覆盖 依赖的 sdk 中的配置 --><applicationandroid:allowBackup="false"tools:replace="android:allowBackup" /></manifest>
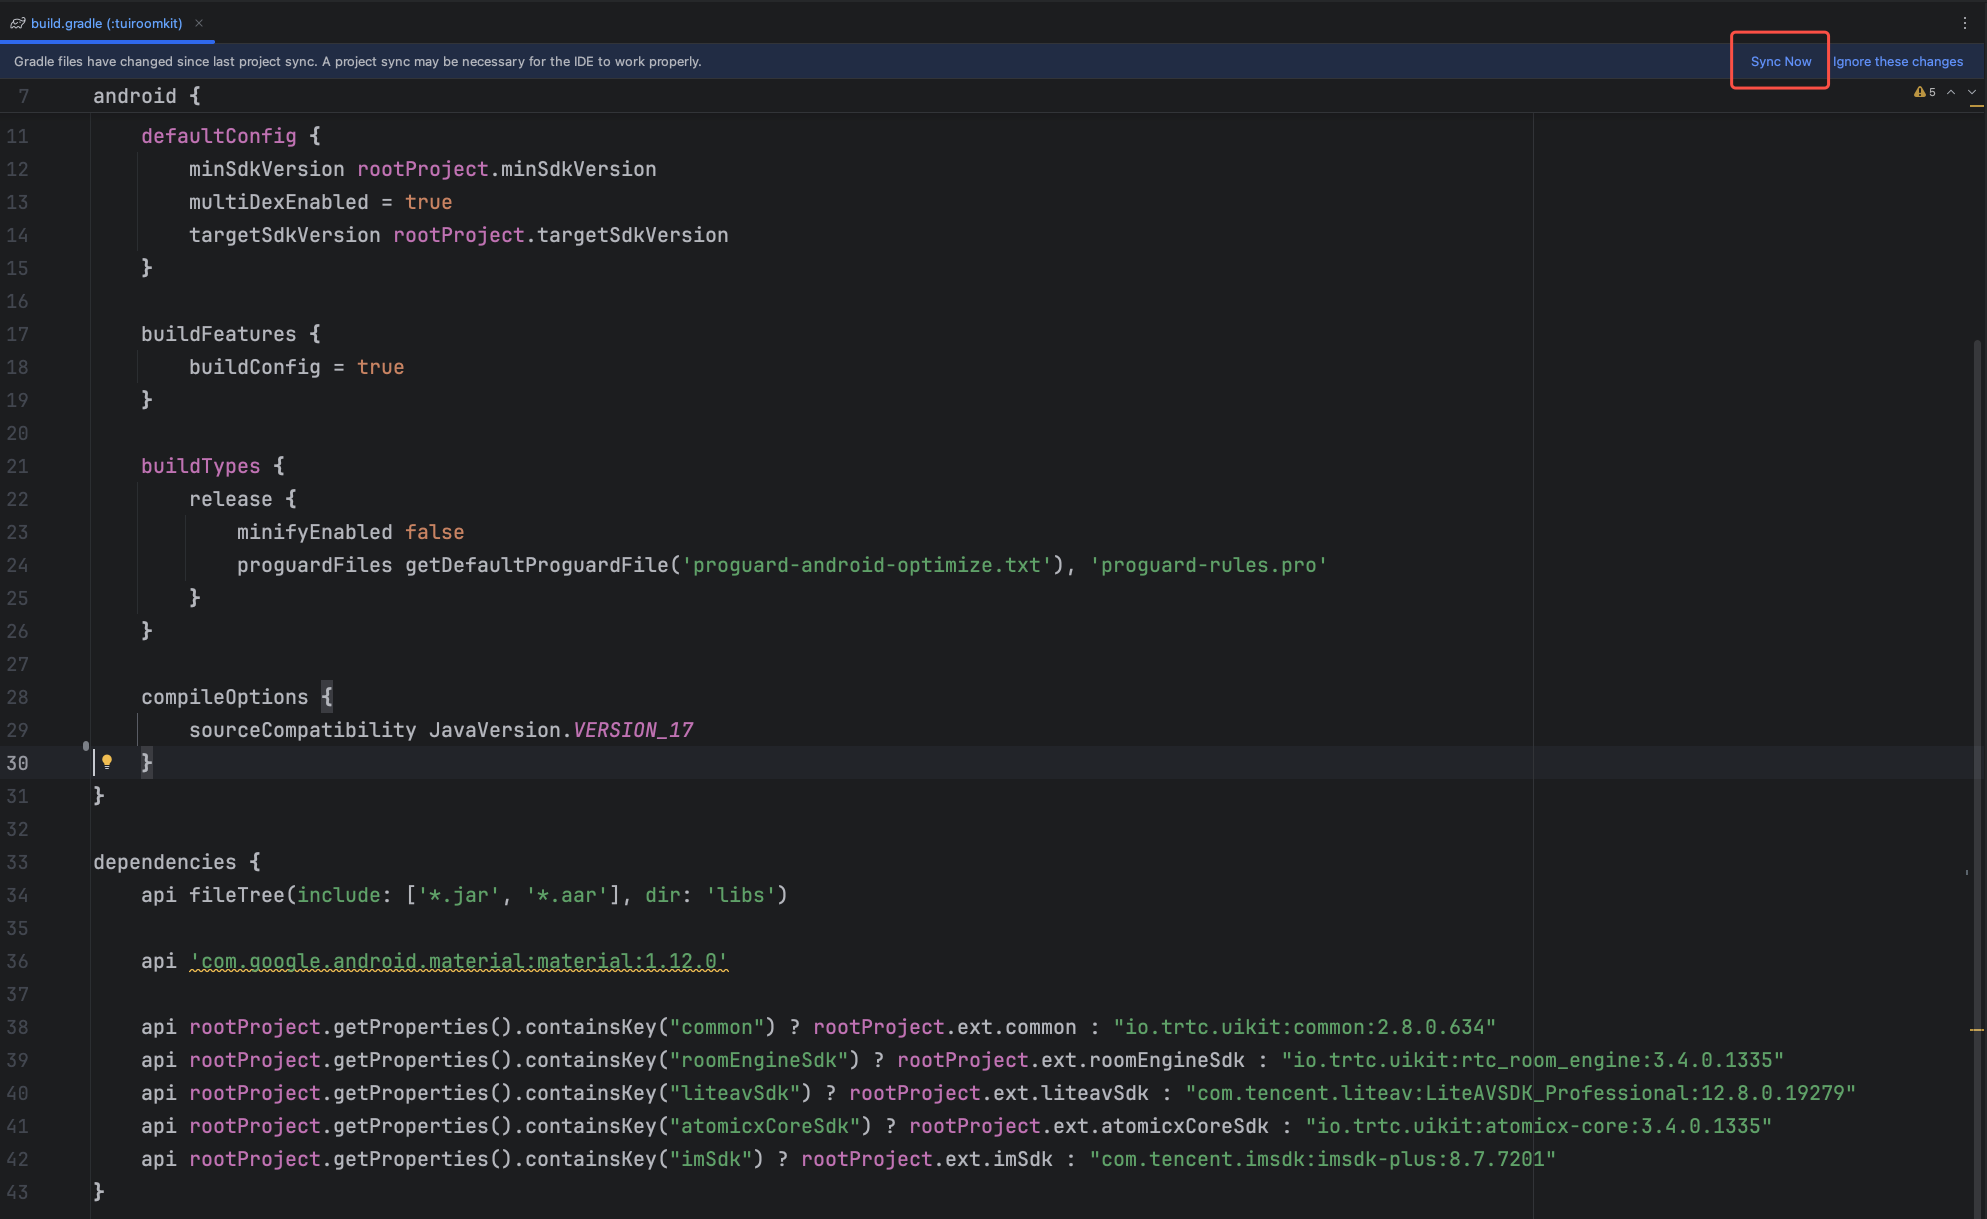
5. 完成项目同步
在完成上述步骤后,通常情况下 Android Studio 会自动为您弹出 Sync Now 按钮,需要点击该同步按钮完成项目的同步,若 IDE 没有自动弹出同步按钮,请手动点击工具栏中的同步按钮进行项目的同步,同步后 IDE 会完成项目的构建配置和索引等工作,您就可以在您的项目中正常使用 TUIRoomKit 组件了。
步骤3:登录
代码集成完成后,您需要完成登录。这是使用 TUIRoomKit 的关键步骤,因为只有在登录成功后才能正常使用 TUIRoomKit 的各项功能,故请您耐心检查相关参数是否配置正确:
说明:
在示例代码中,直接进行了登录接口的调用。但在实际项目场景下,强烈推荐您在完成自己的用户身份验证等相关登录操作后,再调用 AtomicXCore 的登录服务。这样可以避免因过早调用登录服务,导致业务逻辑混乱或数据不一致的问题,同时也能更好地适配您项目中现有的用户管理和权限控制体系。
import android.os.Bundleimport androidx.appcompat.app.AppCompatActivityimport io.trtc.tuikit.atomicxcore.api.login.LoginStoreimport io.trtc.tuikit.atomicxcore.api.CompletionHandlerimport android.util.Logclass MainActivity : AppCompatActivity() {override fun onCreate(savedInstanceState: Bundle?) {super.onCreate(savedInstanceState)LoginStore.shared.login(this, // context1400000001, // 替换为项目的 sdkAppID"test_001", // 替换为项目的 userID"xxxxxxxxxxx", // 替换为项目的 userSigobject : CompletionHandler {override fun onSuccess() {// 登录成功处理Log.d("Login", "login success");}override fun onFailure(code: Int, desc: String) {// 登录失败处理Log.e("Login", "login failed, code: $code, error: $desc");}})}}
登录接口参数说明
参数 | 类型 | 说明 |
SDKAppID | Int | |
UserID | String | 当前用户的唯一 ID,仅包含英文字母、数字、连字符和下划线。 |
userSig | String | 用于腾讯云鉴权的票据。请注意: 开发环境:您可以采用本地 GenerateTestUserSig.genTestSig 函数生成 UserSig 或者通过 UserSig 辅助工具 生成临时的 UserSig。生产环境:为了防止密钥泄露,请务必采用服务端生成 UserSig 的方式。详细信息请参见 服务端生成 UserSig。 |
步骤4:设置头像和昵称
首次登录的用户没有头像和昵称信息,需要通过
LoginStore 的 setSelfInfo 接口设置个人信息:import android.util.Logimport io.trtc.tuikit.atomicxcore.api.CompletionHandlerimport io.trtc.tuikit.atomicxcore.api.login.LoginStoreimport io.trtc.tuikit.atomicxcore.api.login.UserProfileprivate val TAG = "Test"fun setSelfInfo() {val userProfile = UserProfile(userID = "test_001", // 您已经登录的userIDnickname = "tom", // 设置昵称avatarURL = "http://xxx.png" // 设置头像URL)LoginStore.shared.setSelfInfo(userProfile, object : CompletionHandler {override fun onSuccess() {Log.d(TAG, "setSelfInfo success")}override fun onFailure(code: Int, desc: String) {Log.e(TAG, "setSelfInfo failed code:$code, message:$desc")}})}
setSelfInfo 接口参数说明:
参数 | 类型 | 必填 | 说明 |
userProfile | UserProfile | 是 | 个人用户信息核心模型,包含: userID:要设置用户信息的用户 ID。 nickname:昵称信息。 avatarURL:头像链接。 |
completion | CompletionHandler | 否 | 设置个人信息接口的结果回调。若失败会返回错误码和错误信息。 |
步骤5:创建房间
在
TUIRoomKit 组件中,RoomMainView 是集成了完整的多人音视频房间功能的核心界面,以下将对开发者演示如何以房主身份将 RoomMainView 嵌入到应用中。实现方式:
1. 加载创建视图页面:懒加载方式实例化
RoomMainView 。2. 构造进房的配置项:进入房间后是否需要自动打开音视频设备的配置项。
3. 初始化房间主页面:通过房主身份初始化房间主页面。
4. 将视图添加到视图 Activity:在
Activity 的 onCreate 方法中,将 RoomMainView 添加到 Activity 中,并使用布局使其充满整个视图区域。示例代码:
import android.os.Bundleimport androidx.appcompat.app.AppCompatActivityimport com.trtc.uikit.roomkit.view.RoomMainViewimport io.trtc.tuikit.atomicxcore.api.room.CreateRoomOptions// MainActivity 代表您加载房间主页面的 Activityclass MainActivity : AppCompatActivity() {// 1 加载创建视图页面private val roomView: RoomMainView by lazy {RoomMainView(this).apply {// 2 构造进房的配置项val config = RoomMainView.ConnectConfig(autoEnableMicrophone = true, // 进房后是否自动开启麦克风autoEnableCamera = true, // 进房后是否自动开启摄像头autoEnableSpeaker = true // 进房后是否自动开启扬声器)val options = CreateRoomOptions(roomName = "roomName") // 房间名称val behavior = RoomMainView.RoomBehavior.Create(options)// 3 初始化房间主页面init("roomID", behavior, config)}}override fun onCreate(savedInstanceState: Bundle?) {super.onCreate(savedInstanceState)// 4. 将视图添加到视图ActivitysetContentView(roomView)}}
RoomMainView init 函数参数详细说明
:参数 | 类型 | 说明 |
roomID | String | 字符串类型的房间唯一标识符。 限制长度为 0-48 字节。 建议仅包含数字、英文字母(区分大小写)、下划线(_)和连字符(-)。避免使用空格和中文字符。 |
roomType | RoomType | 房间类型: STANDARD:标准房间。WEBINAR:大型研讨会房间。标准房间这里填写 STANDARD 房间类型。 |
behavior | RoomBehavior | 房间主页面初始化来源: Create: 房主身份创建房间。此方式需要构造创建房间配置项,关于 CreateRoomOptions 的详细用法请参考:CreateRoomOptions 结构体详细说明。 Join:参与者身份加入房间。 |
config | ConnectConfig | 进房后音视频设备控制的配置项。 |
ConnectConfig 参数详细说明
:参数 | 类型 | 说明 |
autoEnableMicrophone | Boolean | 进房后是否自动开启麦克风: true:自动开启 (默认值)。 false:不自动开启。 |
autoEnableCamera | Boolean | 进房后是否自动开启摄像头: true:自动开启 (默认值)。 false:不自动开启。 |
autoEnableSpeaker | Boolean | 进房后是否自动开启扬声器: true:自动开启 (默认值)。 false:不自动开启。 |
CreateRoomOptions 结构体详细说明
参数名 | 类型 | 必填 | 说明 |
roomName | String | 否 | 房间名称,可以不设置,默认为空字符串。 限制长度为 0-60 字节。 支持中英文、数字、特殊字符。 |
password | String | 否 | 房间密码,空字符串 "" 通常表示该房间不设密码。 限制长度为 0-32 字节。 推荐使用 4-8 位纯数字,方便移动端输入。设置后,其他用户加入房间时需输入密码。建议不要存储明文敏感信息。 |
isAllMicrophoneDisabled | Boolean | 否 | 是否全员禁止打开麦克风。开启后,除房主/管理员外,普通参与者默认禁止打开麦克风: true:禁止。 false:取消禁止 (默认值)。 |
isAllCameraDisabled | Boolean | 否 | 是否全员禁止打开摄像头。开启后,除房主/管理员外,普通参与者默认禁止打开摄像头: true:禁止。 false:取消禁止(默认值)。 |
isAllScreenShareDisabled | Boolean | 否 | 是否全员禁止发起屏幕共享。开启后,仅房主/管理员可进行屏幕共享: true:禁止。 false:取消禁止(默认值)。 |
isAllMessageDisabled | Boolean | 否 | 是否全员禁止发送聊天消息(禁言)。开启后,普通参与者无法在房间内发送文字消息: true:禁止。 false:取消禁止(默认值)。 |
步骤6:加入房间
以下示例将向开发者演示如何以参与者身份将
RoomMainView 嵌入到应用中。实现方式:
1. 加载创建视图页面:懒加载方式实例化
RoomMainView 。2. 构造进房的配置项:进入房间后是否需要自动打开音视频设备的配置项。
3. 初始化房间主页面:通过参与者身份初始化房间主页面。
4. 将视图添加到视图 Activity:在
Activity 的 onCreate 方法中,将 RoomMainView 添加到 Activity 中,并使用布局使其充满整个视图区域。代码示例:
import android.os.Bundleimport androidx.appcompat.app.AppCompatActivityimport com.trtc.uikit.roomkit.view.RoomMainView// MainActivity 代表您加载房间主页面的 Activityclass MainActivity : AppCompatActivity() {// 1 加载创建视图页面private val roomView: RoomMainView by lazy {RoomMainView(this).apply {// 2 构造进房的配置项val config = RoomMainView.ConnectConfig(autoEnableMicrophone = true, // 进房后是否自动开启麦克风autoEnableCamera = true, // 进房后是否自动开启摄像头autoEnableSpeaker = true // 进房后是否自动开启扬声器)val behavior = RoomMainView.RoomBehavior.Join// 3 初始化房间主页面init("roomID", behavior, config)}}override fun onCreate(savedInstanceState: Bundle?) {super.onCreate(savedInstanceState)// 4. 将视图添加到视图ActivitysetContentView(roomView)}}
核心功能
接入
RoomMainView 代码后,开发者将得到一个完整的多人音视频页面,内部包含成员管理,音视频设备控制,房间信息展示等功能,这是 TUIRoomKit 组件的核心。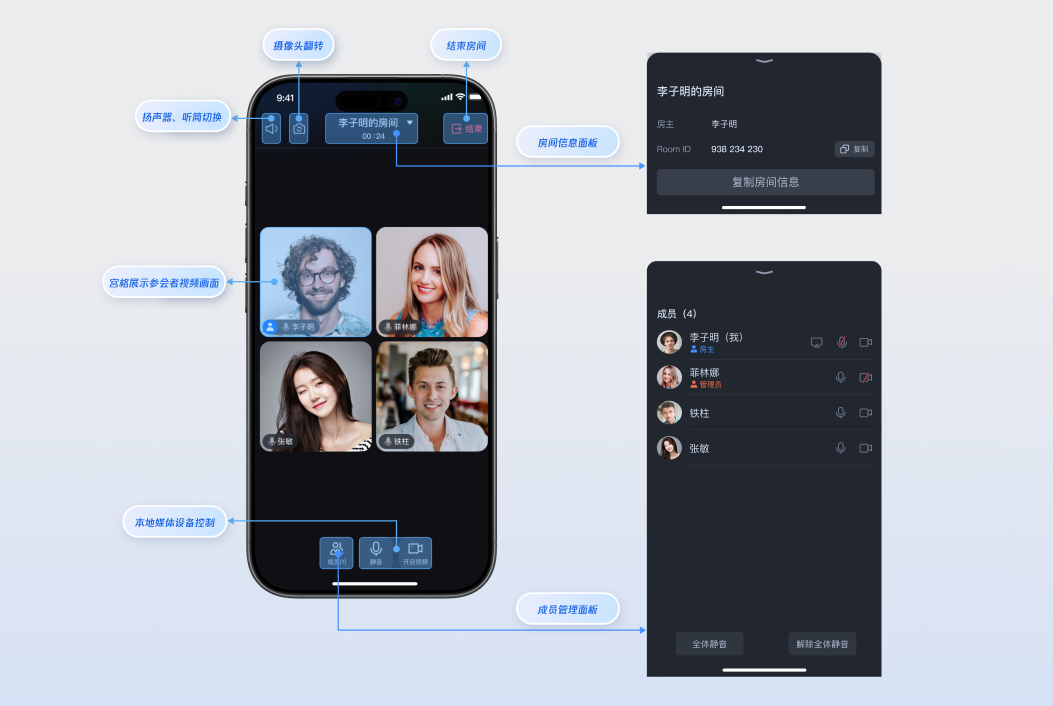
界面定制
RoomMainView 房间主页面内功能丰富,可定制化度高,开发者可以根据实际产品需求,对 UI 进行定制化修改,以适配业务交互场景。以下将详细为开发者展示 RoomMainView 页面中视图组件,便于开发者快速修改。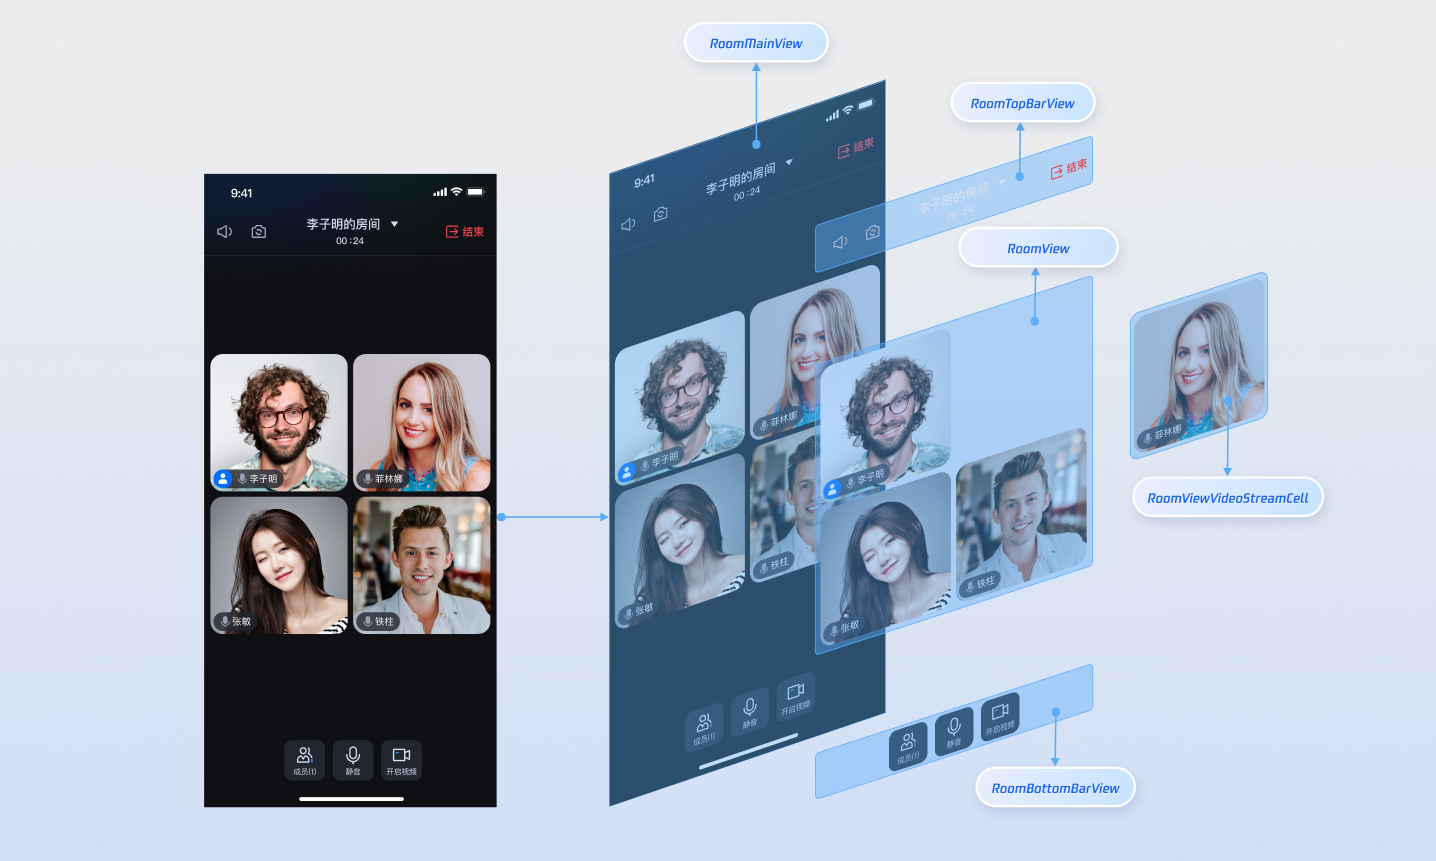
RoomMainView 中组件详细说明组件 | 功能描述 | 定制化建议 |
房间主视图容器,负责协调各子组件的布局与数据流转。 | 可调整整体背景、安全区域适配、组件显隐逻辑。 | |
顶部导航栏,包含房间信息、摄像头和声音控制、退出房间功能入口。 | 可替换图标、调整背景透明度、添加自定义按钮(例如录制、 窗口化)。 | |
视频流展示区域,采用瀑布流布局管理多个用户视频画面。 | 可修改布局算法(行列数、间距)、分页指示器样式、空状态视图。 | |
单个视频流单元格挂件,承载用户视频画面与基本信息。 | 可自定义视频渲染层、用户信息面板(头像、徽章)、互动控件(语音波形)。 | |
底部工具栏,集成麦克风、摄像头、成员管理操作按钮。 | 可重新排列按钮顺序、修改按钮样式(颜色、尺寸)、添加业务相关功能(例如屏幕分享、会中呼叫、美颜)。 |
图标定制
接入
TUIRoomKit 组件后,开发者可以根据实际 UI 交互需求直接替换组件下的图标资源, 以适配开发者的业务场景。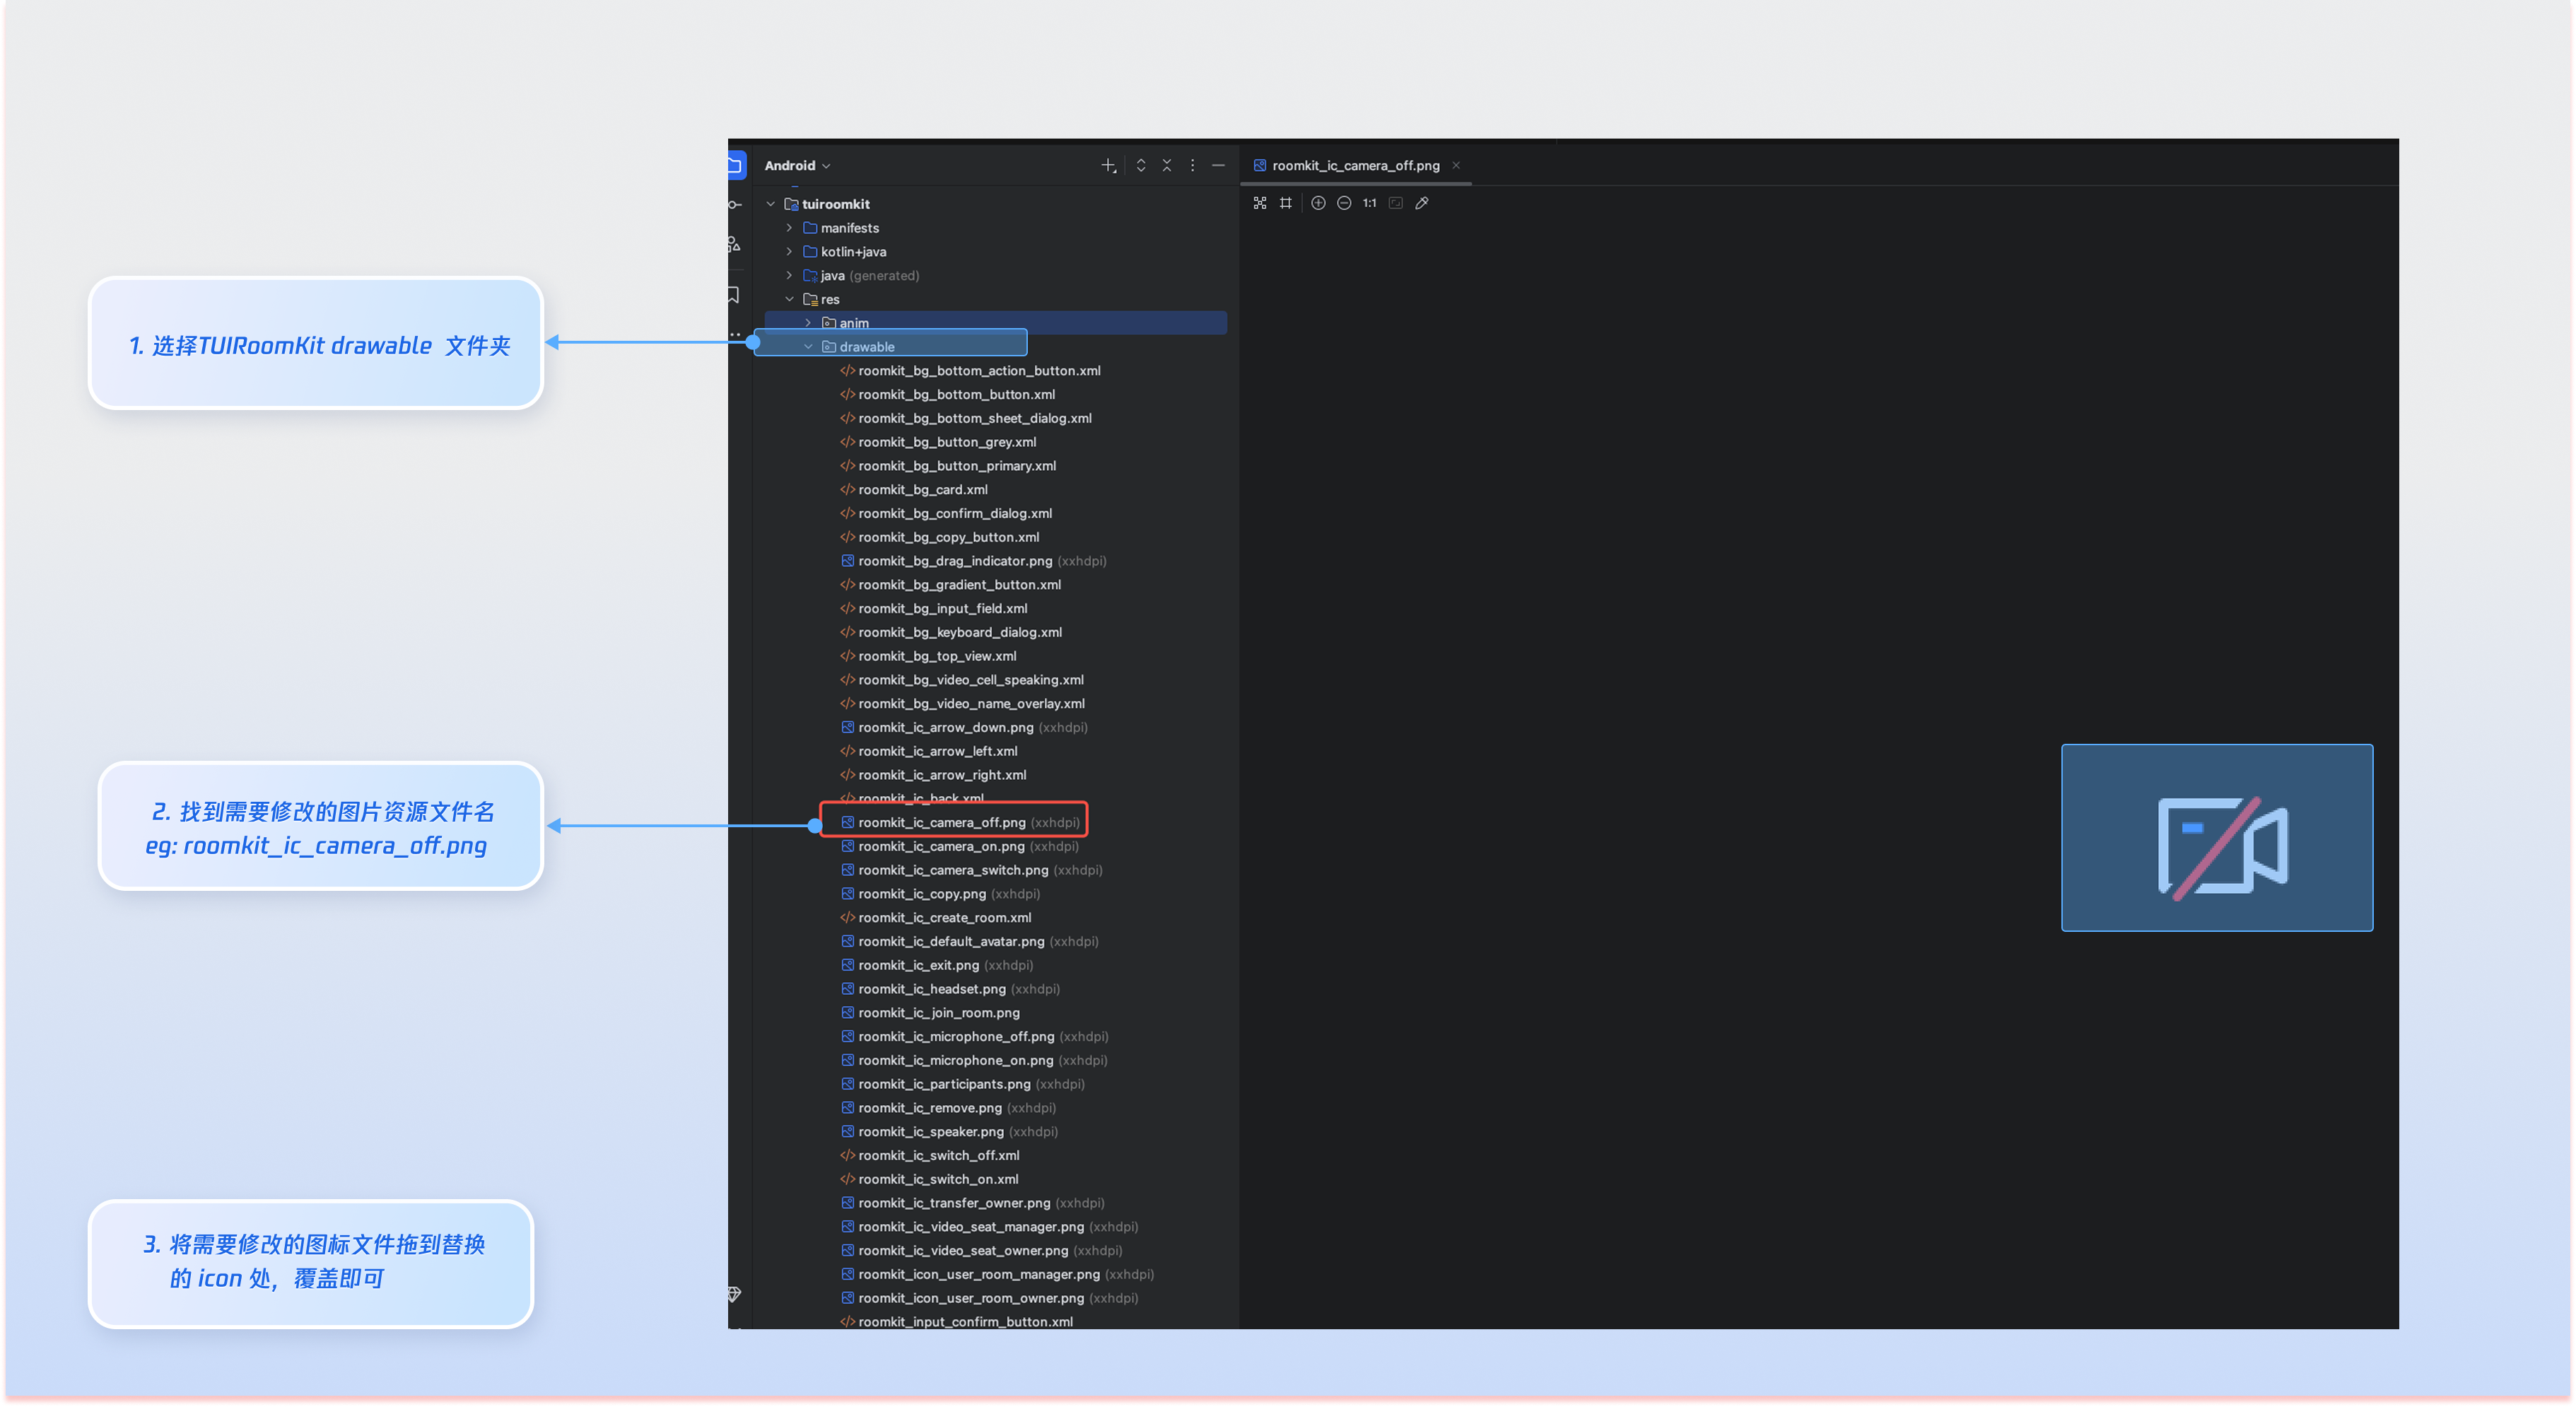
常用的图片文件列表
图标 | 文件名 | 说明 |
 | roomkit_ic_camera_off.png | 摄像头关闭图标 |
 | roomkit_ic_camera_on.png | 摄像头开启图标 |
 | roomkit_ic_microphone_off.png | 麦克风关闭图标 |
 | roomkit_ic_microphone_on.png | 麦克风开启图标 |
 | roomkit_icon_user_room_manager.png | 管理员身份标识图标 |
 | roomkit_ic_video_seat_owner.png | 房主身份标识图标 |
文案定制
TUIRoomKit 使用 Android 通用的 XML 资源文件来管理 UI 所需的文案显示,您可以直接通过
XML 文件修改需要调整的文案: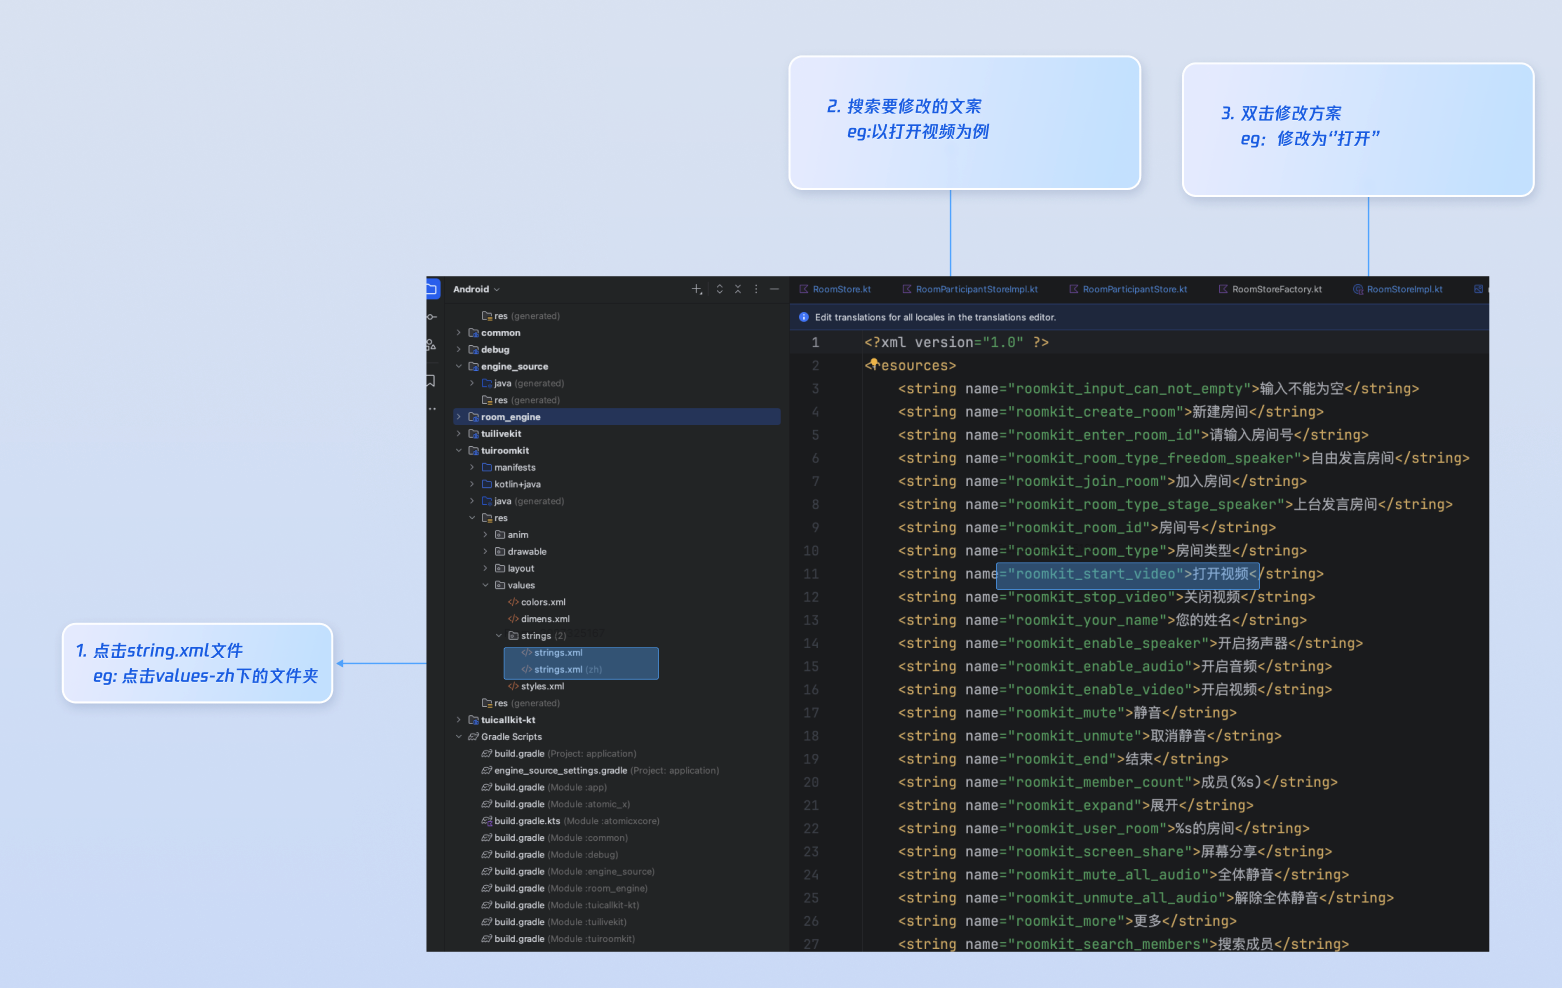
常见问题
每次进房都需要调用登录吗?
不需要。通常您只需要完成一次
LoginStore.shared.login 调用即可,我们建议您将 LoginStore.shared.login 和 LoginStore.shared.logout 与自己的登录业务关联。Android 14 以上机型切到后台后, 采集音视频无画面/无声音?
Android 14 及以上版本,应用在后台采集摄像头或麦克风数据时,必须启动前台服务并声明对应的服务类型,否则无法正常采集,解决方案可按照下面步骤:
1. AndroidManifest.xml 声明
FOREGROUND_SERVICE 、 FOREGROUND_SERVICE_CAMERA 、 FOREGROUND_SERVICE_MICROPHONE 权限和 service 声明。<uses-permission android:name="android.permission.FOREGROUND_SERVICE" /><uses-permission android:name="android.permission.FOREGROUND_SERVICE_CAMERA" /><uses-permission android:name="android.permission.FOREGROUND_SERVICE_MICROPHONE" /><serviceandroid:name=".MediaCaptureService"android:foregroundServiceType="camera|microphone" />
2. 在界面启动后开启后台采集服务。
import android.app.NotificationChannelimport android.app.NotificationManagerimport android.app.Serviceimport android.content.Intentimport android.content.pm.ServiceInfoimport android.os.Bundleimport android.os.IBinderimport androidx.appcompat.app.AppCompatActivityimport androidx.core.app.NotificationCompatclass MainActivity : AppCompatActivity() {override fun onCreate(savedInstanceState: Bundle?) {super.onCreate(savedInstanceState)startForegroundService(Intent(this, MediaCaptureService::class.java))}}class MediaCaptureService : Service() {override fun onCreate() {super.onCreate()// 1. 创建通知渠道val channel = NotificationChannel("media", "媒体采集", NotificationManager.IMPORTANCE_LOW)getSystemService(NotificationManager::class.java).createNotificationChannel(channel)// 2. 构建通知val notification = NotificationCompat.Builder(this, "media").setContentTitle("音视频通话中").setSmallIcon(android.R.drawable.ic_menu_call).build()// 3. 启动前台服务,指定 camera 和 microphone 类型(Android 14+ 必须)startForeground(1, notification,ServiceInfo.FOREGROUND_SERVICE_TYPE_CAMERA or ServiceInfo.FOREGROUND_SERVICE_TYPE_MICROPHONE)}override fun onBind(intent: Intent?): IBinder? = null}
文档反馈